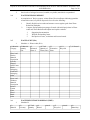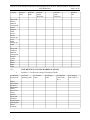
1
Fit-up R H Coats Building/Jean Talon Building (EP067-150054/A) - Procurement Information on Buyandsell.gc.ca Canada.gc.ca Services Departments Français Buyandsell.gc.ca Public Works and Government Services Canada For Businesses Home For Government Procurement Data Tenders Goods and Services Search Search Applications Procurement Data Fit-up R H Coats Building/Jean Talon Building (EP067-150054/A) Fit-up R H Coats Building/Jean Talon Building (EP067-150054/A) Service Upgrade - 2014-05-14: Upgrades to the Buyandsell.gc.ca web service will begin at 20:00 ET Wednesday, May 14, 2014. Site visitors should not experience any service interruption during the upgrade. Further details regarding the upgrades will be released Thursday, May 15, 2014. Tender Notice Status Access and terms of use Publishing status Active Days to closing 3 weeks 1 day hence Dates Publication date 2014/05/14 Amendment date 2014/05/14 Date closing 2014/06/05 14:00 Eastern Daylight Time (EDT) Details Reference number PW-$$FG-340-65101 Solicitation number EP067-150054/A Region of delivery National Capital Region Notice type Notice of Proposed Procurement (NPP) GSIN 5177BA: Interior Fit-Up/Renovations Trade agreement Agreement on Internal Trade (AIT) Tendering procedure All interested suppliers may submit a bid Competitive procurement strategy Lowest/Lower Bid Procurement entity Public Works & Government Services Canada End user entity Public Works & Government Services Canada Government of Canada (GC) tender notices and awards, solicitation documents and tender attachments are available free of charge and without registration on Buyandsell.gc.ca/tenders, the authoritative location for GC tenders. You may have received this tender notice or award through a third-party distributor. The Government of Canada is not responsible for any tender notices and/or related documents and attachments not accessed directly through Buyandsell.gc.ca/tenders. This Government of Canada tender notice or tender award carries an Open Government Licence - Canada that governs its use. Related solicitation documents and/or tender attachments are copyright protected. Please refer to the section about Commercial Reproduction in the Buyandsell.gc.ca Terms and Conditions for more information. Activity The following statistics are only for the English page and are current as of: 2014-05-14 09:49 Eastern Daylight Time (EDT). To calculate the total statistics for a tender notice, you will need to add the English and French statistics. Page views (English page) 4 Unique page views (English page) 4 Tender Notice feed Get notifications for this search result using a or web feed: For more information on notifications, visit the Follow Opportunities page. Contact Information Contact name Brouillet, Richard Contact phone (819) 956-0457 ( ) Contact fax (819) 956-8335 Contact address 11 Laurier St./11 Rue Laurier 3C2, Place du Portage Description Trade Agreement: Agreement on Internal Trade (AIT) Tendering Procedures: All interested suppliers may submit a bid Attachment: None Competitive Procurement Strategy: Lowest/Lower Bid file:///P|/In Progress/Coats Building/Fit-up R H Coats Building-Jean Talon Building (EP067-150054-A) - Procurement Information on Buyandsell_gc_ca.htm[5/14/2014 1:01:26 PM] Fit-up R H Coats Building/Jean Talon Building (EP067-150054/A) - Procurement Information on Buyandsell.gc.ca Phase III Gatineau, Québec K1A 0S5 Comprehensive Land Claim Agreement: No Nature of Requirements: PROJECT IDENTIFICATION: R.067898.002 Project description: Refurbishment to implement Workplace 2.0 designs on the 11th, 14th and 19th floors of the R.H. Coats Building at 100 Tunney's Pasture Driveway and the 7th floor of the Jean Talon Building at 170 Tunney's Pasture Driveway, Ottawa Work is to be completed within forty-two (42) weeks after contract award. The estimated cost for this opportunity is within the following category: $1,000,001.00 - $5,000,000.00. OPTIONAL SITE VISIT: There will be a site visit on May 21, 2014 at 10am. Interested bidders shall meet at the security desk of the Main Stats Building 150 Tunney's Pasture, Ottawa, ON. ENQUIRIES: All enquiries are to be submitted to the Contractual Authority: Richard Brouillet, Tel: (819)956-0457, facsimile (819) 956-8335 or by email at [email protected]. Enquiries are to be made in writing and should be received no less than five (5) calendar days prior to the closing date to allow sufficient time to respond. BID DOCUMENTS: Firms intending to submit bids on this project should obtain bid documents through the Government Electronic Tendering Service at http://Buyandsell.gc.ca/tenders or at the toll-free number 1-855-886-3030. Amendments, when issued, will be available from the same government electronic tendering service. Firms that elect to base their bids on bid documents obtained from other sources do so at their own risk and will be solely responsible to inform the bid calling authority of their intention to bid. BID RECEIVING: Sealed bids will be received at: Public Works and Government Services Canada, Bid Receiving Unit, Place du Portage, Phase III, Main Lobby Core 0A1, 11 Laurier Street, Gatineau, Quebec, K1A 1C9. Delivery Date: Above-mentioned The Crown retains the right to negotiate with suppliers on any procurement. Documents may be submitted in either official language of Canada. Solicitation Documents Amendment number File Unique Download Event (English page) Language Date added ABES.PROD.PW__FG.B340.E65101.EBSU000.PDF 000 English 0 2014-05-14 ABES.PROD.PW__FG.B340.F65101.EBSU000.PDF 000 French 0 2014-05-14 file:///P|/In Progress/Coats Building/Fit-up R H Coats Building-Jean Talon Building (EP067-150054-A) - Procurement Information on Buyandsell_gc_ca.htm[5/14/2014 1:01:26 PM] Fit-up R H Coats Building/Jean Talon Building (EP067-150054/A) - Procurement Information on Buyandsell.gc.ca Attachments File Amendment number project_r067898-002.zip Not available Language Bilingual Unique Download Event (English page) 0 Date added Not available Date modified: 2014-05-14 Terms and Conditions Transparency About Us News Contact Us Site Map Event Calendar Provide Feedback HEALTH TRAVEL SERVICE CANADA JOBS ECONOMY healthycanadians.gc.ca travel.gc.ca servicecanada.gc.ca jobbank.gc.ca actionplan.gc.ca Canada.gc.ca file:///P|/In Progress/Coats Building/Fit-up R H Coats Building-Jean Talon Building (EP067-150054-A) - Procurement Information on Buyandsell_gc_ca.htm[5/14/2014 1:01:26 PM] Project No. R.067898.002 DRAWINGS AND SPECIFICATIONS Section 00 01 10 Page 1 of 4 DRAWINGS: ARCHITECTURAL A001 A002 COVER PAGE, DRAWING LIST, CODE MATRIX LEGEND, ASSEMBLY SCHEDULE A111 A121 R.H. COATS BLDG. 14TH FLOOR DEMOLITION PLAN R.H. COATS BLDG. 14TH FLOOR CONSTRUCTION PLAN; DOOR SCHEDULE R.H. COATS BLDG. 14TH FLOOR REFLECTED CEILING PLANDEMO R.H. COATS BLDG. 14TH FLOOR REFLECTED CEILING PLAN – CONSTRUCTION R.H. COATS BLDG. 14TH FLOOR FINISH PLAN R.H. COATS BLDG. 14TH FLOOR FURNITURE PLAN A131 A132 A141 A151 A211 A221 A222 A231 A232 A241 A251 A311 A321 A331 A332 A341 A351 A411 A421 R.H. COATS BLDG. 11TH FLOOR DEMOLITION PLAN R.H. COATS BLDG. 11TH FLOOR CONSTRUCTION PLAN; DOOR SCHEDULE R.H. COATS BLDG. 11TH FLOOR REFLECTED CEILING PLAN – DEMO R.H. COATS BLDG. 11TH FLOOR REFLECTED CEILING PLAN CONSTRUCTION R.H. COATS BLDG. 11TH FLOOR FINISH PLAN R.H. COATS BLDG. 11TH FLOOR FURNITURE PLAN A441 A451 R.H. COATS BLDG. 19TH FLOOR DEMOLITION PLAN R.H. COATS BLDG. 19TH FLOOR CONSTRUCTION PLAN; DOOR SCHEDULE R.H. COATS BLDG. 19TH FLOOR REFLECTED CEILING PLAN – DEMO R.H. COATS BLDG. 19TH FLOOR REFLECTED CEILING PLAN CONSTRUCTION R.H. COATS BLDG. 19TH FLOOR FINISH PLAN R.H. COATS BLDG. 19TH FLOOR FURNITURE PLAN A501 A502 TYPICAL ELEVATIONS, DETAILS TYPICAL MILLWORK DETAILS A431 A432 JEAN TALON BLDG. 7TH FLOOR DEMOLITION PLAN JEAN TALON BLDG. 7TH FLOOR CONSTRUCTION PLAN JEAN TALON BLDG. 7TH FLOOR DOOR SCHEDULE JEAN TALON BLDG. 7TH FLOOR REFLECTED CEILING PLAN DEMO JEAN TALON BLDG. 7TH FLOOR REFLECTED CEILING PLAN CONSTRUCTION JEAN TALON BLDG. 7TH FLOOR FINISH PLAN JEAN TALON BLDG. 7TH FLOOR FURNITURE PLAN Project No. R.067898.002 MECHANICAL DRAWINGS AND SPECIFICATIONS Section 00 01 10 Page 2 of 4 M001 MECHANICAL - DRAWING LIST, LEGENDS, SCHEDULES & DETAILS M111 R.H.C. - 14TH FLOOR - FIRE PROTECTION& PLUMBING DEMOLITION M121 R.H.C. - 14TH FLOOR - FIRE PROTECTION & PLUMBING - NEW WORK M131 R.H.C. - 14TH FLOOR - HVAC - DEMOLITION M141 R.H.C. - 14TH FLOOR - HVAC - NEW WORK M211 M221 M231 M241 J.T. - 7TH FLOOR - FIRE PROTECTION - DEMOLITION J.T. - 7TH FLOOR - FIRE PROTECTION - NEW WORK J.T. - 7TH FLOOR - HVAC - DEMOLITION J.T. - 7TH FLOOR - HVAC - NEW WORK M311 R.H.C. - 11TH FLOOR - FIRE PROTECTION & PLUMBING DEMOLITION M321 R.H.C. - 11TH FLOOR - FIRE PROTECTION & PLUMBING - NEW WORK M331 R.H.C. - 11TH FLOOR - HVAC - DEMOLITION M341 R.H.C. - 11TH FLOOR - HVAC - NEW WORK ELECTRICAL M411 M421 M431 M441 R.H.C. - 19TH FLOOR - FIRE PROTECTION - DEMOLITION R.H.C. - 19TH FLOOR - FIRE PROTECTION - NEW WORK R.H.C. - 19TH FLOOR - HVAC - DEMOLITION R.H.C. - 19TH FLOOR - HVAC - NEW WORK E001 ELECTRICAL LEGENDS, DRAWING LIST AND LIGHTING FIXTURE SCHEDULE E111 E121 E131 E141 RHC 14 - LIGHTING AND FIRE ALARM DEMOLITION WORK RHC 14 - LIGHTING AND FIRE ALARM NEW WORK RHC 14 - POWER AND SYSTEMS DEMOLITION WORK RHC 14 - POWER AND SYSTEMS NEW WORK AND PANEL SCHEDULES E211 E221 E231 E241 E251 JT 7 - LIGHTING AND FIRE ALARM DEMOLITION WORK JT 7 - LIGHTING AND FIRE ALARM NEW WORK JT 7 - POWER AND SYSTEMS DEMOLITION WORK JT 7 - POWER AND SYSTEMS NEW WORK JT 7 - ELECTRICAL PANEL SCHEDULES E311 E321 E331 E341 RHC 11 - LIGHTING AND FIRE ALARM DEMOLITION WORK RHC 11 - LIGHTING AND FIRE ALARM NEW WORK RHC 11 - POWER AND SYSTEMS DEMOLITION WORK RHC 11 - POWER AND SYSTEMS NEW WORK AND PANEL SCHEDULES Project No. R.067898.002 DRAWINGS AND SPECIFICATIONS Section 00 01 10 Page 3 of 4 E411 E421 E431 E441 RHC 19 - LIGHTING AND FIRE ALARM DEMOLITION WORK RHC 19 - LIGHTING AND FIRE ALARM NEW WORK RHC 19 - POWER AND SYSTEMS DEMOLITION WORK RHC 19 - POWER AND SYSTEMS NEW WORK AND PANEL SCHEDULES SPECIFICATIONS: DIVISION SECTION DIVISION 01 01 00 10 01 14 25 01 33 00 01 35 29.06 01 45 00 01 61 00 01 73 00 01 74 21 01 78 00 01 91 13 DIVISION 06 DIVISION 07 DIVISION 08 DIVISION 09 DIVISION 10 01 91 33 01 91 41 06 40 00 07 92 00 08 11 00 08 14 16 08 71 00 08 80 50 09 21 16 09 22 16 09 30 13 09 51 99 09 65 16 09 91 23 09 91 23.01 10 22 26.33 10 44 16.19 GENERAL INSTRUCTIONS DESIGNATED SUBSTANCES REPORT SUBMITTAL PROCEDURES HEALTH AND SAFETY REQUIREMENTS QUALITY CONTROL COMMON PRODUCT REQUIREMENTS EXECUTION CONSTRUCTION/DEMOLITION WASTE MANAGEMENT AND DISPOSAL CLOSEOUT SUBMITTALS GENERAL COMMISSIONING (CX) REQUIREMENTS COMMISSIONING FORMS COMMISSIONING: TRAINING ARCHITECTURAL WOODWORK JOINT SEALANTS METAL FRAMES FLUSH WOOD DOORS DOOR HARDWARE GLAZING GYPSUM BOARD ASSEMBLIES NON-STRUCTURAL METAL FRAMING CERAMIC TILING ACOUSTICAL CEILINGS RESILIENT SHEET FLOORING INTERIOR PAINTING INTERIOR RE-PAINTING FOLDING PANEL PARTITIONS FIRE EXTINGUISHERS AND SAFETY BLANKETS NO. OF PAGES 7 13 5 3 3 4 3 10 7 9 3 3 9 6 4 4 7 6 7 4 4 5 6 12 11 5 2 DIVISION 21 21 05 01 21 13 13 COMMON WORK RESULTS FOR MECHANICAL WET PIPE SPRINKLER SYSTEMS 3 5 DIVISION 22 22 42 16 COMMERCIAL LAVATORIES AND SINKS 3 DIVISION 23 23 05 49.01 SEISMIC RESTRAINT SYSTEMS (SRS) - TYPE P2 BUILDINGS 5 Project No. R.067898.002 DRAWINGS AND SPECIFICATIONS Section 00 01 10 Page 4 of 4 23 05 93 5 23 07 13 23 31 13.01 23 33 00 23 33 14 23 33 46 23 33 53 23 34 00 23 36 00 23 37 13 TESTING, ADJUSTING AND BALANCING FOR HVAC DUCT INSULATION METAL DUCTS - LOW PRESSURE TO 500 PA AIR DUCT ACCESSORIES DAMPERS – BALANCING FLEXIBLE DUCTS DUCT LINERS HVAC FANS AIR TERMINAL UNITS DIFFUSERS, REGISTERS AND GRILLES DIVISION 25 25 05 01 EMCS: GENERAL REQUIREMENTS 5 DIVISION 26 26 05 00 26 05 20 26 05 21 26 05 29 7 1 1 1 26 50 00 COMMON WORK RESULTS FOR ELECTRICAL WIRE AND BOX CONNECTORS 0-1000 V WIRES AND CABLES (0-1000 V) HANGERS AND SUPPORTS FOR ELECTRICAL SYSTEMS SPLITTERS, JUNCTION, PULL BOXES AND CABINETS OUTLET BOXES, CONDUIT BOXES AND FITTINGS CONDUITS, CONDUIT FASTENINGS AND CONDUIT FITTINGS SEISMIC RESTRAINT SYSTEMS (SRS) - TYPE P2 WIRING DEVICES MOULDED CASE CIRCUIT BREAKERS DISCONNECT SWITCHES – FUSED AND NONFUSED LIGHTING 27 05 28 27 51 19 28 31 00 PATHWAYS FOR COMMUNICATIONS SYSTEMS SOUND MASKING SYSTEMS FIRE DETECTION AND ALARM 26 05 31 26 05 32 26 05 34 26 05 40 26 27 26 26 28 16.02 26 28 23 DIVISION 27 DIVISION 28 END OF TABLE 4 4 3 3 2 4 3 3 3 2 2 3 3 4 2 1 3 2 12 5 Public Works and Government Services Canada Travaux publics et Services gouvernementaux Canada 1 1 RETURN BIDS TO: RETOURNER LES SOUMISSIONS À: Title - Sujet Bid Receiving - PWGSC / Réception des soumissions - TPSGC 11 Laurier St./11 rue Laurier Place du Portage, Phase III Core 0A1 / Noyau 0A1 Gatineau, Québec K1A 0S5 Solicitation No. - N° de l'invitation Date EP067-150054/A 2014-05-13 Client Reference No. - N° de référence du client GETS Ref. No. - N° de réf. de SEAG 20150054 PW-$$FG-340-65101 Fit-up/Aménager R H Coats Bldg File No. - N° de dossier CCC No./N° CCC - FMS No./N° VME fg340.EP067-150054 INVITATION TO TENDER APPEL D'OFFRES Tender To: Public Works and Government Services Canada We hereby offer to sell to Her Majesty the Queen in right of Canada, in accordance with the terms and conditions set out herein, referred to herein or attached hereto, the goods, services, and construction listed herein and on any attached sheets at the price(s) set out therefor. Soumission aux: Travaux Publics et Services Gouvernementaux Canada Nous offrons par la présente de vendre à Sa Majesté la Reine du chef du Canada, aux conditions énoncées ou incluses par référence dans la présente et aux annexes ci-jointes, les biens, services et construction énumérés ici et sur toute feuille ci-annexée, au(x) prix indiqué(s). Solicitation Closes - L'invitation prend fin Time Zone Fuseau horaire at - à 02:00 PM Eastern Daylight Saving Time EDT on - le 2014-06-05 F.O.B. - F.A.B. Plant-Usine: Destination: Other-Autre: Buyer Id - Id de l'acheteur Address Enquiries to: - Adresser toutes questions à: fg340 Brouillet, Richard Telephone No. - N° de téléphone FAX No. - N° de FAX (819) 956-0457 ( (819) 956-8335 ) Destination - of Goods, Services, and Construction: Destination - des biens, services et construction: PUBLIC WORKS AND GOVERNMENT SERVICES CANADA R H COATS AND JEAN TALON BUILDINGS 100 & 170 TUNNEY'S PASTURE DRIVEWAY OTTAWA, ON K1A 0T6 Comments - Commentaires Instructions: See Herein Instructions: Voir aux présentes Vendor/Firm Name and Address Raison sociale et adresse du fournisseur/de l'entrepreneur Delivery Required - Livraison exigée Delivery Offered - Livraison proposée See Herein Vendor/Firm Name and Address Raison sociale et adresse du fournisseur/de l'entrepreneur Issuing Office - Bureau de distribution Telephone No. - N° de téléphone Facsimile No. - N° de télécopieur Construction Services Division/Division des services de construction 11 Laurier St./11 Rue Laurier 3C2, Place du Portage Phase III Gatineau, Québec K1A 0S5 Name and title of person authorized to sign on behalf of Vendor/Firm (type or print) Nom et titre de la personne autorisée à signer au nom du fournisseur/ de l'entrepreneur (taper ou écrire en caractères d'imprimerie) Signature Canada Page 1 of - de 13 Date Solicitation No. - N° de l'invitation Amd. No. - N° de la modif. Buyer ID - Id de l'acheteur Client Ref. No. - N° de réf. du client File No. - N° du dossier CCC No./N° CCC - FMS No/ N° VME 20150054 fg340EP067-150054 EP067-150054/A fg340 INVITATION TO TENDER IMPORTANT NOTICE TO BIDDERS LIMITATION OF LIABILITY PWGSC is limiting the Contractor’s first party liability for work in Low Rise, High Rise and Heritage Buildings. See changes to GC1.6 “Indemnification by the Contractor” of R2810D in the Supplementary Conditions. INSURANCE TERMS The Certificate of Insurance and it’s instructions has been replaced - see Annex B. (Completed certificate is NOT required at bid closing). R2940D CLAUSE IS CANCELLED AND SECTION 3.8 OF R2830D IS MODIFIED Following the repeal of the Fair Wages and Hours of Labour Act, R2940D clause is cancelled for contracts awarded after January 1st 2014. For contracts awarded prior to that date the clause remains applicable. The “Code of Conduct-Bid” is replaced with “Integrity Provision-Bid” and some modifications to the clause where done. See R2710T R2410T GI01. Page 2 of - de 13 Solicitation No. - N° de l'invitation Amd. No. - N° de la modif. Buyer ID - Id de l'acheteur Client Ref. No. - N° de réf. du client File No. - N° du dossier CCC No./N° CCC - FMS No/ N° VME 20150054 fg340EP067-150054 EP067-150054/A fg340 TABLE OF CONTENTS SPECIAL INSTRUCTIONS TO BIDDERS (SI) SI01 Integrity Provisions – Associated Information SI02 Bid Documents SI03 Enquiries during the Solicitation Period SI04 Optional Site Visit SI05 Revision of Bid SI06 Bid Results SI07 Insufficient Funding SI08 Bid Validity Period SI09 Web Sites R2710T GENERAL INSTRUCTIONS - CONSTRUCTION SERVICES - BID SECURITY REQUIREMENTS (GI) (2014-03-01) The following GI’s are included by reference and are available at the following Web Site: https://buyandsell.gc.ca/policy-and-guidelines/standard-acquisition-clauses-and-conditions-manual/5/R/ GI01 Integrity Provisions - Bid GI02 Completion of Bid GI03 Identity or Legal Capacity of the Bidder GI04 Applicable Taxes GI05 Capital Development and Redevelopment Charges GI06 Registry and Pre-qualification of Floating Plant GI07 Listing of Subcontractors and Suppliers GI08 Bid Security Requirements GI09 Submission of Bid GI10 Revision of Bid GI11 Rejection of Bid GI12 Bid Costs GI13 Procurement Business Number GI14 Compliance With Applicable Laws GI15 Approval of Alternative Materials GI16 Performance Evaluation GI17 Conflict of Interest-Unfair Advantage SUPPLEMENTARY CONDITIONS (SC) SC01 Limitation of Liability SC02 Insurance Terms BID AND ACCEPTANCE FORM (BA) BA01 Identification BA02 Business Name and Address of Bidder BA03 The Offer BA04 Bid Validity Period BA05 Acceptance and Contract BA06 Construction Time BA07 Bid Security BA08 Signature Page 3 of - de 13 Solicitation No. - N° de l'invitation Amd. No. - N° de la modif. Buyer ID - Id de l'acheteur Client Ref. No. - N° de réf. du client File No. - N° du dossier CCC No./N° CCC - FMS No/ N° VME 20150054 fg340EP067-150054 EP067-150054/A fg340 APPENDIX 1 - COMPLETE LIST OF EACH INDIVIDUAL WHO ARE CURRENTLY DIRECTORS AND/OR OWNERS OF THE BIDDER ANNEX A - CERTIFICATE OF INSURANCE FORM Page 4 of - de 13 Solicitation No. - N° de l'invitation Amd. No. - N° de la modif. Buyer ID - Id de l'acheteur Client Ref. No. - N° de réf. du client File No. - N° du dossier CCC No./N° CCC - FMS No/ N° VME 20150054 fg340EP067-150054 EP067-150054/A fg340 SPECIAL INSTRUCTIONS TO BIDDERS (SI) SI01 INTEGRITY PROVISIONS - ASSOCIATED INFORMATION By submitting a bid, the Bidder certifies that the Bidder and its Affiliates are in compliance with the provisions as stated in Section 01 Integrity Provisions - Bid of General Instructions Construction Services R2410T General Instructions – Construction Services – Bid Security Requirements. The associated information required within the Integrity Provisions will assist Canada in confirming that the certifications are true. SI02 BID DOCUMENTS 1. The following are the bid documents: a. b. c. d. e. f. g. Invitation to Tender - Page 1; Special Instructions to Bidders; General Instructions - Construction Services - Bid Security Requirements R2710T(2014-03-01) Clauses & Conditions identified in “Contract Documents”; Drawings and Specifications; Bid and Acceptance Form and related Appendix(s); and Any amendment issued prior to solicitation closing. Submission of a bid constitutes acknowledgement that the Bidder has read and agrees to be bound by these documents. 2. General Instructions - Construction Services - Bid Security Requirements R2710T is incorporated by reference and is set out in the Standard Acquisition Clauses and Conditions (SACC) Manual, issued by Public Works and Government Services Canada (PWGSC). The SACC Manual is available on the PWGSC Web site: https://buyandsell.gc.ca/policy-and-guidelines/standard-acquisition-clauses-and-conditions-manual/5/R SI03 ENQUIRIES DURING THE SOLICITATION PERIOD 1. Enquiries regarding this bid must be submitted in writing to the Contracting Officer named on the Invitation to Tender - Page 1 as early as possible within the solicitation period. Except for the approval of alternative materials as described in GI15 of R2710T, enquiries should be received no later than five (5) calendar days prior to the date set for solicitation closing to allow sufficient time to provide a response. Enquiries received after that time may not result in an answer being provided. 2. an To ensure consistency and quality of the information provided to Bidders, the Contracting Officer shall examine the content of the enquiry and shall decide whether or not to issue amendment. SI04 OPTIONAL SITE VISIT There will be a site visit on May 21, 2014 at 10am. Interested bidders shall meet at the security desk of the Main Stats Building – 150 Tunney’s Pasture, Ottawa, ON. Page 5 of - de 13 Solicitation No. - N° de l'invitation Amd. No. - N° de la modif. Buyer ID - Id de l'acheteur Client Ref. No. - N° de réf. du client File No. - N° du dossier CCC No./N° CCC - FMS No/ N° VME 20150054 fg340EP067-150054 EP067-150054/A SI05 fg340 REVISION OF BID A bid may be revised by letter or facsimile in accordance with GI10 of R2710T. The facsimile number for receipt of revisions is (819) 956-1459. SI06 BID RESULTS 1. A public bid opening will be held in the office designated on the Front Page “Invitation to Tender” for the receipt of bids shortly after the time set for solicitation closing. 2. Following solicitation closing, bid results may be obtained by faxing at No. (819) 956-1459 SI07 INSUFFICIENT FUNDING In the event that the lowest compliant bid exceeds the amount of funding allocated for the Work, Canada in its sole discretion may a. cancel the solicitation; or b. obtain additional funding and award the Contract to the Bidder submitting the lowest compliant bid; and/or c. negotiate a reduction in the bid price and/or scope of work of not more than 15% with the Bidder submitting the lowest compliant bid. Should an agreement satisfactory to Canada not be reached, Canada shall exercise option (a) or (b). SI08 BID VALIDITY PERIOD 1. Canada reserves the right to seek an extension to the bid validity period prescribed in BA04 of the Bid and Acceptance Form. Upon notification in writing from Canada, Bidders shall have the option to either accept or reject the proposed extension. 2. If the extension referred to in paragraph 1.of SI08 is accepted, in writing, by all those who submitted bids, then Canada shall continue immediately with the evaluation of the bids and its approvals processes. 3. If the extension referred to in paragraph 1.of SI08 is not accepted in writing by all those who submitted bids then Canada shall, at its sole discretion, either a.continue to evaluate the bids of those who have accepted the proposed extension and seek the necessary approvals; or b.cancel the invitation to tender. 4. The provisions expressed herein do not in any manner limit Canada’s rights in law or under GI11 of R2710T. Page 6 of - de 13 Solicitation No. - N° de l'invitation Amd. No. - N° de la modif. Buyer ID - Id de l'acheteur Client Ref. No. - N° de réf. du client File No. - N° du dossier CCC No./N° CCC - FMS No/ N° VME 20150054 fg340EP067-150054 EP067-150054/A SI09 fg340 WEB SITES The connection to some of the Web sites in the solicitation documents is established by the use of hyperlinks. The following is a list of the addresses of the Web sites: Treasury Board Appendix L, Acceptable Bonding Companies http://www.tbs-sct.gc.ca/pol/doc-eng.aspx?id=14494§ion=text#appL Buy and Sell https://www.achatsetventes-buyandsell.gc.ca Canadian economic sanctions http://www.international.gc.ca/sanctions/index.aspx?lang=eng Contractor Performance Evaluation Report (Form PWGSC-TPSGC 2913) http://www.tpsgc-pwgsc.gc.ca/app-acq/forms/documents/2913.pdf Bid Bond (form PWGSC-TPSGC 504) http://www.tpsgc-pwgsc.gc.ca/app-acq/forms/documents/504.pdf Performance Bond (form PWGSC-TPSGC 505) http://www.tpsgc-pwgsc.gc.ca/app-acq/forms/documents/505.pdf Labour and Material Payment Bond (form PWGWSC-TPSGC 506) http://www.tpsgc-pwgsc.gc.ca/app-acq/forms/documents/506.pdf Standard Acquisition Clauses and Conditions (SACC) Manual ttps://buyandsell.gc.ca/policy-and-guidelines/standard-acquisition-clauses-and-conditions-manual/5/R Schedules of Wage Rates for Federal Construction Contracts http://www.labour.gc.ca/eng/standards_equity/contracts/schedules/index.shtml PWGSC, Industrial Security Services http://ssi-iss.tpsgc-pwgsc.gc.ca/index-eng.html PWGSC, Code of Conduct and Certifications http://www.tpsgc-pwgsc.gc.ca/app-acq/cndt-cndct/index-eng.html PWGSC Consent to a Criminal Record Verification (PWGSC-TPSGC 229) http://www.tpsgc-pwgsc.gc.ca/app-acq/forms/documents/229.pdf Construction and Consultant Services Contract Administration Forms Real Property Contracting Http://www.tpsgc-pwgsc.gc.ca/app-acq/forms/formulaires-forms-eng.html Page 7 of - de 13 Solicitation No. - N° de l'invitation Amd. No. - N° de la modif. Buyer ID - Id de l'acheteur Client Ref. No. - N° de réf. du client File No. - N° du dossier CCC No./N° CCC - FMS No/ N° VME 20150054 fg340EP067-150054 EP067-150054/A fg340 SUPPLEMENTARY CONDITIONS (SC) SC01 LIMITATION OF LIABILITY GC1.6 of R2810D is deleted and replaced with the following: GC1.6 Indemnification by the Contractor 1. The Contractor shall indemnify and save Canada harmless from and against all claims, demands, losses, costs, damages, actions, suits, or proceedings whether in respect to losses suffered by Canada or in respect of claims by any third party, brought or prosecuted and in any manner based upon, arising out of, related to, occasioned by, or attributable to the activities of the Contractor in performing the Work, provided such claims are caused by the negligent or deliberate acts or omissions of the Contractor, or those for whom it is responsible at law. 2. The Contractor's obligation to indemnify Canada for losses related to first party liability shall be limited to: a. In respect to each loss for which insurance is to be provided pursuant to the insurance requirements of the Contract, the Commercial General Liability insurance limit for one occurrence as referred to in the insurance requirements of the Contract. b. In respect to losses for which insurance is not required to be provided in accordance with the insurance requirements of the Contract, the greater of the Contract Amount or $5,000,000, but in no event shall the sum be greater than $20,000,000. The limitation of this obligation shall be exclusive of interest and all legal costs and shall not apply to any infringement of intellectual property rights or any breach of warranty obligations. 3. The Contractor's obligation to indemnify Canada for losses related to third party liability shall have no limitation and shall include the complete costs of defending any legal action by a third party. If requested by Canada, the Contractor shall defend Canada against any third party claims. 4. The Contractor shall pay all royalties and patent fees required for the performance of the Contract and, at the Contractor's expense, shall defend all claims, actions or proceedings against Canada charging or claiming that the Work or any part thereof provided or furnished by the Contractor to Canada infringes any patent, industrial design, copyright trademark, trade secret or other proprietary right enforceable in Canada. 5. such Notice in writing of a claim shall be given within a reasonable time after the facts, upon which claim is based, became known. Page 8 of - de 13 Solicitation No. - N° de l'invitation Amd. No. - N° de la modif. Buyer ID - Id de l'acheteur Client Ref. No. - N° de réf. du client File No. - N° du dossier CCC No./N° CCC - FMS No/ N° VME 20150054 fg340EP067-150054 EP067-150054/A fg340 SC02 INSURANCE TERMS 1) Insurance Contracts (a) The Contractor must, at the Contractor's expense, obtain and maintain insurance contracts in accordance with the requirements of the Certificate of Insurance. Coverage must be placed with an Insurer licensed to carry out business in Canada. (b) Compliance with the insurance requirements does not release the Contractor from or reduce its liability under the Contract. The Contractor is responsible for deciding if additional insurance coverage is necessary to fulfill its obligation under the Contract and to ensure compliance with any applicable law. Any additional insurance coverage is at the Contractor's expense, and for its own benefit and protection. 2) 3) 4) Period of Insurance (a) The policies required in the Certificate of Insurance must be in force from the date of contract award and be maintained throughout the duration of the Contract. (b) The Contractor must be responsible to provide and maintain coverage for Products/Completed Operations hazards on its Commercial General Liability insurance policy, for a period of six (6) years beyond the date of the Certificate of Substantial Performance. Proof of Insurance (a) Before commencement of the Work, and no later than thirty (30) days after acceptance of its bid, the Contractor must deposit with Canada a Certificate of Insurance on the form attached herein. (b) Upon request by Canada, the Contractor must provide originals or certified true copies of all contracts of insurance maintained by the Contractor pursuant to the Certificate of Insurance. Insurance Proceeds In the event of a claim, the Contractor must, without delay, do such things and execute such documents as are necessary to effect payment of the proceeds. 5) Deductible The payment of monies up to the deductible amount made in satisfaction of a claim must be borne by the Contractor. Page 9 of - de 13 Solicitation No. - N° de l'invitation Amd. No. - N° de la modif. Buyer ID - Id de l'acheteur Client Ref. No. - N° de réf. du client File No. - N° du dossier CCC No./N° CCC - FMS No/ N° VME 20150054 fg340EP067-150054 EP067-150054/A fg340 CONTRACT DOCUMENTS (CD) 1. The following are the contract documents: a. Contract Page when signed by Canada; b. Duly completed Bid and Acceptance Form and any Appendices attached thereto; c. Drawings and Specifications; d. General Conditions and clauses GC1 General Provisions - Construction Services R2810D(2014-03-01); GC2 Administration of the Contract R2820D(2012-07-16); GC3 Execution and Control of the Work R2830D(2014-03-01); GC4 Protective Measures R2840D(2008-05-12); GC5 Terms of Payment R2850D(2010-01-11); GC6 Delays and Changes in the Work R2860D(2013-04-25); GC7 Default, Suspension or Termination of Contract R2870D(2008-05-12); GC8 Dispute Resolution R2880D(2012-07-16); GC9 Contract Security R2890D(2012-07-16); GC10 Insurance R2900D(2008-05-12); Supplementary Conditions Allowable Costs for Contract Changes Under GC6.4.1 R2950D (2007-05-25); e. f. g. 2. Any amendment issued or any allowable bid revision received before the date and time set for solicitation closing; Any amendment incorporated by mutual agreement between Canada and the Contractor before acceptance of the bid; and Any amendment or variation of the contract documents that is made in accordance with the General Conditions. The documents identified by title, number and date above are incorporated by reference and are set out in the Standard Acquisition Clauses and Conditions (SACC) Manual, issued by Public Works and Government Services Canada (PWGSC). The SACC Manual is available on the PWGSC Web site: https://buyandsell.gc.ca/policy-and-guidelines/standard-acquisition-clauses-and-conditions-manual 3. The language of the contract documents is the language of the Bid and Acceptance Form submitted. Page 10 of - de 13 Solicitation No. - N° de l'invitation Amd. No. - N° de la modif. Buyer ID - Id de l'acheteur Client Ref. No. - N° de réf. du client File No. - N° du dossier CCC No./N° CCC - FMS No/ N° VME 20150054 fg340EP067-150054 EP067-150054/A fg340 BID AND ACCEPTANCE FORM (BA) BA01 IDENTIFICATION Fit-up of the 11th, 14th and 19th floors of the R.H. Coats Building at 100 Tunney’s Pasture Driveway and the 7th floor of the Jean Talon Building at 170 Tunney’s Pasture Driveway, Ottawa. BA02 Name: BUSINESS NAME AND ADDRESS OF BIDDER ____________________________________________________________________________ Address: ____________________________________________________________________________ Telephone: ____________________ Fax: _______________________ PBN:__________________ BA03 THE OFFER The Bidder offers to Canada to perform and complete the Work for the above named project in accordance with the Bid Documents for the Total Bid Amount of $ ____________________________________________________________excluding applicable taxe(s). (amount in numbers) BA04 BID VALIDITY PERIOD The bid shall not be withdrawn for a period of thirty (30) days following the date of solicitation closing. BA05 ACCEPTANCE AND CONTRACT Upon acceptance of the Contractor’s offer by Canada, a binding Contract shall be formed between Canada and the Contractor. The documents forming the Contract shall be the contract documents identified in Contract Documents (CD). BA06 CONSTRUCTION TIME The Contractor shall perform and complete the Work within Forty-two (42) weeks from the date of notification of acceptance of the offer. BA07 BID SECURITY The Bidder is enclosing bid security with its bid in accordance with GI08 - Bid Security Requirements of R2710T - General Instructions - Construction Services - Bid Security Requirements. BA08 SIGNATURE Name and title of person authorized to sign on behalf of Bidder (Type or print) Signature Date Page 11 of - de 13 Solicitation No. - N° de l'invitation Amd. No. - N° de la modif. Buyer ID - Id de l'acheteur Client Ref. No. - N° de réf. du client File No. - N° du dossier CCC No./N° CCC - FMS No/ N° VME 20150054 fg340EP067-150054 EP067-150054/A fg340 APPENDIX 1 - COMPLETE LIST OF EACH INDIVIDUALS WHO ARE CURRENTLY DIRECTORS AND/OR OWNERS OF THE BIDDER NOTE TO BIDDERS WRITE DIRECTOR’S AND/OR OWNERS SURNAMES AND GIVEN NAMES _________________________________________________________________________________ _________________________________________________________________________________ _________________________________________________________________________________ _________________________________________________________________________________ _________________________________________________________________________________ _________________________________________________________________________________ _________________________________________________________________________________ _________________________________________________________________________________ _________________________________________________________________________________ _________________________________________________________________________________ _________________________________________________________________________________ _________________________________________________________________________________ _________________________________________________________________________________ _________________________________________________________________________________ _________________________________________________________________________________ _________________________________________________________________________________ _________________________________________________________________________________ _________________________________________________________________________________ _________________________________________________________________________________ _________________________________________________________________________________ _________________________________________________________________________________ Page 12 of - de 13 Solicitation No. - N° de l'invitation Amd. No. - N° de la modif. Buyer ID - Id de l'acheteur Client Ref. No. - N° de réf. du client File No. - N° du dossier CCC No./N° CCC - FMS No/ N° VME 20150054 fg340EP067-150054 EP067-150054/A fg340 ANNEX A - CERTIFICATE OF INSURANCE Page 13 of - de 13 Project No. R.067898.002 1.1 GENERAL INSTRUCTIONS Section 01 00 10 Page 1 of 7 TAXES .1 1.2 Pay all taxes properly levied by law (including Federal, Provincial and Municipal). FEES, PERMITS and CERTIFICATES .1 1.3 Pay all fees and obtain all permits. Provide authorities with plans and information for acceptance certificates. Provide inspection certificates as evidence that work conforms to requirements of Authority having jurisdiction. CONSTRUCTION PROGRESS SCHEDULE .1 Schedule and execute work with least possible interference or disturbance to the normal use of premises: .2 On award of contract submit bar chart construction schedule for work, indicating anticipated progress stages within time of completion. When the Departmental Representative has reviewed schedule, incorporate corrections, issue revised baseline schedule for approval or further correction, and take necessary measures to complete work within scheduled time. Do not change schedule without notifying Departmental Representative. .3 The Work shall comprise 4 construction phases, each of which shall be 8 weeks duration. .4 Phases follow each other consecutively. . .5 Allow for demobilization and remobilization between construction phases, with a timeframe of 3 weeks between completion of one phase and the start of the next. .6 Return to Site as directed by Departmental Representative after construction completion, off-hours, to make final electrical connections for systems furniture. .7 Ensure that Project Schedule includes, at minimum, milestone and activity types as follows for each 4 phases: .1 .2 .3 .4 .5 .6 .7 .8 .9 .10 .11 .12 .13 .14 Award submittals permits mobilization demolition disconnect power from existing furniture poles Remove existing furniture poles (by Departmental Representative) new partitions painting new ceilings new floors lighting electrical piping Project No. R.067898.002 .15 .16 .17 .18 .19 .20 .21 GENERAL INSTRUCTIONS Section 01 00 10 Page 2 of 7 controls HVAC Testing and Commissioning Substantial Performance Furniture installation and Client Move-in Final electrical connection of furniture poles (dates to be provided by Departmental Representative) Deficiencies, Total Completion .8 Work can be performed at all times. .9 Carry out noise generating work, as defined by the Departmental Representative, during "off hours" Monday to Friday from 18:00 to 07:00 hours and on Saturdays, Sundays, and statutory holidays: .10 Update schedule on a monthly basis reflecting activity changes and completion, as well as activity in progress 1.4 REGULATORY REQUIREMENTS .1 References and Codes: .1 .2 Building Smoking Environment: .1 .3 Smoking is not permitted in the Building. Obey smoking restrictions on building property. Hazardous Material Discovery: .1 1.5 Materials shall be new and work shall conform to the minimum applicable standards of the “References” indicated in the specification sections, the National Building Code of Canada 2010 (NBC) and all applicable Provincial and Municipal codes. In the case of conflict or discrepancy the most stringent requirement shall apply. Stop work immediately when material resembling spray or trowel-applied asbestos, Polychlorinated Biphenyl (PCB), mould or other designated substance hazardous substance is encountered during demolition work. .1 Take preventative measure and promptly notify Departmental Representative. .2 Do not proceed until written instructions have been received from Departmental Representative. FIRE SAFETY REQUIREMENTS .1 Comply with both the National Building Code of Canada 2010 and the National Fire Code of Canada 2010 for safety of persons in buildings in the event of a fire and the protection of buildings from the effects of fire, as follows; .1 .2 The National Building Code (NBC): for fire safety and fire protection features that are required to be incorporated in a building during construction. The National Fire Code (NFC): Project No. R.067898.002 .1 .2 .3 .4 .5 .2 .2 The on-going maintenance and use of the fire safety and fire protection features incorporated in buildings. The conduct of activities that might cause fire hazards in and around buildings. Limitations on hazardous contents in and around buildings. The establishment of fire safety plans. Fire safety at construction and demolition sites. At least 48 hours prior to commencing cutting, welding or soldering procedure, provide to Departmental Representative: .1 Notice of intent, indicating devices affected, time and duration of isolation or bypass. .2 Completed welding permit as defined by Departmental Representative. .3 Return welding permit to Departmental Representative immediately upon completion of procedures for which permit was issued. Before welding, soldering, grinding and/or cutting work, obtain a permit from the Real property Service Provider as directed by the Departmental Representative. No hot work is shall be undertaken unless authorized by the Real property Service Provider. Where work requires interruption or cause activation of fire alarms or fire suppression, extinguishing or protection systems: .1 .2 .3 .4 1.6 Section 01 00 10 Page 3 of 7 Welding and cutting: .1 .3 GENERAL INSTRUCTIONS Provide “Watchman Service” as required by Departmental Representative; In general, watchman service is defined as an individual conversant with “Fire Emergency Procedures”, performing fire picket duty within an unprotected and unoccupied (no workers) area once per hour. Retain services of manufacturer for fire protection systems on daily basis or as approved by Departmental Representative, to isolate and protect all devices relating to: .1 modification of fire alarms, fire suppression, extinguishing or protection systems; and/or .2 cutting, welding, soldering or other construction activities that might activate fire protection systems. Immediately upon completion of work, restore fire protection systems to normal operation and verify that all devices are fully operational. Inform fire alarm system monitoring agency and local Fire Department immediately prior to isolation and immediately upon restoration of normal operation. HAZARDOUS MATERIALS .1 Hazardous Materials: product, substance, or organism that may cause adverse impact to environment or adversely affect health of persons, animals, or plant life when released into the environment. .2 Comply with the requirements of the Workplace Hazardous Materials Information System (WHMIS) regarding use, handling, storage, and disposal of hazardous materials; and regarding labelling and the provision of Material Safety Data Sheets (MSDS). Project No. R.067898.002 .3 1.7 GENERAL INSTRUCTIONS Section 01 00 10 Page 4 of 7 For work in occupied buildings, give the Department Representative 48 hours notice for work involving designated substances (Ontario Bill 208), hazardous substances (Canada Labour Code Part II Section 10), and before painting, caulking, installing carpet or using adhesives and other materials, that cause off gassing. TEMPORARY UTILITIES .1 Existing services required for work, excluding power required for space temporary heating, may be used by the Contractor without charge. Ensure capacity is adequate prior to imposing additional loads. Connect and disconnect at own expense and responsibility. .2 Maximum power supply of 110 V, 15 A is available and will be provided at no cost. Connect to existing power supply in accordance with Canadian Electrical Code and provide meters and switching. .3 Notify the Departmental Representative and utility companies of intended interruption of services and obtain requisite permission. .4 Give the Departmental Representative 7 days notice related to each necessary interruption of any mechanical or electrical service throughout the course of the work. Keep duration of these interruptions to a minimum. Carry out all interruptions after normal working hours of the occupants, preferably on weekends. 1.8 CONSTRUCTION FACILITIES .1 Access Scaffold: .1 .2 .3 .2 Designated elevators: to be used by construction personnel and transporting of materials. .1 .2 .3 .3 Co-ordinate with Departmental Representative. Protect from damage, safety hazards and overloading of existing equipment. Freight elevator must be booked 24 hours in advance. Site Storage: .1 .2 .3 .4 .5 .4 Scaffolding: install scaffolding in accordance with construction regulations and in accordance with CSA Z797-09 - Code of Practice for Access Scaffold. Provide design drawings, signed and sealed by qualified Professional Engineer licensed in the province of Ontario, where prescribed. Additions or modifications to scaffolding must be approved by Professional Engineer in writing. Storage will be allowed within the area of Work only, no other storage will be available Do not unreasonably encumber site with materials or equipment. Move stored products or equipment that interfere with operations of Departmental Representative or other contractors. Obtain and pay for use of additional storage or work areas needed for operations. Do not load or permit to load any part of work with weight or force that will endanger work. Where security is reduced by work provide temporary means to maintain security. Project No. R.067898.002 GENERAL INSTRUCTIONS Section 01 00 10 Page 5 of 7 .5 Sanitary facilities: the sanitary facilities on the floor of the Work may be used. Keep facilities clean. .6 Signage: .1 .2 .3 .7 Parking: .1 1.9 Provide common-use signs related to traffic control, information, instruction, use of equipment, public safety devices, etcetera, in both official languages or by the use of commonly understood graphic symbols and to approval of the Departmental Representative. No advertising will be permitted on this project. Maintain approved signs and notices in good condition for duration of project and dispose of off site, on completion of project or earlier, as directed by Departmental Representative. Parking on-site is not available. TEMPORARY BARRIERS AND ENCLOSURES .1 Protection: .1 .2 .3 .4 .2 1.10 Protect existing construction, infrastructure, and adjacent areas from damage. Protect work against damage until take-over. Protect adjacent areas and floors against the spread of dust and dirt beyond the work areas. Protect operatives and other users of site from all hazards. The contractor shall agree to install proper site separation and identification in order to maintain "Time and Space" at all times throughout the life of the project. When Building Operations staff requires access to equipment in order to operate the building, proper coordination and communication must exist between all parties involved EXAMINATION and PREPARATION .1 Examine site and conditions likely to affect work and be familiar and conversant with existing conditions. .2 Before commencing work, establish location and extent of services lines in area of work and notify Departmental Representative of findings. 1.11 FIELD QUALITY CONTROL .1 Carry out Work using qualified licensed workers or apprentices in accordance with Provincial Act respecting manpower vocational training and qualification. .2 Permit employees registered in Provincial apprenticeship program to perform specific tasks only if under direct supervision of qualified licensed workers. .3 Determine permitted activities and tasks by apprentices, based on level of training attended and demonstration of ability to perform specific duties. Project No. R.067898.002 1.12 GENERAL INSTRUCTIONS Section 01 00 10 Page 6 of 7 CLEANING .1 Clean up as work progresses. At the end of each work period, and more often if ordered by the Departmental Representative, remove debris from site, neatly stack material for use, and clean up generally. .2 Upon completion remove scaffolding, temporary protection and surplus materials. Make good defects noted at this stage. .3 Clean and polish glass, mirrors, ceramic tile, aluminum, chrome, stainless steel, baked or porcelain enamel, plastic laminate and other plastic surfaces, floors, hardware and washroom fixtures. Clean manufactured articles in accordance with manufacturer's written instructions. .4 Clean areas under contract to a condition equal to what previously existed and to approval of Departmental Representative. 1.13 SECURITY CHECK .1 1.14 Personnel will be checked-in daily at start of work shift and given a pass in exchange for acceptable personal identification, which must be worn at all times. Pass must be returned at end of work shift and personnel checked out. SECURITY ESCORT .1 All personnel employed on this project shall be escorted at all times. .2 Submit an escort request to Departmental Representative at least 72 hours before the service is needed. For requests submitted within the time mentioned above, the Departmental Representative will pay for the costs of the security escort. The cost incurred by a late request will be charged to the Contractor. .3 Any escort request may be cancelled free of charge if notification of cancellation is given at least 24 hours before the scheduled time of the escort. The cost incurred by a late cancellation will be charged to the Contractor. .4 The calculation of costs will be based on the average hourly rate of a security officer for a minimum of 8 hours per day for a late service request and 4 hours for late cancellations. 1.15 COST BREAKDOWN .1 1.16 Before submitting first progress claim, submit breakdown of Contract Amount in detail as directed by Departmental Representative and aggregating the Contract Amount. Make revisions as required by Departmental Representative. After approval by Departmental Representative cost breakdown will be used as the basis of progress payments. PRECEDENCE .1 For Federal Government projects, Division 01 Sections take precedence over technical specification sections in other Divisions of this Project Manual Project No. R.067898.002 Part 2 Products 2.1 NOT USED .1 Not used. Part 3 Execution 3.1 NOT USED .1 GENERAL INSTRUCTIONS Not used. END OF SECTION Section 01 00 10 Page 7 of 7 Project No: R.067484.001 Rev. A. Section 01 14 25 Designated Substances Report Page 1 PART 1 – GENERAL 1.1 REGULATORY REQUIREMENTS .1 An investigation into the presence of designated substances for the Floor Refurbishment Project, located at the R.H. Coates and Jean-Talon Buildings, 100 and 170 Tunney’s Pasture Drive respectively in Ottawa, Ontario, was performed in order to meet the requirements of the Canada Labour Code under Part II, Section 124 that every employer shall ensure that the health and safety at work of every person employed by the employer is protected. Furthermore, Section 125(1)(z.14) of the Canada Labour Code stipulates that the employer will take all reasonable care to ensure that all persons granted access to the work place, other than the employer's employees, are informed of every known or foreseeable health and safety hazard to which they are likely to be exposed in the work place. Also, the designated substances report (DSR) was performed to meet the requirements of Section 30 of the Ontario Occupational Health and Safety Act, Revised Statutes of Ontario, 1990, Chapter 0.1. By having a DSR conducted, the PWGSC Departmental Representative will be able to inform his or her employees, contractors, and tenants of any designated substances that may be present and possibly disturbed throughout the duration of the project. The informed Departmental Representative will then be able to impose appropriate health and safety precautions for all applicable personnel as required. .2 The designated substances identified in the Occupational Health and Safety Act and its corresponding regulations are: .1 Acrylonitrile: “Designated Substances” O.Reg 490/09, as amended. .2 Arsenic: “Designated Substances” O.Reg 490/09, as amended. .3 Asbestos: .1 “Designated Substances” O.Reg 490/09, as amended. .2 “General – Waste Management” O.Reg 347/90, as amended .3 “Designated Substance – Asbestos on Construction Projects and in Buildings and Repair Operations” O.Reg 278/05 (as amended) .4 PWGSC Departmental Policy DP 057 – “Asbestos Management” .4 Benzene: “Designated Substances” O.Reg 490/09, as amended. .5 Coke Oven Emissions: “Designated Substances” O.Reg 490/09, as amended. .6 Ethylene Oxide: “Designated Substances” O.Reg 490/09, as amended. 1 Project No: R.067484.001 Rev. A. Section 01 14 25 Designated Substances Report Page 2 .7 Isocyanates: “Designated Substances” O.Reg 490/09, as amended. .8 Lead: .9 1.2 .1 “Designated Substances” O.Reg 490/09, as amended. .2 “General – Waste Management” O.Reg 347/90, as amended .3 Canada Consumer Product Safety Act’s “Surface Coating Materials Regulations SOR/2005-109” (2011) Mercury: .1 “Designated Substances” O.Reg 490/09, as amended. .2 “General – Waste Management” O.Reg 347/90, as amended .10 Silica: “Designated Substances” O.Reg 490/09, as amended. .11 Vinyl Chloride: “Designated Substances” O.Reg 490/09, as amended. .3 All contractors requesting tenders from subcontractors shall furnish this report to subcontractors. .1 DST Consulting Engineers Inc. (DST), conducted the on-site survey for this report on February 5, 2014. At the request of PWGSC, DST returned to the R.H. Coates project areas on March 27, 2014 to collect additional bulk drywall joint compound samples in order to delineate drywall materials adjacent or in proximity to confirmed asbestos-containing perimeter/exterior wall drywall materials. .2 DST staff completed a visual evaluation of building materials in select areas of both buildings for the presence of suspected designated substances on February 5, 2014 and March 27, 2014. DST did not complete a full building designated substances survey. As such, the DSR for this project specifically included the following floors, hereafter referred to as ‘the project areas’: VALIDITY DATE 2 • 11th, 14th and 19th Floors of the R.H. Coates building, located at 100 Tunney’s Pasture Drive; and • 7th Floor of the Jean-Talon Building, located at 170 Tunney’s Pasture Drive. Project No: R.067484.001 Rev. A. Section 01 14 25 Designated Substances Report Page 3 Prior to the site survey, DST reviewed and utilized information present in the following past designated substance survey: • Designated Substances Report for the Floor Refurbishment Project. R.H. Coates and Jean-Talon Buildings, 100 and 170 Tunney’s Pasture Drive, Ottawa, Ontario. Summary Report (PN: R.065808.005). Prepared by DST Consulting Engineers. November 18, 2013. .1 The scope of work for this report involved a visual inspection of building materials and contents for the presence of suspected designated substances within the project areas. .2 From the visual inspection, suspect materials were sampled and analyzed, (where necessary), for select designated substances. On the basis of this inspection, a total of thirty-nine (39) bulk asbestos samples were collected by DST from the R.H. Coates project areas and twenty-three (23) bulk samples were collected from the Jean Talon project area. .3 Samples were then submitted for their respective analysis at Paracel Laboratories Ltd., (accredited by the Canadian Association for Laboratory Accreditation) located at 300-2319 St. Laurent Boulevard, Ottawa, ON K1G 4J8. .4 The survey was limited to those areas that could be accessed by non-destructive means. The visual inspection and sampling was limited to readily accessible areas. Destructive testing was not included in the investigation. Due to the nature of building construction, some inherent limitations exist as to the possible thoroughness of the designated substance survey. The survey did not include the demolition of floors, floor finishes, solid ceilings or walls, or the sampling of pipe insulations, pipe fitting insulations and floor coverings. .5 It is possible that designated substances are present in non-accessible areas and concealed spaces (i.e., wall and ceiling cavities), or additional confined spaces. No other areas outside the defined work boundaries have been assessed. .6 Prior to beginning work, it must be confirmed with the Departmental Representative that 3 Project No: R.067484.001 Rev. A. Section 01 14 25 Designated Substances Report Page 4 no additional designated substances have been brought to the project area. .7 In addition, the survey refers to Polychlorinated Biphenyls (PCBs) and Halocarbons; however, it does not refer to other substances that may be present in the day-to-day usage for specialized equipment or areas in buildings (i.e., lead shields, fume hoods, chemicals, etc.). .8 There is a possibility that materials that could not be reasonably identified within the scope of this assessment or which were not apparent during previous site visits may exist. Should any designated substance be encountered in the course of demolition or renovation, work must be stopped, preventative measures taken, and the Departmental Representative must be notified immediately. Do not proceed until written instructions have been received. PART 2 - DESIGNATED SUBSTANCES 2.1 SURVEY RESULTS .1 ACRYLONITRILE: Not Identified .2 ARSENIC: Not Identified .3 ASBESTOS: Identified Asbestos is a naturally occurring material. In general, it has historically been intentionally added to many building materials in the construction industry to increase thermal or chemical resistance properties. More common uses are thermal insulation for pipes and boilers, structural steelwork fireproofing, floor tiles and in-wall and ceiling plasters. There are two classes of asbestoscontaining materials: friable and non-friable. Friable asbestos-containing materials are loose in composition or can be easily crumbled using hand pressure. Non-friable asbestos-containing materials are more durable and are held together by a binder such as cement, vinyl or asphalt. Representative bulk samples, collected from materials located within the project areas have been analyzed for asbestos. Analytical results indicate that select samples contain asbestos in the project areas. 4 Project No: R.067484.001 Rev. A. Section 01 14 25 Designated Substances Report Page 5 Tables 1A and 1B summarize the analytical results of bulk samples collected during the site investigation: Table 1A: Asbestos Sample Results by PLM – R.H. Coates Building Sample number Material Location RHC-02A Interior office area, 3rd Floor RHC-02B RHC-02C Plaster on columns – white and grey layers1 RHC-02D Interior office area, 12th Floor RHC-02E Interior office area, 13th Floor 18291-01A 18291-01B 18291-01C 18291-01D 18291-01E 18291-02A 18291-02B 18291-02C 18291-03A 18291-03B 18291-03C 18291-04A 18291-04B 18291-04C 18291-05A 18291-05B 18291-05C 18291-06A 18291-06B 18291-06C 18291-06D 18291-06E Perimeter walls, drywall joint compound Office Areas, 19th Floor Core drywall joint compound Office Areas, 19th Floor Black tar adhesive applied to Styrofoam panels, perimeter of floor Office Area, 19th Floor 12”x12” Vinyl floor tile, streaked 19th Floor, Kitchen Core walls, drywall joint compound Office Areas, 14th Floor Perimeter walls, drywall joint compound Office Areas, 14th Floor 1 Asbestos Type Asbestos content (%) Chrysotile (white layer) 3% n/d (grey layer) n/a Not analyzed – positive n/a stop (white layer) n/d (grey layer) n/a Not analyzed – positive n/a stop (white layer) n/d (grey layer) n/a Not analyzed – positive n/a stop (white layer) n/d (grey layer) n/a Not analyzed – positive n/a stop (white layer) n/d (grey layer) n/a n/d n/a Chrysotile 1% Not analyzed, positive stop Not analyzed, positive stop Not analyzed, positive stop n/d n/a n/d n/a n/d n/a Chrysotile 10.69% Not analyzed, positive stop Not analyzed, positive stop n/d n/d n/d n/d n/d n/d n/d n/a n/a n/a n/a n/a n/a n/a Chrysotile 1 Not analyzed, positive stop Not analyzed, positive stop Not analyzed, positive stop Designated Substances Report for the Floor Refurbishment Project. R.H. Coates and Jean-Talon Buildings, 100 and 170 Tunney’s Pasture Drive, Ottawa, Ontario. Summary Report (PN: R.065808.005). Prepared by DST Consulting Engineers. November 18, 2013. 5 Project No: R.067484.001 Rev. A. Sample number 18291-07A 18291-07B 18291-07C 18291-08A 18291-08B 18291-08C 18291-08D 18291-08E 18291-09A 18291-09B 18291-09C 18291-10A 18291-10B 18291-10C 18291-18A 18291-18B 18291-18C Section 01 14 25 Designated Substances Report Page 6 Asbestos Type Asbestos content (%) Material Location 2’x4’ Ceiling Tile 14th Floor Perimeter walls, drywall joint compound Office Areas, 11th Floors Core walls, drywall joint compound Office Areas, 11th Floor 12”x12” Vinyl floor tiles Kitchen, 11th Floor n/d n/a Perimeter Offices, Drywall Joint Compound 11th Floor 14th Floor 19th Floor n/d n/d n/d n/d n/a n/a n/a n/a n/d n/a n/d n/a n/d n/a Chrysotile 1 Not analyzed, positive stop Not analyzed, positive stop Not analyzed, positive stop Not analyzed, positive stop n/d n/a n/d n/a n/d n/a n/d n/a Bold items exceed the 0.5% regulated concentration of asbestos, as per O.Reg. 278/05, as amended MDL: Method Detection Limit, n/d – none detected, n/a- not applicable Based on analytical sampling results listed above and limited visual observations noted during the survey, the following asbestos-containing materials were identified in the R.H. Coates project areas: 6 Drywall joint compound associated with perimeter/exterior wall drywall materials throughout the 11th, 14th and 19th Floors contains 1% Chrysotile asbestos (Samples 18291-01B, 18291-06B, 18291-08A); DST also collected three (3) representative drywall joint compound samples for drywall materials (partition walls) connected to (i.e. butting up to/against) or in proximity to confirmed asbestos-containing perimeter/exterior wall and bulkhead drywall materials (i.e. perimeter office partitions) on the 11th (Sample 18291-18A), 14th (Sample 18291-18B) and 19th (Sample 18291-18C) floors. Analytical results have revealed that these drywall materials (partition walls) adjacent to/connected to asbestoscontaining perimeter/exterior walls do not contain asbestos. However, in cases where these non-asbestos drywall materials connect to or butt up against asbestoscontaining drywall materials at the perimeter/exterior walls, removal or disturbance at these connection points Project No: R.067484.001 Rev. A. Section 01 14 25 Designated Substances Report Page 7 should be performed using appropriate asbestos precautionary measures. Non-friable black tar adhesive applied to Styrofoam panels around the perimeters of the 11th, 14th and 19th Floors (Sample 18291-03A) contains 10.69% Chrysotile asbestos; Based on historic sampling in the building as part of a separate refit project for the 3rd, 12th and 13th Floors of the R.H Coates building, asbestos-containing plaster materials were identified at structural columns as containing 3% Chrysotile asbestos (Sample RHC-02A). Concealed plaster materials may be present at structural columns throughout the project areas. Encountered plaster materials should be considered asbestos containing, where present. Based on historic observations in the building as part of a separate refit project for the 3rd, 12th and 13th Floors of the R.H Coates building, asbestos-containing pipe fitting insulation may be present in concealed areas of the project area, associated with perimeter radiators. Table 1B: Asbestos Sample Results by PLM – Jean-Talon Building Sample number 18291-11A 18291-11B 18291-11C 18291-11D 18291-11E 18291-12A 18291-12B 18291-12C 18291-13A 18291-13B 18291-13C 18291-14A 18291-14B 18291-14C 18291-15A 18291-15B 18291-15C 18291-16A 18291-16B Material Location Perimeter walls, drywall joint compound 7th Floor Grey caulking applied to perimeter metal wall, above ceiling tiles 7th Floor 2’x4’ Ceiling Tiles 7th 12”x12” Vinyl floor tile, beige 7th Floor Plaster 7th Floor, Core Core columns, drywall joint 7th Floor Asbestos Type Chrysotile 1 Not analyzed, positive stop Not analyzed, positive stop Not analyzed, positive stop Not analyzed, positive stop n/d n/a n/d n/a n/d Floor 7 Asbestos content (%) n/a n/d n/a n/d n/a n/d n/a n/d n/a n/d n/a n/d n/a n/d n/a n/d n/a n/d n/a Chrysotile 1 Not analyzed, positive stop Project No: R.067484.001 Rev. A. Sample number Section 01 14 25 Designated Substances Report Page 8 Material Location Asbestos Type Asbestos content (%) compound 18291-16C Not analyzed, positive stop 18291-17A n/d n/a Elevator Lobby, 7th 18291-17B Stipple n/d n/a Floor 18291-17C n/d n/a Bold items exceed the 0.5% regulated concentration of asbestos, as per O.Reg. 278/05, as amended MDL: Method Detection Limit, n/d – none detected, n/a- not applicable Based on analytical sampling and limited observations noted during the survey, the following asbestos-containing material was identified in the project areas of the 7th Floor of the Jean Talon building: Drywall joint compound associated with perimeter and core (column) drywall materials throughout the project area (Samples 18291-11A and 18291-16A) contains 1% Chrysotile asbestos. .4 BENZENE: Not Identified .5 COKE OVEN EMISSIONS: Not Identified .6 ETHYLENE OXIDE: Not Identified .7 ISOCYANATES: Not Identified .8 LEAD: Suspected Lead is a naturally occurring metal. It was used primarily in paint prior to the 1980s to increase the drying process. Lead in paint becomes a danger when it is old or damaged, as it creates lead dust and chips. Lead can also be found in soldered joints installed on piping up to the mid-1990s and in older cast iron bell and spigot joints. .1 According to the Canada Consumer Product Safety Act’s Surface Coating Materials Regulations SOR/2005-109, as amended, allowable concentration of lead of surface coatings is 0.009 percent by weight (weight of lead to weight of paint), which is equivalent to 90 parts per million (ppm). .2 Even at very low concentrations, there may be potential for exposure to very high levels of lead depending on the activities performed that disturb the lead-containing materials. At low 8 Project No: R.067484.001 Rev. A. Section 01 14 25 Designated Substances Report Page 9 lead concentrations, conducting a risk assessment to assess the potential for exposure is required to determine the need to follow precautionary measures. .3 All paints were observed to be in good condition. As such, samples of paints were not collected as sampling without matrix interference (i.e. removing paint without also removing non-paint substrate) would likely prove difficult. Older interior paint finishes throughout the project area are suspected to contain detectable concentrations of lead. .4 Lead is expected to be present within solder on copper piping throughout the project areas. .9 MERCURY: Identified Mercury is assumed present in vapour form and in the phosphor coating of T-8 fluorescent light tubes throughout the project areas. .10 SILICA: Identified Free crystalline silica is assumed present in concrete, plaster, drywall, stipple, vinyl floor tiles, and ceiling tiles throughout the project areas. 2.2 .11 VINYL CHLORIDE MONOMER: Not Identified .12 POLYCHLORINATED BIPHENYLS (PCBs): Not Identified .13 HALOCARBONS: Not Identified 1. ASBESTOS RECOMMENDATIONS PWGSC’s Departmental Policy (DP) 057, Asbestos Management, sets policy, establishes roles and responsibilities and provides a code of practice for the management of and working with asbestoscontaining materials. All work must be done in accordance with this directive, as well as all other applicable legislation. Disturbance of all asbestos (whether friable or non-friable) is regulated in Ontario by “Designated Substance – Asbestos on Construction Projects and in Buildings and Repair Operations” O.Reg 278/05, as amended, which outlines the precautions required when performing work involving asbestos-containing materials. The regulation stipulates appropriate respiratory 9 Project No: R.067484.001 Rev. A. Section 01 14 25 Designated Substances Report Page 10 protection, work procedures and ventilation requirements that must be utilized during the disturbance of any asbestos-containing materials, or materials suspected to contain asbestos. In the event of conflict between DP-057 and “Designated Substance – Asbestos on Construction Projects and in Buildings and Repair Operations” O.Reg. 278/05, as amended, the more stringent shall apply. The removal or disturbance of less than one square metre of drywall in which the joint-filling compound contains asbestos must be conducted using a minimum of Type 1 asbestos work procedures. The removal or disturbance of one square metre or more of drywall in which the joint filling compounds are asbestos-containing must be conducted using a minimum Type 2 asbestos work procedures. Where encountered, asbestos-containing plaster is considered a non-friable material in good condition (i.e. intact). However, should the removal or disturbance of the asbestos-containing plaster be required, the material shall be treated as a friable material, and should thus be removed in accordance with appropriate precautionary measures stipulated in O.Reg 278/05, as amended. The removal or disturbance of one square metre or less of asbestos containing plaster must be conducted using a minimum of Type 2 asbestos work procedures. The removal or disturbance of more than one square metre of asbestos-containing plaster must be conducted using Type 3 asbestos work procedures. Should Type 3 asbestos abatement procedures be performed in occupied federal buildings, daily asbestos air monitoring outside of each asbestos work area is required, as per PWGSC DP-057. Note that it would be impractical to distinguish white from grey layers in an abatement situation, and thus any disturbance of this plaster as a whole should be treated as an asbestos disturbance. The removal or disturbance of one square metre or less of friable asbestos containing materials, where encountered (grey cement compound on pipe fittings) must be conducted using a minimum of Type 2 asbestos work procedures. The removal or disturbance of more than one square metre of friable asbestos-containing materials must be conducted using Type 3 asbestos work procedures. Type 3 asbestos abatement operations performed in occupied buildings require daily asbestos air monitoring outside of each asbestos work area, as per PWGSC DP-057. It should be noted that the removal of good condition asbestos-containing pipe insulation and pipe fitting insulation can be 10 Project No: R.067484.001 Rev. A. Section 01 14 25 Designated Substances Report Page 11 conducted using Type 2 glove bag procedures, provided the material is in good condition, and a proper seal can be maintained. The removal or disturbance of non-friable ACMs (black tar), if disturbance is necessary, can be conducted using a minimum of Type 1 asbestos work procedures in accordance with O.Reg 278/05, as amended, provided the material is wetted to control the spread of dust or fibres, and the work is done only by means of non-powered hand-held tools. If these conditions cannot be met, then more stringent (Type 2 or Type 3) work procedures are required. The breaking, cutting, drilling, abrading, grinding, sanding or vibrating of non-friable ACMs (black tar at floor/ceiling penetrations), if disturbance is necessary, can be conducted using Type 1 asbestos precautionary measures, provided the material is wetted to control the spread of dust or fibres, and the work is done only by means of non-powered hand-held tools. If these conditions cannot be met, than more stringent (Type 2 or Type 3) work procedures are required. “General – Waste Management” O.Reg 347/90, as amended, governs the disposal of waste containing asbestos. The waste must be disposed at a licensed waste disposal site. 2. LEAD If suspected lead-containing materials are disturbed (i.e. during dry sanding, grinding, polishing and sawing operations), then proper precautions, as outlined under “Designated Substances” O.Reg 490/09, as amended, of the Occupational Health and Safety Act, must be followed. Under Ontario Regulation 490/09, as amended of the Occupational Health and Safety Act, regulatory limits have been established for occupational exposure limits to airborne lead that may be present in a workplace. The Time Weighted Average Exposure Values (TWAEV) to airborne lead dust or fumes should not exceed the Ministry of Labour’s 0.05 milligram per cubic metre (mg/m3) limit during the removal of paints and products containing any concentration of lead. The TWAEV represents the time-weighted average concentration for a conventional 8-hour workday and a 40-hour workweek, to which it is believed that nearly all workers may be repeatedly exposed, day after day, without adverse health effects. Contractors performing work that requires disturbance of lead-containing materials are responsible to ensure that the workers are not 11 Project No: R.067484.001 Rev. A. Section 01 14 25 Designated Substances Report Page 12 exposed to airborne lead dust levels in excess of the time-weighted average and Maximum Exposure Concentration for lead-containing paints. .1 Ontario Ministry of Labour (MoL) has published the document entitled “Guideline: Lead on Construction Projects”. This document classifies all disturbances of lead-containing materials as Type 1, Type 2a, Type 2b, Type 3a or Type 3b work, based on presumed airborne concentrations of lead generated during the work each of which will have defined work practices. Although this document is not a regulation, Ministry of Labour Inspectors use it as guidance during site inspections. Where there is conflict with the exposure limits and respiratory protection required by “Designated Substances” Regulation O.Reg 490/09, as amended, the most stringent requirements of Regulation 490/09 must apply .2 The disposal of construction waste containing lead is controlled by “General – Waste Management” O.Reg 347/90, as amended, under the Ontario Environmental Protection Act. The classification of the waste is dependent upon the result(s) of leachate test(s). The waste can be classified as "hazardous", "non-hazardous" or "registerable solid waste", depending on the results of the leachate test. Prior to disposal, the concentration of leachable lead must be determined for waste materials with elevated lead contents following the Toxicity Characteristic Leaching Procedure (TCLP). Lead sheeting can be recycled as scrap metal waste. 3. MERCURY .1 Mercury is governed by “Designated Substances" O.Reg 490/09, as amended, under the Occupational Health and Safety Act. The regulation provides requirements for allowable exposure levels. .2 In addition, mercury waste is considered a hazardous waste under “General – Waste Management” O.Reg 347/90, as amended, of the Ontario Environmental Protection Act. Fluorescent lamp tubes are considered hazardous material and should be recycled if removed from service. For information regarding the collection of fluorescent lamp tubes, please consult the PWGSC Departmental Representative. 4. SILICA .1 Silica occurs as crystalline material in cement. Crystalline silica is regulated under “Designated Substances” O.Reg 490/09, as amended, of the 12 Project No: R.067484.001 Rev. A. Section 01 14 25 Designated Substances Report Page 13 Occupational Health and Safety Act as a Designated Substance. .2 Silica dust can be generated through such processes as blasting, grinding, crushing, and sandblasting silica-containing material. Since silica is presumed present in concrete, plaster, drywall, stipple, vinyl floor tiles, and ceiling tiles within the project areas, appropriate respiratory protection and ventilation must be donned during the demolition and modifications of these structures. .3 The Occupational Health and Safety Branch of the MoL has published the document entitled “Guideline: Silica on Construction Projects”. This document classifies the disturbance of materials containing silica as Type 1, Type 2 or Type 3 work, and assigns different levels of respiratory protection and work procedures for each classification. These work procedures should be followed when performing work involving the disturbance of silicacontaining materials. 5. CONTRACTORS DUTIES The contractor must review the designated substance report and take the necessary precautions to protect the health and safety of the workers and the environment. As per Section 30(4) of the Ontario Occupational Health and Safety Act, the party hiring the contractor (i.e., PWGSC Departmental Representative) shall ensure that the contractor and subcontractor (if any) for the project has received a copy of the designated substance report prior to entering a binding contract for the supply of work on the project. As per Section 27(2) (a, b, and c) of the Ontario Occupational Health and Safety Act, while onsite, the contractor supervisor shall exercise every reasonable precaution for the protection of a worker. If you have any questions about the designated substance report, please contact the PWGSC Departmental Representative. The contractor shall also complete all reporting requirements to comply with applicable regulations. END OF SECTION 13 Project No. R.067898.002 SUBMITTAL PROCEDURES Part 1 General 1.1 ADMINISTRATIVE Section 01 33 00 Page 1 of 5 .1 Submit to Departmental Representative submittals listed for review. Submit promptly and in orderly sequence to not cause delay in Work. Failure to submit in ample time is not considered sufficient reason for extension of Contract Time and no claim for extension by reason of such default will be allowed. .2 Do not proceed with Work affected by submittal until review is complete. .3 Present shop drawings, product data, samples and mock-ups in SI Metric units. .4 Where items or information is not produced in SI Metric units converted values are acceptable. .5 Review submittals prior to submission to Departmental Representative. This review represents that necessary requirements have been determined and verified, or will be, and that each submittal has been checked and co-ordinated with requirements of Work and Contract Documents. Submittals not stamped, signed, dated and identified as to specific project will be returned without being examined and considered rejected. .6 Notify Departmental Representative, in writing at time of submission, identifying deviations from requirements of Contract Documents stating reasons for deviations. .7 Verify field measurements and affected adjacent Work are co-ordinated. .8 Contractor's responsibility for errors and omissions in submission is not relieved by Departmental Representative's review of submittals. .9 Contractor's responsibility for deviations in submission from requirements of Contract Documents is not relieved by Departmental Representative review. .10 Keep one reviewed copy of each submission on site. 1.2 SHOP DRAWINGS AND PRODUCT DATA .1 The term "shop drawings" means drawings, diagrams, illustrations, schedules, performance charts, brochures and other data which are to be provided by Contractor to illustrate details of a portion of Work. .2 Submit drawings stamped and signed by professional engineer registered or licensed in Province of Ontario. .3 Indicate materials, methods of construction and attachment or anchorage, erection diagrams, connections, explanatory notes and other information necessary for completion of Work. Where articles or equipment attach or connect to other articles or equipment, indicate that such items have been co-ordinated, regardless of Section under which adjacent items will be supplied and installed. Indicate cross references to design drawings and specifications. .4 Allow 5 days for Departmental Representative's review of each submission. .5 Adjustments made on shop drawings by Departmental Representative are not intended to change Contract Price. If adjustments affect value of Work, state such in writing to Departmental Representative prior to proceeding with Work. Project No. R.067898.002 SUBMITTAL PROCEDURES Section 01 33 00 Page 2 of 5 .6 Make changes in shop drawings as Departmental Representative may require, consistent with Contract Documents. When resubmitting, notify Departmental in writing of revisions other than those requested. .7 Accompany submissions with transmittal letter, in duplicate, containing: .1 .2 .3 .4 .5 .8 Date. Project title and number. Contractor's name and address. Identification and quantity of each shop drawing, product data and sample. Other pertinent data. Submissions include: .1 .2 .3 .4 .5 Date and revision dates. Project title and number. Name and address of: .1 Subcontractor. .2 Supplier. .3 Manufacturer. Contractor's stamp, signed by Contractor's authorized representative certifying approval of submissions, verification of field measurements and compliance with Contract Documents. Details of appropriate portions of Work as applicable: .1 Fabrication. .2 Layout, showing dimensions, including identified field dimensions, and clearances. .3 Setting or erection details. .4 Capacities. .5 Performance characteristics. .6 Standards. .7 Operating weight. .8 Wiring diagrams. .9 Single line and schematic diagrams. .10 Relationship to adjacent work. .9 After Departmental Representative's review, distribute copies. .10 Submit one PDF electronic copy of shop drawings for each requirement requested in specification Sections and as Departmental Representative may reasonably request. .11 Submit PDF electronic copy of product data sheets or brochures for requirements requested in specification Sections and as requested by Departmental Representative where shop drawings will not be prepared due to standardized manufacture of product. .12 Submit PDF electronic copies of test reports for requirements requested in specification Sections and as requested by Departmental Representative. Project No. R.067898.002 .1 .2 .13 Section 01 33 00 Page 3 of 5 Report signed by authorized official of testing laboratory that material, product or system identical to material, product or system to be provided has been tested in accord with specified requirements. Testing must have been within 3 years of date of contract award for project. Submit PDF electronic copy of certificates for requirements requested in specification Sections and as requested by Departmental Representative. .1 .2 .14 SUBMITTAL PROCEDURES Statements printed on manufacturer's letterhead and signed by responsible officials of manufacturer of product, system or material attesting that product, system or material meets specification requirements. Certificates must be dated after award of project contract complete with project name. Submit PDF electronic copy of manufacturers instructions for requirements requested in specification Sections and as requested by Departmental Representative. .1 Pre-printed material describing installation of product, system or material, including special notices and Material Safety Data Sheets concerning impedances, hazards and safety precautions. .15 Submit PDF electronic copy of Manufacturer's Field Reports for requirements requested in specification Sections and as requested by Departmental Representative. .16 Documentation of the testing and verification actions taken by manufacturer's representative to confirm compliance with manufacturer's standards or instructions. .17 Submit PDF electronic copy of Operation and Maintenance Data for requirements requested in specification Sections and as requested by Departmental Representative. .18 Delete information not applicable to project. .19 Supplement standard information to provide details applicable to project. .20 If upon review by Departmental Representative, no errors or omissions are discovered or if only minor corrections are made, reviewed marked-up PDF files will be returned and fabrication and installation of Work may proceed. If shop drawings are rejected, noted copy will be returned and resubmission of corrected shop drawings, through same procedure indicated above, must be performed before fabrication and installation of Work may proceed. .21 The review of shop drawings by Public Works and Government Services Canada (PWGSC) is for sole purpose of ascertaining conformance with general concept. .1 .2 .22 This review shall not mean that PWGSC approves detail design inherent in shop drawings, responsibility for which shall remain with Contractor submitting same, and such review shall not relieve Contractor of responsibility for errors or omissions in shop drawings or of responsibility for meeting requirements of construction and Contract Documents. Without restricting generality of foregoing, Contractor is responsible for dimensions to be confirmed and correlated at job site, for information that pertains solely to fabrication processes or to techniques of construction and installation and for co-ordination of Work of sub-trades. Provide paper copies of submittals as requested by Departmental Representative. Project No. R.067898.002 1.3 SUBMITTAL PROCEDURES Section 01 33 00 Page 4 of 5 SAMPLES .1 Submit for review samples in duplicate as requested in respective specification Sections. Label samples with origin and intended use. .2 Deliver samples prepaid to address(es) provided by Departmental Representative. .3 Notify Departmental Representative in writing, at time of submission of deviations in samples from requirements of Contract Documents. .4 Where colour, pattern or texture is criterion, submit full range of samples. .5 Adjustments made on samples by Departmental Representative are not intended to change Contract Price. If adjustments affect value of Work, state such in writing to Departmental Representative prior to proceeding with Work. .6 Make changes in samples which Departmental Representative may require, consistent with Contract Documents. .7 Reviewed and accepted samples will become standard of workmanship and material against which installed Work will be verified. 1.4 MOCK-UPS .1 1.5 Erect mock-ups in accordance with 01 45 00 - Quality Control. PHOTOGRAPHIC DOCUMENTATION .1 Submit electronic and hard copy of colour digital photography in jpg format, fine resolution, minimum weekly and as directed by Departmental Representative .2 Project identification: name and number of project and date of exposure indicated. .3 Number of viewpoints: .1 .4 Frequency of photographic documentation: weekly and as directed by Departmental Representative. .1 1.6 Viewpoints and their location as determined by Departmental Representative Upon completion of: framing and services before concealment, and as directed by Departmental Representative. CERTIFICATES AND TRANSCRIPTS .1 Immediately after award of Contract, submit Workers' Compensation Board status. .2 Submit transcription of insurance immediately after award of Contract. Part 2 Products 2.1 NOT USED .1 Not Used. Project No. R.067898.002 Part 3 Execution 3.1 NOT USED .1 SUBMITTAL PROCEDURES Not Used. END OF SECTION Section 01 33 00 Page 5 of 5 Project No. R.067898.002 HEALTH AND SAFETY REQUIREMENTS Section 01 35 29.06 Page 1 of 3 PART 1 – GENERAL 1.1 REFERENCES .1 Occupational Health and Safety Act R.S.O. 1990, c. 0.1, and Regulations for Construction Projects O. Reg. 213/91, current edition. .2 CAN/CSA, Z462-12 (Workplace Electrical Safety Standard) .3 CAN/CSA-Z460-05 (R2010) - Control of Hazardous Energy. 1.2 SUBMITTALS .1 Make submittals in accordance with Section 01 33 00 - Submittal Procedures. .2 Submit site-specific Health and Safety Plan: Within seven (7) working days after date of Notice to Proceed and prior to commencement of Work. Health and Safety Plan must include: .1 Results of site specific safety hazard assessment. .2 Results of safety and health risk or hazard analysis for site tasks and operation found in work plan. .3 Written safe work procedures to address the known hazards. .3 Submit three (3) copies of Contractor's authorized representative's work site health and safety inspection reports to Departmental Representative, weekly. .4 Submit copies of reports or directions issued by Federal and Provincial health and safety inspectors. .5 Submit copies of incident and accident reports within 24 hours after the event. .6 Submit WHMIS MSDS - Material Safety Data Sheets to Departmental Representative. .7 Departmental Representative will review Contractor's site-specific Health and Safety Plan and provide comments to Contractor within seven (7) working days after receipt of plan. Revise plan as appropriate and resubmit plan to Departmental Representative within seven (7) working days after receipt of comments from Departmental Representative. .8 Departmental Representative's review of Contractor's final Health and Safety plan should not be construed as approval and does not reduce the Contractor's overall responsibility for construction Health and Safety. .9 On-site Contingency and Emergency Response Plan: address standard operating procedures to be implemented during emergency situations. 1.3 FILING OF NOTICE .1 1.4 File Notice of Project with Provincial authorities prior to beginning of Work. SAFETY ASSESSMENT .1 Perform site specific safety hazard assessment related to project. Project No. R.067898.002 1.5 HEALTH AND SAFETY REQUIREMENTS Section 01 35 29.06 Page 2 of 3 MEETINGS .1 1.6 Schedule and administer Health and Safety meeting with Departmental Representative prior to commencement of Work. GENERAL REQUIREMENTS .1 Develop written site-specific Health and Safety Plan based on hazard assessment prior to beginning site Work and continue to implement, maintain, and enforce plan until final demobilization from site. Health and Safety Plan must address project specifications. .2 Departmental Representative may respond in writing, where deficiencies or concerns are noted and may request re-submission with correction of deficiencies or concerns. 1.7 RESPONSIBILITY .1 Be responsible and assume the role of "Constructor" as described in the Ontario Occupational Health & Safety Act and Regulations for Construction Projects." .2 Assume responsibility for health and safety of all other contractors present on site under the prescriptions of the present section. .3 Comply with and enforce compliance by employees with safety requirements of Contract Documents, applicable federal, provincial and local statutes, regulations, and ordinances, and with site-specific Health and Safety Plan. 1.8 COMPLIANCE REQUIREMENTS .1 Comply with the Ontario Occupational Health and Safety Act, R.S.O. 1990, c. 0.1. .2 Comply with the Ontario Regulations for Construction Projects, O. Reg. 213/91. .3 Comply with CAN/CSA, Z462-12 (Workplace Electrical Safety Standard) .4 Comply with CAN/CSA-Z460-05 (R2010) - Control of Hazardous Energy. 1.9 UNFORSEEN HAZARDS .1 1.10 When unforeseen or peculiar safety-related factor, hazard, or condition occur during performance of Work, follow procedures in place for Employee's Right to Refuse Work in accordance with Acts and Regulations of Province having jurisdiction and advise Departmental Representative verbally and in writing. HEALTH AND SAFETY CO-ORDINATOR .1 Employ and assign to Work, competent and authorized representative as Health and Safety Co-ordinator. Health and Safety Co-ordinator must: .1 Have site-related working experience specific to activities associated with specified Work. Submit relevant experience to Departmental Representative. .2 Have working knowledge of occupational safety and health regulations. Project No. R.067898.002 1.11 HEALTH AND SAFETY REQUIREMENTS Section 01 35 29.06 Page 3 of 3 .3 Be responsible for completing Contractor's Health and Safety Training Sessions and ensuring that personnel not successfully completing required training are not permitted to enter site to perform Work. .4 Be responsible for implementing, enforcing daily and monitoring site-specific Contractor's Health and Safety Plan. .5 Be on site during execution of Work. POSTING OF DOCUMENTS .1 1.12 Ensure applicable items, articles, notices and orders are posted in conspicuous location on site in accordance with Acts and Regulations of Province having jurisdiction, and in consultation with Departmental Representative. CORRECTION OF NON-COMPLIANCE .1 Immediately address health and safety non-compliance issues identified by authority having jurisdiction or by Departmental Representative. .2 Provide Departmental Representative with written report of action taken to correct noncompliance of health and safety issues identified. .3 Departmental Representative may stop Work if non-compliance of health and safety regulations is not corrected. 1.13 BLASTING .1 1.14 Blasting or other use of explosives is not permitted. POWDER ACTUATED DEVICES .1 1.15 Use powder actuated devices only after receipt of written permission from Departmental Representative. WORK STOPPAGE .1 Give precedence to safety and health of public and site personnel and protection of environment over cost and schedule considerations for Work. END OF SECTION Project No. R.067898.002 Part 1 General 1.1 INSPECTION QUALITY CONTROL Section 01 45 00 Page 1 of 3 .1 Allow Departmental Representative access to Work. If part of Work is in preparation at locations other than Place of Work, allow access to such Work whenever it is in progress. .2 Give timely notice requesting inspection, minimum 5 days, if Work is designated for special tests, inspections or approvals by Departmental Representative instructions, or law of Place of Work. .3 If Contractor covers or permits to be covered Work that has been designated for special tests, inspections or approvals before such is made, uncover such Work, have inspections or tests satisfactorily completed and make good such Work. .4 Departmental Representative will order part of Work to be examined if Work is suspected to be not in accordance with Contract Documents. If, upon examination such work is found not in accordance with Contract Documents, correct such Work and pay cost of examination and correction. If such Work is found in accordance with Contract Documents, Departmental Representative shall pay cost of examination and replacement. 1.2 INDEPENDENT INSPECTION AGENCIES .1 Independent Inspection/Testing Agencies will be engaged by Departmental Representative for purpose of inspecting and/or testing portions of Work. Cost of such services will be borne by Departmental Representative. .2 Provide equipment required for executing inspection and testing by appointed agencies. .3 Employment of inspection/testing agencies does not relax responsibility to perform Work in accordance with Contract Documents. .4 If defects are revealed during inspection and/or testing, appointed agency will request additional inspection and/or testing to ascertain full degree of defect. Correct defect and irregularities as advised by Departmental Representative at no cost to Departmental Representative. Pay costs for retesting and reinspection. 1.3 ACCESS TO WORK .1 Allow inspection/testing agencies access to Work, off site manufacturing and fabrication plants. .2 Co-operate to provide reasonable facilities for such access. 1.4 PROCEDURES .1 Notify appropriate agency and Departmental Representative in advance of requirement for tests, in order that attendance arrangements can be made. .2 Submit samples and/or materials required for testing, as specifically requested in specifications. Submit with reasonable promptness and in orderly sequence to not cause delays in Work. .3 Provide labour and facilities to obtain and handle samples and materials on site. Provide sufficient space to store and cure test samples. Project No. R.067898.002 1.5 QUALITY CONTROL Section 01 45 00 Page 2 of 3 REJECTED WORK .1 Remove defective Work, whether result of poor workmanship, use of defective products or damage and whether incorporated in Work or not, which has been rejected by Departmental Representative as failing to conform to Contract Documents. Replace or reexecute in accordance with Contract Documents. .2 Make good other Contractor's work damaged by such removals or replacements promptly. .3 If in opinion of Departmental Representative, it is not expedient to correct defective Work or Work not performed in accordance with Contract Documents, Departmental Representative will deduct from Contract Price difference in value between Work performed and that called for by Contract Documents, amount of which will be determined by Departmental Representative. 1.6 REPORTS .1 Submit 4 copies of inspection and test reports to Departmental Representative. .2 Provide copies to subcontractor of work being inspected or tested manufacturer or fabricator of material being inspected or tested. 1.7 TESTS AND MIX DESIGNS .1 Furnish test results and mix designs as requested. .2 Cost of tests beyond those called for in Contract Documents or beyond those required by law of Place of Work will be appraised by Departmental Representative and may be authorized as recoverable. 1.8 MOCK-UPS .1 Prepare mock-ups for Work specifically requested in specifications. Include for Work of Sections required to provide mock-ups. .2 Construct in locations as specified in specific Section acceptable to Departmental Representative. .3 Prepare mock-ups for Departmental Representative with reasonable promptness and in orderly sequence, to not cause delays in Work. .4 Failure to prepare mock-ups in ample time is not considered sufficient reason for extension of Contract Time and no claim for extension by reason of such default will be allowed. .5 If requested, Departmental Representative will assist in preparing schedule fixing dates for preparation. .6 Mock-ups may remain as part of Work at the discretion of the Departmental Representative. 1.9 MILL TESTS .1 Submit mill test certificates as requested. Project No. R.067898.002 1.10 QUALITY CONTROL Section 01 45 00 Page 3 of 3 EQUIPMENT AND SYSTEMS .1 Submit adjustment and balancing reports for mechanical, electrical and building equipment systems. .2 Refer to Section 01 91 13 - General Commissioning (CX) Requirements for definitive requirements. Part 2 Products 2.1 NOT USED .1 Not Used. Part 3 Execution 3.1 NOT USED .1 Not Used. END OF SECTION Project No. R.067898.002 COMMON PRODUCT REQUIREMENTS Part 1 General 1.1 REFERENCES Section 01 61 00 Page 1 of 4 .1 Conform to reference standards in whole or in part as specifically requested in specifications. .2 If there is question as to whether products or systems are in conformance with applicable standards, Departmental Representative reserves right to have such products or systems tested to prove or disprove conformance. .3 Cost for such testing will be born by Departmental Representative in event of conformance with Contract Documents or by Contractor in event of non-conformance. 1.2 QUALITY .1 Products, materials, equipment and articles incorporated in Work shall be new, not damaged or defective, and of best quality for purpose intended. If requested, furnish evidence as to type, source and quality of products provided. .2 Procurement policy is to acquire, in cost effective manner, items containing highest percentage of recycled and recovered materials practicable consistent with maintaining satisfactory levels of competition. Make reasonable efforts to use recycled and recovered materials and in otherwise utilizing recycled and recovered materials in execution of work. .3 Defective products, whenever identified prior to completion of Work, will be rejected, regardless of previous inspections. Inspection does not relieve responsibility, but is precaution against oversight or error. Remove and replace defective products at own expense and be responsible for delays and expenses caused by rejection. .4 Should disputes arise as to quality or fitness of products, decision rests strictly with Departmental Representative based upon requirements of Contract Documents. .5 Unless otherwise indicated in specifications, maintain uniformity of manufacture for any particular or like item throughout building. .6 Permanent labels, trademarks and nameplates on products are not acceptable in prominent locations, except where required for operating instructions, or when located in mechanical or electrical rooms. 1.3 STORAGE, HANDLING AND PROTECTION .1 Handle and store products in manner to prevent damage, adulteration, deterioration and soiling and in accordance with manufacturer's instructions when applicable. .2 Store packaged or bundled products in original and undamaged condition with manufacturer's seal and labels intact. Do not remove from packaging or bundling until required in Work. .3 Store products subject to damage from weather in weatherproof enclosures. .4 Store cementitious products clear of earth or concrete floors, and away from walls. .5 Keep sand, when used for grout or mortar materials, clean and dry. Store sand on wooden platforms and cover with waterproof tarpaulins during inclement weather. Project No. R.067898.002 COMMON PRODUCT REQUIREMENTS Section 01 61 00 Page 2 of 4 .6 Store sheet materials, lumber on flat, solid supports and keep clear of ground. Slope to shed moisture. .7 Store and mix paints in heated and ventilated room. Remove oily rags and other combustible debris from site daily. Take every precaution necessary to prevent spontaneous combustion. .8 Remove and replace damaged products at own expense and to satisfaction of Departmental Representative. .9 Touch-up damaged factory finished surfaces to Departmental Representative's satisfaction. Use touch-up materials to match original. Do not paint over name plates. 1.4 TRANSPORTATION .1 Pay costs of transportation of products required in performance of Work. .2 Transportation cost of products supplied by Departmental Representative will be paid for by Departmental Representative. Unload, handle and store such products. 1.5 MANUFACTURER'S INSTRUCTIONS .1 Unless otherwise indicated in specifications, install or erect products in accordance with manufacturer's instructions. Do not rely on labels or enclosures provided with products. Obtain written instructions directly from manufacturers. .2 Notify Departmental Representative in writing, of conflicts between specifications and manufacturer's instructions, so that Departmental Representative will establish course of action. .3 Improper installation or erection of products, due to failure in complying with these requirements, authorizes Departmental Representative to require removal and reinstallation at no increase in Contract Price or Contract Time. 1.6 QUALITY OF WORK .1 Ensure Quality of Work is of highest standard, executed by workers experienced and skilled in respective duties for which they are employed. Immediately notify Departmental Representative if required Work is such as to make it impractical to produce required results. .2 Do not employ anyone unskilled in their required duties. Departmental Representative reserves right to require dismissal from site, workers deemed incompetent or careless. .3 Decisions as to standard or fitness of Quality of Work in cases of dispute rest solely with Departmental Representative, whose decision is final. 1.7 CO-ORDINATION .1 Ensure co-operation of workers in laying out Work. Maintain efficient and continuous supervision. .2 Be responsible for coordination and placement of openings, sleeves and accessories. 1.8 CONCEALMENT .1 In finished areas conceal pipes, ducts and wiring in floors, walls and ceilings, except where indicated otherwise. Project No. R.067898.002 .2 1.9 COMMON PRODUCT REQUIREMENTS Section 01 61 00 Page 3 of 4 Before installation inform Departmental Representative if there is interference. Install as directed by Departmental Representative. REMEDIAL WORK .1 Perform remedial work required to repair or replace parts or portions of Work identified as defective or unacceptable. Co-ordinate adjacent affected Work as required. .2 Perform remedial work by specialists familiar with materials affected. Perform in a manner to neither damage nor put at risk any portion of Work. 1.10 LOCATION OF FIXTURES .1 Consider location of fixtures, outlets, and mechanical and electrical items indicated as approximate and subject to relocation prior to installation within a radius of up to 3000mm from the location shown to suit site conditions, interferences or other conditions determined by the Departmental Representative. .2 Inform Departmental Representative of conflicting installation. Install as directed. 1.11 FASTENINGS .1 Provide metal fastenings and accessories in same texture, colour and finish as adjacent materials, unless indicated otherwise. .2 Prevent electrolytic action between dissimilar metals and materials. .3 Use non-corrosive hot dip galvanized steel fasteners and anchors for securing exterior work, unless stainless steel or other material is specifically requested in affected specification Section. .4 Space anchors within individual load limit or shear capacity and ensure they provide positive permanent anchorage. Wood, or any other organic material plugs are not acceptable. .5 Keep exposed fastenings to a minimum, space evenly and install neatly. .6 Fastenings which cause spalling or cracking of material to which anchorage is made are not acceptable. 1.12 FASTENINGS - EQUIPMENT .1 Use fastenings of standard commercial sizes and patterns with material and finish suitable for service. .2 Use heavy hexagon heads, semi-finished unless otherwise specified. Use No. 304 stainless steel for exterior areas. .3 Bolts may not project more than one diameter beyond nuts. .4 Use plain type washers on equipment, sheet metal and soft gasket lock type washers where vibrations occur. Use resilient washers with stainless steel. 1.13 PROTECTION OF WORK IN PROGRESS .1 Prevent overloading of parts of building. Do not cut, drill or sleeve load bearing structural member, unless specifically indicated without written approval of Departmental Representative. Project No. R.067898.002 1.14 COMMON PRODUCT REQUIREMENTS Section 01 61 00 Page 4 of 4 EXISTING UTILITIES .1 When breaking into or connecting to existing services or utilities, execute Work at times directed by local governing authorities, with minimum of disturbance to Work, and/or building occupants. .2 Protect, relocate or maintain existing active services. When services are encountered, cap off in manner approved by authority having jurisdiction. Record location of capped service. Part 2 Products 2.1 NOT USED .1 Not Used. Part 3 Execution 3.1 NOT USED .1 Not Used. END OF SECTION Project No. R.067898.002 EXECUTION Part 1 General 1.1 ACTION AND INFORMATIONAL SUBMITTALS .1 Submittals: in accordance with Section 01 33 00 - Submittal Procedures. .2 Submit written request in advance of cutting or alteration which affects: .1 .2 .3 .4 .5 .3 Structural integrity of elements of project. Integrity of weather-exposed or moisture-resistant elements. Efficiency, maintenance, or safety of operational elements. Visual qualities of sight-exposed elements. Work of Departmental Representative or separate contractor. Include in request: .1 .2 .3 .4 .5 .6 .7 .8 1.2 Section 01 73 00 Page 1 of 3 Identification of project. Location and description of affected Work. Statement on necessity for cutting or alteration. Description of proposed Work, and products to be used. Alternatives to cutting and patching. Effect on Work of Departmental Representative or separate contractor. Written permission of affected separate contractor. Date and time work will be executed. MATERIALS .1 Required for original installation. .2 Change in Materials: Submit request for substitution in accordance with Section 01 33 00 - Submittal Procedures. 1.3 PREPARATION .1 Inspect existing conditions, including elements subject to damage or movement during cutting and patching. .2 After uncovering, inspect conditions affecting performance of Work. .3 Beginning of cutting or patching means acceptance of existing conditions. .4 Provide supports to assure structural integrity of surroundings; provide devices and methods to protect other portions of project from damage. .5 Provide protection from elements for areas which are to be exposed by uncovering work; maintain excavations free of water. 1.4 EXECUTION .1 Execute cutting, fitting, and patching including excavation and fill, to complete Work. .2 Fit several parts together, to integrate with other Work. .3 Uncover Work to install ill-timed Work. Project No. R.067898.002 EXECUTION Section 01 73 00 Page 2 of 3 .4 Remove and replace defective and non-conforming Work. .5 Remove samples of installed Work for testing. .6 Provide openings in non-structural elements of Work for penetrations of mechanical and electrical Work. .7 Execute Work by methods to avoid damage to other Work, and which will provide proper surfaces to receive patching and finishing. .8 Employ original installer to perform cutting and patching for weather-exposed and moisture-resistant elements, and sight-exposed surfaces. .9 Cut rigid materials using masonry saw or core drill. Pneumatic or impact tools not allowed on masonry work without prior approval. .10 Restore work with new products in accordance with requirements of Contract Documents. .11 Fit Work airtight to pipes, sleeves, ducts, conduit, and other penetrations through surfaces. .12 At penetration of fire rated wall, ceiling, or floor construction, completely seal voids with firestopping material in accordance with ULC listed firestop assemblies applicable for the existing construction. provide submittals for proposed firestop assemblies prior to installation for approval by Departmental Representative. .13 Patch and make good existing construction that is cut, damaged or disturbed in the course of the Work, to Departmental Representative’s approval. Match existing material and finish texture, appearance and colour. .14 Remove all traces of existing construction removed in the course of the Work. .15 Refinish surfaces to match adjacent finishes: Refinish continuous surfaces to nearest intersection. Refinish assemblies by refinishing entire unit. .16 Conceal pipes, ducts and wiring in floor, wall and ceiling construction of finished areas except where indicated otherwise. .17 At penetration of acoustically-rated partitions, completely seal voids with acoustic sealant on both sides of partition. 1.5 WASTE MANAGEMENT AND DISPOSAL .1 Separate waste materials for reuse/recycling in accordance with Section 01 74 21 Construction/Demolition Waste Management And Disposal. Part 2 Products 2.1 NOT USED .1 Not Used. Project No. R.067898.002 Part 3 Execution 3.1 NOT USED .1 EXECUTION Not Used. END OF SECTION Section 01 73 00 Page 3 of 3 Project No. R.067898.002CONSTRUCTION/DEMOLITION WASTE MANAGEMENT Section 01 74 21 AND DISPOSAL Page 1 of 10 Part 1 General 1.1 WASTE MANAGEMENT GOALS .1 Prior to start of Work conduct meeting with Departmental Representative to review and discuss PWGSC's waste management goal and Contractor's proposed Waste Reduction Workplan for Construction, Renovation and /or Demolition (CRD) waste to be project generated. .2 PWGSC's waste management goal: to divert a minimum 75 percent of total Project Waste from landfill sites. Prior to project completion provide Departmental Representative documentation certifying that waste management, recycling, reuse of recyclable and reusable materials have been extensively practiced. The overall waste diversion goal for this project is 75%.. .3 Minimize amount of non-hazardous solid waste generated by project and accomplish maximum source reduction, reuse and recycling of solid waste produced by CRD activities. .4 Protect environment and prevent environmental pollution damage. 1.2 REFERENCES .1 Definitions: .1 .2 .3 .4 .5 .6 .7 .8 .9 .10 Approved/Authorized recycling facility: waste recycler approved by applicable provincial authority or other users of material for recycling approved by the Departmental Representative. Class III: non-hazardous waste - construction renovation and demolition waste. Construction, Renovation and/or Demolition (CRD) Waste: Class III solid, nonhazardous waste materials generated during construction, demolition, and/or renovation activities Cost/Revenue Analysis Workplan (CRAW): based on information from Waste Reduction Workplan, and intended as financial tracking tool for determining economic status of waste management practices (Schedule E). Inert Fill: inert waste - exclusively asphalt and concrete. Waste Source Separation Program (WSSP): implementation and co-ordination of ongoing activities to ensure designated waste materials will be sorted into predefined categories and sent for recycling and reuse, maximizing diversion and potential to reduce disposal costs. Recyclable: ability of product or material to be recovered at end of its life cycle and re-manufactured into new product for reuse. Recycle: process by which waste and recyclable materials are transformed or collected for purpose of being transferred into new products. Recycling: process of sorting, cleansing, treating and reconstituting solid waste and other discarded materials for purpose of using in altered form. Recycling does not include burning, incinerating, or thermally destroying waste. Reuse: repeated use of product in same form but not necessarily for same purpose. Reuse includes: Project No. R.067898.002CONSTRUCTION/DEMOLITION WASTE MANAGEMENT Section 01 74 21 AND DISPOSAL Page 2 of 10 .1 .11 .12 .13 .14 .15 .16 .17 .2 Salvaging reusable materials from re-modelling projects, before demolition stage, for resale, reuse on current project or for storage for use on future projects. .2 Returning reusable items including pallets or unused products to vendors. Salvage: removal of structural and non-structural materials from deconstruction/disassembly projects for purpose of reuse or recycling. Separate Condition: refers to waste sorted into individual types. Source Separation: act of keeping different types of waste materials separate beginning from the point they became waste. Waste Audit (WA): detailed inventory of estimated quantities of waste materials that will be generated during construction, demolition, deconstruction and/or renovation. Involves quantifying by volume/weight amounts of materials and wastes that will be reused, recycled or landfilled. Refer to Schedule A. Waste Diversion Report: detailed report of final results, quantifying cumulative weights and percentages of waste materials reused, recycled and landfilled over course of project. Measures success against Waste Reduction Workplan (WRW) goals and identifies lessons learned. Waste Management Co-ordinator (WMC) : contractor representative responsible for supervising waste management activities as well as co-ordinating required submittal and reporting requirements. Waste Reduction Workplan (WRW): written report which addresses opportunities for reduction, reuse, or recycling of materials generated by project. Specifies diversion goals, implementation and reporting procedures, anticipated results and responsibilities. Waste Reduction Workplan (Schedule B) information acquired from Waste Audit. Reference Standards: .1 Ontario Ministry of Environment .1 Ontario 3 R's Regulations (regulation 102/94) for waste management programs applicable to construction and demolition projects greater than 2,000 m2. .2 Ontario Environmental Protection Act (EPA) .1 Regulation 102/94, Waste Audits and Waste Reduction Workplans. .2 Regulation 103/94, Source Separation Programs. .3 Canadian Construction Association (CCA) .1 CCA 81-2001: A Best Practices Guide to Solid Waste Reduction. .4 Public Works and Government Services Canada (PWGSC) .1 2002 National Construction, Renovation and Demolition NonHazardous Solid Waste Management Protocol. .2 CRD Waste Management Market Research Report (available from PWGSC's Environmental Services). .3 Sustainable Development Strategy 2007-2009: Target 2.1 Environmentally Sustainable Use of Natural Resources. Project No. R.067898.002CONSTRUCTION/DEMOLITION WASTE MANAGEMENT Section 01 74 21 AND DISPOSAL Page 3 of 10 .1 .2 1.3 Real Property projects over $1 million and in communities where industrial recycling is supported, implementation of CRD waste management practices will be completed, with waste materials being reused or recycled. Contractually ensure resources used in construction or maintenance are consumed and recovered in a sustainable manner. DOCUMENTS .1 Post and maintain in visible and accessible area at job site, one copy of following documents: .1 .2 .3 .4 1.4 Waste Audit (Schedule A). Waste Reduction Workplan (Schedule B). Waste Source Separation Program. Schedules A and B completed for project. ACTION AND INFORMATIONAL SUBMITTALS .1 Submit in accordance with Section 01 33 00 - Submittal Procedures. .2 Prepare and submit following prior to project start-up: .1 .2 .3 .4 .3 Prepare and submit on monthly basis, throughout project or at intervals agreed to by Departmental Representative the following: .1 .2 .3 .4 1 copy and 1 electronic copy of completed Waste Audit (WA): Schedule A. 1 copy and 1 electronic copy of completed Waste Reduction Workplan (WRW): Schedule B. 1 copy and 1 electronic copy of Cost/Revenue Analysis Workplan (CRAW): Schedule E. 1 copy and 1 electronic copy of Waste Source Separation Program (WSSP). Receipts, scale tickets, waybills, and/or waste disposal receipts that show quantities and types of materials reused, recycled, or disposed of. Updated Waste Materials Tracking form (Schedule D). Written bi-weekly monthly summary report detailing cumulative amounts of waste materials reused, recycled and landfilled, and brief status of ongoing waste management activities. Submit prior to final payment the following: .1 .2 Waste Diversion Report, indicating final quantities in tones by material types salvaged for reuse, recycling or disposal in landfill and recycling centres, re-use depots, landfills and other waste processors that received waste materials (See Schedule C). Provide receipts, scale tickets, waybills, waste disposal receipts that confirm quantities and types of materials reused, recycled or disposed of and destination. Project No. R.067898.002CONSTRUCTION/DEMOLITION WASTE MANAGEMENT Section 01 74 21 AND DISPOSAL Page 4 of 10 1.5 WASTE AUDIT (WA) .1 Departmental Representative will prepare WA prior to project start-up. WA will be provided with bid documentation (see Schedule A). .2 WA provides detailed inventory, estimated quantities and types of waste materials that will be generated as well as their potential to be reused and/or recycled and project's waste diversion goals and objectives. .3 After award of contract, contractor to review WA and confirm that anticipated quantities of waste generated are accurate and goals achievable. .4 If after review, contractor determines that indicated quantities or opportunities in WA are not accurate or achievable, contractor to provide written details of discrepancies and revised quantities for areas of concern. Contractor to meet with Departmental Representative to review and justify revisions. .5 Post on-site WA where contractor and sub-contractors are able to review content. 1.6 WASTE REDUCTION WORKPLAN (WRW) .1 Prepare and submit WRW (Schedule B) at least 5 days prior to project start-up. .2 WRW identifies strategies to optimize diversion through reduction, reuse, and recycling of materials and comply with applicable regulations, based on information acquired from WA. .3 WRW should include but not limited to: .1 .2 .3 .4 .5 .6 .7 .8 .9 .10 .11 .12 .13 .14 .15 Applicable regulations. Specific goals for waste reduction, identify existing barriers and develop strategies to overcome them. Destination of materials identified. Deconstruction/disassembly techniques and schedules. Methods to collect, separate, and reduce generated wastes. Location of waste bins on-site. Security of on-site stock piles and waste bins. Protection of personnel, sub-contractors. Clear labelling of storage areas. Training plan for contractor and sub-contractors. Methods to track and report results reliably (Schedule D). Details on materials handling and removal procedures. Recycler and reclaimer requirements. Quantities of materials to be salvaged for reuse or recycled and materials sent to landfill. Requirements for monitoring on-site wastes management activities. .4 Structure WRW to prioritize actions and follow 3R's hierarchy, with Reduction as first priority, followed by Reuse, then Recycle. .5 Post WRW or summary where workers at site are able to review content. Project No. R.067898.002CONSTRUCTION/DEMOLITION WASTE MANAGEMENT Section 01 74 21 AND DISPOSAL Page 5 of 10 .6 1.7 Monitor and report on waste reduction by documenting total volume (in tonnes) and cost of actual waste removed from project (Schedule D). COST/REVENUE ANALYSIS WORKPLAN (CRAW) .1 Prepare CRAW (see Schedule E) and include the following: .1 .2 .3 1.8 Cost of current waste management practices. Implementation cost of waste diversion program. Savings and benefits resulting from waste diversion program. WASTE SOURCE SEPARATION PROGRAM (WSSP) .1 As part of Waste Reduction Workplan, prepare WSSP prior to project start-up. .2 WSSP will detail methodology and planned on-site activities for separation of reusable and recyclable materials from waste intended for landfill. .3 Provide list and drawings of locations that will be made available for sorting, collection, handling and storage of anticipated quantities of reusable and recyclable materials. .4 Provide sufficient on-site facilities and containers for collection, handling, and storage of anticipated quantities of reusable and recyclable materials. .5 Locate containers to facilitate deposit of materials without hindering daily operations. .6 Provide training for workers in handling and separation of materials for reuse and/or recycling. .7 Locate separated materials in areas which minimizes material damage. .8 Clearly and securely label containers to identify types/conditions of materials accepted and assist workers in separating materials accordingly. .9 Monitor on-site waste management activities by conducting periodic site inspections to verify: state of signage, contamination levels, bin locations and condition, personnel participation, use of waste tracking forms and collection of waybills, receipts and invoices. .10 On-site sale of salvaged materials is not permitted unless authorized in writing by Departmental Representative and provided that site safety regulations and security requirements are adhered to. 1.9 USE OF SITE AND FACILITIES .1 Execute Work with minimal interference and disturbance to normal use of premises. .2 Maintain security measures established by facility and provide temporary security measures approved by Departmental Representative. 1.10 WASTE PROCESSING SITES .1 Contractor is responsible to research and locate waste diversion resources and service providers. Salvaged materials are to be transported off site to approved and/or authorized recycling facilities or to users of material for recycling. Project No. R.067898.002CONSTRUCTION/DEMOLITION WASTE MANAGEMENT Section 01 74 21 AND DISPOSAL Page 6 of 10 1.11 QUALITY ASSURANCE .1 After award of Contract, a mandatory site examination will be held for this Project for Contractor and sub-contractors responsible for construction, renovation demolition/deconstruction waste management. .1 .2 1.12 Date, time and location will be arranged by Departmental Representative Waste Management Meeting: Waste Management Co-ordinator is to provide an update on status of waste diversion and management activities at each meeting. Written monthly Waste Diversion Report summary to be provided by Waste Management Coordinator (refer to the Waste Diversion Report form in Schedule C and Waste Materials Tracking form in Schedule D). STORAGE, HANDLING AND PROTECTION .1 Store, materials to be reused, recycled and salvaged in locations as directed by Departmental Representative. .2 Unless specified otherwise, materials for removal become Contractor's property. .3 Protect, stockpile, store and catalogue salvaged items. .4 Separate non-salvageable materials from salvaged items. Transport and deliver nonsalvageable items to licensed disposal facility. .5 Protect structural components not removed and salvaged materials from movement or damage. .6 Support affected structures. If safety of building is endangered, cease operations and immediately notify Departmental Representative .7 Protect surface drainage, mechanical and electrical from damage and blockage. .8 Provide on-site facilities and containers for collection and storage of reusable and recyclable materials. .9 Separate and store materials produced during project in designated areas. .10 Prevent contamination of materials to be salvaged and recycled and handle materials in accordance with requirements for acceptance by designated processing facilities. .1 .2 .3 .4 1.13 On-site source separation is recommended. Remove co-mingled materials to off site processing facility for separation. Obtain waybills, receipts and/or scale tickets for separated materials removed from site. Materials reused on-site are considered to be diverted from landfill and as such are to be included in all reporting. DISPOSAL OF WASTES .1 Do not bury rubbish or waste materials. .2 Do not dispose of waste volatile materials mineral spirits oil paint thinner into waterways, storm, or sanitary sewers. .3 Keep records of construction waste including: .1 Number and size of bins. Project No. R.067898.002CONSTRUCTION/DEMOLITION WASTE MANAGEMENT Section 01 74 21 AND DISPOSAL Page 7 of 10 .2 .3 .4 .5 Waste type of each bin. Total tonnage generated. Tonnage reused or recycled. Reused or recycled waste destination. .4 Remove materials on-site as Work progresses. .5 Prepare project summary to verify destination and quantities on a material-by-material basis as identified in the waste audit. 1.14 SCHEDULING .1 Co-ordinate Work with other activities at site to ensure timely and orderly progress of Work. Part 2 Products 2.1 NOT USED .1 Not Used. Part 3 Execution 3.1 APPLICATION .1 Do Work in compliance with WRW and WSSP. .2 Handle waste materials not reused, salvaged, or recycled in accordance with appropriate regulations and codes. 3.2 CLEANING .1 Progress Cleaning: clean in accordance with Section 01 00 10 – General Instructions. .1 Leave Work area clean at end of each day. .2 Final Cleaning: upon completion remove surplus materials, rubbish, tools and equipment in accordance with Section 01 00 10 – General Instructions. .3 Waste Management: separate waste materials for reuse recycling in accordance with Section 01 74 21 - Construction/Demolition Waste Management and Disposal. .1 .2 3.3 Remove recycling containers and bins from site and dispose of materials at appropriate facility. Source separate materials to be reused/recycled into specified sort areas. DIVERSION OF MATERIALS .1 From following list, separate materials from general waste stream and stockpile in separate piles or containers, as reviewed by Departmental Representative, and consistent with applicable fire regulations. .1 .2 Mark containers or stockpile areas. Provide instruction on disposal practices. Project No. R.067898.002CONSTRUCTION/DEMOLITION WASTE MANAGEMENT Section 01 74 21 AND DISPOSAL Page 8 of 10 .2 3.4 On-site sale of salvaged recovered, reusable, recyclable, materials is not permitted. WASTE DIVERSION REPORT .1 At completion of Project, prepare written Waste Diversion Report indicating quantities of materials reused, recycled or disposed of as well as the following: .1 .2 3.5 Identify final diversion results and measure success against goals from Waste Reduction Workplan. Compare final quantities/percentages diverted with initial projections in Waste Audit and Waste Reduction Workplan and explain variances. .1 Supporting documentation. .2 Waybills and tracking forms. .3 Description of issues, resolutions and lessons learned. WASTE AUDIT (WA) .1 (1) Material Category Schedule A - Waste Audit (WA) (2) Material Quantity Unit (3) Estimated Waste % (4) Total Quantity of Waste (unit) (5) Generation Point (6) % Recycled (7) % Reused Wood and Plastics Material Description Off-cuts Warped Pallet Forms Plastic Packaging Cardboard Packaging Other Doors and Windows Material Description Painted Frames Glass Wood Metal Other 3.6 WASTE REDUCTION WORKPLAN (WRW) .1 (1) Material Schedule B (2) Person(s) (3) Total Quantity (4) Reused Actual (5) Recycled Actual (6) Material(s) Project No. R.067898.002CONSTRUCTION/DEMOLITION WASTE MANAGEMENT Section 01 74 21 AND DISPOSAL Page 9 of 10 Category Responsible of Waste (unit) Amount (units) Projected Amount (unit) Projected Destination Wood and Plastics Material Description Chutes Warped Pallet Forms Plastic Packag ing Cardboard Packag ing Other Doors and Windows Material Description Painted Frames Glass Wood Metal Other 3.7 COST/REVENUE ANALYSIS WORKPLAN (CRAW) .1 (1) Material Description Wood Wood Stud Plywood Baseboard Wood Door Trim Wood Cabinet Doors and Windows Panel Regular Slab Regular Wood Laminate Schedule E - Cost/Revenue Analysis Workplan (CRAW) (2) Total Quantity (unit) (3) Volume (cum) (4) Weight (cum) (5) Disposal Cost/Credit $(+/-) (6) Category Sub-Total $(+/) Project No. R.067898.002CONSTRUCTION/DEMOLITION WASTE MANAGEMENT Section 01 74 21 AND DISPOSAL Page 10 of 10 Byfold - Closet Glazing Metal Studs and Framing (7) Cost (-) / Revenue (+) 3.8 CANADIAN GOVERNMENTAL DEPARTMENTS CHIEF RESPONSIBILITY FOR THE ENVIRONMENT .1 Schedule G - Government Chief Responsibility for the Environment: Province Ontario 3.9 Address Ministry of Environment and Energy, 135 St. Clair Avenue West Toronto ON M4V 1P5 Environment Canada Toronto ON General Inquires 416-323-4321 800-5654923 Fax 416-323-4682 416-734-4494 SCHEDULES .1 Following Schedules are attached to this Specification: .1 .2 .3 .4 Waste Audit - Schedule A. Waste Reduction Workplan Form - Schedule B. Cost/Revenue Analysis Workplan - Schedule E. Government Chief Responsibility for the Environment – Schedule G END OF SECTION Project No. R.067898.002 CLOSEOUT SUBMITTALS Section 01 78 00 Page 1 of 7 Part 1 General 1.1 ADMINISTRATIVE REQUIREMENTS .1 Departmental Representative to establish communication procedures for: .1 Notifying construction warranty defects. .2 Determine priorities for type of defects. .3 Determine reasonable response time. .2 Contact information for bonded and licensed company for warranty work action: provide name, telephone number and address of company authorized for construction warranty work action. .3 Ensure contact is located within local service area of warranted construction, is continuously available, and is responsive to inquiries for warranty work action. 1.2 ACTION AND INFORMATIONAL SUBMITTALS .1 Provide submittals in accordance with Section 01 33 00 - Submittal Procedures. .2 Two weeks prior to Substantial Performance of the Work, submit to the Departmental Representative, four final copies of operating and maintenance manuals in English and French. .3 Provide spare parts, maintenance materials and special tools of same quality and manufacture as products provided in Work. .4 Provide evidence, if requested, for type, source and quality of products supplied. 1.3 FORMAT .1 Organize data as instructional manual. .2 Binders: vinyl, hard covered, 3 'D' ring, loose leaf 219 x 279 mm with spine and face pockets. .3 When multiple binders are used correlate data into related consistent groupings. .1 Identify contents of each binder on spine. .4 Cover: identify each binder with type or printed title 'Project Record Documents'; list title of project and identify subject matter of contents. .5 Arrange content by systems, process flow, under Section numbers and sequence of Table of Contents. .6 Provide tabbed fly leaf for each separate product and system, with typed description of product and major component parts of equipment. .7 Text: manufacturer's printed data, or typewritten data. .8 Drawings: provide with reinforced punched binder tab. .1 .9 Bind in with text; fold larger drawings to size of text pages. Provide 1:1 scaled CAD files in dwg format on CD. Project No. R.067898.002 1.4 CLOSEOUT SUBMITTALS Section 01 78 00 Page 2 of 7 CONTENTS - PROJECT RECORD DOCUMENTS .1 Table of Contents for Each Volume: provide title of project; .1 .2 .3 .2 Date of submission; names. Addresses, and telephone numbers of Consultant and Contractor with name of responsible parties. Schedule of products and systems, indexed to content of volume. For each product or system: .1 List names, addresses and telephone numbers of subcontractors and suppliers, including local source of supplies and replacement parts. .3 Product Data: mark each sheet to identify specific products and component parts, and data applicable to installation; delete inapplicable information. .4 Drawings: supplement product data to illustrate relations of component parts of equipment and systems, to show control and flow diagrams. .5 Typewritten Text: as required to supplement product data. .1 .6 1.5 Provide logical sequence of instructions for each procedure, incorporating manufacturer's instructions specified in Section 01 45 00 - Quality Control. Training: provide training as required by Departmental Representative. AS -BUILT DOCUMENTS AND SAMPLES .1 Maintain, in addition to requirements in General Conditions, at site for Departmental Representative one record copy of: .1 .2 .3 .4 .5 .6 .7 .8 .9 .10 .2 Store record documents and samples in field office apart from documents used for construction. .1 .3 Provide files, racks, and secure storage. Label record documents and file in accordance with Section number listings in List of Contents of this Project Manual. .1 .4 Contract Drawings. Specifications. Addenda. Site Instructions Change Orders and other modifications to Contract. Reviewed shop drawings, product data, and samples. Field test records. Inspection certificates. Manufacturer's certificates. Site Instructions Label each document "PROJECT RECORD" in neat, large, printed letters. Maintain record documents in clean, dry and legible condition. .1 Do not use record documents for construction purposes. Project No. R.067898.002 .5 1.6 CLOSEOUT SUBMITTALS Section 01 78 00 Page 3 of 7 Keep record documents and samples available for inspection by Departmental Representative. RECORDING INFORMATION ON PROJECT RECORD DOCUMENTS .1 Record information on set of black line opaque drawings, and in copy of Project Manual, provided by Departmental Representative. .2 Use felt tip marking pens, maintaining separate colours for each major system, for recording information. .3 Record information concurrently with construction progress. .1 .4 Contract Drawings and shop drawings: mark each item to record actual construction, including: .1 .2 .3 .4 .5 .5 Do not conceal Work until required information is recorded. Measured locations of internal utilities and appurtenances, referenced to visible and accessible features of construction. Field changes of dimension and detail. Changes made by change orders. Details not on original Contract Drawings. References to related shop drawings and modifications. Specifications: mark each item to record actual construction, including: .1 .2 Manufacturer, trade name, and catalogue number of each product actually installed, particularly optional items and substitute items. Changes made by Addenda and change orders. .6 Other Documents: maintain manufacturer's certifications, inspection certifications, field test records, required by individual specifications sections. .7 Provide digital photos, if requested, for site records. 1.7 EQUIPMENT AND SYSTEMS .1 Obtain MMS data forms from Departmental Representative and fill in all information for all new and removed equipment. Forward all maintenance data for inclusion in Preventative Maintenance Support System (PMSS). Obtain equipment tag info from Departmental Representative and include on P-touch label. Provide copies of all MMS data forms in operating and maintenance manuals. .2 For each item of equipment and each system include description of unit or system, and component parts. .1 .2 Give function, normal operation characteristics and limiting conditions. Include performance curves, with engineering data and tests, and complete nomenclature and commercial number of replaceable parts. .3 Panel board circuit directories: provide electrical service characteristics, controls, and communications. .4 Include installed colour coded wiring diagrams. Project No. R.067898.002 .5 CLOSEOUT SUBMITTALS Section 01 78 00 Page 4 of 7 Operating Procedures: include start-up, break-in, and routine normal operating instructions and sequences. .1 .2 Include regulation, control, stopping, shut-down, and emergency instructions. Include summer, winter, and any special operating instructions. .6 Maintenance Requirements: include routine procedures and guide for trouble-shooting; disassembly, repair, and reassembly instructions; and alignment, adjusting, balancing, and checking instructions. .7 Provide servicing and lubrication schedule, and list of lubricants required. .8 Include manufacturer's printed operation and maintenance instructions. .9 Include sequence of operation by controls manufacturer. .10 Provide original manufacturer's parts list, illustrations, assembly drawings, and diagrams required for maintenance. .11 Provide installed control diagrams by controls manufacturer. .12 Provide Contractor's co-ordination drawings, with installed colour coded piping diagrams. .13 Provide charts of valve tag numbers, with location and function of each valve, keyed to flow and control diagrams. .14 Provide list of original manufacturer's spare parts, current prices, and recommended quantities to be maintained in storage. .15 Include test and balancing reports as specified in Section 01 45 00 - Quality Control and 01 91 13 - General Commissioning (Cx) Requirements. .16 Additional requirements: as specified in individual specification sections. 1.8 MATERIALS AND FINISHES .1 Building products, applied materials, and finishes: include product data, with catalogue number, size, composition, and colour and texture designations. .1 Provide information for re-ordering custom manufactured products. .2 Instructions for cleaning agents and methods, precautions against detrimental agents and methods, and recommended schedule for cleaning and maintenance. .3 Moisture-protection and weather-exposed products: include manufacturer's recommendations for cleaning agents and methods, precautions against detrimental agents and methods, and recommended schedule for cleaning and maintenance. .4 Additional requirements: as specified in individual specifications sections. 1.9 MAINTENANCE MATERIALS .1 Spare Parts: .1 .2 .3 .4 Provide spare parts, in quantities specified in individual specification sections. Provide items of same manufacture and quality as items in Work. Deliver to location as directed; place and store. Receive and catalogue items. Project No. R.067898.002 .5 .2 .2 .3 .4 .5 .1 Submit inventory listing to Departmental Representative.. .2 Include approved listings in Maintenance Manual. Obtain receipt for delivered products and submit prior to final payment. Provide maintenance and extra materials, in quantities specified in individual specification sections. Provide items of same manufacture and quality as items in Work. Deliver to site location as directed; place and store. Receive and catalogue items. .1 Submit inventory listing to Departmental Representative .2 Include approved listings in Maintenance Manual. Obtain receipt for delivered products and submit prior to final payment. Special Tools: .1 .2 .3 .4 1.10 Section 01 78 00 Page 5 of 7 Extra Stock Materials: .1 .3 CLOSEOUT SUBMITTALS Provide special tools, in quantities specified in individual specification section. Provide items with tags identifying their associated function and equipment. Deliver to site location as directed; place and store. Receive and catalogue items. .1 Submit inventory listing to Departmental Representative .2 Include approved listings in Maintenance Manual. DELIVERY, STORAGE AND HANDLING .1 Store spare parts, maintenance materials, and special tools in manner to prevent damage or deterioration. .2 Store in original and undamaged condition with manufacturer's seal and labels intact. .3 Store components subject to damage from weather in weatherproof enclosures. .4 Store paints and freezable materials in a heated and ventilated room. .5 Remove and replace damaged products at own expense and for review by Departmental Representative. 1.11 WARRANTIES AND BONDS .1 Develop warranty management plan to contain information relevant to Warranties. .2 Submit warranty management plan, 30 days before planned pre-warranty conference, to Departmental Representative approval. .3 Warranty management plan to include required actions and documents to assure that Departmental Representative receives warranties to which it is entitled. .4 Provide plan in narrative form and contain sufficient detail to make it suitable for use by future maintenance and repair personnel. .5 Submit, warranty information made available during construction phase, to Departmental Representative for approval prior to each monthly pay estimate. Project No. R.067898.002 .6 CLOSEOUT SUBMITTALS Section 01 78 00 Page 6 of 7 Assemble approved information in binder, submit upon acceptance of work and organize binder as follows: .1 .2 .3 .4 .5 .6 Separate each warranty or bond with index tab sheets keyed to Table of Contents listing. List subcontractor, supplier, and manufacturer, with name, address, and telephone number of responsible principal. Obtain warranties and bonds, executed in duplicate by subcontractors, suppliers, and manufacturers, within ten days after completion of applicable item of work. Verify that documents are in proper form, contain full information, and are notarized. Co-execute submittals when required. Retain warranties and bonds until time specified for submittal. .7 Except for items put into use with Departmental Representative’s permission, leave date of beginning of time of warranty until Date of Substantial Performance is determined. .8 Conduct joint 4 month and 9 month warranty inspection, measured from time of acceptance, by Departmental Representative. .9 Include information contained in warranty management plan as follows: .1 .2 .3 Roles and responsibilities of personnel associated with warranty process, including points of contact and telephone numbers within the organizations of Contractors, subcontractors, manufacturers or suppliers involved. Listing and status of delivery of Certificates of Warranty for extended warranty items, to include HVAC balancing, pumps, motors, transformers, commissioned systems fire protection, alarm systems, sprinkler systems, lightning protection systems,. Provide list for each warranted equipment, item, feature of construction or system indicating: .1 Name of item. .2 Model and serial numbers. .3 Location where installed. .4 Name and phone numbers of manufacturers or suppliers. .5 Names, addresses and telephone numbers of sources of spare parts. .6 Warranties and terms of warranty: include one-year overall warranty of construction. Indicate items that have extended warranties and show separate warranty expiration dates. .7 Cross-reference to warranty certificates as applicable. .8 Starting point and duration of warranty period. .9 Summary of maintenance procedures required to continue warranty in force. .10 Cross-Reference to specific pertinent Operation and Maintenance manuals. .11 Organization, names and phone numbers of persons to call for warranty service. Project No. R.067898.002 CLOSEOUT SUBMITTALS Section 01 78 00 Page 7 of 7 .12 .4 .5 .6 Typical response time and repair time expected for various warranted equipment. Contractor's plans for attendance at 4 and 9 month post-construction warranty inspections. Procedure and status of tagging of equipment covered by extended warranties. Post copies of instructions near selected pieces of equipment where operation is critical for warranty and/or safety reasons. .10 Respond in timely manner to oral or written notification of required construction warranty repair work. .11 Written verification to follow oral instructions. .1 1.12 Failure to respond will be cause for the Departmental Representative to proceed with action against Contractor. WARRANTY TAGS .1 Tag, at time of installation, each warranted item. Provide durable, oil and water resistant tag approved by Departmental Representative. .2 Attach tags with copper wire and spray with waterproof silicone coating. .3 Leave date of acceptance until project is accepted for occupancy. .4 Indicate following information on tag: .1 .2 .3 .4 .5 .6 .7 Type of product/material. Model number. Serial number. Contract number. Warranty period. Inspector's signature. Construction Contractor. Part 2 Products 2.1 NOT USED .1 Not Used. Part 3 Execution 3.1 NOT USED .1 Not Used. END OF SECTION Project No. R.067898.002 GENERAL COMMISSIONING (CX) REQUIREMENTS Section 01 91 13 Page 1 PART 1 - GENERAL 1.1 1.2 1.3 SUMMARY .1 Section Includes: .1 General requirements relating to commissioning of project's components and systems, specifying general requirements to PV of components, equipment, sub-systems, systems, and integrated systems. .2 Acronyms: .1 AFD - Alternate Forms of Delivery, service provider. .2 BMM - Building Management Manual. .3 Cx - Commissioning. .4 EMCS - Energy Monitoring and Control Systems. .5 O&M - Operation and Maintenance. .6 PI - Product Information. .7 PV - Performance Verification. .8 TAB - Testing, Adjusting and Balancing. .9 PMSS - Preventative Maintenance Support System. .10 MMS - Maintenance Management System. GENERAL .1 Cx is a planned program of tests, procedures and checks carried out systematically on systems and integrated systems of the finished Project. Cx is performed after systems and integrated systems are completely installed, functional and Contractor's Performance Verification responsibilities have been completed and approved. Objectives: .1 Verify installed equipment, systems and integrated systems operate in accordance with contract documents and design criteria and intent. .2 Ensure appropriate documentation is compiled into the BMM. .3 Effectively train O&M staff. .2 Contractor assists in Cx process, operating equipment and systems, troubleshooting and making adjustments as required. .1 Systems to be operated at full capacity under various modes to determine if they function correctly and consistently at peak efficiency. Systems to be interactively with each other as intended in accordance with Contract Documents and design criteria. .2 During these checks, adjustments to be made to enhance performance to meet environmental or user requirements. .3 Design Criteria: as per Department Representative's requirements. To meet Project functional and operational requirements. COMMISSIONING OVERVIEW .1 Section 01 91 31 - Commissioning (Cx) Plan. .2 Cx to be a line item of Contractor's cost breakdown. .3 Cx activities supplement field quality and testing procedures described in relevant technical sections. Project No. R.067898.002 1.4 1.5 GENERAL COMMISSIONING (CX) REQUIREMENTS Section 01 91 13 Page 2 .4 Cx is conducted in concert with activities performed during stage of project delivery. Cx identifies issues in Planning and Design stages which are addressed during Construction and Cx stages to ensure the built facility is constructed and proven to operate satisfactorily under weather, environmental and occupancy conditions to meet functional and operational requirements. Cx activities includes transfer of critical knowledge to facility operational personnel. .5 Departmental Representative will issue Interim Acceptance Certificate when: .1 Completed Cx documentation has been received, reviewed for suitability and approved by Departmental Representative. .2 Equipment, components and systems have been commissioned. .3 O&M training has been completed. NON-CONFORMANCE TO PERFORMANCE VERIFICATION REQUIREMENTS .1 Should equipment, system components, and associated controls be incorrectly installed or malfunction during Cx, correct deficiencies, re-verify equipment and components within the unfunctional system, including related systems as deemed required by Departmental Representative, to ensure effective performance. .2 Costs for corrective work, additional tests, inspections, to determine acceptability and proper performance of such items to be borne by Contractor. Above costs to be in form of progress payment reductions or hold-back assessments. PRE-CX REVIEW .1 Before Construction: .1 Review contract documents, confirm by writing to Departmental Representative. .1 Adequacy of provisions for Cx. .2 Aspects of design and installation pertinent to success of Cx. .2 During Construction: .1 Co-ordinate provision, location and installation of provisions for Cx. .3 Before start of Cx: .1 Have completed Cx Plan up-to-date. .2 Ensure installation of related components, equipment, sub-systems, systems is complete. .3 Fully understand Cx requirements and procedures. .4 Have Cx documentation shelf-ready. .5 Understand completely design criteria and intent and special features. .6 Submit complete start-up documentation to Departmental Representative. .7 Have Cx schedules up-to-date. .8 Ensure systems have been cleaned thoroughly. .9 Complete TAB procedures on systems, submit TAB reports to Departmental Representative for review and approval. .10 Ensure "As-Built" system schematics are available. .4 Inform Departmental Representative in writing of discrepancies and deficiencies on finished works. Project No. R.067898.002 1.6 1.7 1.9 Section 01 91 13 Page 3 CONFLICTS .1 Report conflicts between requirements of this section and other sections to Departmental Representative before start-up and obtain clarification. .2 Failure to report conflict and obtain clarification will result in application of most stringent requirement. ACTION AND INFORMATIONAL SUBMITTALS .1 1.8 GENERAL COMMISSIONING (CX) REQUIREMENTS Submittals: in accordance with Section 01 33 00 - Submittal Procedures. .1 Submit no later than 4 weeks after award of Contract: .1 Name of Contractor's Cx agent. .2 Draft Cx documentation. .3 Preliminary Cx schedule. .2 Request in writing to Departmental Representative for changes to submittals and obtain written approval at least 2 weeks prior to start of Cx. .3 Submit proposed Cx procedures to Departmental Representative where not specified and obtain written approval at least 2 weeks prior to start of Cx. .4 Provide additional documentation relating to Cx process required by Departmental Representative. COMMISSIONING DOCUMENTATION .1 Refer to Section 01 91 33 - Commissioning (Cx) Forms: Installation Check Lists and Product Information (PI) / Performance Verification (PV) Forms for requirements and instructions for use. .2 Departmental Representative to review and approve Cx documentation. .3 Provide completed and approved Cx documentation to Departmental Representative. COMMISSIONING SCHEDULE .1 Provide detailed Cx schedule as part of construction schedule in accordance with Section 01 00 10 - General Instructions. .2 Provide adequate time for Cx activities prescribed in technical sections and commissioning sections including: .1 Approval of Cx reports. .2 Verification of reported results. .3 Repairs, retesting, re-commissioning, re-verification. .4 Training. 1.10 STARTING AND TESTING .1 Contractor assumes liabilities and costs for inspections. Including disassembly and re-assembly after approval, starting, testing and adjusting, including supply of testing equipment. Project No. R.067898.002 1.11 GENERAL COMMISSIONING (CX) REQUIREMENTS Section 01 91 13 Page 4 WITNESSING OF STARTING AND TESTING .1 Provide 14 days notice prior to commencement. .2 Departmental Representative to witness of start-up and testing. .3 Contractor's Cx Agent to be present at tests performed and documented by sub-trades, suppliers and equipment manufacturers. 1.12 MANUFACTURER'S INVOLVEMENT .1 Factory testing: manufacturer to: .1 Coordinate time and location of testing. .2 Provide testing documentation for approval by Departmental Representative. .3 Arrange for Departmental Representative to witness tests. .4 Obtain written approval of test results and documentation from Departmental Representative before delivery to site. .2 Obtain manufacturers installation, start-up and operations instructions prior to start-up of components, equipment and systems and review with Departmental Representative: .1 Compare completed installation with manufacturer's published data, record discrepancies, and review with manufacturer. .2 Modify procedures detrimental to equipment performance and review same with manufacturer before start-up. .3 Integrity of warranties: .1 Use manufacturer's trained start-up personnel where specified elsewhere in other divisions or required to maintain integrity of warranty. .2 Verify with manufacturer that testing as specified will not void warranties. .4 Qualifications of manufacturer's personnel: .1 Experienced in design, installation and operation of equipment and systems. .2 Ability to interpret test results accurately. .3 To report results in clear, concise, logical manner. 1.13 PROCEDURES .1 Verify that equipment and systems are complete, clean, and operating in normal and safe manner prior to conducting start-up, testing and Cx. .2 Conduct start-up and testing in following distinct phases: .1 Included in delivery and installation: .1 Verification of conformity to specification, approved shop drawings and completion of PI report forms. .2 Visual inspection of quality of installation. .2 Start-up: follow accepted start-up procedures. .3 Operational testing: document equipment performance. .4 System PV: include repetition of tests after correcting deficiencies. .5 Post-substantial performance verification: to include fine-tuning. .3 Correct deficiencies and obtain approval from Departmental Representative after distinct phases have been completed and before commencing next phase. Project No. R.067898.002 GENERAL COMMISSIONING (CX) REQUIREMENTS Section 01 91 13 Page 5 .4 Document require tests on approved PV forms. .5 Failure to follow accepted start-up procedures will result in re-evaluation of equipment by an independent testing agency selected by Departmental Representative. If results reveal that equipment start-up was not in accordance with requirements, and resulted in damage to equipment, implement following: .1 Minor equipment/systems: implement corrective measures approved by Departmental Representative. .2 Major equipment/systems: if evaluation report concludes that damage is minor, implement corrective measures approved by Departmental Representative. .3 If evaluation report concludes that major damage has occurred, Departmental Representative shall reject equipment. .1 Rejected equipment to be remove from site and replace with new. .2 Subject new equipment/systems to specified start-up procedures. 1.14 START-UP DOCUMENTATION .1 Assemble start-up documentation and submit to Departmental Representative for approval before commencement of commissioning. .2 Start-up documentation to include: .1 Factory and on-site test certificates for specified equipment. .2 Pre-start-up inspection reports. .3 Signed installation/start-up check lists. .4 Start-up reports, .5 Step-by-step description of complete start-up procedures, to permit Departmental Representative to repeat start-up at any time. 1.15 OPERATION AND MAINTENANCE OF EQUIPMENT AND SYSTEMS .1 After start-up, operate and maintain equipment and systems as directed by equipment/system manufacturer. .2 With assistance of manufacturer develop written maintenance program and submit Departmental Representative for approval before implementation. .3 Operate and maintain systems for length of time required for commissioning to be completed. .4 After completion of commissioning, operate and maintain systems until issuance of certificate of interim acceptance. 1.16 TEST RESULTS .1 If start-up, testing and/or PV produce unacceptable results, repair, replace or repeat specified starting and/or PV procedures until acceptable results are achieved. .2 Provide manpower and materials, assume costs for re-commissioning. Project No. R.067898.002 1.17 GENERAL COMMISSIONING (CX) REQUIREMENTS Section 01 91 13 Page 6 START OF COMMISSIONING .1 Notify Departmental Representative at least 21 days prior to start of Cx. .2 Start Cx after elements of building affecting start-up and performance verification of systems have been completed. 1.18 INSTRUMENTS / EQUIPMENT .1 Submit to Departmental Representative for review and approval: .1 Complete list of instruments proposed to be used. .2 Listed data including, serial number, current calibration certificate, calibration date, calibration expiry date and calibration accuracy. .2 Provide the following equipment as required: .1 2-way radios. .2 Ladders. .3 Equipment as required to complete work. 1.19 COMMISSIONING PERFORMANCE VERIFICATION .1 Carry out Cx: .1 Under actual accepted simulated operating conditions, over entire operating range, in all modes. .2 On independent systems and interacting systems. .2 Cx procedures to be repeatable and reported results are to be verifiable. .3 Follow equipment manufacturer's operating instructions. .4 EMCS trending to be available as supporting documentation for performance verification. 1.20 WITNESSING COMMISSIONING .1 1.21 Departmental Representative to witness activities and verify results. AUTHORITIES HAVING JURISDICTION .1 Where specified start-up, testing or commissioning procedures duplicate verification requirements of authority having jurisdiction, arrange for authority to witness procedures so as to avoid duplication of tests and to facilitate expedient acceptance of facility. .2 Obtain certificates of approval, acceptance and compliance with rules and regulation of authority having jurisdiction. .3 Provide copies to Departmental Representative within 5 days of test and with Cx report. Project No. R.067898.002 1.22 GENERAL COMMISSIONING (CX) REQUIREMENTS Section 01 91 13 Page 7 COMMISSIONING CONSTRAINTS .1 1.23 Since access into secure or sensitive areas will be very difficult after occupancy it is necessary to complete Cx of occupancy, weather, and seasonal sensitive equipment and systems in these areas before issuance of the Interim Certificate, using, if necessary, simulated thermal loads. EXTRAPOLATION OF RESULTS .1 1.24 Where Cx of weather, occupancy, or seasonal-sensitive equipment or systems cannot be conducted under near-rated or near-design conditions, extrapolate part-load results to design conditions when approved by Departmental Representative in accordance with equipment manufacturer's instructions, using manufacturer's data, with manufacturer's assistance and using approved formulae. EXTENT OF VERIFICATION .1 Laboratory areas: .1 Provide manpower and instrumentation to verify up to 100% of reported results. .2 Elsewhere: .1 Provide manpower and instrumentation to verify up to 30% of reported results, unless specified otherwise in other sections. .3 Number and location to be at discretion of Departmental Representative. .4 Conduct tests repeated during verification under same conditions as original tests, using same test equipment, instrumentation. .5 Review and repeat commissioning of systems if inconsistencies found in more than 20% of reported results. .6 Perform additional commissioning until results are acceptable to Departmental Representative. 1.25 REPEAT VERIFICATIONS .1 1.26 Assume costs incurred by Departmental Representative for third and subsequent verifications where: .1 Verification of reported results fail to receive Departmental Representative's approval. .2 Repetition of second verification again fails to receive approval. .3 Departmental Representative deems Contractor's request for second verification was premature. SUNDRY CHECKS AND ADJUSTMENTS .1 Make adjustments and changes which become apparent as Cx proceeds. .2 Perform static and operational checks as applicable and as required. Project No. R.067898.002 1.27 GENERAL COMMISSIONING (CX) REQUIREMENTS Section 01 91 13 Page 8 DEFICIENCIES, FAULTS, DEFECTS .1 Correct deficiencies found during start-up and Cx to satisfaction of Departmental Representative. .2 Report problems, faults or defects affecting Cx to Departmental Representative in writing. Stop Cx until problems are rectified. Proceed with written approval from Departmental Representative. 1.28 COMPLETION OF COMMISSIONING .1 Upon completion of Cx leave systems in normal operating mode. .2 Except for warranty and seasonal verification activities specified in Cx specifications, complete Cx prior to issuance of Interim Certificate of Completion. .3 Cx to be considered complete when contract Cx deliverables have been submitted and accepted by Departmental Representative. 1.29 ACTIVITIES UPON COMPLETION OF COMMISSIONING .1 When changes are made to baseline components or system settings established during Cx process, provide updated Cx form for affected item. .2 Obtain MMS data forms from Departmental Representative and fill in all information for all new and removed equipment. Forward all maintenance data for inclusion in PMSS. Obtain equipment tag info from Departmental Representative and include on P-touch label. 1.30 TRAINING .1 1.31 In accordance with Section 01 91 41 - Commissioning (Cx) - Training. MAINTENANCE MATERIALS, SPARE PARTS, SPECIAL TOOLS .1 1.32 Supply, deliver, and document maintenance materials, spare parts, and special tools as specified in contract. OCCUPANCY .1 1.33 Cooperate fully with Departmental Representative during stages of acceptance and occupancy of facility. INSTALLED INSTRUMENTATION .1 Use instruments installed under Contract for TAB and PV if: .1 Accuracy complies with these specifications. .2 Calibration certificates have been deposited with Departmental Representative. .2 Calibrated EMCS sensors may be used to obtain performance data provided that sensor calibration has been completed and accepted. Project No. R.067898.002 1.34 GENERAL COMMISSIONING (CX) REQUIREMENTS PERFORMANCE VERIFICATION TOLERANCES .1 Application tolerances: .1 Specified range of acceptable deviations of measured values from specified values or specified design criteria. Except for special areas, to be within +/- 10% of specified values. .2 Instrument accuracy tolerances: .1 To be of higher order of magnitude than equipment or system being tested. .3 Measurement tolerances during verification: .1 Unless otherwise specified actual values to be within +/- 2% of recorded values. 1.35 DEPARTMENTAL REPRESENTATIVE'S PERFORMANCE TESTING .1 Performance testing of equipment or system by Departmental Representative will not relieve Contractor from compliance with specified start-up and testing procedures. PART 2 - PRODUCTS 2.1 NOT USED .1 Not Used. PART 3 - EXECUTION 3.1 Section 01 91 13 Page 9 NOT USED .1 Not Used. END Project No. R.067898.002 COMMISSIONING FORMS Section 01 91 33 Page 1 PART 1 - GENERAL 1.1 SUMMARY .1 1.2 1.3 1.4 Section Includes: .1 Commissioning forms to be completed for equipment, system and integrated system. INSTALLATION/ START-UP CHECK LISTS .1 Include the following data: .1 Product manufacturer's installation instructions and recommended checks. .2 Special procedures as specified in relevant technical sections. .3 Items considered good installation and engineering industry practices deemed appropriate for proper and efficient operation. .2 Equipment manufacturer's installation/start-up check lists are acceptable for use. As deemed necessary by Departmental Representative supplemental additional data lists will be required for specific project conditions. .3 Use check lists for equipment installation. Document check list verifying checks have been made, indicate deficiencies and corrective action taken. .4 Installer to sign check lists upon completion, certifying stated checks and inspections have been performed. Return completed check lists to Departmental Representative. Check lists will be required during Commissioning and will be included in Building Maintenance Manual (BMM) at completion of project. .5 Use of check lists will not be considered part of commissioning process but will be stringently used for equipment pre-start and start-up procedures. PRODUCT INFORMATION (PI) REPORT FORMS .1 Product Information (PI) forms compiles gathered data on items of equipment produced by equipment manufacturer, includes nameplate information, parts list, operating instructions, maintenance guidelines and pertinent technical data and recommended checks that is necessary to prepare for start-up and functional testing and used during operation and maintenance of equipment. This documentation is included in the BMM at completion of work. .2 Prior to Performance Verification (PV) of systems complete items on PI forms related to systems and obtain Departmental Representative's approval. PERFORMANCE VERIFICATION (PV) FORMS .1 PV forms to be used for checks, running dynamic tests and adjustments carried out on equipment and systems to ensure correct operation, efficiently and function independently and interactively with other systems as intended with project requirements. .2 PV report forms include those developed by Contractor records measured data and readings taken during functional testing and Performance Verification procedures. Project No. R.067898.002 .3 1.5 1.6 1.8 Section 01 91 33 Page 2 Prior to PV of integrated system, complete PV forms of related systems and obtain Departmental Representative's approval. SAMPLES OF COMMISSIONING FORMS .1 Departmental Representative will develop and provide to Contractor required project-specific Commissioning forms in electronic format complete with specification data. .2 Revise items on Commissioning forms to suit project requirements. .3 Samples of Commissioning forms and a complete index of produced to date will be attached to this section. CHANGES AND DEVELOPMENT OF NEW REPORT FORMS .1 1.7 COMMISSIONING FORMS When additional forms are required, but are not available from Departmental Representative develop appropriate verification forms and submit to Departmental Representative for approval prior to use. .1 Additional commissioning forms to be in same format as provided by Departmental Representative. COMMISSIONING FORMS .1 Use Commissioning forms to verify installation and record performance when starting equipment and systems. .2 Strategy for Use: .1 Departmental Representative provides Contractor project-specific Commissioning forms with Specification data included. .2 Contractor will provide required shop drawings information and verify correct installation and operation of items indicated on these forms. .3 Confirm operation as per design criteria and intent. .4 Identify variances between design and operation and reasons for variances. .5 Verify operation in specified normal and emergency modes and under specified load conditions. .6 Record analytical and substantiating data. .7 Verify reported results. .8 Form to bear signatures of recording technician and reviewed and signed off by Departmental Representative. .9 Submit immediately after tests are performed. .10 Reported results in true measured SI unit values. .11 Provide Departmental Representative with originals of completed forms. .12 Maintain copy on site during start-up, testing and commissioning period. .13 Forms to be both hard copy and electronic format with typed written results in Building Management Manual. LANGUAGE .1 To suit the language profile of the awarded contract. Project No. R.067898.002 COMMISSIONING FORMS PART 2 - PRODUCTS 2.1 NOT USED .1 Not Used. PART 3 - EXECUTION 3.1 NOT USED .1 Not Used. END Section 01 91 33 Page 3 Project No. R.067898.002 COMMISSIONING: TRAINING Section 01 91 41 Page 1 PART 1 - GENERAL 1.1 SUMMARY .1 1.2 1.3 1.4 TRAINEES .1 Trainees: personnel selected for operating and maintaining this facility. Includes Property Manager, building operators, maintenance staff, security staff, and technical specialists as required. .2 Trainees will be available for training during later stages of construction for purposes of familiarization with systems. INSTRUCTORS .1 Departmental Representative will provide: .1 Descriptions of systems. .2 Instruction on design philosophy, design criteria, and design intent. .2 Contractor and certified factory-trained manufacturers' personnel: to provide instruction on the following: .1 Start-Up, operation, shut-down of equipment, components and systems. .2 Control features, reasons for, results of, implications on associated systems of, adjustment of set points of control and safety devices. .3 Instructions on servicing, maintenance and adjustment of systems, equipment and components. .3 Contractor and equipment manufacturer to provide instruction on: .1 Start-up, operation, maintenance and shut-down of equipment they have certified installation, started up and carried out PV tests. TRAINING OBJECTIVES .1 1.5 Section Includes: .1 This Section specifies roles and responsibilities of Commissioning Training. Training to be detailed and duration to ensure: .1 Safe, reliable, cost-effective, energy-efficient operation of systems in normal and emergency modes under all conditions. .2 Effective on-going inspection, measurements of system performance. .3 Proper preventive maintenance, diagnosis and trouble-shooting. .4 Ability to update documentation. .5 Ability to operate equipment and systems under emergency conditions until appropriate qualified assistance arrives. TRAINING MATERIALS .1 Instructors to be responsible for content and quality. .2 Training materials to include: .1 "As-Built" Contract Documents. .2 Operating Manual. Project No. R.067898.002 .3 .4 .5 1.6 1.7 1.8 COMMISSIONING: TRAINING Section 01 91 41 Page 2 Maintenance Manual. Management Manual. TAB and PV Reports. .3 Department Representative and Commissioning Manager will review training manuals. .4 Training materials to be in a format that permits future training procedures to same degree of detail. .5 Supplement training materials: .1 Transparencies for overhead projectors. .2 Multimedia presentations. .3 Manufacturer's training videos. .4 Equipment models. SCHEDULING .1 Include in Commissioning Schedule time for training. .2 Deliver training during regular working hours, training sessions to be 3 hours in length. .3 Training to be completed prior to acceptance of facility. TRAINING CONTENT .1 Training to include demonstrations by Instructors using the installed equipment and systems. .2 Content includes: .1 Review of facility and occupancy profile. .2 Functional requirements. .3 System philosophy, limitations of systems and emergency procedures. .4 Review of system layout, equipment, components and controls. .5 Equipment and system start-up, operation, monitoring, servicing, maintenance and shut-down procedures. .6 System operating sequences, including step-by-step directions for starting up, shut-down, operation of valves, dampers, switches, adjustment of control settings and emergency procedures. .7 Maintenance and servicing. .8 Trouble-shooting diagnosis. .9 Inter-Action among systems during integrated operation. .10 Review of O&M documentation. .3 Provide specialized training as specified in relevant Technical Sections of the construction specifications. VIDEO-BASED TRAINING .1 Manufacturer's videotapes to be used as training tool with Departmental Representative's review and written approval 3 weeks prior to commencement of scheduled training. .2 On-Site training videos: .1 Videotape training sessions for use during future training. .2 To be performed after systems are fully commissioned. .3 Organize into several short modules to permit incorporation of changes. Project No. R.067898.002 .3 COMMISSIONING: TRAINING Production methods to be professional high quality. PART 2 - PRODUCTS 2.1 NOT USED .1 Not Used. PART 3 - EXECUTION 3.1 NOT USED .1 Not Used. END Section 01 91 41 Page 3 Project No. R.067898.002 ARCHITECTURAL WOODWORK Part 1 General 1.1 RELATED REQUIREMENTS .1 Section 09 30 13 – Ceramic Tiling .2 Section 22 42 16 – Commercial Lavatories and Sinks .3 Section 26 50 00 - Lighting 1.2 Section 06 40 00 Page 1 of 9 REFERENCES .1 American National Standards Institute (ANSI) .1 .2 .3 .2 ASTM International .1 .2 .3 .3 .3 .4 .5 .6 .7 CSA B111-74(R2003), Wire Nails, Spikes and Staples. CSA O112.10-08(R2013), Evaluation of Adhesives for Structural Wood Products (Limited Moisture Exposure). CSA O121-08(R2013), Douglas Fir Plywood. CSA O141-05(R2009), Softwood Lumber. CSA O151-09, Canadian Softwood Plywood. CSA O153-13, Poplar Plywood. CAN/CSA-Z809-08(2013), Sustainable Forest Management. Forest Stewardship Council (FSC) .1 .7 CAN/CGSB-71.20-M88, Adhesive, Contact, Brushable. CSA International .1 .2 .6 Architectural Woodwork Standards (AWS), 2009. Canadian General Standards Board (CGSB) .1 .5 ASTM E1333-10, Standard Test Method for Determining Formaldehyde Concentrations in Air and Emission Rates From Wood Products Using a Large Chamber. ASTM D2832-92(R2011), Standard Guide for Determining Volatile and Nonvolatile Content of Paint and Related Coatings. ASTM D5116-10, Standard Guide For Small-Scale Environmental Chamber Determinations of Organic Emissions From Indoor Materials/Products. Architectural Woodwork Manufacturers Association of Canada (AWMAC) and Architectural Woodwork Institute (AWI) .1 .4 ANSI A208.1-09, Particleboard. ANSI A208.2-09, Medium Density Fiberboard (MDF) for Interior Applications. ANSI/HPVA HP-1-09, Standard for Hardwood and Decorative Plywood. FSC-STD-01-001-2004, FSC Principle and Criteria for Forest Stewardship. Green Seal Environmental Standards (GS) .1 GS-11-11, Paints and Coatings. Project No. R.067898.002 .2 .8 .2 Standard Grading Rules for Canadian Lumber 2010. SCAQMD Rule 1113-A2013, Architectural Coatings. SCAQMD Rule 1168-A2005, Adhesives and Sealants Applications. Sustainable Forestry Initiative (SFI) .1 1.3 Rules for the Measurement and Inspection of Hardwood and Cypress 2011. South Coast Air Quality Management District (SCAQMD), California State, Regulation XI. Source Specific Standards .1 .2 .14 ANSI/NEMA LD-3-05, High-Pressure Decorative Laminates (HPDL). National Lumber Grades Authority (NLGA) .1 .13 ISO 14040-2006, Environmental Management-Life Cycle Assessment Principles and Framework. ISO 14041-98, Environmental Management-Life Cycle Assessment - Goal and Scope Definition and Inventory Analysis. National Hardwood Lumber Association (NHLA) .1 .12 Material Safety Data Sheets (MSDS). National Electrical Manufacturers Association (NEMA) .1 .11 GS-36-13, Commercial Adhesives. International Organization for Standardization (ISO) .1 .10 Section 06 40 00 Page 2 of 9 Health Canada/Workplace Hazardous Materials Information System (WHMIS) .1 .9 ARCHITECTURAL WOODWORK SFI-2010-2014 Standard. ACTION AND INFORMATIONAL SUBMITTALS .1 Submit in accordance with Section 01 33 00 - Submittal Procedures. .2 Product Data: .1 .2 .3 Submit manufacturer's instructions, printed product literature and data sheets for architectural woodwork and include product characteristics, performance criteria, physical size, finish and limitations. Submit two copies of WHMIS MSDS in accordance with Section 01 35 29 Health and Safety Requirements. Shop Drawings: .1 .2 .3 .4 Submit drawings stamped and signed by professional engineer registered or licensed in Province of Ontario, Canada. Indicate details of construction, profiles, jointing, fastening and other related details. .1 details 1:2 or 1:5 as appropriate Indicate materials, thicknesses, finishes and hardware. Indicate locations of service outlets in casework, typical and special installation conditions, and connections, attachments, anchorage and location of exposed fastenings. Project No. R.067898.002 .4 ARCHITECTURAL WOODWORK Section 06 40 00 Page 3 of 9 Samples: .1 .2 Submit duplicate samples of laminated plastic for colour selection. Submit duplicate samples of laminated plastic joints, edging, cutouts and postformed profiles. .5 Certifications: submit certificates signed by manufacturer certifying that materials comply with specified performance characteristics and physical properties. .6 Sustainable Design Submittals: .1 .2 .3 1.4 Construction Waste Management: .1 Submit project Waste Management Plan and Waste Reduction Workplan highlighting recycling and salvage requirements. .2 Submit calculations on end-of-project recycling rates, salvage rates, and landfill rates demonstrating that 75% of construction wastes were recycled or salvaged. Wood Certification: submit vendor's Chain-of-Custody Certificate number for FSC certified wood. .1 Submit manufacturer's FSC Chain-of-Custody Certificate number. Low-Emitting Materials: .1 Submit listing of adhesives and sealants, paints and coatings used in building, comply with VOC and chemical component limits or restrictions requirements. .2 Submit listing of composite wood products used in building, stating that they contain no added urea-formaldehyde resins, laminate adhesives used in building, stating that they contain no urea-formaldehyde. QUALITY ASSURANCE .1 Lumber by grade stamp of an agency certified by Canadian Lumber Standards Accreditation Board. .2 Sustainable Standards Certification: .1 .3 1.5 Certified Wood: submit listing of wood products and materials used in accordance with CAN/CSA-Z809 or FSC or SFI. Plywood, particleboard, OSB and wood based composite panels to CSA and ANSI standards. DELIVERY, STORAGE AND HANDLING .1 Deliver, store and handle materials in accordance with Section 01 61 00 - Common Product Requirements and with manufacturer's written instructions. .2 Delivery and Acceptance Requirements: deliver materials to site in original factory packaging, labelled with manufacturer's name and address. .1 .2 .3 Protect millwork against dampness and damage during and after delivery. Store millwork in ventilated areas, protected from extreme changes of temperature or humidity. Storage and Handling Requirements: Project No. R.067898.002 .1 .2 .3 ARCHITECTURAL WOODWORK Section 06 40 00 Page 4 of 9 Store materials off ground indoors in dry location and in accordance with manufacturer's recommendations in clean, dry, well-ventilated area. Store and protect architectural woodwork from nicks, scratches, and blemishes. Replace defective or damaged materials with new. .4 Develop Construction Waste Management Plan and Waste Reduction Workplan related to Work of this Section. .5 Packaging Waste Management: remove for reuse and return by manufacturer of pallets, crates, padding, packaging materials as specified in Construction Waste Management Plan in accordance with Section 01 74 21 - Construction/Demolition Waste Management and Disposal. Part 2 Products 2.1 MATERIALS .1 Softwood lumber: unless specified otherwise, S4S, moisture content 15 % or less in accordance with following standards: .1 .2 .3 .4 CSA O141. CAN/CSA-Z809 or FSC or SFI certified. NLGA Standard Grading Rules for Canadian Lumber. AWMAC Grade II, moisture content as specified. .2 Machine stress-rated lumber is acceptable for all purposes. .3 Ensure manufacturing process adheres to Lifecycle Assessment (LCA) Standards to ISO 14040/14041 LCA Standards. .4 Hardwood lumber: moisture content in accordance with following standards: .1 .2 .5 Canadian softwood plywood (CSP): to CSA O151, standard construction, FSC certified. .1 .6 Particleboard resin to contain no added urea-formaldehyde. Fibreboard must contain less than 10% roundwood by weight, using weighted average over three month period at manufacturing locations. .1 .2 .9 Plywood resin to contain no added urea-formaldehyde. Interior mat-formed wood particleboard: to ANSI/NPA A208.1, FSC certified. .1 .8 Plywood resin to contain no added urea-formaldehyde. Hardwood plywood for countertops: to ANSI/HPVA HP-1, FSC certified. .1 .7 FSC Certified AWMAC Grade II, moisture content as specified. Fibreboard resin to contain no added urea-formaldehyde. FSC certified. Hardboard: .1 .2 To CAN/CGSB-11.3, FSC certified. Hardboard resin to contain no added urea-formaldehyde. Project No. R.067898.002 .10 ARCHITECTURAL WOODWORK Section 06 40 00 Page 5 of 9 MDF (medium density fibreboard) core: to ANSI A208.2, 16 mm thick unless otherwise indicated, density 769 kg/m2, FSC certified. .1 .2 Medium density fibreboard performance requirements to: ANSI A208.2. MDF resin to contain no added urea-formaldehyde. .11 Laminated plastic for flatwork: to NEMA LD3, Grade VGL, Type HD, 1.2 mm thick; based on manufacturer’s standard colour range. .12 Laminated plastic backing sheet: Grade BK, Type HD, same thickness as face laminate, white colour. .13 Laminated plastic liner sheet: Grade GP, Type HD, 0.5 mm thick, white colour. .14 Nails and staples: to CSA B111. .15 Wood screws: plain, type and size to suit application. .16 Splines: wood .17 Sealant: in accordance with Section 07 92 00 - Joint Sealants .1 .18 Laminated plastic adhesive: .1 .2 .3 .4 2.2 Sealants: VOC limit 250 g/L maximum to SCAQMD Rule 1168. Adhesive: , contact adhesive to CAN/CGSB-71.20 Adhesives: VOC limit 30 g/L maximum to GS-36. Clear Wood Finishes: VOC limit 350 g/L maximum to GS-11 Paints: VOC limit 50 g/L maximum to GS-11. MANUFACTURED UNITS .1 Casework: .1 .2 .3 .4 .5 .6 Fabricate caseworks to AWMAC custom quality grade. Furring, blocking, nailing strips, grounds and rough bucks and sleepers. .1 Board sizes: "standard" or better grade. .2 Dimension sizes: "standard" light framing or better grade. .3 Urea-formaldehyde free. Framing species, NLGA grade. Case bodies (ends, divisions and bottoms). .1 Softwood and poplar plywood DFP or CSP or PP or particleboard, square edge, 19 mm thick unless otherwise indicated, grade suitable for application of plastic laminate. Plastic laminate all exposed faces and edges, including face of cabinets behind doors and drawers, plastic laminate backing sheet on opposite concealed faces. Backs: .1 Hardboard, Type 2, 6 mm thick. Shelving: .1 Concealed locations: .1 Particleboard, 19mm thick, plastic laminate liner sheet all faces and edges Project No. R.067898.002 .2 .2 .3 .4 .5 Fabricate drawers to AWMAC custom grade supplemented as follows: Backs. .1 Hardwood plywood: .1 Thickness: 12.7mm. .2 Number of plies: 7. .3 Plastic laminate liner sheet all faces and edges Bottoms: .1 Hardboard: type 2, 6 mm thick. Fronts: .1 Particleboard, 19mm thick, plastic laminate all faces and edges. Sides .1 Manufactured metal drawer side and slide system that includes attachment provisions for back and bottom and hardware mounting brackets for drawer face that facilitates tool-free drawer face attachment and removal. Fabricate doors to AWMAC custom grade supplemented as follows: Particleboard, 19mm thick, plastic laminate all faces and edges Countertops: .1 .2 .3 2.3 Exposed locations: .1 Particleboard, 19mm thick, plastic laminate all faces and edges Casework Doors: .1 .2 .4 Section 06 40 00 Page 6 of 9 Drawers: .1 .2 .3 ARCHITECTURAL WOODWORK Fabricate countertops to AWMAC custom grade supplemented as follows: Laminated Plastic for flatwork on front surface, front edge, and all edges of interior openings Hardwood plywood: .1 Thickness: 19 mm .2 Number of plies: 7 .3 Core: veneer .4 Bond: Type II .5 Shop sanded exterior grade .6 Laminated plastic backing sheet on back surface FABRICATION .1 Fabricate to AWMAC Custom grade. .2 Cabinet style: flush overlay. .3 Set nails and countersink screws, apply plain wood filler to indentations, sand smooth and leave ready to receive finish. .4 Shop install cabinet hardware for doors, shelves and drawers. Recess shelf standards unless noted otherwise. Project No. R.067898.002 ARCHITECTURAL WOODWORK Section 06 40 00 Page 7 of 9 .5 Shelving to cabinetwork to be adjustable unless otherwise noted. .6 Provide cutouts for plumbing fixtures, inserts, appliances, outlet boxes and other fixtures. .7 Shop assemble work for delivery to site in size easily handled and to ensure passage through building openings. .8 Obtain governing dimensions before fabricating items which are to accommodate or abut appliances, equipment and other materials. .9 Ensure adjacent parts of continuous laminate work match in colour and pattern. .10 Veneer laminated plastic to core material in accordance with adhesive manufacturer's instructions. Ensure core and laminate profiles coincide to provide continuous support and bond over entire surface. Use continuous lengths up to 2400 mm. Keep joints 600 mm from sink cutouts. .11 Use straight self-edging laminate strip for flatwork to cover exposed edge of core material. Chamfer exposed edges uniformly at approximately 20 degrees. Do not mitre laminate edges. .12 Apply laminate backing sheet to reverse side of core of plastic laminate work. .13 Apply laminated plastic liner sheet to interior of cabinetry and where indicated. 2.4 CABINET HARDWARE .1 .2 .3 .4 Shelf rests: to CAN/CGSB 69.25-M90 ANSI/BHMA A156.9-1982 brushed chrome finish, B04081. Adjustable recessed shelf standards: to CAN/CGSB 69.25-M90 ANSI/BHMA A156.91982 brushed chrome finish, B04071. Cabinet hinges: to CAN/CGSB 69.25-M90 ANSI/BHMA A156.9-1982 concealed, brushed chrome finishes, B01601. Two (2) per door up to 915 mm, three (3) per door up to 1500 mm. Door and drawer pulls: wire D-pulls, 100 mm centres, 8mm diameter, brushed stainless steel finish Part 3 Execution 3.1 EXAMINATION .1 Verification of Conditions: verify conditions of substrates previously installed under other Sections or Contracts are acceptable for architectural woodwork installation in accordance with manufacturer's instructions. .1 .2 .3 Visually inspect substrate in presence of Departmental Representative. Inform Departmental Representative of unacceptable conditions immediately upon discovery. Proceed with installation only after unacceptable conditions have been remedied and after receipt of written approval to proceed from Departmental Representative Project No. R.067898.002 3.2 ARCHITECTURAL WOODWORK Section 06 40 00 Page 8 of 9 INSTALLATION .1 Do architectural woodwork to AWMAC Custom Grade. .2 Install prefinished millwork at locations shown on drawings. .1 .3 Position accurately, level, plumb straight. Fasten and anchor millwork securely. .1 Supply and install heavy duty fixture attachments for wall mounted cabinets. .4 Use draw bolts in countertop joints. .5 Scribe and cut as required to fit abutting walls and to fit properly into recesses and to accommodate piping, columns, fixtures, outlets or other projecting, intersecting or penetrating objects. .6 At junction of plastic laminate counter back splash and adjacent wall finish, apply small bead of sealant in accordance with Section 07 92 00 - Joint Sealants. .7 Apply water resistant building paper over wood framing members in contact with masonry or cementitious construction. .8 Fit hardware accurately and securely in accordance with manufacturer's written instructions. .9 Site apply laminated plastic to units as indicated. .1 .2 .3 .4 .5 .10 3.3 Adhere laminated plastic over entire surface. Make corners with hairline joints. Use full sized laminate sheets. Make joints only where indicated or approved by Departmental Representative Slightly bevel arises. For site application, offset joints in plastic laminate facing from joints in core. CLEANING .1 Progress Cleaning: clean in accordance with Section 01 00 10 – General Instructions .1 .2 Final Cleaning: upon completion remove surplus materials, rubbish, tools and equipment in accordance with Section 01 00 10 – General Instructions. .1 .2 .3 Clean millwork, cabinet work, outside surfaces, inside cupboards, drawers. Remove excess glue from surfaces. Waste Management: separate waste materials for reuse recycling in accordance with Section 01 74 21 - Construction/Demolition Waste Management and Disposal. .1 3.4 Leave Work area clean at end of each day. Remove recycling containers and bins from site and dispose of materials at appropriate facility. PROTECTION .1 Protect millwork cabinet work from damage until final inspection. .2 Protect installed products and components from damage during construction. Project No. R.067898.002 .3 ARCHITECTURAL WOODWORK Section 06 40 00 Page 9 of 9 Repair damage to adjacent materials caused by architectural woodwork installation. END OF SECTION Project No. R.067898.002 JOINT SEALANTS Part 1 General 1.1 RELATED REQUIREMENTS .1 Section 06 40 00 – Architectural Woodwork .2 Section 09 21 16 – Gypsum Board Assemblies 1.2 Section 07 92 00 Page 1 of 6 REFERENCES .1 ASTM International .1 .2 Canadian General Standards Board (CGSB) .1 .2 .3 .4 .5 .3 Material Safety Data Sheets (MSDS). South Coast Air Quality Management District (SCAQMD), California State, Regulation XI. Source Specific Standards .1 1.3 FS-SS-S-200-E(2)1993, Sealants, Joint, Two-Component, Jet-Blast-Resistant, Cold Applied, for Portland Cement Concrete Pavement. Health Canada/Workplace Hazardous Materials Information System (WHMIS) .1 .5 CGSB 19-GP-5M-1984, Sealing Compound, One Component, Acrylic Base, Solvent Curing (Issue of 1976 reaffirmed, incorporating Amendment No. 1). CAN/CGSB-19.13-M87, Sealing Compound, One-component, Elastomeric, Chemical Curing. CGSB 19-GP-14M-1984, Sealing Compound, One Component, ButylPolyisobutylene Polymer Base, Solvent Curing (Reaffirmation of April 1976). CAN/CGSB-19.17-M90, One-Component Acrylic Emulsion Base Sealing Compound. CAN/CGSB-19.24-M90, Multi-component, Chemical Curing Sealing Compound. General Services Administration (GSA) - Federal Specifications (FS) .1 .4 ASTM C919-08, Standard Practice for Use of Sealants in Acoustical Applications. SCAQMD Rule 1168-A2005, Adhesives and Sealants Applications. ACTION AND INFORMATIONAL SUBMITTALS .1 Submit in accordance with Section 01 33 00 - Submittal Procedures. .2 Product Data: .1 .2 Submit manufacturer's instructions, printed product literature and data sheets for joint sealants and include product characteristics, performance criteria, physical size, finish and limitations. Manufacturer's product to describe: .1 Caulking compound. .2 Primers. Project No. R.067898.002 JOINT SEALANTS Section 07 92 00 Page 2 of 6 .3 .3 .3 Samples: .1 .2 .4 Submit instructions to include installation instructions for each product used. Sustainable Design Submittals: .1 .2 1.4 Submit 2 samples of each type of material and colour. Cured samples of exposed sealants for each colour where required to match adjacent material. Manufacturer's Instructions: .1 .5 Sealing compound, each type, including compatibility when different sealants are in contact with each other. Submit 2 copies of WHMIS MSDS in accordance with Section 01 35 29.06 Health and Safety Requirements. . Construction Waste Management: .1 Submit project Waste Management Plan Waste Reduction Workplan highlighting recycling and salvage requirements. .2 Submit calculations on end-of-project recycling rates, salvage rates, and landfill rates demonstrating that 75% of construction wastes were recycled or salvaged. CLOSEOUT SUBMITTALS .1 Submit in accordance with Section 01 78 00 - Closeout Submittals. .2 Operation and Maintenance Data: submit operation and maintenance data for incorporation into manual. 1.5 DELIVERY, STORAGE AND HANDLING .1 Deliver, store and handle materials in accordance with Section 01 61 00 - Common Product Requirements and with manufacturer's written instructions. .2 Delivery and Acceptance Requirements: deliver materials to site in original factory packaging, labelled with manufacturer's name and address. .3 Storage and Handling Requirements: .1 .2 .3 Store materials off ground indoors in dry location and in accordance with manufacturer's recommendations in clean, dry, well-ventilated area. Store and protect joint sealants from nicks, scratches, and blemishes. Replace defective or damaged materials with new. .4 Develop Construction Waste Management Plan Waste Reduction Workplan related to Work of this Section. .5 Packaging Waste Management: remove for reuse and return by manufacturer of pallets, crates, padding, packaging materials as specified in Construction Waste Management Plan Waste Reduction Workplan in accordance with Section 01 74 21 Construction/Demolition Waste Management and Disposal. Project No. R.067898.002 1.6 JOINT SEALANTS Section 07 92 00 Page 3 of 6 SITE CONDITIONS .1 Ambient Conditions: .1 .2 Joint-Width Conditions: .1 .3 Proceed with installation of joint sealants only where joint widths are more than those allowed by joint sealant manufacturer for applications indicated. Joint-Substrate Conditions: .1 1.7 Proceed with installation of joint sealants only when: .1 Ambient and substrate temperature conditions are within limits permitted by joint sealant manufacturer or are above 4.4 degrees C. .2 Joint substrates are dry. .3 Conform to manufacturer's recommended temperatures, relative humidity, and substrate moisture content for application and curing of sealants including special conditions governing use. Proceed with installation of joint sealants only after contaminants capable of interfering with adhesion are removed from joint substrates. ENVIRONMENTAL REQUIREMENTS .1 Comply with requirements of Workplace Hazardous Materials Information System (WHMIS) regarding use, handling, storage, and disposal of hazardous materials; and regarding labelling and provision of Material Safety Data Sheets (MSDS) acceptable to Health Canada. .2 Ventilate area of work as directed by Departmental Representative. Part 2 Products 2.1 SEALANT MATERIALS .1 Do not use caulking that emits strong odours, contains toxic chemicals or is not certified as mould resistant in air handling units. .2 When low toxicity caulks are not possible, confine usage to areas which off gas to exterior, are contained behind air barriers, or are applied several months before occupancy to maximize off gas time. .3 Where sealants are qualified with primers use only these primers. 2.2 SEALANT MATERIAL DESIGNATIONS .1 Clear Silicones one part: to CAN/CGSB-19.13. .2 Paintable Acrylic latex one part: to CAN/CGSB-19.17. .3 Acoustical sealant: to ASTM C919. .4 Preformed compressible and non-compressible back-up materials: .1 Polyethylene, urethane, neoprene or vinyl foam: .1 Extruded closed cell foam backer rod. .2 Size: oversize 30 to 50 %. Project No. R.067898.002 .2 .3 .4 2.3 JOINT SEALANTS Section 07 92 00 Page 4 of 6 Neoprene or butyl rubber: .1 Round solid rod, Shore A hardness 70. High density foam: .1 Extruded closed cell polyvinyl chloride (PVC), extruded polyethylene, closed cell, Shore A hardness 20, tensile strength 140 to 200 kPa, extruded polyolefin foam, 32 kg/m3 density, or neoprene foam backer, size as recommended by manufacturer. Bond breaker tape: .1 Polyethylene bond breaker tape which will not bond to sealant. SEALANT SELECTION .1 Perimeters of interior frames, as detailed and itemized: sealant type: Acrylic Latex .2 Perimeter of plumbing fixtures (e.g. sinks, tubs, urinals, stools, water closets, basins, vanities): sealant type: Silicone .3 Junction of millwork and adjacent surfaces: Silicone .4 Exposed interior control joints in drywall: sealant type: Acrylic Latex .5 All penetrations acoustic-rated partitions as well as junction of acoustic partition and concrete slab: Acoustic 2.4 JOINT CLEANER .1 Non-corrosive and non-staining type, compatible with joint forming materials and sealant in accordance with sealant manufacturer's written recommendations. .2 Primer: in accordance with sealant manufacturer's written recommendations. Part 3 Execution 3.1 EXAMINATION .1 Verification of Conditions: verify that conditions of substrate previously installed under other Sections or Contracts are acceptable for joint sealants installation in accordance with manufacturer's written instructions. .1 .2 .3 3.2 Visually inspect substrate in presence of Departmental Representative. Inform Departmental Representative of unacceptable conditions immediately upon discovery. Proceed with installation only after unacceptable conditions have been remedied and after receipt of written approval to proceed from Departmental Representative SURFACE PREPARATION .1 Examine joint sizes and conditions to establish correct depth to width relationship for installation of backup materials and sealants. Project No. R.067898.002 JOINT SEALANTS Section 07 92 00 Page 5 of 6 .2 Clean bonding joint surfaces of harmful matter substances including dust, rust, oil grease, and other matter which may impair Work. .3 Do not apply sealants to joint surfaces treated with sealer, curing compound, water repellent, or other coatings unless tests have been performed to ensure compatibility of materials. Remove coatings as required. .4 Ensure joint surfaces are dry and frost free. .5 Prepare surfaces in accordance with manufacturer's directions. 3.3 PRIMING .1 Where necessary to prevent staining, mask adjacent surfaces prior to priming and caulking. .2 Prime sides of joints in accordance with sealant manufacturer's instructions immediately prior to caulking. 3.4 BACKUP MATERIAL .1 Apply bond breaker tape where required to manufacturer's instructions. .2 Install joint filler to achieve correct joint depth and shape, with approximately 30% compression. 3.5 MIXING .1 3.6 Mix materials in strict accordance with sealant manufacturer's instructions. APPLICATION .1 Sealant: .1 .2 .3 .4 .5 .6 .7 .8 .2 Curing: .1 .2 3.7 Apply sealant in accordance with manufacturer's written instructions. Mask edges of joint where irregular surface or sensitive joint border exists to provide neat joint. Apply sealant in continuous beads. Apply sealant using gun with proper size nozzle. Use sufficient pressure to fill voids and joints solid. Form surface of sealant with full bead, smooth, free from ridges, wrinkles, sags, air pockets, embedded impurities. Tool exposed surfaces before skinning begins to give slightly concave shape. Remove excess compound promptly as work progresses and upon completion. Cure sealants in accordance with sealant manufacturer's instructions. Do not cover up sealants until proper curing has taken place. CLEANING .1 Progress Cleaning: clean in accordance with Section 01 74 11 - Cleaning. .1 .2 Leave Work area clean at end of each day. Clean adjacent surfaces immediately. Project No. R.067898.002 .3 .4 JOINT SEALANTS Section 07 92 00 Page 6 of 6 Remove excess and droppings, using recommended cleaners as work progresses. Remove masking tape after initial set of sealant. .2 Final Cleaning: upon completion remove surplus materials, rubbish, tools and equipment in accordance with Section 01 00 10 – General Instructions. .3 Waste Management: separate waste materials for reuse recycling in accordance with Section 01 74 21 - Construction/Demolition Waste Management and Disposal .1 3.8 Remove recycling containers and bins from site and dispose of materials at appropriate facility. PROTECTION .1 Protect installed products and components from damage during construction. .2 Repair damage to adjacent materials caused by joint sealants installation. END OF SECTION Project No. R.067898.002 METAL FRAMES Part 1 General 1.1 RELATED REQUIREMENTS .1 Section 08 14 16 – Flush Wood Doors .2 Section 08 71 00 – Door Hardware .3 Section 08 80 50 - Glazing 1.2 Section 08 11 00 Page 1 of 4 REFERENCES .1 American Society for Testing and Materials International (ASTM) .1 .2 Canadian General Standards Board (CGSB) .1 .3 .2 SCAQMD Rule 1113-13, Architectural Coatings. SCAQMD Rule 1168-05, Adhesives and Sealants Applications. Underwriters' Laboratories of Canada (ULC) .1 .2 .3 1.3 CSDMA, Recommended Specifications for Commercial Steel Doors and Frames, 2006. South Coast Air Quality Management District (SCAQMD), California State .1 .2 .6 CSA-G40.20-13/G40.21-13, General Requirements for Rolled or Welded Structural Quality Steel/Structural Quality Steel. CSA W59-13, Welded Steel Construction (Metal Arc Welding). Canadian Steel Door Manufacturers' Association (CSDMA) .1 .5 CAN/CGSB-1.181-99, Ready-Mixed Organic Zinc-Rich Coating. Canadian Standards Association (CSA International) .1 .4 ASTM A653/A653M-09, Specification for Steel Sheet, Zinc-Coated (Galvanized) or Zinc-Iron Alloy-Coated (Galvannealed) by the Hot-Dip Process. CAN/ULC-S701-11, Standard for Thermal Insulation, Polystyrene, Boards and Pipe Covering. CAN/ULC-S702-09, Standard for Thermal Insulation, Mineral Fibre, for Buildings. CAN/ULC-S704-11, Standard for Thermal Insulation, Polyurethane and Polyisocyanurate Boards, Faced. ACTION AND INFORMATIONAL SUBMITTALS .1 Provide submittals in accordance with Section 01 33 00 - Submittal Procedures. .2 Provide product data: in accordance with Section 01 33 00 - Submittal Procedures. .3 Provide shop drawings: in accordance with Section 01 33 00 - Submittal Procedures. .1 Indicate each type frame material, core thickness, reinforcements, glazing stops, location of anchors and exposed fastenings reinforcing, finishes. Project No. R.067898.002 .2 .3 METAL FRAMES Section 08 11 00 Page 2 of 4 Include schedule identifying each unit, with door marks and numbers relating to numbering on drawings and door schedule. Submit test and engineering data, and installation instructions. .4 Provide samples in accordance with Section 01 33 00 - Submittal Procedures. .5 Submit one 300 x 300 mm corner sample of each type of frame. .1 1.4 Show butt cutout glazing stops snap-on trim with clips 300 mm long removable mullion connection.. DELIVERY, STORAGE AND HANDLING .1 Deliver, store and handle materials in accordance with Section 01 61 00 - Common Product Requirements. .2 Waste Management and Disposal: .1 Separate waste materials for reuse /recycling in accordance with Section 01 74 21 - Construction/Demolition Waste Management and Disposal. Part 2 Products 2.1 MATERIALS .1 Hot dipped galvanized steel sheet: to ASTM A653M, ZF75, minimum base steel thickness in accordance with CSDMA Table 1 - Thickness for Component Parts. .2 Reinforcement channel: to CSA G40.20/G40.21, Type 44W, coating designation to ASTM A653M, ZF75. 2.2 PRIMER .1 Touch-up prime CAN/CGSB-1.181. .1 2.3 Maximum VOC limit 50 g/L to GC-03. PAINT .1 2.4 Field paint steel frames in accordance with Sections 09 91 23 – Interior Painting. Protect weatherstrips from paint. Provide final finish free of scratches or other blemishes. ACCESSORIES .1 Door silencers: single stud rubber/neoprene type. .2 Fabricate glazing stops as formed channel, minimum 16 mm height, accurately fitted, butted at corners and fastened to frame sections with counter-sunk oval head sheet metal screws. .3 Metallic paste filler: to manufacturer's standard. .4 Make provisions for glazing as indicated and provide necessary glazing stops. .1 .2 Provide removable stainless steel glazing beads for use with glazing tapes and compounds and secured with countersunk stainless steel screws dry glazing of snap-on type. Design exterior glazing stops to be tamperproof. Project No. R.067898.002 2.5 METAL FRAMES Section 08 11 00 Page 3 of 4 FRAMES FABRICATION GENERAL .1 Fabricate frames in accordance with CSDMA specifications. .2 Fabricate frames to profiles and maximum face sizes as indicated. .3 Interior frames: 1.2 mm welded type construction. .4 Blank, reinforce, drill and tap frames for mortised, templated hardware, using templates provided by finish hardware supplier. Reinforce frames for surface mounted hardware. .5 Protect mortised cutouts with steel guard boxes. .6 Prepare frame for door silencers, 3 for single door, 2 at head for double door. .7 Manufacturer's nameplates on frames and screens are not permitted. .8 Conceal fastenings except where exposed fastenings are indicated. .9 Provide factory-applied touch up primer at areas where zinc coating has been removed during fabrication. .10 Insulate exterior frame components with polyurethane insulation. 2.6 FRAME ANCHORAGE .1 Provide appropriate anchorage to floor and wall construction. .2 Locate each wall anchor immediately above or below each hinge reinforcement on hinge jamb and directly opposite on strike jamb. .3 Provide 2 anchors for rebate opening heights up to 1520 mm and 1 additional anchor for each additional 760 mm of height or fraction thereof. .4 Locate anchors for frames in existing openings not more than 150 mm from top and bottom of each jambs and intermediate at 660 mm on centre maximum. 2.7 FRAMES: WELDED TYPE .1 Welding in accordance with CSA W59. .2 Accurately mitre or mechanically joint frame product and securely weld on inside of profile. .3 Cope accurately and securely weld butt joints of mullions, transom bars, centre rails and sills. .4 Grind welded joints and corners to a flat plane, fill with metallic paste and sand to uniform smooth finish. .5 Securely attach floor anchors to inside of each jamb profile. .6 Weld in 2 temporary jamb spreaders per frame to maintain proper alignment during shipment. Project No. R.067898.002 METAL FRAMES Part 3 Execution 3.1 MANUFACTURER'S INSTRUCTIONS .1 3.2 Section 08 11 00 Page 4 of 4 Compliance: comply with manufacturer's written recommendations or specifications, including product technical bulletins, handling, storage and installation instructions, and datasheets. INSTALLATION GENERAL .1 3.3 Install frames to CSDMA Installation Guide. FRAME INSTALLATION .1 Set frames plumb, square, level and at correct elevation. .2 Secure anchorages and connections to adjacent construction. .3 Brace frames rigidly in position while building-in. Install temporary horizontal wood spreader at third points of door opening to maintain frame width. Provide vertical support at centre of head for openings over 1200 mm wide. Remove temporary spreaders after frames are built-in. .4 Make allowances for deflection of structure to ensure structural loads are not transmitted to frames. .5 Caulk perimeter of frames between frame and adjacent material. 3.4 DOOR INSTALLATION .1 Install doors and hardware in accordance with hardware templates and manufacturer's instructions and Section 08 71 00 - Door Hardware. .2 Provide even margins between doors and jambs and doors and finished floorand thresholds as follows. .1 .2 .3 Hinge side: 1.0 mm. Latchside and head: 1.5 mm. Finished floor, top of carpet noncombustible sill and thresholds: 13 mm. .3 Adjust operable parts for correct function. .4 Install louvres. 3.5 FINISH REPAIRS .1 Touch up with primer finishes damaged during installation. .2 Fill exposed frame anchors surfaces with imperfections with metallic paste filler and sand to a uniform smooth finish. 3.6 GLAZING .1 Install glazing for doors frames in accordance with Section 08 80 50 - Glazing. END OF SECTION Project No. R.067898.002 FLUSH WOOD DOORS Part 1 General 1.1 RELATED REQUIREMENTS .1 Section 08 11 00 – Metal Frames .2 Section 08 71 00 – Door Hardware .3 Section 08 80 50 - Glazing 1.2 Section 08 14 16 Page 1 of 4 REFERENCES .1 Architectural Woodwork Manufacturers Association of Canada (AWMAC). .1 .2 ASTM International .1 .3 .2 .3 .4 .5 .6 CSA A440.2-14, Energy Performance of Windows and Other Fenestration Systems. CSA O115-M1982(R2001), Hardwood and Decorative Plywood. CAN/CSA O132.2 Series-90(2003), Wood Flush Doors. CAN/CSA-O132.5-M1992(R1998), Stile and Rail Wood Doors. CAN/CSA-Z808-96, A Sustainable Forest Management System: Guidance Document. CSA Certification Program for Windows and Doors 00. Environmental Choice Program (ECP). .1 .2 1.3 CAN/CGSB-71.19-M88, Adhesive, Contact, Sprayable. CAN/CGSB-71.20-M88, Adhesive, Contact, Brushable. Canadian Standards Association (CSA International). .1 .5 ASTM D5456-14, Standard Specification for Evaluation of Structural Composite Lumber Products Canadian General Standards Board (CGSB). .1 .2 .4 Architectural Woodwork Standards (2009) CCD-045-95, Sealants and Caulking Compounds. CCD-046-96, Adhesives. ACTION AND INFORMATIONAL SUBMITTALS .1 Product Data: .1 .2 .2 Submit manufacturer's printed product literature, specifications and data sheet in accordance with Section 01 33 00 - Submittal Procedures. Submit two copies of WHMIS MSDS - Material Safety Data Sheets in accordance with Section 01 33 00 - Submittal Procedures. Indicate VOC's: .1 For caulking materials during application and curing. .2 For door materials and adhesives. Shop Drawings: Project No. R.067898.002 .1 .2 1.4 FLUSH WOOD DOORS Section 08 14 16 Page 2 of 4 Submit shop drawings in accordance with Section 01 33 00 - Submittal Procedures. Indicate door types and cutouts for lights, sizes, core construction. SAMPLES .1 Submit samples in accordance with Section 01 33 00 - Submittal Procedures. .2 Submit one 300 x 300 mm corner sample of each type wood door. .3 Show door construction, core, glazing detail and faces. .4 Manufacturer's Instructions: .1 1.5 Submit manufacturer's installation instructions. QUALITY ASSURANCE .1 Regulatory Requirements: .2 Test Reports: certified test reports showing compliance with specified performance characteristics and physical properties. .3 Certificates: product certificates signed by manufacturer certifying materials comply with specified performance characteristics and criteria and physical requirements. .4 Pre-installation Meetings: conduct pre-installation meeting to verify project requirements, manufacturer's installation instructions and manufacturer's warranty requirements. 1.6 DELIVERY, STORAGE, AND HANDLING .1 Storage and Protection: .1 .2 .3 .4 1.7 Protect doors from dampness. Arrange for delivery after work causing abnormal humidity has been completed. Store doors in well ventilated room, off floor, in accordance with manufacturer's recommendations. Protect doors from scratches, handling marks and other damage. Wrap doors. Store doors away from direct sunlight. WASTE MANAGEMENT AND DISPOSAL .1 Remove from site and dispose of packaging materials at appropriate recycling facilities. .2 Dispose of corrugated cardboard polystyrene plastic packaging material in appropriate on-site bin for recycling in accordance with site waste management program. .3 Unused or damaged glazing materials are not recyclable and must not be diverted to municipal recycling programs. .4 Divert unused adhesive material from landfill to official hazardous material collections site approved by Departmental Representative. .5 Do not dispose of unused paint materials into sewer systems, into lakes, streams, onto ground or in locations where it will pose health or environmental hazard. Project No. R.067898.002 FLUSH WOOD DOORS Part 2 Products 2.1 WOOD FLUSH DOORS .1 Solid core: to CAN/CSA-O132.2.1. .1 .2 .3 .4 .5 .6 .7 2.2 Section 08 14 16 Page 3 of 4 Construction: particle core, ultra heavy-duty, anti-warping construction: Stiles: 3 mm thick veneer, longitudinally laminated by hot pressing with type 1 structural glue, as per ASTM-D5456-93 (LVL FSC), including a 22 mm piece of hardwood, matched with faces, for a total width of 107 mm. Top and bottom rails: 3 mm thick veneer, longitudinally laminated by hot pressing with type 1 structural glue, as per ASTM-D5456-93 (LVL FSC), or laminated strand lumber (LSL) for a total width of 85 mm. Core: Solid particleboard. Density of 0.45-0.50 metric ton per cubic metre. Complies with CSA-0188 and ANSI A208-1 standards (LD‑1/LD-2). Available NAUF/FSC (LD-2). Faces: Oak veneer (2 ply plywood). Available NAUF/FSC. Lock Block: Integrated Adhesive: Type I PVA Cross-link (NAUF) FABRICATION .1 Vertical edge strips to match face veneer. .2 Prepare doors for glazing. Provide glazing stops hardwood oak species with mitred corners. .3 Bevel vertical edges of single acting doors 3 mm in 50 mmon lock side and 1.5 mm in 50 mm on hinge side. Part 3 Execution 3.1 MANUFACTURER'S INSTRUCTIONS .1 3.2 Compliance: comply with manufacturer's written data, including product technical bulletins, product catalogue installation instructions, product carton installation instructions, and data sheets. INSTALLATION .1 Unwrap and protect doors in accordance with CAN/CSA-O132.2 Series, Appendix A. .2 Install labelled fire rated doors to NFPA 80. .3 Install doors and hardware in accordance with manufacturer's printed instructions and CAN/CSA-O132.2 Series, Appendix A. .4 Adjust hardware for correct function. .5 Install glazing in accordance with Section 08 80 50 - Glazing. Project No. R.067898.002 3.3 FLUSH WOOD DOORS Section 08 14 16 Page 4 of 4 ADJUSTMENT .1 3.4 Re-adjust doors and hardware just prior to completion of building to function freely and properly. CLEANING .1 Perform cleaning as soon as possible after installation to remove construction and accumulated environmental dirt. .2 Remove traces of primer, caulking; clean doors and frames. .3 Clean glass and glazing materials with approved non-abrasive cleaner. .4 On completion of installation, remove surplus materials, rubbish, tools and equipment barriers. END OF SECTION Project No. R.067898.002 DOOR HARDWARE Part 1 General 1.1 RELATED REQUIREMENTS .1 1.2 Section 08 71 00 Page 1 of 7 Section 08 14 16 – Wood Doors REFERENCES .1 American National Standards Institute (ANSI) / Builders Hardware Manufacturers Association (BHMA) .1 .2 .3 .4 .5 ANSI/BHMA A156.1-2000, American National Standard for Butts and Hinges. ANSI/BHMA A156.2-2003, Bored and Preassembled Locks and Latches. ANSI/BHMA A156.6-2005, Architectural Door Trim. ANSI/BHMA A156.13-2002, Mortise Locks and Latches Series 1000. ANSI/BHMA A156.18-2006, Materials and Finishes. .2 CAN/CSA B651-12, Accessible Design for the Built Environment .3 Canadian Steel Door and Frame Manufacturers' Association (CSDMA) .1 1.3 CSDMA Recommended Dimensional Standards for Commercial Steel Doors and Frames - 2009. ACTION AND INFORMATIONAL SUBMITTALS .1 Submit in accordance with Section 01 33 00 - Submittal Procedures. .2 Product Data: .1 .3 Samples: .1 .2 .3 .4 .4 Submit manufacturer's instructions, printed product literature and data sheets for door hardware and include product characteristics, performance criteria, physical size, finish and limitations. Submit for review and acceptance of each unit. Samples will be returned for inclusion into work. Identify each sample by label indicating applicable specification paragraph number, brand name and number, finish and hardware package number. After approval samples will be returned for incorporation in Work. Hardware List: .1 .2 Submit contract hardware list. Indicate specified hardware, including make, model, material, function, size, finish and other pertinent information. .5 Test Reports: certified test reports showing compliance with specified performance characteristics and physical properties. .6 Manufacturer's Instructions: submit manufacturer's installation instructions. .7 Sustainable Design Submittals: Project No. R.067898.002 .1 .2 1.4 DOOR HARDWARE Section 08 71 00 Page 2 of 7 Construction Waste Management: .1 Submit project Waste Management Plan Waste Reduction Workplan highlighting recycling and salvage requirements. .2 Submit calculations on end-of-project recycling rates, salvage rates, and landfill rates demonstrating that 75% of construction wastes were recycled or salvaged. Recycled Content: .1 Submit listing of recycled content products used, including details of required percentages or recycled content materials and products, showing their costs and percentages of post-consumer post-industrial content, and total cost of materials for project. CLOSEOUT SUBMITTALS .1 Submit in accordance with Section 01 78 00 - Closeout Submittals. .2 Operation and Maintenance Data: submit operation and maintenance data for door hardware for incorporation into manual. 1.5 MAINTENANCE MATERIALS SUBMITTALS .1 Extra Stock Materials: .1 .2 1.6 Supply maintenance materials in accordance with Section 01 78 00 - Closeout Submittals. Tools: .1 Supply 2 sets of wrenches for door closers locksets and fire exit hardware. QUALITY ASSURANCE .1 Regulatory Requirements: .1 .2 1.7 Hardware for doors in fire separations and exit doors certified by a Canadian Certification Organization accredited by Standards Council of Canada. Certificates: product certificates signed by manufacturer certifying materials comply with specified performance characteristics and criteria and physical requirements. DELIVERY, STORAGE AND HANDLING .1 Deliver, store and handle materials in accordance with Section 01 61 00 - Common Product Requirements and with manufacturer's written instructions. .2 Delivery and Acceptance Requirements: deliver materials to site in original factory packaging, labelled with manufacturer's name and address. .3 Package items of hardware including fastenings, separately or in like groups of hardware, label each package as to item definition and location. .4 Storage and Handling Requirements: .1 .2 Store materials off ground indoors in dry location and in accordance with manufacturer's recommendations in clean, dry, well-ventilated area. Store and protect door hardware from nicks, scratches, and blemishes. Project No. R.067898.002 .3 .4 DOOR HARDWARE Section 08 71 00 Page 3 of 7 Protect prefinished surfaces with wrapping. Replace defective or damaged materials with new. .5 Develop Construction Waste Reduction Workplan related to Work of this Section. .6 Packaging Waste Management: remove for reuse and return by manufacturer of pallets, crates, padding, packaging materials as specified in Construction Waste Reduction Workplan in accordance with Section 01 74 21 - Construction/Demolition Waste Management and Disposal. Part 2 Products 2.1 HARDWARE ITEMS .1 Use one manufacturer's products only for similar items. .2 All hardware to be finish 626 (satin chrome) unless otherwise indicated. 2.2 DOOR HARDWARE .1 Locks and latches: .1 .2 .3 .4 .5 .2 Butts and hinges: .1 .3 Butts and hinges: to ANSI/BHMA A156.1, designated by letter A and numeral identifiers, followed by size and finish, listed in Hardware Schedule. Auxiliary hardware: to ANSI/BHMA A156.16, designated by letter L and numeral identifiers listed in Hardware Schedule as listed below, finish to match leverset. .1 2.3 Bored and preassembled locks and latches: to ANSI/BHMA A156.2, grade 1 designed for function and keyed as stated in Hardware Schedule. Lever handles : plain design. Roses: round. Normal strikes: box type, lip projection not beyond jamb. Cylinders: key into keying system as directed. stop, floor mounted MISCELLANEOUS HARDWARE .1 2.4 Indexed key control system: to ANSI/BHMA A156.5, designated by letter E and numeral identifiers, paint finish to Departmental Representative’s selection. FASTENINGS .1 Use only fasteners provided by manufacturer. Failure to comply may void warranties and applicable licensed labels. .2 Supply screws, bolts, expansion shields and other fastening devices required for satisfactory installation and operation of hardware. .3 Exposed fastening devices to match finish of hardware. .4 Use fasteners compatible with material through which they pass. Project No. R.067898.002 2.5 DOOR HARDWARE Section 08 71 00 Page 4 of 7 KEYING .1 Door locks to be keyed differently and master keyed as noted in Hardware Schedule. Prepare detailed keying schedule in conjunction with Departmental Representative. .2 Supply 2 keys in for every lock in this Contract. .3 Supply 3 master keys for each master key or grand master key group. .4 Stamp keying code numbers on keys and cylinders. .5 permanent cores and keys by Departmental Representative. .6 Obtain written approval of the complete keying system prior to keying of locks. Part 3 Execution 3.1 INSTALLATION .1 Manufacturer's Instructions: comply with manufacturer's written recommendations, including product technical bulletins, product catalogue installation instructions, product carton installation instructions, and data sheets. .2 Supply metal door and frame manufacturers with complete instructions and templates for preparation of their work to receive hardware. .3 Supply manufacturers' instructions for proper installation of each hardware component. .4 Install hardware to standard hardware location dimensions in accordance with CSDFMA Canadian Metric Guide for Steel Doors and Frames (Modular Construction). .5 Where door stop contacts door pulls, mount stop to strike bottom of pull. .6 Install key control cabinet. .7 Use only manufacturer's supplied fasteners. .1 .8 Remove construction cores locks when directed by Departmental Representative .1 3.2 Use of "quick" type fasteners, unless specifically supplied by manufacturer, is unacceptable. Install permanent cores and ensure locks operate correctly. ADJUSTING .1 Adjust door hardware, operators, closures and controls for optimum, smooth operating condition, safety and for weather tight closure. .2 Lubricate hardware, operating equipment and other moving parts. .3 Adjust door hardware to ensure tight fit at contact points with frames. 3.3 CLEANING .1 Progress Cleaning: clean in accordance with Section 01 00 10 – General Instructions. .1 .2 Leave Work area clean at end of each day. Clean hardware with damp rag and approved non-abrasive cleaner, and polish hardware in accordance with manufacturer's instructions. Project No. R.067898.002 .3 .4 .2 Section 08 71 00 Page 5 of 7 Remove protective material from hardware items where present. Final Cleaning: upon completion remove surplus materials, rubbish, tools and equipment in accordance with Section 01 00 10 – General Instructions.. Waste Management: separate waste materials for reuse recycling in accordance with Section 01 74 21 - Construction/Demolition Waste Management and Disposal. .1 3.4 DOOR HARDWARE Remove recycling containers and bins from site and dispose of materials at appropriate facility. DEMONSTRATION .1 Keying System Setup and Cabinet: .1 .2 .3 .2 Maintenance Staff Briefing: .1 .3 3.5 Set up key control system with file key tags, duplicate key tags, numerical index, alphabetical index and key change index, label shields, control book and key receipt cards. Place file keys and duplicate keys in key cabinet on their respective hooks. Lock key cabinet and turn over key to Departmental Representative Brief maintenance staff regarding: .1 Proper care, cleaning, and general maintenance of projects complete hardware. .2 Description, use, handling, and storage of keys. .3 Use, application and storage of wrenches for door closers and locksets. Demonstrate operation, operating components, adjustment features, and lubrication requirements. PROTECTION .1 Protect installed products and components from damage during construction. .2 Repair damage to adjacent materials caused by door hardware installation. Project No. R.067898.002 DOOR HARDWARE 3.6 SCHEDULE GROUP # 01 701.1, 1104.1, 1403.1, 1904.1 QTÉ 3 1 1 Note: DESCRIPTION Wood Door/Hollow Metal Frame Ball bearing hinges A8112 - 4.5 x 4 Bored lock office function grade 1 F81x GMK x MK x CK x 3 KEYS Dome floor door stop LO2141 3 1 1 Note: FINI MANUFACTURIER 652 626 626 The quantities stated are the unit amounts required for each door cited in references. Cylinders are Multi-Lock and the permanent keying will be done by the Departmental Representative GROUP # 02 QTÉ Section 08 71 00 Page 6 of 7 702.1, 703.1, 704.1, 705.1, 706.1, 708.1, 709.1, 711.1, 711.2, 712.1, 1101.1, 1102.1, 1103.1, 1108.1, 1118.1, 1401.1, 1402.1, 1404.1, 1405.1, 1406.1, 1406.2, 1407.1, 1408.1, 1901.1, 1902.1, 1903.1, 1905.1, 1906.1, 1906.2, DESCRIPTION Wood Door/Hollow Metal Frame Ball bearing hinges A8112 - 4.5 x 4 Bored lock passage function grade 1 F75 x Dome floor door stop LO2141 FINI 652 626 626 The quantities stated are the unit amounts required for each door cited in references. MANUFACTURIER Project No. R.067898.002 GROUP # 03 QTÉ Note : DOOR HARDWARE Section 08 71 00 Page 7 of 7 700.1, 700.2, 700.3, 700.4, 700.5, 700.6, 700.7, 700.8, 700.9, 700.10, 700.11, 700.12, 700.13, 714.1, 715.1, 716.1, 717.1, 718.1, 719.1, 1100.1, 1100.2, 1100.3, 1100.4, 1100.5, 1100.6, 1100.7, 1100.8, 1100.9, 1100.10, 1112.1, 1113.1, 1115.1, 1116.1, 1400.1, 1400.2, 1400.3, 1400.4, 1400.5, 1400.6, 1400.7, 1400.8, 1400.9, 1400.10, 1900.1, 1900.2, 1900.4, 1900.5, 1900.6, 1900.7, 1900.8, 1900.9, 1900.10, 1907.1, 1908.1 DESCRIPTION EXISTING DOOR TO REMAIN FINI The quantities stated are the unit amounts required for each door cited in references. END OF SECTION MANUFACTURIER Project No. R.067898.002 GLAZING Part 1 General 1.1 RELATED REQUIREMENTS .1 Section 08 11 00 – Metal Frames .2 Section 08 14 16 – Flush Wood Doors 1.2 Section 08 80 50 Page 1 of 6 REFERENCES .1 ASTM International .1 .2 .3 .4 .5 .6 .7 .8 .2 Canadian General Standards Board (CGSB) .1 .2 .3 .4 .5 .3 CCD-045-95(R2005), Sealants and Caulking Compounds. Glass Association of North American (GANA) .1 .2 .5 CAN/CGSB-12.1-M90, Tempered or Laminated Safety Glass. CAN/CGSB-12.2-M91, Flat, Clear Sheet Glass. CAN/CGSB-12.3-M91, Flat, Clear Float Glass. CAN/CGSB-12.8-97, Insulating Glass Units. CAN/CGSB-12.8-97 (Amendment), Insulating Glass Units. Environmental Choice Program (ECP) .1 .4 ASTM C542-05 (2011), Standard Specification for Lock-Strip Gaskets. ASTM D790-10, Standard Test Methods for Flexural Properties of Unreinforced and Reinforced Plastics and Electrical Insulating Materials. ASTM D1003-11, Standard Test Method for Haze and Luminous Transmittance of Plastics. ASTM D1929-10, Standard Test Method for Determining Ignition Temperature of Plastics. ASTM D2240-05 (2010), Standard Test Method for Rubber Property Durometer Hardness. ASTM E84-10, Standard Test Method for Surface Burning Characteristics of Building Materials. ASTM E330-02, Standard Test Method for Structural Performance of Exterior Windows, Doors, Skylights and Curtain Walls by Uniform Static Air Pressure Difference. ASTM F1233-08, Standard Test Method for Security Glazing Materials and Systems. GANA Glazing Manual - 2008. GANA Laminated Glazing Reference Manual - 2009. South Coast Air Quality Management District (SCAQMD), California State, Regulation XI. Source Specific Standards .1 SCAQMD Rule 1168-A2005, Adhesives and Sealants Applications. Project No. R.067898.002 1.3 GLAZING Section 08 80 50 Page 2 of 6 ADMINISTRATIVE REQUIREMENTS .1 Pre-Installation Meetings: .1 .2 1.4 Convene pre-installation meeting 1 week prior to beginning work of this Section on-site installation, with Contractor's Representative and Departmental Representative to: .1 Verify project requirements. .2 Review installation and substrate conditions. .3 Co-ordination with other building subtrades. .4 Review manufacturer's written installation instructions and warranty requirements. Arrange for site visit with Departmental Representative prior to start of Work to examine existing site conditions adjacent to demolition Work. ACTION AND INFORMATIONAL SUBMITTALS .1 Submit in accordance with Section 01 33 00 - Submittal Procedures. .2 Product Data: .1 .3 Submit manufacturer's instructions, printed product literature and data sheets for glass, sealants, and glazing accessories and include product characteristics, performance criteria, physical size, finish and limitations. Samples: .1 .2 .3 Submit for review and acceptance of each unit. Samples will be returned for inclusion into work. Submit duplicate samples of setting blocks, glazing tape and sealant material. .4 Certificates: submit product certificates signed by manufacturer certifying materials comply with specified performance characteristics and criteria and physical requirements. .5 Test Reports: certified test reports showing compliance with specified performance characteristics and physical properties. .1 .2 .6 Submit testing analysis of glass under provisions of Section 01 45 00 - Quality Control. Submit shop inspection testing for glass. Sustainable Design Submittals: .1 .2 Construction Waste Management: .1 Submit project Waste Management Plan/Waste Reduction Workplan highlighting recycling and salvage requirements. .2 Submit calculations on end-of-project recycling rates, salvage rates, and landfill rates demonstrating that 75% of construction wastes were recycled or salvaged. Low-Emitting Materials: .1 Submit listing of adhesives and sealants used in building, showing compliance with VOC and chemical component limits or restrictions requirements. Project No. R.067898.002 1.5 GLAZING Section 08 80 50 Page 3 of 6 CLOSEOUT SUBMITTALS .1 Submit in accordance with Section 01 78 00 - Closeout Submittals. .2 Operation and Maintenance Data: submit operation and maintenance data for glazing for incorporation into manual. 1.6 QUALITY ASSURANCE .1 Certificates: product certificates signed by manufacturer certifying materials comply with specified performance characteristics and criteria and physical requirements. .2 Mock-ups: .1 .2 .3 .4 .5 .6 1.7 Construct mock-ups in accordance with Section 01 45 00 - Quality Control. Construct mock-up to include glazing Mock-up will be used: .1 To judge quality of work, substrate preparation, operation of equipment and material application.. Locate where directed where indicated. Allow 24 hours for inspection of mock-up before proceeding with work. When accepted, mock-up will demonstrate minimum standard of quality required for this work. Approved mock-up may remain as part of finished work. DELIVERY, STORAGE AND HANDLING .1 Deliver, store and handle materials in accordance with Section 01 61 00 - Common Product Requirements and with manufacturer's written instructions. .2 Delivery and Acceptance Requirements: deliver materials to site in original factory packaging, labelled with manufacturer's name and address. .3 Storage and Handling Requirements: .1 .2 .3 Store materials off ground indoors in dry location and in accordance with manufacturer's recommendations in clean, dry, well-ventilated area. Store and protect glazing and frames from nicks, scratches, and blemishes. Replace defective or damaged materials with new. .4 Develop Construction Waste Reduction Workplan related to Work of this Section. .5 Packaging Waste Management: remove for reuse and return by manufacturer of pallets, crates, padding, packaging materials as specified in Construction Waste Reduction Workplan in accordance with Section 01 74 21 - Construction/Demolition Waste Management and Disposal 1.8 AMBIENT CONDITIONS .1 Ambient Requirements: .1 .2 Install glazing when ambient temperature is 10 degrees C minimum. Maintain ventilated environment for 24 hours after application. Maintain minimum ambient temperature before, during and 24 hours after installation of glazing compounds. Project No. R.067898.002 Part 2 Products 2.1 MATERIALS .1 .2 2.2 Size glass to withstand dead loads and positive and negative live loads to ASTM E330 Limit glass deflection to 1/200 flexural limit of glass with full recovery of glazing materials. Flat Glass: .1 .3 Section 08 80 50 Page 4 of 6 Design Criteria: .1 .2 GLAZING Safety glass: to CAN/CGSB-12.1, transparent, 6 mm thick. .1 Type 2-tempered. .2 Class B-float. .3 Category 1. .4 Edge treatment. Sealant: in accordance with Section 07 92 00 - Joint Sealants. ACCESSORIES .1 Setting blocks: to suit glazing method, glass light weight and area .2 Spacer shims: neoprene, 50-60 Shore A durometer hardness to ASTM D2240, 75 mm long x one half height of glazing stop x thickness to suit application. Self adhesive on one face. .3 Glazing tape: .1 .2 Preformed butyl compound, 10-15 Shore A durometer hardness to ASTM D2240; coiled on release paper; black colour. Closed cell polyvinyl chloride foam, coiled on release paper over adhesive on two sides, maximum water absorption by volume 2 %, designed for compression of 25 % .4 Glazing clips: manufacturer's standard type. .5 Lock-strip gaskets: to ASTM C542. Part 3 Execution 3.1 EXAMINATION .1 Verification of Conditions: verify conditions of substrates previously installed under other Sections or Contracts are acceptable for glazing installation in accordance with manufacturer's written instructions. .1 .2 .3 Verify that openings for glazing are correctly sized and within tolerance. Verify that surfaces of glazing channels or recesses are clean, free of obstructions, and ready to receive glazing. Visually inspect substrate in presence of Departmental Representative Project No. R.067898.002 .4 .5 3.2 GLAZING Section 08 80 50 Page 5 of 6 Inform Departmental Representative of unacceptable conditions immediately upon discovery. Proceed with installation only after unacceptable conditions have been remedied and after receipt of written approval to proceed from Departmental Representative PREPARATION .1 Clean contact surfaces with solvent and wipe dry. .2 Seal porous glazing channels or recesses with substrate compatible primer or sealer. .3 Prime surfaces scheduled to receive sealant. 3.3 INSTALLATION: INTERIOR WET/DRY METHOD (TAPE AND SEALANT) .1 Perform work in accordance with GANA Glazing Manual GANA Laminated Glazing Reference Manual for glazing installation methods. .2 Cut glazing tape to length and install against permanent stops, projecting 1.6 mm above sight line. .3 Place setting blocks at 1/3 points, with edge block maximum 150 mm from corners. .4 Rest glazing on setting blocks and push against tape to ensure full contact at perimeter of light or unit. .5 Install removable stops, with spacer shims inserted between glazing and applied stops at 600 mm intervals, 6 mm below sight line. .6 Fill gaps between light and applied stop with sealant to depth equal to bite on glazing, to uniform and level line. .7 Trim protruding tape edge. 3.4 CLEANING .1 Progress Cleaning: clean in accordance with Section 01 00 10 – General Instructions .1 .2 .2 Waste Management: separate waste materials for reuse/recycling in accordance with Section 01 74 21 - Construction/Demolition Waste Management and Disposal. .1 3.5 Leave Work area clean at end of each day. .1 Remove traces of primer, caulking. .2 Remove glazing materials from finish surfaces. .3 Remove labels. .4 Clean glass and mirrors using approved non-abrasive cleaner in accordance with manufacturer's instructions. Final Cleaning: upon completion remove surplus materials, rubbish, tools and equipment in accordance with Section 01 00 10 – General Instructions Remove recycling containers and bins from site and dispose of materials at appropriate facility. PROTECTION .1 Protect installed products and components from damage during construction. Project No. R.067898.002 .2 Section 08 80 50 Page 6 of 6 After installation, mark each light with an "X" by using removable plastic tape or paste. .1 .3 GLAZING Do not mark heat absorbing or reflective glass units. Repair damage to adjacent materials caused by glazing installation. END OF SECTION Project No. R.067898.002 GYPSUM BOARD ASSEMBLIES Part 1 General 1.1 RELATED REQUIREMENTS .1 Section 07 92 00 - Joint Sealants .2 Section 09 22 16 – Non-Structural Metal Framing .3 Section 09 51 99 – Acoustical Ceilings 1.2 Section 09 21 16 Page 1 of 7 REFERENCES .1 ASTM International .1 .2 .3 .4 .5 .6 .7 .8 .9 .2 Association of the Wall and Ceilings Industries International (AWCI) .1 .3 GS-11-11, 2nd Edition, Paints and Coatings. South Coast Air Quality Management District (SCAQMD), California State, Regulation XI. Source Specific Standards .1 .2 .5 AWCI Levels of Gypsum Board Finish-97. Green Seal Environmental Standards (GS) .1 .4 ASTM C475-02(2007), Standard Specification for Joint Compound and Joint Tape for Finishing Gypsum Board. ASTM C557-03(2009)e1, Standard Specification for Adhesives for Fastening Gypsum Wallboard to Wood Framing. ASTM C840-13, Standard Specification for Application and Finishing of Gypsum Board. ASTM C954-11, Standard Specification for Steel Drill Screws for the Application of Gypsum Panel Products or Metal Plaster Bases to Steel Studs From 0.033 in. (0.84 mm) to 0.112 in. (2.84 mm) in Thickness. ASTM C1002-07 (2013), Standard Specification for Steel Self-Piercing Tapping Screws for the Application of Gypsum Panel Products or Metal Plaster Bases to Wood Studs or Steel Studs. ASTM C1047-09, Standard Specification for Accessories for Gypsum Wallboard and Gypsum Veneer Base. ASTM C1280-13a, Standard Specification for Application of Gypsum Sheathing. ASTM C1178/C1178M-13, Standard Specification for Glass Mat WaterResistant Gypsum Backing Board. ASTM C1396/C1396M-13a, Standard Specification for Gypsum Wallboard. SCAQMD Rule 1113-A2013, Architectural Coatings. SCAQMD Rule 1168-A2005, Adhesives and Sealants Applications. Underwriters' Laboratories of Canada (ULC) .1 CAN/ULC-S102-07, Standard Method of Test of Surface Burning Characteristics of Building Materials and Assemblies. Project No. R.067898.002 1.3 GYPSUM BOARD ASSEMBLIES Section 09 21 16 Page 2 of 7 ACTION AND INFORMATIONAL SUBMITTALS .1 Submit in accordance with Section 01 33 00 - Submittal Procedures. .2 Product Data: .1 .3 Samples: .1 .2 .3 .4 Submit for review and acceptance of each unit. Samples will be returned for inclusion into work. Submit duplicate 300 mm long samples of corner and casing beads, shadow mould, cornice cap, insulating strip. Sustainable Design Submittals: .1 .2 .3 1.4 Submit manufacturer's instructions, printed product literature and data sheets for gypsum board assemblies and include product characteristics, performance criteria, physical size, finish and limitations. Construction Waste Management: .1 Submit project Waste Management Plan Waste Reduction Workplan highlighting recycling and salvage requirements. .2 Submit calculations on end-of-project recycling rates, salvage rates, and landfill rates demonstrating that 75% of construction wastes were recycled or salvaged. Recycled Content: .1 Submit listing of recycled content products used, including details of required percentages or recycled content materials and products, showing their costs and percentages of post-consumer post-industrial content, and total cost of materials for project. Low-Emitting Materials: .1 Submit listing of adhesives and sealants paints and coatings used in building, showing compliance with VOC and chemical component limits or restriction requirements. DELIVERY, STORAGE AND HANDLING .1 Deliver, store and handle materials in accordance with Section 01 61 00 - Common Product Requirements and with manufacturer's written instructions. .2 Delivery and Acceptance Requirements: deliver materials to site in original factory packaging, labelled with manufacturer's name and address. .3 Storage and Handling Requirements: .1 .2 .3 .4 Store gypsum board assemblies materials level off ground indoors in dry location and in accordance with manufacturer's recommendations in clean, dry, wellventilated area. Store and protect gypsum board assemblies from nicks, scratches, and blemishes. Protect from weather, elements and damage from construction operations. Handle gypsum boards to prevent damage to edges, ends or surfaces. Project No. R.067898.002 .5 .6 GYPSUM BOARD ASSEMBLIES Section 09 21 16 Page 3 of 7 Protect prefinished aluminum surfaces with wrapping or strippable coating. Do not use adhesive papers or sprayed coatings which bond when exposed to sunlight or weather. Replace defective or damaged materials with new. .4 Develop Construction Waste Management Plan/Waste Reduction Workplan related to Work of this Section. .5 Packaging Waste Management: remove for reuse and return by manufacturer of pallets, crates, padding, packaging materials as specified in Construction Waste Management Plan Waste Reduction Workplan in accordance with Section 01 74 21 Construction/Demolition Waste Management and Disposal. 1.5 AMBIENT CONDITIONS .1 Maintain temperature 10 degrees C minimum, 21 degrees C maximum for 48 hours prior to and during application of gypsum boards and joint treatment, and for 48 hours minimumafter completion of joint treatment. .2 Apply board and joint treatment to dry, frost free surfaces. .3 Ventilation: ventilate building spaces as required to remove excess moisture that would prevent drying of joint treatment material immediately after its application. Part 2 Products 2.1 MATERIALS .1 Standard board: to ASTM C1396/C1396M, Type X, 16 mm thick unless otherwise indicated, 1200 mm wide x maximum practical length, ends square cut, edges bevelled. .2 Glass mat water-resistant gypsum backing board: to ASTM C1178/C1178M, 16 mm thick, 1200 mm wide x maximum practical length. .3 Drywall furring channels: 0.5 mm core thickness galvanized steel channels for screw attachment of gypsum board. .4 Resilient clips and drywall furring : 0.5 mm base steel thickness galvanized steel for resilient attachment of gypsum board. .5 Steel drill screws: to ASTM C1002. .6 Casing beads, corner beads, control joints, drywall reveal trim, edge trim: to ASTM C1047, zinc-coated by hot-dip process, 0.5 mm base thickness, perforated flanges, one piece length per location. .7 Sealants: in accordance with Section 07 92 00 - Joint Sealants. .1 .2 VOC limit 250 g/L maximum to SCAQMD Rule 1168. Acoustic sealant: in accordance with Section 07 92 00 - Joint Sealants. .8 Noise stop foam seal, continuous, 3 mm thick x 45 mm wide, with self sticking permanent adhesive on one face, lengths as required. .9 Joint compound: to ASTM C475, asbestos-free. Project No. R.067898.002 Part 3 Execution 3.1 EXAMINATION .1 Section 09 21 16 Page 4 of 7 Verification of Conditions: verify conditions of substrates previously installed under other Sections or Contracts are acceptable for gypsum board assemblies installation in accordance with manufacturer's written instructions. .1 .2 .3 3.2 GYPSUM BOARD ASSEMBLIES Visually inspect substrate in presence of Departmental Representative. Inform Departmental Representative of unacceptable conditions immediately upon discovery. Proceed with installation only after unacceptable conditions have been remedied and after receipt of written approval to proceed from Departmental Representative ERECTION .1 Do application and finishing of gypsum board to ASTM C840 except where specified otherwise. .2 Do application of gypsum sheathing to ASTM C1280. .3 Erect hangers and runner channels for suspended gypsum board ceilings to ASTM C840 except where specified otherwise. .4 Support light fixtures by providing additional ceiling suspension hangers within 150 mm of each corner and at maximum 600 mm around perimeter of fixture. .5 Install work level to tolerance of 1:1200. .6 Frame with furring channels, perimeter of openings for access panels, light fixtures, diffusers, grilles, . .7 Install 19 x 64 mm furring channels parallel to, and at exact locations of steel stud partition header track. .8 Furr for gypsum board faced vertical bulkheads within and at termination of ceilings. .9 Furr above suspended ceilings for gypsum board fire and sound stops and to form plenum areas as indicated. .10 Install wall furring for gypsum board wall finishes to ASTM C840, except where specified otherwise. .11 Furr openings and around built-in equipment, cabinets, access panels, , on four sides. Extend furring into reveals. Check clearances with equipment suppliers. .12 Furr duct shafts, beams, columns, pipes and exposed services where indicated. .13 Erect drywall resilient furring transversely across studs and joists between the layers of gypsum board, spaced maximum 600 mm on centre and not more than 150 mm from ceiling/wall juncture. Secure to each support with 25 mm drywall screw. 3.3 APPLICATION .1 Apply gypsum board after bucks, anchors, blocking, sound attenuation, electrical and mechanical work have been approved. Project No. R.067898.002 .2 GYPSUM BOARD ASSEMBLIES Section 09 21 16 Page 5 of 7 Apply single layer gypsum board to wood metal furring or framing using screw fasteners. Maximum spacing of screws 300 mm on centre. .1 Single-Layer Application: .1 Apply gypsum board on ceilings prior to application of walls to ASTM C840. .2 Apply gypsum board vertically or horizontally, providing sheet lengths that will minimize end joints. .3 Apply glass mat water-resistant gypsum backing board where wall tiles to be applied. Apply water-resistant sealant to edges, ends, cut-outs which expose gypsum core and to fastener heads. Do not apply joint treatment on areas to receive tile finish. .4 Apply 12 mm diameter bead of acoustic sealant continuously around periphery of each face of partitioning to seal gypsum board/structure junction where partitions abut fixed building components. Seal full perimeter of cut-outs around electrical boxes, ducts, , in partitions where perimeter sealed with acoustic sealant. .5 Install ceiling boards in direction that will minimize number of end-butt joints. Stagger end joints at least 250 mm. .6 Install gypsum board on walls vertically to avoid end-butt joints. At stairwells and similar high walls, install boards horizontally with end joints staggered over studs, except where local codes or fire-rated assemblies require vertical application. .7 Install gypsum board with face side out. .8 Do not install damaged or damp boards. .9 Locate edge or end joints over supports. Stagger vertical joints over different studs on opposite sides of wall. 3.4 INSTALLATION .1 Erect accessories straight, plumb or level, rigid and at proper plane. Use full length pieces where practical. Make joints tight, accurately aligned and rigidly secured. Mitre and fit corners accurately, free from rough edges. Secure using contact adhesive for full length at 150 mm on centre. .2 Install casing beads around perimeter of suspended ceilings. .3 Install casing beads where gypsum board butts against surfaces having no trim concealing junction and where indicated. Seal joints with sealant. .4 Provide paintable metal drywall reveal trim at all junctions of new partitions and existing exposed concrete walls or columns, on both sides of partition. .5 Construct control joints of preformed units set in gypsum board facing and supported independently on both sides of joint. .6 Provide continuous polyethylene dust barrier behind and across control joints. .7 Locate control joints where indicated, at changes in substrate construction at approximate 10 m spacing on long corridor runs and at approximately 15 m spacing on ceilings. .8 Install control joints straight and true. .9 Construct expansion joints as detailed, at building expansion and construction joints. Provide continuous dust barrier. Project No. R.067898.002 GYPSUM BOARD ASSEMBLIES Section 09 21 16 Page 6 of 7 .10 Install expansion joint straight and true. .11 Splice corners and intersections together and secure to each member with 3 screws. .12 Install access doors to electrical and mechanical fixtures specified in respective sections. .1 Rigidly secure frames to furring or framing systems. .13 Finish face panel joints and internal angles with joint system consisting of joint compound, joint tape and taping compound installed according to manufacturer's directions and feathered out onto panel faces. .14 Gypsum Board Finish: finish gypsum board walls and ceilings to following levels in accordance with AWCI Levels of Gypsum Board Finish: .1 Levels of finish: .1 Level 1- above-ceiling plenum barriers: embed tape for joints and interior angles in joint compound. Surfaces to be free of excess joint compound; tool marks and ridges are acceptable. .2 Level 2 – tile backer board: embed tape for joints and interior angles in joint compound and apply one separate coat of joint compound over joints, angles, fastener heads and accessories; surfaces free of excess joint compound; tool marks and ridges are acceptable. .3 Level 5 – all other areas: embed tape for joints and interior angles in joint compound and apply three separate coats of joint compound over joints, angles, fastener heads and accessories; apply a thin skim coat of joint compound to entire surface; surfaces smooth and free of tool marks and ridges. .15 Finish corner beads, control joints and trim as required with two coats of joint compound and one coat of taping compound, feathered out onto panel faces. .16 Fill screw head depressions with joint and taping compounds to bring flush with adjacent surface of gypsum board so as to be invisible after surface finish is completed. .17 Sand lightly to remove burred edges and other imperfections. Avoid sanding adjacent surface of board. .18 Completed installation to be smooth, level or plumb, free from waves and other defects and ready for surface finish. .19 Mix joint compound slightly thinner than for joint taping. .20 Apply thin coat to entire surface using trowel or drywall broad knife to fill surface texture differences, variations or tool marks. .21 Allow skim coat to dry completely. .22 Remove ridges by light sanding or wiping with damp cloth. 3.5 CLEANING .1 Progress Cleaning: clean in accordance with Section 01 00 10 – General Instructions. .1 .2 Leave Work area clean at end of each day. Final Cleaning: upon completion remove surplus materials, rubbish, tools and equipment in accordance with Section 01 00 10 – General Instructions. Project No. R.067898.002 .2 Section 09 21 16 Page 7 of 7 Waste Management: separate waste materials for reuse recycling in accordance with Section 01 74 21 - Construction/Demolition Waste Management and Disposal. .1 3.6 GYPSUM BOARD ASSEMBLIES Remove recycling containers and bins from site and dispose of materials at appropriate facility. PROTECTION .1 Protect installed products and components from damage during construction. .2 Repair damage to adjacent materials caused by gypsum board assemblies installation. END OF SECTION Project No. R.067898.002 NON-STRUCTURAL METAL FRAMING Part 1 General 1.1 RELATED REQUIREMENTS .1 1.2 Section 09 22 16 Page 1 of 4 Section 09 21 16 – Gypsum Board Assemblies REFERENCES .1 ASTM International .1 .2 .2 Environmental Choice Program (ECP) .1 .2 .3 Architectural Painting Specification Manual - current edition. .1 MPI #26, Primer, Galvanized Metal, Cementitious. South Coast Air Quality Management District (SCAQMD), California State, Regulation XI. Source Specific Standards .1 1.3 Material Safety Data Sheets (MSDS). The Master Painters Institute (MPI) .1 .5 CCD-047-98(R2005), Architectural Surface Coatings. CCD-048-95(R2006), Surface Coatings - Recycled Water-Borne. Health Canada/Workplace Hazardous Materials Information System (WHMIS) .1 .4 ASTM C645-13, Standard Specification for Nonstructural Steel Framing Members. ASTM C754-11, Standard Specification for Installation of Steel Framing Members to Receive Screw-Attached Gypsum Panel Products. SCAQMD Rule 1168-A2005, Adhesives and Sealants Applications. ACTION AND INFORMATIONAL SUBMITTALS .1 Submit in accordance with Section 01 33 00 - Submittal Procedures. .2 Shop Drawings: .1 .2 .3 .3 Product Data: .1 .4 Submit drawings stamped and signed by a professional engineer licensed in the Province of Ontario, Canada Indicate framing for partitions below and above existing ceilings as well as lateral support framing required to support partitions independant of existing suspended ceiling system, to which the partition assembly will not be fastened. Indicate member design thickness exclusive of coatings, connection and bracing details, screw sizing and spacing, and anchors Indicate locations, dimensions, openings and requirements of related work Submit manufacturer's instructions, printed product literature and data sheets for metal framing and include product characteristics, performance criteria, physical size, finish and limitations. Samples: Project No. R.067898.002 .1 .5 Section 09 22 16 Page 2 of 4 Submit duplicate 300 mm long samples of non-structural metal framing. Sustainable Design Submittals: .1 1.4 NON-STRUCTURAL METAL FRAMING Construction Waste Management: .1 Submit project Waste Management Plan Waste Reduction Workplan highlighting recycling and salvage requirements. .2 Submit calculations on end-of-project recycling rates, salvage rates, and landfill rates demonstrating that 75% of construction wastes were recycled or salvaged. .3 Recycled Content: .1 Submit listing of recycled content products used, including details of required percentages or recycled content materials and products, showing their costs and percentages of post-consumer post-industrial content, and total cost of materials for project. QUALITY ASSURANCE .1 Test Reports: submit certified test reports showing compliance with specified performance characteristics and physical properties. .2 Certificates: submit product certificates signed by manufacturer certifying materials comply with specified performance characteristics and criteria and physical requirements. .3 Site review and Post-Installation Certification: Engineer who stamped shop drawings shall provide periodic site review and reports, progress billing review and reports, and signed and stamped certification that the work of this Section has been performed in conformance with shop drawings. 1.5 DELIVERY, STORAGE AND HANDLING .1 Deliver, store and handle materials in accordance with Section 01 61 00 - Common Product Requirements with manufacturer's written instructions. .2 Delivery and Acceptance Requirements: deliver materials to site in original factory packaging, labelled with manufacturer's name and address. .3 Storage and Handling Requirements: .1 .2 .3 Store materials off ground indoors in dry location and in accordance with manufacturer's recommendations in clean, dry, well-ventilated area. Store and protect metal framing from nicks, scratches, and blemishes. Replace defective or damaged materials with new. .4 Develop Construction Waste Management Plan Waste Reduction Workplan related to Work of this Section. .5 Packaging Waste Management: remove for reuse and return by manufacturer of pallets, crates, padding, packaging materials as specified in Construction Waste Management Plan Waste Reduction Workplan in accordance with Section 01 74 21 Construction/Demolition Waste Management and Disposal. Project No. R.067898.002 NON-STRUCTURAL METAL FRAMING Part 2 Products 2.1 MATERIALS .1 Section 09 22 16 Page 3 of 4 Non-load bearing channel stud framing: to ASTM C645, 92 mm stud size unless otherwise indicated, thickness as required by engineered shop drawings, roll formed, hot dipped galvanized steel sheet, for screw attachment of gypsum board. .1 Knock-out service holes at 460 mm centres. .2 Floor and ceiling tracks: to ASTM C645, in widths to suit stud sizes, 32 mm flange height. .3 Metal channel stiffener: 1.4 mm thick cold rolled steel, coated with rust inhibitive coating. .4 Acoustical sealant: in accordance with Section 07 92 00 - Joint Sealants. .5 Noise stop foam seal, continuous, 3 mm thick x 45 mm wide, with self sticking permanent adhesive on one face, lengths as required. Part 3 Execution 3.1 EXAMINATION .1 Verification of Conditions: verify that conditions of substrate previously installed under other Sections or Contracts are acceptable for non-structural metal framing application in accordance with manufacturer's written instructions. .1 .2 .3 3.2 Visually inspect substrate in presence of Departmental Representative Inform Departmental Representative of unacceptable conditions immediately upon discovery. Proceed with installation only after unacceptable conditions have been remedied and after receipt of written approval to proceed from Departmental Representative ERECTION .1 Align partition tracks at floor and ceiling and secure at 600 mm on centre maximum. .2 Place studs vertically at 600 mm on centre and not more than 50 mm from abutting walls, and at each side of openings and corners. .1 Position studs in tracks at floor and ceiling. Cross brace steel studs as required to provide rigid installation to manufacturer's instructions. .3 Erect metal studding to tolerance of 1:1000. .4 Co-ordinate simultaneous erection of studs with installation of service lines. When erecting studs ensure web openings are aligned. .5 Co-ordinate erection of studs with installation of door/window frames and special supports or anchorage for work specified in other Sections. .6 Provide two studs extending from floor to ceiling at each side of openings wider than stud centres specified. Project No. R.067898.002 .1 .7 NON-STRUCTURAL METAL FRAMING Section 09 22 16 Page 4 of 4 Secure studs together, 50 mm apart using column clips or other approved means of fastening placed alongside frame anchor clips. Erect track at head of door/window openings and sills of sidelight/window openings to accommodate intermediate studs. .1 .2 Secure track to studs at each end, in accordance with manufacturer's instructions. Install intermediate studs above and below openings in same manner and spacing as wall studs. .8 Frame openings and around built-in equipment, cabinets, access panels, on four sides. Extend framing into reveals. Check clearances with equipment suppliers. .9 Provide 40 mm stud or furring channel secured between studs for attachment of fixtures behind lavatory basins, toilet and bathroom accessories, and other fixtures including grab bars and towel rails, attached to steel stud partitions. .10 Install steel studs or furring channel between studs for attaching electrical and other boxes. .11 Extend partitions to ceiling height except where noted otherwise on drawings. .12 Maintain clearance under beams and structural slabs to avoid transmission of structural loads to studs. .1 .13 3.3 Use 50 mm leg ceiling tracks. Use double track slip joint as required. Install insulating strip under studs and tracks around perimeter of sound control partitions. CLEANING .1 Progress Cleaning: clean in accordance with Section 01 00 10 – General Instructions. .1 Leave Work area clean at end of each day. .2 Final Cleaning: upon completion remove surplus materials, rubbish, tools and equipment in accordance with Section 01 00 10 – General Instructions. .3 Waste Management: separate waste materials for reuse recycling in accordance with Section 01 74 21 - Construction/Demolition Waste Management and Disposal. .1 3.4 Remove recycling containers and bins from site and dispose of materials at appropriate facility. PROTECTION .1 Protect installed products and components from damage during construction. .2 Repair damage to adjacent materials caused by non-structural metal framing application. END OF SECTION Project No. R.067898.002 CERAMIC TILING Part 1 General 1.1 RELATED REQUIREMENTS .1 1.2 Section 09 30 13 Page 1 of 4 Section 09 21 16 – Gypsum Board Assemblies REFERENCES .1 American National Standards Institute (ANSI)/Ceramic Tile Institute (CTI) .1 .2 .3 .4 .5 .2 American Society for Testing and Materials International (ASTM) .1 .2 .3 .4 .3 .2 .3 .4 CAN/CSA-A3000-03(R2006), Cementitious Materials Compendium (Consists of A3001, A3002, A3003, A3004 and A3005). South Coast Air Quality Management District (SCAQMD), California State .1 .6 CAN/CGSB-51.34-M86(R1988), Vapour Barrier, Polyethylene Sheet for Use in Building Construction. CGSB 71-GP-22M-78(AMEND.), Adhesive, Organic, for Installation of Ceramic Wall Tile. CAN/CGSB-75.1-M88, Tile, Ceramic. CAN/CGSB-25.20-95, Surface Sealer for Floors. Canadian Standards Association (CSA International) .1 .5 ASTM C144-04, Specification for Aggregate for Masonry Mortar. ASTM C207-06, Specification for Hydrated Lime for Masonry Purposes. ASTM C847-06, Specification for Metal Lath. ASTM C979-05, Specification for Pigments for Integrally Coloured Concrete. Canadian General Standards Board (CGSB) .1 .4 ANSI A108.1-99, Specification for the Installation of Ceramic Tile (Includes ANSI A108.1A-C, 108.4-.13, A118.1-.10, ANSI A136.1). CTI A118.3-92, Specification for Chemical Resistant, Water Cleanable Tile Setting and Grouting Epoxy and Water Cleanable Tile Setting Epoxy Adhesive (included in ANSI A108.1). CTI A118.4-92, Specification for Latex Cement Mortar (included in ANSI A108.1). CTI A118.5-92, Specification for Chemical Resistant Furan Resin Mortars and Grouts for Tile Installation (included in ANSI A108.1). CTI A118.6-92, Specification for Ceramic Tile Grouts (included in ANSI A108.1). SCAQMD Rule 1168-05, Adhesives and Sealants Applications. Terrazzo Tile and Marble Association of Canada (TTMAC) .1 .2 Tile Specification Guide 09 30 00 2006/2007, Tile Installation Manual. Tile Maintenance Guide 2000. Project No. R.067898.002 1.3 CERAMIC TILING Section 09 30 13 Page 2 of 4 ACTION AND INFORMATIONAL SUBMITTALS .1 Provide submittals in accordance with Section 01 33 00 - Submittal Procedures. .2 Provide product data in accordance with Section 01 33 00 - Submittal Procedures. .1 .3 Provide samples in accordance with Section 01 33 00 - Submittal Procedures. .1 .2 1.4 Include manufacturer's information on: .1 Ceramic tile, marked to show each type, size, and shape required. .2 Chemical resistant mortar and grout (Epoxy and Furan). .3 Cementitious backer unit. .4 Dry-set cement mortar and grout. .5 Divider strip. .6 Elastomeric membrane and bond coat. .7 Reinforcing tape. .8 Levelling compound. .9 Latex cement mortar and grout. .10 Commercial cement grout. .11 Organic adhesive. .12 Slip resistant tile. .13 Waterproofing isolation membrane. .14 Fasteners. Wall tile: submit duplicate, 300 x 300 mm sample panels of each colour, texture, size, and pattern of tile. Adhere tile samples to 11 mm thick plywood and grout joints to represent project installation. QUALITY ASSURANCE .1 Quality Assurance Submittals: .1 .2 1.5 Manufacturer's Instructions: manufacturer's installation instructions. Manufacturer's Field Reports: manufacturer's field reports specified. DELIVERY, STORAGE AND HANDLING .1 Packing, shipping, handling and unloading: .1 .2 Waste Management and Disposal: .1 1.6 Deliver, store and handle materials in accordance with Section 01 61 00 Common Product Requirements. Separate waste materials for reuse recycling in accordance with Section 01 74 21 - Construction/Demolition Waste Management and Disposal. AMBIENT CONDITIONS .1 Maintain air temperature and structural base temperature at ceramic tile installation area above 12 degrees C for 48 hours before, during, and 48 hours after, installation. .2 Do not install tiles at temperatures less than 12 degrees C or above 38 degrees C. Project No. R.067898.002 .3 1.7 CERAMIC TILING Section 09 30 13 Page 3 of 4 Do not apply epoxy mortar and grouts at temperatures below 15 degrees C or above 25 degrees C. MAINTENANCE .1 Extra Materials: .1 .2 .3 Provide maintenance materials in accordance with Section 01 78 00 - Closeout Submittals. Provide minimum 2% of each type and colour of tile required for project for maintenance use. Store where directed. Maintenance material same production run as installed material. Part 2 Products 2.1 WALL TILE .1 2.2 Ceramic tile: to CAN/CGSB-75.1, Type 3, Class MR , 150 x 75 mm size, edges, glazed, surface, pattern, colour as selected by Departmental Representative. BOND COAT .1 Epoxy bond coat: non-toxic, non-flammable, non-hazardous during storage, mixing, application, and when cured. To produce shock and chemical resistant mortars having the following physical characteristics: .1 .2 .3 .4 .5 .6 .7 .8 2.3 Compressive Strength: 246 kg/cm2. Bond Strength: 53 kg/cm2. Water Absorption: 4.0% Max. Ozone Resistance, 200 hours @ 200 ppm: no loss of strength. Smoke Contribution Factor: 0. Flame Contribution Factor: 0. Finished mortar and grout to be resistant to urine, dilute acid, dilute alkali, sugar, brine and food waste products, petroleum distillates, oil and aromatic solvents. Bond Coat: maximum VOC limit 65 g/L to SCAQMD Rule 1168. GROUT .1 Colouring Pigments: .1 .2 .3 .4 .2 Pure mineral pigments, limeproof and nonfading, complying with ASTM C979. Colouring pigments to be added to grout by manufacturer. Job coloured grout are not acceptable. Use in Commercial Cement Grout, Dry-Set Grout, and Latex Cement Grout. Cement Grout: to ANSI A108.1. .1 Use one part white cement to one part white sand passing a number 30 screen. .3 Commercial Cement Grout: to CTI A118.6. .4 Dry-Set Grout: to CTI A118.6. Project No. R.067898.002 .5 CERAMIC TILING Latex Cement Grout: to ANSI A108.1, fast curing, high early strength, polymermodified, stain resistant, sanded mix for floors, unsanded mix for walls and floors with polished tiles commercial tile grout. Part 3 Execution 3.1 MANUFACTURER'S INSTRUCTIONS .1 3.2 Section 09 30 13 Page 4 of 4 Compliance: comply with manufacturer's written recommendations or specifications, including product technical bulletins, handling, storage and installation instructions, and datasheets. WORKMANSHIP .1 Do tile work in accordance with TTMAC Tile Installation Manual 2006/2007, "Ceramic Tile", except where specified otherwise. .2 Apply tile or backing coats to clean and sound surfaces. .3 Fit tile around corners, fitments, fixtures, drains and other built-in objects. Maintain uniform joint appearance. Cut edges smooth and even. Do not split tiles. .4 Maximum surface tolerance 1:800. .5 Make joints between tile uniform and approximately 1.5 mm wide, plumb, straight, true, even and flush with adjacent tile. Ensure sheet layout not visible after installation. Align patterns. .6 Lay out tiles so perimeter tiles are minimum 1/2 size. .7 Sound tiles after setting and replace hollow-sounding units to obtain full bond. .8 Make internal angles square, external angles rounded bullnosed. .9 Install divider strips at junction of tile flooring and dissimilar materials. .10 Allow minimum 24 hours after installation of tiles, before grouting. .11 Clean installed tile surfaces after installation and grouting cured. 3.3 WALL TILE .1 3.4 Install in accordance with TTMAC FIELD QUALITY CONTROL .1 Manufacturer's Field Services: .1 3.5 Provide manufacturer's field services consisting of product use recommendations and periodic site visits for inspection of product installation in accordance with manufacturer's instructions. CLEANING .1 Proceed in accordance with Section 01 00 10 – General Instructions. END OF SECTION Project No. R.067898.002 ACOUSTICAL CEILINGS Part 1 General 1.1 RELATED REQUIREMENTS .1 Section 09 21 16 – Gypsum Board Assemblies .2 Section 09 22 16 – Non-Structural Metal Framing 1.2 Section 09 51 99 Page 1 of 5 REFERENCES .1 ASTM International .1 .2 .3 .2 Canadian General Standards Board (CGSB) .1 .3 SCAQMD Rule 1113-A2013, Architectural Coatings. Underwriter's Laboratories of Canada (ULC) .1 1.3 Material Safety Data Sheets (MSDS). South Coast Air Quality Management District (SCAQMD), California State, Regulation XI. Source Specific Standards .1 .6 GS-11-11, 2nd Edition, Paints and Coatings. Health Canada/Workplace Hazardous Materials Information System (WHMIS) .1 .5 CAN/CGSB-92.1-M89, Sound Absorptive Prefabricated Acoustical Units. Green Seal Environmental Standards (GS) .1 .4 ASTM C635/C635M-13a, Standard Specifications for the Manufacture, Performance and Testing of Metal Suspension Systems for Acoustical Tile and Lay-In Panel Ceilings. ASTM C636/C636M-13, Standard Practice for Installation of Metal Ceiling Suspension Systems for Acoustical Tile and Lay-In Panels. ASTM E1477-98a(2013), Standard Test Method for Luminous Reflectance Factor of Acoustical Materials by Use of Integrating-Sphere Reflectometers. CAN/ULC-S102-2007, Standard Method of Test for Surface Burning Characteristics of Building Materials and Assemblies. ACTION AND INFORMATIONAL SUBMITTALS .1 Submit in accordance with Section 01 33 00 - Submittal Procedures. .2 Product Data: .1 .2 .3 Submit manufacturer's instructions, printed product literature and data sheets for ceiling panels and ceiling suspension system and include product characteristics, performance criteria, physical size, finish and limitations. Submit 2 copies of WHMIS MSDS in accordance with Section 01 35 29.06 Health and Safety Requirements 01 35 43 - Environmental Procedures. Shop Drawings: .1 Submit drawings stamped and signed by professional engineer registered or licensed in Province of Ontario. Project No. R.067898.002 .2 .3 .4 .4 Engineer who stamped shop drawings shall provide periodic site review and reports and progress billing review and stamped post-installation certification that work of this Section in in conformance with stamped shop drawings. Submit for review and acceptance of each unit. Samples will be returned for inclusion into work. Submit duplicate full size samples of each type acoustical units. Sustainable Design Submittals: .1 .2 .3 1.4 Submit stamped shop drawings for any replacement, reinstatement and/or alterations made to existing acoustical ceiling grid or suspension system Submit reflected ceiling plans for special grid patterns as indicated. Indicate lay-out, insert and hanger spacing and fastening details, splicing method for main and cross runners, change in level details, and acoustical unit support at ceiling fixture lateral bracing and accessories. Samples: .1 .2 .3 .6 Section 09 51 99 Page 2 of 5 Site Review and Post-Installation Certification: .1 .5 ACOUSTICAL CEILINGS Construction Waste Management: .1 Submit project Waste Management Plan and Waste Reduction Workplan highlighting recycling and salvage requirements. .2 Submit calculations on end-of-project recycling rates, salvage rates, and landfill rates demonstrating that 75% of construction wastes were recycled or salvaged. Recycled Content: .1 Submit listing of recycled content products used, including details of required percentages or recycled content materials and products, showing their costs and percentages of post-consumer post-industrial content, and total cost of materials for project. Low-Emitting Materials: .1 Submit listing of touch-up paints used in building, comply with VOC and chemical component limits or restriction requirements. DELIVERY, STORAGE AND HANDLING .1 Deliver, store and handle materials in accordance with Section 01 61 00 - Common Product Requirements and with manufacturer's written instructions. .2 Delivery and Acceptance Requirements: deliver materials to site in original factory packaging, labelled with manufacturer's name and address. .3 Storage and Handling Requirements: .1 .2 .3 Store materials off ground indoors in dry location and in accordance with manufacturer's recommendations in clean, dry, well-ventilated area. Store materials inside, level, under cover. Protect from weather, damage from construction operations and other causes, in accordance with manufacturer's printed instructions. Handle materials to prevent damage to edges or surfaces. Protect metal accessories and trim from being bent or damaged. Project No. R.067898.002 .4 .5 ACOUSTICAL CEILINGS Section 09 51 99 Page 3 of 5 Store and protect acoustic ceiling materials from nicks, scratches, and blemishes. Replace defective or damaged materials with new. .4 Develop Construction Waste Management Plan Waste Reduction Workplan related to Work of this Section. .5 Packaging Waste Management: remove for reuse and return by manufacturer of pallets, crates, padding, packaging materials as specified in Construction Waste Management Plan Waste Reduction Workplan in accordance with Section 01 74 21 Construction/Demolition Waste Management and Disposal. Part 2 Products 2.1 COMPONENTS .1 RH Coats Building - Acoustic units for suspended ceiling system: to CAN/CGSB-92.1. .1 .2 .3 .4 .5 .6 .7 .8 .2 Jean Talon Building - Acoustic units for suspended ceiling system: to CAN/CGSB-92.1. .1 .2 .3 .4 .5 .6 .7 .8 .3 Non-Directional Pattern , Class A. Noise Reduction Coefficient (NRC) designation of 0.55. Light Reflectance (LR) range of 0.85 to ASTM E1477. Edge type square. Colour white Size: varies, refer to drawings. Thickness: 16mm Shape flat. Non-Directional Pattern , Class A. Noise Reduction Coefficient (NRC) designation of 0.55. Light Reflectance (LR) range of 0.85 to ASTM E1477. Edge type square. Colour white Size: varies, refer to drawings. Some tiles will need to be custom-cut Thickness: 19mm Shape flat. Acoustical Suspension: .1 .2 .3 .4 Intermediate duty system to ASTM C635. Basic materials for suspension system: commercial quality cold rolled steel, zinc coated. Suspension system: non fire rated, two directional exposed tee bar grid. Exposed tee bar grid components: shop painted satin sheen, white colour. Components die cut. Main tee with double web, rectangular bulb and 25 mm rolled cap on exposed face. Cross tee with rectangular bulb; web extended to Project No. R.067898.002 .5 .6 .7 .8 .4 Section 09 51 99 Page 4 of 5 form positive interlock with main tee webs; lower flange extended and offset to provide flush intersection. Hanger wire: galvanized soft annealed steel wire, 3.6 mm diameter for access tile ceilings. Hanger inserts: purpose made. Carrying channels: 38 mm channel, galvanized steel, thickness to be determined by engineered shop drawings. Accessories: splices, clips, wire ties, retainers and wall moulding flush reveal, to complement suspension system components, as recommended by system manufacturer. Performance/Design Criteria: .1 2.2 ACOUSTICAL CEILINGS Maximum deflection: 1/360th of span to ASTM C635 deflection test. ACCESSORIES .1 Touch-up paint: in accordance with manufacturer's recommendations for surface conditions: .1 Paint: VOC limit 250 g/L maximum to GS-11 SCAQMD Rule 1113. Part 3 Execution 3.1 EXAMINATION .1 Verification of Conditions: verify conditions of substrates previously installed under other Sections or Contracts are acceptable for product installation in accordance with manufacturer's written instructions prior to acoustical ceiling installation. .1 .2 .3 3.2 Visually inspect substrate in presence of Departmental Representative Inform Departmental Representative of unacceptable conditions immediately upon discovery. Proceed with installation only after unacceptable conditions have been remedied and after receipt of written approval to proceed from Departmental Representative. INSTALLATION .1 Installation: in accordance with ASTM C636 except where specified otherwise. .2 Suspension System: .1 .2 .3 .4 Erect ceiling suspension system after work above ceiling has been inspected by Departmental Representative Secure hangers to overhead structure using attachment methods as indicated acceptable to Departmental Representative. Install hangers spaced at maximum 1200 mm centres and within 150 mm from ends of main tees. Lay out centreline of ceiling both ways, to provide balanced borders at room perimeter with border units not less than 50% of standard unit width system according to reflected ceiling plan. Install wall moulding to provide correct ceiling height. Project No. R.067898.002 .5 .6 .7 .8 .3 Section 09 51 99 Page 5 of 5 Completed suspension system to support super-imposed loads, such as lighting fixtures diffusers grilles and speakers. Support at light fixtures diffusers with additional ceiling suspension hangers within 150 mm of each corner and at maximum 600 mm around perimeter of fixture. Interlock cross member to main runner to provide rigid assembly. Ensure finished ceiling system is square with adjoining walls and level within 1:1000. Acoustic Panels: .1 .2 3.3 ACOUSTICAL CEILINGS Install acoustical panels and tiles in ceiling suspension system. Co-ordinate ceiling work with work of other sections such as interior lighting, fire protection communication, and intrusion and detection systems. CLEANING .1 Progress Cleaning: clean in accordance with Section 01 00 10 – General Instructions. .1 Leave Work area clean at end of each day. .2 Final Cleaning: upon completion remove surplus materials, rubbish, tools and equipment in accordance with Section 01 00 10 – General Instructions. .3 Waste Management: separate waste materials for reuse and recycling in accordance with Section 01 74 21 - Construction/Demolition Waste Management and Disposal. .1 3.4 Remove recycling containers and bins from site and dispose of materials at appropriate facility. PROTECTION .1 Protect installed products and components from damage during construction. .2 Repair damage to adjacent materials caused by acoustical ceiling installation. END OF SECTION Project No. R.067898.002 Part 1 General 1.1 REFERENCES .1 .3 .4 .5 .6 .7 .8 .9 .10 .11 .2 Material Safety Data Sheets (MSDS). South Coast Air Quality Management District (SCAQMD), California State .1 .2 1.2 INSTALL Resilient Certification Health Canada/Workplace Hazardous Materials Information System (WHMIS) .1 .5 NFPA 253 Test Method for Critical Radiant Flux of Floor-Covering Systems Using a Radiant Heat Energy Source. NFPA 258 Test Method for Specific Optical Density of Smoke Generated by Solid Materials. International Standards and Training Alliance (INSTALL): .1 .4 ASTM F 2034 Standard Specification for Linoleum Sheet Floor Covering. ASTM F 1869 Standard Test Method for Measuring Vapor Emission Rate of Concrete Subfloor Using Anhydrous Calcium Chloride ASTM F 2170 Standard Test Method for Determining Relative Humidity in Concrete Floor Slabs Using in situ Probes ASTM F 1861 Standard Specification for Resilient Wall Base. ASTM F 710 Standard Practice for Preparing Concrete Floors to Receive Resilient Flooring. ASTM F 1482 Standard Practice for Installation and Preparation of Panel Type Underlayments to Receive Resilient Flooring. ASTM E 648 Standard Test Method for Critical Radiant Flux of Floor-Covering Systems Using a Radiant Heat Energy Source. ASTM E 662 Standard Test Method for Specific Optical Density of Smoke Generated by Solid Materials. ASTM E 84 Standard Test Method for Surface Burning Characteristics of Building Materials. ASTM E 492 Standard Test Method for Laboratory Measurement of lmpact Sound Transmission through Floor-Ceiling Assemblies Using the Tapping Machine. ASTM E 989 Standard Classification for Determination of lmpact lnsulation Class (llC). National Fire Protection Association (NFPA): .1 .3 Section 09 65 16 Page 1 of 6 American Society for Testing and Materials International (ASTM) .1 .2 .2 RESILIENT SHEET FLOORING SCAQMD Rule 1113-13, Architectural Coatings. SCAQMD Rule 1168-05, Adhesives and Sealants Applications. ACTION AND INFORMATIONAL SUBMITTALS .1 Provide submittals in accordance with Section 01 33 00 - Submittal Procedures. Project No. R.067898.002 RESILIENT SHEET FLOORING Section 09 65 16 Page 2 of 6 .2 Shop Drawings: submit shop drawings showing layout, profiles, and product components, including anchorage, accessories, finish colours, patterns and textures. .3 Provide product data in accordance with Section 01 33 00 - Submittal Procedures. .4 Provide samples in accordance with Section 01 33 00 - Submittal Procedures. .1 Submit duplicate 300 x 300 mm sample pieces of sheet material, edge and transition strips. .5 Certification of Compliance: provide Letter of Compliance signed by manufacturer certifying materials comply with specified performance characteristics and criteria, and physical requirements. .6 Manufacturer’s Instructions: provide manufacturer’s installation instructions. .7 Provide Manufacturer’s Field Reports specified herein. .8 Closeout Submittals – submit operation and maintenance data for installed products in accordance with Section 01 78 00 – Closeout Submittals. Include methods for maintaining installed products and precautions against cleaning materials and methods detrimental to finishes and performance. 1.3 QUALITY ASSURANCE .1 Mock-ups: install at project site a job mock-up using acceptable products and manufacturer approved installation methods. Obtain Departmental Representative’s acceptance of finish colour, texture and pattern, and workmanship standard. Comply with Section 01 45 00 – Quality Control. .2 Pre-Installation Meetings: Conduct pre-installation meeting to verify project requirements, substrate conditions, manufacturer's installation instructions, and manufacturer's warranty requirements. Comply with Division 1 Project Management and Coordination (Project Meetings) Section. .3 Pre-Installation Testing: Conduct pre-installation testing as follows: Specify testing (i.e. moisture tests, bond test, pH test, etc). 1.4 DELIVERY, STORAGE AND HANDLING .1 Deliver, store and handle materials in accordance with Section 01 61 00 - Common Product Requirements. .2 Waste Management and Disposal: .1 1.5 Separate waste materials for reuse recycling in accordance with Section 01 74 21 - Construction/Demolition Waste Management and Disposal. AMBIENT CONDITIONS .1 Environmental Requirements/Conditions: In accordance with manufacturer's recommendations, areas to receive flooring should be clean, fully enclosed and weathertight. The permanent HVAC must be fully operational, controlled and set at a minimum of 20o C for a minimum of seven days prior to, during, and seven days after the installation. The flooring material should be conditioned in the same manner for at least 48 hours prior to the installation. Areas to receive flooring shall be adequately lighted to allow for proper inspection of the substrate, installation and seaming of the flooring, and for final inspection. Project No. R.067898.002 .2 Section 09 65 16 Page 3 of 6 Temperature Requirements: Maintain air temperature in spaces where products will be installed for time period before, during, and after installation as recommended by manufacturer. .1 1.6 RESILIENT SHEET FLOORING Temperature Conditions: 20o C for a minimum of seven days prior to, during, and seven days after the installation. MAINTENANCE .1 Extra Materials: .1 .2 .3 .4 .5 .6 Provide extra materials of resilient sheet flooring and adhesives in accordance with Section 01 78 00 - Closeout Submittals. Resilient sheet flooring to be from same production run as products installed. Package products with protective covering and identify with descriptive labels. Provide 5 m2 of each colour, pattern and type flooring material required for project for maintenance use. Extra materials one piece and from same production run as installed materials. Identify each roll of sheet flooring and each container of adhesive. Deliver to Departmental Representative, upon completion of the work of this section. Store where directed by Departmental Representative. Part 2 Products 2.1 MATERIALS .1 Linoleum sheet flooring: Homogeneous sheet linoleum of primarily natural materials consisting of linseed oil, wood flour, and rosin binders, mixed and calendered onto natural jute backing. Pattern and color shall extend throughout total thickness of material. .1 .2 .3 .4 .5 .6 .7 .8 .2 Width: 2 Meters Length: 32 Meters Gauge: 2.5mm Backing: Jute Pattern and Color: .1 Up to 3 colours selected by Departmental Representative Adhesive: as recommended by manufacturer Heat Welding Rod: as recommended by manufacturer, colour- and texturematched to floor finish Topshield finish Resilient base: continuous, top set, complete with premoulded end stops and external corners: .1 .2 .3 Type: rubber. Style: cove. Thickness: 3.17 mm. Project No. R.067898.002 .4 .5 .6 .3 RESILIENT SHEET FLOORING Section 09 65 16 Page 4 of 6 Height: 152 mm. Lengths: cut lengths minimum 2400 mm. Colour: colour selected by Departmental Representative Primers and adhesives: of types recommended by resilient flooring manufacturer for specific material on applicable substrate, above, on or below grade. .1 .2 Rubber floor adhesives: .1 Adhesive: maximum VOC limit 60 g/L to SCAQMD Rule 1168. Cove base adhesives: .1 Adhesive: maximum VOC limit 50 g/L to SCAQMD Rule 1168. .4 Sub-floor filler and leveller: white premix latex requiring water only to produce cementitious paste 2 part latex-type filler requiring no water or as recommended by flooring manufacturer for use with their product. .5 Metal edge strips: .1 Brushed stainless steel, with lips to extend under new floor finih and over edge of existing adjacent carpet. .6 External corner protectors: stainless steel, type recommended by flooring manufacturer. .7 Edging to floor penetrations: stainless steel, type recommended by flooring manufacturer. .8 Sealer and wax: type recommended by resilient flooring material manufacturer for material type and location. .1 Sealer: maximum VOC limit 100 g/L to SCAQMD Rule 1113. Part 3 Execution 3.1 MANUFACTURER'S INSTRUCTIONS .1 3.2 Compliance: comply with manufacturer's written recommendations or specifications, including product technical bulletins, handling, storage and installation instructions, and datasheets. SITE VERIFICATION OF CONDITIONS .1 3.3 Ensure concrete floors are clean and dry by using test methods recommended by flooring manufacturer. PREPARATION .1 Remove existing carpet. .2 Remove or treat old adhesives to prevent residual, old flooring adhesives from bleeding through to new flooring and/or interfering with the bonding of new adhesives. .3 Clean floor and apply filler; trowel and float to leave smooth, flat hard surface. Prohibit traffic until filler cured and dry. .4 Remove sub-floor ridges and bumps. Fill low spots, cracks, joints, holes and other defects with sub-floor filler. .5 Prime Seal concrete slab to resilient flooring manufacturer's printed instructions. Project No. R.067898.002 3.4 RESILIENT SHEET FLOORING Section 09 65 16 Page 5 of 6 APPLICATION: FLOORING .1 Adhesive Flooring Installation: Cut required length of linoleum flooring from roll, allowing enough material to extend up the wall 4 to 6 inches at either end. Layout and position sheet flooring so that any seams will fall at least 6 inches from underlayment joints or saw cuts in concrete substrate. Scribe and cut flooring material to shape of vertical surfaces, including walls and partitions. Apply adhesive and lay sheet flooring into wet adhesive and roll with a 50 kg roller. Install sheet flooring square with room axis. .1 .2 .2 Installation Techniques: .1 .2 .3 .4 .5 .6 .7 3.5 Adhesive, Seamless Flooring Installation: Rout out seams and heat weld together with complementary colored heat welding rod of complimentary composition in accordance with resilient flooring manufacturer's recommendations. Adhesive Material Installation: Use trowel as recommended by flooring manufacturer for specific adhesive. Spread at rate recommended by flooring manufacturer. Install flooring before new partitions. Scribe, cut, fit flooring to butt tightly to vertical surfaces, permanent fixtures and built-in furniture, including pipes, outlets, edgings, thresholds, nosings, and cabinets. Extend flooring into toe spaces, door reveals, closets, and similar openings. Install flooring on covers for telephone and electrical ducts, and similar items occurring within finish floor areas. Maintain overall continuity of color and pattern with pieces of flooring installed on these covers. Do not install resilient flooring over expansion joints. Use expansion joint covers manufactured for use with resilient flooring. Refer to other specification sections for expansion joint covers. Adhere resilient flooring to substrate without producing open cracks, voids, raising and puckering at joints, telegraphing of adhesive spreader marks, or other surface imperfections in completed installation. .1 Use adhesive applied to substrate in compliance with flooring manufacturer’s recommendations, including those for trowel notching, adhesive mixing, and adhesive open and working times. Roll resilient flooring as required by resilient flooring manufacturer. APPLICATION: BASE .1 Lay out base to keep number of joints at minimum. .2 Clean substrate and prime with one coat of adhesive. .3 Apply adhesive to back of base. .4 Set base against wall and floor surfaces tightly by using 3 kg hand roller. .5 Install straight and level to variation of 1:1000. .6 Scribe and fit to door frames and other obstructions. Use premoulded end pieces at flush door frames. Project No. R.067898.002 RESILIENT SHEET FLOORING Section 09 65 16 Page 6 of 6 .7 Cope internal corners. Use premoulded corner units for right angle external corners. Use formed straight base material for external corners of other angles. .8 Use toeless type base where floor finish will be carpet, coved type elsewhere. .9 Install toeless type base before installation of carpet on floors. .10 Heat weld base in accordance with manufacturer's printed instructions. 3.6 FIELD QUALITY CONTROL .1 Manufacturer's Field Services: .1 3.7 Provide manufacturer's field services consisting of product use recommendations and periodic site visits for inspection of product installation in accordance with manufacturer's instructions. CLEANING .1 Proceed in accordance with Section 01 00 10 – General Instructions. .2 Cleaning: Remove temporary coverings and protection of adjacent work areas. Repair or replace damaged installed products. Clean installed products in accordance with manufacturer's instructions prior to Departmental Representative’s acceptance. Remove construction debris from project site and legally dispose of debris. .1 .2 .3 .4 3.8 Remove visible adhesive and other surface blemishes using cleaning methods recommended by floor manufacturer. Sweep and vacuum floor after installation. Do not wash floor until after time period recommended by flooring manufacturer. Damp mop flooring to remove black marks and soil. PROTECTION .1 Protect new floors from time of final set of adhesive until final inspection. .2 Prohibit traffic on floor for 48 hours after installation. .3 Use only water-based coating for linoleum. END OF SECTION Project No. R.067898.002 Part 1 General 1.1 SUMMARY .1 Section 09 91 23 Page 1 of 12 Related Requirements .1 .2 .3 1.2 INTERIOR PAINTING Section 08 11 00 – Metal Frames Section 08 14 16 – Flush Wood Doors Section 09 21 16 – Gypsum Board Assemblies REFERENCES .1 Department of Justice Canada (Jus) .1 .2 Environmental Protection Agency (EPA) .1 .3 EPA Test Method for Measuring Total Volatile Organic Compound Content of Consumer Products, Method 24 - 1995, (for Surface Coatings). Health Canada / Workplace Hazardous Materials Information System (WHMIS) .1 .4 Canadian Environmental Protection Act (CEPA), 1999, c. 33 Material Safety Data Sheets (MSDS). Master Painters Institute (MPI) .1 MPI Architectural Painting Specifications Manual, Current Edition .5 National Fire Code of Canada - 2010 .6 Society for Protective Coatings (SSPC) .1 .7 Transport Canada (TC) .1 1.3 SSPC Painting Manual, Volume Two, 8th Edition, Systems and Specifications Manual. Transportation of Dangerous Goods Act (TDGA), 1992, c. 34 . QUALITY ASSURANCE .1 Mock-Ups: .1 Construct mock-ups in accordance with Section 01 45 00 - Quality Control. .1 Provide one room mock-up. Prepare and paint designated room (in each colour scheme) to specified requirements, with specified paint or coating showing selected colours, gloss/sheen, textures. .2 Mock-up will be used: .1 To judge workmanship, substrate preparation, operation of equipment and material application and workmanship to MPI Architectural Painting Specification Manual standards. .3 Locate where directed. .4 Allow 24 hours for inspection of mock-up before proceeding with work. Project No. R.067898.002 .5 .2 When accepted, mock-up will demonstrate minimum standard of quality required for this work. Approved mock-up may remain as part of finished work. Convene pre-installation meeting one week prior to beginning work of this Section. .1 Verify project requirements. .2 Review installation and substrate conditions. .3 Coordination with other building subtrades. .4 Review manufacturer's installation instructions and warranty requirements. Health and Safety: .1 1.4 Section 09 91 23 Page 2 of 12 Pre-Installation Meeting: .1 .3 INTERIOR PAINTING Do construction occupational health and safety in accordance with Section 01 35 29.06 - Health and Safety Requirements. SCHEDULING .1 Submit work schedule for various stages of painting to Departmental Representative for review. Submit schedule minimum of 48 hours in advance of proposed operations. .2 Obtain written authorization from Departmental Representative for changes in work schedule. .3 Schedule painting operations to prevent disruption of occupants. 1.5 ACTION AND INFORMATIONAL SUBMITTALS .1 Submittals in accordance with Section 01 33 00 - Submittal Procedures. .2 Product Data: .1 .2 .3 .3 Submit product data and instructions for each paint and coating product to be used, clearly identifying the MPI product number and paint system to which it belongs. Submit product data for the use and application of paint thinner. Submit two copies of Workplace Hazardous Materials Information System (WHMIS) Material Safety Data Sheets (MSDS) in accordance with Section 01 33 00 - Submittal Procedures. Indicate VOCs during application and curing. Samples: .1 .2 Submit full range colour sample chips to indicate where colour availability is restricted. Submit duplicate 200 x 300 mm sample panels of each paint with specified paint or coating in colours, gloss/sheen and textures required to MPI Architectural Painting Specification Manual standards submitted on following substrate materials: .1 3 mm plate steel for finishes over metal surfaces. .2 13 mm birch plywood for finishes over wood surfaces. Project No. R.067898.002 INTERIOR PAINTING Section 09 91 23 Page 3 of 12 .3 .3 .4 .5 .6 .7 1.6 50 mm concrete block for finishes over concrete or concrete masonry surfaces. .4 13 mm gypsum board for finishes over gypsum board and other smooth surfaces. Retain reviewed samples on-site to demonstrate acceptable standard of quality for appropriate on-site surface. Test reports: submit certified test reports for paint from approved independent testing laboratories, indicating compliance with specifications for specified performance characteristics and physical properties. .1 Lead, cadmium and chromium: presence of and amounts. .2 Mercury: presence of and amounts. .3 Organochlorines and PCBs: presence of and amounts. Certificates: submit certificates signed by manufacturer certifying that materials comply with specified performance characteristics and physical properties. Manufacturer's Instructions: .1 Submit manufacturer's application instructions. Closeout Submittals: submit maintenance data for incorporation into manual specified in Section 01 78 00 - Closeout Submittals include following: .1 Product name, type and use. .2 Manufacturer's product number. .3 Colour numbers. .4 MPI Environmentally Friendly classification system rating. MAINTENANCE .1 Extra Materials: .1 .2 .3 1.7 Deliver to extra materials from same production run as products installed. Package products with protective covering and identify with descriptive labels. Comply with Section 01 78 00 - Closeout Submittals. Quantity: provide one - one four litre can of each type and colour of primer and paint. Identify colour and paint type in relation to established colour schedule and finish system. Delivery, storage and protection: comply with Departmental Representative requirements for delivery and storage of extra materials. DELIVERY, STORAGE AND HANDLING .1 Packing, Shipping, Handling and Unloading: .1 .2 Pack, ship, handle and unload materials in accordance with Section 01 61 00 Common Product Requirements and manufacturer's written instructions. Acceptance at Site: .1 Identify products and materials with labels indicating: .1 Manufacturer's name and address. .2 Type of paint or coating. .3 Compliance with applicable standard. Project No. R.067898.002 .4 INTERIOR PAINTING Colour number in accordance with established colour schedule. .3 Remove damaged, opened and rejected materials from site. .4 Storage and Protection: .1 .2 .3 Section 09 91 23 Page 4 of 12 Provide and maintain dry, temperature controlled, secure storage. Store materials and supplies away from heat generating devices. Store materials and equipment in well ventilated area with temperature range 7 degrees C to 30 degrees C. .5 Store temperature sensitive products above minimum temperature as recommended by manufacturer. .6 Keep areas used for storage, cleaning and preparation clean and orderly. After completion of operations, return areas to clean condition. .7 Remove paint materials from storage only in quantities required for same day use. .8 Fire Safety Requirements: .1 .2 .3 .9 Provide one 9 kg Type ABC or dry chemical fire extinguisher as recommended by the manufacturer adjacent to storage area. Store oily rags, waste products, empty containers and materials subject to spontaneous combustion in ULC approved, sealed containers and remove from site on a daily basis. Handle, store, use and dispose of flammable and combustible materials in accordance with National Fire Code of Canada requirements. Waste Management and Disposal: .1 .2 .3 .4 .5 .6 .7 .8 .9 .10 Separate waste materials for reuse and recycling in accordance with Section 01 74 21 - Construction/Demolition Waste Management and Disposal. Remove from site and dispose of packaging materials at appropriate recycling facilities. Collect and separate for disposal paper, plastic, polystyrene, corrugated cardboard packaging material in appropriate on-site bins for recycling in accordance with Waste Management Plan (WMP). Separate for reuse recycling and place in designated containers Steel Metal Plastic waste in accordance with Waste Management Plan (WMP). Place materials defined as hazardous or toxic in designated containers. Handle and dispose of hazardous materials in accordance with CEPA, TDGA, Regional and Municipal, regulations. Ensure emptied containers are sealed and stored safely. Unused paint coating materials must be disposed of at official hazardous material collections site as approved by Departmental Representative. Paint, stain and wood preservative finishes and related materials (thinners, and solvents) are regarded as hazardous products and are subject to regulations for disposal. Information on these controls can be obtained from Provincial Ministries of Environment and Regional levels of Government. Material which cannot be reused must be treated as hazardous waste and disposed of in an appropriate manner. Project No. R.067898.002 .11 .12 .13 .14 1.8 INTERIOR PAINTING Section 09 91 23 Page 5 of 12 Place materials defined as hazardous or toxic waste, including used sealant and adhesive tubes and containers, in containers or areas designated for hazardous waste. To reduce the amount of contaminants entering waterways, sanitary/storm drain systems or into ground follow these procedures: .1 Retain cleaning water for water-based materials to allow sediments to be filtered out. .2 Retain cleaners, thinners, solvents and excess paint and place in designated containers and ensure proper disposal. .3 Return solvent and oil soaked rags used during painting operations for contaminant recovery, proper disposal, or appropriate cleaning and laundering. .4 Dispose of contaminants in approved legal manner in accordance with hazardous waste regulations. .5 Empty paint cans are to be dry prior to disposal or recycling (where available). Where paint recycling is available, collect waste paint by type and provide for delivery to recycling or collection facility. Set aside and protect surplus and uncontaminated finish materials. Deliver to or arrange collection by employees, individuals, or organizations for verifiable reuse or re-manufacturing. SITE CONDITIONS .1 Heating, Ventilation and Lighting: .1 .2 .3 .4 .5 .6 .2 Ventilate enclosed spaces. Provide heating facilities to maintain ambient air and substrate temperatures above 10 degrees C for 24 hours before, during and after paint application until paint has cured sufficiently. Provide continuous ventilation for seven days after completion of application of paint. Coordinate use of existing ventilation system with Departmental Representative and ensure its operation during and after application of paint as required. Provide temporary ventilating and heating equipment where permanent facilities are not available or supplemental ventilating and heating equipment if ventilation and heating from existing system is inadequate to meet minimum requirements. Provide minimum lighting level of 323 Lux on surfaces to be painted. Temperature, Humidity and Substrate Moisture Content Levels: .1 Unless pre-approved written approval by Departmental Representative, perform no painting when: .1 Ambient air and substrate temperatures are below 10 degrees C. .2 Substrate temperature is above 32 degrees C unless paint is specifically formulated for application at high temperatures. .3 Substrate and ambient air temperatures are not expected to fall within MPI or paint manufacturer's prescribed limits. Project No. R.067898.002 INTERIOR PAINTING Section 09 91 23 Page 6 of 12 .4 .2 .3 .4 .3 Surface and Environmental Conditions: .1 .2 .3 .4 The relative humidity is under 85% or when the dew point is more than 3 degrees C variance between the air/surface temperature. Paint should not be applied if the dew point is less than 3 degrees C below the ambient or surface temperature. Use sling psychrometer to establish the relative humidity before beginning paint work. .5 Ensure that conditions are within specified limits during drying or curing process, until newly applied coating can itself withstand 'normal' adverse environmental factors. Perform painting work when maximum moisture content of the substrate is below: .1 Allow new concrete and masonry to cure minimum of 28 days. .2 15% for wood. .3 12% for plaster and gypsum board. Test for moisture using calibrated electronic Moisture Meter. Test concrete floors for moisture using "cover patch test". Test concrete, masonry and plaster surfaces for alkalinity as required. Apply paint finish in areas where dust is no longer being generated by related construction operations or when wind or ventilation conditions are such that airborne particles will not affect quality of finished surface. Apply paint to adequately prepared surfaces and to surfaces within moisture limits. Apply paint when previous coat of paint is dry or adequately cured. Additional interior application requirements: .1 .2 Apply paint finishes when temperature at location of installation can be satisfactorily maintained within manufacturer's recommendations. Schedule operations to approval of Departmental Representative such that painted surfaces will have dried and cured sufficiently before occupants are affected. Part 2 Products 2.1 MATERIALS .1 Paint materials listed in the MPI Approved Products List (APL) are acceptable for use on this project. .2 Provide paint materials for paint systems from single manufacturer. .3 Only qualified products with E2 or E3 "Environmentally Friendly" rating are acceptable for use on this project. .4 Conform to latest MPI requirements for interior painting work including preparation and priming. .5 Materials (primers, paints, coatings, varnishes, stains, lacquers, fillers, thinners, solvents, etc.) in accordance with MPI Architectural Painting Specification Manual "Approved Product" listing. Project No. R.067898.002 INTERIOR PAINTING Section 09 91 23 Page 7 of 12 .6 Linseed oil, shellac, and turpentine: highest quality product from approved manufacturer listed in MPI Architectural Painting Specification Manual, compatible with other coating materials as required. .7 Flash point: 61.0 degrees C or greater for water-borne surface coatings and recycled water-borne surface coatings. 2.2 COLOURS .1 Departmental Representative will provide colour schedule after contract award. .2 Colour schedule will be based upon selection of up to 11 colours. .3 Selection of colours from manufacturers full range of colours. .4 Where specific products are available in restricted range of colours, selection based on limited range. .5 Second coat in three coat system to be tinted slightly lighter colour than top coat to show visible difference between coats. 2.3 MIXING AND TINTING .1 Perform colour tinting operations prior to delivery of paint to site. Obtain written approval from Departmental Representative for tinting of painting materials. .2 Mix paste, powder or catalyzed paint mixes inaccordance with manufacturer's written instructions. .3 Use and add thinner in accordance with paint manufacturer's recommendations. Do not use kerosene or similar organic solvents to thin water-based paints. .4 Thin paint for spraying in accordance with paint manufacturer's instructions. .5 Re-mix paint in containers prior to and during application to ensure break-up of lumps, complete dispersion of settled pigment, and colour and gloss uniformity. 2.4 GLOSS/SHEEN RATINGS .1 Paint gloss is defined as sheen rating of applied paint, in accordance with following values: Gloss Level 1 - Matte Finish (flat) Gloss Level 2 - Velvet-Like Finish Gloss Level 3 - Eggshell Finish Gloss Level 4 - Satin-Like Finish Gloss Level 5 - Traditional Semi-Gloss Finish Gloss Level 6 - Traditional Gloss Gloss Level 7 - High Gloss Finish .2 Gloss @ 60 degrees Max. 5 Sheen @ 85 degrees Max. 10 Max.10 10 to 35 10 to 25 20 to 35 35 to 70 10 to 35 min. 35 70 to 85 More than 85 Gloss level ratings of painted surfaces as indicated. Project No. R.067898.002 2.5 INTERIOR PAINTING Section 09 91 23 Page 8 of 12 INTERIOR PAINTING SYSTEMS .1 Galvanized metal: doors, frames, railings, misc. steel, pipes, overhead decking, and ducts. .1 .2 Dressed lumber: including doors, door and window frames, casings, mouldings: .1 .3 INT 9.2B - High performance architectural latex, G3 walls, G 2 ceilings Canvas and cotton coverings. .1 2.6 INT 6.3A - High performance architectural latex, G5 finish. Plaster and gypsum board: gypsum wallboard, drywall, "sheet rock type material", and textured finishes: .1 .4 INT 5.3M - High performance architectural latex, G5 finish INT 10.1A – Latex, G3 finish SOURCE QUALITY CONTROL .1 Perform following tests on each batch of consolidated post-consumer material before surface coating is reformulated and canned. Testing by laboratory or facility which has been accredited by Standards Council of Canada. .1 .2 .3 Lead, cadmium and chromium are to be determined using ICP-AES (Inductively Coupled Plasma - Atomic Emission Spectroscopy) technique no. 6010 as defined in EPA SW-846. Mercury is to be determined by Cold Vapour Atomic Absorption Spectroscopy using Technique no. 7471 as defined in EPA SW-846. Organochlorines and PCBs are to be determined by Gas Chromatography using Technique no. 8081 as defined in EPA SW-846. Part 3 Execution 3.1 MANUFACTURER'S INSTRUCTIONS .1 3.2 Compliance: comply with manufacturer's written recommendations or specifications, including product technical bulletins, handling, storage and installation instructions, and data sheet. GENERAL .1 Perform preparation and operations for interior painting in accordance with MPI Architectural Painting Specifications Manual except where specified otherwise. .2 Apply paint materials in accordance with paint manufacturer's written application instructions. 3.3 EXAMINATION .1 Investigate existing substrates for problems related to proper and complete preparation of surfaces to be painted. Report to Departmental Representative damages, defects, unsatisfactory or unfavourable conditions before proceeding with work. Project No. R.067898.002 INTERIOR PAINTING Section 09 91 23 Page 9 of 12 .2 Conduct moisture testing of surfaces to be painted using properly calibrated electronic moisture meter, except test concrete floors for moisture using simple "cover patch test". Do not proceed with work until conditions fall within acceptable range as recommended by manufacturer. .3 Maximum moisture content as follows: .1 .2 .3 .4 3.4 Stucco, plaster and gypsum board: 12%. Concrete: 12%. Clay and Concrete Block/Brick: 12%. Wood: 15%. PREPARATION .1 Protection: .1 .2 .3 .4 .2 Surface Preparation: .1 .2 .3 .3 Protect existing building surfaces and adjacent structures from paint spatters, markings and other damage by suitable non-staining covers or masking. If damaged, clean and restore surfaces as directed by Departmental Representative. Protect items that are permanently attached such as Fire Labels on doors and frames. Protect factory finished products and equipment. Protect building occupants and general public in and about the building. Remove electrical cover plates, light fixtures, surface hardware on doors, bath accessories and other surface mounted equipment, fittings and fastenings prior to undertaking painting operations. Identify and store items in secure location and re-installed after painting is completed. Move and cover furniture and portable equipment as necessary to carry out painting operations. Replace as painting operations progress. Place "WET PAINT" signs in occupied areas as painting operations progress. Signs to approval of Departmental Representative. Clean and prepare surfaces in accordance with MPI Architectural Painting Specification Manual requirements. Refer to MPI Manual in regard to specific requirements and as follows: .1 .2 .3 .4 .5 .6 Remove dust, dirt, and other surface debris by vacuuming, wiping with dry, clean cloths or compressed air. Wash surfaces with a biodegradable detergent and bleach where applicable and clean warm water using a stiff bristle brush to remove dirt, oil and other surface contaminants. Rinse scrubbed surfaces with clean water until foreign matter is flushed from surface. Allow surfaces to drain completely and allow to dry thoroughly. Prepare surfaces for water-based painting, water-based cleaners should be used in place of organic solvents. Use trigger operated spray nozzles for water hoses. Project No. R.067898.002 .7 INTERIOR PAINTING Section 09 91 23 Page 10 of 12 Many water-based paints cannot be removed with water once dried. Minimize use of mineral spirits or organic solvents to clean up water-based paints. .4 Prevent contamination of cleaned surfaces by salts, acids, alkalis, other corrosive chemicals, grease, oil and solvents before prime coat is applied and between applications of remaining coats. Apply primer, paint, or pretreatment as soon as possible after cleaning and before deterioration occurs. .5 Where possible, prime non-exposed surfaces of new wood surfaces before installation. Use same primers as specified for exposed surfaces. .1 .2 .3 Apply vinyl sealer to MPI #36 over knots, pitch, sap and resinous areas. Apply wood filler to nail holes and cracks. Tint filler to match stains for stained woodwork. .6 Sand and dust between coats as required to provide adequate adhesion for next coat and to remove defects visible from a distance up to 1000 mm. .7 Clean metal surfaces to be painted by removing rust, loose mill scale, welding slag, dirt, oil, grease and other foreign substances in accordance with MPI requirements. Remove traces of blast products from surfaces, pockets and corners to be painted by brushing with clean brushes blowing with clean dry compressed air and/or vacuum cleaning. .8 Touch up of shop primers with primer as specified. .9 Do not apply paint until prepared surfaces have been accepted by Departmental Representative. 3.5 APPLICATION .1 Method of application to be as approved by Departmental Representative. Apply paint by brush or roller. Conform to manufacturer's application instructions unless specified otherwise. .2 Brush and Roller Application: .1 .2 .3 .4 .5 Apply paint in uniform layer using brush and/or roller type suitable for application. Work paint into cracks, crevices and corners. Paint surfaces and corners not accessible to brush using daubers and/or sheepskins. Paint surfaces and corners not accessible to roller using brush, daubers or sheepskins. Brush and/or roll out runs and sags, and over-lap marks. Rolled surfaces free of roller tracking and heavy stipple. Remove runs, sags and brush marks from finished work and repaint. .3 Use dipping, sheepskins or daubers only when no other method is practical in places of difficult access. .4 Apply coats of paint continuous film of uniform thickness. Repaint thin spots or bare areas before next coat of paint is applied. .5 Allow surfaces to dry and properly cure after cleaning and between subsequent coats for minimum time period as recommended by manufacturer. .6 Sand and dust between coats to remove visible defects. Project No. R.067898.002 INTERIOR PAINTING Section 09 91 23 Page 11 of 12 .7 Finish surfaces both above and below sight lines as specified for surrounding surfaces, including such surfaces as tops of interior cupboards and cabinets and projecting ledges. .8 Finish inside of cupboards and cabinets as specified for outside surfaces. .9 Finish closets and alcoves as specified for adjoining rooms. .10 Finish top, bottom, edges and cutouts of doors after fitting as specified for door surfaces. 3.6 MECHANICAL/ELECTRICAL EQUIPMENT .1 Paint finished area exposed conduits, piping, hangers, ductwork and other mechanical and electrical equipment with colour and finish to match adjacent surfaces, except as indicated. .2 Boiler room, mechanical and electrical rooms: paint exposed conduits, piping, hangers, ductwork and other mechanical and electrical equipment. .3 Other unfinished areas: leave exposed conduits, piping, hangers, ductwork and other mechanical and electrical equipment in original finish and touch up scratches and marks. .4 Touch up scratches and marks on factory painted finishes and equipment with paint as supplied by manufacturer of equipment. .5 Do not paint over nameplates. .6 Keep sprinkler heads free of paint. .7 Paint inside of ductwork where visible behind grilles, registers and diffusers with primer and one coat of matt black paint. .8 Paint fire protection piping red. .9 Paint disconnect switches for fire alarm system and exit light systems in red enamel. .10 Paint natural gas piping yellow. .11 Paint both sides and edges of backboards for telephone and electrical equipment before installation. Leave equipment in original finish except for touch-up as required, and paint conduits, mounting accessories and other unfinished items. .12 Do not paint interior transformers and substation equipment. 3.7 SITE TOLERANCES .1 Walls: no defects visible from a distance of 1000 mm at 90 degrees to surface. .2 Ceilings: no defects visible from floor at 45 degrees to surface when viewed using final lighting source. .3 Final coat to exhibit uniformity of colour and uniformity of sheen across full surface area. 3.8 FIELD QUALITY CONTROL .1 Standard of Acceptance: .1 .2 .3 Walls: no defects visible from a distance of 1000 mm at 90 degreesto surface. Ceilings: no defects visible from floor at 45 degrees degrees to surface when viewed using final lighting source. Final coat to exhibit uniformity of colour and uniformity of sheen across full surface area. Project No. R.067898.002 INTERIOR PAINTING Section 09 91 23 Page 12 of 12 .2 Advise Departmental Representative when surfaces and applied coating is ready for inspection. Do not proceed with subsequent coats until previous coat has been approved. .3 Cooperate with inspection firm and provide access to areas of work. .4 Retain purchase orders, invoices and other documents to prove conformance with noted MPI requirements when requested by Departmental Representative. 3.9 RESTORATION .1 Clean and re-install hardware items removed before undertaken painting operations. .2 Remove protective coverings and warning signs as soon as practical after operations cease. .3 Remove paint splashings on exposed surfaces that were not painted. Remove smears and spatter immediately as operations progress, using compatible solvent. .4 Protect freshly completed surfaces from paint droppings and dust to approval of Departmental Representative. Avoid scuffing newly applied paint. .5 Restore areas used for storage, cleaning, mixing and handling of paint to clean condition as approved by Departmental Representative. END OF SECTION Project No. R.067898.002 Part 1 General 1.1 REFERENCES .1 Material Safety Data Sheets (MSDS). South Coast Air Quality Management District (SCAQMD), California State .1 1.2 Test Method for Measuring Total Volatile Organic Compound Content of Consumer Products, Method 24 (for Surface Coatings). Health Canada/Workplace Hazardous Materials Information System (WHMIS) .1 .4 Maintenance Repainting Manual, current edition, Master Painters Institute (MPI), including Identifiers, Evaluation, Systems, Preparation and Approved Product List. Environmental Protection Agency (EPA) .1 .3 Section 09 91 23.01 Page 1 of 11 The Master Painters Institute (MPI) .1 .2 INTERIOR RE-PAINTING SCAQMD Rule 1113-13, Architectural Coatings. QUALITY ASSURANCE .1 Conform to latest MPI requirements for interior repainting work including cleaning, preparation and priming. .2 Materials (primers, paints, coatings, varnishes, stains, lacquers, fillers, thinners and solvents) shall be in accordance with the latest edition of the MPI Approved Product List and shall be from a single manufacturer for each system used. .3 Paint materials such as linseed oil, shellac, reducers and turpentine shall be the highest quality product of an approved manufacturer listed in MPI Maintenance Repainting Manual and shall be compatible with other coating materials as required. .4 Retain purchase orders, invoices and other documents to prove conformance with noted MPI requirements when requested by Departmental Representative. .5 Standard of Acceptance: when viewed using final lighting source surfaces shall indicate the following: .1 .2 .3 .6 Walls: no defects visible from a distance of 1000 mm at 90 degrees to surface. Ceilings: no defects visible from floor at 45 degrees to surface. Final coat to exhibit uniformity of colour and sheen across full surface area. Mock-ups: construct mock-ups in accordance with Section 01 45 00 - Quality Control. .1 .2 Provide a mock-up in accordance with requirements of Section 01 45 00 Quality Control to Departmental Representative approval. Prepare and repaint mock-up designated interior room, to requirements specified herein, with specified paint or coating showing selected colours, gloss/sheen, textures and workmanship to MPI Maintenance Repainting Manual standards for review and approval. Project No. R.067898.002 .3 1.3 INTERIOR RE-PAINTING Section 09 91 23.01 Page 2 of 11 When approved, repainted room, surface and/or item shall become acceptable standard of finish quality and workmanship for similar on-site interior repainting work. PERFORMANCE REQUIREMENTS .1 Environmental Performance Requirements: .1 1.4 Provide paint products meeting MPI "Environmentally Friendly" E2 or E3 ratings based on VOC (EPA Method 24) content levels.. SCHEDULING .1 Submit work schedule for various stages of painting to Departmental Representative for approval. .2 Paint occupied facilities in accordance with approved schedule. Schedule operations to approval of Departmental Representative such that painted surfaces will have dried and cured sufficiently before occupants are affected. .3 Obtain written authorization from Departmental Representative for changes in work schedule. .4 Schedule repainting operations to prevent disruption by other trades if applicable and by occupants in and about building. 1.5 ACTION AND INFORMATIONAL SUBMITTALS .1 Provide product data and manufacturer's installation/application instructions for each paint and coating product to be used in accordance with the requirements of Section 01 33 00 - Submittal Procedures. .2 Provide samples in accordance with Section 01 33 00 - Submittal Procedures. .1 .2 .3 Closeout Submittals: .1 1.6 Submit full range colour sample chips for review and selection. Indicate where colour availability is restricted. Submit WHMIS MSDS - Material Safety Data Sheets for paint and coating materials in accordance with Section 01 00 10 – General Instructions Provide maintenance data for incorporation into manual specified in Section 01 78 00 - Closeout Submittals. .1 Submit records of products used. List products in relation to finish system and include following: .1 Product name, type and use (i.e. materials and location). .2 Manufacturer's product number. .3 Colour code numbers. .4 MPI Environmentally Friendly classification system rating. .5 Manufacturer's Material Safety Data Sheets (MSDS). DELIVERY, STORAGE AND HANDLING .1 Deliver, store and handle materials in accordance with Section 01 61 00 - Common Product Requirements , supplemented as follows:. Project No. R.067898.002 .1 .2 .3 .4 .5 .6 .7 .8 .9 .2 INTERIOR RE-PAINTING Section 09 91 23.01 Page 3 of 11 Deliver and store materials in original containers, sealed, with labels intact. Labels to indicate: .1 Manufacturer's name and address. .2 Type of paint or coating. .3 Compliance with applicable standard. .4 Colour number in accordance with established colour schedule. Remove damaged, opened and rejected materials from site. Store and handle in accordance with manufacturer's recommendations. Store materials and equipment in secure, dry, well-ventilated area with temperature range between 7 degrees C to 30 degrees C. Store materials and supplies away from heat generating devices and sensitive products above minimum temperature as recommended by manufacturer. Keep areas used for storage, cleaning and preparation, clean and orderly to approval of Departmental Representative. After completion of operations, return areas to clean condition to approval of Departmental Representative. Remove paint materials from storage in quantities required for same day use. Comply with requirements of Workplace Hazardous Materials Information System (WHMIS) regarding use, handling storage, and disposal of hazardous materials. Fire Safety Requirements: .1 Provide one 9 kg Type ABC or dry chemical fire extinguisher as recommended by manufacturer adjacent to storage area. .2 Store oily rags, waste products, empty containers and materials subject to spontaneous combustion in ULC approved, sealed containers and remove from site daily. .3 Handle, store, use and dispose of flammable and combustible materials in accordance with National Fire Code of Canada. Waste Management and Disposal: .1 .2 .3 .4 .5 Separate waste materials for reuse recycling in accordance with Section 01 74 21 - Construction/Demolition Waste Management and Disposal. Paint, stain and wood preservative finishes and related materials (thinners, and solvents) are hazardous products and are subject to regulations for disposal. Information on these controls can be obtained from Provincial Ministries of Environment and Regional levels of Government. Materials that cannot be reused must be treated as hazardous waste and disposed of in an appropriate manner. Place materials defined as hazardous or toxic waste, including used sealant and adhesive tubes and containers, in containers or areas designated for hazardous waste. To reduce the amount of contaminants entering waterways, sanitary/storm drain systems or into the ground the following procedures shall be strictly adhered to: .1 Retain cleaning water for water-based materials to allow sediments to be filtered out. In no case shall equipment be cleaned using free draining water. Project No. R.067898.002 INTERIOR RE-PAINTING Section 09 91 23.01 Page 4 of 11 .2 .6 .7 1.7 Retain cleaners, thinners, solvents and excess paint and place in designated containers and ensure proper disposal. .3 Return solvent and oil soaked rags used during painting operations for contaminant recovery, proper disposal, or appropriate cleaning and laundering. .4 Dispose of contaminants in an approved legal manner in accordance with hazardous waste regulations. .5 Empty paint cans are to be dry prior to disposal or recycling (where available). .6 Close and seal tightly partly used cans of materials including sealant and adhesive containers and store protected in well ventilated fire-safe area at moderate temperature. Where paint recycling is available, collect waste materials by type and provide for delivery to recycling or collection facility. Set aside and protect surplus and uncontaminated finish materials: . Deliver to or arrange collection by employees, individuals, or organizations for verifiable reuse or re-manufacturing. SITE CONDITIONS .1 Heating, Ventilation and Lighting: .1 .2 .3 .4 .2 Do not perform repainting work unless adequate and continuous ventilation and sufficient heating facilities are in place to maintain ambient air and substrate temperatures above 10 degrees C for 24 hours before, during and after paint application and until paint has cured sufficiently. Ventilate enclosed spaces. Where required, provide continuous ventilation for seven days after completion of application of paint. Co-ordinate use of existing ventilation system with Departmental Representative and ensure its operation during and after application of paint as required. Do not perform painting work unless minimum lighting level of 323Lux is provided on surfaces to be painted. Temperature, Humidity and Substrate Moisture Content Levels: .1 .2 .3 Unless specifically pre-approved Departmental Representative and applied product manufacturer, do not perform repainting work when: .1 Ambient air and substrate temperatures are below 10 degrees C. .2 Substrate temperature is over 32 degrees C unless paint is specifically formulated for application at high temperatures. .3 Relative humidity within area to be repainted is above 85%. Conduct moisture tests using properly calibrated electronic Moisture Meter, except use simple "cover patch test" on concrete floors to be repainted. Do not perform repainting work when maximum moisture content of substrate exceeds: .1 12% for concrete and masonry (clay and concrete brick/block). .2 15% for wood. .3 12% for plaster and gypsum board. Project No. R.067898.002 .4 .3 Section 09 91 23.01 Page 5 of 11 Test painted concrete, masonry and plaster surfaces for alkalinity as required. Surface and Environmental Conditions: .1 .2 .3 .4 .5 1.8 INTERIOR RE-PAINTING Apply paint finish in areas where dust is no longer being generated by related construction operations or when ventilation conditions are such that airborne particles will not affect quality of finished surface. Apply paint to adequately prepared surfaces and to surfaces within moisture limits noted herein. Apply paint when previous coat of paint is dry or adequately cured, unless otherwise pre-approved by specific coating manufacturer. Schedule operations to approval of the Departmental Representative such that painted surfaces will have dried and cured sufficiently before occupants are affected. Test all existing paint surfaces to determine if latex or alkyd and provide plans marked up to indicate location of existing alkyd surfaces at time of submitting action and information submittals, highlighting existing surfaces whose type (alkyd/latex) is not as indicated in tender documents. MAINTENANCE .1 Extra Materials: .2 Submit maintenance materials in accordance with Section 01 78 00 - Closeout Submittals. .3 Submit one - four litre can of each type and colour of finish coating. Identify type and colour in relation to established colour schedule and finish system. Part 2 Products 2.1 MATERIALS .1 Paint materials listed in latest edition of MPI Approved Product List (APL) are acceptable for use on this project. .2 Where required by authorities having jurisdiction, paints and coatings to provide a fire resistant rating. .3 Paint materials for repaint systems to be products of single manufacturer. .4 Only qualified products with MPI "Environmentally Friendly" E2 or E3 rating are acceptable for use on this project. 2.2 COLOURS .1 Departmental Representative will provide colour schedule after contract award. .2 Colour schedule will be based upon selection of up to 11 colours. .3 Selection of colours from manufacturers full range of colours. .4 Where specific products are available in restricted range of colours, selection based on limited range. Project No. R.067898.002 .5 2.3 INTERIOR RE-PAINTING Section 09 91 23.01 Page 6 of 11 First coat in two coat (Premium) repaint system to be tinted slightly lighter colour than top coat to show visible difference between coats. MIXING AND TINTING .1 Perform colour tinting operations prior to delivery of paint to site. On-site tinting of painting materials is allowed with Departmental Representative's written permission. .2 Mix paste, powder or catalyzed paint mixes in accordance with manufacturer's written instructions. .3 Where thinner is used, addition not to exceed paint manufacturer's recommendations. Do not use kerosene or such organic solvents to thin water-based paints. .4 Thin paint for spraying in accordance with paint manufacturer' instructions. If directions are not on container, obtain instructions in writing from manufacturer and provide copy of instructions to Departmental Representative. .5 Re-mix paint in containers prior to and during application to ensure break-up of lumps, complete dispersion of settled pigment, and colour and gloss uniformity. 2.4 GLOSS/SHEEN RATINGS .1 Paint gloss defined as sheen rating of applied paint, in accordance with following MPI gloss / sheen standard values: Gloss Level Category G1 - matte finish G2 - velvet finish G3 - eggshell finish G4 - satin finish G5 - semi-gloss finish G6 - gloss finish G7 - high gloss finish .2 2.5 Units @ 60 Degrees 0 to 5 0 to 10 10 to 25 20 to 35 35 to 70 70 to 85 85 Units @ 85 Degrees maximum 10 10 to 35 10 to 35 minimum 35 Gloss level ratings of repainted surfaces shall be as specified herein as noted on Finish Schedule. INTERIOR PAINTING SYSTEMS .1 RIN 4.2 - Concrete Masonry Units: (Concrete Block and Concrete Brick). .1 .2 RIN 5.1 (modified) - Structural Steel and Metal Fabrications: convector covers .1 .3 RIN 4.2K - High Performance Architectural Latex, Premium Grade, G 5 finish RIN 5.1R – High Performance Architectural Latex, Premium Grade, G5 finish, modified to use MPI 17 as full primer coat - clean and de-gloss existing surface prior to application. Allow 24 hours minimum drying time after application of primer coat. RIN 5.3 - Galvanized Metal: Doors, Frames, Railings, Pipes, etc. .1 RIN 5.3B - High Performance Architectural Latex, Premium Grade, G5 finish .1 When painting over existing alkyd paint, modify system to use MPI 17 as full primer coat - clean and de-gloss existing surface prior to application. Allow 24 hours minimum drying time after application of primer coat Project No. R.067898.002 .4 RIN 6.3T – High Performance Architectural Latex, Premium Grade, G5 finish .1 When painting over existing alkyd paint, modify system to use MPI 17 as full primer coat - clean and de-gloss existing surface prior to application. Allow 24 hours minimum drying time after application of primer coat RIN 9.2 - Plaster and Gypsum Board: (gypsum wallboard, drywall, and "sheet rock type material". .1 .7 RIN 5.4F – High Performance Architectural Latex, Premium Grade, G5 finish RIN 6.3 - Dressed Lumber: (Including Doors, Door and Window Frames, and Mouldings). .1 .6 RIN 9.2B - High Performance Architectural Latex, Premium Grade, G3 finish (walls), G2 finish (ceilings) RIN 10.1 - Canvas and Cotton Coverings (Pipe and Duct Coverings). .1 RIN 10.1A – Latex, Premium Grade, G3 finish Part 3 Execution 3.1 MANUFACTURER'S INSTRUCTIONS .1 3.2 Section 09 91 23.01 Page 7 of 11 RIN 5.4 Aluminum: .1 .5 INTERIOR RE-PAINTING Compliance: comply with manufacturer's written recommendations or specifications, including product technical bulletins, handling, storage and installation instructions, and datasheets. EXAMINATION .1 Interior surfaces requiring repainting: inspected by painting contractor who will notify Departmental Representative in writing of defects or problems, prior to commencing repainting work, or after surface preparation if unseen substrate damage is discovered. .2 Where an assessed degree of surface degradation of DSD-1 to DSD-3 before preparation of surfaces for repainting is revealed to be DSD-4 after preparation, repair or replacement of such unforeseen defects discovered are to be corrected, as mutually agreed, before repainting is started. .3 Where "special" repainting or recoating system applications (i.e. elastomeric coatings) or non-MPI listed products or systems are to be used, paint or coating manufacturer to provide as part of work, certification of surfaces and conditions for specific paint or coating system application as well as on site supervision, inspection and approval of their paint or coating system application as required at no additional cost to Departmental Representative. 3.3 PREPARATION .1 Perform preparation and operations for interior painting in accordance with MPI Maintenance Repainting Manual requirements except where otherwise specified. .2 Apply paint materials in accordance with paint manufacturer's written application instructions. Project No. R.067898.002 .3 INTERIOR RE-PAINTING Section 09 91 23.01 Page 8 of 11 Clean and prepare interior surfaces to be repainted in accordance with MPI Maintenance Repainting Manual requirements. Refer to MPI Manual in regard to specific requirements and as follows: .1 .2 .3 .4 .5 .6 Remove dust, dirt, and surface debris by vacuuming, wiping with dry, clean cloths or compressed air. Wash surfaces with a biodegradable detergent and bleach where applicable and clean warm water using stiff bristle brush to remove dirt, oil and surface contaminants. Rinse scrubbed surfaces with clean water until foreign matter is flushed from surface. Allow surfaces to drain completely and to dry thoroughly. Allow sufficient drying time and test surfaces using an electronic moisture meter before commencing work. Use water-based cleaners in place of organic solvents where surfaces will be repainted using water based paints. Many water-based paints cannot be removed with water once dried. Minimize use of kerosene or such organic solvents to clean up water-based paints. .4 Clean metal surfaces to be repainted by removing rust, dirt, oil, grease and foreign substances in accordance with MPI requirements. Remove such contaminates from surfaces, pockets and corners to be repainted by brushing with clean brushes, blowing with clean dry compressed air, or brushing/vacuum cleaning as required. Existing metal convector covers shall be sanded to remove existing gloss. .5 Prevent contamination of cleaned surfaces by salts, acids, alkalis, other corrosive chemicals, grease, oil and solvents before priming and between applications of remaining coats. Touch-up, spot prime, and apply primer, paint, or pre-treatment as soon as possible after cleaning and before deterioration occurs. .6 Do not apply paint until prepared surfaces have been accepted by Departmental Representative. .7 Sand and dust between coats as required to provide adequate adhesion for next coat and to remove defects visible from distance up to 1000 mm. 3.4 EXISTING CONDITIONS .1 Prior to commencing work, examine site conditions and existing interior substrates to be repainted. Report in writing to Departmental Representative damages, defects, or unsatisfactory or unfavourable conditions or surfaces that will adversely affect this work. .2 Conduct moisture testing of surfaces to be painted using properly calibrated electronic moisture meter, except test concrete floors for moisture using simple "cover patch test" and report findings to Departmental Representative. Maximum moisture content not to exceed specified limits. .3 Do not commence until such adverse conditions and defects have been corrected and surfaces and conditions are acceptable to Painting Subcontractor and Inspection Agency. .4 Degree of surface deterioration (DSD) to be assessed using MPI Identifiers and Assessment criteria indicated in MPI Maintenance Repainting Manual. MPI DSD ratings and descriptions are as follows: Project No. R.067898.002 INTERIOR RE-PAINTING Condition DSD-0 Description Sound Surface ( includes visual (aesthetic) defects that do not affect film's protective properties). Slightly Deteriorated Surface (indicating fading; gloss reduction, slight surface contamination, minor pin holes scratches). Moderately Deteriorated Surface (small areas of peeling, flaking, slight cracking, and staining). Severely Deteriorated Surface (heavy peeling, flaking, cracking, checking, scratches, scuffs, abrasion, small holes and gouges). Substrate Damage (repair or replacement of surface required). DSD-1 DSD-2 DSD-3 DSD-4 3.5 Section 09 91 23.01 Page 9 of 11 PROTECTION .1 Protect existing surfaces and adjacent fixtures and furnishings from paint spatters, markings and other damage by suitable non-staining covers or masking. If damaged, clean and restore such surfaces as directed by Departmental Representative. .2 Protect items that are permanently attached such as Fire Labels on doors and frames. .3 Protect factory finished products and equipment. .4 Protect general public and building occupants in and about building. .5 Remove electrical cover plates, light fixtures, surface hardware on doors, bath accessories and surface mounted equipment, fittings and fastenings prior to undertaking re-painting operations. Store items and re-install after painting is completed. .6 Move and cover furniture and portable equipment as necessary to carry out repainting operations. Replace as painting operations progress. .7 As repainting operations progress, place "WET PAINT" signs in occupied areas to approval of Departmental Representative. 3.6 APPLICATION .1 Apply paint by method that is best suited for substrate being repainted using brush or roller. Conform to manufacturer's application instructions unless specified otherwise. Methods of application as pre-approved by Departmental Representative before commencing work. .2 Brush and Roller Application: .1 .2 .3 .4 .5 Apply paint in uniform layer using brush and/or roller of types suitable for application. Work paint into cracks, crevices and corners. Paint surfaces and corners not accessible to brush using spray, daubers and/or sheepskins. Paint surfaces and corners not accessible to roller using brush, daubers or sheepskins. Brush and/or roll out runs and sags, and over-lap marks. Rolled surfaces free of roller tracking and heavy stipple unless approved by Departmental Representative. Remove runs, sags and brush marks from finished work and repaint. Project No. R.067898.002 INTERIOR RE-PAINTING Section 09 91 23.01 Page 10 of 11 .3 Use dipping, sheepskins or daubers when no other method is practical in places of difficult access and when specifically authorized by Departmental Representative. .4 Apply paint coats in continuous manner and allow surfaces to dry and properly cure between coats for minimum time period as recommended by manufacturer. Minimum dry film thickness of coats not less than that recommended by manufacturer. Repaint thin spots or bare areas before next coat of paint is applied. .5 Sand and dust between coats to remove visible defects. .6 Repaint surfaces both above and below sight lines as specified for surrounding surfaces, including such surfaces as tops of interior cupboards and cabinets and projecting ledges. .7 Repaint top, bottom, and vertical edges of doors to be repainted. .8 Repaint inside of cupboards and cabinets as specified for outside surfaces. .9 Repaint closets and alcoves to match existing, unless otherwise scheduled or noted. 3.7 MECHANICAL/ELECTRICAL EQUIPMENT .1 Unless otherwise noted, repainting to include exposed to view / previously painted mechanical and electrical equipment and components (panels, conduits, piping, hangers, and ductwork.). .2 Touch up scratches and marks and repaint such mechanical and electrical equipment and components with colour, and sheen finish to match existing unless otherwise noted or scheduled. .3 Do not paint over name plates or instruction labels. .4 Leave unfinished exposed conduits, piping, hangers, ductwork and other mechanical and electrical equipment in original finish. .5 Keep sprinkler heads free of paint. .6 Do not paint interior transformers and substation equipment. .7 Standard of Acceptance: when viewed using natural prevailing sunlight at peak period of day (mid-day) on surface viewed, surfaces to indicate following: .1 .2 .3 3.8 Walls: no defects visible from distance of 1000 mm at 90 degrees to surface. Soffits: no defects visible from grade at 45 degrees to surface. Final coat to exhibit uniformity of colour and sheen across full surface area. FIELD QUALITY CONTROL .1 Inspection: .2 Advise Departmental Representative when each surface and applied coating is ready for inspection. Do not proceed with subsequent coats until previous coat has been approved. 3.9 CLEANING .1 Proceed in accordance with Section 01 00 10 – General Instructions, supplemented as follows:. .1 Remove paint where spilled, splashed, splattered or sprayed as work progresses using means and materials that are not detrimental to affected surfaces. Project No. R.067898.002 .2 .3 .4 .5 .6 3.10 INTERIOR RE-PAINTING Section 09 91 23.01 Page 11 of 11 Keep work area free from unnecessary accumulation of tools, equipment, surplus materials and debris. Remove combustible rubbish materials and empty paint cans each day and safely dispose of same in accordance with requirements of authorities having jurisdiction. Clean equipment and dispose of wash water used for water borne materials, solvents used for oil based materials as well as other cleaning and protective materials (e.g. rags, drop cloths, and masking papers), paints, thinners, paint removers/strippers in accordance with safety requirements of authorities having jurisdiction and as noted herein. Clean painting equipment in leak-proof containers that will permit particulate matter to settle out and be collected. Sediment remaining from cleaning operations to be recycled or disposed of in manner acceptable to authorities having jurisdiction. Recycle paint and coatings in excess of repainting requirements as specified. RESTORATION .1 Clean and re-install hardware items removed before undertaken painting operations. .2 Remove protective coverings and warning signs as soon as practical after operations cease. .3 Remove paint splashings on affected exposed surfaces. Remove smears and spatter immediately as operations progress, using compatible solvent. .4 Protect freshly completed surfaces from paint droppings and dust to approval of Departmental Representative. Avoid scuffing newly applied paint. .5 Restore areas used for storage, cleaning, mixing and handling of paint to clean condition as approved by Departmental Representative. END OF SECTION Project No. R.067898.002 FOLDING PANEL PARTITIONS Part 1 General 1.1 RELATED REQUIREMENTS .1 Section 09 21 16 – Gypsum Board Assemblies .2 Section 09 22 16 – Non-Structural Metal Framing 1.2 Section 10 22 26.33 Page 1 of 5 REFERENCES .1 American National Standards Institute (ANSI) .1 .2 .2 American Society for Testing and Materials International (ASTM) .1 .2 .3 .3 FSC-STD-01-001-2004, FSC Principle and Criteria for Forest Stewardship. FSC-STD-20-002-2004, Structure and Content of Forest Stewardship Standards V2-1. FSC Accredited Certification Bodies. Underwriters Laboratories' of Canada (ULC) .1 1.3 CSA O115-M1982(R2001), Hardwood and Decorative Plywood. CSA O151-04, Canadian Softwood Plywood. Forest Stewardship Council (FSC) .1 .2 .6 CAN/CGSB-11.3-M87, Hardboard. Canadian Standards Association (CSA International) .1 .2 .5 ASTM E90-04, Standard Test Method for Laboratory Measurement of Airborne Sound Transmission Loss of Building Partitions and Elements. ASTM E336-05, Standard Test Method for Measurement of Airborne Sound Insulation in Buildings. Canadian General Standards Board (CGSB) .1 .4 ANSI A208.1-09, Particleboard, Mat-Formed Wood. ANSI A208.2-09, Medium Density Fiberboard (MDF) for Interior Application. CAN/ULC-S102-03, Method of Test for Surface Burning Characteristics of Building Materials and Assemblies. DESIGN REQUIREMENTS .1 Design and fabricate folding partitions with minimum STC of 45 tested to ASTM E90. .2 Operation of partition shall not require a force of more than 22 N. 1.4 ACTION AND INFORMATIONAL SUBMITTALS .1 Provide submittals in accordance with Section 01 33 00 - Submittal Procedures. .2 Product Data: Project No. R.067898.002 .1 .2 .3 Submit duplicate 300 x 300mm samples of partition finish for each colour selected. Include statement indicating total cost of mechanical and electrical components. Quality assurance/control submittals: submit following in accordance with Section 01 45 00 - Quality Control. .1 .2 .3 .4 .5 .6 .7 .7 Submit drawings stamped and signed by professional engineer registered or licensed in Province of Ontario, Canada. .1 Include plans, sections, details, attachments to other construction. Indicate installation requirements including dimensions, head and jamb conditions, track layout and support, stacking arrangement, switching, hardware, finish and colour, operating mechanism, and location. Indicate blocking to be provided by others. Submit Project Materials and Cost Data: provide statement for total cost for building materials used for project. .1 .6 Submit manufacturer's printed product literature, specifications and datasheet and include product characteristics, performance criteria, physical size, finish and limitations. Submit WHMIS MSDS - Material Safety Data Sheets in accordance with Section 02 81 01 - Hazardous Materials. Samples: .1 .5 Section 10 22 26.33 Page 2 of 5 Shop Drawings: .1 .4 FOLDING PANEL PARTITIONS Test reports: submit certified test reports for folding panel partitions from approved independent testing laboratories, indicating compliance with specifications for specified performance characteristics and physical properties. Submit test data indicating compliance with design requirements regarding sound transmission and fire hazard classification. Submit acoustical test data to ASTM E90 and ensure construction details and weight are provided. Certificates: submit certificates signed by manufacturer certifying that materials comply with specified performance characteristics and physical properties. Manufacturer's Instructions: submit manufacturer's installation instructions. Indicate special handling criteria, installation sequence, cleaning procedures and . Manufacturer's Field Reports: manufacturer's field reports specified. Site review and Post-Installation Certification: Engineer who stamped shop drawings shall provide periodic site review and reports, progress billing review and reports, and signed and stamped certification that the work of this Section has been performed in conformance with shop drawings. Closeout Submittals: .1 Provide operation and maintenance data for folding panel partitions for incorporation into manual specified in Section 01 78 00 - Closeout Submittals. Project No. R.067898.002 1.5 FOLDING PANEL PARTITIONS Section 10 22 26.33 Page 3 of 5 QUALITY ASSURANCE .1 Forest Certification: provide operable panel partitions made from wood obtained from forests certified by FSC accredited certification body to comply with FSC-STD-01-001. .2 Site Meetings: as part of Manufacturer's Services described in PART 3 - FIELD QUALITY CONTROL, schedule site visits, to review Work, at stages listed. .1 .2 .3 1.6 After delivery and storage of products, and when preparatory Work is complete but before installation begins. Twice during progress of Work at 25% and 60%complete. Upon completion of Work, after cleaning is carried out. WASTE MANAGEMENT AND DISPOSAL .1 Separate waste materials for reuse recycling in accordance with Section 01 74 21 Construction/Demolition Waste Management and Disposal. Part 2 Products 2.1 MATERIALS .1 Panel Construction: .1 .2 .3 2.2 Panel Core: Nominal 76 mm thick panels in manufacturer's standard 1220 mm widths. All panel horizontal and vertical framing members fabricated from minimum 1.2 mm formed steel with overlapped and welded corners for rigidity. Top channel is reinforced to support suspension system components. Frame is designed so that full vertical edges of panels are of formed steel and provide concealed protection of the edges of the panel skin. Panel Skin: 13 mm tackable moisture resistant gypsum board, class “A” rated single material or composite layers continuously bonded to panel frame. Acoustical ratings of panels with this construction 45 STC Panel Finishes: .1 Panel Trim: exposed panel trim of one consistent colour from Manufacturer's standard range .2 Panel face finish shall be reinforced vinyl with woven backing weighing not less than 648 g per lineal metre, colour to Departmental Representative's selection from standard colour range COMPONENTS .1 Overhead suspension system: .1 .2 .3 Suspension Tracks: Minimum 3 mm roll-formed steel track, suitable for either direct mounting to a wood header or supported by adjustable steel hanger brackets, supporting the load-bearing surface of the track, connected to structural support by pairs of 9.5 mm diameter threaded rods. Aluminum track is not acceptable. Exposed track soffit: Steel, integral to track, and pre-painted off-white. Carriers: One all-steel trolley with steel-tired ball-bearing wheels per panel (except hinged panels). Non-steel tires are not acceptable. Project No. R.067898.002 .2 .2 Full leaf butt hinges, attached directly to panel frame with welded hinge anchor plates within panel. Sound seals: .1 .2 .3 2.3 Equip partition with manufacturer's standard hardware. Hardware finish selected from manufacturer's standard finishes. Install standard latch. Hinges: .1 .4 Section 10 22 26.33 Page 4 of 5 Hardware: .1 .3 FOLDING PANEL PARTITIONS Vertical Interlocking Sound Seals between panels: Roll-formed steel astragals, with reversible tongue and groove configuration in each panel edge for universal panel operation. Rigid plastic astragals or astragals in only one panel edge are not acceptable. Horizontal Top Seals: Continuous contact extruded vinyl bulb shape with pairs of non-contacting vinyl fingers to prevent distortion without the need for mechanically operated parts. Horizontal Bottom Seals: automatic operable seals providing nominal 51 mm operating clearance with an operating range of +13 mm to -38 mm which automatically drop as panels are positioned, without the need for tools or cranks. ACCESSORIES .1 2.4 Provide manufacturer's standard stack jamb closure panel, with lever operator. OPERATION .1 Partition is a series of paired flat panels hinged together in pairs, manually operated, topsupported with operable floor seals .2 Final closure: horizontally expanding panel edge with removable crank. Part 3 Execution 3.1 MANUFACTURER'S INSTRUCTIONS .1 3.2 Compliance: comply with manufacturer's written recommendations or specifications, including product technical bulletins, handling, storage and installation instructions, and datasheets. INSTALLATION .1 Secure and level track. .2 Install folding partitions in accordance with manufacturer's printed instructions. .3 Touch up damaged finishes, repair damage to partitions to match original finish. .4 Clean folding partition system and protect from damage. .5 Adjust and leave partitions in smooth operating condition. Project No. R.067898.002 3.3 FOLDING PANEL PARTITIONS Section 10 22 26.33 Page 5 of 5 FIELD QUALITY CONTROL .1 Site Tests: .1 .2 Manufacturer's Field Services: .1 .2 .3 3.4 Acoustic field testing: have field sound performance certified byindependent acoustical consultant in accordance with ASTM E336. Obtain written report from manufacturer verifying compliance of Work, in handling, installing, applying, protecting and cleaning of product and submit Manufacturer's Field Reports as described in PART 1 - SUBMITTALS. Provide manufacturer's field services consisting of product use recommendations and periodic site visits for inspection of product installation in accordance with manufacturer's instructions. Schedule site visits, to review Work, as directed in PART 1 - QUALITY ASSURANCE. CLEANING .1 Proceed in accordance with Section 01 00 10 – General Instructions .2 On completion and verification of performance of installation, remove surplus materials, excess materials, rubbish, tools and equipment. END OF SECTION Project No. R.067898.002 FIRE EXTINGUISHERS AND SAFETY BLANKETS Section 10 44 16.19 Page 1 PART 1 - GENERAL 1.1 1.2 1.3 REFERENCES .1 Health Canada/Workplace Hazardous Materials Information System (WHMIS) .1 Material Safety Data Sheets (MSDS). .2 National Fire Protection Association (NFPA) .1 NFPA (Fire) 10, Standard for Portable Fire Extinguishers, 2007 Edition. .3 Underwriters Laboratories of Canada (ULC) .1 CAN/ULC S508-02, Standard for the Rating and Fire Testing of Fire Extinguishers, Including Amendments 1 and 2. ACTION AND INFORMATIONAL SUBMITTALS .1 Provide submittals in accordance with Section 01 33 00 - Submittal Procedures. .2 Product Data: .1 Submit manufacturer's printed product literature and datasheet and include product characteristics, performance criteria, physical size, finish and limitations. .2 Submit two copies WHMIS MSDS - Material Safety Data Sheets in accordance with Section 01 00 10 General Instructions. .3 Provide shop drawings. .4 Quality control submittals: submit following in accordance with Section 01 45 00 - Quality Control. .1 Manufacturer's Instructions: submit manufacturer's installation instructions and special handling criteria, installation sequence, cleaning procedures and. .2 Manufacturer's Field Reports: submit manufacturer's written reports within 3 days of review, verifying compliance of Work, as described in PART 3, FIELD QUALITY CONTROL. .5 Closeout Submittals: .1 Provide operation and maintenance data for incorporation into manual specified in Section 01 78 00 Closeout Submittals. DELIVERY, STORAGE AND HANDLING .1 Packing, shipping, handling and unloading: .1 Deliver, store and handle materials in accordance with Section 01 61 00 - Common Product Requirements. .2 Waste Management and Disposal: .1 Separate waste materials for reuse and recycling in accordance with Section 01 74 21 Construction/Demolition Waste Management and Disposal. Project No. R.067898.002 FIRE EXTINGUISHERS AND SAFETY BLANKETS Section 10 44 16.19 Page 2 PART 2 - PRODUCTS 2.1 MULTI-PURPOSE DRY CHEMICAL EXTINGUISHERS .1 2.2 Cartridge operated type or Stored pressure rechargeable type with hose and shut-off nozzle, ULC labelled for A, B and C class protection. .1 Size 2.25 kg. IDENTIFICATION .1 Identify extinguishers in accordance with recommendations of ANSI/NFPA 10 & CAN/ULC-S508. .2 Attach bilingual tag or label to extinguishers, indicating month and year of installation. Provide space for service dates. PART 3 - EXECUTION 3.1 MANUFACTURER'S INSTRUCTIONS .1 3.2 3.3 Compliance: comply with manufacturer's written recommendations, including product technical bulletins, handling, storage and installation instructions, and datasheets. INSTALLATION .1 Install or mount extinguishers in cabinets or on brackets in accordance with NFPA (Fire) 10. .2 Install fire safety blankets as indicated. FIELD QUALITY CONTROL .1 Manufacturer's Field Services: .1 Provide manufacturer's field services consisting of product use recommendations and periodic site visits for inspection of product installation in accordance with manufacturer's instructions. END Project No. R.067898.002 COMMON WORK RESULTS FOR MECHANICAL Section 21 05 01 Page 1 PART 1 - GENERAL 1.1 1.2 1.3 RELATED REQUIREMENTS .1 Section 09 91 23 - Interior Painting. .2 Section 23 05 93 - Testing, Adjusting and Balancing for HVAC. ACTION AND INFORMATIONAL SUBMITTALS .1 Submit in accordance with Section 01 33 00 - Submittal Procedures. .2 Product Data: .1 Submit manufacturer's instructions, printed product literature and data sheets for and include product characteristics, performance criteria, physical size, finish and limitations. .3 Shop drawings: .1 Submit drawings stamped and signed by professional engineer registered or licensed in Province of Ontario, Canada. .2 Drawings to show: .1 Mounting arrangements. .2 Operating and maintenance clearances. .3 Drawings and product data accompanied by: .1 Detailed drawings of bases, supports, and anchor bolts. .2 Acoustical sound power data, where applicable. .3 Points of operation on performance curves. .4 Manufacturer to certify current model production. .5 Certification of compliance to applicable codes. .4 In addition to transmittal letter referred to in Section 01 33 00 - Submittal Procedures: use MCAC "Shop Drawing Submittal Title Sheet". Identify section and paragraph number. CLOSEOUT SUBMITTALS .1 Submit in accordance with Section 01 78 00 - Closeout Submittals. .2 Operation and Maintenance Data: submit operation and maintenance data for for incorporation into manual. .1 Operation and maintenance manual approved by, and final copies deposited with, Departmental Representative before final inspection. .2 Operation data to include: .1 Control schematics for systems including environmental controls. .2 Description of systems and their controls. .3 Description of operation of systems at various loads together with reset schedules and seasonal variances. .4 Operation instruction for systems and component. .5 Description of actions to be taken in event of equipment failure. .3 Maintenance data to include: .1 Servicing, maintenance, operation and trouble-shooting instructions for each item of equipment. .2 Data to include schedules of tasks, frequency, tools required and task time. Project No. R.067898.002 .4 .5 .6 .7 1.4 1.5 Section 21 05 01 Page 2 Performance data to include: .1 Equipment manufacturer's performance datasheets with point of operation as left after commissioning is complete. .2 Equipment performance verification test results. .3 Special performance data as specified. .4 Testing, adjusting and balancing reports as specified in Section 23 05 93 - Testing, Adjusting and Balancing for HVAC. Approvals: .1 Submit 2 copies of draft Operation and Maintenance Manual to Departmental Representative for approval. Submission of individual data will not be accepted unless directed by Departmental Representative. .2 Make changes as required and re-submit as directed by Departmental Representative. Additional data: .1 Prepare and insert into operation and maintenance manual additional data when need for it becomes apparent during specified demonstrations and instructions. Submit copies of as-built drawings for inclusion in final TAB report. MAINTENANCE MATERIAL SUBMITTALS .1 Submit in accordance with Section 01 78 00 - Closeout Submittals. .2 Provide one set of special tools required to service equipment as recommended by manufacturers. DELIVERY, STORAGE AND HANDLING .1 Deliver, store and handle materials in accordance with Section 01 61 00 - Common Product Requirements and with manufacturer's written instructions. .2 Delivery and Acceptance Requirements: deliver materials to site in original factory packaging, labelled with manufacturer's name and address. .3 Storage and Handling Requirements: .1 Store materials off ground, indoors, in dry location and in accordance with manufacturer's recommendations in clean, dry, well-ventilated area. .2 Store and protect from nicks, scratches, and blemishes. .3 Replace defective or damaged materials with new. PART 2 - PRODUCTS 2.1 COMMON WORK RESULTS FOR MECHANICAL NOT USED .1 Not used. Project No. R.067898.002 COMMON WORK RESULTS FOR MECHANICAL Section 21 05 01 Page 3 PART 3 - EXECUTION 3.1 EXAMINATION .1 3.2 3.3 3.4 Verification of Conditions: verify that conditions of substrate previously installed under other Sections or Contracts are acceptable for installation in accordance with manufacturer's written instructions. .1 Visually inspect substrate in presence of Departmental Representative. .2 Inform Departmental Representative of unacceptable conditions immediately upon discovery. .3 Proceed with installation only after unacceptable conditions have been remedied and after receipt of written approval to proceed from Departmental Representative. PAINTING REPAIRS AND RESTORATION .1 Do painting in accordance with Section 09 91 23 - Interior Painting. .2 Prime and touch up marred finished paintwork to match original. .3 Restore to new condition, finishes which have been damaged. CLEANING .1 Progress Cleaning: clean in accordance with Section 01 00 10 - General Instructions. .1 Leave Work area clean at end of each day. .2 Final Cleaning: upon completion remove surplus materials, rubbish, tools and equipment in accordance with Section 01 00 10 - General Instructions. PROTECTION .1 Protect equipment and systems openings from dirt, dust, and other foreign materials with materials appropriate to system. END Project No. R.067898.002 WET PIPE SPRINKLER SYSTEMS Section 21 13 13 Page 1 PART1 - GENERAL 1.1 REFERENCES .1 1.2 National Fire Prevention Association (NFPA) .1 NFPA (Fire) 13, Standard for the Installation of Sprinkler Systems, 2007 Edition. .2 NFPA (Fire) 20, Standard for the Installation of Stationary Pumps for Fire Protection, 2003 Edition. ACTION AND INFORMATIONAL SUBMITTALS .1 Provide submittals in accordance with Section 01 33 00 - Submittal Procedures. .2 Product Data: .1 Provide manufacturer's printed product literature and data sheets, and include product characteristics, performance criteria, physical size, finish and limitations. .3 Shop Drawings: .1 Submit drawings stamped and signed by professional engineer registered or licensed in Province of Ontario, Canada. .2 Indicate: .1 Materials. .2 Finishes. .3 Method of anchorage .4 Number of anchors. .5 Supports. .6 Reinforcement. .7 Assembly details. .8 Accessories. .4 Samples: .1 Submit samples of following: .1 Each type of sprinkler head. .2 Signs. .5 Test reports: .1 Submit certified test reports for wet pipe fire protection sprinkler systems from approved independent testing laboratories, indicating compliance with specifications for specified performance characteristics and physical properties. .6 Certificates: .1 Submit certificates signed by manufacturer certifying that materials comply with specified performance characteristics and physical properties. .7 Manufacturers' Instructions: .1 Provide manufacturer's installation instructions. .8 Field Quality Control Submittals: .1 Manufacturer's Field Reports: manufacturer's field reports specified. Project No. R.067898.002 1.3 1.4 1.5 Section 21 13 13 Page 2 CLOSEOUT SUBMITTALS .1 Provide operation, maintenance and engineering data for incorporation into manual specified in Section 01 78 00 - Closeout Submittals in accordance with NFPA (Fire) 20. .2 Manufacturer's Catalog Data, including specific model, type, and size for: .1 Pipe and fittings. .2 Sprinkler heads. .3 Pipe hangers and supports. .4 Mechanical couplings. .3 Records: .1 As-built drawings of each system. .1 After completion, but before final acceptance, submit complete set of as-built drawings of each system for record purposes. .4 Operation and Maintenance Manuals: .1 Provide Contractors Material and Test Certificate for aboveground and underground piping and other documentation for incorporation into manual in accordance with NFPA (Fire) 13. QUALITY ASSURANCE .1 Qualifications: .1 Installer: company or person specializing in wet sprinkler systems with documented experience. .2 Supply grooved joint couplings, fittings, grooving tools and specialties from a single manufacturer. Use date stamped castings for coupling housings, fittings for quality assurance and traceability. MAINTENANCE MATERIAL SUBMITTALS .1 1.6 WET PIPE SPRINKLER SYSTEMS Extra Materials: .1 Provide maintenance materials in accordance with Section 01 78 00 - Closeout Submittals. .2 Provide spare sprinklers and tools in accordance with NFPA (Fire) 13. DELIVERY, STORAGE AND HANDLING .1 Deliver, store and handle materials in accordance with Section 01 61 00 - Common Product Requirements and with manufacturer's written instructions. .2 Delivery and Acceptance Requirements: .1 Deliver materials to site in original factory packaging, labelled with manufacturer's name, address. .3 Storage and Protection: .1 Store materials indoors in dry location. .2 Store and protect materials from exposure to harmful weather conditions and at temperature and humidity conditions recommended by manufacturer. .4 Packaging Waste Management: remove for reuse and return by manufacturer of pallets, crates, padding, and packaging materials in accordance with Section 01 74 21 - Construction/Demolition Waste Management and Disposal. Project No. R.067898.002 WET PIPE SPRINKLER SYSTEMS Section 21 13 13 Page 3 PART 2 - PRODUCTS 2.1 2.2 2.3 DESIGN REQUIREMENTS .1 Design automatic wet pipe fire suppression sprinkler systems in accordance with required and advisory provisions of NFPA (Fire) 13, by pipe schedules for light hazard occupancy or hydraulic calculations for uniform distribution of water over design area. .2 Include with each system materials, accessories, and equipment inside and outside building to provide each system complete and ready for use. .3 Design and provide each system to give full consideration to blind spaces, piping, electrical equipment, ducts, and other construction and equipment in accordance with detailed shop drawings. .4 Locate sprinkler heads in consistent pattern with ceiling grid, lights, and air supply diffusers. .5 Devices and equipment for fire protection service: ULC approved for use in wet pipe sprinkler systems. .6 Location of Sprinkler Heads: .1 Locate heads in relation to ceiling and spacing of sprinkler heads not to exceed that permitted by NFPA (Fire) 13 for light hazard occupancy. .2 Uniformly space sprinklers on branch. ABOVE GROUND PIPING SYSTEMS .1 Provide fittings for changes in direction of piping and for connections. .1 Make changes in piping sizes through tapered reducing pipe fittings, bushings will not be permitted. .2 Perform welding in shop; field welding will not be permitted. .3 Conceal piping in areas with suspended ceiling. PIPE, FITTINGS AND VALVES .1 Pipe: .1 Ferrous: to NFPA (Fire) 13. .2 Copper tube: to NFPA (Fire) 13. .2 Fittings and joints to NFPA (Fire) 13: .1 Ferrous: screwed, welded, flanged or roll grooved. .1 Grooved joints designed with two ductile iron housing segments, pressure responsive gasket, and zinc-electroplated steel bolts and nuts. Cast with offsetting angle-pattern bolt pads for rigidity and visual pad-to-pad offset contact. .2 Copper tube: screwed, soldered, brazed, grooved. .3 Provide welded, threaded, grooved-end type fittings into which sprinkler heads, sprinkler head riser nipples, or drop nipples are threaded. .4 Plain-end fittings with mechanical couplings and fittings which use steel gripping devices to bite into pipe when pressure is applied will not be permitted. .5 Rubber gasketted grooved-end pipe and fittings with mechanical couplings are permitted in pipe sizes 32 mm and larger. .6 Fittings: ULC approved for use in wet pipe sprinkler systems. Project No. R.067898.002 .7 .8 .9 .3 2.4 WET PIPE SPRINKLER SYSTEMS Section 21 13 13 Page 4 Ensure fittings, mechanical couplings, and rubber gaskets are supplied by same manufacturer. Side outlet tees using rubber gasketted fittings are not permitted. Sprinkler pipe and fittings: metal. Pipe hangers: .1 ULC listed for fire protection services in accordance with NFPA. SPRINKLER HEADS .1 General: to NFPA (Fire) 13 and ULC listed for fire services. .2 Sprinkler Head Type: .1 Type A: upright bronze. .2 Type B: recessed chrome glass bulb type with ring and cup. .3 Type C: flush , white cover. PART 3 - EXECUTION 3.1 MANUFACTURER'S INSTRUCTIONS .1 3.2 INSTALLATION .1 3.3 Compliance: comply with manufacturer's written recommendations or specifications, including product technical bulletins, handling, storage and installation instructions, and datasheet. Install, inspect and test to acceptance in accordance with NFPA (Fire) 13 and NFPA (Fire) 25. PIPE INSTALLATION .1 Install piping straight and true to bear evenly on hangers and supports. Do not hang piping from plaster ceilings. 3.4 .2 Keep interior and ends of new piping and existing piping thoroughly cleaned of water and foreign matter. .3 Keep piping systems clean during installation by means of plugs or other approved methods. When work is not in progress, securely close open ends of piping to prevent entry of water and foreign matter. .4 Inspect piping before placing into position. CONNECTIONS TO EXISTING WATER SUPPLY SYSTEMS .1 Notify Contracting Officer in writing at least 15 days prior to connection date. .2 Use tapping or drilling machine valve and mechanical joint type sleeves for connections to be made under pressure. .3 Bolt sleeves around main piping. Project No. R.067898.002 3.5 Section 21 13 13 Page 5 .4 Bolt valve to branch connection. Open valve, attach drilling machine, make tap, close valve, and remove drilling machine, without interruption of service. .5 Furnish materials required to make connections into existing water supply systems. FIELD QUALITY CONTROL .1 3.6 WET PIPE SPRINKLER SYSTEMS Site Test, Inspection: .1 Perform test to determine compliance with specified requirements in presence of Departmental Representative. .2 Test, inspect, and approve piping before covering or concealing. .3 Preliminary Tests: .1 Hydrostatically test each system at 200 psig for a 2 hour period with no leakage or reduction in pressure. .2 Flush piping with potable water in accordance with NFPA (Fire) 13. .3 Piping above suspended ceilings: tested, inspected, and approved before installation of ceilings. .4 Test alarms and other devices. .5 Test water flow alarms by flowing water through inspector's test connection. When tests have been completed and corrections made, submit signed and dated certificate in accordance with NFPA (Fire) 13. .4 Formal Tests and Inspections: .1 Do not submit request for formal test and inspection until preliminary test and corrections are completed and approved. .2 Submit written request for formal inspection at least 15 days prior to inspection date. .3 Repeat required tests as directed. .4 Correct defects and make additional tests until systems comply with contract requirements. .5 Furnish appliances, equipment, instruments, connecting devices, and personnel for tests. .6 Authority of Jurisdiction, will witness formal tests and approve systems before they are accepted. CLEANING .1 Clean in accordance with Section 01 00 10 - General Instructions. .1 Remove surplus materials, excess materials, rubbish, tools and equipment. END Project No. R.067898.002 COMMERCIAL LAVATORIES AND SINKS Section 22 42 16 Page 1 PART 1 - GENERAL 1.1 REFERENCES .1 1.2 1.3 1.4 Canadian Standards Association (CSA International) .1 CAN/CSA-B45 Series-02(R2013), Plumbing Fixtures. .2 CAN/CSA-B125.3-12, Plumbing Fittings. .3 CAN/CSA-B651-12, Accessible Design for the Built Environment. ACTION AND INFORMATIONAL SUBMITTALS .1 Provide submittals in accordance with Section 01 33 00 - Submittal Procedures. .2 Product Data: .1 Provide manufacturer's printed product literature and datasheets for fixtures, and include product characteristics, performance criteria, physical size, finish and limitations. CLOSEOUT SUBMITTALS .1 Provide maintenance data in accordance with Section 01 78 00 - Closeout Submittals. .2 Include: .1 Description of fixtures and trim, giving manufacturer's name, type, model, year, capacity. .2 Details of operation, servicing, maintenance. .3 List of recommended spare parts. DELIVERY, STORAGE AND HANDLING .1 Deliver, store and handle in accordance with Section 01 61 00 - Common Product Requirements. .2 Deliver materials to site in original factory packaging, labelled with manufacturer's name, address. .3 Packaging Waste Management: remove for reuse and return by manufacturer of pallets crates padding and packaging materials in accordance with Section 01 74 21 - Construction/Demolition Waste Management and Disposal. Project No. R.067898.002 COMMERCIAL LAVATORIES AND SINKS Section 22 42 16 Page 2 PART 2 - PRODUCTS 2.1 MANUFACTURED UNITS .1 Fixtures: manufacture in accordance with CAN/CSA-B45 series. .2 Trim, fittings: manufacture in accordance with CAN/CSA-B125. .3 Exposed plumbing brass to be chrome plated. .4 Number, locations: architectural drawings to govern. .5 Fixtures to be product of one manufacturer. .6 Trim to be product of one manufacturer. .7 Stainless steel counter-top sinks. .1 S-1: barrier-free single compartment, ledge back. .1 From 1.2 mm thick type 304 stainless steel, self-rimming, undercoated, clamps. Inside sizes: 520 x 510 x 127 mm. .2 Trim: chrome plated brass, with swing spout, aerator, single lever handle, washerless controls, accessories to limit maximum flow rate to 8.35 litres/minute at 413 kPa. .8 Fixture piping: .1 Hot and cold water supplies to each fixture: .1 Chrome plated flexible supply pipes each with screwdriver stop, reducers, escutcheon. .2 Waste: .1 All barrier free sinks shall have chrome plated offset P-trap with cleanout. Insulate P-trap, hot and cold water pipes with pre-formed & finished surface insulation. PART 3 - EXECUTION 3.1 APPLICATION .1 3.2 Manufacturer's Instructions: comply with manufacturer's written recommendations, including product technical bulletins, handling, storage and installation instructions, and datasheets. INSTALLATION .1 Mounting heights: .1 Standard: to comply with manufacturer's recommendations unless otherwise indicated or specified. .2 Physically handicapped: to comply with most stringent of either NBCC or CAN/CSA-B651. Project No. R.067898.002 3.3 3.4 COMMERCIAL LAVATORIES AND SINKS ADJUSTING .1 Conform to water conservation requirements specified this section. .2 Adjustments: .1 Adjust water flow rate to design flow rates. .2 Adjust pressure to fixtures to ensure no splashing at maximum pressures. CLEANING .1 Clean in accordance with Section 01 00 10 - General Instructions. .1 Remove surplus materials, excess materials, rubbish, tools and equipment. END Section 22 42 16 Page 3 Project No. R.067898.002 SEISMIC RESTRAINT SYSTEMS (SRS) TYPE P2 BUILDINGS Section 23 05 49.01 Page 1 PART 1 - GENERAL 1.1 1.2 1.3 1.4 1.5 SUMMARY .1 Section Includes: .1 Seismic restraint systems for statically supported and vibration isolated equipment and systems; including all mechanical equipment, both vibration isolated and statically supported. .2 Related Requirements .1 Section 21 13 13 - Wet Pipe Sprinkler Systems. REFERENCES .1 Health Canada/Workplace Hazardous Materials Information System (WHMIS) .1 Material Safety Data Sheets (MSDS). .2 National Research Council Canada (NRCC) .1 NRCC NBCC-2010, National Building Code of Canada 2010. DEFINITIONS .1 Priority Two (P2) Buildings: buildings in which life safety is of paramount concern. It is not necessary that P2 buildings remain operative during or after earthquake activity. .2 SRS: acronym for Seismic Restraint System. DESCRIPTION .1 SRS fully integrated into, and compatible with: .1 Noise and vibration controls specified elsewhere. .2 Structural, mechanical, electrical design of project. .2 Systems, equipment not required to be operational during and after seismic event. .3 During seismic event, SRS to prevent systems and equipment from causing personal injury and from moving from normal position. .4 Designed by Professional Engineer specializing in design of SRS and registered in Province of Ontario. ACTION AND INFORMATIONAL SUBMITTALS .1 Submittals: in accordance with Section 01 33 00 - Submittal Procedures. .2 Shop drawings: submit drawings stamped and signed by professional engineer registered or licensed in Province of Ontario, Canada. .3 Submit design data including: .1 Full details of design criteria. Project No. R.067898.002 .2 .3 .4 .5 .6 .7 .8 .9 1.6 Section 23 05 49.01 Page 2 Design calculations (including restraint loads resulting from seismic forces in accordance with National Building Code, detailed work sheets, tables). Separate shop drawings for each SRS and devices for each system, equipment. Identification of location of devices. Schedules of types of SRS equipment and devices. Details of fasteners and attachments to structure, anchorage loadings, attachment methods. Installation procedures and instructions. Design calculations including restraint loads to NBC and Supplement. Detailed work sheets, tables Simplified, Detailed work sheets, tables. Simplified, conservative assumptions may be acceptable. .4 Submit additional copy of shop drawings and product data to Structural Engineer for review of connection points to building structure. .5 Quality assurance submittals: submit following in accordance with Section 01 33 00 - Submittal Procedures. .1 Certificates: submit certificates signed by manufacturer certifying that materials comply with specified performance characteristics and physical properties. .2 Instructions: submit manufacturer's installation instructions. .1 Departmental Representative will make available 1 copy of systems supplier's installation instructions. .6 Closeout Submittals: .1 Provide maintenance data including monitoring requirements for incorporation into manuals specified in Section 01 78 00 - Closeout Submittals. QUALITY ASSURANCE .1 1.7 SEISMIC RESTRAINT SYSTEMS (SRS) TYPE P2 BUILDINGS Health and Safety: .1 Do construction occupational health and safety in accordance with Section 01 35 29.06 - Health and Safety Requirements. DELIVERY, STORAGE, AND HANDLING .1 Packing, shipping, handling and unloading: .1 Deliver, store and handle in accordance with Section 01 61 00 - Common Product Requirements. .2 Deliver, store and handle materials in accordance with manufacturer's written instructions. .2 Waste Management and Disposal: .1 Construction/Demolition Waste Management and Disposal: separate waste materials for reuse and recycling in accordance with Section 01 74 21 - Construction/Demolition Waste Management and Disposal. Project No. R.067898.002 SEISMIC RESTRAINT SYSTEMS (SRS) TYPE P2 BUILDINGS Section 23 05 49.01 Page 3 PART 2 - PRODUCTS 2.1 SRS MANUFACTURER .1 2.2 2.3 SRS from one manufacturer regularly engaged in SRS production. GENERAL .1 SRS to provide gentle and steady cushioning action and avoid high impact loads. .2 SRS to restrain seismic forces in every direction. .3 Fasteners and attachment points to resist same load as seismic restraints. .4 SRS of Piping systems compatible with: .1 Expansion, anchoring and guiding requirements. .2 Equipment vibration isolation and equipment SRS. .5 SRS utilizing cast iron, threaded pipe, other brittle materials not permitted. .6 Attachments to RC structure: .1 Use high strength mechanical expansion anchors. .2 Drilled or power driven anchors not permitted. .7 Wet pipe sprinkler systems: refer to Section 21 13 13 - Wet Pipe Sprinkler Systems. .8 Seismic control measures not to interfere with integrity of firestopping. SRS FOR STATIC EQUIPMENT, SYSTEMS .1 Floor-mounted equipment, systems: .1 Anchor equipment to equipment supports. .2 Anchor equipment supports to structure. .3 Use size of bolts scheduled in approved shop drawings. .2 Suspended equipment, systems: .1 Use one or combination of following methods: .1 Install tight to structure. .2 Cross-brace in every direction. .3 Brace back to structure. .4 Slack cable restraint system. .2 SCS to prevent sway in horizontal plane, "rocking" in vertical plane, sliding and buckling in axial direction. .3 Hanger rods to withstand compressive loading and buckling. Project No. R.067898.002 2.4 2.5 SEISMIC RESTRAINT SYSTEMS (SRS) TYPE P2 BUILDINGS Section 23 05 49.01 Page 4 SRS FOR VIBRATION ISOLATED EQUIPMENT .1 Floor mounted equipment, systems: .1 Use one or combination of following methods: .1 Vibration isolators with built-in snubbers. .2 Vibration isolators and separate snubbers. .3 Built-up snubber system approved by Departmental Representative, consisting of structural elements and elastomeric layer. .2 SRS to resist complete isolator unloading. .3 SRS not to jeopardize noise and vibration isolation systems. Provide 4-8 mm clearance between seismic restraint snubbers and equipment during normal operation of equipment and systems. .4 Cushioning action: gentle and steady by utilizing elastomeric material or other means in order to avoid high impact loads. .2 Suspended equipment, systems: .1 Use one or combination of following methods: .1 Slack cable restraint system. .2 Brace back to structure via vibration isolators and snubbers. SLACK CABLE RESTRAINT SYSTEM (SCS) .1 Use elastomer materials or similar to avoid high impact loads and provide gentle and steady cushioning action. .2 SCS to prevent sway in horizontal plane, "rocking" in vertical plane, sliding and buckling in axial direction. .3 Hanger rods to withstand compressive loading and buckling. PART 3 - EXECUTION 3.1 MANUFACTURER'S INSTRUCTIONS .1 3.2 Compliance: comply with manufacturer's written recommendations or specifications, including product technical bulletins, handling, storage and installation instructions, and datasheet. INSTALLATION .1 Attachment points and fasteners: .1 To withstand same maximum load that seismic restraint is to resist and in every direction. .2 Slack Cable Systems (SCS): .1 Connect to suspended equipment so that axial projection of wire passes through centre of gravity of equipment. .2 Use appropriate grommets, shackles, other hardware to ensure alignment of restraints and to avoid bending of cables at connection points. .3 Piping systems: provide transverse SCS at 10 m spacing maximum, longitudinal SCS at 20 m maximum or as limited by anchor/slack cable performance. .4 Small pipes may be rigidly secured to larger pipes for restraint purposes, but not reverse. .5 Orient restraint wires on ceiling hung equipment at approximately 90 degrees to each other (in plan), tie back to structure at maximum of 45 degrees to structure. Project No. R.067898.002 .6 .7 3.3 3.4 SEISMIC RESTRAINT SYSTEMS (SRS) TYPE P2 BUILDINGS Section 23 05 49.01 Page 5 Adjust restraint cables so that they are not visibly slack but permit vibration isolation system to function normally. Tighten cable to reduce slack to 40 mm under thumb pressure. Cable not to support weight during normal operation. .3 Install SRS at least 25 mm from equipment, systems, services. .4 Miscellaneous equipment not vibration-isolated: .1 Bolt through house-keeping pad to structure. .5 Co-ordinate connections with other disciplines. .6 Vertical tanks: .1 Anchor through house-keeping pad to structure. .2 Provide steel bands above centre of gravity. .7 Horizontal tanks: .1 Provide at least two straps with anchor bolts fastened to structure. FIELD QUALITY CONTROL .1 Manufacturer's Field Services: .1 Arrange with manufacturer's representative to review work of this Section and submit written reports to verify compliance with Contract Documents. .2 Manufacturer's Field Services: consisting of product use recommendations and periodic site visits to review installation, scheduled as follows: .1 After delivery and storage of Products. .2 After preparatory work is complete but before installation commences. .3 Twice during the installation, at 25% and 60% completion stages. .4 Upon completion of installation. .3 Submit manufacturer's reports to Departmental Representative within 3 days of manufacturer representative's review. .2 Inspection and Certification: .1 SRS: inspected and certified by Seismic Engineer upon completion of installation. .2 Provide written report to Departmental Representative with certificate of compliance. CLEANING .1 Proceed in accordance with Section 01 00 10 - General Instructions. .2 Upon completion and verification of performance of installation, remove surplus materials, excess materials, rubbish, tools and equipment. END Project No. R.067898.002 TESTING, ADJUSTING AND BALANCING FOR HVAC Section 23 05 93 Page 1 PART 1 - GENERAL 1.1 1.2 1.3 SUMMARY .1 TAB is used throughout this Section to describe the process, methods and requirements of testing, adjusting and balancing for HVAC. .2 TAB means to test, adjust and balance to perform in accordance with requirements of Contract Documents and to do other work as specified in this section. QUALIFICATIONS OF TAB PERSONNEL .1 Submit names of personnel to perform TAB to Departmental Representative within 15 days of award of contract. .2 Provide documentation confirming qualifications, successful experience. .3 TAB: performed in accordance with the requirements of standard under which TAB Firm's qualifications are approved: .1 Associated Air Balance Council, (AABC) National Standards for Total System Balance, MN-1-2002. .2 National Environmental Balancing Bureau (NEBB) TABES, Procedural Standards for Testing, Adjusting, Balancing of Environmental Systems-1998. .3 Sheet Metal and Air Conditioning Contractors' National Association (SMACNA), HVAC TAB HVAC Systems - Testing, Adjusting and Balancing-2002. .4 Recommendations and suggested practices contained in the TAB Standard: mandatory. .5 Use TAB Standard provisions, including checklists, and report forms to satisfy Contract requirements. .6 Use TAB Standard for TAB, including qualifications for TAB Firm and Specialist and calibration of TAB instruments. .7 Where instrument manufacturer calibration recommendations are more stringent than those listed in TAB Standard, use manufacturer's recommendations. .8 TAB Standard quality assurance provisions such as performance guarantees form part of this contract. .1 For systems or system components not covered in TAB Standard, use TAB procedures developed by TAB Specialist. .2 Where new procedures, and requirements, are applicable to Contract requirements have been published or adopted by body responsible for TAB Standard used (AABC, NEBB, or TABB), requirements and recommendations contained in these procedures and requirements are mandatory. PURPOSE OF TAB .1 Test to verify proper and safe operation, determine actual point of performance, evaluate qualitative and quantitative performance of equipment, systems and controls at design, average and low loads using actual or simulated loads Project No. R.067898.002 1.4 1.5 1.6 1.7 Section 23 05 93 Page 2 .2 Adjust and regulate equipment and systems to meet specified performance requirements and to achieve specified interaction with other related systems under normal and emergency loads and operating conditions. .3 Balance systems and equipment to regulate flow rates to match load requirements over full operating ranges. CO-ORDINATION .1 Schedule time required for TAB (including repairs, re-testing) into project construction and completion schedule to ensure completion before acceptance of project. .2 Do TAB of each system independently and subsequently, where interlocked with other systems, in unison with those systems. PRE-TAB REVIEW .1 Review contract documents before project construction is started and confirm in writing to Departmental Representative adequacy of provisions for TAB and other aspects of design and installation pertinent to success of TAB. .2 Review specified standards and report to Departmental Representative in writing proposed procedures which vary from standard. .3 During construction, co-ordinate location and installation of TAB devices, equipment, accessories, measurement ports and fittings. START-UP .1 Follow start-up procedures as recommended by equipment manufacturer unless specified otherwise. .2 Follow special start-up procedures specified elsewhere in Division 23. OPERATION OF SYSTEMS DURING TAB .1 1.8 TESTING, ADJUSTING AND BALANCING FOR HVAC Operate systems for length of time required for TAB and as required by Departmental Representative for verification of TAB reports. START OF TAB .1 Notify Departmental Representative 7 days prior to start of TAB. .2 Start TAB when building is essentially completed, including: .3 Installation of ceilings, doors, windows, other construction affecting TAB. .4 Application of weatherstripping, sealing, and caulking. .5 Pressure, leakage, other tests specified elsewhere Division 23. Project No. R.067898.002 1.9 TESTING, ADJUSTING AND BALANCING FOR HVAC Section 23 05 93 Page 3 .6 Provisions for TAB installed and operational. .7 Start-up, verification for proper, normal and safe operation of mechanical and associated electrical and control systems affecting TAB including but not limited to: .1 Proper thermal overload protection in place for electrical equipment. .2 Air systems: .1 Filters in place, clean. .2 Duct systems clean. .3 Ducts, air shafts, ceiling plenums are airtight to within specified tolerances. .4 Correct fan rotation. .5 Fire, smoke, volume control dampers installed and open. .6 Coil fins combed, clean. .7 Access doors, installed, closed. .8 Outlets installed, volume control dampers open. APPLICATION TOLERANCES .1 1.10 Do TAB to following tolerances of design values: .1 Other HVAC systems: plus 5%, minus 5%. ACCURACY TOLERANCES .1 1.11 Measured values accurate to within plus or minus 2% of actual values. INSTRUMENTS .1 Prior to TAB, submit to Departmental Representative list of instruments used together with serial numbers. .2 Calibrate in accordance with requirements of most stringent of referenced standard for either applicable system or HVAC system. .3 Calibrate within 3 months of TAB. Provide certificate of calibration to Departmental Representative. 1.12 ACTION AND INFORMATIONAL SUBMITTALS .1 Submit, prior to commencement of TAB: .2 Proposed methodology and procedures for performing TAB if different from referenced standard. 1.13 PRELIMINARY TAB REPORT .1 Submit for checking and approval of Departmental Representative, prior to submission of formal TAB report, sample of rough TAB sheets. Include: .1 Details of instruments used. .2 Details of TAB procedures employed. .3 Calculations procedures. .4 Summaries. Project No. R.067898.002 1.14 TESTING, ADJUSTING AND BALANCING FOR HVAC Section 23 05 93 Page 4 TAB REPORT .1 Format in accordance with referenced standard. .2 TAB report to show results in SI units and to include: .1 Project record drawings. .2 System schematics. .3 Submit 6 copies of TAB Report to Departmental Representative for verification and approval, in English in D-ring binders, complete with index tabs. 1.15 VERIFICATION .1 Reported results subject to verification by Departmental Representative. .2 Provide personnel and instrumentation to verify up to 30% of reported results. .3 Number and location of verified results as directed by Departmental Representative. .4 Pay costs to repeat TAB as required to satisfaction of Departmental Representative. 1.16 SETTINGS .1 After TAB is completed to satisfaction of Departmental Representative, replace drive guards, close access doors, lock devices in set positions, ensure sensors are at required settings. .2 Permanently mark settings to allow restoration at any time during life of facility. Do not eradicate or cover markings. 1.17 COMPLETION OF TAB .1 1.18 TAB considered complete when final TAB Report received and approved by Departmental Representative. AIR SYSTEMS .1 Standard: TAB to most stringent of this section or TAB standards of AABC, NEBB, SMACNA & ASHRAE. .2 Do TAB of systems, equipment, components, controls specified Division 23. .3 Qualifications: personnel performing TAB current member in good standing of AABC or NEBB. .4 Quality assurance: perform TAB under direction of supervisor qualified to standards of AABC or NEBB. .5 Measurements: to include as appropriate for systems, equipment, components, controls: air velocity, static pressure, flow rate, pressure drop (or loss), temperatures (dry bulb, wet bulb, dewpoint), duct cross-sectional area, RPM, electrical power, voltage, noise, vibration. Project No. R.067898.002 TESTING, ADJUSTING AND BALANCING FOR HVAC .6 Locations of equipment measurements: to include as appropriate: .1 Inlet and outlet of dampers, filter, coil, humidifier, fan, other equipment causing changes in conditions. .2 At controllers, controlled device. .7 Locations of systems measurements to include as appropriate: main ducts, main branch, sub-branch, run-out (or grille, register or diffuser). PART 2 - PRODUCTS 2.1 NOT USED .1 Not used. PART 3 - EXECUTION 3.1 Section 23 05 93 Page 5 NOT USED .1 Not used. END Project No. R.067898.002 DUCT INSULATION Section 23 07 13 Page 1 PART 1 - GENERAL 1.1 1.2 REFERENCES .1 Definitions: .1 For purposes of this section: .1 "CONCEALED" - insulated mechanical services and equipment in suspended ceilings and non-accessible chases and furred-in spaces. .2 "EXPOSED" - means "not concealed" as previously defined. .3 Insulation systems - insulation material, fasteners, jackets, and other accessories. .2 TIAC Codes: .1 CRD: Code Round Ductwork, .2 CRF: Code Rectangular Finish. .2 Reference Standards: .1 American Society of Heating, Refrigeration and Air Conditioning Engineers (ASHRAE) .1 ASHRAE/IESNA 90.1-2010, Energy Standard for Buildings Except Low-Rise Residential Buildings. .2 ASTM International Inc. .1 ASTM C335/C335M-10e1, Standard Test Method for Steady State Heat Transfer Properties of Pipe Insulation. .2 ASTM C553-11, Standard Specification for Mineral Fiber Blanket Thermal Insulation for Commercial and Industrial Applications. .3 ASTM C612-10, Standard Specification for Mineral Fiber Block and Board Thermal Insulation. .3 Canadian General Standards Board (CGSB) .1 CGSB 51-GP-52Ma, Vapour Barrier, Jacket and Facing Material for Pipe, Duct and Equipment Thermal Insulation. .4 Thermal Insulation Association of Canada (TIAC): National Insulation Standards (2005). .5 Underwriters Laboratories of Canada (ULC) .1 CAN/ULC-S102-10, Method of Test for Surface Burning Characteristics of Building Materials and Assemblies. ACTION AND INFORMATIONAL SUBMITTALS .1 Provide submittals in accordance with Section 01 33 00 - Submittal Procedures. .2 Product Data: .1 Provide manufacturer's printed product literature and datasheets for duct insulation, and include product characteristics, performance criteria, physical size, finish and limitations. .1 Description of equipment giving manufacturer's name, type, model, year and capacity. .2 Details of operation, servicing and maintenance. .3 Recommended spare parts list. .3 Shop Drawings: .1 Provide drawings stamped and signed by professional engineer registered or licensed in Province of Ontario, Canada. .4 Samples: .1 Submit for approval: complete assembly of each type of insulation system, insulation, coating, and adhesive proposed. .2 Mount sample on 12 mm plywood board. .3 Affix typewritten label beneath sample indicating service. Project No. R.067898.002 .5 1.3 Section 23 07 13 Page 2 Manufacturers' Instructions: .1 Provide manufacture's written duct insulation jointing recommendations. and special handling criteria, installation sequence, cleaning procedures. QUALITY ASSURANCE .1 1.4 DUCT INSULATION Qualifications: .1 Installer: specialist in performing work of this section, qualified to standards member of TIAC. DELIVERY, STORAGE AND HANDLING .1 Deliver, store and handle in accordance with Section 01 61 00 - Common Product Requirements. .2 Deliver materials to site in original factory packaging, labelled with manufacturer's name, address and ULC markings. .3 Packaging Waste Management: remove for reuse and return by manufacturer of pallets, crates, padding and packaging materials in accordance with Section 01 74 21 - Construction/Demolition Waste Management and Disposal. PART 2 - PRODUCTS 2.1 FIRE AND SMOKE RATING .1 2.2 To CAN/ULC-S102: .1 Maximum flame spread rating: 25. .2 Maximum smoke developed rating: 50. INSULATION .1 Mineral fibre: as specified includes glass fibre, rock wool, slag wool. .2 Thermal conductivity ("k" factor) not to exceed specified values at 24 degrees C mean temperature when tested in accordance with ASTM C335. .3 TIAC Code C-1: Rigid mineral fibre board to ASTM C612, with factory applied vapour retarder jacket to CGSB 51-GP-52Ma (as scheduled in PART 3 of this Section). .4 TIAC Code C-2: Mineral fibre blanket to ASTM C553 faced with factory applied vapour retarder jacket to CGSB 51-GP-52Ma (as scheduled in PART 3 of this section). .1 Mineral fibre: to ASTM C553. .2 Jacket: to CGSB 51-GP-52Ma. .3 Maximum "k" factor: to ASTM C553. Project No. R.067898.002 2.3 DUCT INSULATION Section 23 07 13 Page 3 ACCESSORIES .1 Vapour retarder lap adhesive: .1 Water based, fire retardant type, compatible with insulation. .2 Tape: self-adhesive, aluminum, plain reinforced, 50 mm wide minimum. .3 Contact adhesive: quick-setting. .4 Tie wire: 1.5 mm stainless steel. .5 Fasteners: 4 mm diameter pins with 35 mm diameter clips, length to suit thickness of insulation. PART 3 - EXECUTION 3.1 APPLICATION .1 3.2 3.3 Manufacturer's Instructions: comply with manufacturer's written recommendations, including product technical bulletins, handling, storage and installation instructions, and datasheets. PRE- INSTALLATION REQUIREMENTS .1 Pressure test ductwork systems complete, witness and certify. .2 Ensure surfaces are clean, dry, free from foreign material. INSTALLATION .1 Install in accordance with TIAC National Standards. .2 Apply materials in accordance with manufacturers instructions and as indicated. .3 Use 2 layers with staggered joints when required nominal thickness exceeds 75 mm. .4 Maintain uninterrupted continuity and integrity of vapour retarder jacket and finishes. .1 Ensure hangers, and supports are outside vapour retarder jacket. .5 Hangers and supports: .1 Apply high compressive strength insulation where insulation may be compressed by weight of ductwork. .6 Fasteners: install at 300 mm on centre in horizontal and vertical directions, minimum 2 rows each side. Project No. R.067898.002 3.4 DUCT INSULATION DUCTWORK INSULATION SCHEDULE .1 Insulation types and thicknesses: conform to following table: TIAC Code Rectangular cold and dual temperature supply air ducts Round cold and dual temperature supply air ducts Acoustically lined ducts 3.5 Section 23 07 13 Page 4 C-1 Vapour Retarder yes Thickness (mm) 50 C-2 yes 50 none CLEANING .1 Clean in accordance with Section 01 00 10 - General Instructions. .1 Remove surplus materials, excess materials, rubbish, tools and equipment. .2 Waste Management: separate waste materials for reuse and recycling in accordance with Section 01 74 21 Construction/Demolition Waste Management and Disposal. END Project No. R.067898.002 METAL DUCTS - LOW PRESSURE TO 500 PA Section 23 31 13.01 Page 1 PART 1 - GENERAL 1.1 1.2 1.3 REFERENCES .1 American Society of Heating, Refrigerating and Air-Conditioning Engineers (ASHRAE) .2 ASTM International .1 ASTM A653/A653M-11, Standard Specification for Steel Sheet, Zinc Coated (Galvanized) or Zinc-Iron Alloy Coated (Galvannealed) by the Hot-Dip Process. .3 Sheet Metal and Air Conditioning Contractors' National Association (SMACNA) .1 SMACNA HVAC Duct Construction Standards - Metal and Flexible, 2005. .2 SMACNA HVAC Air Duct Leakage Test Manual, 2012. .3 IAQ Guideline for Occupied Buildings Under Construction 2007. ACTION AND INFORMATIONAL SUBMITTALS .1 Submit in accordance with Section 01 33 00 - Submittal Procedures. .2 Product Data: .1 Submit manufacturer's instructions, printed product literature and data sheets for metal ducts and include product characteristics, performance criteria, physical size, finish and limitations. .3 Shop Drawings: .1 Submit drawings stamped and signed by professional engineer registered or licensed in Province of Ontario, Canada. .4 Test and Evaluation Reports: .1 Certification of Ratings: .1 Catalogue or published ratings to be those obtained from tests carried out by manufacturer or independent testing agency signifying adherence to codes and standards. DELIVERY, STORAGE AND HANDLING .1 Deliver, store and handle materials in accordance with Section 01 61 00 - Common Product Requirements and with manufacturer's written instructions. .2 Delivery and Acceptance Requirements: deliver materials to site in original factory packaging, labelled with manufacturer's name and address. .3 Storage and Handling Requirements: .1 Store materials off ground, indoors, in dry location and in accordance with manufacturer's recommendations in clean, dry, well-ventilated area. .2 Store and protect metal ducts from nicks, scratches, and blemishes. .3 Replace defective or damaged materials with new. Project No. R.067898.002 METAL DUCTS - LOW PRESSURE TO 500 PA Section 23 31 13.01 Page 2 PART 2 - PRODUCTS 2.1 SEAL CLASSIFICATION .1 Classification as follows: Maximum Pressure Pa 500 250 125 125 .2 2.2 2.3 .1 Sustainability Characteristics: .1 Adhesives and sealants: in accordance with Section 07 92 00 - Joint Sealants. .2 Sealant: oil resistant, water borne, polymer type flame resistant duct sealant. Temperature range of minus 30 degrees C to plus 93 degrees C. TAPE Tape: polyvinyl treated, open weave fiberglass tape, 50 mm wide. DUCT LEAKAGE .1 2.5 Seal classification: .1 Class A: longitudinal seams, transverse joints, duct wall penetrations and connections made airtight with sealant and tape. .2 Class B: longitudinal seams, transverse joints and connections made airtight with sealant, tape or combination thereof. .3 Class C: transverse joints and connections made air tight with gasket, sealant, tape or combination thereof. Longitudinal seams unsealed. .4 Unsealed seams and joints. SEALANT .1 2.4 SMACNA Seal Class C C C Unsealed In accordance with SMACNA HVAC Air Duct Leakage Test Manual. FITTINGS .1 Fabrication: to SMACNA. .2 Radiused elbows: .1 Rectangular: standard radius short radius with single thickness turning vanes centreline radius: 1.5 times width of duct. .2 Round: smooth radius five piece, centreline radius: 1.5 times diameter. .3 Branches: .1 Rectangular main and branch: with radius on branch 1.5 times width of duct 45 degrees entry on branch. .2 Round main and branch: enter main duct at 45 degrees with conical connection. Project No. R.067898.002 .3 .4 2.6 2.7 METAL DUCTS - LOW PRESSURE TO 500 PA Section 23 31 13.01 Page 3 Provide volume control damper in branch duct near connection to main duct. Main duct branches: with splitter damper. .4 Transitions: .1 Diverging: 20 degrees maximum included angle. .2 Converging: 30 degrees maximum included angle. .5 Offsets: .1 Full radiused elbows as indicated. .6 Obstruction deflectors: maintain full cross-sectional area. .1 Maximum included angles: as for transitions. FIRE STOPPING .1 Retaining angles around duct, on both sides of fire separation in accordance with Section 07 84 00 - Fire Stopping. .2 Fire stopping material and installation must not distort duct. GALVANIZED STEEL .1 Lock forming quality: to ASTM A653/A653M, Z90 zinc coating. .2 Thickness, fabrication and reinforcement: to ASHRAE & SMACNA. .3 Joints: to ASHRAE, SMACNA or proprietary manufactured duct joint. Proprietary manufactured flanged duct joint to be considered to be a class A seal. PART 3 - EXECUTION 3.1 EXAMINATION .1 3.2 Verification of Conditions: verify that conditions of substrate previously installed under other Sections or Contracts are acceptable for metal duct installation in accordance with manufacturer's written instructions. .1 Visually inspect substrate in presence of Departmental Representative. .2 Inform Departmental Representative of unacceptable conditions immediately upon discovery. .3 Proceed with installation only after unacceptable conditions have been remedied and after receipt of written approval to proceed from Departmental Representative. GENERAL .1 Do work in accordance with ASHRAE & SMACNA as indicated. .2 Do not break continuity of insulation vapour barrier with hangers or rods. .1 Insulate strap hangers 100 mm beyond insulated duct. Ensure diffuser is fully seated. .3 Support risers in accordance with ASHRAE & SMACNA. Project No. R.067898.002 3.3 METAL DUCTS - LOW PRESSURE TO 500 PA .4 Install breakaway joints in ductwork on sides of fire separation. .5 Install proprietary manufactured flanged duct joints in accordance with manufacturer's instructions. .6 Manufacture duct in lengths and diameter to accommodate installation of acoustic duct lining. HANGERS .1 Strap hangers: install in accordance with SMACNA. .2 Angle hangers: complete with locking nuts and washers. .3 Hanger spacing: in accordance with ASHRAE & SMACNA as follows: Duct Size (mm) to 1500 1501 and over 3.4 3.5 Section 23 31 13.01 Page 4 Spacing (mm) 3000 2500 SEALING AND TAPING .1 Apply sealant in accordance with SMACNA and to manufacturer's recommendations. .2 Bed tape in sealant and recoat with minimum of 1 coat of sealant to manufacturers recommendations. CLEANING .1 Progress Cleaning: clean in accordance with Section 01 00 10 - General Instructions. .1 Leave Work area clean at end of each day. .2 Final Cleaning: upon completion remove surplus materials, rubbish, tools and equipment in accordance with Section 01 00 10 - General Instructions. END Project No. R.067898.002 AIR DUCT ACCESSORIES Section 23 33 00 Page 1 PART 1 - GENERAL 1.1 REFERENCES .1 1.2 1.3 Sheet Metal and Air Conditioning Contractors' National Association (SMACNA) .1 SMACNA - HVAC Duct Construction Standards - Metal and Flexible, 2005. ACTION AND INFORMATIONAL SUBMITTALS .1 Submit in accordance with Section 01 33 00 - Submittal Procedures. .2 Product Data: .1 Submit manufacturer's instructions, printed product literature and data sheets for air duct accessories and include product characteristics, performance criteria, physical size, finish and limitations. .2 Indicate: .1 Flexible connections. .2 Duct access doors. .3 Turning vanes. .4 Instrument test ports. DELIVERY, STORAGE AND HANDLING .1 Deliver, store and handle materials in accordance with Section 01 61 00 - Common Product Requirements and with manufacturer's written instructions. .2 Delivery and Acceptance Requirements: deliver materials to site in original factory packaging, labelled with manufacturer's name and address. .3 Storage and Handling Requirements: .1 Store materials off ground, indoors, in dry location and in accordance with manufacturer's recommendations in clean, dry, well-ventilated area. .2 Store and protect air duct accessories from nicks, scratches, and blemishes. .3 Replace defective or damaged materials with new. .4 Packaging Waste Management: remove for reuse and return by manufacturer of pallets, crates, padding, and packaging materials as specified in Construction Waste Management Plan Waste Reduction Workplan in accordance with Section 01 74 21 - Construction/Demolition Waste Management and Disposal. Project No. R.067898.002 AIR DUCT ACCESSORIES Section 23 33 00 Page 2 PART 2 - PRODUCTS 2.1 GENERAL .1 2.2 2.3 Manufacture in accordance with SMACNA - HVAC Duct Construction Standards. FLEXIBLE CONNECTIONS .1 Frame: galvanized sheet metal frame 10 mm thick with fabric clenched by means of double locked seams. .2 Material: .1 Fire resistant, self extinguishing, neoprene coated glass fabric, temperature rated at minus 40 degrees C to plus 90 degrees C, density of 1.3 kg/m 2. SPIN-IN COLLARS .1 Conical galvanized sheet metal spin-in collars with lockable butterfly damper. .2 Sheet metal thickness to co-responding round duct standards. PART 3 - EXECUTION 3.1 EXAMINATION .1 3.2 Verification of Conditions: verify that conditions of substrate previously installed under other Sections or Contracts are acceptable for air duct accessories installation in accordance with manufacturer's written instructions. .1 Visually inspect substrate in presence of Departmental Representative. .2 Inform Departmental Representative of unacceptable conditions immediately upon discovery. .3 Proceed with installation only after unacceptable conditions have been remedied and after receipt of written approval to proceed from Departmental Representative. INSTALLATION .1 Flexible Connections: .1 Install in following locations: .1 Inlets and outlets to supply air units and fans. .2 Inlets and outlets of exhaust and return air fans. .3 As indicated. .2 Length of connection: 100 mm. .3 Minimum distance between metal parts when system in operation: 75 mm. .4 Install in accordance with recommendations of SMACNA. .5 When fan is running: .1 Ducting on sides of flexible connection to be in alignment. .2 Ensure slack material in flexible connection. Project No. R.067898.002 3.3 AIR DUCT ACCESSORIES Section 23 33 00 Page 3 CLEANING .1 Progress Cleaning: clean in accordance with Section 01 00 10 - General Instructions. .1 Leave Work area clean at end of each day. .2 Final Cleaning: upon completion remove surplus materials, rubbish, tools and equipment in accordance with Section 01 00 10 - General Instructions. END Project No. R.067898.002 DAMPERS - BALANCING Section 23 33 14 Page 1 PART 1 - GENERAL 1.1 REFERENCES .1 1.2 1.3 1.4 Sheet Metal and Air Conditioning National Association (SMACNA) .1 SMACNA HVAC Duct Construction Standards, Metal and Flexible-2013. ACTION AND INFORMATIONAL SUBMITTALS .1 Submit in accordance with Section 01 33 00 - Submittal Procedures. .2 Product Data: .1 Submit manufacturer's instructions, printed product literature and data sheets for dampers and include product characteristics, performance criteria, physical size, finish and limitations. CLOSEOUT SUBMITTALS .1 Submit in accordance with Section 01 78 00 - Closeout Submittals. .2 Operation and Maintenance Data: submit operation and maintenance data for dampers for incorporation into manual. DELIVERY, STORAGE AND HANDLING .1 Deliver, store and handle materials in accordance with Section 01 61 00 - Common Product Requirements and with manufacturer's written instructions. .2 Delivery and Acceptance Requirements: deliver materials to site in original factory packaging, labelled with manufacturer's name and address. .3 Storage and Handling Requirements: .1 Store materials off ground, indoors, in dry location and in accordance with manufacturer's recommendations in clean, dry, well-ventilated area. .2 Store and protect dampers from nicks, scratches, and blemishes. .3 Replace defective or damaged materials with new. Project No. R.067898.002 DAMPERS - BALANCING Section 23 33 14 Page 2 PART 2 - PRODUCTS 2.1 GENERAL .1 2.2 Manufacture to SMACNA standards. SINGLE BLADE DAMPERS .1 Fabricate from same material as duct, but one sheet metal thickness heavier. V-groove stiffened. .2 Size and configuration to recommendations of SMACNA, except maximum height 100 mm as indicated. .3 Locking quadrant with shaft extension to accommodate insulation thickness. .4 Inside and outside nylon bronze end bearings. .5 Channel frame of same material as adjacent duct, complete with angle stop. PART 3 - EXECUTION 3.1 EXAMINATION .1 3.2 Verification of Conditions: verify that conditions of substrate previously installed under other Sections or Contracts are acceptable for damper installation in accordance with manufacturer's written instructions. .1 Visually inspect substrate in presence of Departmental Representative. .2 Inform Departmental Representative of unacceptable conditions immediately upon discovery. .3 Proceed with installation only after unacceptable conditions have been remedied and after receipt of written approval to proceed from Departmental Representative. INSTALLATION .1 Install where indicated. .2 Install in accordance with recommendations of SMACNA and in accordance with manufacturer's instructions. .3 Locate balancing dampers in each branch duct, for supply, return and exhaust systems. .4 Runouts to registers and diffusers: install single blade damper located as close as possible to main ducts. .5 Dampers: vibration free. .6 Ensure damper operators are observable and accessible. .7 Corrections and adjustments conducted by Departmental Representative. Project No. R.067898.002 3.3 DAMPERS - BALANCING Section 23 33 14 Page 3 CLEANING .1 Progress Cleaning: clean in accordance with Section 01 00 10 - General Instructions. .1 Leave Work area clean at end of each day. .2 Final Cleaning: upon completion remove surplus materials, rubbish, tools and equipment in accordance with Section 01 00 10 - General Instructions. END Project No. R.067898.002 FLEXIBLE DUCTS Section 23 33 46 Page 1 PART 1 - GENERAL 1.1 1.2 1.3 REFERENCES .1 American Society of Heating, Refrigerating and Air-Conditioning Engineers, Inc. (ASHRAE) .2 National Fire Protection Association (NFPA) .1 NFPA (Fire) 90A, Standard for the Installation of Air-Conditioning and Ventilating Systems, 2012 Edition. .2 NFPA (Fire) 90B, Standard for Installation of Warm Air Heating and Air-Conditioning Systems, 2012 Edition. .3 Sheet Metal and Air-Conditioning Contractors' National Association (SMACNA) .1 SMACNA HVAC Duct Construction Standards - Metal and Flexible, 2005. .2 SMACNA IAQ Guideline for Occupied Buildings under Construction,2005. .4 Underwriters' Laboratories (UL) .1 UL 181, Standard for Factory-Made Air Ducts and Air Connectors. .5 Underwriters' Laboratories of Canada (ULC) .1 CAN/ULC-S110-13, Standard Methods of Tests for Air Ducts. ACTION AND INFORMATIONAL SUBMITTALS .1 Submit in accordance with Section 01 33 00 - Submittal Procedures. .2 Product Data: .1 Submit manufacturer's instructions, printed product literature and data sheets for flexible ducts and include product characteristics, performance criteria, physical size, finish and limitations. .2 Indicate: .1 Thermal properties. .2 Friction loss. .3 Acoustical loss. .4 Leakage. .5 Fire rating. .3 Test and Evaluation Reports: .1 Catalogue or published ratings to be those obtained from tests carried out by manufacturer or independent testing agency signifying adherence to codes and standards. DELIVERY, STORAGE AND HANDLING .1 Deliver, store and handle materials in accordance with Section 01 61 00 - Common Product Requirements and with manufacturer's written instructions. .2 Delivery and Acceptance Requirements: deliver materials to site in original factory packaging, labelled with manufacturer's name and address. .3 Storage and Handling Requirements: .1 Store materials off ground, indoors, in dry location and in accordance with manufacturer's recommendations in clean, dry, well-ventilated area. Project No. R.067898.002 .2 .3 FLEXIBLE DUCTS Section 23 33 46 Page 2 Store and protect flexible ducts from nicks, scratches, and blemishes. Replace defective or damaged materials with new. PART 2 - PRODUCTS 2.1 2.2 GENERAL .1 Factory fabricated to CAN/ULC-S110. .2 Pressure drop coefficients listed below are based on relative sheet metal duct pressure drop coefficient of 1.00. .3 Flame spread rating not to exceed 25. Smoke developed rating not to exceed 50. METALLIC - INSULATED .1 Type 1: spiral wound flexible aluminum with factory applied, 37 mm thick flexible glass fibre thermal insulation with vapour barrier and vinyl jacket, as indicated. .2 Performance: .1 Factory tested to 2.5 kPa without leakage. .2 Maximum relative pressure drop coefficient: 3. PART 3 - EXECUTION 3.1 EXAMINATION .1 3.2 DUCT INSTALLATION .1 3.3 Verification of Conditions: verify that conditions of substrate previously installed under other Sections or Contracts are acceptable for flexible ducts installation in accordance with manufacturer's written instructions. .1 Visually inspect substrate in presence of Departmental Representative. .2 Inform Departmental Representative of unacceptable conditions immediately upon discovery. .3 Proceed with installation only after unacceptable conditions have been remedied and after receipt of written approval to proceed from Departmental Representative. Install in accordance with: CAN/ULC-S110, UL 181, NFPA (Fire) 90A, NFPA (Fire) 90B & SMACNA. CLEANING .1 Progress Cleaning: clean in accordance with Section 01 00 10 - General Instructions . .1 Leave Work area clean at end of each day. .2 Final Cleaning: upon completion remove surplus materials, rubbish, tools and equipment in accordance with Section 01 00 10 - General Instructions. END Project No. R.067898.002 DUCT LINERS Section 23 33 53 Page 1 PART 1 - GENERAL 1.1 1.2 1.3 REFERENCES .1 ASTM International .1 ASTM C177-13, Standard Test Method for Steady-State Heat Flux Measurements and Thermal Transmission Properties by Means of the Guarded-Hot-Plate Apparatus. .2 ASTM C423-09a, Standard Test Method for Sound Absorption and Sound Absorption Coefficients by the Reverberation Room Method. .3 ASTM C916-85(2007), Standard Specification for Adhesives for Duct Thermal Insulation. .4 ASTM C1071-12, Standard specification for Fibrous Glass Duct Lining Insulation (Thermal and Sound Absorbing Material). .5 ASTM C1338-08, Standard Test Method for Determining Fungi Resistance of Insulation Materials and Facings. .6 ASTM G21-09, Standard Practice for Determining Resistance of Synthetic Polymeric Materials to Fungi. .2 National Fire Protection Association (NFPA) .1 NFPA (Fire) 90A, Standard for the Installation of Air Conditioning and Ventilating Systems, 2012 Edition. .2 NFPA (Fire) 90B, Standard for the Installation of Warm Air Heating and Air Conditioning Systems, 2013 Edition. .3 North American Insulation Manufacturers Association (NAIMA) .1 NAIMA AH116-2002, Fibrous Glass Duct Construction Standards. .4 Sheet Metal and Air Conditioning Contractor's National Association (SMACNA) .1 SMACNA, HVAC Duct Construction Standards, Metal and Flexible-2005. .2 SMACNA IAQ Guideline for Occupied Buildings Under Construction-2007. .5 Underwriter's Laboratories of Canada (ULC) .1 CAN/ULC-S102-10, Standard Method of Test for Surface Burning Characteristics of Building Materials and Assemblies. ACTION AND INFORMATIONAL SUBMITTALS .1 Submit in accordance with Section 01 33 00 - Submittal Procedures. .2 Product Data: .1 Submit manufacturer's instructions, printed product literature and data sheets for duct liners and include product characteristics, performance criteria, physical size, finish and limitations. CLOSEOUT SUBMITTALS .1 Submit in accordance with Section 01 78 00 - Closeout Submittals. .2 Operation and Maintenance Data: submit operation and maintenance data for duct liners for incorporation into manual. Project No. R.067898.002 1.4 DUCT LINERS Section 23 33 53 Page 2 DELIVERY, STORAGE AND HANDLING .1 Deliver, store and handle materials in accordance with Section 01 61 00 - Common Product Requirements and with manufacturer's written instructions. .2 Delivery and Acceptance Requirements: deliver materials to site in original factory packaging, labelled with manufacturer's name and address. .3 Storage and Handling Requirements: .1 Store materials off ground, indoors, in dry location and in accordance with manufacturer's recommendations in clean, dry, well-ventilated area. .2 Store and protect duct liners from nicks, scratches, and blemishes. .3 Replace defective or damaged materials with new. PART 2 - PRODUCTS 2.1 2.2 DUCT LINER .1 General: .1 Mineral Fibre duct liner: air surface coated mat facing. .2 Flame spread rating shall not exceed 25. Smoke development rating shall not exceed 50 when tested in accordance with CAN/ULC-S102 and NFPA 90A NFPA 90B. .3 Recycled Content: EcoLogo certified with minimum 35% by weight recycled content. .4 Fungi resistance: to ASTM C1338 & ASTM G21. .2 Rigid: .1 Use on flat surfaces where indicated. .2 25 mm thick, to ASTM C1071 Type 2, fibrous glass rigid board duct liner. .3 Density: 48 kg/m3 minimum. .4 Thermal resistance to be minimum 0.76 (m2. degrees C)/W for 25 mm thickness when tested in accordance with ASTM C177, at 24 degrees C mean temperature. .5 Maximum velocity on faced air side: 20.3 m/s. .6 Minimum NRC of 0.70 at 25 mm thickness based on Type A mounting to ASTM C423. .7 Recycled Content: EcoLogo certified containing minimum 45% by weight recycled content. .3 Flexible: .1 Use on round or oval surfaces surfaces indicated. .2 25 mm thick, to ASTM C1071 Type 1, fibrous glass blanket duct liner. .3 Density: 24 kg/m3 minimum. .4 Thermal resistance to be minimum 0.37 (m2.degrees C)/W for 12 mm thickness when tested in accordance with ASTM C177, at 24 degrees C mean temperature. .5 Maximum velocity on coated air side: 25.4 m/s. .6 Minimum NRC of 0.65 at 25 mm thickness based on Type A mounting to ASTM C423. ADHESIVE .1 Adhesive: to NFPA (Fire) 90A, NFPA (Fire) 90B and ASTM C916. .2 Flame spread rating shall not exceed 25. Smoke development rating shall not exceed 50. Temperature range minus 29 degrees C to plus 93 degrees C. Project No. R.067898.002 .3 2.3 Water-based fire retardant type. Weld pins 2.0 mm diameter, length to suit thickness of insulation. Metal retaining clips, 32 mm square. JOINT TAPE .1 2.5 Section 23 33 53 Page 3 FASTENERS .1 2.4 DUCT LINERS Poly-Vinyl treated open weave fiberglass membrane 50 mm wide. SEALER .1 Meet requirements of NFPA (Fire) 90A and NFPA (Fire) 90B. .2 Flame spread rating shall not exceed 25. Smoke development rating shall not exceed 50. Temperature range minus 68 degrees C to plus 93 degrees C. PART 3 - EXECUTION 3.1 EXAMINATION .1 3.2 3.3 Verification of Conditions: verify that conditions of substrate previously installed under other Sections or Contracts are acceptable for duct liner installation in accordance with manufacturer's written instructions. .1 Visually inspect substrate in presence of Departmental Representative. .2 Inform Departmental Representative of unacceptable conditions immediately upon discovery. .3 Proceed with installation only after unacceptable conditions have been remedied and after receipt of written approval to proceed from Departmental Representative. GENERAL .1 Do work in accordance with SMACNA HVAC Duct Construction Standard, NAIMA AH116 and as indicated except as specified otherwise. .2 Line inside of ducts where indicated. .3 Duct dimensions, as indicated, are clear inside duct lining. DUCT LINER .1 Install in accordance with manufacturer's recommendations, and as follows: .1 Fasten to interior sheet metal surface with 100% coverage of adhesive to ASTM C916. .1 Exposed leading edges and transverse joints to be factory coated or coated with adhesive during fabrication. .2 In addition to adhesive, install weld pins not less than 2 rows per surface and not more than 425 mm on centres, to compress duct liner sufficiently to hold it firmly in place. Project No. R.067898.002 .2 3.4 3.5 DUCT LINERS Section 23 33 53 Page 4 In systems, where air velocities exceeds 20.3 m/s, install galvanized sheet metal noising to leading edges of duct liner. JOINTS .1 Seal butt joints, exposed edges, weld pin and clip penetrations and damaged areas of liner with joint tape and sealer. Install joint tape in accordance with manufacturer's written recommendations, and as follows: .1 Bed tape in sealer. .2 Apply 2 coats of sealer over tape. .2 Replace damaged areas of liner at discretion of Departmental Representative. .3 Protect leading and trailing edges of duct sections with sheet metal nosing having 15 mm overlap and fastened to duct. CLEANING .1 Progress Cleaning: clean in accordance with Section 01 00 10 - General Instructions. .1 Leave Work area clean at end of each day. .2 Final Cleaning: upon completion remove surplus materials, rubbish, tools and equipment in accordance with Section 01 00 10 - General Instructions. END Project No. R.067898.002 HVAC FANS Section 23 34 00 Page 1 PART 1 - GENERAL 1.1 RELATED REQUIREMENTS .1 1.2 1.3 1.4 Section 23 33 00 - Air Duct Accessories. REFERENCES .1 Air Movement and Control Association (AMCA) .1 AMCA 99-10, Standards Handbook. .2 AMCA 210-07, Laboratory Methods of Testing Fans for Aerodynamic Performance Rating. .3 AMCA 300-08, Reverberant Room Method for Sound Testing of Fans. .4 AMCA 301-06, Methods for Calculating Fan Sound Ratings from Laboratory Test Data. .2 The Master Painters Institute (MPI) .1 Architectural Painting Specification Manual - current edition. .1 MPI #18, Primer, Zinc Rich, Organic. ACTION AND INFORMATIONAL SUBMITTALS .1 Submit in accordance with Section 01 33 00 - Submittal Procedures. .2 Product Data: .1 Submit manufacturer's instructions, printed product literature and data sheets for HVAC fans and include product characteristics, performance criteria, physical size, finish and limitations. .3 Shop Drawings: .1 Submit drawings stamped and signed by professional engineer registered or licensed in Province of Ontario, Canada. .2 Provide: .1 Fan performance curves showing point of operation, bhp and efficiency. .2 Sound rating data at point of operation. .3 Indicate: .1 Motors, sheaves, bearings, shaft details. .2 Minimum performance achievable with variable speed controllers and variable inlet vanes as appropriate. MAINTENANCE MATERIAL SUBMITTALS .1 Extra Materials: .1 Submit in accordance with Section 01 78 00 - Closeout Submittals. .1 Furnish list of individual manufacturer's recommended spare parts for equipment, include: .1 Bearings and seals. .2 Addresses of suppliers. .3 List of specialized tools necessary for adjusting, repairing or replacing. Project No. R.067898.002 1.5 HVAC FANS Section 23 34 00 Page 2 DELIVERY, STORAGE AND HANDLING .1 Deliver, store and handle materials in accordance with Section 01 61 00 - Common Product Requirements and with manufacturer's written instructions. .2 Delivery and Acceptance Requirements: deliver materials to site in original factory packaging, labelled with manufacturer's name and address. .3 Storage and Handling Requirements: .1 Store materials off ground, indoors, in dry location and in accordance with manufacturer's recommendations in clean, dry, well-ventilated area. .2 Store and protect HVAC fans from nicks, scratches, and blemishes. .3 Replace defective or damaged materials with new. PART 2 - PRODUCTS 2.1 SYSTEM DESCRIPTION .1 2.2 2.3 Performance Requirements: .1 Catalogued or published ratings for manufactured items: obtained from tests carried out by manufacturer or those ordered by manufacturer from independent testing agency signifying adherence to codes and standards in force. .2 Capacity: flow rate, total static pressure, bhp, efficiency, revolutions per minute, power, model, size, sound power data and as indicated on schedule. .3 Fans: statically and dynamically balanced, constructed in conformity with AMCA 99. .4 Sound ratings: comply with AMCA Standard 301, tested to AMCA 300. Supply unit with AMCA certified sound rating seal. .5 Performance ratings: based on tests performed in accordance with AMCA 210. Supply unit with AMCA certified rating seal, except for propeller fans smaller than 300 mm diameter. FANS GENERAL .1 Motors: .1 Sizes as indicated. .2 Factory primed before assembly in colour standard to manufacturer. .3 Scroll casing drains: as indicated. .4 Flexible connections: to Section 23 33 00 - Air Duct Accessories. CENTRIFUGAL FANS .1 Fan wheels: .1 Welded steel or aluminum construction. .2 Maximum operating speed of centrifugal fans not more than 40% of first critical speed. .3 Backward inclined blades, as indicated. .2 Bearings: heavy duty grease lubricated ball or roller self aligning type with oil retaining, dust excluding seals and a certified minimum rated life of 100,000 hours. Project No. R.067898.002 2.4 HVAC FANS Section 23 34 00 Page 3 CABINET FANS - GENERAL PURPOSE .1 Fan characteristics and construction: as centrifugal fans. .2 Cabinet hung single or multiple wheel with DWDI centrifugal fans in factory fabricated casing complete with vibration isolators and seismic control measures, motor, variable speed controller. .3 Fabricate casing of zinc coated or phosphate treated steel reinforced and braced for rigidity. Provide removable panels for access to interior. Paint uncoated, steel parts with corrosion resistant paint to MPI #18. Finish inside and out, over prime coat, with rust resistant enamel. Internally line cabinet with 25 mm thick rigid acoustic insulation, pinned and cemented. .4 Solid state speed controller, CSA listed, shipped loose for mounting on wall by electrical trade. PART 3 - EXECUTION 3.1 EXAMINATION .1 3.2 3.3 FAN INSTALLATION .1 Install fans as indicated, complete with resilient mountings, flexible electrical leads and flexible connections in accordance with Section 23 33 00 - Air Duct Accessories. .2 Access doors and access panels to be easily accessible. ANCHOR BOLTS AND TEMPLATES .1 3.4 Verification of Conditions: verify that conditions of substrate previously installed under other Sections or Contracts are acceptable for HVAC fans installation in accordance with manufacturer's written instructions. .1 Visually inspect substrate in presence of Departmental Representative. .2 Inform Departmental Representative of unacceptable conditions immediately upon discovery. .3 Proceed with installation only after unacceptable conditions have been remedied and after receipt of written approval to proceed from Departmental Representative. Size anchor bolts to withstand seismic acceleration and velocity forces as specified. CLEANING .1 Progress Cleaning: clean in accordance with Section 01 00 10 - General Instructions. .1 Leave Work area clean at end of each day. .2 Final Cleaning: upon completion remove surplus materials, rubbish, tools and equipment in accordance with Section 01 00 10 - General Instructions. END Project No. R.067898.002 AIR TERMINAL UNITS Section 23 36 00 Page 1 PART 1 - GENERAL 1.1 1.2 1.3 1.4 REFERENCES .1 National Fire Protection Association (NFPA) .1 NFPA (Fire) 90A, Standard for the Installation of Air Conditioning and Ventilating Systems, 2012 Edition. .2 Underwriter's Laboratories (UL) .1 UL 181, Factory-Made Air Ducts and Air Connectors. ACTION AND INFORMATIONAL SUBMITTALS .1 Submit in accordance with Section 01 33 00 - Submittal Procedures. .2 Product Data: .1 Submit manufacturer's instructions, printed product literature and data sheets for air terminal units and include product characteristics, performance criteria, physical size, finish and limitations. .3 Shop Drawings: .1 Submit drawings stamped and signed by professional engineer registered or licensed in Province of Ontario, Canada. .2 Indicate the following: .1 Capacity. .2 Pressure drop. .3 Noise rating. .4 Leakage. CLOSEOUT SUBMITTALS .1 Submit in accordance with Section 01 78 00 - Closeout Submittals. .2 Operation and Maintenance Data: submit operation and maintenance data for air terminal units for incorporation into manual. DELIVERY, STORAGE AND HANDLING .1 Deliver, store and handle materials in accordance with Section 01 61 00 - Common Product Requirements and with manufacturer's written instructions. .2 Delivery and Acceptance Requirements: deliver materials to site in original factory packaging, labelled with manufacturer's name and address. .3 Storage and Handling Requirements: .1 Store materials off ground, indoors, in dry location and in accordance with manufacturer's recommendations in clean, dry, well-ventilated area. .2 Store and protect air terminal units from nicks, scratches, and blemishes. .3 Replace defective or damaged materials with new. Project No. R.067898.002 AIR TERMINAL UNITS Section 23 36 00 Page 2 PART 2 - PRODUCTS 2.1 SYSTEM DESCRIPTION .1 2.2 MANUFACTURED UNITS .1 2.3 2.4 Performance Requirements: .1 Catalogued or published ratings for manufactured items: obtained from tests carried out by manufacturer or those ordered by manufacturer from certified ADC (Air Diffusion Council) testing agency signifying adherence to codes and standards. Terminal units of the same type to be product of one manufacturer. VARIABLE VOLUME BOXES .1 Pressure independent factory reset to air flow between zero minimum and maximum air volume. .2 Sizes, capacities, differential pressures and sound ratings: as indicated on drawings. Adjust VAV box maximum to suit diffuser airflow, minimum to 20% of maximum. .3 Differential pressure not to exceed 25 Pa at inlet air velocity of 10 m/s. .4 Complete with: .1 Operator and controller: DDC, field mounted by base building Controls Contractor, to match existing building standard. .2 Sound attenuator. .3 DDC controller to operate damper operator between maximum or minimum air volume settings:. .5 Minimum 35 kPa reset span. .6 Adjustable reset start point. .7 Operator to be field mounted and calibrated: .1 Gauge taps for balancing with standard pressure gauge. .2 Controller to have adjustable flow settings. .8 Casing: constructed of galvanized steel, internally lined with 25 mm, 0.7 kg density fibrous glass, to UL 181 and NFPA (Fire) 90A. Mount control components inside protective metal shroud. .9 Damper: galvanized steel with peripheral gasket and self lubricating bearings. Air leakage past closed damper not to exceed 2% of nominal rating at 750 Pa inlet static pressure, in accordance with Air Diffusion Council test procedure. FAN POWERED BOXES .1 General: .1 Primary air assembly, pressure independent with reset to any air flow between zero and maximum air volume as indicated. .2 DDC controller to operate damper operator between independent of maximum or minimum air volume settings. Project No. R.067898.002 .3 .4 .5 .6 .7 .2 AIR TERMINAL UNITS Section 23 36 00 Page 3 DDC operator and controller to be field mounted by base building contractor, to match existing base building standard. Field calibration and readjustment of air volume as follows: .1 Gauge tops for balancing with standard pressure gauge. .2 Adjustable flow settings. Casing: galvanized steel, internally lined with 25 mm, 0.7 kg density fibrous glass, to UL 181 and NFPA (Fire) 90A. Mount control components inside protective metal shroud. Damper: galvanized steel with peripheral gasket and self lubricating bearings. Air leakage past closed damper not to exceed 2% of nominal rating at 750 Pa inlet static pressure, in accordance with Air Diffusion Council test procedure. Complete with: .1 Sound attenuator. Fan section: .1 CSA certified. .2 Forward curved, centrifugal, direct drive, permanently lubricated ECM motor, internally suspended and isolated from casing on rubber-in-shear isolators complete with access panel. .3 Fan controls sealed from primary air flow. .4 Electrical characteristics: as per schedule. PART 3 - EXECUTION 3.1 EXAMINATION .1 3.2 3.3 Verification of Conditions: verify that conditions of substrate previously installed under other Sections or Contracts are acceptable for air terminal units installation in accordance with manufacturer's written instructions. .1 Visually inspect substrate in presence of Departmental Representative. .2 Inform Departmental Representative of unacceptable conditions immediately upon discovery. .3 Proceed with installation only after unacceptable conditions have been remedied and after receipt of written approval to proceed from Departmental Representative. INSTALLATION .1 Install in accordance with manufacturers recommendations. .2 Support independently of ductwork. .3 Install with at least 1000 mm of flexible inlet ducting and minimum of four duct diameters of straight inlet duct, same size as inlet. .4 Locate controls, dampers and access panels for easy access. CLEANING .1 Progress Cleaning: clean in accordance with Section 01 00 10 - General Instructions. .1 Leave Work area clean at end of each day. .2 Final Cleaning: upon completion remove surplus materials, rubbish, tools and equipment in accordance with Section 01 00 10 - General Instructions. Project No. R.067898.002 DIFFUSERS, REGISTERS AND GRILLES Section 23 37 13 Page 1 PART 1 - GENERAL 1.1 1.2 ACTION AND INFORMATIONAL SUBMITTALS .1 Submit in accordance with Section 01 33 00 - Submittal Procedures. .2 Product Data: .1 Submit manufacturer's instructions, printed product literature and data sheets for diffusers, registers and grilles and include product characteristics, performance criteria, physical size, finish and limitations. .2 Indicate following: .1 Capacity. .2 Throw and terminal velocity. .3 Noise criteria. .4 Pressure drop. .5 Neck velocity. MAINTENANCE MATERIAL SUBMITTALS .1 1.3 Extra Materials: .1 Provide maintenance materials in accordance with Section 01 78 00 - Closeout Submittals. .2 Include: .1 Keys for volume control adjustment. .2 Keys for air flow pattern adjustment. DELIVERY, STORAGE AND HANDLING .1 Deliver, store and handle materials in accordance with Section 01 61 00 - Common Product Requirements and with manufacturer's written instructions. .2 Delivery and Acceptance Requirements: deliver materials to site in original factory packaging, labelled with manufacturer's name and address. .3 Storage and Handling Requirements: .1 Store materials off ground, indoors, in dry location and in accordance with manufacturer's recommendations in clean, dry, well-ventilated area. .2 Store and protect diffuser, registers and grilles from nicks, scratches, and blemishes. .3 Replace defective or damaged materials with new. Project No. R.067898.002 DIFFUSERS, REGISTERS AND GRILLES Section 23 37 13 Page 2 PART 2 - PRODUCTS 2.1 SYSTEM DESCRIPTION .1 2.2 2.3 GENERAL .1 Frames: .1 Full perimeter gaskets. .2 Plaster frames where set into plaster or gypsum board and as specified. .3 Concealed fasteners. .2 Concealed manual volume control damper operators. .3 Colour: standard. MANUFACTURED UNITS .1 2.4 Grilles, registers and diffusers of same generic type, products of one manufacturer. RETURN AND EXHAUST GRILLES AND REGISTERS .1 2.5 Performance Requirements: .1 Catalogued or published ratings for manufactured items: obtained from tests carried out by manufacturer or those ordered by manufacturer from independent testing agency signifying adherence to codes and standards. Type RG1/TG1: aluminum, 13 x 13 mm egg crate type face bars, size as indicated on drawings, with drywall frame in coffered ceiling tiles. Finish: White. DIFFUSERS .1 General: volume control dampers with flow straightening devices and gaskets. .2 Type SD-1: existing coffered ceiling diffuser to remain or be relocated. .3 Type SD-2: steel, square type, 300 x 300, having fixed pattern, neck size as indicated on drawings, lay-in mounted. Finish: White. Project No. R.067898.002 DIFFUSERS, REGISTERS AND GRILLES Section 23 37 13 Page 3 PART 3 - EXECUTION 3.1 EXAMINATION .1 3.2 3.3 Verification of Conditions: verify that conditions of substrate previously installed under other Sections or Contracts are acceptable for diffuser, register and grille installation in accordance with manufacturer's written instructions. .1 Visually inspect substrate in presence of Departmental Representative. .2 Inform Departmental Representative of unacceptable conditions immediately upon discovery. .3 Proceed with installation only after unacceptable conditions have been remedied and after receipt of written approval to proceed from Departmental Representative. INSTALLATION .1 Install in accordance with manufacturers instructions. .2 Install with cadmium plated screws in countersunk holes where fastenings are visible. .3 Bolt grilles, registers and diffusers, in place, in gymnasium and similar game rooms. .4 Provide concealed safety chain on each grille, register and diffuser in gymnasium and similar game rooms and elsewhere as indicated. CLEANING .1 Progress Cleaning: clean in accordance with Section 01 00 10 - General Instructions. .1 Leave Work area clean at end of each day. .2 Final Cleaning: upon completion remove surplus materials, rubbish, tools and equipment in accordance with Section 01 00 10 - General Instructions. END Project No. R.067898.002 EMCS: GENERAL REQUIREMENTS Section 25 05 01 Page 1 PART 1 - GENERAL 1.1 1.2 1.3 SUMMARY .1 Section Includes: .1 General requirements for building Energy Monitoring and Control System (EMCS) that are common to NMS EMCS Sections. .2 Related Requirements .1 Section 21 05 01 - Common Work Results for Mechanical. REFERENCES .1 American National Standards Institute (ANSI)/The Instrumentation, Systems and Automation Society (ISA). .1 ANSI/ISA 5.5-1985, Graphic Symbols for Process Displays. .2 American National Standards Institute (ANSI)/ Institute of Electrical and Electronics Engineers (IEEE). .1 ANSI/IEEE 260.1-1993, American National Standard Letter Symbols Units of Measurement (SI Units, Customary Inch-Pound Units, and Certain Other Units). .3 American Society of Heating, Refrigerating and Air-Conditioning Engineers, Inc. (ASHRAE). .1 ASHRAE STD 135-R2001, BACNET - Data Communication Protocol for Building Automation and Control Network. .4 Canadian Standards Association (CSA International). .1 CAN/CSA-Z234.1-89(R1995), Canadian Metric Practice Guide. .5 Consumer Electronics Association (CEA). .1 CEA-709.1-B-2002, Control Network Protocol Specification. .6 Department of Justice Canada (Jus). .1 Canadian Environmental Assessment Act (CEAA), 1995, c. 37. .2 Canadian Environmental Protection Act (CEPA), 1999, c. 33. .7 Health Canada/Workplace Hazardous Materials Information System (WHMIS). .1 Material Safety Data Sheets (MSDS). .8 Transport Canada (TC). .1 Transportation of Dangerous Goods Act (TDGA), 1992, c. 34. ACRONYMS AND ABBREVIATIONS .1 Acronyms used in EMCS: .1 AEL - Average Effectiveness Level. .2 AI - Analog Input. .3 AIT - Agreement on International Trade. .4 AO - Analog Output. .5 BACnet - Building Automation and Control Network. .6 BC(s) - Building Controller(s). .7 BECC - Building Environmental Control Center. .8 CAD - Computer Aided Design. Project No. R.067898.002 .9 .10 .11 .12 .13 .14 .15 .16 .17 .18 .19 .20 .21 .22 .23 .24 .25 .26 .27 .28 .29 .30 .31 .32 .33 .34 .35 .36 .37 .38 .39 .40 .41 1.4 EMCS: GENERAL REQUIREMENTS Section 25 05 01 Page 2 CDL - Control Description Logic. CDS - Control Design Schematic. COSV - Change of State or Value. CPU - Central Processing Unit. DI - Digital Input. DO - Digital Output. DP - Differential Pressure. ECU - Equipment Control Unit. EMCS - Energy Monitoring and Control System. HVAC - Heating, Ventilation, Air Conditioning. IDE - Interface Device Equipment. I/O - Input/Output. ISA - Industry Standard Architecture. LAN - Local Area Network. LCU - Local Control Unit. MCU - Master Control Unit. NAFTA - North American Free Trade Agreement. NC - Normally Closed. NO - Normally Open. OS - Operating System. O&M - Operation and Maintenance. OWS - Operator Work Station. PC - Personal Computer. PCI - Peripheral Control Interface. PCMCIA - Personal Computer Micro-Card Interface Adapter. PID - Proportional, Integral and Derivative. RAM - Random Access Memory. SP - Static Pressure. ROM - Read Only Memory. TCU - Terminal Control Unit. USB - Universal Serial Bus. UPS - Uninterruptible Power Supply. VAV - Variable Air Volume. DEFINITIONS .1 Point: may be logical or physical. .1 Logical points: values calculated by system such as setpoints, totals, counts, derived corrections and may include, but not limited to result of and statements in CDL's. .2 Physical points: inputs or outputs which have hardware wired to controllers which are measuring physical properties, or providing status conditions of contacts or relays which provide interaction with related equipment (stop, start) and valve or damper actuators. .2 Point Name: composed of two parts, point identifier and point expansion. .1 Point identifier: comprised of three descriptors, "area" descriptor, "system" descriptor and "point" descriptor, for which database to provide 25 character field for each point identifier. "System" is system that point is located on. .1 Area descriptor: building or part of building where point is located. .2 System descriptor: system that point is located on. .3 Point descriptor: physical or logical point description. For point identifier "area", "system" and "point" will be shortforms or acronyms. Database must provide 25character field for each point identifier. Project No. R.067898.002 .2 .3 1.5 1.6 EMCS: GENERAL REQUIREMENTS Section 25 05 01 Page 3 Point expansion : comprised of three fields, one for each descriptor. Expanded form of shortform or acronym used in "area", "system" and "point" descriptors is placed into appropriate point expansion field. Database must provide 32 character field for each point expansion. Bilingual systems to include additional point identifier expansion fields of equal capacity for each point name for second language. .1 System to support use of numbers and readable characters including blanks, periods or underscores to enhance user readability for each of the above strings. .3 Point Object Type: points fall into following object types: .1 AI (analog input). .2 AO (analog output). .3 DI (digital input). .4 DO (digital output). .5 Pulse inputs. .4 Symbols and engineering unit abbreviations utilized in displays: to ANSI/ISA S5.5. .1 Printouts: to ANSI/IEEE 260.1. SYSTEM DESCRIPTION .1 Work covered by sections referred to above consists of fully operational EMCS, including, but not limited to, following: .1 DDC VAV box actuator and temperature sensors to match existing. .2 Data communications equipment necessary to effect EMCS data transmission system. .3 Field control devices. .4 Software/Hardware complete with full documentation. .5 Acceptance tests, technical support during commissioning, full documentation. .6 Wiring interface co-ordination of equipment supplied by others. .7 Miscellaneous work as specified in these sections and as indicated. .2 Design Requirements: .1 Design and provide conduit and wiring linking elements of system. .2 Supply sufficient programmable controllers of types to meet project requirements. Quantity and points contents as reviewed by Departmental Representative prior to installation. .3 Location of controllers as reviewed by Departmental Representative prior to installation. .3 Existing systems: Existing base building controls service contractor for R.H. Coats building is Regulvar, and for Jean Talon building is Direct Energy. .4 All workmanship and materials to match existing base building standard. ACTION AND INFORMATIONAL SUBMITTALS .1 Make submittals in accordance with Section 01 33 00 - Submittal Procedures. .2 Quality Control: .1 Provide equipment and material from manufacturer's regular production, CSA certified, manufactured to standard quoted plus additional specified requirements. .2 Where CSA certified equipment is not available submit such equipment to inspection authorities for special inspection and approval before delivery to site. Project No. R.067898.002 1.7 1.8 EMCS: GENERAL REQUIREMENTS Section 25 05 01 Page 4 DELIVERY, STORAGE AND HANDLING .1 Material Delivery Schedule: provide Departmental Representative with schedule within 2 weeks after award of Contract. .2 Waste Management and Disposal: .1 Separate waste materials for reuse and recycling. .2 Remove from site and dispose of packaging materials at appropriate recycling facilities. .3 Collect and separate for disposal paper plastic polystyrene corrugated cardboard packaging material in appropriate on-site bins for recycling. .4 Separate for reuse and recycling and place in designated containers Steel Metal Plastic waste in accordance with Waste Management Plan. .5 Place materials defined as hazardous or toxic in designated containers. EXISTING- CONTROL COMPONENTS .1 Utilize existing control wiring and piping as indicated. .2 Re-use field control devices that are usable in their original configuration provided that they conform to applicable codes, standards specifications. .1 Do not modify original design of existing devices without written permission fromDepartmental Representative. .2 Provide for new, properly designed device where re-usability of components is uncertain. .3 Inspect and test existing devices intended for re-use within 30 days of award of contract, and prior to installation of new devices. .1 Furnish test report within 40 days of award of contract listing each component to be re-used and indicating whether it is in good order or requires repair by Departmental Representative. .2 Failure to produce test report will constitute acceptance of existing devices by contractor. .4 Non-functioning items: .1 Provide with report specification sheets or written functional requirements to support findings. .2 Departmental Representative will repair or replace existing items judged defective yet deemed necessary for EMCS. .5 Submit written request for permission to disconnect controls and to obtain equipment downtime before proceeding with Work. .6 Assume responsibility for controls to be incorporated into EMCS after written receipt of approval from Departmental Representative. .1 Be responsible for items repaired or replaced by Departmental Representative. .2 Be responsible for repair costs due to negligence or abuse of equipment. .3 Responsibility for existing devices terminates upon final acceptance of EMCS by Departmental Representative. .7 Remove existing controls not re-used or not required. Place in approved storage for disposition as directed. Project No. R.067898.002 EMCS: GENERAL REQUIREMENTS Section 25 05 01 Page 5 PART 2 - PRODUCTS 2.1 EQUIPMENT .1 Control Network Protocol and Data Communication Protocol: to CEA 709.1 ASHRAE STD 135. .2 Complete list of equipment and materials to be used on project and forming part of bid tender documents by adding manufacturer's name, model number and details of materials, and submit for approval. .1 All materials to match existing base building standards. PART 3 - EXECUTION 3.1 MANUFACTURER'S RECOMMENDATIONS .1 Installation: to manufacturer's recommendations. END Project No. R.067898.002 COMMON WORK RESULTS FOR ELECTRICAL Section 26 05 00 Page 1 PART 1 - GENERAL 1.1 1.2 1.3 RELATED SECTIONS .1 Section 26 05 31 - Splitters, Junction, Pull Boxes and Cabinets. .2 Section 26 28 23 - Disconnect Switches - Fused and Non-Fused. REFERENCES .1 Canadian Standards Association (CSA International) .1 CSA C22.1-12, Canadian Electrical Code, Part 1 (22nd Edition), Safety Standard for Electrical Installations. .2 Electrical and Electronic Manufacturer's Association of Canada (EEMAC) .1 EEMAC 2Y-1, Light Gray Colour for Indoor Switch Gear. .3 Institute of Electrical and Electronics (IEEE)/National Electrical Safety Code Product Line (NESC) .1 IEEE SP1122, The Authoritative Dictionary of IEEE Standards Terms, 7th Edition. .4 Underwriters Laboratories of Canada (ULC) .1 CAN/ULC S537-04, Verification of Fire Alarm Systems. DEFINITIONS .1 1.4 Electrical and electronic terms: unless otherwise specified or indicated, terms used in these specifications, and on drawings, are those defined by IEEE SP1122. DESIGN REQUIREMENTS .1 Operating voltages: to CAN3-C235. .2 Motors, electric heating, control and distribution devices and equipment to operate satisfactorily at 60 Hz within normal operating limits established by above standard. .1 Equipment to operate in extreme operating conditions established in above standard without damage to equipment. .3 Language operating requirements: provide identification nameplates and labels for control items in English and French. .4 Use one nameplate or label for each language. .5 Coordinate work with mechanical contractor to avoid interference. Project No. R.067898.002 1.5 1.6 COMMON WORK RESULTS FOR ELECTRICAL Section 26 05 00 Page 2 SUBMITTALS .1 Submittals: in accordance with Section 01 33 00 - Submittal Procedures. .2 Shop drawings: .1 Submit shop drawings with contractor's stamp to indicate acceptance and conformance to installation requirements. .2 Submit wiring diagrams and installation details of equipment indicating proposed location, layout and arrangement, control panels, accessories, piping, ductwork, and other items that must be shown to ensure co-ordinated installation. .3 Identify on wiring diagrams circuit terminals and indicate internal wiring for each item of equipment and interconnection between each item of equipment. .4 Indicate of drawings clearances for operation, maintenance, and replacement of operating equipment devices. .5 Submit shop drawings and product data electronically to Departmental Representative for review of conformance to design intent. .6 If changes are required, notify Departmental Represenative of these changes before they are made. .3 Quality Control: in accordance with Section 01 45 00 - Quality Control: .1 Provide CSA certified equipment and material. .2 Where CSA certified equipment and material is not available, submit such equipment and material to inspection authorities for special approval before delivery to site. .3 Submit test results of installed electrical systems and instrumentation. .4 Permits and fees: in accordance with General Conditions of contract. .5 Submit shop drawings and product data electronically to Departmental Representative for review of conformance to design intent. .6 Submit certificate of acceptance from authority having jurisdiction upon completion of Work to Departmental Represenative. .4 Manufacturer's Field Reports: submit to Departmental Represenative's written report, within 3 days of review, verifying compliance of Work and electrical system and instrumentation testing, as described in PART 3 - FIELD QUALITY CONTROL. QUALITY ASSURANCE .1 Quality Assurance: in accordance with Section 01 45 00 - Quality Control. .2 Qualifications: electrical Work to be carried out by qualified, licensed electricians who hold valid Master Electrical Contractor license or apprentices as per the conditions of Provincial Act respecting manpower vocational training and qualification. .1 Employees registered in provincial apprentices program: permitted, under direct supervision of qualified licensed electrician, to perform specific tasks .2 Permitted activities: determined based on training level attained and demonstration of ability to perform specific duties. .3 Health and Safety Requirements: do construction occupational health and safety in accordance with Section 01 35 29.06 - Health and Safety Requirements. Project No. R.067898.002 1.7 1.8 Section 26 05 00 Page 3 DELIVERY, STORAGE AND HANDLING .1 Material Delivery Schedule: provide Departmental Represenative with schedule within 2 weeks after award of Contract. .2 Construction/Demolition Waste Management and Disposal: separate waste materials for reuse and recycling in accordance with Waste Management Plan. SYSTEM STARTUP .1 1.9 COMMON WORK RESULTS FOR ELECTRICAL Instruct Departmental Represenative and operating personnel in operation, care and maintenance of systems, system equipment and components. OPERATING INSTRUCTIONS .1 Provide for each system and principal item of equipment as specified in technical sections for use by operation and maintenance personnel. .2 Operating instructions to include following: .1 Wiring diagrams, control diagrams, and control sequence for each principal system and item of equipment. .2 Start up, proper adjustment, operating, lubrication, and shutdown procedures. .3 Safety precautions. .4 Procedures to be followed in event of equipment failure. .5 Other items of instruction as recommended by manufacturer of each system or item of equipment. 1.10 MODIFICATIONS TO FIRE ALARM SYSTEM .1 Where work requires modifications to or interruption of fire alarms systems: .1 Retain services of building fire alarm maintenance contractor (Jean Talon Building - Simplex, and R.H. Coats Building - Siemens) for fire alarm systems on a daily basis, to isolate and protect all devices relating to: .1 modification of fire alarms systems; and/or .2 cutting, welding, soldering or other construction activities which might activate fire alarm system. .2 Immediately upon completion of work, restore fire alarm systems to normal operation and verify that all devices are fully operational. .3 Inform fire alarm system monitoring agency and local Fire Department immediately prior to isolation and immediately upon restoration of normal operation. .4 Provide verification report at completion of work in accordance with CAN/ULC S537. Project No. R.067898.002 COMMON WORK RESULTS FOR ELECTRICAL Section 26 05 00 Page 4 PART 2 - PRODUCTS 2.1 2.2 2.3 MATERIALS AND EQUIPMENT .1 Material and equipment to be CSA certified. Where CSA certified material and equipment are not available, obtain special approval from inspection authorities before delivery to site and submit such approval as described in PART 1.5 - SUBMITTALS. .2 Factory assemble control panels and component assemblies. WARNING SIGNS .1 Warning Signs: in accordance with requirements of authority having jurisdiction and Departmental Represenative. .2 Decal signs, minimum size 175 x 250 mm. WIRING TERMINATIONS .1 2.4 Ensure lugs, terminals, screws used for termination of wiring are suitable for either copper or aluminum conductors. EQUIPMENT IDENTIFICATION .1 Identify electrical equipment with nameplates and labels as follows: .1 Nameplates: lamicoid 3 mm thick plastic engraving sheet, black face, white core (or to match building starndard), lettering accurately aligned and engraved into core mechanically attached with self tapping screws. .2 Sizes as follows: NAMEPLATE SIZES Size 6 25 x 100 mm 1 line 12 mm high letters 25 x 100 mm 2 lines 6 mm high letters Size 7 .2 Labels: electronically printed, self-adhesive, plastic labels with 6 mm high letters unless specified otherwise. White with black lettering. .3 Wording on nameplates and labels to be approved by Departmental Represenative prior to manufacture. .4 Allow for minimum of twenty-five (25) letters per nameplate . .5 Nameplates for junction boxes to indicate system and/or voltage characteristics. .6 Identify equipment with labels engraved "ASSET INVENTORY NO." as directed by Departmental Represenative. .7 Disconnects, splitters & panels: indicate equipment power source and voltage. .8 Pull boxes: indicate system and voltage. Project No. R.067898.002 2.5 2.6 Section 26 05 00 Page 5 WIRING IDENTIFICATION .1 Identify wiring with permanent indelible identifying markings, numbered on both ends of phase conductors of feeders and branch circuit wiring. .2 Maintain phase sequence and colour coding throughout. .3 Colour coding: to CSA C22.1. .4 Use colour coded wires in communication cables, matched throughout system. CONDUIT AND CABLE IDENTIFIC .1 Colour code conduits, boxes and metallic sheathed cables. .2 Code with plastic tape or paint at points where conduit or cable enters wall, ceiling, or floor, and at 15 m intervals. .3 Colours: 25 mm wide prime colour and 20 mm wide auxiliary colour. up to 250 V up to 600 V 2.7 COMMON WORK RESULTS FOR ELECTRICAL Prime Yellow Yellow Auxiliary Green FINISHES .1 Shop finish metal enclosure surfaces by application of rust resistant primer inside and outside, and at least two coats of finish enamel. .1 Paint outdoor electrical equipment "equipment green" finish to EEMAC Y1-1. .2 Paint indoor switchgear and distribution enclosures light gray to EEMAC 2Y-1. PART 3 - EXECUTION 3.1 INSTALLATION .1 3.2 Do complete installation in accordance with CSA C22.1 except where specified otherwise. NAMEPLATES AND LABELS .1 Ensure manufacturer's nameplates, CSA labels and identification nameplates are visible and legible after equipment is installed. .2 Provide labels indicating panel name and circuit number for all receptacles and light switches. Project No. R.067898.002 3.3 3.4 3.5 Section 26 05 00 Page 6 CONDUIT AND CABLE INSTALLATION .1 Sleeves through concrete: sized for free passage of conduit and protruding 50 mm. .2 If plastic sleeves are used in fire rated walls or floors, remove before conduit installation. .3 Install cables, conduits and fittings embedded or plastered over, close to building structure so furring can be kept to minimum. MOUNTING HEIGHTS .1 Mounting height of equipment is from finished floor to centreline of equipment unless specified or indicated otherwise. .2 If mounting height of equipment is not specified or indicated, verify before proceeding with installation. .3 Install electrical equipment at following heights unless indicated otherwise. .1 Local switches: 1200 mm. .2 Wall receptacles: .1 General: 400 mm. .2 Above top of continuous baseboard heater: 200 mm. .3 Above top of counters or counter back splashes: 175 mm. .4 In mechanical rooms: 1200 mm. .3 Telephone and interphone outlets: 400 mm. .4 Wall mounted telephone and interphone outlets: 1200 mm. .5 Fire alarm pull stations: 1200 mm. .6 Television outlets: 400 mm. CO-ORDINATION OF PROTECTIVE DEVICES .1 3.6 COMMON WORK RESULTS FOR ELECTRICAL Ensure circuit protective devices such as overcurrent trips, relays and fuses are installed to required values and settings. FIELD QUALITY CONTROL .1 Load Balance: .1 Measure phase current to panelboards affected by the work with normal loads (lighting) operating at time of acceptance; adjust branch circuit connections as required to obtain best balance of current between phases for new and existing loads and record changes. .2 Provide upon completion of work, load balance report as directed in PART 1 ACTION AND INFORMATIONAL SUBMITTALS: phase and neutral currents on panelboards affected by the work, operating under normal load, as well as hour and date on which each load was measured, and voltage at time of test. .2 Conduct following tests in accordance with Section 01 45 00 - Quality Control. .1 Power generation and distribution system including phasing, voltage, grounding and load balancing. .2 Circuits originating from branch distribution panels. .3 Motors and associated control equipment including sequenced operation of systems where applicable. .3 Carry out tests in presence of Departmental Represenative. Project No. R.067898.002 3.7 3.8 COMMON WORK RESULTS FOR ELECTRICAL Section 26 05 00 Page 7 .4 Provide instruments, meters, equipment and personnel required to conduct tests during and at conclusion of project. .5 Manufacturer's Field Services: .1 Obtain written report from manufacturer verifying compliance of Work, in handling, installing, applying, protecting and cleaning of product and submit Manufacturer's Field Reports as described in PART 1 SUBMITTALS. .2 Provide manufacturer's field services consisting of product use recommendations and periodic site visits for inspection of product installation in accordance with manufacturer's instructions. CLEANING .1 Clean and touch up surfaces of shop-painted equipment scratched or marred during shipment or installation, to match original paint. .2 Clean and prime exposed non-galvanized hangers, racks and fastenings to prevent rusting. DEMOLITION .1 Unless otherwise noted, materials for removal become the contractor's property and shall be taken from site, and disposed of in accordance with all applicable codes, standards and regulations. .2 Disconnect and make safe all systems to be demolished including panels, feeders, branch circuits and equipment by other divisions. Coordinate with other divisions. .3 Maintain existing remaining circuits, systems, etc., which pass through area of construction. Provide necessary components to maintain systems. Ensure components will be concealed when construction is complete. .4 Reinstate immediately any remaining existing systems that are in-advertently interrupted during construction. .5 Remove redundant conduit and wiring back to source unless otherwise noted, and make safe. .6 Devices from demolition are not to be reused unless noted otherwise. .7 All fire alarm devices to remain in operation. Protect smoke detectors from dust exposure during construction. .8 Ensure fire alarm system is operational at the end of each shift. .9 After demolition work is complete and prior to proceeding with new work, notify the Departmental Representative for inspection. END Project No. R.067898.002 WIRE AND BOX CONNECTORS 0-1000 V Section 26 05 20 Page 1 PART 1 - GENERAL 1.1 SECTION INCLUDES .1 1.2 RELATED SECTIONS .1 1.3 Materials and installation for wire and box connectors. Section 26 05 21 - Wire and Cables (0-1000 V). REFERENCES .1 Canadian Standards Association (CSA International) .1 CAN/CSA C22.2 No. 18-98 (R2003), Outlet Boxes, Conduit Boxes, Fittings and Associated Hardware. .2 CSA C22.2 No. 65-13, Wire Connectors. .2 Electrical and Electronic Manufacturers' Association of Canada (EEMAC) .1 EEMAC 1Y-2, Bushing Stud Connectors and Aluminum Adapters (1200 Ampere Maximum Rating). .3 National Electrical Manufacturers Association (NEMA) PART 2 - PRODUCTS 2.1 MATERIALS .1 Pressure type wire connectors to: CSA C22.2 No. 65, with current carrying parts of copper alloy sized to fit copper conductors as required. .2 Clamps or connectors for armoured cable and flexible conduit as required to: CAN/CSA-C22.2 No. 18. PART 3 - EXECUTION 3.1 INSTALLATION .1 Remove insulation carefully from ends of conductors and: .1 Install mechanical pressure type connectors and tighten screws with appropriate compression tool recommended by manufacturer. Installation shall meet secureness tests in accordance with CSA C22.2 No. 65. END Project No. R.067898.002 WIRES AND CABLES (0-1000 V) Section 26 05 21 Page 1 PART 1 - GENERAL 1.1 1.2 RELATED SECTIONS .1 Section 26 05 20 - Wire and Box Connectors - 0 - 1000 V. .2 Section 26 05 34 - Conduits, Conduit Fastenings and Conduit Fittings. PRODUCT DATA .1 Submit product data in accordance with Section 01 33 00 - Submittal Procedures. PART 2 - PRODUCTS 2.1 2.2 BUILDING WIRES .1 Conductors: stranded for 10 AWG (6 mm2) and larger. Minimum size: 12 AWG (4 mm2). .2 Copper conductors: size as indicated, with 1000 V insulation of chemically cross-linked thermosetting polyethylene material rated RW90. ARMOURED CABLES .1 Conductors: insulated, copper, size as indicated. .2 Type: AC90. .3 Armour: interlocking type fabricated from aluminum strip. .4 Connectors: anti short connectors. PART 3 - EXECUTION 3.1 INSTALLATION OF BUILDING WIRES .1 Install wiring as follows: .1 In conduit systems in accordance with Section 26 05 34 - Conduits, Conduit Fastenings and Conduit Fittings. .2 Install minimum #12 AWG green insulated ground wire in all conduits used for power or lighting circuit. END Project No. R.067898.002 HANGERS AND SUPPORTS FOR ELECTRICAL SYSTEMS Section 26 05 29 Page 1 PART 2 - PRODUCTS 2.1 SUPPORT CHANNELS .1 U shape, size 41 x 41 mm, 2.5 mm thick, surface mounted and suspended. PART 3 - EXECUTION 3.1 INSTALLATION .1 Secure equipment to solid masonry, tile and plaster surfaces with lead anchors. .2 Support equipment, conduit or cables using clips, spring loaded bolts, cable clamps designed as accessories to basic channel members. .3 Fasten exposed conduit or cables to building construction or support system using straps. .1 One-hole steel straps to secure surface conduits and cables 50 mm and smaller. .2 Two-hole steel straps for conduits and cables larger than 50 mm. .3 Beam clamps to secure conduit to exposed steel work. .4 Suspended support systems. .1 Support individual cable or conduit runs with 6 mm diameter threaded rods and spring clips. .2 Support 2 or more cables or conduits on channels supported by 6 mm diameter threaded rod hangers where direct fastening to building construction is impractical. .5 For surface mounting of two or more conduits use channels at 3 m on centre spacing. .6 Provide metal brackets, frames, hangers, clamps and related types of support structures where indicated or as required to support conduit and cable runs. .7 Ensure adequate support for raceways and cables dropped vertically to equipment where there is no wall support. .8 Do not use wire lashing or perforated strap to support or secure raceways or cables. .9 Do not use supports or equipment installed for other trades for conduit or cable support except with permission of other trade and approval of Departmental Representative. .10 Install fastenings and supports as required for each type of equipment cables and conduits, and in accordance with manufacturer's installation recommendations. .11 Paint cut ends of threaded rods with zinc rust inhibiting paint. END Project No. R.067898.002 SPLITTERS, JUNCTION, PULL BOXES AND CABINETS Section 26 05 31 Page 1 PART 1 - GENERAL 1.1 RELATED SECTIONS .1 1.2 Section 26 05 00 - Common Work Results for Electrical. SHOP DRAWINGS AND PRODUCT DATA .1 Submit shop drawings and product data for cabinets in accordance with Section 01 00 10 - General Instructions. PART 2 - PRODUCTS 2.1 2.2 SPLITTERS .1 Construction: Sheet metal enclosure, welded corners and formed hinged cover suitable for locking in closed position. .2 Terminations: Main and branch lugs to match required size and number of incoming and outgoing conductors as indicated. .3 Spare Terminals: minimum three spare terminals on each connection or lug block sized less than 400 A. JUNCTION AND PULL BOXES .1 Construction: welded steel enclosure. .2 Covers flush mounted: 25 mm minimum extension all around. PART 3 - EXECUTION 3.1 3.2 SPLITTER INSTALLATION .1 Mount plumb, true and square to the building lines. .2 Extend splitters full length of equipment arrangement except where indicated otherwise. JUNCTION, PULL BOXES AND CABINETS INSTALLATION .1 Install pull boxes in inconspicuous but accessible locations. .2 Only main junction and pull boxes are indicated. Install pull boxes so as not to exceed 30 m of conduit run or three 90° bends between pull boxes. Project No. R.067898.002 3.3 SPLITTERS, JUNCTION, PULL BOXES AND CABINETS IDENTIFICATION .1 Equipment identification: to Section 26 05 00 - Common Work Results for Electrical. .2 Identification labels: Size 2 indicating voltage and phase. END Section 26 05 31 Page 2 Project No. R.067898.002 OUTLET BOXES, CONDUIT BOXES AND FITTINGS Section 26 05 32 Page 1 PART 1 - GENERAL 1.1 REFERENCES .1 1.2 SUBMITTALS .1 1.3 Canadian Standards Association (CSA International) .1 CSA C22.1-12, Canadian Electrical Code, Part 1, 22nd Edition. Submit samples for floor box in accordance with Section 01 33 00 - Submittal Procedures. WASTE MANAGEMENT AND DISPOSAL .1 Waste Management and Disposal: .1 Separate waste materials for recycling in accordance with Section 01 74 21 - Waste Management and Disposal. PART 2 - PRODUCTS 2.1 2.2 OUTLET AND CONDUIT BOXES GENERAL .1 Size boxes in accordance with CSA C22.1. .2 102 mm square or larger outlet boxes as required. .3 Gang boxes where wiring devices are grouped. .4 Blank cover plates for boxes without wiring devices. .5 347 V outlet boxes for 347 V switching devices. .6 Combination boxes with barriers where outlets for more than one system are grouped. GALVANIZED STEEL OUTLET BOXES .1 One-piece electro-galvanized construction. .2 Single and multi gang flush device boxes for flush installation, minimum size 76 x 50 x 38 mm or as indicated. 102 mm square outlet boxes when more than one conduit enters one side with extension and plaster rings as required. .3 102 mm square or octagonal outlet boxes for lighting fixture outlets. .4 Extension and plaster rings for flush mounting devices in finished walls. Project No. R.067898.002 2.3 OUTLET BOXES, CONDUIT BOXES AND FITTINGS Section 26 05 32 Page 2 FITTINGS - GENERAL .1 Bushing and connectors with nylon insulated throats. .2 Knock-out fillers to prevent entry of debris. .3 Conduit outlet bodies for conduit up to 35 mm and pull boxes for larger conduits. .4 Double locknuts and insulated bushings on sheet metal boxes. PART 3 - EXECUTION 3.1 INSTALLATION .1 Support boxes independently of connecting conduits. .2 Fill boxes with paper, sponges or foam or similar approved material to prevent entry of debris during construction. Remove upon completion of work. .3 For flush installations mount outlets flush with finished wall using plaster rings to permit wall finish to come within 6 mm of opening. .4 Provide correct size of openings in boxes for conduit, mineral insulated and armoured cable connections. Do not install reducing washers. .5 Vacuum clean interior of outlet boxes before installation of wiring devices. .6 Identify systems for outlet boxes as required. END Project No. R.067898.002 CONDUITS, CONDUIT FASTENINGS AND CONDUIT FITTINGS Section 26 05 34 Page 1 PART 1 - GENERAL 1.1 RELATED SECTIONS .1 1.2 Section 26 05 21 - Wires and Cables (0-1000 V). REFERENCES .1 Canadian Standards Association (CSA International) .1 CAN/CSA C22.2 No. 18-98(R2003), Outlet Boxes, Conduit Boxes, Fittings and Associated Hardware, A National Standard of Canada. .2 CSA C22.2 No. 56-04(R2009), Flexible Metal Conduit and Liquid-Tight Flexible Metal Conduit. .3 CSA C22.2 No. 83-M1985(R2013), Electrical Metallic Tubing. PART 2 - PRODUCTS 2.1 2.2 2.3 CONDUITS .1 Electrical metallic tubing (EMT): to CSA C22.2 No. 83, with couplings with expanded ends. .2 Flexible metal conduit: to CSA C22.2 No. 56, steel liquid-tight flexible metal. CONDUIT FASTENINGS .1 One hole steel straps to secure surface conduits 50 mm and smaller. .1 Two hole steel straps for conduits larger than 50 mm. .2 Beam clamps to secure conduits to exposed steel work. .3 Channel type supports for two or more conduits at 3 m on centre. .4 Threaded rods, 6 mm diameter, to support suspended channels. CONDUIT FITTINGS .1 Fittings: to CAN/CSA C22.2 No. 18, manufactured for use with conduit specified. Coating: same as conduit. .2 Ensure factory "ells" where 90 degrees bends for 25 mm and larger conduits. .3 Steel connectors and couplings for EMT. Project No. R.067898.002 2.4 CONDUITS, CONDUIT FASTENINGS AND CONDUIT FITTINGS Section 26 05 34 Page 2 FISH CORD .1 Polypropylene. PART 3 - EXECUTION 3.1 MANUFACTURER'S INSTRUCTIONS .1 3.2 3.3 Compliance: comply with manufacturer's written recommendations or specifications, including product technical bulletins, handling, storage and installation instructions, and datasheets. INSTALLATION .1 Install conduits to conserve headroom in exposed locations and cause minimum interference in spaces through which they pass. .2 Conceal conduits except in mechanical and electrical service rooms. .3 Use electrical metallic tubing (EMT) except whre otherwise indicated. .4 Use flexible metal conduit for connection to motors in dry areas. .5 Use liquid tight flexible metal conduit for connection to motors or vibrating equipment in damp, wet or corrosive locations. .6 Minimum conduit size for power circuits: 21 mm. .7 Bend conduit cold: .1 Replace conduit if kinked or flattened more than 1/10th of its original diameter. .8 Mechanically bend steel conduit over 21 mm diameter. .9 Field threads on rigid conduit must be of sufficient length to draw conduits up tight. .10 Install fish cord in empty conduits. .11 Remove and replace blocked conduit sections. .1 Do not use liquids to clean out conduits. .12 Dry conduits out before installing wire. SURFACE CONDUITS .1 Run parallel or perpendicular to building lines. .2 Locate conduits behind infrared or gas fired heaters with 1.5 m clearance. .3 Run conduits in flanged portion of structural steel. .4 Group conduits wherever possible on surface channels. Project No. R.067898.002 3.4 CONDUITS, CONDUIT FASTENINGS AND CONDUIT FITTINGS Section 26 05 34 Page 3 .5 Do not pass conduits through structural members except as indicated. .6 Do not locate conduits less than 75 mm parallel to steam or hot water lines with minimum of 25 mm at crossovers. CONCEALED CONDUITS .1 Run parallel or perpendicular to building lines. END Project No. R.067898.002 SEISMIC RESTRAINT SYSTEMS (SRS) - TYPE P2 Section 26 05 40 Page 1 PART 1 - GENERAL 1.1 RELATED SECTIONS .1 1.2 1.3 1.4 1.5 Section 26 05 00 - Common Work Results for Electrical. DEFINITIONS .1 Priority Two (P2) Buildings: buildings in which life safety is paramount concern. It is not necessary that P2 buildings remain operative during or after an earthquake. .2 SRS: acronym for Seismic Restraint System. GENERAL DESCRIPTION .1 This section covers design, supply and installation of complete SRS for all systems, equipment specified for installation on this project. This includes electrical light fixtures, conduit, electrical equipment and systems, both vibration isolated and statically supported. .2 SRS to be fully integrated into, compatible with: .1 Noise and vibration controls specified elsewhere in this project specification. .2 Structural, mechanical, electrical design of project. .3 During seismic event, SRS to prevent systems and equipment from causing personal injury and from moving from normal position. .4 Design to be by Professional Engineer specializing in design of SRS and registered in Province of Ontario. Division 26 to include all costs associated with this work as it relates to Division 26 installations. Submit design sketches c/w professional stamp prior to start of installations, c/w installation requirements. SUBMITTALS .1 Submit shop drawings and product data in accordance with Section 26 05 00 - Common Work Results for Electrical. .2 Submittals to include: .1 Full details of design criteria. .3 Submit additional copy of shop drawings and product data to Structural Engineer for review of connection points to building structure. MAINTENANCE DATA .1 Provide maintenance data including monitoring requirements for incorporation into manuals specified in Section 26 05 00 - Common Work Results for Electrical. Project No. R.067898.002 SEISMIC RESTRAINT SYSTEMS (SRS) - TYPE P2 Section 26 05 40 Page 2 PART 2 - PRODUCTS 2.1 SRS MANUFACTURER .1 2.2 2.3 2.4 SRS to be from one manufacturer regularly engaged in production of same. GENERAL .1 SRS to provide gentle and steady cushioning action and avoid high impact loads .2 SRS to restrain seismic forces in all directions. .3 Fasteners and attachment points to resist same load as seismic restraints. .4 SRS of conduit systems to be compatible with: .1 Expansion, anchoring and guiding requirements. .2 Equipment vibration isolation and equipment SRS. .5 SRS utilizing cast iron, threaded pipe, other brittle materials not permitted. .6 Attachments to RC structure: .1 Use high strength mechanical expansion anchors. .2 Drilled or power driven anchors not permitted. .7 Seismic control measures not to interfere with integrity of firestopping. SRS FOR STATIC EQUIPMENT, SYSTEMS .1 Floor-mounted equipment, systems: .1 Anchor equipment to equipment supports. .2 Anchor equipment supports to structure. .3 Use size of bolts scheduled in approved shop drawings. .2 Suspended equipment, systems: .1 Use one or combination of following methods: .1 Install tight to structure. .2 Cross-brace in all directions. .3 Brace back to structure. .4 Slack cable restraint system. .2 SRS to prevent sway in horizontal plane, "rocking" in vertical plane, sliding and buckling in axial direction. .3 Hanger rods to withstand compressive loading and buckling. SRS FOR VIBRATION ISOLATED EQUIPMENT .1 Floor mounted equipment, systems: .1 Use one or combination of following methods: .1 Vibration isolators with built-in snubbers. .2 Vibration isolators and separate snubbers. Project No. R.067898.002 SEISMIC RESTRAINT SYSTEMS (SRS) - TYPE P2 Section 26 05 40 Page 3 .3 .2 .3 .4 .2 Built-up snubber system approved by Engineer, consisting of structural elements and elastomeric layer. SRS to resist complete isolator unloading. SRS not to jeopardize noise and vibration isolation systems. Provide 4-8 mm clearance between seismic restraint snubbers and equipment during normal operation of equipment and systems. Cushioning action to be gentle and steady by utilizing elastomeric material or other means in order to avoid high impact loads. Suspended equipment, systems: .1 Use one or combination of following methods: .1 Slack cable restraint system. .2 Brace back to structure via vibration isolators and snubbers. PART 3 - EXECUTION 3.1 3.2 3.3 INSTALLATION .1 Attachment points and fasteners: .1 To withstand same maximum load that seismic restraint is to resist and in all directions. .2 Install SRS at least 25 mm from all other equipment, systems, services. .3 Miscellaneous equipment not vibration-isolated: .1 Bolt through house-keeping pad to structure. .4 Co-ordinate connections with all disciplines. INSPECTION AND CERTIFICATION .1 SRS to be inspected and certified by Manufacturer upon completion of installation. .2 Provide written report stamped by professional Engineer licensed in Ontario to Departmental Representative with signed certificate of compliance with the SRS design requirements. COMMISSIONING DOCUMENTATION .1 Upon completion and acceptance of certification, hand over to Departmental Representative complete set of construction documents, revised to show "as-built" conditions. END Project No. R.067898.002 WIRING DEVICES Section 26 27 26 Page 1 PART 1 - GENERAL 1.1 SECTION INCLUDES .1 1.2 RELATED SECTIONS .1 1.3 Canadian Standards Association (CSA International) .1 CSA-C22.2 No. 42-10, General Use Receptacles, Attachment Plugs and Similar Devices. .2 CAN/CSA C22.2 No. 42.1-00 (R2009), Cover Plates for Flush-Mounted Wiring Devices (Bi-national standard, with UL 514D). .3 CSA C22.2 No. 55-M1986 (R2012), Special Use Switches. .4 CSA C22.2 No. 111-10, General-use Snap Switches. SHOP DRAWINGS AND PRODUCT DATA .1 1.5 Section 26 05 00 - Common Work Results for Electrical. REFERENCES .1 1.4 Switches, receptacles, wiring devices, cover plates and their installation. Submit shop drawings and product data in accordance with Section 01 33 00 - Submittal Procedures. WASTE MANAGEMENT AND DISPOSAL .1 Separate and recycle waste materials in accordance with Section 01 74 21 - Waste Management and Disposal. .2 Remove from site and dispose of all packaging materials at appropriate recycling facilities. .3 Collect and separate for disposal paper, plastic, polystyrene, corrugated cardboard packaging material in appropriate on-site bins for recycling in accordance with Waste Management Plan. .4 Divert unused metal and wiring materials from landfill to metal recycling facility. Project No. R.067898.002 WIRING DEVICES Section 26 27 26 Page 2 PART 2 - PRODUCTS 2.1 2.2 2.3 SWITCHES .1 20 A, 120 V, single pole, double pole, three-way, four-way switches to: CSA-C22.2 No. 55 and CSA-C22.2 No. 111. .2 Manually-operated general purpose ac switches with following features: .1 Terminal holes approved for No. 10 AWG wire. .2 Silver alloy contacts. .3 Urea or melamine moulding for parts subject to carbon tracking. .4 Suitable for back and side wiring. .5 White toggle. .3 Toggle operated fully rated for tungsten filament and fluorescent lamps, and up to 80% of rated capacity of motor loads. Rated 120V, 20A. .4 Switches of one manufacturer throughout project. RECEPTACLES .1 Duplex receptacles, CSA type 5-15 R, 125 V, 15 A, U ground, to: CSA-C22.2 No. 42 with following features: .1 White nylon face moulded housing, Decora style. .2 Suitable for No. 10 AWG for back and side wiring. .3 Break-off links for use as split receptacles. .4 Eight back wired entrances, four side wiring screws. .5 Triple wipe contacts and rivetted grounding contacts. .2 Single receptacles CSA type 5-15 R, 125 V, 15 A, U ground with following features: .1 White urea moulded housing. .2 Suitable for No. 10 AWG for back and side wiring. .3 Four back wired entrances, 2 side wiring screws. .3 Other receptacles with CSA configuration, ampacity and voltage as indicated. Specification grade, nylon face, white. .4 Receptacles of one manufacturer throughout project. .5 Self-contained with 15 A, 120 V circuit interrupter and white duplex receptacle complete with: .1 Solid state ground sensing device. .2 Facility for testing and reset. SPECIAL WIRING DEVICES .1 Special wiring devices: .1 Clock hanger outlets, 15 A, 125 V, 3 wire, grounding type, suitable for No. 10 AWG for installation in flush outlet box. .2 Pilot lights as indicated, with neon type 0.04 W, 125 V lamp and red plastic LED type. Project No. R.067898.002 .2 2.4 WIRING DEVICES Section 26 27 26 Page 3 Wall Mounted Motion Sensor Switches: Dual technology passive infrared and ultrasonic to turn lights off after adjustable time delay. Tamperproof for programming manual "on" and automatic "off" at 5-30 minute delay. Automatically adjusts time delay for usage pattern. Automatic audible/visual alerts/light sensor with adjustable sensitivity, vandal resistant lense. COVER PLATES .1 Cover plates for wiring devices to: CSA C22.2 No. 42.1. .2 Cover plates from one manufacturer throughout project. .3 Sheet steel utility box cover for wiring devices installed in surface-mounted utility boxes. .4 Stainless steel, 1 mm thick cover plates cover plates, thickness 2.5 mm for wiring devices mounted in flush-mounted outlet box. .5 Sheet metal cover plates for wiring devices mounted in surface-mounted FS or FD type conduit boxes. .6 Weatherproof double lift spring-loaded cast aluminum cover plates, complete with gaskets for duplex receptacles as indicated. .7 Weatherproof spring-loaded cover plates complete with gaskets for single receptacles or switches. PART 3 - EXECUTION 3.1 INSTALLATION .1 Switches: .1 Install single throw switches with handle in "UP" position when switch closed. .2 Install switches in gang type outlet box when more than one switch is required in one location. .3 Mount toggle switches at height in accordance with Section 26 05 00 - Common Work Results for Electrical as indicated. .2 Receptacles: .1 Install receptacles in gang type outlet box when more than one receptacle is required in one location. .2 Mount receptacles at height in accordance with Section 26 05 00 for Common Work Results for Electrical as indicated. .3 Where split receptacle has one portion switched, mount vertically and switch upper portion. .3 Cover plates: .1 Protect stainless steel cover plate finish with paper or plastic film until painting and other work is finished. .2 Install suitable common cover plates where wiring devices are grouped. .3 Do not use cover plates meant for flush outlet boxes on surface-mounted boxes. .4 Motion sensor switch adjustments: .1 Set motion sensor programming switches for Manual On/Automatic Off, 15 minute time delay off, Light sensitivity to midrange, SmartSet On, walk-thru mode On, audible alert On. .2 Provide min. 3 hours manufacturer training for typical set up. Project No. R.067898.002 .5 WIRING DEVICES Section 26 27 26 Page 4 Labelling: .1 Provide labelling in accordance with Section 26 05 00 - Common Work Results for Electrical. END Project No. R.067898.002 MOULDED CASE CIRCUIT BREAKERS Section 26 28 16.02 Page 1 PART 1 - GENERAL 1.1 SECTION INCLUDES .1 1.2 REFERENCES .1 1.3 Materials for moulded-case circuit breakers. Canadian Standards Association (CSA International). .1 CSA C22.2 No. 5-13, Molded-case Circuit Breakers, Molded-case Switches and Circuit-breaker Enclosures. SUBMITTALS .1 Prior to any installation of circuit breakers in either a new or existing installation, Contractor must submit three (3) copies of a certificate of origin, from the manufacturer, duly signed by the factory and the local manufacturer's representative, certifying that all circuit breakers come from this manufacturer, they are new and they meet standards and regulations. These certificates must be submitted to the Departmental Representative for approval. .2 A delay in the production of the certificate of origin won't justify any extension of the contract: and additional compensation. .3 Any work of manufacturing, assembly or installation should begin only after acceptance of the certificate of origin by Departmental Representative. Unless complying with this requirement, Departmental Representative reserves the right to mandate the manufacturer listed on circuit breakers to authenticate all new circuit breakers under the contract, and that, to Contractor's expense. .4 In general, the certificate of origin must contain: .1 The name and address of the manufacturer and the person responsible for authentication. The responsible person must sign and date the certificate; .2 The name and address of the licensed dealer and the person of the distributor responsible for the Contractor's account. .3 The name and address of the Contractor and the person responsible for the project. .4 The name and address of the local manufacturer's representative. The local representative must sign and date the certificate. .5 The name and address of the building where circuit breakers will be installed: .1 Project title. .2 End user's reference number. .3 The list of circuit breakers. .5 Submit product data in accordance with Section 01 33 00 - Submittal Procedures. Project No. R.067898.002 MOULDED CASE CIRCUIT BREAKERS Section 26 28 16.02 Page 2 PART 2 - PRODUCTS 2.1 2.2 BREAKERS GENERAL .1 Moulded-case circuit breakers: to CSA C22.2 No. 5. .2 Bolt-on moulded case circuit breaker: quick- make, quick-break type, for manual and automatic operation with temperature compensation for 40°ambient. .3 Common-trip breakers: with single handle for multi-pole applications. .4 Magnetic instantaneous trip elements in circuit breakers to operate only when value of current reaches setting. .1 Trip settings on breakers with adjustable trips to range from 3-8 times current rating. .5 Circuit breakers over 60 A to have minimum 35,000 A symmetrical rms interrupting capacity rating. THERMAL MAGNETIC BREAKERS .1 Moulded case circuit breaker to operate automatically by means of thermal and magnetic tripping devices to provide inverse time current tripping and instantaneous tripping for short circuit protection. PART 3 - EXECUTION 3.1 INSTALLATION .1 Install circuit breakers in existing panelboards as indicated. END Project No. R.067898.002 DISCONNECT SWITCHES - FUSED AND NON-FUSED Section 26 28 23 Page 1 PART 1 - GENERAL 1.1 RELATED SECTIONS .1 Section 26 05 00 - Common Work Results for Electrical. 1.2 REFERENCES .1 Canadian Standards Association (CSA International). .1 CAN/CSA C22.2 No. 4-M04 (R2009), Enclosed Switches. .1 Non-fusible, disconnect switch in CSA Enclosure, to CAN/CSA C22.2 No. 4 size as indicated. .2 Provision for padlocking in off switch position by three locks. .3 Mechanically interlocked door to prevent opening when handle in ON position. .4 Quick-make, quick-break action. .5 ON-OFF switch position indication on switch enclosure cover. .1 Provide equipment identification in accordance with Section 26 05 00 - Common Work Results for Electrical. .2 Indicate name of load controlled on size 4 nameplate. .1 Install disconnect switches as shown. PART 2 - PRODUCTS 2.1 DISCONNECT SWITCHES 2.2 EQUIPMENT IDENTIFICATION PART 3 - EXECUTION 3.1 INSTALLATION END Project No. R.067898.002 LIGHTING Section 26 50 00 Page 1 PART 1 - GENERAL 1.1 RELATED REQUIREMENTS .1 1.2 1.3 1.4 REFERENCES .1 Canadian Standards Association (CSA). .2 Underwriters' Laboratories of Canada (ULC) ACTION AND INFORMATIONAL SUBMITTALS .1 Provide submittals in accordance with Section 01 33 00 - Submittal Procedures. .2 Product Data: .1 Provide manufacturer's printed product literature, specifications and datasheet and include product characteristics, performance criteria, physical size, finish and limitations. .2 Provide complete photometric data prepared by independent testing laboratory for luminaires where specified, for review by Departmental Representative. .3 Photometric data to include: spacing criterion, coefficient of utilization table, luminaire efficient. .3 Quality assurance submittals: provide following in accordance with Section 01 45 00 - Quality Control. .1 Manufacturer's instructions: provide manufacturer's written installation instructions and special handling criteria, installation sequence, cleaning procedures and. QUALITY ASSURANCE .1 1.5 Section 26 05 00 - Common Work Results for Electrical. Provide one initial in standalone of every fixture type for review on site of mounting details, orientation, aiming and lamping, prior to continuing with balance of fixture installation. Provide power to fixture for initial installation. DELIVERY, STORAGE AND HANDLING .1 Deliver, store and handle materials in accordance with project schedule. .2 Deliver materials to site in original factory packaging, labelled with manufacturer's name, address. .3 Packaging Waste Management: remove for reuse and return by manufacturer of pallets crates paddling and packaging materials in accordance with Section 01 74 21 - Waste Management and Disposal. .4 Divert unused metal materials from landfill to metal recycling facility. .5 Disposal and recycling of fluorescent lamps as per local regulations. .6 Disposal of old PCB filled ballasts. Project No. R.067898.002 1.6 LIGHTING Section 26 50 00 Page 2 PROOF OF ORDER .1 Contractor to provide a proof of order via copy of purchase order or other suitable document from supplier, within 4 weeks of approval of shop drawings. PART 2 - PRODUCTS 2.1 LAMPS .1 2.2 BALLASTS .1 2.3 Light fixture finish and construction to meet ULC listings and CSA certifications related to intended installation. OPTICAL CONTROL DEVICES .1 2.5 Fluorescent ballast: CBM and CSA certified, energy efficient type. .1 Rating: 347 V, 60 Hz, for use with 1 or 2-32W, T8 lamps. .2 Totally encased and designed for 40 degrees Celsius ambient temperature. .3 Ballast factor: as indicated on fixture schedule. .4 Current crest factor: 1.7 maximum. .5 Harmonics: 10 % maximum THD. .6 Operating frequency of electronic ballast: 20 kHz minimum. .7 Ballast factor: to be between 0.8 and 1.0 to be determined at shop dwg stage. .8 Sound rated: Class A. .9 Mounting: integral with luminaire. FINISHES .1 2.4 Standard fluorescent lamps to be - T8, medium bi-pin, mercury free 4100 K, 30,000 hour lamp life, 2900 initial lumens, CRI 85; or as indicated. As indicated in Lighting Fixture Schedule. LUMINAIRES .1 As indicated in Lighting Fixture Schedule. Project No. R.067898.002 LIGHTING Section 26 50 00 Page 3 PART 3 - EXECUTION 3.1 3.2 INSTALLATION .1 Locate and install luminaires as indicated. .2 Provide adequate support to suit ceiling system. .3 Where relocated fixture contains no ballast, provide new single lamp ballast in fixture. Where relocated fixture contains a 4-lamp ballast, relocate ballast to remaining fixtures in the area. WIRING .1 3.3 LUMINAIRE SUPPORTS .1 3.4 3.5 Connect luminaires to lighting circuits: .1 Install flexible or rigid conduit for luminaires. For suspended ceiling installations support luminaires independently of ceiling. LUMINAIRE ALIGNMENT .1 Align luminaires mounted in continuous rows to form straight uninterrupted line. .2 Align luminaires mounted individually parallel or perpendicular to building grid lines. CLEANING .1 Clean fixtures, housings lamps, reflectors & lenses with clean damp cloth prior to final acceptance. .2 Waste Management: separate waste materials for reuse and recycling in accordance with Section 01 74 21 - Construction/Demolition Waste Management. END Project No. R.067898.002 PATHWAYS FOR COMMUNICATIONS SYSTEMS Section 27 05 28 Page 1 PART 1 - GENERAL 1.1 RELATED SECTIONS .1 1.2 SYSTEM DESCRIPTION .1 1.3 Section 26 05 34 - Conduits, Conduit Fastenings and Conduit Fittings. Empty telecommunications raceways system consists of outlet boxes, cover plates, conduits, cabletroughs, pull boxes, sleeves and caps, fish wires, service poles, service fittings, concrete encased ducts. WASTE MANAGEMENT AND DISPOSAL .1 Separate and recycle waste materials in accordance with Section 01 74 21 - Waste Management and Disposal. .2 Remove from site and dispose of all packaging materials at appropriate recycling facilities. .3 Collect and separate for disposal paper plastic polystyrene corrugated cardboard packaging material in appropriate on-site bins for recycling in accordance with Waste Management Plan. .4 Divert unused metal conduit and wiring materials from landfill to metal recycling facility. .5 Fold up metal banding, flatten and place in designated area for recycling. PART 2 - PRODUCTS 2.1 MATERIAL .1 Conduits: EMT type, in accordance with Section 26 05 34 - Conduits, Conduit Fastenings and Conduit Fittings. .2 Outlet boxes type, conduit boxes size, and fittings: in accordance with Section 26 05 31 - Splitters, Junction, Pull Boxes and Cabinets. .3 Fish wire: polypropylene type. Project No. R.067898.002 PATHWAYS FOR COMMUNICATIONS SYSTEMS Section 27 05 28 Page 2 PART 3 - EXECUTION 3.1 INSTALLATION .1 Install empty raceway system, in ceiling space distribution system, fish wire, terminal cabinets, outlet boxes, pull boxes, cover plates, conduit, sleeves and caps, cabletroughs, miscellaneous and positioning material to constitute complete system. .2 For each data communication outlet shown, provide a minimum 21 mm C from outlet, up to ceiling space or as indicated. .3 Provide sleeves with bushings, min. 27 mm, from common corridor ceiling space to each enclosed room or as indicated. END Project No. R.067898.002 SOUND MASKING SYSTEMS 27 51 19 Page 1 of 12 WORKPLACE 2.0 – SOUND MASKING SYSTEMS SPECIFICATION 1. PART ONE – GENERAL 1.1. SECTION INCLUDES A. Sound masking systems 1.2. REFERENCES A. B. C. D. E. F. G. H. I. UL6500 / ULC 60065 – Standard for Audio/Video and Musical Instrument Apparatus for Household, Commercial and Similar General Use UL 2043 – Standard for Fire Test for Heat and Visible Smoke Release for Discrete Products and Their Accessories Installed in Air-Handling Spaces; 1996 FCC – EN 55103-1&2 – Audio, Video and Entertainment Lighting Control ASTM E1374-06 (11) – Standard Guide for Open Office Acoustics and Applicable ASTM Standards ASTM E1573-09 – Standard Test Method for Evaluating Masking Sound in Open Office Using A-Weighted and One-Third Octave Band Sound Pressure Levels ASTM E1130-08 – Standard Test Method for Objective Measurement of Speech Privacy in Open Offices Using Articulation Index ASTM E2638 - Standard Test Method for Objective Measurement of Speech Privacy Provide by Closed Rooms ANSI S12.2 - 2008 – Criteria for Evaluating Room Noise 2011 ASHRAE Handbook – HVAC Applications 1.3. PERFORMANCE AND DESIGN REQUIREMENTS A. System Architecture 1. Sound masking systems and their components requiring communications and transfer of electronic data between them shall use wired connections and shall not use wireless, Wi-Fi, or other telemetry based systems in any aspect of their functionality The system shall be a plenum based system, independent from ceiling constructions. The system shall consist of, centralized control unit(s), and addressable and controllable masking devices, distributed throughout the installation area on a given floor. The addressable and controllable masking devices shall limit the number of loudspeakers assigned to each to a maximum of 3 loudspeakers. Each addressable and controllable masking device and its associate loudspeakers shall be denoted as a “zone” The system must provide the capability for in-room occupant control devices. (As an available non-standard design option.) The minimal requirements for in-room occupant controls are specified in Section 1.3.I 2. 3. 4. 5. B. Sound Masking Operational Performance 1. The system shall use digital signal processing (DSP) technology for masking sound generation and output adjustment of masking signals. The masking sound shall be generated via a truly-random, non-deterministic digital process with no repeat cycle. The system shall provide independently controllable masking zones that efficiently allow the ability to control and monitor the operation of each zone and provide, 2. 3. i. ii. a third-octave equalizer with minimum of 18 bands, ranging from 100Hz to 5,000Hz an independent masking volume control providing minimum 0.5 dBA volume increments and an output range of 35 to 85 dBA @ 1m from the loudspeaker Project No. R.067898.002 iii. iv. 4. i. C. SOUND MASKING SYSTEMS 27 51 19 Page 2 of 12 a temporary mute function for the masking output the ability to completely disable the masking output The system shall provide a function to allow a gradual ramp up of masking volume each time power is applied This functionality shall have a programmable ramp up rate, as well as enabled/disabled feature, controlled from central control device. . Sound Masking Zone Design 1. The departmental representative shall provide qualifying suppliers tendering information which includes, scaled fit-up drawings of overall floor plans and/or specifications indicating, i. open office areas; fully and partially enclosed rooms; public lobbies, corridors and waiting areas ii. fully and partially enclosed rooms partition types (e.g. slab to slab; slab to ceiling; plenum barriers) iii. the ceiling type(s), heights; plenum iv. structural/architectural/mechanical/electrical or other design details limiting or restricting access to plenum space and proper installation of sound masking system components (e.g. primary air duct routing), v. wiring routing requirements (e.g., conduit sleeves if required for slab to slab walls) vi. rooms requiring in room occupant controls; vii. speech security zones and specific requirements for rooms requiring speech privacy/security protection to be provided by sound masking, including communication, monitoring and alerting requirements as determined by departmental representatives, security, acoustical and communications specialist. viii. Any other details related to supplier’s design, installation and material costing requirements 2. Sound masking zone area shall be defined by, the independently addressable and controllable masking devices and associated loudspeakers, and comply with Section 1.3.A 3. i. 4. Private offices and meeting rooms and other fully enclosed rooms having slab to slab partitions, and/or plenum barriers enclosing their plenum space. i. 5. i. 6. Open Office Areas (common/shared plenum) Shall consist of multiple individual zones, each zone shall be limited to a maximum of 3 loud speakers, such that the acoustical performance requirements specified in 1.3.D are maintained in each zone, and between all zones. Shall each be an independently controllable zone, or multiple zones, such that the acoustical performance requirements specified in Section 1.3.C and D are maintained. Adjacent partially enclosed rooms having floor to ceiling partitions, and common shared plenum space. (no plenum barriers) A maximum of 2 adjacent and partially enclosed rooms may be included within a single zone’s coverage area such that the maximum masking devices in 1.3.A and performance requirements specified in 1.3.,C and D are maintained. Conference and large meeting rooms and/or those that make use of audio enhancement/sound reinforcement systems, (microphones/public address systems, audio translation systems, etc.), broadcasting and/or similar special purpose rooms requiring high levels of speech intelligibility, will require special acoustical and audio design considerations in regards to the use sound masking, if used, Project No. R.067898.002 i. 7. i. 8. SOUND MASKING SYSTEMS 27 51 19 Page 3 of 12 Each speaker shall be considered a zone, and in-room occupant control devices shall be provided which include the minimal features listed in Section 1.3.I. Public servicing areas, corridors, lobbies, waiting areas and other public and common areas Shall meet the zonal requirements 1.3.A and acoustical and operational performance requirements in Section 1.3 C and D. Speech Security Zones (It is assumed, that the level of speech security protection required and zones have been defined by the appropriate security procedures; and appropriate acoustical expertise has been retained to, provide the rooms required design and construction details; determine the sound masking system’s operational requirements in conjunction with the supplier; verify speech security performance has been achieved upon commissioning. When sound masking is integral to meeting the speech security protection requirements the following specifications must be met) i. ii. iii. iv. v. D. Within a Speech Security Zones (SSZ), each speaker and its associated devices shall be considered as an independent zone with the central control unit setup for monitoring and logging operational status in real time. The supplier shall setup and enable the central control units communications interface to allow it to facilitate direct and/or remote communications with departmental representatives monitoring system, and/or to provide automated alerts of its operational status in real-time. Minimal operation requirements to meet speech security requirements are provided in Sections 1.3.E, F, M, N. The supplier must provide departmental representative with detailed technical manuals including the communication protocols and materials required to link multiple control unit (s) within a facility and to access and monitor operational status of secure zones. The supplier may also provide proprietary monitoring software as an optional item. It shall be the departmental representatives responsibility to, determine and facilitate communication, monitoring/alert methodologies, and ensure that communications and security requirements are maintained; It shall be the departmental representatives responsibility to provide any computer equipment or other resources required for monitoring security requirements. Sound Masking Systems Acoustical Performance 1. The supplier shall setup the sound masking system to meet acoustical performance requirements when HVAC systems are functioning under what is considered a “normal” mode of operation for occupied periods. i. It is the departmental representatives responsibility to ensure HVAC systems are operating as required during sound masking system’s scheduled commissioning and that background noise levels generated by HVAC systems comply with applicable industry standards references Section 1.2.H, I). ii. The departmental representative should make efforts to provide supplier tendering information indicating any locations where existing building noise exceeds HVAC acoustical performance standards and/or the preferred sound masking spectrum levels identified in Section 1.3.D.3,4,5. iii. The departmental representative shall make efforts to provide supplier tendering information indicating any building design details or other constraints which may affect the sound masking system’s proper installation and operational requirements. iv. The supplier shall not be responsible to meet acoustical performance requirements in locations where, existing background noise exceeds masking noise levels, and/or where building design details or other constraints prevent its proper installation, setup and operation.. Project No. R.067898.002 v. 2. 3. SOUND MASKING SYSTEMS 27 51 19 Page 4 of 12 Locations not meeting acoustical performance requirements, and not the result of departmental representative’s negligence and/or other existing site conditions or constraints, shall be corrected at the supplier’s expense by any means necessary within compliance of this specification, and any other applicable codes and regulations.. Upon completion of installation, and final setup the supplier shall provide a report to departmental representative of the sound masking systems acoustical performance as per requirements in Section 3.9. The target sound masking overall dBA levels for each type of area shall be as follows, Open office spaces, 47 dBA Fully enclosed offices, meeting or similar rooms with slab to slab/or plenum barrier partitions, 42 dBA iii. Adjacent partially enclosed rooms, with floor to ceiling partitions only (no plenum barriers) 43 dBA; iv. corridors, lobbies, public servicing and waiting and other common areas, 47 dBA. v. In room occupant controls, when used, shall be set not to exceed 42 dBA i. ii. 4. The target sound masking frequency spectrum to be used shall be that provided in 1.3.D.5, Table 1. Developed by National Research Council of Canada (NRC) and denoted as NRC Optimal Sound Masking Spectrum (nominal @45 dBA) i. 5. All zones shall conform to the overall dBA the sound and the one-third octave spectrum dB levels defined in 1.3.D.5 - Table 1, to within the tolerances provided below. i. ii. 6. The frequency contour provided shall be maintained at different dBA target levels by equally applying the positive or negative difference, between the nominal 45 dBA level and the target dBA level, to each of the one-third octave frequency band’s dB level, so as to equally shift the entire contour. (e.g. A target level of 42 dBA, will required shifting the entire 45 dBA spectrum down equally by 3 dB in each of the 1/3 octave frequency bands) Overall dBA levels measured within zones and between adjacent zones of the same office type shall be within +/- 11.0 dBA, of the specified target level.. Spectrum uniformity measured within zones or between adjacent zones of the same office type shall vary no more than +/- two (2) dB from the 1/3 octave band contour levels indicated in Table 1, as adjusted to meet the overall dBA target level, as indicated in 1.3.D.4. Table 1 – NRC Optimal Sound Masking Spectrum. Project No. R.067898.002 SOUND MASKING SYSTEMS 27 51 19 Page 5 of 12 Table 1: NRC Optimal Sound Masking Spectrum – Nominal 45 dBA Contour E. 1/3 Octave Band Center Frequency 1/3 Octave dB Sound Levels ( overall = 45 dBA nominal) Hz 100 125 160 200 250 315 400 500 630 800 1,000 1,250 1,600 2,000 2,500 3,150 4,000 5,000 dB 46.9 45.9 44.7 43.9 42.7 41.4 40.4 38.9 37.4 35.4 33.7 31.4 29.4 27.4 24.9 22.4 19.4 16.4 System Control i. ii. iii. 2. i. ii. iii. iv. v. The system shall provide setup/programming/control of operational parameter, as well monitoring and logging operational status for each masking zone from a centrally located control unit or units (s). The number of control units are based on the capacity and feasibility of zones possible per control unit. Programming and querying of each masking devices through the control unit may be provided as an integrated display and key panel directly on control unit or through an external proprietary device provided by supplier and included as part of the sound masking system The system must also provide, a wired interface to allow connection to control unit through the use of a personal computer, laptop or similar device (not provided by supplier); and a supplier developed software to allow system programming, control and management of the system’s operational parameters. . The control panel component, or suppliers external device and/or PC based software shall provide controls for: networked device addressing system setup and configuration masking volume and contour adjustment system zoning for masking, timer and room control functions masking timer programming Project No. R.067898.002 vi. vii. 3. F. The systems operational features and/or supplier installation report documentation shall provide a means of identifying the location of any masking devices identified in the control units operational logs as malfunctioning Timer Performance i. ii. iii. iv. 2. i. ii. The networked masking devices shall be capable of being zoned for masking, timer, and in-room control functions. Zoning of networked masking devices shall be performed digitally. Assignments to each type of zone shall be independent of each other. The masking devices shall be capable of being individually rezoned without rewiring. 2. 3. 4. In-Room Occupant Control 1. The system shall have the capability of providing (optional) in-room manual control of masking volume and functionality for zones as small as one loudspeaker. The in-room control shall: 2. i. ii. iii. J. provide control of masking volumes independently from main control unit be capable of restricting the range of allowable volume adjustment for masking be capable of individually muting the masking output System Cabling 1. 2. K. The control unit and/or PC/software shall provide masking timer function that includes: automatic masking volume adjustments according to custom departmental representative-programmed schedules the ability to digitally assign any group of masking zones to a selected time schedule calendar-based operation automatic and departmental representative-defined daylight savings adjustment The timer function in each control panel component shall provide independent timer zones, each with: a programmable 15-day acclimatization function that automatically increases the masking volume according to a departmental representative-defined schedule a programmable activation date for the acclimatization function System Zoning 1. I. security functions system diagnostics, logging and real-time monitoring Addressing 1. H. 27 51 19 Page 6 of 12 The system shall also provide the capability for multiple central control units to be interconnected using standards communication and data protocols for interfacing with building management systems and/or from a central computer location. 1. G. SOUND MASKING SYSTEMS The system shall use cabling rated for air-handling plenums. Cabling connections shall be made using connectors with positive locking mechanisms. Diagnostic Performance 1. Upon initial configuration, the system shall: automatically detect the number and type of networked devices connected to each control panel component ii. automatically detect the number of loudspeakers connected to each networked device, and in total, per control panel component iii. verify that each networked device is communicating with the control panel component i. Project No. R.067898.002 iv. v. 2. i. ii. iii. iv. 3. i. ii. 4. 5. 6. i. ii. L. SOUND MASKING SYSTEMS 27 51 19 Page 7 of 12 indicate the address of networked devices that are not communicating with the control panel component verify the integrity of the system design, including required components, communication limits and power limits The system shall provide a loudspeaker monitoring function that: detects deviations from the expected number of functioning loudspeakers connected to each networked device, whether due to incorrect installation or speaker/cabling malfunctions initiates notifications upon detecting a speaker count error is available over a wide range of masking settings be capable of being enabled/disabled The system shall provide continuous voltage metering that detects and reports on the availability of sufficient voltage at each networked device for ideal operation. This function shall: initiate notifications when insufficient voltage is measured at a given networked device be capable of being enabled/disabled The system shall provide a function for locating loudspeakers from below the ceiling, producing an audible tone burst. Diagnostics shall be viewable from a control panel component or computer software. The system shall provide (as per project design) monitoring/notification software that is capable of monitoring the status of all networked devices (including control panel components) and which is also capable of: email notification of errors to departmental representative-defined addresses email notification of ‘all well’ at departmental representative-defined periods Reporting Performance 1. The system shall be capable of reporting: i. control panel component parameters ii. the quantity and type of networked devices connected to each control panel component iii. masking output settings for each networked masking device iv. zone assignments v. timer schedules vi. in-room occupant control settings vii. the networked devices’ serial numbers and software/firmware versions (including control panel components) 2. The system shall be capable of generating reports in printed and editable electronic formats. M. Security Performance 1. The system shall provide physical security measures, including: the control panel component shall be contained in a key-locked metal enclosure cable connections to the control panel component shall be made inside the locked enclosure iii. no physical output controls shall be located on the networked masking devices or loudspeakers The system shall provide electronic security measures, including: i. password-protected access levels ii. departmental representative-definable access to the functions available at each level iii. backup of all settings to an electronic storage medium iv. continuous monitoring of communications with each networked device v. loudspeaker monitoring vi. support for internal and external alarm device activation upon detection of communication error vii. option for email notification upon detection of system error viii. 128-bit encrypted communication between the control panel components and any computer i. ii. 2. Project No. R.067898.002 ix. x. xi. N. SOUND MASKING SYSTEMS 27 51 19 Page 8 of 12 storage of settings in non-volatile memory in each networked masking device and control panel component, which shall be maintained during power outages optional external relay modules for connection to third-party alarm devices or security monitoring equipment exception date programming for the masking timer function Failsafe Power Supply 1. The system shall provide (as per project design) a power component that: incorporates two independent power supplies designed to jointly power the system while both are in operation ii. provides automatic and uninterrupted power transition in the event of a single power supply failure iii. provides monitoring of power supply failure i. O. Aesthetics 1. The system shall be aesthetically appealing in open ceiling applications, including: networked masking devices and loudspeakers shall be visually appealing cabling shall be color-matched to the networked masking devices and loudspeakers iii. loudspeaker suspension shall be braided steel cable (as per project design) iv. cabling shall be connector-based v. networked masking devices, loudspeakers and cabling shall be available in white or charcoal (as per project design) i. ii. 1.2. SUBMITTALS A. B. Product Data: Manufacturer’s specifications and installation instructions. System Design: Schematics of the system showing quantity and location of components, related cabling and accessories. Warranty Documents: Warranty documents covering the system components. C. 1.3. QUALITY ASSURANCE A. B. System Design: Performed by an approved manufacturer representative. Installer Qualifications: Approved by manufacturer representative and are trained with the specified components or have demonstrated experience with the installation of similar products to those specified. System Adjustment: Done by an approved manufacturer representative or trained contractor. C. 1.4. REGULATORY TESTING AND CERTIFICATIONS A. B. 1. 2. 3. 4. 5. The relevant system components shall conform to: Canada Safety and Electrical i. IEC 60065 – Standard for Audio, Video and Similar Electronic Apparatus Safety Requirements. Products shall be labelled accordingly. Electromagnetic Interference (EMI) i. ICES-003 (Industry Canada) – Interference-Causing Equipment Standard. Cabling i. UL CL3P/CMP 75C. Products shall be labeled accordingly. Heavy Metals i. RoHS – Restriction of Hazardous Substances (voluntary). Low Voltage Power Supplies i. UL1310, Standard for Class 2 Power Units. Products shall be labeled accordingly. 1.5. DELIVERY, STORAGE AND HANDLING Project No. R.067898.002 A. B. SOUND MASKING SYSTEMS 27 51 19 Page 9 of 12 Protect from moisture during shipping, storage and handling. Deliver in manufacturer’s original unopened and undamaged packages with manufacturer’s labels legible and intact. Inspect manufacturer’s packages upon receipt. Handle packages carefully. C. D. 1.6. WARRANTY AND MAINTENANCE A. 2. Provide a written warranty that the system components installed shall be free from defects in parts or assembly for a 5-year period from date of first use (the date of system initialization). PART TWO – PRODUCTS 2.1. MANUFACTURERS A. Acceptable Manufacturers, those able to meet all these specifications 2.2. SYSTEM COMPONENTS General System Overview: The sound masking system shall be a networked decentralized system with complete digital, central control down to individually addressable networked masking devices. The system shall be comprised of a selection of a) distributed primary networked masking devices; b) distributed secondary networked masking devices; c) loudspeakers; d) one or more control panel components; e) computer software; f) programmable keypads; g) cable assemblies; h) audio input modules; i) ceiling mount adaptors; and j) one or more power supplies. A. Each primary masking device shall provide: 1. 2. 3. 4. 5. 6. A DSP-based masking sound generator An individual third-octave -band equalizer for masking An individual volume control for masking Network communication functions An audio amplifier Overall dimensions of: i. ii. B. Diameter Height 5.1 inches; 13.0 cm 1.75 inches; 4.5 cm Each secondary networked masking device shall provide: 1. 2. 3. A loudspeaker connection Signal connections to/from other primary/secondary networked masking devices Overall dimensions of: i. ii. C. Diameter Height 5.1 inches; 13.0 cm 1.75 inches; 4.5 cm Each loudspeaker shall provide: 1. 2. 3. 4. 5. A connection to masking devices A suspension chain at least 20 inches (51 cm) in length and tool-less length adjustment clip An acoustically damped enclosure Tool-less, on-site adjustment of upward/downward loudspeaker orientation Overall dimensions of: i. ii. Diameter Height 6.5 inches; 16.5 cm 3.5 inches; 9.0 cm Project No. R.067898.002 6. Diameter Power Rating Sensitivity Frequency Response Impedance Magnet Structure Weight 4.0 inches; 10.0 cm 25 Watts RMS 87 dBA @ 1W / 1m 100 - 10,000 Hz (+/- 6 dB) 16 Ohms 17.6 oz; 500 g Each control panel component shall provide: 1. 2. 3. Network communication components Network control electronics for masking and timer functions Connections to networked devices, additional control panel components and a computer Serial connection for third-party control systems (optional model) Ethernet connection and IP addressability Overall dimensions of: 4. 5. 6. i. Height ii. Width iii. Depth E. 9.4 inches; 23.8 cm 11.0 inches; 28.0 cm 3.2 inches; 8.0 cm System control software to: 1. Allow control of all system adjustments from a computer, including: i. ii. iii. iv. 2. 3. F. System setup Sound masking volume and equalization Sound masking timer programs In-room occupant control setup Allow the reporting of all system settings Perform system diagnostics Monitoring/notification software to: 1. 2. G. Provide email notification of errors to departmental representative-defined addresses Provide email notification of ‘all well’ at departmental representative-defined periods Each programmable keypad shall provide: 1. 2. 3. H. Function selection and volume adjustments An interface for controlling volume increase/decrease, mute An enclosure capable of being installed in a single gang box Cable assemblies to: 1. 2. 3. I. Provide power, and control signals over a single cable assembly Provide over molded micro-connectors with positive locking mechanisms Meet air-handing plenum standards (UL - CMP 75C or CSA – 75C TYPE CMP FT-6) Ceiling mount adaptors to: 1. J. 27 51 19 Page 10 of 12 A loudspeaker driver with: i. ii. iii. iv. v. vi. D. SOUND MASKING SYSTEMS Attach on-site to convert plenum loudspeakers to ceiling plate loudspeakers Power supplies to: Project No. R.067898.002 1. 3. SOUND MASKING SYSTEMS 27 51 19 Page 11 of 12 Power the networked devices and control panel components PART THREE - EXECUTION 3.1. SYSTEM DESIGN A. Design system according to manufacturer’s specifications. 3.2. EXAMINATION A. B. C. D. E. F. Ensure that facility build out is at a stage suitable for the system installation. Ensure that facility is constructed according to plans, including wall locations, ceiling types and plenum barriers. Ensure that the plenum height is appropriate as per manufacturer’s recommendations and as per plan. Ensure power requirements have been provided as per plan. Ensure sufficient space for centrally located components is available as per plan and manufacturer’s specifications. Ensure any third-party components required to be interfaced with the system have been provided. 3.3. PERMITS A. Obtain necessary permits for installation work. 3.4. INSTALLATION A. B. C. D. E. Follow all applicable codes for the area. Follow manufacturer’s recommendations regarding installation. Follow the system design for location of loudspeakers and wiring. Record any necessary changes to the system design on the plan. Ensure that supplementary materials used meet applicable safety standards. 3.5. FIELD QUALITY CONTROL A. B. C. D. E. F. Ensure that plenum heights meet the minimum recommended by the manufacturer for the loudspeakers. Ensure that the distance between the top of the loudspeaker and the deck meets manufacturer’s minimum specifications. Ensure that loudspeakers are suspended in a level manner. Minimize obstructions to loudspeakers, to the extent possible. Ensure cables are properly supported in the ceiling. Ensure cables are securely terminated. 3.6. SYSTEM CONFIGURATION AND ADJUSTMENT A. Follow manufacturer’s recommendations for system settings as found in the User Manual. 3.7. CLEANING A. B. C. Ensure that empty packaging is removed. ** Please recycle ** Ensure that any material waste is removed. Ensure the system components are clean and presentable where required. 3.8. DEMONSTRATION AND TRAINING A. B. Demonstrate operational system to customer by walking the space. Demonstrate functionality of the system to the customer or customer’s representative. Project No. R.067898.002 C. SOUND MASKING SYSTEMS 27 51 19 Page 12 of 12 Provide any training to customer’s representative that may be required under the terms of the contract to maintain and/or operate the system or any optional devices (e.g., in room controls) Special training may be provided for sound masking systems monitoring software, when operation requires monitoring for speech security requirements. D. 3.9. TESTING AND REPORTING A. The supplier shall provide the departmental representative a report including at a minimal; 1. 2. 3. 4. 5. 6. B. An as- installed floor plan indicating speaker layout and wiring routing between control unit and speakers. The floor plan should also indicate commissioning measurement locations for each zone. A listing of any identification labeling used on components (speakers, hubs, control devices, wiring) and as referenced in the sound masking software to allow physically locating devices within the plenum/floor plan. An indication of tolerance compliance dBA and spectrum in each zone. Results may be provided in table format and/or plotted graphically. An indication of locations, if applicable, where acoustical performance was not achieved. These should be clearly indicated on a plan, with rationale provided if not previously identified by departmental representative as having an existing issue. The supplier shall include a letter of conformance upon final setup, certifying that the acoustical performance requirements have been achieved in all zones, with any exceptions listed. Sound masking systems used to provide specific levels of speech security to specific closed rooms will require addition accurate details of sound levels, hardware locations and labeling in order to quickly address any alerts received. The speech security protection achieved shall not be considered the suppliers responsibility to determine achieved As previously stated these requirements require special design considerations and in the sound masking system’s supply contract and terms of references The departmental representative reserves the right, at their own expense, to conduct third party testing and verification of acoustical performance. The measurements of acoustical performance shall be made in accordance with appropriate sections of current ASTM E1573, Standard Test Method for Evaluating Masking Sound in Open Office Using AWeighted and One-Third Octave Band Sound Pressure Levels, with HVAC systems functioning under a “normal” mode of operation, as when would be during normally occupied time periods.. 1. If it is determined by departmental representative that acoustical performance has not been achieved, not as a result of existing background sound levels, building conditions or departmental representative negligence, they shall be corrected at the supplier’s expense. This may be achieved through software control and/or modification to sound masking system layout, and/or additional /replacement of components, hardware or as may be required and determined by supplier, within compliance of this specification, and applicable codes and/or regulations. -------------------End of Document -------------------------------------------- Project No. R.067898.002 FIRE DETECTION AND ALARM Section 28 31 00 Page 1 PART 1 - GENERAL 1.1 1.2 1.3 SUMMARY .1 Section Includes: .1 Materials and installation for fire alarm systems. .2 New devices to be connected to an existing control panel to carry out fire alarm and protection functions including receiving alarm signals, initiating general alarm, supervising system continuously, actuating zone annunciators, and initiating trouble signals. .3 Audible signal devices. .2 Related Sections: .1 Section 26 05 00 - Common Work Results. REFERENCES .1 Health Canada/Workplace Hazardous Materials Information System (WHMIS) .1 Material Safety Data Sheets (MSDS). .2 National Fire Protection Agency .1 NFPA (Fire) 20, Standard for the Installation of Stationary Pumps for Fire Protection, 2013 Edition. .3 Underwriter's Laboratories of Canada (ULC) .1 CAN/ULC S524-06-AMI, Standard for the Installation of Fire Alarm Systems, Includes Amendment 1 (Feb 2011) . .2 CAN/ULC S525-07, Audible Signal Devices for Fire Alarm Systems, Including Accessories. .3 CAN/ULC S527-11, Standard for Control Units for Fire Alarm Systems. SUBMITTALS .1 Product Data: .1 Submit manufacturer's printed product literature, specifications and datasheet in accordance with Section 01 33 00 - Submittal Procedures. .1 Submit two copies of Workplace Hazardous Materials Information System (WHMIS) Material Safety Data Sheets (MSDS) in accordance with Section 01 33 00 - Submittal Procedures. .2 Shop Drawings: .1 Submit shop drawings in accordance with Section 01 33 00 - Submittal Procedures. .1 Shop drawings: stamped and signed by professional engineer registered or licensed in Province of Ontario, Canada. .2 Include: .1 Layout of equipment. .2 Zoning. .3 Complete wiring diagram, including schematics of modules. .3 Quality assurance submittals: submit following in accordance with Section 01 33 00 - Submittal Procedures. .1 Certificates: submit certificates signed by manufacturer certifying that materials comply with specified performance characteristics and physical properties. Project No. R.067898.002 .2 .3 .4 1.4 FIRE DETECTION AND ALARM Instructions: submit manufacturer's installation instructions. Manufacturer's Field Reports: manufacturer's field reports specified. Closeout Submittals: .1 Submit maintenance and engineering data for incorporation into manual specified in Section 01 78 00 - Close Out Submittals in accordance with NFPA (Fire) 20. .2 Authority of Jurisdiction will delegate authority for review and approval of submittals required by this Section. .3 Submit to Authority of Jurisdiction 2 sets of approved submittals and drawings immediately after approval but no later than 15 working days to prior to final inspection. .4 Submit following: .1 Manufacturer's Data for: .1 Alarm speakers. .2 Wiring. .2 System wiring diagrams: .1 Submit wiring diagrams of system showing points of connection and terminals used for electrical connections in the system. .3 Design data: Power Calculations: .1 Submit design calculations for existing system and new work specified to substantiate that battery capacity exceeds supervisory and alarm power requirements. QUALITY ASSURANCE .1 Qualifications: .1 Installer: company or person specializing in fire alarm system installations with 5 -years documented experience approved by manufacturer. .2 Provide services of representative or technician from manufacturer of system, experienced in installation and operation of type of system being provided, to supervise installation, adjustment, preliminary testing, and final testing of system and to provide instruction to project personnel. PART 2 - PRODUCTS 2.1 2.2 Section 28 31 00 Page 2 MATERIALS .1 Equipment and devices: ULC listed and labelled and supplied by single manufacturer. .2 Audible signal devices: to CAN/ULC S525. EXISTING SYSTEM OPERATION .1 Two stage operation. Operation to actuation following: .1 Manual station. .2 Heat detector. .3 Smoke detector. .4 Automatic fire sprinkler system. .5 Fire extinguishing system. .6 Fire standpipe system. Project No. R.067898.002 .2 2.3 2.5 Actuation of two operation device to initiate following: .1 Building evacuation alarm devices to operate continuously. .2 Transmit signal to fire department via monitoring station. .3 Zone of alarm device to be indicated on control panel and remote annunciators. .4 Ventilating fans to shut down or to function so as to provide required control of smoke movement. .5 Fire doors and smoke control doors if normally held open, to close automatically. .6 Electro-magnetic door holders to de-energize. .7 Operations to remain in alarm mode (except alarm notification appliances if manually silenced) until system is manually restored to normal. Existing fire alarm in Jean Talon Building is a Simplex system model 2500 NDU Command Centre. Existing fire alarm in R.H. Coats Building is a Siemens model MXLV system. AUDIBLE SIGNAL DEVICES .1 Audible device(s): .1 Speakers: 24 V dc, 200 mm, white. .2 Do not exceed 80 percent of listed rating in amperes of notification appliance circuit. Provide additional circuits above those shown if required to meet this requirement. .3 For surface mounting provide appliance manufacturer's approved back box. Back box finish to match appliance finish. CONDUIT .1 2.6 Section 28 31 00 Page 3 CONTROL PANEL .1 2.4 FIRE DETECTION AND ALARM Electrical Metallic Tubing (EMT):. WIRING .1 Wire for 120 V circuits: No. 12 AWG minimum solid copper conductor. .2 Wire for low voltage DC circuits: No. 14 AWG minimum solid copper conductor .3 Insulation 75 degrees C minimum with nylon jacket. .4 Colour code wiring. Project No. R.067898.002 FIRE DETECTION AND ALARM Section 28 31 00 Page 4 PART 3 - EXECUTION 3.1 MANUFACTURER'S INSTRUCTIONS .1 3.2 3.3 Compliance: comply with manufacturer's written recommendations or specifications, including product technical bulletins, handling, storage and installation instructions, and datasheet. INSTALLATION .1 Install systems in accordance with CAN/ULC S524 and TB OSH Chapter 3-04. .2 Install new modules as required to existing main control panel. .3 Connect alarm circuits to main control panel. .4 Locate and install signal and connect to signalling circuits. .5 Connect signalling circuits to main control panel. FIELD QUALITY CONTROL .1 Site Tests: .1 Perform tests in accordance with Section 26 05 00 - Common Work Results - for Electrical and CAN/ULC S537. .2 Fire alarm system: .1 Check annunciator panels to ensure zones are shown correctly. .2 Simulate grounds and breaks on alarm and signalling circuits to ensure proper operation of system. .3 Class A circuits. .1 Test each conductor on circuits for capability of providing alarm signal on each side of single open-circuit fault condition imposed near midmost point of circuit. Reset control unit after each alarm function and correct imposed fault after completion of each test. .2 Test each conductor on circuits for capability of providing alarm signal during ground-fault condition imposed near midmost point of circuit. Reset control unit after each alarm function and correct imposed fault after completion of each test. .4 Class B circuits. .1 Test each conductor on circuits for capability of providing alarm signal on line side of single open-circuit fault condition imposed at electrically most remote device on circuit. Reset control unit after each alarm function and correct imposed fault after completion of each test. .2 Test each conductor on circuits for capability of providing alarm signal during ground-fault condition imposed at electrically most remote device on circuit. Reset control unit after each alarm function and correct imposed fault after completion of each test. .2 Manufacturer's Field Services: .1 Obtain written report from manufacturer verifying compliance of Work, in handling, installing, applying, protecting and cleaning of product and submit Manufacturer's Field Reports as described in PART 1 - SUBMITTALS. Project No. R.067898.002 .2 .3 3.4 FIRE DETECTION AND ALARM Section 28 31 00 Page 5 Provide manufacturer's field services consisting of product use recommendations and periodic site visits for inspection of product installation in accordance with manufacturer's instructions. Schedule site visits, to review Work, as directed in PART 1 - QUALITY ASSURANCE. CLEANING .1 Proceed in accordance with Section 01 74 11 - Cleaning. .2 Upon completion and verification of performance of installation, remove surplus materials, excess materials, rubbish, tools and equipment. END