1
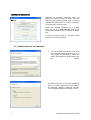
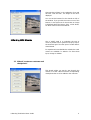
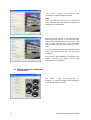
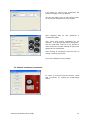
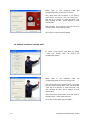
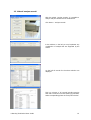
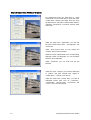
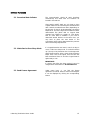
Benzing Technische Uhren GmbH • Karlstraße 45 • 78054 VS-Schwenningen
Tel.: +49 (0) 7720 / 39 09–60 • Fax: +49 (0) 7720 / 39 09–22
E-Mail: [email protected]
User Manual for
eSOFT 2006
© Benzing Technische Uhren GmbH
2
© Benzing Technische Uhren GmbH
© Benzing Technische Uhren GmbH
3
Content
User Manual for .................................................................................................................................. 1
1 Software Installation ......................................................................................................................... 6
1.1
DotNet Framework 2.0 Installation....................................................................................... 6
1.2
MS MDAC Installation......................................................................................................... 7
1.3
eSOFT 2006 Installation....................................................................................................... 7
2 Run eSOFT 2006............................................................................................................................... 8
2.1
Enter License Data .............................................................................................................. 8
3 Working With Wizards...................................................................................................................... 9
3.1
Wizard “create new customer and checkpoints“ .................................................................. 9
3.2
Wizard “create new checkpoints for customer“.................................................................. 10
3.3
Wizard “create new occurences“....................................................................................... 11
3.4
Wizard “create new security staff“ .................................................................................... 12
3.5
Wizard “analyse records“.................................................................................................. 13
4 Edit Master Data Without Wizards................................................................................................... 14
5 Other Functions.............................................................................................................................. 15
5.1
Download Data Collector .................................................................................................. 15
5.2
Wake Device From Sleep Mode ......................................................................................... 15
5.3
Read Licence Agreement................................................................................................... 15
5.4
Create routes ................................................................................................................... 16
5.5
Analyse Errors................................................................................................................... 18
4
© Benzing Technische Uhren GmbH
Preparation
SAFETY INSTRUCTIONS
For being able to configure the software correctly To guarantee a safe operation of the COGARD
eSOFT 2006 requests some information. This System, the follwoing safety instructions are
chapter is designed to help you providing the categorically to be observed:
required information.
Do not operate defective devices; exchange these
with you dealer or system analyst.
Materials
For the installation you should have the follwing
materials at hand:
1. Product CD for eSOFT 2006
2. License number. The 15-digit character string
serves to distinguish a real BENZING product from a
pirated copy.
eSOFT 2006 is not executable without license
number. In case of loss the license number can be
requested from BENZING Technische Uhren GmbH.
E-Mail: [email protected]
The Comcharger is designed for the use in enclosed
and dry rooms. Select as location a level and dry
area.
Before initial operation observe the instruction
manual and safety instructions!
Opening of the device and service only by trained
and competent staff.
For maintenance and repair of a handheld device it
must be switched zero-potential. First check isolated
components for zero potential before continuing
the work!
Adobe Reader from version 5.5 can be downloaded
and installed free of charge from
Jobs on electrical installations are only to be
http://www.adobe.com/de/products/acrobat/readste
performed by expert staff or by trained persons
p2.html.
under the guidance and supervision of expert staff
according to electrical regulations!
Minimum requirements:
-
Win 2000/Win XP Home or Professional
Pentium III PC
min. 256 MByte RAM (better 512 MByte)
CD-ROM drive
free USB and/or serial interface(s)
Mouse and keyboard
min. 50 MByte free hard drive memory
VGA monitor with 800x600 pixel (better
1024x768)
Recommended:
-
Win XP Professional
Pentium 4 PC
512 MByte RAM
CD burner (for saving data)
free USB and/or serial interface(s)
Mouse and keyboard
200 MByte free hard drive memory
SVGA monitor with 1024x768 pixel
fast printer
© Benzing Technische Uhren GmbH
5
1 Software Installation
Following all necessary installation steps are
displayed to install the software. Please note, that
all users working with the system need to have the
corresponding authorization to warrant a problemfree performance of the program.
Please insert supplied installation CD in CDROM
drive. The CD is an auto run CD. After a few
seconds the installation menu will apear, as shown
here.
In order to use eSOFT 2006 in a first step DotNet
Framework 2.0 is to be installed.
1.1 DotNet Framework 2.0 Installation
1. Click the corresponding button in the Start
menu to install DotNet Framework 2.0. You
will possibly be prompted to restart the
system after installation. Please comply with
the
request.
If DotNet Framework 2.0 is already installed on
the PC on which eSOFT 2006 is to be installed,
the following message is displayed (see left).
Cancel further installation by clicking “Cancel“.
6
© Benzing Technische Uhren GmbH
1.2 MS MDAC Installation
2.
After installing DotNet Framework 2.0 you
have to install MS MDAC in a second step if
your PC does not have Windows XP
including Servicepack 2 installed! If your PC
does have Windows XP with SP2 installed,
you can skip to step 3. You are possibly
prompted to restart the system after
installation. Please comply with the request.
If you install MS MDAC on a PC with Windows
XP SP2 the following message (see left) is
displayed. This shows that MS MDAC is already
part of Windows XP with SP2! Cancel further
installation by clicking “Cancel“.
1.3 eSOFT 2006 Installation
3. The third step is the actual installation of
eSOFT 2006.
This step is only available after reading and
confirming the license agreement.
© Benzing Technische Uhren GmbH
7
The button to install eSOFT is only activated after
reading the license agreement and confirming by
clicking on “YES“.
After clicking the button „Install eSOFT 2006“ (see
top image left), you have to select, if the software is
only to be implemented for “Just me” or
“Everyone” of the PC. Select and click “Next“.
After the software is installed the next message has
to be closed by clicking on “Close“.
The software is now completely installed and you
can run it via START – PROGRAMS – BTU – eSOFT –
eSOFT.
Under START – PROGRAMS – BTU – eSOFT you find
direct access to the newly implemented wizards for
creating new customers, checkpoints, occurences
and security staffs.
2 Run eSOFT 2006
2.1 Enter License Data
Run the software by clicking START – PROGRAMS –
BTU – eSOFT – eSOFT.
With the initial run you are prompted to enter the
15-digit license number including hyphens.
INFO:
If you received a demo version please enter demo
instead of the licence number!
Enter your name and address in the corresponding
fields. These data later serve to generate the header
for printing the record analyses.
8
© Benzing Technische Uhren GmbH
After entering all data in the registration form and
exit with “save and exit“, the image on the left is
displayed.
You can see the buttons for the wizards on left of
the window. If you go with the cursor to one of the
buttons, in the right area of the window an image
is displayed above the button “Exit“, which shows,
for which function the wizard stands.
3 Working With Wizards
Aim of eSOFT 2006 is, to unburdon the user as
much as possible and to guide him step by step to
the envisoned goal. Thus the input of master data is
wizard-based.
For experienced users besides the wizards the usual
menus are available for selection for direct data
input, change or deletion.
3.1 Wizard “create new customer and
checkpoints“
This wizard guides you step by step through the
creation of a new customer and the corresponding
checkpoints that are to be added to the customer.
© Benzing Technische Uhren GmbH
9
Click button “create new customer
checkpoints“ to display image on the left.
and
Note:
Check the small field “ Print log of my entries“ to
create and print a log after entering all data, which
displays all new entered data.
Enter data of new customer in the respective fields.
After all fields are filled in you can end the input
without adding checkpoints to the customer. Click
button “Finish input and save“. Thus the entered
data are saved and the wizard returns to the main
menu.
If you want to create further customers click button
“Now enter additional customer“. The same form
will appear.
If you want to add checkpoints for a further newly
created customer click button “Now enter
checkpoints of this customer“.
3.2 Wizard “create new checkpoints
for customer“
Click button “create new checkpoints for
customer“ to access the wizard to add checkpoints
for an already existing customer.
10
© Benzing Technische Uhren GmbH
If the button for input of new checkpoints was
clicked, the display on the left appears.
Click the gray field in front of the customer name,
for whom new checkpoints are to be created.
Enter respective data for new checkpoint in
corresponding fields.
Click “Now enter further checkpoints for this
customer“, if you want to add further checkpoints.
Click the small field “ Print log of my entries“ to
create and print a log after entering all data, which
displays all new entered data.
After entering all checkpoints close the input by
clicking “Finish input and save“.
Up to 250 checkpoints may be lodged!
3.3 Wizard “create new occurences“
To create an occurence start the wizard “create
new occurences“ by clicking the corresponding
button.
© Benzing Technische Uhren GmbH
11
Please enter in the respective fields
corresponding data for the new occurence.
the
Click “Now enter new occurence“ if you want to
enter further occurences. Click the small field “
Print log of my entries“ to create and print a log
after entering all data, which displays all new
entered data.
After entering all occurences close the input by
clicking button “Finish input and save“.
Up to 250 occurences may be lodged!
3.4 Wizard “create new security staff“
To create a new security staff start the wizard
“create new security staff“ by clicking the
corresponding button.
Please enter in the respective fields
corresponding data for the new security staff.
the
Click “Now enter further security staff“ if you want
to enter further security staffs. Click the small field
“ Print log of my entries“ to create and print a log
after entering all data, which displays all new
entered data.
After entering all security staffs close the input by
clicking button “ Finish input and save“.
Up to 250 security staffs may be lodged!!
12
© Benzing Technische Uhren GmbH
3.5 Wizard “analyse records“
With the wizard “analyze records“ it is possible to
analyze and print several record combinations.
Click button “ analyze records“.
In the window on the left you may implement any
combination of analysis that are supported by the
wizard.
On the left all records for the above selection are
displayed.
This is a printout of all records including security
staff and occurences on screen (hardcopy printable).
Select corresponding printer in the top left window.
© Benzing Technische Uhren GmbH
13
4 Edit Master Data Without Wizards
For experienced users the alternative to create
master data not via wizards but to access the menu
“master data“ directly is provided. There you have
the alternative to add, edit or delete master data for
customers, checkpoints, occurences, security staffs
and routes.
Under the menu item “application“ you will find
the items “enter licence data“, “set language“ and
“terminate“.
Under “enter licence data“ you can change the
company data for the list header.
Software is then implemented in the corresponding
language. Under “set language“ you can set eSOFT
2006 for other languages.
Under “terminate“ you can close and exit the
software.
Under the menu “analysis“ you have the alternative
to conduct and print analysis with regard to
“master data“, “records“ and “errors“.
Under the menu item “master data“ you find all
analysable master data, such as “customers“,
“checkpoints“, “security staff“, “occurences“ and
“route“, which can be analyzed.
14
© Benzing Technische Uhren GmbH
5 Other Functions
5.1 Download Data Collector
The communication checks all serial interfaces
automatically and starts with the software. Its
located in the task bar.
After starting eSOFT 2006 you only have to place
Cogard 3000 into the Comcharger to download the
data. Several seconds/minutes later (depending on
the amount of data to be downloaded), the device
beeps twice. This is the signal that all data has been
downloaded. The yellow LED on Cogard 3000
changes from blinking to steady on. This shows,
that no more data is available. If you have to
download several devices at the same time, you
only have to place the next device in the
Comcharger after having downloaded the previous
device and having beeped twice.
5.2 Wake Device From Sleep Mode
If a Cogard 3000 has not been in use for 6 days or
more, it falls into sleep mode. To wake this device
up it is only to be placed into the Comcharger with
eSOFT 2006 running. After a short while the device
beeps twice. This is the signal, that the time has
been transferred from PC and the Cogard 3000 is
again ready to use.
IMPORTANT:
If a device has fallen into sleep mode it has to be
charged after reactivation for at least 48 hours!
5.3 Read Licence Agreement
© Benzing Technische Uhren GmbH
Under menu item „?“ you find the license
agreement for eSOFT 2006 in German and English.
It can be displayed by clicking the corresponding
button.
15
5.4 Create routes
Click “master data“ and afterwards “route“ to
create a new route. You may enter during which
time period and in what sequence a certain route
has to be executed. For this it is later possible to
create error analysis.
The image on the left displays the main menu to
create a new route. Click “new route“ to start its
creation.
On the left you see already executed inputs for the
description of on route as well as the set time
period, during which the route has to be executed.
Marked in green are the weekdays, on which the
route has to be executed. The weekdays marked in
red display, the weekdays in which this route is not
to be executed.
16
© Benzing Technische Uhren GmbH
After selecting weekdays and time periods for the
route, click “save route“. After it is saved new
checkpoints may be added to the route.
If you want to add checkpoints to the exisiting
route without saving it first, the message on the left
is displayed. Please save the route by clicking “ save
route“ first.
A new checkpoint may be added to the route by
clicking the customer name, for whom a checkpoint
will be added in the route. On the right of the
customer name all checkpoints for this customer are
displayed.
Mark the checkpoint to be added by clicking on it
and afterwards clicking button “add checkpoint(s)“.
It is possible to highlight several checkpoints with
the mouse and add them to the route. Press and
hold left mouse button while dragging and
dropping the highlighted one to the next
checkpoint.
© Benzing Technische Uhren GmbH
17
After adding all checkpoints for the route click once
again “save route“.
If you want to view details for a route, double click
“routes“ the corresponding route. The window on
the left is displayed.
You may add and/or delete checkpoints to/from a
route. Click respective button. If you want to
change the checkpoint order of the route, highlight
the checkpoint to be changed, and click the green
box on the right of the checkpoints display, to move
the checkpoint one position up or the purple box
on the right of the checkpoints, to move the
highlighted checkpoint one position down. Save the
changes by clicking “save route“.
5.5 Analyse Errors
In eSOFT 2006 it is possible to analyze errors in
routes.
eSOFT 2006 offers a variety of criteria to analyze
these errors.
The following images display the criteria, which by
themselves as well as in combination with others
can be analyzed.
On the left you see options to select the error
analysis. All selection criteria are to be selected by
themselves as well as in combination with others.
18
© Benzing Technische Uhren GmbH
The following is a brief description of the criteria:
□ analysis of route
It means, that here may be searched for complete
routes which were not existing in the deposited
time frame.
□ checkpoint not in route
Here all checkpoints may be listed, which are in fact
attributed to a customer but do not belong to one
of the routes.
□ deviation time frame
Here all checkpoints are listed, that were not
recorded within the deposited time frame.
□ wrong sequence
All checkpoints that were recorded in wrong
sequence. However, at least 5 checkpoints have to
be recorded with 3 in the right sequence, otherwise
no analysis is possible.
□ missing checkpoints
All checkpoints that belong to a certain route, but
were not recorded.
□ unknown checkpoints
All checkpoints that were recorded, but cannot be
attributed to a customer, security staff or
occurence.
□ double records
All checkpoints that were recorded within a time
period twice (i.e. within 1 minute).
□ no security staff
All records which cannot be assigned to a security
staff.
© Benzing Technische Uhren GmbH
19
BENZING
BENZING Technische Uhren GmbH
Karlstraße 45
78054 Villingen-Schwenningen
Germany
Phone +49 – (0) 7720 – 3909-60
Fax +49 – (0) 7720 – 3909-22
E-mail [email protected]
Internet www.benzing-btu.com
Edition: July 2006
Subject to change without prior notice!
20
© Benzing Technische Uhren GmbH