1
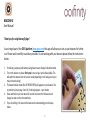
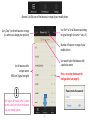
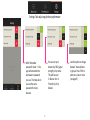
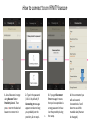
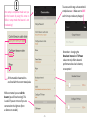
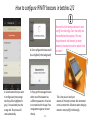
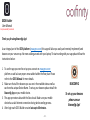
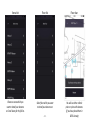
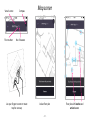
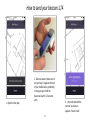
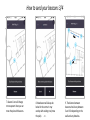
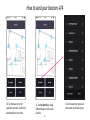
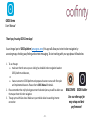
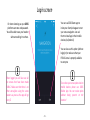
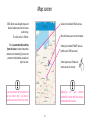
Apps User Manuals For beacons configuration use: For beacons implementation use: For beacons navigation use: BEACONFIG GEOS Builder GEOS Demo page 1 page 11 page 22 Not yet available for Android BEACONFIG User Manual -1- BEACONFIG User Manual Thank you for using Beaconfig App! As an integral part of the GEOS platform (www.geos.zone) this app will allow you to set up your beacons for further use. Please read it carefully to avoid any troubles. To start working with your beacons please follow the instructions below: 1. For delivery purposes (and battery saving) beacons are shipped in disabled mode. 2. To turn the beacon on please firmly tap it once using a hard surface (table). This will switch the beacon into the service mode (depending on the setup you may or may not hear buzzing). 3. The beacon default name (like IF19FF867F66F9) will appear on your beacons’ list or proximity list (see page 3 and 4). If nothing happens – tap it harder. 4. Once switched on you have about 45 seconds to connect to the beacon and change its state or other characteristics. 5. If you do nothing in 45 seconds the beacon will automatically go to the sleep mode. -2- Beacons’ List Tab: see all the beacons in range of your mobile phone Use ‘Sort’ to list all beacons according to signal strength (or name – see p. 5) Use „Clear” to refresh beacons in range (i.e. when you change your position) Number of beacons in range of your mobile phone Use search tab to find beacon with a particular name List of beacons with: unique names RSSI level (signal strength) Press > to access the beacon for configuration (see page 6) The higher the value (that is closer to zero value) the closer the beacon is to your mobile phone. -3- Proximity List Tab: see all the beacons close to your mobile phone Use ‘Sort’ to list all beacons according to the signal strength Use „Clear” to refresh beacons in range (when you change beacons attributes) Number of beacons in range of your mobile phone Beacons unique name (given by Ifinity) Press > to access the beacon for configuration (see page 6) With ‘Proximity List’ mode only the beacons with signal strength -40 and higher will be listed. This means for accurate identification you should put your phone as close to the beacon as possible (beacon against back of the phone). It’s particularly useful when working with a large number of beacons at the same time (see page 9). -4- Settings Tab: adjust app for best performance You can sort your beacons by RSSI (signal strength) or by name. This will be used in ‘Beacon List’ or ‘Proximity List’ by default. With ‘Remember password’ mode ON the app will remember the last beacon’s password you use. This helps when you use the same password for many beacons. -5- Use this option to change beacons’ characteristics in groups. Press ‘Edit’ to select one, two or more. (see page 9) How to connect to an IFINITY beacon 1. List all beacons in range using Beacons’ List or Proximity List tab. Then press > next to the desired beacon to connect to it. 2. Type in the password (111111 by default). If Connecting to message appears to take too long you probably lost the proximity. Go to step 1. -6- 3. If you get Disconnect Error message it means that you have provided a wrong password or have lost the proximity during the setup. 4. Once connected you will see beacon’s characteristics. Scroll down to see all the mutable data (that can be changed). Beacon mutable characteristics DESCRIPTION REMARKS Use only unsigned integer values (no less or more). We recommend to use the same password for all beacons you have. Make sure you remember your password! Once forgotten it can be only reset by IFINITY (with additional charges). Beacon buzzes to confirm its status - when tapped (for service mode) or changing its state (on/off) With beacon state enabled you can turn the buzzing off. Use to turn on or turn off your beacon. To enable the beacon tap it for the service mode (see page 1) and set Enabled in setup menu (page 7). Use unsigned integer values from 1 to 65535. This value (with UUID and Major) is broadcasted in beacons’ passive mode. Minor is used to identify a single beacon within one group (like particular venue within organisation or one floor) Assign a unique beacon’s name for proper GEOS recognition. Use default or your own name (up to 15 ASCI characters). Broadcasted in beacon’s active mode. For proper GEOS recognition each Device Name has to be unique Use unsigned integer values from 1 to 65535. This value (with UUID and Minor) is broadcasted in beacons passive mode. Major is used to identify beacons assigned to particular groups (like one venue within organisation or one venue floor/room) Use form 100ms (fastest) up to 1000ms (slowest) for UUID, minor and major values broadcast. This affects battery life. For a higher accuracy (i.e. for indoor navigation) use fast intervals. Used to identify all beacons within your organisation, or with a large group of beacons. Broadcasted in beacons passive mode. Use www.uuidgenerator.net to generate your own UUID for all your beacons. By default you get IFINITY UUID. Use from -40dBm up to 4dBm to setup beacon’s signal strength. This affects battery life. For long distance broadcast - up to 60-70 meters - use high TX Power values. For close proximity – lowest values. DESCRIPTION REMARKS You can call beacon while connected to make sure you talk with the right beacon. You will hear buzzing. -7- This is helpful when you service beacons form the distance or you want to identify particular beacon among others in a stack. To access and change a characteristic’s state/value use >. Make sure to SAVE each time you make any changes! Once setup is completed make sure you exit the beacon by using this arrow <. While in setup mode the beacon is not broadcasting! Remember – changing the Broadcast Interval and TX Power values not only affects beacon’s performance but also its battery consumption! All the mutable characteristics are listed with the current state/value. While connected you can call the beacon (you will hear buzzing). This is useful if you are not sure if you are connected to the right one (from a distance or stacked). -8- How to configure IFINITY beacons in batches 1/2 With the Multiconfig set ON it will enable Config all selected orange tab in Beacons’ list or Proximity List tabs. Use Proximity List for more accurate multiconfiguration. Check all the characteristics you want to set at once. For each one use > to put the appropriate value (see page 7). -9- For the Device Name set the basis (like name or shop) and then a number used for randomisation. The names will be set as name1, name2, name 3, etc. How to configure IFINITY beacons in batches 2/2 2. Once configured the beacon will be un-higlited (in the background). 1. Select beacons that you want to configure and press orange tab (they will be highlighted in grey) . Once selected press the orange tab. The process will start automatically. 3. If you get this message it means either one of the beacons has a different password or it has lost its connection with the app. Press orange button again or connect directly. - 10 - Be careful while changing beacons’ state on/off in multiconfig. Once shut they can be enabled only by tapping. This may be problematic with beacon (or many beacons) mounted on walls or places hard to reach! This is how you can stack your beacons in Proximity List mode. We recommend not to use more than 10 beacons when changing beacons’ state (on/off) in Multiconfig. GEOS Builder User Manual Not yet available for Android - 11 - GEOS Builder User Manual Not yet available for Android Thank you for using Beaconfig App! As an integral part of the GEOS platform (www.geos.zone) this app will allow you easily and remotely implement/seed beacons on your venue map. No more walking around with your laptop! To start working with your app please follow the instructions below: 1. To use the app you need to set up your account on www.geos.zone platform as well as have proper venue added within the floor plan. Please refer to the GEOS Manual for more details. 2. Make sure that all the beacons you use are in the enabled state as well as each one has unique Device Name. To set up your beacons please install the Beaconfig App on your mobile device. 3. The app syncronises data with the Geos cloud. Make sure your mobile device has a valid internet connection during whole seeding process. 4. After login each GEOS Builder session lasts up to 60 minutes. - 12 - BEACONFIG To set up your beacons please use our Beaconfig App! Welcome screen Login screen Login screen Press CONTINUE if you already have your GEOS account and your beacons. Use the same login and password you use for GEOS platform. The App remembers your login when you close it (up to 60 minutes). - 13 - Venue list Floor list Floor plan Choose a venue which you want to install your beacons at. Scroll down for the full list. Select floor which you want to install your beacons at. You will see either a blank plan or a plan with beacons (if you have placed them in GEOS already) - 14 - Venue’s name Compass Floor number No. of beacons Use your fingers to zoom or rotate map for accuracy Map screen A clean floor plan - 17 - Floor plan with inactive and active beacons How to seed your beacons 1/4 1. Open the floor plan 2. Take one beacon (make sure it’s on!) and touch it against the back of your mobile device, preferably in the upper part. Hold the beacon at least for 2-3 seconds until… - 18 - 3. …the violet tab with the name of your beacon appears. Press the tab! How to seed your beacons 2/4 4. A blue beacon icon will appear in the middle of the screen. It’s locked. 5. Move, rotate or zoom your plan to place your beacon in the position. Press OK to seed. - 19 - 6. Beacons’ position will be synced with your floor plan. Make sure you are connected to the internet! How to seed your beacons 3/4 7. Beacon’s icon will change to transparent. Now you can move the plan with beacons. 8. New beacon will always be locked in the centre. It may overlap with existing one (move the plan). - 20 - 9. The distance between beacons should vary between 3 and 15m depending on the walls and any obstacles. How to seed your beacons 4/4 10. Tap the beacon icon for reposition/removal. It will move automatically to the centre. 11. Use Re-identify to assign different beacon to the same position. - 21 - 12. Sort beacons by signal and choose the one closest to you. GEOS Demo User Manual - 22 - GEOS Demo User Manual Thank you for using GEOS Demo App! As an integral part of GEOS platform (www.geos.zone) this app will allow you to test indoor navigation by accessing maps, checking way finding and context messaging. To start working with your app please follow below: 1. To use the app: a. make sure that the venue you are visiting has installed indoor navigation based on GEOS platform and beacons, or a. have an account on GEOS platform and prepare at least one venue with floor plan and implemented beacons. Please refer to GEOS Manual for details. 2. Please remember that only by being present at the location/venue you will be able to see the map and test the indor navigation. 3. The app syncs with Geos cloud. Make sure your mobile device has working internet connection - 23 - BEACONFIG GEOS Builder Use our other aps for easy setup and best performance! Welcome screen Tap to start your adventure with indoor navigation. Make sure your Bluetooth is on as well you allow GPS localisation! Use RADAR tab to see beacons performance in real time. See page 29 for details. To make sure that GEOS App works with most recent maps/location updates – tap 3 times with your 3 fingers on blue screen part to clear the cache. Those features will be discontinued in the next app update – they are not explained in this manual) - 24 - Login screen You can use GEOS Demo app to invite your clients/coleagues to test your venue navigation. Just ask them to install app in their mobile devices (Ios/Android). For internal testing use your GEOS platform username and password. You will be able to see your location without revelling it to others. You can also use this option (without loging in) to make sure that your PUBLIC venue is properly available to everyone When logged you will also see all the venues that have been made PUBLIC. Make sure that there is no other venue/plan using the same beacons as yours as the app will go crazy To see how your venue plans look on mobile devices please use GEOS Builder App. You can review plans without being present at the location! - 25 - Map screen GEOS Demo uses Google maps and device location services for venue positioning. The def. radius is 500 km. Green pins indicate PUBLIC venues. The App automatically switches from this view to indoor map when beacons are detected. If you are not present at the location you will see only this view. Violet pins indicate PRIVATE venues (within your GEOS account). Blue dot shows your current location. Zoom map to see if there are more venues in one city. If you are present at the location but not see indoor map – go back to welcome screen and clear the cache. Depending on your internet bandwidth it make take few minutes to download all locations. - 26 - Map screen Press this tab to see context messages assigned to particular areas in the venue Press compass to automatically orientate your plan with Google maps. Release it for free plan mode. Zoom/rotate venue plan for more details. Your location Your current level/floor Venue name/area name For best performance all colour plans used in GEOS are transformed into greyscale. Colour maps will be introduced in apps April’15 update! Use Navigate to area tab find if there are any zones in the venue See page 28. - 27 - Navigation screen Select Home to see all areas/POI or particular floor number to narrow the list. Press X to return to free mode. Path Your destination name Touch POI name to start navigation Distance to the next turn Current area name - 28 - Radar screen Your beacon position Use RADAR to see beacons proximity performance. Your mobile device distance form the beacon with beacon name Put up to 6 beacons very close to your mobile device to lock them. The icon will turn gold. Press START to have fun! Maximum radar distance is 5m. List of locked beacons. Select one to see radar working - 29 -