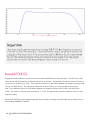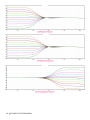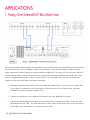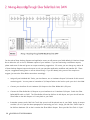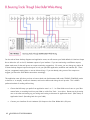
1
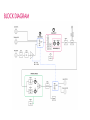
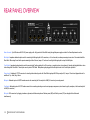
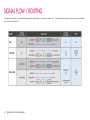
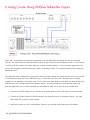
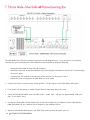
DRAFT – 11/7/15 Thank you for purchasing the Silver Bullet. We believe that it is a forward thinking product that will revitalize and infuse your digital workflow with an awesome analog sound. As the Louder Than Liftoff website says: “Welcome to the Mission!” Over three years ago, Brad McGowan and I found ourselves on similar paths in our search to bridge analog sonics into our digital worlds. What you have sitting in front of you today is the culmination of 3+ years of extensive R&D and real world testing. It’s been a fascinating journey, and I think it’s an interesting read to see how and why we got to where we are today. I invite you to join us for a little back story. But hey, feel free to skip it if you just want to play with the box. (That’s probably what I would do.) Los Angeles Audio Production, circa 1993. The principle audio concerns in my life at that point in time dealt mostly with tape distortion, headroom, noise, how to automate and recall mixes, and which transparent console to buy. There was enough distortion in the world back then and “searching for mojo” was not really on my radar. I already had as much mojo as I needed with my 100% tape based analog workflow. Fast forward 15 years to 2008… It was a gradual process, but by 2008, my recording process had become completely digital. The tape machines were gone, and I was left with a recording chain that was devoid of all the analog “artifacts” that I had fought for so long. The chief concerns and “issues” of 1993 were no longer a problem, but there were new problems introduced that had no long standing history of audio engineering solutions for fixing them. Digititus had arrived. It was new, uncharted territory - and it was pervasive and deceptively ugly. By 2008 I had solidly begun the transition into ITB and Hybrid mixing. But something was missing, and it wasn’t just the old JH24. I hadn’t quite figured it out yet, but I was feeling somewhat uneasy with mixing ITB - although day by day it was becoming more and more of a necessity for both myself and my clients. There was no turning back. The realization for me hit hard one day when I was mixing a big show for Disney at O'Henry’s Studio A. Studio A was fantastic - certainly one of my favorite studios of all time. It had the biggest API on the West Coast and was automated with Neve Flying Faders. They had a large compliment of classic high end outboard gear. Sweet!! It was going to be a great mix day. But on that day, about mid way through my mix after numerous client requests, a light bulb went off and I realized that I was only using the two large Pro Tools systems I had brought with me and the 2 track return of the massive automated console. The entire glorious 88 channel API and all the studio outboard was essentially bypassed as I sat there mixing ITB because my client needed recall and automation overseas. Aaaaargh!!! 2 SILVER BULLET USER MANUAL Back at my own place where I could choose my preferred workflow, mixing through my transparent console was not helping matters much either, and I eventually realized I would have to look elsewhere to find the analog vibe I was missing from the old days. Industry wide there was already a search to bring back some of the “analog love” that many of us had found missing in our ITB digital mixes. I could feel it resonating through the audio community like a distant peal of thunder across the desert….the realities of living in a digital age were mixed with discontent. It was sometime during that period that I started to experiment with running mixes through discrete class A mic preamps. More than a few told me what I was doing was “wrong”, but in my mind, I was hearing a lot of benefits such a more musical tone due to the saturation and 2nd order harmonic distortion. In the old days we could never seem to get quite far enough away from the distortion and artifacts, but in this digital age, somehow adding them back in was making me smile. Processing through these analog circuits was starting to bring back some of the analog goodness I was missing, and as a side benefit, the taming of spurious transients ended up yielding a higher overall “loudness” level without compression or limiting. This was a really helpful on mixes that were headed to mastering as they required less compression and limiting to get them to the level they needed to be at for professional release. So I pushed on. As I progressed on my journey and began talking about it online, I noticed this idea began resonating with a lot of people. But there were some downsides to working this way. The workflow was kludgy at best, and the ability to gain stage creatively and cascade back and forth as I wanted to was not there. I was using circuits that were not designed to do what I wanted them to do. I couldn’t get the gain staging right, and it was difficult to get the drive and push dialed in like I used to able to do with those old behemoth consoles from the 70’s. I was getting more and more frustrated. The sound of those old API and the Neve consoles was haunting me every time I reached for a Pro Tools keyboard. And so….the concept for the Silver Bullet was born. Somewhere back in the recesses of my mind it began to slowly take shape. In subsequent conversations with Brad, we found ourselves on similar paths, and eventually we teamed up to bring about a workflow and audio solution for digital ITB users that didn’t exist at that point in time. And here we are - almost 4 years later….with a box that doesn’t easily entertain description. So by now you’re probably asking yourself: The Silver Bullet began its life as a dual MOJO Amp box, and gradually we added what we believe to be essential and useful features for those who are tracking and mixing ITB. (That’s “In The Box” or “completely digital inside a computer” for those of you who have been hiding under a rock for the last 10 years.) It is comprised of multiple analog circuits designed to allow what we in the audio community refer to as “classic analog tone” to be simply and elegantly inserted and manipulated into your DAW. In other words - it was initially designed to put a healthy dose of analog tone directly into your DAW’s (Digital Audio Workstation’s) mix bus. But it grew beyond that. 3 SILVER BULLET USER MANUAL We have had endless transformer listening sessions, and many, many revisions of the analog electronics in the TONEAMP™. What we ultimately ended up with is two completely different sounding vintage inspired MOJO Amp’s that we feel are “as good as it gets” without compromise in their sonics or tonality. Brad and I didn’t design the Silver Bullet to a price point, we designed it for our own personal sonic aesthetics and engineering needs - and we believe the build is forward thinking and world class. The Silver Bullet’s MOJO Amps are controlled by a front panel that is simple and elegant - not all that different in workflow than your favorite guitar amp. Add the detented pots into the mix for convenient recall, and you have a very user friendly analog device that integrates seamlessly with your ITB workflow. There are quite simply just two controls that will lead you into a world of Mojo - Gain and Output. Push the “Gain” and pull back the “Output” for more harmonic goodness and Mojo - or go the opposite direction for a more transparent signal path while still retaining a nice analog three dimensionality and width. These two circuits are the “A” and “N” that you see on the front panel. They represent the best of the best in my opinion - two classic American and British console sounds. This unique workflow allows you to cascade and combine the gain-staging and sonics of vintage LFAC’s (Large Format Analog Consoles) in a way that has not been easily or inexpensively achievable up to this point. When cascading the MOJO Amp’s, you will have the ability to drive and cascade / combine these two classic circuits into each other, creating tones that were previously only available by using two classic analog consoles. This concept of cascading is a long held secret with old school mix engineers. Back in the “old days” it was often popular to track on Neve consoles and mix on API’s or sometimes SSL’s to get a more diverse sonic signature in the end product. Savvy engineers often inserted Neve based circuitry into their SSL or API mixes for added depth. This sonic diversity gives a rich harmonic flavor that allows for added texture and depth of field that often exceeds the sum of both consoles. In this same classic tradition, cascading the Silver Bullets MOJO Amp’s gives you access to a remarkably rich sonic palate. Add to that the ability to cascade them in either direction (SWAP) and you have a sonic adventure awaiting your experimentation. The Silver Bullet is a gain-staging dream come true, and will reward your experimentations with rich harmonic goodness that is very similar sonically to mixing on those classic American and British consoles. You should be aware though, that there is a LOT OF GAIN in the Silver Bullet - and with that gain comes some responsibility on your part. Use it wisely. OK then. That pretty much covers the history. Make sure to check out the application notes for some good suggestions on how to interface the Silver Bullet into your production world. I hope you find the Silver Bullet as essential to your work flow and sonic signature as I have. Best of luck - and enjoy! Regards, William Pearson - aka drBill 4 SILVER BULLET USER MANUAL DESIGN MISSION 6 FEATURES 6 UNPACKING 7 RACK MOUNTING 7 Thermal Design and Ventilation 7 POWER REQUIREMENTS 8 SAFETY PRECAUTIONS 8 SERVICING 9 BLOCK DIAGRAM 10 FRONT PANEL OVERVIEW 11 REAR PANEL OVERVIEW 12 SIGNAL FLOW / ROUTING 13 CONTROL DESCRIPTIONS 14 MODE Selection 14 Mic Modes 15 MOJO Amps Mojo LEDS 16 17 Tone Shaping (EQ) Section 17 TIGHT High Pass Filter 17 Baxandall TONE EQ 18 VINTAGE Mode 22 INSERTS 23 METERS 24 APPLICATIONS 25 1. Mixing - Silver Bullet on DAW 2-Bus Master Insert 25 2. Mixing – Recording Through Silver Bullet Back Into DAW 28 3. Tracking Other Gear Through the Silver Bullet While In Mix Mode 31 4. Tracking – Using the Silver Bullet as a Mic Preamp 34 5. Analog Console – Mixing With Silver Bullet on Mix Insert 37 6. Analog Console – Mixing With Silver Bullet on Mix Outputs 39 7. Folcrom Mode – Silver Bullet with Passive Summing Box 41 8. Bouncing Tracks Through Silver Bullet While Mixing 43 SPECIFICATIONS 47 LIMITED PRODUCT WARRANTY 48 CREDITS 49 5 SILVER BULLET USER MANUAL There are two reasons that audio gear is worth keeping in the studio: 1. It sounds so damn fetching that every time I remove the item in question from the signal path, it feels like a mean man just stole my ice cream cone. 2. It gets me from point A to point B in such an intuitive and immediately gratifying way that I can’t help but be more creative and have more fun making music. Looking impressive in the rack, being affordable…those are obviously beneficial traits as well, but if the two things listed above are not there, then that piece of gear will probably find its way to Craigslist or Ebay. The second item is the “workflow multiplier” effect. When you use equipment that possesses this trait, you find yourself navigating the creative process with more proficiency, more speed, less stress, and less frustration. When used in the presence of clients you look like a genius that adeptly holds dominion over his/her electronic doo-dads. In essence, it makes life easy. We designed the Silver Bullet to meet the two goals above…for the purpose of making life easier and more creative. Innovative MOJO Amp "A" and "N" circuit topologies inspired by classic American and British consoles capable of stereo widening, “3D”-izing, saturation and other desirable artifacts - all in the analog domain. Stereo signal path throughout with a single set of detented and easy recallable stereo controls Visually stunning 20-segment stereo high resolution output meter Mojo LEDs provide visual feedback of signal level intensity Suite of tone shaping features designed specifically for mix management and broad stroke tone sculpting o TIGHT: 12 dB/oct, 20 Hz high pass filter with slight resonance at 40 Hz for tightening bottom end and increasing low frequency headroom o o Baxandall TONE EQ with +/-9 dB boost/cut LF: Pultec-inspired Subsonic (30 Hz) and Bass (60 Hz) frequencies HF: Presence and Air frequencies VINTAGE: softens high frequency response to emulate vintage British consoles Mix and Tracking Modes allows both Mix processing and Overdub / Tracking processing without any repatching of cables or need for patch bays o Mix Mode: process the DAW 2-bus, bounce digitally recorded tracks and stems, use with a passive summing in Folcrom™ mode, or insert on your Analog Console Mix Bus. o 6 Track Mode: connect after your mic preamp, synth, sampler, etc. SILVER BULLET USER MANUAL Mic Modes allow Silver Bullet to function as a fully featured stereo microphone preamplifier with Polarity Reverse and 48V phantom power Choose your Mojo flavor by selecting “A” or “N” sonics or both! Transformers by Ed Anderson and Cinemag ROGUE FIVE discrete op amps designed by Louder Than Liftoff, conforming to standard 2520 footprint Class-A biased op amps All circuit components chosen by ear for maximum Mojo. The unit was carefully packed by the droids at the Rogue Planet Command factory to protect against damage during transit. Please inspect the unit and shipping box for any signs of damage that may have occurred. If you notice any damage please contact us immediately. Be sure to save the original box and packaging in case you ever need to send in the unit for service. Inside the box you will find the following items: Silver Bullet PSU-001 external power supply IEC power cord plastic product card with links to this manual While many will want to mount their Silver Bullet in a rack, some will want it at or near their mix position. drBill prefers to mount his unit either dead center between his speakers, on the console bridge, or in the rack space directly below his speakers. Many of the newer studio desks allow you to rackmount gear in this manner, below the video monitor shelf. This allows for tweaking the MOJO amp gain and Tone while you’re sitting in the sweet spot. Special attention was given to the thermal design of the Silver Bullet so that it will give you countless years of excellent performance, even in non-ideal operating environments. The hottest components inside the unit directly conduct into a rear-facing heat sink to maximize heat transfer due to convection and radiation. We realize that a studio rack can become a crowded tower of heat generating devices, so this design gives the unit the best chance at operating at cooler temperatures. In addition, we have configured the enclosure and cover with a generous number of ventilation cutouts to provide numerous paths for heat to escape from the unit. These cutouts should not be covered or blocked if you want your unit to give you many years of trouble-free operation. There are over 900 parts in the Silver Bullet circuit. Some of that mojo inducing circuitry can get quite warm so allowing adequate ventilation is important. To avoid potential overheating, a Silver Bullet should not be stacked immediately above or adjacent to 7 SILVER BULLET USER MANUAL any other gear that gets very hot. When possible, one rack space above the unit should be left open for optimal ventilation. The rear of the rack should have adequate ventilation as well. Just remember - heat shortens the life of electronics. Each Silver Bullet includes a custom low-noise switching power supply, which is rated for more than double the DC current demand of the unit’s audio circuitry. It connects to the rear of the unit via a 5-pin XLR connector. The power supply is "universal”, and will accept 100V through 240V AC, 50/60Hz, as it complies with standard mains voltages throughout the world. Only use the approved power supply, Louder Than Liftoff part number PSU-001, with the Silver Bullet. Please note: there may be other pro audio power supplies on the market that look similar, but they will NOT work with the Silver Bullet and could cause potential damage. This custom power supply has outputs of +/- 21 VDC @ 1.4 A and 52 VDC @ 100 mA, which are further filtered and regulated for exceptionally quiet and reliable DC power. The Silver Bullet features a delayed power-on sequence. Upon switching on the power, the unit’s relays will hard bypass the Mix Inputs to the Mix Outputs, and mute the Track Outputs for the first five seconds to allow voltage rails to reach steady state. Relay clicking sounds may be heard in the audio during the first 30 seconds of operation after power-on if the Mode or MOJO Select rotary switches are actuated while large value capacitors throughout the circuit continue to reach steady state. If for any reason the Silver Bullet does not power up, please contact Louder Than Liftoff at: [email protected]. In general, it is good practice to power on speakers after turning on the Silver Bullet, and to power off the Silver Bullet before turning off speakers. In general, common sense should prevail when operating electronic equipment plugged into an AC outlet. However, there are some important safety precautions that should be taken: Don't operate the Silver Bullet in or around water! Electronics and water don’t mix and are potentially hazardous. If any liquid or drink is spilled into the Silver Bullet such as soda, coffee, or other drinks, the sugars and acids can cause permanent damage. SWITCH THE UNIT OFF IMMEDIATELY and contact us at: [email protected]. Unplug the Silver Bullet from the wall AC receptacle during lightning storms or when left unused for long periods of time. 8 Clean only with a dry cloth. SILVER BULLET USER MANUAL Don't operate the Silver Bullet with the cover removed. We know it looks cool inside, but don’t do it. The cover provides magnetic screening from hum and stray RF fields and the Silver Bullet will sound better when its cover is in place. It will also keep you from dropping rack screws into the unit and shorting out the Mojo. Please be aware that other equipment may radiate strong hum fields which could upset the performance and outstanding specifications of your Silver Bullet. If you encounter such problems, try relocating the Silver Bullet or other piece of interfering gear. As mentioned in the Rack Mounting section, don’t block the ventilation cutouts. Don’t install the unit near any heat sources such as radiators, heat registers, or stoves. Protect the power cord and power supply cables from being walked on or pinched, particularly at wall receptacles, in the rack between gear and at the rear of the unit. Do not lift or defeat the 3rd pin of the AC cable. A polarized AC plug has two blades with one wider than the other. A grounding type like the one employed by the Silver Bullet has a plug with two blades and a third grounding prong. The third prong is provided for your safety. Please do not defeat it by lifting it or using adapters to bypass the ground. We want you live a long life and make lots of great music. Other than changing jumper settings or swapping discrete op amps, the user should not attempt to modify or service the Silver Bully beyond those procedures described in this manual. Unauthorized service will void your warranty. Do not remove the cover or attempt to remove components until the unit has been disconnected from the AC power source, and all circuits inside have been allowed to discharge for at least 1 minute . Some components can become hot once the unit has been turned on, and they should not be touched until they have cooled to room temperature. To reduce the risk of fire or electrical shock, do not expose to rain or moisture, or operate it where it is exposed to water. Refer all servicing, or any questions about servicing, to Louder Than Liftoff LLC. The locations of jumpers J13 and J14 are shown in the picture below. (COMING SOON) 9 SILVER BULLET USER MANUAL 11 SILVER BULLET USER MANUAL Power Connector: 5 pin XLR mates with PSU-001 power supply cable. Only operate the Silver Bullet using the supplied power supply as noted in the Power Requirements section. Mix Outputs: Impedance balanced outputs used for connecting the Mix signal path to A/D converters, or a 2-track recorder; use when processing a stereo mix or 2-bus material with the Silver Bullet. When using the unit with a passive summing box like a Folcrom, Jumper J13 can be set to config the Mic signal path to output the Mix Outputs. Track Outputs: Impedance balanced outputs used for connecting the Tracking signal path to A/D converters, or console inputs or return channels. Use when tracking individual or stereo tracks through the Silver Bullet. These outputs are only active in TRK Mode. Microphone signals plugged into the Mic Inputs route to the Track Outputs by default. Stereo Inserts: Unbalanced 1/4" TRS connectors for inserting other outboard gear into the Silver Bullet signal post MOJO Amps and pre EQ. Jumper J14 sets insert bypass behavior for each Mode. Tip = Send, Ring = Return. Mix Inputs: Balanced inputs on XLR/TRS combo connector for connecting the 2-bus output of a DAW (D/A converters), or analog console. Track Inputs: Balanced inputs on XLR/TRS combo connector for connecting external gear such as mic preamps, compressors, mixer channels, synths, samplers, or the channel output of a DAW (D/A converters). Mic Inputs: XLR connectors for plugging in condensor, dynamic, and ribbon microphones. Phantom power (48V) and Polarity reverse (POL) can be applied to both channels simultaneously. 12 SILVER BULLET USER MANUAL The signal flow through the Silver Bullet is depicted for each Mode, as a function of Jumper J13. The Insert bypass behavior is also shown for each Mode, as a function of Jumper J14. 13 SILVER BULLET USER MANUAL The Silver Bullet is a true stereo unit with one common set of controls for both left and right channels. All potentiometers feature 41 detents to facilitate recall. The Silver Bullet is comprised of three main sections: 1. MODE Selection – facilitates different workflows: Mixing, Tracking, Microphones 2. MOJO Amps – impart harmonic distortion, saturation, and analog “mojo” 3. Tone Shaping (EQ) section – enables you to shape and enhance the tone of the signal The MODE Selector Switch controls which set of inputs and outputs is routed to the MOJO Amp and Tone Shaping circuitry of the Silver Bullet. The signal flow for each Mode is best understood by referencing the Block Diagram and Signal Flow / Routing Diagram above. In general, the MODE Selector activates an input pair and its corresponding output pair. For example, MIX Mode activates the Mix Inputs, and the Mix Outputs; TRK/BYP Mode activates the Track Inputs and the Track Outputs. MIC (or MIC+) Mode normally activates the Mic Inputs and the Track Outputs. When Jumper J13 enables “Folcrom Mode”, the MIC Modes will activate the Mix Outputs instead to facilitate passive summing box workflows (see Signal Flow / Routing Diagram). The TRK/BYP setting doubles as a hard relay bypass for signals plugged into the Mix input and output connectors. If you are monitoring the Mix Outputs of the Silver Bullet in your DAW or on your console, you can use this setting as a global bypass for all processing - the Mix Inputs connectors are patched directly to the Mix output connectors via relays. This makes it very easy to A/B your mixes with and without the Silver Bullet in the signal path. Note: sources plugged into the Mix or Track Inputs that have a DC offset (most well-designed gear that is functioning normally should not) may cause minor audible pops when switching from MIX to TRK/BYP. Also note that the Mix path goes into hard bypass when in MIC Mode as well, but not when Jumper J13 has enabled “Folcrom Mode” (see Signal Flow / Routing Diagram). The unique circuit topology of the Silver Bullet allows it to be used as a true stereo or single channel microphone preamp. There are two MIC Modes to accommodate a range of microphone input signal levels. The first MIC Mode has more input headroom and works well for louder sources such as drums and electric guitar amps. With one MOJO Amp engaged 6 to 30 dB of gain is available in MIC Mode. When cascading both MOJO Amps up to 54 dB of gain is available. Please note that the GAIN and OUTPUT knobs control both left and right channels simultaneously and that independent dual mono operation is not possible. MIC+ Mode has +24 dB more gain, and thus has less headroom. It works well for quieter sources like vocals and acoustic guitars. If you are clipping the microphone inputs of the Silver Bullet (with GAIN at minimum) you can increase input headroom by switching back to the first MIC Mode. With one MOJO Amp engaged 30 to 54 dB of gain is available in MIC+ Mode. When cascading both MOJO Amps an additional 24 dB of gain is available from the second stage. Up to 78 dB of total gain is available, which is a ton of gain, so take care to gain stage carefully to avoid clipping and to minimize noise. The POL switch reverses the polarity of both left and right Mic inputs simultaneously. When recording drums it's a good practice to check the polarity of all sources against each other so that you have a full and punchy low end. the 48V switch activates phantom power for both left and right Mic inputs simultaneously. You may want to lower the volume of your speakers when turning phantom power on or off as there may be loud pops or thumps when the switch is engaged. Take care to turn on phantom power only after plugging in your microphone, and to turn it off prior to disconnecting the mic. Do not activate phantom power with anything other than a microphone plugged into the Mic inputs as you may damage the Silver Bullet or the connected equipment. Also note that some older ribbon mics may be sensitive to phantom power so exercise caution. 15 SILVER BULLET USER MANUAL To activate either or both A/N MOJO Amps press the MOJO pushbutton switch. The active Amps will be indicated by the Mojo LED labelled “A” or “N”. The active MOJO Amp or cascaded combination of Amps is selected with the rotary MOJO Selector switch. You can choose to use just one Amp, or both A and N Amps in series. The fourth setting swaps the serial order; the “SWAP” LED will illuminate to indicate this setting. The GAIN and OUTPUT controls each provide 24 dB of gain. In either the A>N or N>A cascaded selections, up to 48 dB of gain is available. Needless to say that's a crap-ton of gain to use on a full mix. The potential to completely mangle program material into sonic soup is high when both GAIN and OUTPUT are at maximum. Unity gain is always approximately achieved by setting GAIN and OUTPUT to mirrored settings. For example, GAIN at 9 o'clock, and OUTPUT at 3 o'clock will be close to unity gain. GAIN at 1 o'clock and OUTPUT at 11 o'clock will also yield an output close to unity gain. 16 Use the meters for reference and fine tune the OUTPUT to taste. SILVER BULLET USER MANUAL The output level of each MOJO Amp channel is calibrated for unity gain when the GAIN is set to minimum and the OUTPUT is set the maximum. This ensures well-matched left/right channel gain and a balanced stereo image. The LEDs for the A and N MOJO Amps illuminate blue when the MOJO switch is engaged based on the setting of the rotary MOJO Selector switch. If the N>A setting is selected the SWAP LED will illuminate as well to indicate the the signal is flowing into the N Amp before the A Amp. To help gauge the level of saturation in each MOJO Amp the blue LEDs will turn magenta and then red as the Gain knob is turned up. When the LEDs turn red the audio will probably sound severely mangled. Engage the TIGHT pushbutton switch to activate a 12 dB/oct high pass filter with a corner frequency (-3 dB) at 20 Hz. The filter is slightly resonant so there will also be a tasteful 0.6 dB bump at 40 HZ. TIGHT works well for clearing up subsonic mud that can reduce headroom in a mix without adversely affecting the perception of low end size and extension. This feature can be used in conjunction with or separately from all other processing. 17 SILVER BULLET USER MANUAL Engage the TONE pushbutton switch to insert the 2-band Baxandall EQ into the signal path. The LED in the center of the section will illuminate blue to indicate that the EQ is activated. The left knob controls the amount of boost or cut for the Low Frequency (LF) shelf. The pushbutton switch to its right selects between two frequency settings: SUB (30 Hz), and BASS (60 Hz). The right knob controls the amount of boost or cut for the High Frequency (HF) shelf. The pushbutton switch to its left selects between two frequency settings: PRES (4 kHz), and AIR (off the charts). The amount of boost/cut for each band is +/- 9 dB. The figure below shows the response curves for each frequency setting. Because the TONE EQ can be engaged separately from all other processing, the Silver Bullet can be used just for its tone shaping capabilities if desired. 18 SILVER BULLET USER MANUAL 19 SILVER BULLET USER MANUAL When used in conjunction with TIGHT, some interesting low end shaping can be achieved: 20 SILVER BULLET USER MANUAL 21 SILVER BULLET USER MANUAL Engage the VINTAGE pushbutton switch to apply a 6 dB/oct low pass filter to the extreme high frequencies. One of the trademark characteristics of vintage Neve consoles is the soft and silky top end, especially when the EQ is engaged in the channel. The VINTAGE switch applies this characteristic coloration to the signal path. When combined with the high shelves of the TONE section, unique equalization curves can be created to expand the palette of treble tone shaping possibilities. Like the TIGHT filter and Baxandall TONE EQ, VINTAGE can be used independently from the MOJO Amps. The plot in the TIGHT section above shows the frequency response of VINTAGE Mode without the Baxandall TONE EQ engaged. 22 SILVER BULLET USER MANUAL Other outboard gear can be inserted into the Silver Bullet signal path via the pair of unbalanced ¼” TRS insert jacks on the rear panel. Be sure to use cables that are wired with the Send signal connected to the Tip, and the Return signal connected to the Ring. As depicted in the Block Diagram the Insert is after the MOJO Amps and TIGHT filter, but before the Baxandall TONE EQ. The Inserts are automatically activated or bypassed as a function of MODE selection and the setting of Jumper J14. There are three insert modes that can be set by J14: 1. The inserts are bypassed in TRK Mode. (Jumper pins 1 and 2.) 2. The inserts are bypassed in TRK, MIC, and MIC+ Modes. (Jumper pins 2 and 3.) 3. The inserts are active for all Modes. (Jumper pins 3 and 4.) Refer to the Servicing section to see the location of Jumper J14. See the Signal Flow / Routing Diagram for additional detail regarding how the jumper setting affects operation. 23 SILVER BULLET USER MANUAL The stereo meter provides modified PPM ballistics to give visual indication of average levels and loudness on full mixes, while also responding quickly enough to register transient peaks of individual drum tracks. The meter is marked with a VU scale where 0 VU is equal to +4 dBu (1.228 VAC). Many A/D converters are calibrated for 0 VU = -18 dBFS. Keep your output levels from hitting +16 on the Silver Bullet's meter and you'll likely avoid clipping your converters. The signal feeding the meters is always taken at the output of all processing. It monitors the signal level of the active Mode. Note that no signal will be present on the meters in TRK/BYP Mode if you are monitoring the Mix Outputs with nothing feeding the Track Inputs. 24 SILVER BULLET USER MANUAL For the sake of these hookup diagrams and application notes, we will assume your DAW defaults its Monitor Output Bus to either the L/R or the 1/2 hardware outputs of your interface. If you are monitoring via different outputs, please make note of that and ignore our output monitoring suggestions. Of course, you can change any and/or all of these hookup diagram inputs and outputs to suit your particular application, workflow and interface I/O. These are just a suggested starting place so we can discuss things. If you are already using some of the outputs we suggest, just move the Silver Bullet connections accordingly. Instantiate a hardware insert (Insert 3/4) on your DAW 2Bus Master Fader. If you don’t have a master fader in your session, instantiate one first, then assign it to feed the output of your monitor path. After that, instantiate the above mentioned hardware insert. Connect your interfaces D to A Hardware 3/4 Outputs to the Silver Bullets Mix L/R Inputs. Connect the Silver Bullet Mix L/R Outputs to your interfaces A to D Hardware 3/4 Inputs. Switch the Silver Bullet Mode switch to “MIX”. The Silver Bullet will now be fed from its Mix Inputs, and your mix will exit the Silver Bullet on the Mix Outputs on its way back to your DAW. 25 SILVER BULLET USER MANUAL If you have accomplished the above mentioned steps, the Silver Bullet should now be inserted into your DAW’s 2Bus Master Fader. Adjust the Silver Bullet to taste, and bounce your mix to disk in real-time. #1 - IMPORTANT - there IS NO right or wrong. The Silver Bullet is a gain stagers dream come true. Experiment and do crazy things. That’s why I originally came up with the idea for the Silver Bullet. I found that I WASN’T experimenting enough when using mic preamps and other outboard for coloring on my 2Bus. The Silver Bullet begs to be tweaked - that’s why we made it. So please have at it and make up your own rules - maintaining a spirit of tweaking and experimenting as you go….. I like to start out with EQ (TONE) disabled, and only one MOJO Amp inserted into the signal path. I tend to leave the TIGHT HPF depressed and in the signal path, although with mixes that contain a lot of LF, I’ll A/B back and forth and occasionally remove it from the signal path if the “thump” sounds better without it inserted. Leaving it in gives the Silver Bullet a good deal more headroom on LF heavy mixes though - and 9 times out of 10 I’ll leave it inserted in the path. I’ve always been kind of an API guy when it comes to mixing, so I tend to head that direction to begin with. I generally start with the MOJO Amp set to “A”, GAIN at around 10:00 and the OUTPUT at around 2:00. Of course, this depends a good deal on how hard the output of your DAW is feeding the input of the Silver Bullet - but 10:00-2:00 is a good place to start if your mix is peaking at around 12 to -8 dBFS on your DAW with the Silver Bullet bypassed. (Hardware Bypass is easily accomplished by switching the MODE switch from MIX to TRK/BYP.) Of course all of this is subjective and depends on transients, bass content and on where you are heading….. At this stage of the game, I’ll generally switch to the N MOJO Amp or a perhaps even a cascaded MOJO Amp setup if I’m looking for a thicker, more euphonically dense sound. (As the muse strikes of course.) The beauty of the A vs N MOJO Amps™ is that you can switch back and forth between A vs N settings and get a feel for what is going to work better for your mix without making any changes to either mix - just switch the MOJO Amp switch back and forth between “A” and “N”. After mixing and living with the Silver Bullet for awhile, you’ll begin to instinctually know which is going to be best for the particular mix you’re working on. While you are learning the Silver Bullet - make sure to go back and forth between the A and N MOJO Amps™ often - massaging the GAIN and OUTPUT of each path until you know what’s best for your mix. The more you tweak with the gain staging of the Silver Bullet, the more you will begin to zone in on the harmonic changes taking place. As you become familiar with it, you will begin to increasingly hear it shave off transients, increase harmonic distortion, widen the mix, saturate various frequency ranges, and generally “analog-ize” your mix and make it more 3D. The A and N MOJO Amp paths react differently to how you push them, so a setting on the A Amp will not necessarily equate to the same vibe if you set the N Amp the same. Swapping while mixing between A and N Amps is very easy, and you will not have to do any “recalling” other 26 SILVER BULLET USER MANUAL than the A/N MOJO Amp switch. If you’re cascading, then obviously you will have to use the detented pots to “recall” your previous setting. Or you can do like I do - I just wing it until I’m happy, and change later if the muse demands it. It’s all very organic and intuitive, and for me - constantly changing as my mix progresses. Brad and I worked hard to make it intuitive and organic feeling. As I mentioned briefly above, it’s important to note that you can do quick A/B Hardware Bypassing to hear your naked digital mix by switching from “MIX” to “TRK/BYP” on the MODE switch. This essentially hardware bypasses your mix bus - you do not have to bypass or remove the insert on your 2Bus master fader to A/B Silver Bullet and NON-Silver Bullet mixes. As I get the mix up and going, I’ll start to drive the MOJO Amps™ harder until things gel more and/or the mix starts to bloom. This is functionally equivalent to finding the sweet spot on a large format analog console and driving your mix harder into it’s mix bus. It’s a lot easier with a Silver Bullet though as you are not rebalancing your mix as you boost / cut / tweak the input levels on 48, 96+ fader inputs. All you need to do is adjust the MOJO Amps™ GAIN and OUTPUT knobs. I like to add the EQ after I get the mix gelling and “in the zone”, so “if” or “when” I drop it into the path is a little inconsistent for me. I go with whatever works, and whenever it feels like it’s “time”. You may find you like to “mix into” the EQ. Many do. Others like to drop it in for a touch of sweetening at the end of a mix. Either way, you will find that it is a wonderful “tone” shaper. Brad really took it over the top with his design. In the application scenario we’ve been discussing, when you bounce your track to disk, you will of course need to do it in realtime, as the Silver Bullet is on an analog insert. You should be pretty much done by this point. After you finish your mix, if you want a shock to the system, hardware bypass the Silver Bullet and listen back to the digital only output of your DAW. 27 SILVER BULLET USER MANUAL For the sake of these hookup diagrams and application notes, we will assume your DAW defaults it’s Monitor Output Bus to either the L/R or the 1/2 hardware outputs of your interface. If you are monitoring out different outputs, please make note of that and ignore our output monitoring suggestions. Of course, you can change any and/or all of these hookup diagram inputs and outputs to suit your particular application, workflow and interface I/O. These are just a suggested starting place so we can discuss things. If you are already using some of the outputs we suggest, just move the Silver Bullet connections accordingly. Assign all your Individual Mix Tracks, your Aux Returns, etc. to Hardware Outputs 3/4 instead of their normal monitoring path. You may want to instantiate a 3/4 Output Fader to trim back or push your mix in the DAW. Connect your interfaces D to A Hardware 3/4 Outputs to the Silver Bullets Mix L/R Inputs. Connect the Silver Bullet Mix L/R Outputs to your interfaces A to D Hardware 3/4 Inputs. Switch the Silver Bullet MODE switch to “MIX”. The Silver Bullet will now be fed from its Mix Inputs, and your mix will exit the Silver Bullet on the Mix Outputs on it’s way back to your DAW. Instantiate a stereo audio “Mix Print Track” that your mix will be printed onto in your DAW. Assign its output to either L/R or 1/2 per the above paragraph for monitoring your mix. Assign your Mix Print Track’s Input to be fed from Hardware 3/4 so that it receives the Silver Bullet’s Output. Place your Mix Print Track in “input” 28 SILVER BULLET USER MANUAL and put the track into “record ready”. Again, make sure the Silver Bullets MODE switch is in the “MIX” position. You should now be monitoring “through” the Silver Bullet, into and through your Mix Print Track and out your Monitoring Bus. Hitting “Play” on your DAW should be feeding through the Silver Bullet and returning to your Mix Print Track - which you are monitoring through. Adjust the Silver Bullet to taste, and record your mix through the Silver Bullet back into your session on the “Mix Print Track”. Beyond the obvious above mentioned routing differences - my application notes are pretty similar to the previous 2Bus Insert application notes. (Application Note #1) We’re still dealing with MIXING and having the Silver Bullet on the 2 Mix, so if you haven’t read the previous notes, I’d suggest you might want to go back and peruse them. There’s a lot of good notes and tips in there. Again - EXPERIMENT!!! Switch up your work flow, do something different, try something “wrong”. I mean, why not? In some respects, the whole concept of the Silver Bullet is “wrong” from the purist viewpoint. Something I didn’t touch on in the previous application notes : the VINTAGE mode in the EQ / Tone section. This is a beautiful and subtle part of the Silver Bullets EQ / TONE circuitry. It emulates the (extremely) gentle roll-off in those classic 80-series N consoles that people pay crazy amounts of money to mix on or track through. It can gently soften and smooth out a harsh digital sounding mix, caress your top end, and generally sooth the savage beast when needed. I generally get a mix into the zone first before instantiating it to see if it’s going to work on my mix though, but some like to drop it in right from the start. Either way, it’s pretty special and unique. When using VINTAGE mode, a trick I will sometimes try is to place the VINTAGE mode into the signal path, and then use the HF boost to go up above the VINTAGE curve to play around with the air and HF content. Again, experimentation is key. There is some unique beauty to be found for those willing to experiment. Let’s go back to the MOJO Amp stages now. Generally speaking, you will probably find the need to be a little gentler in the amount of GAIN (“Drive”) on a Mix as compared to processing an individual track. You can often really grind individual tracks (I’m going to talk a little more about that on the “Tracking” application notes), but generally speaking, a mix can be a much more complex and wild beast to tame, so you’ve got to be careful if you’re driving her hard. Many is the time I have been driving a mix pretty hard into the MOJO Amps™ and have gotten the mix exactly where I LOVED it - and without scrutiny, I’ll often get up and head out for a cup of coffee while I print the mix - only to come back and check my mix later and notice there is a little bit of NON-desireable crackle or distortion in one or maybe a couple places in the mix. 29 SILVER BULLET USER MANUAL If this ever happens to you, I’m of course assuming you’re not making the rookie mistake of driving the return A/D on your converters too hard on the input back into your DAW. Right? If you are, then back off the output on the final stage of the last MOJO Amp and you will be good to go. Make sure not to push your mixes TOO hard, and double check (at a lower volume often helps) to make sure you have no crackly distortion in your mixes. As I mentioned in the last application, the more you tweak the gain staging in the Silver Bullet, the more you will zone in on the harmonic changes taking place that shave off transients, increase harmonic distortion, widen the mix, saturate various frequency ranges, and generally “analog-ize” your mix and make it more 3D. Like I said earlier, the A and N paths react differently depending on how you push them, so a setting on the A MOJO Amp will not necessarily equate to the same “vibe” or “mojo” if you set the N MOJO Amp the same. Swapping while mixing between A and N is very easy - DO IT. Often I am surprised how the “other” MOJO Amp is actually better when I thought I already had the best settings for my mix. Don’t forget that you can do quick A/B hardware bypassing to hear your naked digital mix by switching from “MIX” to “TRK/BYP” on the MODE switch. Switching back and forth “hardware bypasses” your mix bus. If you’re not hearing a pretty substantial difference, you may not be driving the Silver Bullet hard enough. That’s it. You’re ready to record your final mix back into your DAW in realtime. 30 SILVER BULLET USER MANUAL For the sake of these hookup diagrams and application notes, we will assume your DAW defaults it’s Monitor Output Bus to either the L/R or the 1/2 hardware outputs of your interface. If you are monitoring out different outputs, please make note of that and ignore our output monitoring suggestions. Of course, you can change any and/or all of these hookup diagram inputs and outputs to suit your particular application, workflow and interface I/O. These are just a suggested starting place so we can discuss things. If you are already using some of the outputs we suggest, just move the Silver Bullet connections accordingly. For this application note, we will assume you are using the Silver Bullet on your Mix bus - either as an insert, or to record back into your DAW on a “Mix Print Track”. So please start by choosing one or the other and setting up your wiring and bussing as discussed in Application Note 1 (2Bus Insert) or Application Note 2 (Recording back into your DAW). After you have done that : Hook up the outputs of your External Device - Keyboard, Synthesizer, Drum Machine, Mic Pre, Mixer, or other electronics to the Silver Bullets L/R Track Inputs. Connect the Silver Bullets Track Outputs to your interfaces A to D Hardware 5/6 Inputs. Add a stereo audio track in your DAW. Set its input to be fed from Hardware 5/6. The output of your record track should be sent to your current Mix pathway. Place the track on “input” and put it into “record ready”. 31 SILVER BULLET USER MANUAL Currently, the Silver Bullet should be in “MIX” mode as you have been using it on your mix bus. Switch the Silver Bullet Mode switch from “MIX” to “TRK/BYP” (Tracking). This will hardware bypass your 2Bus mix (you’ll still hear the mix, but without Silver Bullet processing), and place your external device that you have designated for tracking into the Silver Bullets MOJO Amps™ and EQ for processing. Before interrupting your mix though, it’s a good idea to make mental notes or jot down your settings so that you can recall them after tracking your external device(s). Play your keyboard, drum machine, external mic pre or whatever you have plugged in. You should be hearing it processed by the Silver Bullet. Record your overdub. When you are finished, switch from TRK/BYP mode back to MIX mode and your Mix is once again being processed by the Silver Bullet. Recall your mix settings if necessary. Continue mixing or production monitoring through the Silver Bullet. If you are mixing on the A MOJO Amp, and Tracking off the N MOJO Amp (fairly normal for drBill), all you need to do is switch from MIX to TRK/BYP, and A to N and you’re good to go. Switch back when finished tracking, and there’s no recall necessary on the MOJO Amps™ GAIN and OUTPUT controls. Your Mix will now be fed into the Silver Bullet just as it was before you tracked on the N Amp. I added the “While In Mix Mode” into this particular application note, because for simple applications, the Silver Bullet can be placed “in line” like any other piece of gear and you can record “through” it normally. Just like a compressor, EQ, Mic Pre or any other piece of gear. It’s a no brainer really, and there’s no real need for any application note if you only use it like that. But one of the coolest things about the Silver Bullet is its work flow options. I ALWAYS like to keep it on my mix bus from writing onward, and I’ll switch it into tracking or mic mode on the front panel - and then back - when I need to during the production process. But it’s always on my mix bus if possible. So if you don’t have two Silver Bullets, its unique workflow is worth it weight in gold. Or at least as much as another Silver Bullet. So, for the sake of these application examples, I’m just going to assume you’d like to always keep the Silver Bullet on your mix bus as well. When you are in the writing or production stage of your musical adventures, keep in mind that the Silver Bullet is designed to be the front end - either via Mic Inputs or via its Track Inputs - for everything that enters your DAW. It’s a great way to track things so that they “sound like a record” right from the get-go. You can track Neve and mix API. Or perhaps you prefer to track API and mix Neve. Or maybe you like to track drums, guitars and percussion through API and track Vocals, Synths and Bass on a Neve - then mix on a combo API/Neve console. The possibilities are as endless as your creativity. Put it to work! When you get to the mixing 32 SILVER BULLET USER MANUAL stage of your record, you’ll find that your tracks will be much closer to “sounding like a record” if you track and mic everything through the Silver Bullet on it’s way into your DAW. On a side note - have you ever wondered why your Neve mic pre doesn’t sound like tracking through a Neve console? Or why recording through your API mic pre doesn’t sound like tracking through an API console? That’s because traditional class A discrete analog consoles of yesteryear had a LOT of circuitry, transformers and class A electronics in line AFTER the mic pre and EQ sections. A mic pre alone can’t sound quite like a console for this reason. So……? So don’t neglect trying the Silver Bullet in tracking mode AFTER your external mic pre’s. Yes, I know that is theoretically “wrong”. Ask me if I care. LOL I don’t, because it WORKS. I don’t always do this, but often if I’m looking for a thicker, solid, more 3D image, combining a great tube pre out in front of the Silver Bullet sounds great. Big, phat and muscular. Also, try mixing up the MOJO Amps™ a bit while tracking. A, N, A>N, N>A, different gain and output settings etc. It adds a nice dimensionality back into your processed tracks. 33 SILVER BULLET USER MANUAL For the sake of these hookup diagrams and application notes, we will assume your DAW defaults it’s Monitor Output Bus to either the L/R or the 1/2 hardware outputs of your interface. If you are monitoring out different outputs, please make note of that and ignore our output monitoring suggestions. Of course, you can change any and/or all of these hookup diagram inputs and outputs to suit your particular application, workflow and interface I/O. These are just a suggested starting place so we can discuss things. If you are already using some of the outputs we suggest, just move the Silver Bullet connections accordingly. For this application note, we will assume you are using the Silver Bullet on your Mix bus - either as an insert, or to record back into your DAW on a “Mix Print Track”. So please start by choosing one or the other and setting up your wiring and bussing as discussed in Application Notes 1 (2Bus Insert) or Application Notes 2 (Recording back into your DAW). After you have done that : Make sure the 48V and POL switches on the Silver Bullet are NOT depressed. Hook up the outputs of your microphone (or microphones) to the Silver Bullets L and/or R “Mic Inputs”. 34 Connect the Silver Bullets L and/or R “Tracking Outputs” to your interfaces A to D Hardware 5/6 Inputs. SILVER BULLET USER MANUAL Add a stereo or mono or two mono audio track(s) in your DAW. Set the input(s) to be fed from Hardware 5/6. The output(s) on the record track(s) should be sent to your current Mix pathway. Place the track(s) on “input” and put it into “record ready”. Currently, the Silver Bullet should be in “MIX” mode. Switch the Silver Bullet Mode switch from “MIX” to “MIC or MIC+ mode. MIC+ should be used with low level sources or microphones with low output levels such as ribbons, dynamics (SM7, etc.) For most mics and sources, MIC mode will be sufficient. Switching from MIX to MIC or MIC+ mode will hardware bypass your 2Bus mix (you’ll still hear the mix, but without Silver Bullet processing), and place your microphone(s) into the Silver Bullets MOJO Amps™ (now effectively in Microphone Pre-Amp mode). You will also have the TONE circuitry (EQ) available for processing your microphones. Please note that in MIC and MIC+ modes, the MOJO Amps™ have significantly more gain than in MIX and TRACKING modes. MIC and MIC+ modes are designed specifically for microphone input i.e. : they are now essentially operating as mic pres. Before switching to MIC mode and interrupting your mix, it’s a good idea to make mental notes or jot down your settings so that you can recall them after tracking your external device(s). Select and depress the 48v switch if you are using phantom powered microphone(s). Select POL if the polarity of the input signal needs reversing. (Note that POL reverses the polarity of BOTH microphone inputs - if ONE of your mics is “out of phase” correct it at the source.) Sing or play into the microphone(s). You should be hearing them processed by the Silver Bullet. Choose A, N, A>N, or N>A modes and adjust your GAIN and OUTPUT controls in the MOJO Amps™ as you would normally would with a Mic Pre. For the most transparent mic pre amplification, we suggest starting with the OUTPUT up full, and the GAIN low. Bring up the GAIN up until you have a good level back into your DAW. Raise the GAIN and lower the OUTPUT for a more colored sound. Record your overdub. When you are finished, switch from MIC mode back to MIX mode and your microphones are now bypassed and your Mix is once again being processed by the Silver Bullet. Recall your mix settings if necessary. Continue mixing or production monitoring through the Silver Bullet. Again, the reason I chose this style of workflow hookup is because I ALWAYS want the Silver Bullet on my mix bus. The Silver Bullet CAN be used just like any normal mic pre if desired - straight in, straight out. The Silver Bullet mic pre’s were put under scrutiny for a long time and compared with the best of the best. I think you will find that they compare very favorably with the current leaders in the API and Neve style camps. The input transformers we chose are the best we could find after months of arduous testing, and we have spared no cost in the audio circuitry. The circuitry is not a “clone” 35 SILVER BULLET USER MANUAL of the original circuits, but instead a tip of the hat to the essence of those pre’s while taking the circuitry further into the territory of our MOJO Amp philosophy. The mic pre’s will react pretty much as you would expect them to. GAIN will drive the mic pre harder, generate more 2nd order harmonic distortion as you push it hard, and become more “euphonic” the further and harder you drive it, and the OUTPUT will allow you to attenuate to proper signal level to get back into your DAW or other device(s) following. While I use them constantly in the single MOJO Amp mic modes, where the Silver Bullet really becomes a unique voice is in the cascaded mic pre modes : the A>N and N>A modes. I’ve got dozens of high end mic pre’s of all flavors, but nothing quite like the Silver Bullet in cascaded Mic mode. In cascaded Mic Modes it’s a unique beast, and to the best of my knowledge, there is nothing else like it available at any price. The first time I put a single U47 (MK47) in front of a drum kit, dialed in the N>A mode and started twisting the GAIN knobs, my jaw hit the floor. “That” sound - you know the one - that huge, ever so slightly crunchy, kind of dirty, full of vibe, massively 3D sounding kit was right at my fingertips without even trying. It’s a sound I’ve been looking for for years, but one that I’ve never been able to achieve without a big iron LFAConsole that has lots of gain stages in it. I’ve had dozens of freestanding mic pre’s over the years, and none of them could quite achieve what I got without effort with the Silver Bullet’s cascaded mic modes. I think I spent the next half hour giggling. The cascaded mic pre modes of the Silver Bullet offer an amazing palette of sonics for your microphone audio paintbrush. Be careful though, there’s a LOT of gain on tap. Use it wisely. If you’ve been faithfully reading through all the Silver Bullet application notes, by now you’re probably beginning to realize just how versatile and uniquely useable this box is. Have fun experimenting with your mics and the Silver Bullet. 36 SILVER BULLET USER MANUAL That’s right. The Silver Bullet is perfectly at home on an Analog Console. The Silver Bullet finds itself especially at home on any IC based console - or any console you’d like to add a little “American” or “British” coloration to. For this particular application note you can also substitute “Active Summing Box / Mixer” for Analog Console if your Summing Mixer has a Master 2Bus Insert. If you don’t have a master bus insert, please refer to Application Note 6. For a passive summing mixer, please see application note 7. Use two appropriate bi-directional Send/Return “Y” cables (see drawing in the Silver Bullet Tech Notes section) to connect the L/R Mix Bus Insert of your console to the Silver Bullet L/R Mix In and L/R Mix Out connectors. Please note that some consoles use the ring as send, and the tip as return for their insert send / returns. Other manufacturers use the ring as return and the tip as send. Please check your console’s user manual and build or procure the appropriate cables. Note that unlike the console hookup on application note 6, the Silver Bullet will be present on both the 2Bus Mix output of your console, AND monitored back through the control room monitors in this application. This is the preferred setup if at all possible. Of course it does require the special cabling mentioned above. Patch the Mix Outputs of your console to the inputs of your 2 Track recording device (tape machine, DAW, CDR, etc.), the outputs of your 2 Track recording device to the consoles 2 Track return, and the outputs of your consoles CRM (control room monitor) to your speakers. 37 SILVER BULLET USER MANUAL Note that the Silver Bullet should be in “MIX” mode. You can bypass it from both the Console’s 2Bus Mix Outputs and CRM monitoring outputs by switching the Silver Bullet into “TRK/BYP” mode. Adjust the Silver Bullet to taste using the MOJO Amp and TONE (EQ) sections. As mentioned, you can hardware bypass the Silver Bullet by switching the MODE switch from MIX to TRK/BYP. With this particular application hookup, you will hear the effects of the Silver Bullet on the Mix Outputs of the console, the 2 Track recording device AND through the Control Room Monitor section of the console. I will be parking a Silver Bullet on the 2Bus Insert of both my D&R’s mixing consoles as soon as production starts (which should be now if you’re reading this). It’s a great way to get “that sound” on a transparent or inexpensive transformer-less analog console. It will also work with a digital console that has an Analog Insert path. Once upon a time I wanted a transparent console. I was running tape, fighting noise, distortion, coloration and analog artifacts. That was a different era. Fast forward to the modern world of DAW’s, plugins, ultra transparency and the sterility of digital and I found my console wasn’t optimum for me anymore. I still love the workflow and the ergonomics of working on a console, but the transparency I sought out in the early 1990’s just wasn’t really appropriate for me anymore. I wanted - no, make that needed - more girth and a little hair on the console. But the finances behind music have changed, and I can’t justify the $30k, 40k, 80k, 100k + cost of a classic console when I’ve got a great transparent one sitting right here. And so, Brad and I made sure the Silver Bullet concept was adapted to work well with analog consoles as well. It can be a new lease on life for your console - giving it a dose of mojo that we wanted on all our transparent consoles. A nice side bonus by putting the Silver Bullet on your mix bus is the Metering. It has more high resolution in it’s meters than most console master meters. Dropping a Silver Bullet onto the 2Bus Master Insert of your console is like giving the ‘ol girl a new lease on life. It’s the most inexpensive way out there to give your console a “personality” change depending on your creative muse, your clients’ wishes or the creative need of the music you’re working on…. 38 SILVER BULLET USER MANUAL That’s right. As mentioned in the previous application note, the Silver Bullet is perfectly at home on an Analog Console. The Silver Bullet finds itself especially at home on any IC based or transformerless console - or any console to which you’d like to add a little classic American or British console coloration. For this particular application note you can also substitute “Active Summing Box / Mixer” for Analog Console. For a passive summing mixer, please see Application Note 7. This application note is different from the previous Analog Console method, and should only be used if your console or summing mixer does NOT have a 2Bus Mix Insert. In cases where you DO have a 2Bus Mix Insert, we highly suggest you use application and hookup note 5 as you will get the Silver Bullet on both 2Bus Mix Outputs AND your monitoring via your consoles Control Room Monitor section. As most consoles do have a 2Bus Mix Insert, this particular application note is a little redundant, but we wanted to make sure to cover all your possible bases. Connect the L/R Mix Outputs of your Console or Summing Mixer to the L/R Mix Inputs of the Silver Bullet. Connect the L/R Mix Outputs of the Silver Bullet to the Record Inputs of your Mixdown Device – e.g. tape deck, DAW, CDR, or other 2-track recorder. 39 Monitor the output of your 2-track Mixdown Device as you normally would without the Silver Bullet. SILVER BULLET USER MANUAL Note that the Silver Bullet should be in “MIX” mode. You can bypass it from both the Console’s 2Bus Mix Outputs and CRM outputs by switching the Silver Bullet into TRK/BYP mode. Adjust the Silver Bullet to taste using the MOJO Amp and TONE (EQ) sections. As mentioned previously, you can hardware bypass the Silver Bullet by switching the MODE switch from MIX to TRK/BYP. In this instance, you will need to monitor the mix and Silver Bullet via the L/R Playback Outputs of your Mixdown Device - NOT by the console’s CRM as its “pre” Silver Bullet. Place the device in “input” and “record armed”, and monitor the Playback L/R Outputs of the 2 Track Recording Device. Preferably into a 2 track return of your console. If you don’t have a 2 track return, you’ll have to get creative. Please note that monitoring the CRM (control room monitor) section of your console will NOT allow you to monitor the Silver Bullet unless you can monitor your Mixdown Device via a 2 track return as the Silver Bullet resides downstream from the console in this scenario. That’s why we suggest application and hookup note 5 if possible. Luckily, most consoles have a 2Bus Master Insert. About the only thing I have to say here beyond the previous Analog Console application notes are that you should try to use the previous hookup method if at all possible. The monitoring options alone make it much more flexible. 40 SILVER BULLET USER MANUAL The Silver Bullet has a Folcrom or passive summing box mode designed into it. If you own and or use a passive summing box, you should jumper the Silver Bullet into Folcrom Mode by doing the following: o Unplug the Silver Bullet AC from the wall receptacle. o Remove the top cover of the Silver Bullet by using a small philips screwdriver to remove the 7 screws holding the cover in place. o Locate Jumper J13 as shown in the Servicing section and set it to shunt pins 3 and 4. o Replace the cover, and plug the AC cable back into its AC outlet. Connect the Folcrom or other Passive Summing Mixer’s L/R Mix Outputs to the Silver Bullet’s MIC Inputs. If you haven’t set the jumper to enable Folcrom Mode as mentioned above, do it now. Switch the Silver Bullet MODE switch into MIC or MIC + mode. MIC + will give you approximately 20dB more gain. If you need it, use it. Connect the Silver Bullet L/R Mix Outputs into the L/R Record Inputs of your Mixdown Device (Tape Machine, DAW, Recordable CD, etc.) Monitor the L/R Outputs of your Mixdown Device. Adjust the Silver Bullet MOJO Amps™ and TONE (EQ) circuitry to taste, and print your mix. 41 SILVER BULLET USER MANUAL Note that you will need to monitor the outputs of your Mixdown Device to hear the Silver Bullet and it’s processing. Without getting into the controversial discussion of ITB vs. OTB summing, let me just say that any passive summing box is almost certainly going to need a gain stage following its summing process, and I believe that the Silver Bullet offers more options with it’s metering, hi resolution EQ and MOJO Amps™ than most other solutions out there. Add in its Folcrom mode with the obvious work flow benefits, and it’s a winning combination! 42 SILVER BULLET USER MANUAL For the sake of these hookup diagrams and application notes, we will assume your DAW defaults it’s Monitor Output Bus to either the L/R or the 1/2 hardware outputs of your interface. If you are monitoring out different outputs, please make note of that and ignore our output monitoring suggestions. Of course, you can change any and/or all of these hookup diagram inputs and outputs to suit your particular application, workflow and interface I/O. These are just a suggested starting place so we can discuss things. If you are already using some of the outputs we suggest, just move the Silver Bullet connections accordingly. This application note will show you how to bounce back and forth between MIX mode, TRK/BYP (TRACKING) mode to bounce or “re-amplify” certain mix elements, and back to MIX mode during the mix process. This is drBill’s preferred method of working while mixing. Choose the MIX setup you prefer from application note 1 or 2 - i.e.: Silver Bullet on an Insert on your 2Bus master fader, or recording back into your DAW on a Mix Print Track. Your choice. Please start by choosing one or the other and setting up your wiring and bussing as discussed in Application Note 1 (2Bus Insert) or Application Note 2 (Recording back into your DAW). 43 Connect your interfaces D to A Hardware 3/4 Outputs to the Silver Bullets Mix L/R Inputs. SILVER BULLET USER MANUAL Connect the Silver Bullet Mix L/R Outputs to your interfaces A to D Hardware 3/4 Inputs. Switch the Silver Bullet MODE switch to “MIX”. The Silver Bullet will now be fed from its L/R Mix Inputs, and your mix will exit the Silver Bullet on the L/R Mix Outputs on it’s way back to your DAW. Connect your interfaces D to A Hardware 5/6 Outputs to the Silver Bullets Tracking L/R Inputs. Connect the Silver Bullets Tracking L/R Outputs to your interfaces A to D Hardware 5/6 Inputs. When switching the Silver Bullet to Tracking mode (TRK/BYP), the Silver Bullet will be fed by Hardware Outputs 5/6 and return to your DAW on Hardware Inputs 5/6 for the bouncing various mix elements. For this example we will be mixing through the A MOJO Amp, and bouncing Bass through the N MOJO Amp. Make sure the Silver Bullet is in MIX mode, and that the MOJO Amp is set to A. Start your mix and get it into “the zone”. At some point during the mix, I/we have decided to re-amp the Bass - sending it out to the Silver Bullet to put a little “hair” on it. We have decided to use the N setting for it’s “big bottom”. Add a new track next to your Bass track. Name it “Bass SB” or “Bass R-A” (Bass Silver Bullet or Bass Re-Amp) - or whatever makes sense to you. Re-assign the output of the original Bass track from it’s current assignment into the mix path, and send it out Hardware 5/6. On the new track that we will use to record the re-amped bass, set it’s output to the current mix path, and it’s input to Hardware 5/6. Place the track on “input” and “record arm”. Switch the Silver Bullet to Tracking mode (TRK/BYP), and switch the MOJO Amp to “N”. Hit “play” on your DAW and you should hear the Mix - no longer affected by the Silver Bullet. Instead the Bass is now feeding the Silver Bullet’s Mojo sections. Adjust the N MOJO Amp to taste, and adjust it’s output to be an appropriate level for your new bass tracks input level. Add TONE if you want to EQ the bass. Drive it (GAIN) as hard as you like, and re-record back into your new track in the DAW. As you mix, you can switch back and forth between MIX and TRK/BYP modes, bouncing various mix elements to give them different flavors. This is my preferred method of using the Silver Bullet. I mean, I use the Silver Bullet for all its functions, but I generally leave it set up like this. It’s easy to switch to MIC mode, into MIX mode, over to Tracking (TRK/BYP) mode (re-amp tracking) and back - all day long - without re-patching anything in my patch bay. Since I do almost all my own mixing, I start building towards mix right from the writing stage with the Silver Bullet. Building, tweaking, getting the sounds right as they go in, sometime re-affecting them as 44 SILVER BULLET USER MANUAL things change or get added. I’m not scared of multiple AD/DA “generations”. I try to build a track so that it sounds like a record right from the get go - and the Silver Bullets workflow has become crucial for my production process in a digital world. At this stage of the application notes, I think it’s important and appropriate to note that you can get away with driving individual tracks much harder than you can a Mix, and that leads me to a story I’d like to share - as it applies to the re-amping/bouncing aspect of the Silver Bullet. Really, it is the story of another lightbulb going off for me. It’s when I started on the journey that ultimately led to the creation of the Silver Bullet. Early 2000’s. I was past the tape / console stage of life, and was now mixing with a DAW - either OTB on my console, Hybrid or sometimes completely ITB. On this particular day, I was mixing a hybrid orchestra / rhythm section project for a composer friend of mine. The string elements of the mix I received had some distortion on them and I contacted my buddy and asked him to reprint the strings at a lower level. I told him that I would keep mixing with the distorted strings as a placeholder until he could get me the clean replacements. Now mind you, these tracks were pretty distorted. No respectable engineer would have let them out the door without a fight, but we were in the midst of an incredible time crunch, and somehow they got past the composer. At any rate, I was trying to stay on schedule and I kept mixing. When I got the replacement strings I was done with the mix, so I dropped the new strings in, level matched them, copied over the automation…..and then spent the next half hour or so futzing, tweaking, EQing, changing reverbs, and generally wondering why they didn’t sound good to me anymore. I mean, they were clean now with no distortion. They should sound better - right? Why didn’t’ they feel good anymore? Why didn’t they sit in the mix? Why did the old distorted strings sound better? It was then that the lightbulb came on for me. Distortion, Saturation, Dirt - call it what you like - often HELPS individual elements sit better in digital mixes. Doh!!! A hard lesson for me to learn after I had spent most of my adult production life fighting it. That fight made sense during the tape / console stage of my life, because no matter how hard we fought it, tape and analog electronics always left their imprint on the audio. (Some called it mojo, but a lot of old timers called it “the enemy” because it didn’t come back sounding like it did “in the room”.) But here we are in the digital age and now things are completely different. Same war, different battle. We find ourselves in a completely different recording paradigm - and we need to re-learn how to record all over again. And we need new tools! Digital is sterile, clean and non-distorted (at least if you “know what you’re doing”). And now we find that the Analog mojo that we have grown up with and loved has been erased out of our modern digital recordings. Digititus. The new enemy. If you’re adding back in distortion, saturation, etc. to a particular track, it might not sound so pristine and great when solo’d - but when it comes time to mix, I often find a saturated track sits so well inside the mix. Why? If you’ve come this far and purchased a Silver Bullet, I think you already know why. When it’s mix time and the gloves come off, nothing is sacred, and experienced mix engineers who are in demand know how to make a dirty little secret work in their favor….. Saturation. It works. Almost like EQ. Or a magic potion. It helps elements sit down into a mix without poking out. It adds to the vibe of the track. It helps tame transients that sound un-natural. It helps give the track “street cred”. It puts that euphonic 3D back into a track. 45 SILVER BULLET USER MANUAL It makes mixing e a s i e r. So - don’t be afraid to take the gloves off and use the Silver Bullet to slap some individual mix elements around. Hit ‘em. Hard. Put the grease back into your mix elements. Saturate the $#!^ out of them when appropriate. Now, don’t get me wrong. I’d don’t always distort everything, and there are always “levels” of saturation. What I call distortion, you might call “analog sounding” or “rolled off on the high end” or “warm” or “3D”. But call it what you like, it’s a cool sound that harkens back to analog recording days, and it smooths away DIGITITUS like nothing else To my ears, things just sound more natural when you employ it. So the question then becomes : a little or a lot? That depends on your esthetic and what the what the music is asking for. And that’s the beauty of it - it’s a journey that’s always changing. Just remember, too much really is too much. And too little is not enough. Find your happy spot. The Silver Bullet can make your record sound like a trashy thrash Indie mix, or it can gently push it into a euphonic 3D vibe perfectly suitable for a high end jazz project. It’s all about the gain staging. Enjoy the Silver Bullet. It’s fun, and it’s a journey. Learn to make it sing. Your mixes will be better for it. 46 SILVER BULLET USER MANUAL 47 SILVER BULLET USER MANUAL Louder Than Liftoff LLC warrants this product to be free of manufacturing defects in materials and workmanship for a period of one (1) year from the date of purchase. Louder Than Liftoff LLC’s sole obligation under this warranty shall be to remedy any defect identified within such one year period by, at its option, repairing or replacing the product without charge. The warranty is not transferable and applies only to the original end user purchaser of the product. All warranties expressed or implied made by Louder Than Liftoff LLC, including warranties of merchantability and fitness, are limited to the period of this warranty. Louder than Liftoff LLC is not responsible for indirect, incidental or consequential damages arising from the use or failure of this product, including injury to persons or property. This warranty does not cover damage due to: misuse, abuse, modification, accident, negligence, or shipping. The warranty does not apply if the unit is repaired or altered by persons unauthorized by Louder Than Liftoff LLC in such a manner as to injure, in Louder Than Liftoff LLC’s sole judgment, the performance, stability or reliability of the unit. The warranty does not apply if the unit is connected, installed or used otherwise than in accordance with the instructions furnished by Louder Than Liftoff LLC. If the equipment requires warranty repair, return authorization must be obtained from Louder Than Liftoff LLC prior to shipment by emailing [email protected] or calling 408-686-9585. Equipment should not be shipped to Louder Than Liftoff LLC until return authorization and the proper shipping address is obtained from us. The equipment (with all its components parts and connecting cables) must be suitably packaged preferably within its original box, including a note with the owner's name, address, telephone number and a description of the reason for return. The owner pays two-way shipping (we recommend Fedex), and we suggest that the shipment be insured for its full value. This limited warranty is in lieu of all other warranties, expressed or implied, and no representative or person is authorized to represent or assume for us any liability in connection with the sale of our products than set forth herein. This limited warranty gives you specific legal rights, and you may also have other rights which vary from state to state. 48 SILVER BULLET USER MANUAL The Silver Bullet was the collaborative work of a team of talented and dedicated music lovers over the course of three years. The following people contributed to creating this product: William “drBill” Pearson Brad McGowan Kyle McGowan John Petrucelli Olga Gomelskaya Madison Smith Justin Ulysses Morse Eric Strouth Benny Grotto 49 SILVER BULLET USER MANUAL 50 SILVER BULLET USER MANUAL