1
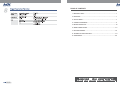
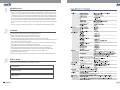
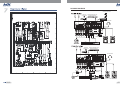
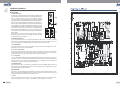
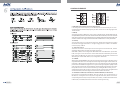
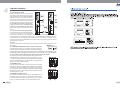
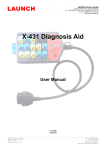
USER' S MANUAL
NF03522-1.0
TABLE OF CONTENTS
1. INTRODUCTION.......................................................................1
2. FEATURES...............................................................................1
3. USEFUL DATA...........................................................................1
4. CONTROL ELEMENTS................................................................3
5. INSTALLATION TIPS ................................................................14
6. WIRE CONNECTIONS...... ........................................................15
7. BLOCK DIAGRAM ...................................................................16
8. TECHNICAL SPECIFICATION.....................................................18
9. GUARANTEE .........................................................................20
INTRODUCTION
Thank you for purchasing the MX series MX.22 / 2FX & MX.26 / 2FX mixing console. The
MX.22 / 2FX mixing console is packed with some features that can not be found in other
consoles of its size: 4 mono (these are provided with ultra low noise microphone preamplifiers and phantom power at +48V) and 2 stereo input channels (4 channels for MX.26/2FX )
and each of them is provided with warm, natural EQ; 2-Track inputs assign-able to Main mix,
Phones / Control Room outputs etc. Besides, the 24-bit effect processor with 256 effects.
Please read this manual carefully so you can take advantages of all the features of the MX
series.
Thank you again for making the right choice in purchasing the TOPP PRO MUSIC GEAR.
FEATURES
4 mono inputs with gold plated XLR and Balanced TRS jack
2 (4 for MX.26/2FX) stereo inputs with Balanced TRS jack
GAIN control and +48V phantom power for mono inputs
3-band EQ (plus 75Hz low cut filter) on all mono channels (For MX.22/2FX)
3-band EQ with sweepable MID (plus 75Hz low cut filter) on all mono channels and 4-band
EQ on stereo channels (For MX.26//2FX)
2 AUX sends: AUX1 with PRE / POST-fader switch for monitoring, AUX2 POST-fader for
effect sends can be changed in PRE-fader for monitoring
Each input channel features MUTE/ALT3-4, SOLO switches and OL LED (MX.22/2FX)
MUTE, SUB1-2 and L-R assign switches, SOLO switches and OL LED (MX.26/2FX)
2-Track IN/OUT with discrete switches for routing to Control Room and to Main Mix
Two different ways of SOLO PFL/AFL for a better control over signal path
Balanced XLR & TRS jack output
24-bits internal DSP with 256 effects (16 presets by 16 variations), DSP MUTE & Peak LED
USEFUL DATA
Please write your serial number here for future reference.
Serial Number:
Data of Purchase:
Purchased at:
HOOKUP DIAGRAM
STAGE MONITORS
MIC1
MIC2
WIRELESS MONO IN/STEREO OUT
MICROPHONE
BEVER(OPTIONAL)
MX . 26/2FX
HEADPHONE
MODEL
SERIAL
L
1
1
3
1
R
2
2
4
2
CTRL RM
OUT
SUB
OUTS
AUX
SEND
FOOTSW
R
L
TIP SEND/RING RTN
POWER
MAIN OUTS(BAL/UNBAL)
PHONES
CHANNEL INSERTS
USB PLAYER
L
L
00
MP3
MONO
R
R
USB REP
03 :08
ALL
TAC-MP3-T
AUX RETURN
GAIN
GAIN
75Hz
GAIN
75Hz
GAIN
75Hz
+4
-10
75Hz
POWER
(Push & Hold)
FX RETURN
+4
-10
+4
-10
LINE
MP3
DRUM MACHINE
CD PLAYER 1
MIC1
KEYBOARD
MIC2
ACTIVE SPEAKERS
DAT RECORDER
WIRELESS MONO IN/STEREO OUT
MICROPHONE
BEVER(OPTIONAL)
MX . 26/2FX
HEADPHONE
MODEL
SERIAL
FOOTSW
R
L
1
1
3
1
R
2
2
4
2
CTRL RM
OUT
SUB
OUTS
AUX
SEND
L
TIP SEND/RING RTN
POWER
MAIN OUTS(BAL/UNBAL)
PHONES
CHANNEL INSERTS
USB PLAYER
L
L
00
MP3
MONO
R
R
USB REP
03 :08
ALL
TAC-MP3-T
AUX RETURN
GAIN
GAIN
75Hz
GAIN
75Hz
GAIN
75Hz
75Hz
DI BOX
GUITAR
+4
-10
POWER
(Push & Hold)
FX RETURN
+4
-10
+4
-10
LINE
MP3
DIGITAL AUDIO
INTERFACE
KEYBOARD
DIGITAL AUDIO
WORKSTATION
DRUM MACHINE ACTIVE STUDIO MONITORS
CONTROL ELEMENTS
FRONT PANEL
1- Mono MIC Input
The MX series is equipped with 4 low-noise mic preamplifiers with
optional phantom power providing up to 50 dB of amplification.
You can connect almost any type of microphone. Dynamic
microphones don't need phantom power. Use phantom power
only with condenser microphones but make sure that the phantom
power switch is disengaged before connecting the microphone.
Phantom power will not damage your dynamic microphones but
it may damage tube or ribbon microphones so make sure to read
the microphone instructions manual before engaging phantom
power switch. There are also equipped with 1 / 4" TRS balanced
and TS unbalanced LINE IN plug, you can connect with line-level
instruments, such as synthesizers, key-boards, drum machines or
effect devices.
NOTE: Never try to connect a line-level signal to the XLR MIC
input when the phantom power is engaged, doing this you may
seriously damage your equipment.
2- STEREO LINE INPUTS
1
3
4
GAIN
75Hz
2
LINE
MP3
5
6
They are organized in stereo pair and provided with1/4" TRS jacks. It is used to connect the
stereo device, plug both the left input and the right input. Using the left input if connect a
mono input signal to the STEREO INPUT, the signal will appear on both sides.
3- GAIN CONTROL
This GAIN control is used to control the input sensitivity of the MIC and LINE inputs. The
adjustable range goes from 0 dB to 50 dB.
4- 75 Hz Low-Cut Switch
By pressing this button you will activate a 75 Hz low frequency filter that cuts the bass
frequency below 75 Hz. You can use this switch to reduce the hum noise caused by the
mains power supply, or the stage rumble while using a microphone.
5- +4/-10 Switch
+4/-10 switches are used to select the input sensitivity of the line inputs on the stereo
channels. +4 dBu is suitable for professional audio devices and -10 dBv is suitable for
general devices. If not sure to use which setting, try +4 dBu first, then change it to
-10 dBv if the volume is too small to be satisfied.
6- LINE/MP3 Switch
By pressing this button, it will switch to the MP3 mode, then the MP3 signal can be sent
to this channel or the Main Mix channel; by releasing this button, LINE IN inputs signal
will send to the line input channels.
EQUALIZATION
The MX.22 / 2FX is equipped with 3-band EQ on all the channels while the MX.26 / 2FX
has 3-band EQ with sweepable MID on all mono channels and 4-band EQ on stereo
channels. All bands provide up to 15 dB boost or cut.
7- HIGH
This is the treble control. You can use it to get rid of high frequency of the human voice.
The gain range goes from -15 dB to +15 dB with a centre frequency of 12 kHz.
3
CONTROL ELEMENTS
7
7
600
8
9
MID
FREQ
100
MID
3kHz
9
MID
500Hz
9'
8k
9
10
10
MX.22/2FX
MX.26/2FX
8- MID FREQ (Only for Mono Channels of MX.26/2FX)
It can change the center frequency for the MID EQ filter. From this knob you can more
accurately select the band of frequency that you want to boost or cut. The ranges goes from
100 Hz to 8 kHz.
9- MID EQ
This control provides 15 dB boost or cut at 2.5 kHz on the MX.22/2FX. The MX.26/2FX has one
sweepable MID EQ controls on the mono channels and two discrete MID EQ on the stereo channels
with center frequencies at 3 kHz and 500 Hz(9'), the midrange frequencies include the upper male
and lower female vocal ranges,and the fundamentals and harmonics for many instruments.
10- LOW EQ
This is the bass control. It is used to boost male voice, kick-drum or bass guitar. Your system
will sound much bigger than what it is. The gain range goes from -15 dB to +15 dB with a
center frequency of 80 Hz.
11- AUX Send Controls
These two controls are used to adjust the level of signal sent to AUX bus 1&2, and this
adjustment doesn't effect the main mix output signal at all.
AUX SEND1 ( MON ) can be configured as PRE / POST fader via the PRE switch. Up for POST
fader, the signal is sent out after the channel fader and will be affected by the channel
fader. Down for PRE fader, the signal is sent out before the channel fader and will not be
affected by the channel fader. AUX 2 (FX) is configured as POST fader.
12- PAN/BAL
Abbreviation of PANORAMA control for mono channels,for the stereo channels, always
says, BALANCE control. You can adjust the stereo image of the signal via this control. For
mono MIC / LINE channels, keep PAN control in centre position and your signal will be
positioned in the middle of stage that is to say the mono signal appears equally in both
sides. Turn this control fully counterclockwise and the signal will be present only on the
left speaker and vice-versa. For stereo channels, by rotating the BAL control, you can
attenuate the signal of left or right. It means if turn the control to left, the right channel
will be attenuated; if turned to right, the left channel will be attenuated.
13- MUTE/ALT3-4 SWITCH (For MX.22/2FX) and MUTE SWITCH (For MX.26/2FX)
Each channel is equipped with the MUTE / ALT3-4 ( in MX.22 / 2FX ) or MUTE switch ( in
MX.26/2FX ). Pressing this switch is equal to turning the fader down, which can mute the
corresponding channel output except for SOLO (in PFL mode), the MUTE LED will illuminate.
In MX.22/2FX , the MUTE/ALT3-4 switch can also be used for signal routing.
4
CONTROL ELEMENTS
14- SOLO SWITCH & OL LED
When pressing this switch, the OL LED will
11
illuminate and the SOLO signal will replace
11
other signals and reach to the CONTROL ROOM/
PHONES. Usually use the SOLO function to
12
12
preview each channel before they are get into
the mix. You can solo more than one channel
13
13
at a time. And the soloed channels are sent to
the CONTROL ROOM, PHONES, and LED display.
Engaging the SOLO switch, all CONTROL ROOM
14
14
SOURCE selections MAIN MIX, CD/TAPE, ALT3-4
15
( MX.22/2FX ) & SUB1-2 ( MX.26/2FX ) will be
muted.
15- 1-2 & L-R Switches(only for MX.26/2FX)
16
16
Each channel provides two assignment switches:
CH1
1-2, and L-R. Pressing the 1-2 will assign the
CH1
MX.22/2FX
MX.26/2FX
channel signal to SUB1-2, you can depend on the PAN / BAL control to adjust the amount of
channel signal sent to the SUB1 versus SUB2, when turns the PAN/BAL to completely left, then
the signal can be only controlled by SUB1 and vice-versa. In the same way, pressing the L-R will
assign the channel signal to MAIN MIX L-R. This switch must be engaged in to get the channel's
signal through to main outs.
PRE
PRE
MUTE
MUTE
ALT
10
OL
OL
10
5
5
0
SOLO
0
1-2
5
-5
10
-10
L-R
20
-20
30
-30
40
50
60
SOLO
-40
-50
-60
16- Fader
This control will adjust the overall level of this channel and set the amount of signal sent to the
17
main output.
SUB ASSIGN
TO MAIN MIX
17- SUB ASSIGN TO MAIN MIX Switches (only for MX.26/2FX)
Through these switches, you can operate the SUB1-2 faders as
L
R
L
R
a master control for assigning the SUB 1-2 to MAIN MIX. Engage
the LEFT switch to send the corresponding sub signal to MAIN MIX L, and the RIGHT switch
for MAIN MIX R. When engaging the both switches, the signal will be sent to L/R of MAIN MIX.
18- ALT3-4 Master Faders (MX.22/2FX) & SUB1-2 Master Faders (MX.26/2FX)
These faders are used to control the levels of signal that send
to the ALT3-4OUT / SUB1-2 OUT. The range goes from - to
MX.22/2FX
+10 dB. By pushing in the MUTE/ ALT3-4 switch(for MX.22/2FX)
& SUB 1-2 ASSIGN switch ( for MX.26/2FX ), the signals will
appear at the ALT3-4/SUB1-2 OUTS.
12- INPUT 2 2BUS MIXER WITH DIGITAL EFFECTS
19- MAIN MIX Faders
These two faders set the level of main mix signals sent to the Main
Outputs, Tape Outputs, CONTROL ROOM, PHONES, and LED display.
Note: When connecting a speaker to the speaker output jacks on
rear panel, please pay more attention to the level setting for avoiding
damaging the speaker. Generally, the faders will be positioned
between 0 dB (U) & +5 dB.
20- MASTER AUX SEND Controls
Both knobs are used to determine the master AUX SEND levels. The
adjustable range is from - to +15 dB. When the external effect
unit connected to mixer has no input gain control, you can get a
further +15 dB gain available from these AUX SEND outputs.
5
10
10
10
10
5
5
5
5
0
0
0
0
5
5
5
5
10
10
10
10
20
20
20
20
30
30
30
30
40
50
60
40
50
60
40
50
60
40
50
60
ALT 3
ALT 4
MAIN MIX
18
19
MX.26/2FX
16-INPUT 2/2BUS MIXER WITH DIGITAL EFFECTS
10
10
10
10
5
5
5
5
0
0
0
0
-5
-5
-5
-5
-10
-10
-10
-10
-20
-20
-20
-20
-30
-30
-30
-30
-40
-50
-60
-40
-50
-60
-40
-50
-60
-40
-50
-60
SUB 1
SUB 2
18
MAIN MIX
19