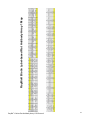
1
RayBio Label-Based (L-Series) Rat Antibody Array 90 (L-90) Patent Pending Technology User Manual (Revised May 14th, 2015) For the simultaneous detection of the relative expression of 90 (L-90) rat proteins in serum, plasma, cell culture supernatants, cell/tissue lysates or other body fluids. L-Series Rat Antibody Array L-90 Cat# AAR-BLG-4 (4 Sample Kit) Cat# AAR-BLG-8 (8 Sample Kit) Please read manual carefully before starting experiment Your Provider for Excellent Protein Array Systems and Services Tel: (Toll Free) 1-888-494-8555 or +1-770-729-2992; Fax: +1-770-206-2393; Website: www.raybiotech.com Email: [email protected] RayBiotech, Inc TABLE OF CONTENTS Introduction and How It Works……...………...... Materials Provided………………………….…… A. Storage Recommendations…………….…….. B. Additional Materials Required………………. III. Overview and General Considerations…….……. A. Preparation and Storage of Samples…………. B. Handling the Glass Slides…….……….…..…. C. Glass Slide Layout…………….…………..…. D. Incubation and Washes………………………. IV. Protocol…………………………………………... A. Dialysis of Sample.…………………..……..... B. Biotin Labeling of Sample ………..…………. C. Drying of the Glass Chip.……………..…....... D. Blocking and Incubations…............................. E. Fluorescence Detection….…….……….…...... V. Antibody Array Map….…….……….................... VI. Interpretation of Results………………….……… VII. Troubleshooting Guide………………………...... VIII. Selected References……………...….…….......... I. II. RayBio® L-Series Rat Antibody Array L-90 Protocol 2 3 3 4 4 4 7 8 8 9 9 9 12 13 16 18 20 24 25 1 I. Introduction Recent technological advances by RayBiotech have enabled the largest commercially available antibody array to date. With the L-Series Antibody Array 90, researchers can now obtain a broad, panoramic view of cytokine expression. The expression levels of 90 rat target proteins can be simultaneously detected, including cytokines, chemokines, adipokine, growth factors, angiogenic factors, proteases, soluble receptors, soluble adhesion molecules and other proteins in cell culture supernatants, serum and plasma. The first step in using the RayBio® L-Series Rat Antibody Array 90 is to biotinylate the primary amine of the proteins in serum or plasma samples, cell culture supernatant, cell lysate or tissue lysate. The glass slide arrays are then blocked, just like a Western blot, and the biotin-labeled sample is added onto the glass slide, which is pre-printed with capture antibodies, and incubated to allow for interaction of target proteins. Streptavidin-conjugated fluorescent dye (Cy3 equivalent) is then applied to the array. Finally, the glass slide is dried, and laser fluorescence scanning is used to visualize the signals. RayBio® L-Series Rat Antibody Array L-90 Protocol 2 II. Materials Provided A. Storage Recommendations Upon receipt, the kit should be stored at -20°C until needed. Please use within 6 months from the date of shipment. After initial use, remaining reagents should be stored at 4°C to avoid repeated freeze-thaw cycles (may be stored for up to 3 months, Labeling Reagent, Item B should be fresh preparation before use). Unused glass slides should be kept at -20 °C and avoid repeated freezethaw cycles (may be stored for up to 6 months). RayBio® L-Series Rat Antibody Array 90 ITEM A B D E F G H I J K L N/A M DESCRIPTION Dialysis Vials Labeling Reagent Stop Solution ® RayBio L-series Rat Antibody Array L-90 Glass Slides* Blocking Buffer 20X Wash Buffer I 20X Wash Buffer II Cy3-Conjugated Streptavidin** Adhesive Plastic Strips Labeling Buffer Floating Dialysis Rack 2X Cell Lysis Buffer*** 30 ml Centrifuge Tube Cat#: AAR-BLG-1-4 Cat#: AAR-BLG-1-8 8 vials 2 vials 16 vials 4 vials 1 vial (50 μl) 1 L-90 Slide 2 L-90 Slides 1 bottle (8 ml) 1 bottle (30 ml) 1 bottle (30 ml) 1 vials bottle (8 ml) 1 bottle (30 ml) 1 bottle (30 ml) 2 vials 1 bottlel (8 ml) 1 rack 1 bottle (10 ml) 1 tube *Each slide contains 4 identical subarrays **HiLyte PlusTM 532 ***Only needed if testing cell or tissue lysates RayBio® L-Series Rat Antibody Array L-90 Protocol 3 B. Additional Materials Required Distilled or de-ionized water KCl, NaCl, KH2PO4 and Na2HPO4 Small plastic or glass containers Orbital shaker or oscillating rocker Beaker, stir plate and stir bar 1 ml tube Pipettors, pipette tips and other common lab consumables Laser scanner for fluorescence detection (list available online) Aluminum foil III. Overview and General Considerations A. Preparation and Storage of Samples 1) Preparation of Cell Culture Supernatants Seed cells at a density of 1x10⁶ cells in 100 mm tissue culture dishes (*). ● Culture in complete culture medium for ~24–48 hours (**). ● Replenish with serum-free or low-serum medium such as 0.2% FCS/FBS serum, and then incubate cells again for ~48 hours (**, †). Recommended using membrane-based array if using high serum medium such as 10% FCS/FBS, the glass slide arrays tend to have extremely high background for high serum containing media samples. ● To collect supernatants, centrifuge at 1,000 g for 10 min and store as ≤1 ml aliquots at -80°C until needed. ● RayBio® L-Series Rat Antibody Array L-90 Protocol 4 ● Measure the total wet weight of cultured cells in the pellet and/or culture dish. You may then normalize between arrays by dividing fluorescent signals by total cell mass (i.e., express results as the relative amount of protein expressed/mg total cell mass). Or you can normalize between array by determining cell lylate concentration using a total protein assay (BCA Protein Assay Kit, Pierce, Prod# 23227). Note: * The density of cells per dish used is dependent on the cell type. More or less cells may be required. ** Optimal culture time may vary and will depend on the cell line, treatment conditions and other factors. † Bovine serum proteins produce detectable signals on the RayBio® L-Series Rat Antibody Array 90 in media containing serum concentrations as low as 0.2%. When testing serum-containing media, we strongly recommend testing an uncultured media blank for comparison with sample results. 2) Extracting Protein from Cells ● For attached cells, remove supernatant from cell culture, wash cells twice with cold 1X PBS. For suspension cells, pellet the cells by centrifuging using a microcentrifuge at 1500 rpm for 10 min. ● Make sure to remove any remaining PBS before adding 1X RayBio® L-Series Rat Antibody Array L-90 Protocol 5 Cell Lysis Buffer (2X Cell Lysis Buffer should be diluted 2 fold with deionized or distilled water). Solubilize the cells at 2x10⁷ cells/ml in 1X Cell Lysis Buffer. ● Pipette up and down to resuspend cells and rock the lysates gently at 2–8 °C for 30 minutes. Transfer extracts to microfugetubes and centrifuge at 13,000 rpm for 10 min at 2-8 °C *. ● Transfer supernatant to a clean tube. Determining cell lylate concentration using a total protein assay (BCA Protein Assay Kit, Pierce, Prod# 23227). Aliquot the lysates and store at – 70°C. Note *: If the supernatant appears to be cloudy, transfer the supernatants to a clean tube, centrifuge again at 13,000 rpm for 20 minutes at 2-8°C. If the supernatant is still not clear, store the lysate at -70°C for 20 minutes. Remove from the freezer, immediately centrifuge at 13,000 rpm for 20 minutes at 2-8°C. 3) Extracting Protein from Crude Tissue ● Transfer approximate 100 mg crude tissue into a tube with 1 ml 1X Cell Lysis Buffer (2X Cell Lysis Buffer should be diluted 2 fold with deionized or distilled water). ● Homogenize the tissue according to homogenizer manufacturer instructions. ● Transfer extracts to microcentrifuge tubes and centrifuge for 20 min at 13,000 rpm (4°C). ● Transfer supernatant to a clean tube and store at – 70°C. Note *: If the supernatant appears to be cloudy, transfer the RayBio® L-Series Rat Antibody Array L-90 Protocol 6 supernatants to a clean tube, centrifuge again at 13,000 rpm for 20 minutes at 2-8°C. If the supernatant is still not clear, store the lysate at -70°C for 20 minutes. Remove from the freezer, immediately centrifuge at 13,000 rpm for 20 minutes at 2-8°C. B. Handling the glass slides The microarray slides are delicate. Please do not touch the array surface with pipette tips, forceps or your fingers. Hold the slides by the edges only. Handle the slides with powder-free gloves and in a clean environment. Do not remove the glass slide from the chamber assembly until step 19, and take great care not to break the glass slide when doing so. Remove reagents/sample by gently applying suction with a pipette to corners of each chamber. Do not touch the printed area of the array, only the sides. RayBio® L-Series Rat Antibody Array L-90 Protocol 7 C. Layout of Rat L-90 Glass Slide Two or four identical sub-arrays on one slide 2 Subarray 4 Subarray Blank D. Incubations and Washes Cover incubation chamber with a Plastic Adhesive Strip (Item J) to prevent evaporation during incubation or wash steps, particularly those lasting 2 hours or longer. During incubation and wash steps avoid foaming and be sure to remove all bubbles from the sub-array surface. Perform all incubation and wash steps under gentle rotation or rocking motion (~0.5 to 1 cycle/sec). Wash steps in Wash Buffer II and all incubation steps may be performed overnight at 4°C. Avoid cross-contamination of samples to neighboring wells. To remove Wash Buffers and other reagents from chamber wells, you may invert the Glass Slide Assembly to decant, and aspirate the remaining liquid. Unlike most Cy3 fluors, the HiLyte Plus™ 532 used in this kit is very stable at RT and resistant to photobleaching on the RayBio® L-Series Rat Antibody Array L-90 Protocol 8 hybridized glass slides. However, please protect glass slides from directly strong light and temperatures above RT. IV. Protocol Assay Diagram 1. Cell culture supernatants or cell/tissue lysates*. 2. Serum or plasma * If using cell or tissue lysates start at step 2. “Dialysis of sample” A. Dialysis of Sample Note: Samples must be dialyzed prior to biotin-labeling (Steps 5–7). 1. To prepare dialysis buffer (1X PBS, pH=8.0), dissolve 0.6 g KCl, 24 g NaCl, 0.6 g KH2PO4 and 3.45 g Na2HPO4 in 2500 ml de- RayBio® L-Series Rat Antibody Array L-90 Protocol 9 ionized or distilled water. Adjust pH=8.0 with 1M NaOH and adjust final volume to 3000 ml with de-ionized or distilled water. 2. Add each sample into a separate Dialysis Tube (Item A). Load 200 μl cell culture supernatant* or 100 μl cell lysates or tissue lysate (1~2 mg/ml total protein) or 20 μl serum or plasma + 80 μl 1X PBS, pH=8 (5-fold dilution. Carefully place Dialysis Tubes into Floating Dialysis Rack (Item L). 3. Place Floating Dialysis Rack into ≥500 ml dialysis buffer in a large beaker. Place beaker on a stir plate and dialyze, for at least 3 hours at 4°C, stirring buffer gently. Then exchange the 1X PBS buffer and repeat dialysis for at least 3 h at 4°C. Transfer dialyzed sample to a clean eppendorf tube. Spin dialyzed samples for 5 min at 10,000 rpm to remove any particulates or precipitants, and then transfer the supernatants to a clean tube. Note: The sample volume may change during dialysis. Note: Dialysis procedure may proceed overnight. Note: Determine the total protein concentration for cell culture supernatants or cell/tissue lysate after dialysis procedure (Step 3). We recommended using a BCA total protein assay (eg, Pierce, Catalog # 23227). B. Biotin-labeling Sample RayBio® L-Series Rat Antibody Array L-90 Protocol 10 Note: Amines (e.g., Tris, glycine) and azides quench the biotinylation reaction. Avoid contaminating samples with these chemicals prior to biotinylation. 4. Immediately before use, prepare 1X Labeling Reagent. Briefly spin down the Labeling Reagent tube (Item B). Add 100 µl 1X PBS into the tube, pipette up and down or vortex slightly to dissolve the lyophilized reagent. 5. Add 1X Labeling Reagent to dialyzed samples. a) For labeling cell culture supernatants: transfer 180 μl dialyzed sample into a new tube. Add 36 μl of 1X Labeling Reagent Solution per 1 mg total protein in dialyzed cell culture supernatant. Mix well. For example, if sample’s total protein concentration is 0.5 mg/ml you need to add 3.24 µl 1X Labeling Reagent to 180 μl dialyzed sample. b) For labeling serum or plasma: Add 22 μl of 1X Labeling Reagent Solution into a new tube containing 35 μl* dialyzed serum or plasma sample and 155 μl Labeling Buffer (Item K). Note *: To normalize serum/plasma concentrations during biotinylation, measure sample volume before and after dialysis. Then adjust the volumes of dialyze serum/plasma and Labeling Buffer to compensate (to keep same total protein amount and total volume). For example, if serum /plasma sample volume increased from 100 μl to 200 μl, add 70 μl dialyzed serum and 120 μl Labeling Buffer to RayBio® L-Series Rat Antibody Array L-90 Protocol 11 keep same total volume, 212 ul. c) For labeling cell or tissue lysates: transfer 30 µg (15 μl of 2 mg/ml) cell or tissue lysates into a tube and add labeling buffer (Item K) for a total volume of 300 μl. Then add 3.3 μl of 1X Labeling Reagent Solution. 6. Incubate the reaction solution at room temperature with gentle rocking or shaking for 30 min. Mix the reaction solution by gently tapping the tube every 5 min. 7. Add 3 μl Stop Solution (Item D) into each reaction tube and immediately dialyze as directed in Steps 2–3. Note: Biotinylated samples can be stored at -20°C or -80°C until you are ready to proceed with the assay. C. Drying of the Glass Slide 8. Remove the package containing the Assembled Glass Slide (Item E) from the freezer. Place unopened package on the bench top for approx. 15 min, and allow the Assembled Glass Slide to equilibrate to room temperature (RT). 9. Open package, and take the Assembled Glass Slide out of the sleeve (Do not disassemble the Glass Slide from the chamber assembly). Place glass slide assembly in laminar flow hood or similar clean environment for 1-2 hours at RT. Note: Protect the slide from dust or others contaminants. RayBio® L-Series Rat Antibody Array L-90 Protocol 12 D. Blocking and Incubations Note: Glass slide should be completely dry before adding Blocking Buffer to wells. 10. Block sub-arrays by adding 400 μl of Blocking Buffer (Item F) into each well of Assembled Glass Slide and incubating at RT for 30 min. Ensure there are no bubbles on the array surfaces. 11. Immediately prior to sample incubation, spin biotin-labeled samples for 5 min at 10,000 rpm to remove any particulates or precipitants. Dilute samples with Blocking Buffer.* *Note: Recommended dilution of the biotin-labeled samples with Blocking Buffer prior to incubation is 2-10 fold for cell culture supernatants, 20-fold for serum/plasma or 30 fold cell/tissue lysate . Note: Optimal sample dilution factor will depend on the abundance of target proteins. If the background or antigen-specific antibody signals are too strong, the sample can be diluted further in subsequent experiments. If the signal is too weak, more concentrated samples can be used. 12. Completely remove Blocking Buffer from each well. Add 400 μl of diluted samples into appropriate wells. Remove any bubbles on array surfaces. Incubate arrays with gentle rocking or shaking for 2 hours at RT or overnight at 4°C. RayBio® L-Series Rat Antibody Array L-90 Protocol 13 Note: Avoid the flow of sample into neighboring wells. 13. Dilute 20X Wash Buffer I Concentrate (Item G) 20-fold with de-ionized or distilled water. Decant the samples from each well, and wash 3 times with 800 μl of 1X Wash Buffer I at RT with gentle rocking or shaking for 5 min per wash. 14. Obtain a clean container (e.g., pipette tip box or slidestaining jar), place the Assembled Glass Slide into the container with enough volume of 1X Wash Buffer I to completely cover the entire assembly, and remove any bubbles in wells. Wash 2 times at RT with gentle rocking or shaking for 10 min per wash. 15. Dilute 20X Wash Buffer II Concentrate (Item H) 20-fold with de-ionized or distilled water. Decant the Wash Buffer I from each well, place the Assembled Glass Slide into the container with enough volume of 1X Wash Buffer II to completely cover the entire assembly, and remove any bubbles in wells. Wash 2 times at RT with gentle rocking or shaking for 5 min per wash. 16. Prepare 1X Cy3-Conjugated Streptavidin: a) Briefly spin down tube containing the Cy3-Conjugated Streptavidin (Item I) immediately before use. b) Add 1000 μl of Blocking Buffer into the tube to prepare a concentrated Cy3-Conjugated Streptavidin stock RayBio® L-Series Rat Antibody Array L-90 Protocol 14 solution. Pipette up and down to mix gently (do not store the stock solution for later use). c) Add 200 μl of Cy3-Conjugated Streptavidin stock solution into a tube with 800 μl of Blocking Buffer. Mix gently to prepare 1X Cy3-Conjugated Streptavidin. 17. Carefully remove Assembled Glass Slide from container. Remove all of Wash Buffer II from the wells. Add 400 μl of 1X Cy3-Conjugated Streptavidin to each sub-array. Cover the incubation chamber with the plastic adhesive strips. Note: Avoid exposure to light in Steps 19–25 by covering the Glass Slide Assembly with aluminum foil or incubate in dark room. 18. Incubate with Cy3-Conjugated Streptavidin at RT for 2 hours with gentle rocking or shaking. Note: Incubation may be done overnight at 4°C. 19. Decant the solution and disassemble the glass slide from the incubation frame and chamber. Disassemble the device by pushing clips outward from the side, as shown below. Carefully remove the glass slide from the gasket. Note: Be careful not to touch the printed surface of the glass slide, which is on the same side as the barcode. RayBio® L-Series Rat Antibody Array L-90 Protocol 15 20. Gently place the glass slide into 30 ml Centrifuge Tube (Item M). Add enough 1X Wash Buffer I to cover the entire glass slide. Wash with gentle rocking or shaking for 10 min. Remove the wash buffer. Repeat 2 times for a total of 3 washes. 21. Repeat step 20, this time with 1X Wash Buffer II. Repeat one time for a total of two washes for 5 min per wash. 22. Finally, wash the glass slide with 30 ml of de-ionized or distilled water for 5 min. Remove glass slide and decant water from Centrifuge Tube. 23. Remove excess liquid from Centrifuge Tube, and place glass slide into the tube. Centrifuge at 1,000 rpm for 3 minutes to remove water droplets. Make sure the finished glass slide is completely dry before scanning or storage. Note: Alternatively, you may gently dry the glass slide using a low-velocity Nitrogen gas stream or ambiently in a laminar flow hood or similar clean environment (Be sure to protect from light). E. Fluorescence Detection 24. You may proceed immediately to scanning or you may store the slide at -20 °C in the Centrifuge Tube provided or at RT and to scan at a later time. RayBio® L-Series Rat Antibody Array L-90 Protocol 16 Note: Unlike most Cy3 fluors, the HiLyte Plus™ Fluor 532 used in this kit is very stable at RT and resistant to photobleaching on completed glass slides. However, please protect glass slides from temperatures above RT and store them in the dark. Do not expose glass slide to strong light, such as sunlight or UV lamp. Note: If you need to repeat any of the incubation after finishing the experiment, you must first re-assemble the glass slide into the incubation chamber by following step as shown in the figures below. To avoid breaking the printed glass slide, you may first want to practice assembling the device with a blank glass slide. 1. Apply slide to incubation chamber barcode facing upward as in image A (below). 2. Gently snap one edge of a snap-on side as shown in image B. 3. Gently press other of side against lab bench and push in lengthwise direction (image C). 4. Repeat with the other side (image D) A B C D RayBio® L-Series Rat Antibody Array L-90 Protocol 17 V. Antibody Array Map RayBio® L-Series Rat Antibody Array L-90 Protocol 18 RayBio® Biotin Label-based Rat Antibody Array 1 Map RayBio® L-Series Rat Antibody Array L-90 Protocol 19 RayBio® Biotin Label-based Rat Antibody Array 1 List RayBio® L-Series Rat Antibody Array L-90 Protocol 20 VI. Interpretation of Results: A. Explanation of Controls Spots 1) Positive Control spots (POS1, POS2, POS3) are standardized amounts of biotinylated IgGs printed directly onto the array. All other variables being equal, the Positive Control intensities will be the same for each sub-array. This allows for normalization based upon the relative fluorescence signal responses to a known control, much as “housekeeping” genes or proteins are used to normalize results in PCR or Western blots, respectively. 2) Negative Control (NEG) spots contain a proteincontaining buffer (used to dilute antibodies printed on the array). Their signal intensities represent non-specific binding of Biotin-conjugated anti-Cytokines and/or the Cy3-Conjugated Streptavidin. Negative control signal intensities are usually very close to background signals in each sub-array. B. Typical results obtained with RayBio® L-Series Rat Obesity Antibody Array L-90 The following figure shows the RayBio® L-Series Rat Antibody Array 90 probed with serum sample. The images were captured using a Axon GenePix laser scanner. The strong signals in row 20 and the upper left and lower right corners of each RayBio® L-Series Rat Antibody Array L-90 Protocol 21 array are Positive Controls, which can be used to identify the orientation and help normalize the results between arrays. RayBio® L-Series Rat Antibody Array 90 Sample-1 Sample-2 If scanned using optimal settings, 3 distinct signal intensities will be seen: POS1>POS2>POS3. If all of these signals are of similar intensity, try increasing or decreasing laser power and/or signal gain settings. Also, in the absence of an external standard curve for each protein detected, there is no means of assessing absolute or relative concentrations of different proteins in the same sample using immunoassays. If you wish to obtain quantitative data (ie, RayBio® L-Series Rat Antibody Array L-90 Protocol 22 concentrations of the various analytes in your samples), try using our Quantibody® Arrays instead. C. Background Subtraction: Once you have obtained fluorescence intensity data, you should subtract the background and normalize to the Positive Control signals before proceeding to analysis. Most laser fluorescence scanner software have an option to automatically measure the local background around each spot. For best results, we recommend comparing signal intensities representing the MEDIAN background signals minus local background. If your resulting fluorescence signal intensity reports do not include these values (e.g., a column labeled as “MED532B532”), you may need to subtract the background manually or change the default settings on your scanner’s data report menu. D. Normalization of Array Data: To normalize signal intensity data, one sub-array is defined as "reference" to which the other arrays are normalized. This choice is arbitrary. For example, in our Analysis Tool Software (described below), the array represented by data entered in the left-most column each worksheet is the default “reference array.” You can calculate the normalized values as follows: X(Ny) = X(y) * P1/P(y) RayBio® L-Series Rat Antibody Array L-90 Protocol 23 Where: P1 = mean signal intensity of POS spots on reference array P(y) = mean signal intensity of POS spots on Array "y" X(y) = mean signal intensity for spot "X" on Array "y" X(Ny) = normalized signal intensity for spot "X" on Array "y" The RayBio® Analysis Tool software is available for use with data obtained using RayBio® Biotin Label-based Antibody Arrays. You can copy and paste your signal intensity data (with and without background) into the Analysis Tool, and it will automatically normalize signal intensities to the Positive Controls. To order the Analysis Tool, please contact us at +1-770-729-2992 or [email protected] for more information. E. Threshold of significant difference in expression: After subtracting background signals and normalization to Positive Controls, comparison of signal intensities between and among array images can be used to determine relative differences in expression levels of each protein between samples or groups. Any ≥1.5-fold increase or ≤0.65-fold decrease in signal intensity for a single analyte between samples or groups may be considered a measurable and significant difference in expression, provided that both sets of signals are well above background (Mean background + 2 standard deviations, accuracy ≈ 95%). RayBio® L-Series Rat Antibody Array L-90 Protocol 24 VII. Troubleshooting Guide Problem Weak signal High background Uneven signal Cause Recommendation Inadequate detection Check laser power and PMT parameters Inadequate reagent volumes or improper dilution Check pipettors and ensure correct preparation Short incubation times Ensure sufficient incubation time and change sample incubation step to overnight Too low protein concentration in sample Don’t make too low dilution Or concentrate sample Improper storage of kit Store kit at suggested temperature Sample is too concentrated Use more diluted sample Excess of streptavidin Make sure to use the correct amount of streptavidin Inadequate detection Check laser power and PMT parameters Inadequate wash Increase the volume of wash buffer and incubation time Bubbles formed during incubation Avo id bubble formation during incubation and incubation time buffer volume Completely cover arrays with solution Arrays are not completely covered by reagent RayBio® L-Series Rat Antibody Array L-90 Protocol 25 VIII. Selected References 1. Christina Scheel et all. Paracrine and Autocrine Signals Induce and Maintain Mesenchymal and Stem Cell States in the Breast. Cell. 2011;145, 926–940 2. Lin Y, Huang R, Chen L, et al. Profiling of cytokine expression by biotin-labeled-based protein arrays. Proteomics. 2003, 3: 1750–1757. 3. Huang R, Jiang W, Yang J, et al. A Biotin Label-based Antibody Array for High-content Profiling of Protein Expression. Cancer Genomics Proteomics. 2010; 7(3):129– 141. 4. Liu T, Xue R, Dong L, et al. Rapid determination of serological cytokine biomarkers for hepatitis B–virus-related hepatocellulare carcinoma using antibody arrays. Acta Biochim Biophys Sin. 2011; 43(1):45–51. 5. Cui J, Chen Y, Chou W-C, et al. An integrated transcriptomic and computational analysis for biomarker identification in gastric cancer. Nucl Acids Res. 2011; 39(4):1197–1207. 6. Jun Zhong et all. Temporal Profiling of the Secretome during Adipogenesis in Humans. Journal of Proteome Research. 2010, 9, 5228–5238 RayBio® L-Series Rat Antibody Array L-90 Protocol 26 7. Chowdury UR, Madden BJ, Charlesworth MC, Fautsch MP. Proteomic Analysis of Human Aqueous Humor. Invest Ophthalmol Visual Sci. 2010; 51(10):4921–4931. 8. Wei Y, Cui C, Lainscak M, et al. Type-specific dysregulation of matrix metalloproteinases and their tissue inhibitors in endstag heart failure patients: relationshp between MMP-10 and LV remodeling. J Cell Mol Med. 2011; 15(4):773–782. 9. Kuranda K, Berthon C, Lepêtre F, et al. Expression of CD34 in hematopoietic cancer cell lines reflects tightly regulated stem/progenitor-like state. J Cell Biochem. 2011; 112(5):1277– 1285. 10. Toh HC, Wang W-W, Chia WK, et al. Clinical Benefit of Allogenic Melanoma Cell Lysate-Pulsed Autologous Dendritic Cell Vaccine in MAGE-Positive Colorectal Cancer Patients. Clin Chem Res. 2009; 15:7726–7736. 11. Zhen Hou. Cytokine array analysis of peritoneal fluid between women with endometriosis of different stages and those withoutendometriosi Biomarkers. 2009;14(8): 604-618. 12. Yao Liang Tang,et al. Hypoxic Preconditioning Enhances the Benefit of Cardiac Progenitor Cell Therapy for Treatment of Myocardial Infarction by Inducing CXCR4. Circ Res. 2009;109:197723 RayBio® L-Series Rat Antibody Array L-90 Protocol 27 RayBio® L-series Antibody Arrays are patent-pending technology developed by RayBiotech. This product is intended for research only and is not to be used for clinical diagnosis. Our produces may not be resold, modified for resale, or used to manufacture commercial products without written approval by RayBiotech, Inc. Under no circumstances shall RayBiotech be liable for any damages arising out of the use of the materials. Products are guaranteed for six months from the date of shipment when handled and stored properly. In the event of any defect in quality or merchantability, RayBiotech’s liability to buyer for any claim relating to products shall be limited to replacement or refund of the purchase price. RayBio® is a registered trademark of RayBiotech, Inc. HyLite Plus™ is a trademark of Anaspec, Inc. GenePix® is a registered trademark of Molecular Devices, Inc. RayBio® L-Series Rat Antibody Array L-90 Protocol 28 This product is for research use only. ©2011 RayBiotech, Inc. RayBio® L-Series Rat Antibody Array L-90 Protocol 29