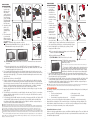
1
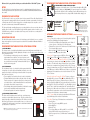
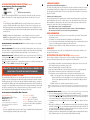
warnings and cautions for jstim device and components
IMPORTANT SAFETY INSTRUCTIONS. DO NOT DESTROY
The manufacturer strongly recommends carefully reading the “Warnings and Cautions” below before using your
Jstim.
Prescription labeling: Federal law restricts this device to sale or use by or on the order of a practitioner so
licensed by the state.
contraindications
1. Do not place the pads on the carotid sinuses located at the two sides of the neck, (where a doctor feels for a pulse), or over
the eyes.
2. Do not use this Jstim unit if you have a heart pacemaker or serious heart rhythm problem.
3. Do not place your electrodes or wraps on any non-intended body parts or treatment areas unless discussed with a physician.
warnings
1.
2.
3.
4.
5.
Do not use the JStim unit during the pregnancy or at anytime on the abdomen during pregnancy.
This Jstim Unit is not effective for pain of central origin. (include headache)
The Jstim unit should be used only under the continued supervision of a physician.
The jstim unit has no curative value.
The Jstim is a symptomatic treatment which suppresses the sensation of pain, which would otherwise serve as a protective
mechanism.
6. The user must keep the device out of the reach of children
7. Electronic monitoring equipment may not operate properly when Jstim stimulation is in use.
8. Do not use Jstim unit if you are driving or operating machinery.
9. If you have epilepsy, consult your doctor about use of the JStim.
Allergic reactions to the treatment pads can occur, even though they are hypoallergenic:
•Do not apply to broken skin.
•Do not apply pads to skin that does not have normal sensation. If the skin is numb, stimulation will not be felt and too great an
intensity might then be used accidentally.
PRECAUTIONS
1. Isolated cases of skin irritation may occur at the site of electrode placement following long-term application.
2. Effectiveness is highly dependent upon patient selection by a person qualified in the management of pain patients.
3. If any adverse reaction occurs, discontinue use immediately and contact your supplier and physician.
ADVERSE REACTIONS
Skin irritation and electrode burns are potential adverse reactions.
GENERAL WARNINGS
1. Do not immerse JStim units in water.
2. Do not place the JStim unit close to excessive heat.
warnings and cautions for jstim infrared heat therapy components
DANGER – to reduce the risk of burns, electrical shock and fire, this product must be used in accordance with the following
instructions. Please read and follow ALL instructions.
contraindications
• Safety for the JStim for use during pregnancy has not been established.
• Caution should be used for patients with suspected or diagnosed heart problems.
• Caution should be used for patients with suspected or diagnosed epilepsy or other disease states.
warnings
•
•
•
•
•
•
•
•
•
•
•
•
If you are pregnant, please consult your physician before using the Jstim.
If you are over the age of 65, please consult your physician before using.
If you have sensitive skin, or skin insensitivity, please consult your physician.
The Jstim should be kept out of the reach of infants and children.
This product is not to be used by an invalid, unconscious person or person with low blood circulation unless attended.
Discontinue use if you experience a rash or if any discomfort occurs from use.
Check skin underneath therapy wrap periodically throughout a heat treatment session.
The Jstim should not be applied over cancerous lesions, wounds, infected areas or open sores.
Burns can occur regardless of control setting. Check skin under pad frequently when using the heat treatment.
Never use in an oxygen enriched environment or near equipment that stores or emits oxygen
Turn off when not in use
Do not sleep with your Jstim in the DT mode.
precautions
• Sensitive skin patients or patients with compromised circulatory disorders must consult their physician in all situations.
• There is absolute danger in using the Jstim in conjunction with external analgesics. Placing methyl salicylate, camphor, or mentholcontaining external analgesics on the painful area increases superficial blood flow. If a heating product is subsequently placed on the
jstim 1000 users manual
Manufactured by Pain Management Technologies, Inc.
PLEASE READ ALL INSTRUCTIONS AND WARNINGS/CAUTIONS CAREFULLY
BEFORE YOU BEGIN USING YOUR SYSTEM
all rights reserved | ©2011 | www.JSTIM.com
CAUTION: Federal law restricts this device to sale by or on the order of a practitioner
licensed by the law of the State in which he/she practices to use or order the use of the
device. A prescription is required to obtain this product. The product can be used in the
home or clinic by all patients in need.
Welcome, this is your guide for achieving successful results with the JStim 1000™ System
intro
1
components that make up your jstim 1000 system
4. infrared heat system, compression wrap
The components of the heating system: (1) 2 by 4” Infrared Heat Band or IHB, (2) IHB
Controller, (3) charging cord (not pictured), (4) compression wrap. For use, the IHB is
plugged into the controller. Use the Secure Wrap to keep the IHB controller snug to the
hand or knee wrap. When not in use, charge the IHB controller with the charging cord.
The JStim 1000 device is a brand new therapy system. It is combination-therapy that deploys the use of
electrotherapy, infrared heat and compression to treat Osteoarthritis (OA) and Rheumatoid arthritis (RA) of the
knee or hand.
frequency of application
For optimal results, it is best to use your JStim system for the recommended 7 hours daily. Using the infrared
heat component in conjunction with the JStim is recommended for 30 minutes per treatment session (defaults
to 30 minute auto shut-off). The JStim is designed to be comfortable and practical to sleep with so as to fit
into your life easier when using the intended NT treatment mode.
The Jstim works through a cumulative therapy process, meaning benefits are often seen over time, and not immediately. After 3 months of use (250-300 hours), benefits should be apparent, and after 6 months to a year
(1200-2000 hours), you will notice even better results. Therapy can be scaled back once a certain pattern of
relief has maintained itself.
indications for use
components that make up your jstim 1000 system
1. soft knee wrap
The soft wrap is made of comfortable and breathable neoprene material, which wraps around the knee and
thigh snugly, and comfortably. It is flexible, lightweight, and simple to wear. This wrap is one size fits most, but
can be customized if needed.
• The electrotherapy conductive patches are used to stimulate the
target treatment areas on the knee. Two electrode pads are used in
the knee system: an active electrode over the knee (orange), a grounding electrode (black) over the thigh. The Infrared Heat Band is placed
under the active orange patch.
2. soft hand wrap
3. jstim electrotherapy device
The JStim is small, Li-ion battery-powered, and fits onto your therapy wraps
securely via an optional black compression strap. The device generates the proprietary, high voltage, sub-threshold electrical signal. The JStim uses a rechargeable battery, and incorporates a patient compliance timer so as to keep a record
of treatment. The Signal Generator is dual channel so that bilateral stimulation is
possible (both knees or both hands).
Note: There is a plug input on the side of your Jstim. This is not needed for any of the components of your device. Please ignore this input.
6. conductive
spray
conductive glove
7. patient cables
(lead wires)
Note: Two pairs are included,
however, you will only need one
(per channel) to treat a joint. The
extra lead wire can be used as
a spare, and/or can be used
simultaneously if you purchase
another hand or knee wrap component.
jstim electrotherapy device settings (continued on next page)
lcd display
The JStim 1000 external, noninvasive, non-narcotic, electrotherapy system is indicated for use as a combined
therapy in reducing the level of pain and symptoms associated with Osteoarthritis and Rheumatoid Arthritis of
the kneee or hand.
The soft hand wrap is made of a comfortable conductive garment material that
is shaped into a one size fits all glove. An Arm Band is included to serve as the
ground pad to activate the conductive glove. Infrared heat fabric is incorporated
into the wrist area of the glove.
• The user applies the red Conductive Glove (red, active) to the hand first.
• The Infrared Heat Band is placed either on the palm or back of the hand.
Then the user puts on the Compression Glove (black, soft wrap) over the
red Conductive Glove, so that the Infrared Heat Band is securely between
the Conductive Glove and the Compression Glove.
• The Li-ion Battery, which activates the infrared heat, is affixed onto the compression glove and secured with the provided compression wrap.
• The arm band is applied to the arm that is being treated.
5. rechargeable
li-ion battery
and charger
for jstim device
A. Power Up Turn on device using any one of the two Analog Knobs (top dials)
provided. The LCD will light up the following information:
• CH1 & CH2 Icon will light up, if both Analog Knobs are in ON state. If
only one of them is on, then either CH1 or CH2 will appear.
• Treatment Time is shown as 1:45, which means 1 hour and 45 minutes.
The clock symbol will also appear.
• Mode by default is NT (JStim), indicated by icon NT.
• Battery Icon will display charge left in battery.
B. Setting Mode To change mode, press MODE key. LCD Icon DT and NT will
toggle. DT denotes TENS, and NT denotes JStim. Note: Do NOT sleep in the DT mode.
A.
B.
C.
C. Setting Intensity Amplitude and Treatment Time - NT Mode 1. To increase or decrease intensity for a channel, rotate Analog Knob. Vertical Bars on LCD will
glow ON or OFF to indicate the change in intensity. Figure C shows Channel
1 intensity set to maximum level and Channel 2 intensity to 50%. To increase
D.1
or decrease treatment time, press SET key. Treatment time will flash on LCD.
Press TIME Increase (+) Button or TIME Decrease (-) Button, to set the desired
treatment time. The treatment time can be selected in between 1:45, 3:30,
5:15 or 7:00 hours.
D. Setting Pulse Width and Treatment Time - DT Mode To increase or decrease
D.2
Pulse Width in DT mode, press SET Key. The Pulse Width will flash “P3” as
shown in Figure D.1. Press Increase (+) Button or Decrease (-) Button, to
select the desired Pulse Width. In DT mode, pulse width can be selected in between 50µS (P1), 150 µS (P2) and 250µS (P3). Once Pulse Width is selected,
press SET key to confirm. Now treatment time for DT mode will flash (D.2),
E.
Press Increase (+) Button or Decrease (-) Button, to set the desired treatment
time. In DT mode, treatment time can be selected in between 0:00, 0:30 and
1:00 hours, where 0:00 denotes continuous treatment.
E. End of Treatment At the end of treatment, output will switch OFF Automatically. LCD will display 0:00 to indicate ‘0’ treatment time.
F. Usage Meter To View Usage, Follow instructions as mentioned below:
1. Press Mode key.
2. Press SET key also, keeping MODE key pressed.
3. Release MODE key.
4. Release SET key.
5. To reset Usage Meter, press INC key, within 5 Seconds. LCD will
display ‘0000’ to indicate usage meter has been reset.
6. After the usage meter is reset, LCD will return to Treatment Mode in
5 seconds.
F.5
F.6
jstim electrotherapy device settings (continued)
battery indication: JStim Electrotherapy Device
FULL BATTERY
1/3 BATTERY
2/3 BATTERY
EMPTY;recharge battery immediately
The above represent the different indicators for your JStim device’s battery life. Your Jstim comes with a
lithium Ion 9volt battery. This is a high capacity battery that will power your Jstim for the 7 hour cycle. charging:
The 9volt JStim device battery will NEED charged for at least 12-14 hours before it is ready to power
your device. The IHB controller will need to be charged for 5-6 hours before it is ready to power your
IHB. Replacement batteries may be obtained from the manufacturer (contact your supplier). Do not use
any rechargeable battery type that is different from that supplied with the signal generator when originally
purchased as new.
DO NOT use alkaline non-rechargeable batteries, or any other batteries except the ones provided.
DO NOT use any battery that shows any signs of corrosion, leaking, or other damage before, or immediately following charging. Replace leaking, damaged, or corroded batteries.
increase/decrease (up and down) buttons The Increase/Decrease buttons are for controlling
your settings up or down.
analog voltage knobs The knobs at the top of the JStim Electrotherapy Device are used to increase or
decrease the voltage. To set-up a proper treatment you should increase the voltage until you feel the tingling
sensation in your knee or thigh (or hand/arm if using the hand wrap) — not too strong nor too soft.
mode button (dt or nt) The Mode Button allows the user to select between two modes. The NT mode
is the intended mode in which this users manual is instructed towards. It is the mode that is to be operated 7
hours daily, often times performed at night.
The DT mode is ONLY for short term use, 1-2 hour treatment sessions. Its use is strictly for symptomatic pain
relief, as is a TENS unit. DO NOT sleep using the JStim in the DT Mode.
BEFORE SETTING UP YOUR JSTIM SYSTEM, PLEASE READ ALL WARNINGS AND
PRECAUTIONS LISTED ON THE BACK PAGE OF THIS MANUAL
infrared heat therapy settings
The Infrared Heat Band (IHB) can be used in conjunction with either the knee or hand system. When the IHB
is plugged in via USB to the lightweight, detachable IHB Controller, the medically proven benefits of infrared
heat will penetrate deep (up to 2”) into muscles and joints. Traditional heat therapy only goes one-tenth of an
inch. In addition, the multi-layer fabric emits all natural therapeutic minerals into the body. The band will stay
comfortable, secure and breathable for longer treatment sessions. Using the infrared heat in conjunction with
the JStim is recommended for at least one hour per treatment session, but not more than two consecutive
hours. The infrared heat should be unplugged before wearing your JStim to bed.
battery indication: Infrared Heat Band Controller
Lithium-polymer Battery Life*:
High Temperature (107°F): 2.5 hours
Medium (104°F): 3 hours
Low (100°F): 4 hours
*For each charge/discharge cycle, the battery loses
0.04% of total power. After 500 uses, the battery can
only be charged vv0%
Battery Output Voltage: DC 5V
Battery Output Current: 1000mA max.
Battery Size: (W) 2.0” x (L) 2.5” x (H) 0.5”
Battery Light: The light goes off after 5 seconds to
save power. Press the red button again slightly for
the light to come back.
charging:
Before use, charge IHB Controller for at least 4 hours. Turn on/off the IHB Controller by holding down the
red button; high (3 lights), medium (2 lights), and low (1 light).
care and cleaning
Signal Generator (JStim Electrotherapy Device)
The outside of the signal generator may be cleaned with a cloth. Do not use liquids or chemicals for cleaning.
A decontamination formula can be used instead. Do not open the signal generator by removing the screws.
The signal generator should be turned “OFF” when not in use. Always store the stimulator in a clean, dry area
between 0° and 140°F.
JStim wrap and conductive patches
The neoprene wrap and the silver conductive patches should be hand washed using mild soap, and/or warm
water. Air drying them is then best. The conductive patches can be detached from the wrap to clean easier.
When reattaching the conductive patches, make sure the red active knee patch is placed back on the knee
treatment spot, and the other is placed at the thigh treatment spot.
• Never put the wrap or patches in a washing machine.
• Never clean the wrap or patches with bleach, fabric softener, or other harsh detergents.
• Be careful not to touch the loop velcro to the silver garment material.
user information
• Try to utilize your JStim System 7 hrs/day, it is not recommended to use more than 7 hrs/day without
the physician’s consent.
• It is optimal to use your JStim approximately 1,500-2000 hours for full treatment effect.
• Once you notice improved therapy results and sustained therapy results, you can then begin to decrease
the use of your JStim. Improvement should be noticeable after12 weeks.
• If using one system for both knees or hands, alternate your treatment sessions one day per each.
warranty
Your JStim signal generator carries a three year warranty against all mechanical defects. And there is a 60
day warranty on all other items.
instructions for use of the jstim (continued on next page)
Be sure to charge your batteries for both your device, and heat controller before every treatment. The following pages contain step-by-step instructions for the set-up and use of the JStim System.
1. First, familiarize yourself with the components that make up the JStim System. Please be sure to read
all the details about parts and components on page 1 and 2.
2. Remove all jewelry that will be covered by the JStim System
3. Apply only to unbroken, healthy skin. If a pre-existing rash is present, please consult your physician.
4. Clean and dry the treatment area to which the conductive patches are to be applied.
5. The JStim wrap comes preassembled, but the electrode patches should be positioned as such:
A)Knee – the orange patch needs positioned directly on the knee, and the black patch needs
positioned above the knee (on the upper thigh) or as far to the top part of the wrap as it can go.
Feel free to make adjustments particular to the area you want treated. The IHB goes under the
orange patch.
B)Hand – layout all of the conductive components and glove accessories.
Note: The JStim Electrotherapy Device can be positioned where the patient feels it most comfortable. But, with use of the knee and hand
system, most patients place the JStim Device on the hip. It can be strapped to the wrap itself through the use of the included compression
strap.
jstim electrotherapy device (Refer to page 5 or 6 for setup of your knee or hand system, then proceed with the following)
1. Turn on your JStim signal generator (once all leads are connected and items are in place).
2. Set your mode to DT or NT. The NT mode is specifically designed for night time use. NT is for 7 hour therapy
sessions, and is your default setting and intended treatment mode. DT is for short or long term therapy sessions, but only should be used to counter act pain, if pain is present.
3. Set treatment timer: set 5-7 hrs. for NT Mode; set 0:30 or 1 hour for DT Mode (or continuous if doctor reccomended).
4. Next, adjust your stimulator to a comfortable stimulation level by pressing the increase/decrease intensity
level button. If using the NT mode, set your intensity more aggressively for the knee than for the hand. The
user may or may not feel the stimulation as a strong sensation. Do note, it is the consistency of use, and not
the strength of the intensity that results in positive therapy results.
5. Typically, you should increase the intensity until you feel a tingling sensation, and then back it down a little, so
that you still feel the tingle – but so it is not strong. It should feel mild and comfortable.
for use of the
jstim on the knee
1. The components
of the JStim
hand application
(clockwise): Red
1. The black electrode
is placed on the
thigh area of the
wrap, and the
orange electrode is
placed on the knee
area of the wrap
(on top of the IHB).
Thread the pigtails
through the small
hole in the wrap
2. Spray the electrode
patches (2-3
sprays) with the
conductive spray.
[Fig. A]
for use of the
jstim on the hand
Infrared Heat Band (IHB) placed
underneath red active patch
JStim Electrotherapy Device
2. Try on the red
conductive glove for
a custom stretch,
then remove.
Preform as well
with the black
compression glove.
device back
cut-away view
3. It is recommended
to perform a heat
therapy session for
the first 30 minutes
of treatment in the
NT mode. To assemble the heat components, see below:
A)The Infrared Heat Band (IHB) has Velcro on either side. Place the
IHB underneath the orange active patch. [Fig. B]
IHB: Insulated Side
4. Insert your hand into the red conductive glove, pull snug. For heat
therapy use the IHB as follows:
IHB: Emission Side
A)It is recommended to perform a heat therapy session for the first 30
minutes of treatment in the NT mode.
B) FOR THE KNEE: the IHB’s Emission Side faces the knee. The emmission side is the side with
loop velcro.
5.
6.
7.
8.
9.
Infrared Heat Band
may be placed on
either the palm-side
or back of the hand
3. Spray the inside of
the red conductive
glove (active) with
conductive spray (2-3 sprays) and then insert your hand into the glove.
Also spray the black patch that goes on the arm band with 2-3 sprays.
Li-polymer
Rechargeable
Battery
4.
Conductive Glove; Black
Compression Glove;
Arm Band; Infrared Heat
Band (IHB); Li-ion Battery
Controller.
C)Place the red electrode back on top of the IHB. [Fig. B-C] You may make slight adjustments to
ensure the IHB and red electrode treat the target area (knee cap). Make sure the USB cord can still
be threaded through the hole in the knee wrap.
To hook up the JStim Electrotherapy Device, first plug the lead wires into the pigtail connectors of the
black and red patches that are poking out of the wrap. The red pin should be reserved for the knee (red),
and the black for the thigh. [Fig. C] The lead wires should be thread through the same hole in the wrap
as the USB cord.
Apply the wrap to the knee as shown in [Fig. D]
Ensure the conductive patches are positioned correct; the top black patch on the thigh, the red patch
centered on the knee. The black and the red electrodes should be spread apart as far as possible with
the red electrode centered over the knee. The knee wrap should be secure, but not too tight on the knee.
All wires — USB for infrared heat and the pigtails to the red/black patches — should be comfortably
threaded to the outside of the knee wrap so they may connect to their respective devices.
Insert the charged battery into the JStim Device, then adjust to desired settings (see page 2 for setting
details). [Fig. E-F]
The JStim Device can be positioned to securely fit directly on the knee wrap. To do this, for convenience,
simply use the black compression belt to secure a fit. You can also place the JStim Device on your hip
using the belt clip. [Fig. G]
For heat therapy, position the IHB Controller on the outside of the wrap near the USB cord. Plug the USB
cord into the IHB Controller and turn on the heat function. Turn on the IHB Controller by holding down
the red button; high (3 lights), medium (2 lights), and low (1 light). Use the black compression wrap for
comfort, as well as to secure the IHB controller in place.
Note: When not using the IHB, or while sleeping, you can remove the heat components — particularly the battery.
Note: Make sure to position the red electrode square on the knee, and the black electrode on the thigh (highest part of the wrap). The infrared heat band
is placed underneath the red patch, and the red patch is placed onto of the infrared heat band. These patches are positioned in a horizontal fashion as the
user’s manual shows. If you feel that the red electrode has slipped down during treatment, make sure to redo your wrap – until you feel it is perfect. Note: On spraying your pads and intensity; the optimal amount of sprays should be 2-3 sprays per garment electrode. Too many sprays can produce a
stronger stimulation than desired/recommended; which means the user will most likely have to turn down their intensity – to a more comfortable level. When
using electrotherapy conductive garment material it is recommended to turn your intensity to where you can feel it, and then turn it down to where you barely
can. Also note, after first adjusting your intensity, wait 20 minutes, and then adjust it again (up or down; typically slightly up – since your body adjusts to the
stim after awhile). Also, note, when lying down [or rolling around while sleeping] or setting things on your lap – pressure against your pads can adjust your
intensity up. So take this into account as well.
B)Place the IHB in the palm of your hand.
C)FOR THE HAND: the IHB’s Emission Side faces the hand.
5. Pull the black compression glove
IHB: Emission Side
over the red conductive glove. Ensure
the IHB stays in place.
*Note: The IHB can also be placed on the back side of the hand in between the red and black glove.
6. To hook up the JStim Electrotherapy Device, first plug the red pin
connector into the red glove, and then the black pin connector into
the pigtail cord that is positioned on the arm band. Insert a charged
battery into the JStim Device, then adjust to desired setting (page2).
7. The arm band is applied to the upper portion of the same arm as the glove (around the biceps area).
Make it comfortable, but taught. For heat therapy, plug the USB cord into the Li-polymer battery and then
Velcro the battery to the top of the glove/hand.
8. For heat therapy, position the IHB Controller on the outside of the wrap near the USB cord. Plug the USB
cord into the IHB Controller and turn on the heat function. Turn on the IHB Controller by holding down
the red button; high (3 lights), medium (2 lights), and low (1 light). Use the black compression wrap for
comfort, as well as to secure the IHB controller in place.
Note: Make sure your black electrode in the arm band is positioned on the outside of bicep. The inside of your bicep is much tenderer, and
not recommended for placement. The arm band is placed on the same arm that the Jstim hand glove is in use upon. jstim removal
After finishing a treatment, air dry the treatment pads, and/or clean them following the enclosed cleaning and
care instructions.
• Allow system to air dry
• Turn off your signal generator
• If needed hand wash in cold water
• Un-Velcro the straps
• No bleach
• Clean skin with soap and water after removal
Please note, you may notice a mild redness in the treatment areas due to the conducted current passing
through the skin, creating friction. This is normal for all types of electrotherapy, and a hypo-allergenic. Aloe
Vera moisturizer can help relieve the redness or a cortisone cream. If your skin appears to have an allergic
reaction to any of the parts or treatments, please consult your physician.
Red and black fasteners on Leads
At the end of the leads supplied with your system, you will find red and black adapters. These are Cathode and
Anode respectively. The following general points are made for your information: More sensation tends to come
from the black adapter (cathode).