1
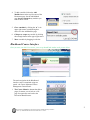
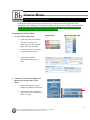
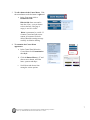
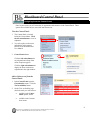
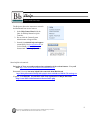
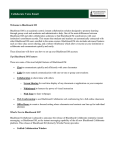
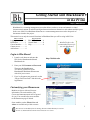
Getting Started with Blackboard 9 in Ka Piʻina http://bb.ksbe.edu Blackboard 9 is a learning management system that allows teachers to create and maintain a virtual classroom environment for online learning and interaction between themselves and students and their peers. In the case of Ka Piʻina Blackboard functions as a content management area used to keep track of documents related to the project. This tutorial covers only the essential functions in Blackboard that you will be using in Ka Piʻina. Main Features Logging in ................... 1 Homeroom .................. 1 Course Interface .......... 2 Content Areas.............. 4 Add an Item................. 4 Supplemental Edit Course Menu ...... 6 Control Panel ............. 8 Help ............................ 9 Mozilla Firefox is the recommended browser for use with Blackboard. Login to Blackboard 1. Launch a web browser and enter the URL for the Kamehameha Schools Blackboard site. http://bb.ksbe.edu 2. Enter your KS Username and Password. Then press the Login button. You will be given access to the Kamehameha Blackboard Homeroom with all of your courses. 3. If you’ve forgotten your password, use the “Forgot Your Password?” link above the login button. Customizing your Homeroom Modules are boxes with useful course information. The main modules –My Classes and Announcements will be opened for you. You can add a few more modules to the Homeroom page if desired. Some modules such as What’s New and Alerts are available only within a course. 1 This tutorial was modified from the Getting Started with Blackboard for Teachers 2010 by Kamehameha Schools Instructional Services Center 4. To add a module click on the Add Module button in the top left corner of the Homeroom page. On the Add Module page check or uncheck any modules you want to show or hide. 5. Close a module by clicking the “x” in its upper right corner or unchecking that choice it in the Add Modules page. 6. Collapse or reopen any module by clicking the rectangle button in the upper right corner. 7. Move a module by dragging its title bar. Blackboard Course Interface Once you enter your Ka Pi’ina course, your set-up should look similar to the picture below. The main navigation in the Blackboard interface can be customized using two panels - the Course Menu and Course Management Control Panel. 1. The Course Menu has buttons that link to pages of content, sets of tools or a full page for a particular tool such as the Discussion Board forums. 2 This tutorial was modified from the Getting Started with Blackboard for Teachers 2010 by Kamehameha Schools Instructional Services Center 2. Course Menu Views: At the top of the Course Menu are options for viewing and navigating the contents of the course. a. “List” view displays buttons/links. b. The next two are folder views – fixed and floating. Click the + sign next to a folder to reveal its contents. Click the – (minus sign) to collapse it. c. The rounded arrows reset it to your default view. d. The last button, the Reorder icon, is only available in List view. It’s probably faster to drag a button up or down with its left margin arrow. 3. The Course Management Control Panel menu and submenus located below the Course Menu control an item’s settings and available tools. 4. Reveal contextual menus: Blackboard 9 uses chevrons called “action buttons” that reveal or conceal additional options in drop down menus. 5. You can conveniently toggle between the instructor and student views with the Edit Mode button. Use Edit Mode ON to add or modify tools, create content, download student work and manage the course. Use Edit Mode OFF for the student view. 3 This tutorial was modified from the Getting Started with Blackboard for Teachers 2010 by Kamehameha Schools Instructional Services Center , Content Areas Adding links and course content Content Areas are blank pages onto which links to various kinds of content and tool links can be placed. Click the tabs to add Items, Build tool pages, course links and folders, Evaluate via assignments and tests, to Collaborate with discussion boards and chats, and access Wimba voice tools and blogs. Within Ka Pi’ina, you will only need to use the features found within the Build Content tab, and you will primarily use the add Item function. Content Areas – Building Content 1. Click the Course Menu button for the page you want to add the item to. The page opens. 2. Click the Build Content tab. 3. In the Create column choose an Item, a File to attach, different kinds of media, or a web link. 4. An Item is any set of instructions for the students, perhaps with links, attachments or images. Creating content works similarly for the above types of items. We’ll show an Item as an example. 5. Enter an Item Name, then the instructions in the Text box. 6. Format the font or font color, use bullets and numbering, add links or images, or lower a paragraph to create more white space between sections To attach a file to the Item: 1. Click the Choose File button and locate the file on your computer. Double-click the filename or click the filename once to select it, then click Open to attach it. 2. It will appear as an Attachment link on the content page. Keep in mind the students’ software when creating attachments for them to view or use. 4 This tutorial was modified from the Getting Started with Blackboard for Teachers 2010 by Kamehameha Schools Instructional Services Center Your computer 3. Next select display Options: e. Click Yes or No to: View the Item now or Track the student views. f. Select Date and Time Restrictions to display the Item between specific dates. To display it indefinitely, leave this unchecked. 4. Click the Submit button. A link to your item is now on the content page. 5. To edit a posted item: Click the action button to the right of the item for the drop down menu. a. Edit returns you to the Item creation page. b. Adaptive Release sets requirements that must be met before the student is allowed access to this assignment. c. Copy copies it for another course and d. Delete removes it. Caution, this is a permanent deletion. 5 This tutorial was modified from the Getting Started with Blackboard for Teachers 2010 by Kamehameha Schools Instructional Services Center , Course Menu Adding tools and customizing the Course Menu Customization allows the instructor to manage course content and activities, appearance, and management tools. Adding a Course Menu item adds a page to your course and a button on the Menu. Note: The Ka Piʻina course is already setup for you. In the rare instance where you may need to alter the course menu, the following instructions are provided. Customizing the Course Menu: 1. To add a Course Menu item: Create Item: Choose the item type: a. At the top of the Course Menu click the Create item “+” button (you must have the Edit Mode ON to see the button.) b. Choose the type of item (page) from the drop down menu c. Complete the required information for that type of item. 2. A button is created for each page and placed at the bottom of the Course Menu. a. Drag its left edge arrow up to change its placement in the menu. b. You can also create subheaders and dividers lines to group sets of buttons visually. 6 This tutorial was modified from the Getting Started with Blackboard for Teachers 2010 by Kamehameha Schools Instructional Services Center 3. To edit a button in the Course Menu: Click the action button on the the button’s right end. a. In the flyout menu click to Rename the Link. Hide the link from users until a later date. Note: even you choose to show the link, if the page is empty, it won’t be visible. Delete is permanent, be careful. If a button is associated with course content, all content will also be deleted. Read the warning message carefully. Ask before deleting. 4. To customize the Course Menu appearance: a. In the Control Panel below the Course Menu click Customization then Style. b. Click the Button Library “+” and choose text or button, and if the latter, a pattern and shape. c. Scroll down and choose from among the various options. 7 This tutorial was modified from the Getting Started with Blackboard for Teachers 2010 by Kamehameha Schools Instructional Services Center , Blackboard Control Panel Designing from the Control Panel Once in your course you will customize its appearance and contents via the Control Panel. These options are available only to users with instructor access. View the Control Panel: 1. The Control Panel is located below the Course Menu. Click the left action button to view its subpanels. 2. You will explore each section individually in this tutorial. Details are in the Blackboard User Manual 3. Control Panel views: Click the left action button for any subpanel and a drop down menu of options appears. Click the right action button to display the items with a short explanation in the right window. Add or Delete a tool from the Control Panel: 1. In the Control Panel open the Customization menu. Click the Tool Availability button. 2. On the Tool Availability page check the tools you want to have: available in the Course Menu options, and/or available in the Content Area menus 8 This tutorial was modified from the Getting Started with Blackboard for Teachers 2010 by Kamehameha Schools Instructional Services Center , Help Online and Print Help The Help area allows the instructor to research the Blackboard from several sources. 1. In the Help Control Panel click the links for the help Manual or Quick Tutorials. 2. Do not click the Contact System Administrator or Support links. 3. Instead, for technical help and support contact Kelly Cua ([email protected]) or Valerie Bland ([email protected]), Instructional Technology Specialists. Some helpful web tutorials: University of Texas screenshots and succinct explanation of the various features. Very well done. http://www.utexas.edu/academic/blackboard/tutorials/ Dartmouth University has many helpful video tutorials about Blackboard. http://bbfaq.dartmouth.edu/faq/index.php?action=artikel&cat=29&id=77& artlang=en Virginia Tech tutorials. Screen shots with clear explanation of major functions. http://www.iddl.vt.edu/instructors/breeze/index.php 9 This tutorial was modified from the Getting Started with Blackboard for Teachers 2010 by Kamehameha Schools Instructional Services Center