1
UNIVERSAL ACCOUNT NUMBER (UAN)
(Toll Free No. 1800-118-005)
USER MANUAL ON UAN FUNCTIONS
IN
OTCP
Version 1.2
AUGUST 2014
IS DIVISION
EMPLOYEES’ PROVIDENT FUND ORGANISATION
Head Office, New Delhi
Page 1 of 23
USER MANUAL ON UAN FUNCTIONS
IN THE OTCP
SCOPE OF THE DOCUMENT:
This manual provides the details of UAN functions incorporated in the Online Transfer Claim
Portalto facilitate employer to complete Form-11 in terms of linkage of previous
employment/UAN/First Time Employment of new members and manage KYC. A list containing
member ids without UAN would be generated at OTCP to identify members without UAN against
member ids. Employer can declare such member ids (new member ids in the latest ECR file) against
Previous member id/UAN/First time membership & approve the same. Such declared member ids
would flow from OTCP to EPFO NDC on daily basis. At EPFO NDC, this information would be
processed to generate new UANs/link member-ids accordingly. The processed information would
be pushed daily to the OTCP. The other activities to facilitate employer in respect of UAN are also
explained in this manual in user friendly manner.
OBJECTIVE OF UAN:
A universal number will be generated for each of the PF Account Number at EPFO NDC. The
UAN will act as an umbrella for the multiple Member Ids allotted to the same individual. The idea is
to concatenate multiple Member Identification Numbers (Member Id) allotted to a single member
under single Universal Account Number. This will help the member to view details of all the
Member Identification Numbers (Member Id) linked to it. If a member is already allotted Universal
Account Number (UAN) then he/ she may provide the same to new establishment/ employer which
in turn will mark the new allotted Member Identification Number (Member Id) to the Universal
Identification Number (UAN).
The main objective behind this new function is to capture KYC details of its members in
order to eliminate the dependency on the employer and improve the quality of service. The KYC
details will be tagged against the allotted UAN rather the member id thereby eliminating the
redundancy.
BACKGROUND WORK:
Initial generation of UAN:
1. As on any cutoff date (for example all distinct ECR members from the wage month of Jan
2014 to June 2014 except those with DOE) would be provided by OTCP to EPFO NDC.
Page 2 of 23
2. A universal number will be generated for each of the PF Account Number at EPFO NDC.
3. First time, UAN will be allotted to all contributors appearing in the ECR of the specified
period.
4. The UANs allotted would be made available to Employer Portal for dissemination.
5. Employer will download the UAN list from UAN Menu in OTCP.
6. It will be the duty of employer to disseminate UANs to the concerned members through
SMS, email, IVRS Type & Short Code Services.
Recurring/Subsequent UAN generation/linking:
1. Further whenever an ECR is submitted by employer and payment is confirmed by SBI, a list
containing the member ids without UAN would be generated at OTCP to identify members
without UAN against member ids.
2. It is the duty of employer to complete Form-11 in respect of those member ids, which have
not been allotted UAN or linked to UAN in terms of linkage of previous
employment/UAN/First Time Employment of new members and manage KYC.
3. Facility would be given on OTCP to employers to declare such member ids (new member ids
in the latest ECR file) against
a. Previous member id
b. UAN
c. First time membership & approve the same
4. Such declared member ids would flow from OTCP to EPFO NDC on daily basis.At EPFO NDC,
this information would be processed to
a. Generate new UANs against member ids which do not have UAN.
b. Link member ids against UAN having UAN already generated against previous
member id.
c. Generate and link UAN against member id and previous member id if neither of
them have UAN.
(The processed information would be pushed daily to the portal and this cycle would
continue.)
Uploading & Approving Bulk KYC Text File/Enter Individual KYC Details
Employer can either enter individual KYC details of members or can upload Bulk KYC Text File
through KYC menu given in OTCP. In case of bulk text file, employer will have to upload bulk KYC
Text File as per the revised format enclosed below. There will be following options in KYC Menu:
-
Enter Individual KYC Details
Upload Bulk KYC Text File
Approve Bulk KYC PDF File
View Approved PDF Files
Update Incomplete Member’s Details
Error List
Bulk KYC PDF file will be approved with DSC for only those records, which are complete in respect of
DOB, DOJ and Father’s/Husband’s Name. The records incomplete in terms of DOB, DOJ and
Page 3 of 23
Father’s/Husband’s Name will reflect in option ‘Update Incomplete Member’s Details’ for updating
the missing information.
Under the Head ‘Update Incomplete Member’s Details’ user has an option ‘Add Missing
Information’ to complete the missing entries and ‘Generate PDF for Approval/Rejection’ of the
same.
ERROR LIST:
In case of any errors while uploading files, error log will be generated and can be seen in ‘Error List’
given in KYC Menu.
PRE-CONDITIONS:
-
-
Must register your digital signature
Java version 1.7 should be installed in your system.
Please use only alphabets and numbers in file names. There should be no special characters
or spaces in the file name.
Only text files of upto 2mb size can be uploaded using this facility.
Bulk Text file format should be exactly as per the format given by EPFO, NDC.
SCREEN FLOW :
Login > UAN > Search UAN ID
Login > UAN > Confirm Previous Employment
Login > UAN >Download UAN List
Login > UAN > History PDFs
Login > KYC >Enter Individual KYC Details
Login > KYC >Upload Bulk KYC Text File
Login > KYC >Approve Bulk KYC PDF File
Login > KYC >View Approved PDF Files
Login > KYC >Update Incomplete Member’s Details
Login > KYC >Error List
EXPLANATION THROUGH SCREEN SHOTS :
The employer can perform the following activities through UAN Menu in OTCP :- Search UAN IDs
- Confirm Previous Employment
- Download UAN List
- History PDFs
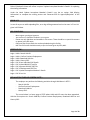
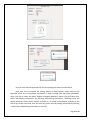
The screen below is a home page of OTCP where UAN and KYC menu has been appended.
UAN has four options viz. Search UAN IDs, Confirm Previous Employment, Download UAN List and
History PDFs.
Page 4 of 23
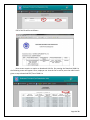
The following two screens facilitate employers to search UAN IDs of their members as well
as the members of any other establishment. Once employers press the search button, will be
allowed to see Establishment Name, Member’s Name, UAN ID, Date of Birth (only of their own
members), Date of Joining and Date of Exit.
Searching UAN of own establishment
Searching UAN of other establishment
Page 5 of 23
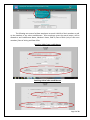
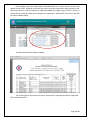
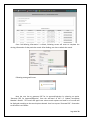
The next screen shows the details of the members, if employers search UAN wise. That means,
Employer has also an option in this search bar to search member id, if UAN of that particular member is
available with him.
The following screen contains an option to Confirm Previous Employment of New Members.
It is the responsibility of employers to collect the declaration form (Form-11) for each person.
Employers can either provide previous member id or UAN id to confirm previous employment of
members and click Display. Details of member against the Member ID/ UAN provided by employer
shall be displayed alongwith Confirmed/ Not Confirmed radio button in Verification Column. In case
the system finds out that there is a difference in name or DoB after confirmed radio button is
pressed by the employer, the system warns the employer to verify the details of that particular
member. There is also an option of First Time Employment, which is to be selected only in those
members whose current employment is the first employment.
Page 6 of 23
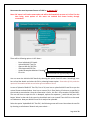
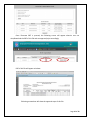
If employer verifies it, then he/she can select the button on the top (RHS) ‘Submit/Change’
as shown below in screenshot:
After pressing the button ‘Submit/Change’, following screen will appear to verify the details and
generate PDF of the same. If he/she is not satisfied with the case, he/she can simply delete it.
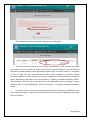
Once employer press the radio button ‘Generate PDF’, following screen will come giving an
option of approving or rejecting the PDF. Employer can view this PDF file by pressing on the link and
if satisfied, can approve it else he/she can reject it.
Page 7 of 23
PDF of this file will be as follows :-
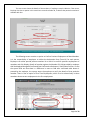
Next screen contains an option to download UAN list. On pressing the Download UAN List,
the following screen will appear. Here, employer can view the list as well as press the radio button
given on top to download PDF/Text of UAN List.
Page 8 of 23
Once employer press the radio button ‘Download PDF/Text’, various options to do so will
appear on the screen. Employer can choose any option as per his requirement and convenience and
download the same. User can request to regenerate only if the images/ logo of EPFO is missing in
the pdf file by selecting a radio button ‘Request to re-generate’. Download of Text file of UAN will
be made available shortly.
The downloaded file will appear as below :
The screen below is the outcome of option ‘History PDF’ containing two options ‘Approved
PDF’ and ‘Rejected PDF’:
Page 9 of 23
Once employer choose an option ‘Approved PDF’, he/she will be facilitated to download
approved pdf. He/she has to select the link and download the same. The screen giving option to
download approved pdf is as below.
Procedure is same for the Rejected PDFs.
Page 10 of 23
Now comes the most important feature of UAN i.e. to manage KYC.
Note: KYC menu is still under construction and will be facilitated fully as soon as it is final. For the
time being, some options of this menu are enabled and shown hereby through
screenshots.
There will be following options in KYC Menu :-
Enter Individual KYC Details
Upload Bulk KYC Text File
Approve Bulk KYC PDF File
View Approved PDF Files
Update Incomplete Member’s Details
Error List
Add Missing Information
Generate PDF for Approval/Rejection
User can enter the individual KYC details by selecting this option from KYC menu. Accordingly, user
has to feed the details and select the file by selecting browse option. Screenshot of this particular
option will be made available as and when get activated on Portal.
In case of Upload of Bulk KYC Text File, first of all, user has to upload bulk KYC text file as per the
revised format enclosed below. User has to create a file in Excel having 13 columns as specified in
the revised structure below. Once the information is fed in, this file is to be saved as CSV (Ms-DOS).
The user will have to open this file in Notepad, replace the separator (,) with #~# and press the
button ‘delete’ at the end of the record so that blank row is not created. Then this file is to be saved
as FileName.txt. Now your bulk KYC text file is ready to be uploaded.
Select the option ‘Upload Bulk KYC Text File’, the following screen will come. Now select the text file
by choosing a radio button ‘Browse’ and press submit. :Page 11 of 23
After submitting the case and upload, following screen will appear :
Just check the pdf by clicking on the link given to open/save the PDF, whether all records
have come or not. It is pertinent to mention here that the records complete in terms of DOB, DOJ
and Father’s/husband’s Name will be approved through this PDF. Rest of the records i.e. incomplete
in terms of DOB, DOJ and Father’s/Husband’s Name will be available in the option ‘Update
Incomplete Member’s Details’ wherein you have to complete the missing details by selecting an
option ‘Add Missing Information’ from the sub-menu of ‘Updating Incomplete Member’s Details’.
And afterwards, user will have to generate PDF for the completed entries by selecting an option
‘Generate PDF for Approval/Rejection’ from the sub-menu of ‘Updating Incomplete Member’s
Details’.
It is also pertinent to mention here that Approval of the file can be done with DSC only. User
can hereby either reject or approve the PDF generated. The screenshots for approving the file with
DSC are as follows:-
Page 12 of 23
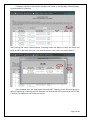
User can also view the Approved PDF Files by selecting this option from KYC Menu.
Now, user has to complete the missing details of those records, which could not be
approved in PDF due to incomplete information in respect of DOB, DOJ and Father’s/Husband’s
name. User has to select the option ‘Update Incomplete Member’s Details’ from KYC Menu then
select ‘Add Missing Information’. By selecting ‘Add Missing Information’, following screen will
appear which has various search options and total no. of records to be updated according to the
search type is also mentioned. User can select any option and add missing information by selecting
a radio button ‘Add Missing Information’ on the RHS.
Page 13 of 23
Once ‘Add Missing Information’ is clicked, following screen will come to complete the
missing information of that particular record. After feeding, user has to submit the record.
Following message will come.
Now the user has to generate PDF for its approval/rejection by selecting an option
‘Generate PDF for Approval/Rejection’ from the sub-menu of KYC i.e. ‘Update Incomplete
Member’s Details’. This screen will again have various search options and total no. of records will
be displayed according to the search option selected. User has to press ‘Generate PDF’. Screenshot
to this effect is as follows:Page 14 of 23
Once ‘Generate PDF’ is pressed, the following screen will appear wherein user can
view/download the PDF of this file and can approve/reject accordingly.
PDF of this file will appear as below:-
Following screenshots will show the approval steps of this file:
Page 15 of 23
Page 16 of 23
User can also view these approved KYCs in ‘View Approved PDFs’ as follows:-
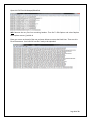
User can also view Error List generated while uploading the files containing errors. He/she
has to choose an option ‘Error List’ on the KYC Menu. Once ‘Error List’ is selected, Error Log will be
opened which will show last 10 error files. Each error file shall show the first 20 errors, after which
file validation is stopped. This screen will contain KYC File Upload Date & Time, Uploaded KYC File
and Error Log File. The screenshot is being given below:
Error Log File will be as follows:-
Page 17 of 23
Revised KYC Text File Structure 2.0
S.
No.
Field Name
Type
Size
Validation
1.
UAN
Number
12
i.
ii.
2.
Document Type
Character
1
3.
Document
Number
Character
30
4.
IFSC Code
Character
11
5.
Name
Character
85
6.
Expiry Date
Date
7.
Educational
Qualifications
Character
1
8.
Physically
Handicap
Character
1
9.
Physically
Handicap
Character
1
Remark
Mandatory
Number should be as per
verhoeff algorithm
iii. UAN should present in
database
iv. Atleast one member id
linked with UAN should be
of the same establishment
who is uploading the file
i. Mandatory
N- National Population Register
ii. Valid Values in {‘N’, ‘A’, ‘P’, A- AADHAR
‘B’, ‘T’, ‘D’, ‘E’,’R’}
P- Permanent Account Number
B- Bank Account Number
T- Passport
D- Driving License
E- Election Card
R- Ration Card
i. Mandatory
ii. Other Validations should
according to document
type
If value at serial number 2 is ‘B’
then not null otherwise blank
i. Mandatory
Name should be as, as appear in
ii. Special Characters are not KYC document
allowed
i. If at serial number 2 value Date
format
should
be
is ‘D’ or ‘T’ then not null dd/mm/YYYY
otherwise blank
ii. If not null should be
greater than system date
i. Optional
I - Illiterate
ii. Valid Values in {‘I’, ‘N’, ‘M’, N – Non Matric
‘S’, ‘G’, ‘P’, ‘D’} or blank
M - Matric
S - Senior Secondary
G - Graduate
P - Post Graduate
D - Doctorate
i. Optional
Y - Yes
ii. Valid Values in {‘Y’,’N’} or
N – No
blank
i. If value at Serial No.8 is Y L - Locomotive disability
than mandatory
V - Visual
Page 18 of 23
Category
ii.
10.
Gender
Character
1
i.
ii.
11.
International
Worker
Character
1
i.
ii.
12.
Marital Status
Character
1
i.
ii.
13.
Est ID
Character
15
i.
ii.
Valid Values in {‘L’, ‘V’, ‘H’}
or blank
Optional
Valid Values {‘M’,‘F’,‘T’} or
blank
Optional
Valid Values {‘Y’,‘N’} or
blank
Optional
Valid
Values
{‘M’,‘U’,‘W’,’D’} or blank
H - Hearing
M - Male
F - Female
T - Trans Gender
Y - Yes
N - No
M - Married
U - Un-Married
W - Widow/Widower
D - Divorcee
Mandatory
This establishment should
match with establishment
login.
Steps to create Bulk KYC Text File :
1)
2)
3)
4)
5)
6)
Create Excel File with 13 columns as described in above table.
Save excel file as CSV (Comma Separated Value MS-DOS)
Open CSV in text editor like Notepad / Wordpad etc
Replace comma(,) with ‘#~#’
Save as <filename>.txt
This txt file has to be uploaded under KYC – Upload Bulk KYC Text File
Page 19 of 23
Screenshots for creating bulk KYC text file are shown hereunder :
Sample Excel File
Now Save As: CSV(MS-DOS) as shown below:
Page 20 of 23
Open this CSV File with Notepad/WordPad:
IMP: Remove the very first line containing headers. Then Go To Edit Option and select Replace.
Now replace comma (,) with #~#.
Place your cursor at the end of the row and press delete to remove the blank lines. Then save this
file as filename.txt. Your bulk KYC text file is ready to be uploaded.
Page 21 of 23
KYC Error codes and their Description
S.No.
1
2
3
4
Error Code
Error Code 001
Error Code 002
Error Code 003
Error Code 004
Description
Data is not as per KYC format. (Has control characters)
Data is not as per KYC format. (Has non-print characters)
The file encoding should be ANSI.
UAN 100015374649 (Field-1) is blank or length is less than 12 or alphanumeric on line number 1.
UAN 100015374649 (Field-1) does not follow the defined algorithm, hence
invalid, on line number 1.
UAN 100015374649 (Field-1) is not found in UAN master table or not
associated with your establishment on line number 1.
5
Error Code 005
6
Error Code 006
7
Error Code 007
8
Error Code 008
9
Error Code 009
10
Error Code 010
11
Error Code 011
12
Error Code 012
13
Error Code 013
14
Error Code 014
15
16
17
Error Code 015
Error Code 016
Error Code 017
18
19
20
21
Error Code 018
Error Code 019
Error Code 020
Error Code 021
Gender Flag L (Field-10) is invalid on line number 4
International Worker Flag D (Field-11) is invalid on line number 4
Marital Status Flag J (Field-12) is invalid on line number 4
Establishment ID DSSHD0015477000 (Field-13) is invalid on line number 4.
(Blank or not 15 character or defined format.)
22
Error Code 022
23
Error Code 023
Establishment ID DSSHD0015477000 (Field-13) and login establishment id is
not same on line number 4.
Line is not as per UAN KYC format (13 Fields separated by #~# not found) on
line number 1.
UAN 100015374649 (Field-1) is not found in member master database on
line number 1.
Document Type E (Field-2) is incorrect on line number 1. It should be one of
N, A, P, B, T, D or E.
Document Number ALJPS3474B (Field-3) value is blank or length is greater
than 30 on line number 1.
Document Number ALJPS3474B (Field-3) is invalid on line number 2.
IFSC Code IOBN0111111111 (Field-4) is blank or length is less than 11 or not
alpha numeric on line number 1.
Employee Name Devendra (Field-5) is incorrect on line number 3. (either
length more than 85 character or has special characters.)
Expiry Date 10-11-2014 (Field-6) of document type is invalid on line number
4. (dd/mm/yyyy format, mandatory for passport and driving license)
Expiry Date 10-11-2014 (Field-6) of document type is greater than system
date on line number 4.
Education Qualification Flag T (Field-7) is invalid on line number 4.
Physically Handicap Flag H (Field-8) is invalid on line number 4
Physically Handicap Category Flag B (Field-9) is invalid on line number 4
Page 22 of 23
Common errors observed while uploading Bulk KYC Text file
1. Error due to Uploading of UAN Text file instead of Bulk KYC Text file:
There is a link given to Download PDF/Text File of UAN List in the Sub Menu ‘Download UAN
List’ of ‘UAN’ Menu. The file being downloaded from this link is not the text file required for
uploading Bulk KYC Text File by the employer. Bulk KYC Text File is to be made separately as
per the revised format given in User Manual for Employers Version 1.2.
The text file being made available as part of UAN downloads is only for use internally by the
employer and should not be uploaded as KYC text file.
2. Blank rows at the end of text file:
Your text file must not have any blank row. The most recurring error is to leave blank row in
your text file. User must place the cursor at the end of the last row and press ‘delete’ button
to remove the blank rows and save it for uploading the same.
If on uploading a text file, we are getting a message which says that error on line number X
which is one more than no of records in KYC text file, it implies that we have left a blank row
at the end of the text file. Placing the cursor at the end of the penultimate row and pressing
delete button to remove any blank row and saving the text file will solve this error.
3. Header row uploaded at start of the text file:
Header row has to be deleted before saving csv file as text file. Uploading txt file with
header row gives error of various types.
(Toll Free No. 1800-118-005)
Page 23 of 23