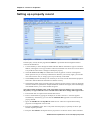
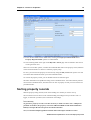
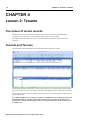
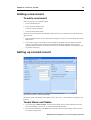
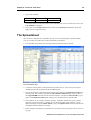
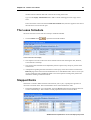
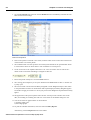
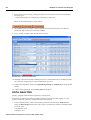
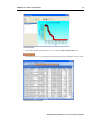
1
ARGUS Software: ARGUS Valuation-Capitalisation Step-by-Step Guide
The contents of this document are considered proprietary by ARGUS Software, the information
enclosed and any portion thereof may not be utilised for any purpose other than the consideration of
ARGUS Software. Information in this document is subject to change without notice and represents no
commitment on the part of ARGUS Software.
Copyright © 2008 ARGUS Software, Inc. All rights reserved.
Trademarks
ARGUS Software™ is a trademark of ARGUS Software. All other trademarks and registered
trademarks are property of their respective companies and should be treated as such.
ARGUS Developer was formerly known as CircleDeveloper.
ARGUS Development Budget was formerly known as CircleBudget.
ARGUS Valuation - Capitalisation was formerly known as Circle Visual Investor.
ARGUS Multiview was formerly known as CircleMultiview.
Disclaimer
This manual has been prepared for use by ARGUS Software personnel, licensees and customers.
ARGUS Software reserves the right to make changes without notice at any time to this document, and
shall not be held legally responsible for any typographical, arithmetic and listing errors.
Build date: 9 October 2008 12:55 am
Version: 2.50 Doc. Version: 1.0 Rev. Date: 9/10/08
ARGUS Valuation-Capitalisation Step-by-Step Guide
CONTENTS
i
Table of Contents
Chapter 1
Introduction . . . . . . . . . . . . . . . . . . . . . . . . . . . . . . . . . . . . . . . . . . . . . . . . 1
Welcome to the world of ARGUS . . . . . . . . . . . . . . . . . . . . . . . . . . . . . . . . . . . . . 1
The User Interface . . . . . . . . . . . . . . . . . . . . . . . . . . . . . . . . . . . . . . . . . . . . . . . . . 2
Menus . . . . . . . . . . . . . . . . . . . . . . . . . . . . . . . . . . . . . . . . . . . . . . . . . . . . . . . . . . . 4
Buttons . . . . . . . . . . . . . . . . . . . . . . . . . . . . . . . . . . . . . . . . . . . . . . . . . . . . . . . . . . 4
Input and data windows. . . . . . . . . . . . . . . . . . . . . . . . . . . . . . . . . . . . . . . . . . . . . 5
About the lessons . . . . . . . . . . . . . . . . . . . . . . . . . . . . . . . . . . . . . . . . . . . . . . . . . 5
Chapter 2
Getting Started. . . . . . . . . . . . . . . . . . . . . . . . . . . . . . . . . . . . . . . . . . . . . . 6
User Preferences . . . . . . . . . . . . . . . . . . . . . . . . . . . . . . . . . . . . . . . . . . . . . . . . . . 6
Customising the Button Toolbar. . . . . . . . . . . . . . . . . . . . . . . . . . . . . . . . . . . . . . 6
Chapter 3
Lesson 1: Properties . . . . . . . . . . . . . . . . . . . . . . . . . . . . . . . . . . . . . . . . . 8
Adding a new property. . . . . . . . . . . . . . . . . . . . . . . . . . . . . . . . . . . . . . . . . . . . . . 8
Setting up a property record . . . . . . . . . . . . . . . . . . . . . . . . . . . . . . . . . . . . . . . . 11
Sorting property records . . . . . . . . . . . . . . . . . . . . . . . . . . . . . . . . . . . . . . . . . . . 13
Chapter 4
Lesson 2: Tenants . . . . . . . . . . . . . . . . . . . . . . . . . . . . . . . . . . . . . . . . . . 14
The nature of tenant records. . . . . . . . . . . . . . . . . . . . . . . . . . . . . . . . . . . . . . . . 14
Tenants and Tenures . . . . . . . . . . . . . . . . . . . . . . . . . . . . . . . . . . . . . . . . . . . . . . 14
Adding a new tenant . . . . . . . . . . . . . . . . . . . . . . . . . . . . . . . . . . . . . . . . . . . . . . 15
Setting up a tenant record . . . . . . . . . . . . . . . . . . . . . . . . . . . . . . . . . . . . . . . . . . 15
Chapter 5
Lesson 3: Costs. . . . . . . . . . . . . . . . . . . . . . . . . . . . . . . . . . . . . . . . . . . . 20
Expenditure and Revenues . . . . . . . . . . . . . . . . . . . . . . . . . . . . . . . . . . . . . . . . . 20
Entering a capital cost . . . . . . . . . . . . . . . . . . . . . . . . . . . . . . . . . . . . . . . . . . . . . 21
Entering a running cost . . . . . . . . . . . . . . . . . . . . . . . . . . . . . . . . . . . . . . . . . . . . 22
Chapter 6
Lesson 4: Assumptions . . . . . . . . . . . . . . . . . . . . . . . . . . . . . . . . . . . . . 24
Just before the valuation . . . . . . . . . . . . . . . . . . . . . . . . . . . . . . . . . . . . . . . . . . . 24
ARGUS Valuation-Capitalisation version 2.50 Step-by-Step Guide
CONTENTS
ii
Chapter 7
Lesson 5: Valuation. . . . . . . . . . . . . . . . . . . . . . . . . . . . . . . . . . . . . . . . . 27
Traditional valuation . . . . . . . . . . . . . . . . . . . . . . . . . . . . . . . . . . . . . . . . . . . . . . .
Viewing the valuation results. . . . . . . . . . . . . . . . . . . . . . . . . . . . . . . . . . . . . . . .
The Value Fields . . . . . . . . . . . . . . . . . . . . . . . . . . . . . . . . . . . . . . . . . . . . . . . . . .
The Yield Fields. . . . . . . . . . . . . . . . . . . . . . . . . . . . . . . . . . . . . . . . . . . . . . . . . . .
The Rent Fields . . . . . . . . . . . . . . . . . . . . . . . . . . . . . . . . . . . . . . . . . . . . . . . . . . .
Valuation Details . . . . . . . . . . . . . . . . . . . . . . . . . . . . . . . . . . . . . . . . . . . . . . . . . .
The Valuation Log . . . . . . . . . . . . . . . . . . . . . . . . . . . . . . . . . . . . . . . . . . . . . . . . .
About reports . . . . . . . . . . . . . . . . . . . . . . . . . . . . . . . . . . . . . . . . . . . . . . . . . . . .
27
27
28
28
28
28
30
30
Chapter 8
Lesson 6: Cash Flow. . . . . . . . . . . . . . . . . . . . . . . . . . . . . . . . . . . . . . . . 31
Discounted Cash Flow . . . . . . . . . . . . . . . . . . . . . . . . . . . . . . . . . . . . . . . . . . . . .
The Cash Flow screen . . . . . . . . . . . . . . . . . . . . . . . . . . . . . . . . . . . . . . . . . . . . .
Rental Growth / Exit Value . . . . . . . . . . . . . . . . . . . . . . . . . . . . . . . . . . . . . . . . . .
The Spreadsheet . . . . . . . . . . . . . . . . . . . . . . . . . . . . . . . . . . . . . . . . . . . . . . . . . .
31
31
33
35
Chapter 9
Lesson 7: Tenure. . . . . . . . . . . . . . . . . . . . . . . . . . . . . . . . . . . . . . . . . . . 37
Adding tenures . . . . . . . . . . . . . . . . . . . . . . . . . . . . . . . . . . . . . . . . . . . . . . . . . . .
Tenure listing. . . . . . . . . . . . . . . . . . . . . . . . . . . . . . . . . . . . . . . . . . . . . . . . . . . . .
Multi-tenure . . . . . . . . . . . . . . . . . . . . . . . . . . . . . . . . . . . . . . . . . . . . . . . . . . . . . .
Complex tenures. . . . . . . . . . . . . . . . . . . . . . . . . . . . . . . . . . . . . . . . . . . . . . . . . .
Checking ground rent figures . . . . . . . . . . . . . . . . . . . . . . . . . . . . . . . . . . . . . . .
37
37
39
40
40
Chapter 10
Lesson 8: Portfolios . . . . . . . . . . . . . . . . . . . . . . . . . . . . . . . . . . . . . . . . 41
Portfolio View . . . . . . . . . . . . . . . . . . . . . . . . . . . . . . . . . . . . . . . . . . . . . . . . . . . .
Portfolio record . . . . . . . . . . . . . . . . . . . . . . . . . . . . . . . . . . . . . . . . . . . . . . . . . . .
General usage of a portfolio record . . . . . . . . . . . . . . . . . . . . . . . . . . . . . . . . . .
Specific usage of a portfolio record . . . . . . . . . . . . . . . . . . . . . . . . . . . . . . . . . .
Portfolio Actions . . . . . . . . . . . . . . . . . . . . . . . . . . . . . . . . . . . . . . . . . . . . . . . . . .
41
41
42
43
43
Chapter 11
Lesson 9: Finance . . . . . . . . . . . . . . . . . . . . . . . . . . . . . . . . . . . . . . . . . . 45
Debt and funding . . . . . . . . . . . . . . . . . . . . . . . . . . . . . . . . . . . . . . . . . . . . . . . . . 45
Finance in the Cash Flow. . . . . . . . . . . . . . . . . . . . . . . . . . . . . . . . . . . . . . . . . . . 46
Chapter 12
Lesson 10: Leases. . . . . . . . . . . . . . . . . . . . . . . . . . . . . . . . . . . . . . . . . . 49
The Lease Schedule . . . . . . . . . . . . . . . . . . . . . . . . . . . . . . . . . . . . . . . . . . . . . . . 51
Stepped Rents . . . . . . . . . . . . . . . . . . . . . . . . . . . . . . . . . . . . . . . . . . . . . . . . . . . . 51
Vacancies. . . . . . . . . . . . . . . . . . . . . . . . . . . . . . . . . . . . . . . . . . . . . . . . . . . . . . . . 52
ARGUS Valuation-Capitalisation version 2.50 Step-by-Step Guide
iii
CONTENTS
Fixed Value leases . . . . . . . . . . . . . . . . . . . . . . . . . . . . . . . . . . . . . . . . . . . . . . . . 54
Fixed Reversion leases . . . . . . . . . . . . . . . . . . . . . . . . . . . . . . . . . . . . . . . . . . . . 54
Option leases . . . . . . . . . . . . . . . . . . . . . . . . . . . . . . . . . . . . . . . . . . . . . . . . . . . . 54
Chapter 13
Lesson 11: Complex Properties. . . . . . . . . . . . . . . . . . . . . . . . . . . . . . . 56
The Tenancy Schedule. . . . . . . . . . . . . . . . . . . . . . . . . . . . . . . . . . . . . . . . . . . . .
Filling in the record data . . . . . . . . . . . . . . . . . . . . . . . . . . . . . . . . . . . . . . . . . . .
Using Rent Groups for Rental Value. . . . . . . . . . . . . . . . . . . . . . . . . . . . . . . . . .
Valuing using the Cap Groups . . . . . . . . . . . . . . . . . . . . . . . . . . . . . . . . . . . . . .
Generating multiple tenants . . . . . . . . . . . . . . . . . . . . . . . . . . . . . . . . . . . . . . . .
Seeing results . . . . . . . . . . . . . . . . . . . . . . . . . . . . . . . . . . . . . . . . . . . . . . . . . . . .
Adjusting the Schedule . . . . . . . . . . . . . . . . . . . . . . . . . . . . . . . . . . . . . . . . . . . .
56
57
57
58
58
59
59
Chapter 14
Lesson 12: Analysis . . . . . . . . . . . . . . . . . . . . . . . . . . . . . . . . . . . . . . . . 61
Filters. . . . . . . . . . . . . . . . . . . . . . . . . . . . . . . . . . . . . . . . . . . . . . . . . . . . . . . . . . . 61
Analysis types . . . . . . . . . . . . . . . . . . . . . . . . . . . . . . . . . . . . . . . . . . . . . . . . . . . 63
Chapter 15
Lesson 13: ARGUS Zone . . . . . . . . . . . . . . . . . . . . . . . . . . . . . . . . . . . . 73
Chapter 16
Contact details. . . . . . . . . . . . . . . . . . . . . . . . . . . . . . . . . . . . . . . . . . . . . 75
ARGUS Valuation-Capitalisation version 2.50 Step-by-Step Guide
CONTENTS
ARGUS Valuation-Capitalisation version 2.50 Step-by-Step Guide
iv
Chapter 1: Introduction
1
CHAPTER 1
Introduction
Welcome to the world of ARGUS
We are delighted that you have chosen ARGUS Valuation-Capitalisation.
This tutorial guide will make life easier for you as it sets out to provide essential and important
information on using the program and handling portfolios, properties, tenures and tenants in the
most efficient and comprehensive manner.
A program the size and complexity of Valuation-Capitalisation cannot be learnt instantly, and
indeed it is not designed as a quick fix product. Time and patience will be needed to go through all
the features of the system and it is most likely that you will not need to know everything in the
program to carry out your work effectively. But you can gain a good working knowledge if you
pace out the lessons and examples and practice the steps when you have the time.
A good understanding of the program will enable you to find the answers and solutions to your
particular tasks quickly.
The companion User Manual supplied with the software offers a structured explanation and
description of the contents of the program and the combination of both manuals should provide
sufficient detail and information to enable you to work alone.
The ARGUS support team is available if you have any queries. You may also find further
information on the ARGUS Software website:
http://www.argussoftware.com
In addition, you can use the resources provided for collaborative and team working in the ARGUS
Zone:
http://www.arguszone.com
How to use the Tutorials
The pages are divided into major subjects, and sub-divided into action sections. These are
numbered as steps for you to follow. Illustrations will ensure you are seeing the correct screens and
accessing the correct keys or menu options.
The first section sets the scene as you will get familiar with some of the important actions that take
place behind the scenes before you even see your first portfolio or property listing.
Each lesson builds on the previous lesson although you can jump in at any point when you want to
know about a specific topic.
Examples are provided where it is necessary to illustrate a point or command. Due to the
complexity and inter-connection between functions and processes there will be cross-references to
lessons elsewhere in this guide.
The comprehensive index should also provide quick access to answers.
ARGUS Valuation-Capitalisation version 2.50 Step-by-Step Guide
Chapter 1: Introduction
2
The User Interface
Screens
As a typical Windows application, all the main screens in Valuation-Capitalisation have a similar
format.
Command Centre
In the above example of the Command Centre, the window displays the following main features:
1. The Toolbar containing buttons;
2. Information and Input windows in the main body of the screen where you read and enter data
for Portfolios, Properties, Tenures and Tenants;
3. The ARGUS Zone pane.
The appearance of screens can be modified to suit individual preferences, and in some cases the
size and position of windows is retained after you close down the program, so that they are the
same when you log in again.
The first screen you encounter in the program is the Login dialog.
The Login dialog requires you to enter your unique User Name and Password. This will be given to
you when the program is supplied, but can be changed in the program by the System Supervisor.
ARGUS Valuation-Capitalisation version 2.50 Step-by-Step Guide
Chapter 1: Introduction
3
Login window
Note: A user with Supervisor status has access to all the features and options in the program
and can set user names and passwords using the System Options.
The User Manual and Administrator’s Manual deal fully with the role of the System Supervisor and
whilst this manual assumes the user has Supervisor status, this may not be the case in practice, and
you should consult your Supervisor if you need clarification on specific issues.
Without Supervisor intervention, the program can be entered through the login dialog with the
default setup:
1. Type “A” in the Username field
2. Type “A” in the Password field
3. Click the OK button.
After logging into the program you will be in the Command Centre window. This is main location
from which most activities start or take place.
An understanding of the format of the data is necessary to get a clear picture of how all the
component elements fit together.
The structure is best imagined as a “tree” with the main roots being the SYSTEM level that deals
with initialisation and defaults, branching out into the PORTFOLIO level, followed by then
PROPERTY and TENANT levels.
SYSTEM
Security, Defaults, Assumptions
PORTFOLIO
Assumptions and Overrides
Valuation,Cash Flow,Analysis
Reports
PROPERTY
Assumptions and Overrides
Tenures, Costs, Groups
ARGUS Valuation-Capitalisation version 2.50 Step-by-Step Guide
Chapter 1: Introduction
4
Valuation,Cash Flow,Analysis
Reports
TENURES
Freehold, Leaseholds
Ground Leases and Ground Rents
TENANTS and UNITS
Occupiers and Vacancies
Floor Areas, Leases, Rents, Costs
System level
Portfolio level
Property Level
Defaults
Costs
3
3
3
3
Areas
3
Valuation
3
3
3
Tenures
Tenant Level
Leases
& Rents
3
3
3
Performance
3
3
3
Cash
Flow
3
3
Reports
3
3
3
3
3
Table showing basic operations at each level
At each level there are sub-branches and common shared functions and these will be evident as you
go through the lessons.
Menus
Most commands and actions can be accessed from a menu (except in the Command Centre, where
most of the commands can be selected from the toolbar). There are two types of menus.
1. Top menus at the top of the window where you point the mouse pointer on the name and click
with the left mouse button. You can also use the Alt key on the keyboard plus the underlined
character on the menu name.
2. Sub-menus, or “pop-ups” when you click with the right mouse button when the pointer is over
a particular part of the screen. A different menu will appear depending on the possible activities
for that item.
Buttons
The button toolbars that are seen just below the top menus contain buttons representing some of the
commands (these act as a short-cut to some of the more frequently used commands).
Holding your mouse pointer over a button for a few seconds reveals the purpose of the button.
As you go through each lesson, the appropriate buttons will be pointed out to you.
In addition to the conventional buttons, you can find the Application button, which is located in
the top left-hand corner of the Command Centre:
ARGUS Valuation-Capitalisation version 2.50 Step-by-Step Guide
Chapter 1: Introduction
5
Input and data windows
Valuation-Capitalisation is a database system, and any data already existing in the database records
are displayed in “fields” or schedules. It is to be remembered that the program is not an “empty
box” awaiting your input, but is an active reservoir of information where data can be added,
updated, deleted and moved around. You can load data from files, import from other systems and
type in data by hand. You may not be able to enter all fields for editing as there is a security layer
that protects data and you will be informed when this occurs.
To navigate through screens, you can move from one field to another using the TAB key (just
above the Caps Lock key on your keyboard) or you can use the mouse pointer and click with the
left mouse button into any available field.
About the lessons
There are several ways of starting a session in Valuation-Capitalisation and the procedure presented
here is just one typical example of moving through the screens and functions.
In time, users generally find the most efficient way they want to work in the program, and this
depends on the type of work being undertaken.
We are going to take a direct route to get up and running as soon as possible, and therefore you will
be taken through procedures and commands that will be unfamiliar and probably not immediately
understood.
There is a temptation to get diverted and investigate things you come across on the screens. This is
fine, but will interrupt your progress and so prolong the learning timescale.
There is a lot to get through, and it is understood you may only wish to look at subjects that are
relevant to your work. In this case the chapters are set out in a way that enables concentration on
specific topics although a fuller understanding of the basic steps may be necessary to complete the
picture.
We will be starting the lessons in the Command Centre with the assumption that we are working
with Module 1, that is, the basic property valuation and calculation engine.
This will later be expanded into Module 2 that adds cash flow functions to properties.
Module 3 will be covered to expand the valuation and cash flow modules to work with portfolios.
Following lessons then widen the portfolio and property actions in Module 4 handling portfolio
analysis and performance measurement.
Finally, Module 5 is explained dealing with finance and debt.
Other lessons cover specific topics such as graphics and reports. These components have an
essential place in the structure of the program but tend to have a wealth of features that require
special attention and occur often in several places in the program.
It is not intended to explain the details of the background system settings since this is the domain of
the System Supervisor, which includes a number of IT and system level operations such as network
configuration settings and file backups, however you need to be aware of the effect of these
settings, and where you might require adjustments to be made.
ARGUS Valuation-Capitalisation version 2.50 Step-by-Step Guide
Chapter 2: Getting Started
6
CHAPTER 2
Getting Started
The Valuation-Capitalisation interface can be customised to some degree based on your
preferences.
Most of the major screens in the program retain their size and position after you leave each one.
Although each screen and dialog box is “modal” (i.e. is at the front of underlying windows and
remains the active window until it is closed), it is useful for example to expand the Command
Centre to full size so that you can see the lists whilst working in other screens.
User Preferences
Some aspects of the Command Centre display can be customised by clicking on the Application
button and using the User Options menu item.
User Options dialog box
1. The option labelled Ask for revaluation on selecting DCF switches on a special reminder
prompting you to revalue the selected property or portfolio before proceeding to the Discounted
Cash Flow function.
2. The Tag Colour drop-down allows you to select the colour of the “tags” in the first column of
the property and tenant listings. Since these two items are fundamental to the program’s
functions, you have the opportunity of displaying colours that will draw your attention to them.
3. The Dictionary drop-down allows you to change the program language if alternative dictionary
translations are available.
Customising the Button Toolbar
Right-click on a button in the toolbar, and select the More Commands... option. This opens the
ARGUS Valuation-Capitalisation version 2.50 Step-by-Step Guide
Chapter 2: Getting Started
7
1. On the Toolbars tab, select the toolbars you wish to be visible.
2. With the Commands tab open, you can drag items to the toolbar in order to rearrange the
buttons on the toolbar.
3. The right-click menu item Minimise the Ribbon allows you to specifically show or hide the
toolbar itself.
4. In some of the windows, you can also move the toolbar off the top line and make a “floating
toolbox”. It is possible to use the mouse to select and drag the toolbar off the bar at the top of
the screen to any other position. Once it is in this mode, the toolbar can be resized by dragging
the borders.
The toolbar can be replaced at the top of the screen by dragging the header on to the top again.
ARGUS Valuation-Capitalisation version 2.50 Step-by-Step Guide
Chapter 3: Lesson 1: Properties
8
CHAPTER 3
Lesson 1: Properties
ARGUS Valuation-Capitalisation has the capacity to store any number of properties, depending
upon the limit of your hard disk. Properties always have a parent portfolio, and any individual
property can be sub-divided using tenures.
Adding a new property
To add a new property, ensure you are in the Command Centre.
Note: If the portfolio module is not installed, the following section will not apply. Please go
directly to the next section “To add a new property”.
If you do have the portfolio module, you must select or create a portfolio to work in. For our
purposes, we will create a new portfolio.
1. Left-click the mouse anywhere in the list marked Portfolios.
2. Ensure the portfolio level is active (focused). You can tell if a level is selected by the darker
colour on the list’s title, on the left-hand side of the list.
3. To add a new portfolio, you can click on the New button or you can right-click inside the
portfolio list box and select New.
4. The new portfolio is created with the default system name. To change the name of the portfolio,
you must edit the record.
ARGUS Valuation-Capitalisation version 2.50 Step-by-Step Guide
Chapter 3: Lesson 1: Properties
9
5. Once again, there are several ways of entering the record. With the newly created record
highlighted, you can click on the Open button or right-click the highlighted record and select
Open, or you can double-click on the record.
The portfolio screen
6. In the Portfolio name field, type the name “Training Portfolio”. Use the File | Close menu
option to close down the window.
Note carefully that the portfolio record has a valuation date. This appears in the records and at the
top of the portfolio listing schedule. You can change this if you wish. This only affects a portfolio
valuation or cash flow and not individual properties. When you add a new property, it will have its
own default valuation date, but you can change this at any time.
Look closely at the Properties list in the Command Centre. With the “Training Portfolio” selected,
there are no properties in the list.
ARGUS Valuation-Capitalisation version 2.50 Step-by-Step Guide
Chapter 3: Lesson 1: Properties
10
To add a new property
1. Ensure the Properties level is focused in the Command Centre.
2. With the Properties list selected, click on the New button, or right-click and select New from
the menu.
3. You will be prompted to confirm the use of a template. Click OK to proceed.
4. A property record should be created. If you open it, you should notice that some of the fields
contain default data. This is due to the effect of the default property Template. Your Supervisor
can set up unlimited templates, and each portfolio can determine the default template that is
used when adding new properties.
5. When multiple templates have been defined by the Supervisor, you will be asked to choose
whether you want the default template recommended by the portfolio or any other template.
6. Double-click the new line in the list or select it and click on the Open button.
ARGUS Valuation-Capitalisation version 2.50 Step-by-Step Guide
Chapter 3: Lesson 1: Properties
11
Setting up a property record
Property record window
In the Property record, the first page labelled Address is presented. Work through the fields to
overwrite the default text.
1. Use the TAB key to move through the fields and enter address information. Type in a fictitious
address, ensuring the correct type of data is entered in each field. You do not have to enter data in
every field but ensure there is enough to identify the property.
2. The fields Town and County have labels that are blue “hypertext” controls. Clicking these
labels opens lists for you to select pre-defined text. Based on your security rights, you can add
new entries in these lists, or simply type in any text directly in the fields.
3. The Currency field is most likely to be useful if you are involved with international properties
and wish to hold all financial information in another currency.
4. The final three fields on the left of this page are categories for this property. These are important
when the Valuation-Capitalisation Analysis Module is installed. Once again, these fields display
user-defined lists for you to select suitable categories.
Note: These fields specifically relate to the geographic region, the main use-type sector and
the primary use type within the sector. You must ensure that these settings make logical sense.
5. Enter further data as required in the General data section.
6. Enter a valuation date by typing (for example, 01 01 2009. Note the “/” character appears
automatically. Alternatively, you can click the Valuation date hypertext to set a date from the
pop-up calendar.
7. Ignore the File/Ref No and Supl. Ref No fields for now. These are required when linking
properties to management or file records.
8. Keep the % owned as 100%. This is only used when the property is partially owned or split
between separate portfolios.
9. Keep the Area Measure as Imperial unless you prefer to see all floor areas in metric standard.
ARGUS Valuation-Capitalisation version 2.50 Step-by-Step Guide
Chapter 3: Lesson 1: Properties
12
10. Rent input view should be set to “Rent per annum”. This will ensure all your screen views of
rents interprets your inputs as rents per annum. If your local tradition or custom is to enter rents
on a monthly basis then switch to that standard.
11. Ignore the Manager/Code field. This is used primarily where several portfolio managers are
responsible for specific properties.
12. The Tagged check box MUST be checked ON. If this box is off, the property will be
temporarily ignored in all calculations.
13. The Active record check box MUST be checked ON. This switch effectively turns the record
off, regardless of the Tagged setting. The purpose is to create an archive option so that the
record can be referred to. If this box is off, the property will be permanently ignored in all
calculations.
14. Ignore the Notes field for now, but you can store random text by left-clicking the Notes
hypertext label.
15. Click the Tenure tab and ensure it shows a single freehold item under the word Property in the
Structure (or “tree”) box.
Property tenure page
16. Click on the last tab labelled Buy/Sell + Extras.
ARGUS Valuation-Capitalisation version 2.50 Step-by-Step Guide
Chapter 3: Lesson 1: Properties
13
17. Leave all these fields in their default state, ensuring the Property Purchase in DCF and
Property Disposal in DCF options are checked OFF.
18. The remaining fields on the right of the Buy/Sell + Extras page will be referred to later on but
can be ignored for now.
There are several other options, switches and commands that relate to the property record, but these
will be encountered later on when we refine the property setup.
For now, you can leave the property record screen by using the File | Close menu option. This will
save all the data entered and return you to the Command Centre.
To re-enter the property record, you can double-click the record item again.
The basic information will update the listing in the Command Centre. You cannot directly edit the
record in the Command Centre, but where there are lots of property records you can sort these in a
pre-defined order.
Sorting property records
With the property listing focused, click on the heading of a column you wish to sort by.
The sort direction arrow shown on the column heading will change when you do this. This is a
toggle, so each time you do this, the sort direction will change.
Lesson Summary
To generate a property record, it was first necessary to make sure there was a valid parent
portfolio. From there, the property record was added and filled in with details sufficient to
identify it and provide the basic parent for tenants and units.
Next, we will add a simple hypothetical tenant and avoid complex and diverse issues.
ARGUS Valuation-Capitalisation version 2.50 Step-by-Step Guide
Chapter 4: Lesson 2: Tenants
14
CHAPTER 4
Lesson 2: Tenants
The nature of tenant records
Tenant records represent the physical elements of a property. These may include buildings,
occupied or vacant premises, or non-buildings such as open sites or car parks.
The important function of the record is to store rent and lease information, plus the basis for
valuation.
Tenants and Tenures
You should be in the Command Centre with the TENANTS listing box visible.
To the left of the tenant listing, there is a Tenure pane (if this is not visible, drag the pane’s border
out to reveal the tenure tree). Any tenants you add will be attached to the currently selected tenure.
This is important when you have multiple tenures so that the correct calculations are applied to the
appropriate tenants.
Note: This technique is very useful for complex cost definitions. You can split a property into
multiple freeholds, for example, and attach separate groups of tenants to specific tenures.
Each tenure can then describe unique costs for its tenants. This will be clearer when we look
at adding costs.
ARGUS Valuation-Capitalisation version 2.50 Step-by-Step Guide
Chapter 4: Lesson 2: Tenants
15
Adding a new tenant
To add a new tenant
There are several ways of adding tenants.
•
In the Command Centre;
•
From inside any Tenant record;
•
From the Tenancy Schedule;
•
From inside the Quick Valuer.
These various screens will be encountered in these lessons, but we shall use the Command Centre
option for now.
1. In the Command Centre, click on the Tenants listing box to ensure it is focused and click on the
New button.
2. You will now see the new tenant record. The fields are not blank. They are filled in with the
content of the default tenant record associated with the Property Template. If the Property
Template holds more than one tenant, these form a list of Tenant Template records and you will
be asked to choose one.
Setting up a tenant record
Tenant record screen - Name & Status page
The tenant record is divided into four paged sections. For now, we will assume a valid tenancy for
this unit.
Tenant Name and Status
1. On the first page, Name & Status, fill in the tenant name such as “Acme Chemists Ltd” and
enter (for example), “Front Unit”, in the description field (optional).
2. Leave all the other fields in the Name section blank or on the current settings. These are used
for analysis and printouts.
ARGUS Valuation-Capitalisation version 2.50 Step-by-Step Guide
Chapter 4: Lesson 2: Tenants
16
3. In the General section, once again leave all fields as they are. You must, however, ensure the
Tagged and Active record boxes are ticked ON, otherwise the record is ignored in valuations.
Tenant Lease
1. Click the Lease & Rent tab. We will now enter a lease for this tenant.
2. You can enter a lease start date, term and expiry date. This is the contractual term and not
payment dates. Now you have choices, either:
a)enter a start date for the lease, say 28/09/2008, and a term of 15 years. The expiry date then
automatically appears.
Note: The expiry date is always the last day of the lease and NOT the first date after expiry.
OR:
b)enter the expiry date, say 27/09/2023. You will then be asked whether you want to update
the start date or adjust the term.
Note: Dates can be typed in manually or for convenience you can click the hypertext date
labels to produce a calendar to set the date.
3. Ignore the Break Exercised and Next Review fields. Ensure the Market Rent Review cycle
years field is 5.
4. For this typical lease, we will assume rent reviews are based on “Upward Only”. This of course
will allow over-rented units to fall back to market rental value at lease expiry or when a break
option is exercised.
5. Leave the Lease Type as “Standard lease”.
Tenant Rent
1. In the Rent section, click the hypertext label to view the Payment Dates dialog box. Select
“English Quarter Days”, “In Advance”, and click the Done button.
ARGUS Valuation-Capitalisation version 2.50 Step-by-Step Guide
Chapter 4: Lesson 2: Tenants
17
2. In the Current Rent field, enter a rent of £20,000. Do not type the currency or commas. If the
label to the right of the field reads “per annum” then the £20,000 will be the annual rent.
3. Ignore Holding Over for now. Our assumption is that this is a valid lease spanning the
valuation date. Where the valuation date falls between a lease expiry date and a future renewed
lease, any rent passing between these dates is represented in the Holding Over field.
4. Ignore Outstanding RR (Rent Review) for now. This is relevant only where the valuation falls
after a rent review date and the new rental has not yet been agreed. The assumed, backdated rent
can be entered in this field for valuation purposes.
5. Rental Value is the market rent that can be derived from a single calculated or “rough” figure,
or detailed in the tenant’s Area Schedule. We will look at this shortly, but for the meantime
ensure the ERV Mode field is set to Manual. Type in £30,000. (Remember, no currency symbol
or commas.)
6. The following fields can remain as they are, but note that the Geared ERV option allows
definition of a percentage of Market Rental Value to be applied at reviews.
7. The fields relating to Indexation are not available in this example, but will be seen later on
when we look at more detailed valuation issues.
ARGUS Valuation-Capitalisation version 2.50 Step-by-Step Guide
Chapter 4: Lesson 2: Tenants
18
8. Voids have an important place in the valuation process, and the types of voids applicable in the
tenant unit record are:
1)Current Void months, for the definition of a fixed void period from the valuation date until
letting, This moves the new lease start date consistently when the valuation date is changed.
This can be used for vacant units, for example.
2)Expiry Void months, defining the reletting or marketing period following determination of the
lease detailed in the tenant unit record.
3)Rent Free months, representing the period at the start of the lease where there may be an
agreement for the tenant to pay zero rent.
Leave all these fields with a value of zero.
Tenant Lease Renewal
At the end of the lease period, for the purposes of the valuation, we need to define some terms to
assume what will happen after the expiry of the current lease.
In this example we shall leave the fields in the default state, however, to understand what will
happen in the valuation process...
1. Click the Renewal tab.
2. Ensure “Full Rental Value” is selected in the Rent Basis drop-down. This means the sequential
lease will be let on full market terms. The alternatives allow the renewal to be on the same basis
of Geared Rental Value, to have a manually input Reversionary Rental Value, or to have a
specific manual Valuation input as an amount.
3. The Renewal Review cycle can be set as well as an assumed Rent Free period in the following
(renewal) lease. Re-letting probability should be 100%. The term for the renewed and
subsequent leases can also be set.
Tenant Valuation set up
The overall property valuation is an amalgamation of tenant valuation settings. This means that
each of the tenant records can uniquely specify how they are valued, or they can be a member of a
group that sets the basis for valuation.
In this way, the valuation can be of a general nature, or broken down into components making it
easier to represent risk and income security.
4. The Capitalisation basis for tenants can be controlled by either selecting a Capitalisation Group
or being PRIVATE. Selecting the group is a simple matter of clicking the hypertext label and
ARGUS Valuation-Capitalisation version 2.50 Step-by-Step Guide
Chapter 4: Lesson 2: Tenants
19
selecting one of the groups that may be defined. Groups are aligned to the property record, so
the same group list appears for all tenants in the property.
5. For our example select “Private” in the Capitalisation Group drop-down, select “Hardcore” as
the valuation method and enter 10.00 as the capitalisation percentage rate.
6. Ignore all other fields at this time. The unit is not over-rented so we can ignore the Froth OverRent section.
7. The simple tenant record data entry is now complete, so leave the tenant screen by selecting the
File | Close menu option. The data is saved.
Lesson Summary
We created and set up a simple standard tenant and looked at the minimum level of data
entry to establish a viable valuation entity.
In the next lesson, we will look at refining and expanding the data in order to move closer to
the valuation and cash flow stages.
At any point, you can view the valuation based on the current setup. In the Command Centre,
see the Valuation and Cashflow buttons.
ARGUS Valuation-Capitalisation version 2.50 Step-by-Step Guide
Chapter 5: Lesson 3: Costs
20
CHAPTER 5
Lesson 3: Costs
Expenditure and Revenues
For any property and tenant, there are almost always costs associated with them. Broadly, costs fall
into two categories, capital expenditure and running costs. Revenues are primarily obtained through
rental income, but other receipts can be allowed for under the same heading as costs.
Capital Expenditure will include the property purchase price, fees and expenses associated with it.
Also there may be property repairs and building works, single payments, fees and outgoings and
random expenditure. Running Costs (or Revenue Expenditure) are defined in ValuationCapitalisation as deductible sums often aligned or geared to rental income. These will include
regular sums such as management charges, common area maintenance, service charges, etc.
Costs for any property or tenant can be accessed from several places in the program where you see
the Costs button:
or the menu option: Schedules | Costs.
Adding Costs
1. Ensure you are in the Command Centre.
2. Click ONCE only with the left mouse button on the newly-created property record.
3. Click the Costs button to open the Costs screen.
ARGUS Valuation-Capitalisation version 2.50 Step-by-Step Guide
Chapter 5: Lesson 3: Costs
21
4. The “tree” on the left of the main schedule shows the hierarchy of the costs. The steps for costs
determine the scope of application. Costs attached to the Property item relate to the whole
property. Costs attached to the Tenure level affect only those tenants under that definition.
Individual tenant costs apply to the single tenant only.
5. Look first at the item labelled Acquisition Costs. This provides the property with the default
settings for Land Purchase Tax or Stamp Duty, plus agency and legal fees associated with the
purchase. For the United Kingdom there should be a default set-up for tiered Stamp Duty and in
other cases a single percentage rate may apply. The setting for this field is controlled by the
System Supervisor.
6. We will add a capital cost. Click ONCE with the left mouse button on the Property level in the
tree, then click the New button to add a new cost. This appears with the default label New cost.
Entering a capital cost
Cost Definition page
1. Look at the bottom part of the screen. A two-tab folder has appeared and the Definition page
will be open. Type the name “Repairs” over the words “New cost”, either in the tree or in the
Name field.
2. The Category field is blank. Add a category by typing “Building Costs” in the Category field
and press the Add/Insert category item button on the left hand side just below it:
The Building Cost category is added.
3. The Scope section should have both Enable in DCF and Enable in Valuations options
checked on. This means the cost will be used in both processes.
4. Do NOT click Apply to each Tenant, because if we add another tenant the cost will be
duplicated.
ARGUS Valuation-Capitalisation version 2.50 Step-by-Step Guide
Chapter 5: Lesson 3: Costs
22
5. In the Type section, ensure Capital Expenditure is selected and the Receipt/Income box is not
checked.
Cost Details page
1. The Cost Trigger provides the point at which a cost will apply, as a single sum or as the start of
a cycle of costs.
2. Assuming our capital repair costs will take place on 1st December 2008, ensure the Cost
Trigger option is set to “On Date” and enter the date 01/12/2008 below.
3. This is a single cost, so the Repeat...Until option should be set to “No Repeat”.
4. For the Amount section, type 5000 into the Fixed Amount field. This will be a capital repair
cost of £5,000 on the specific date.
5. Ignore the other fields at this time.
Entering a running cost
The same procedure is adopted for a running cost as seen above for a capital cost, but individual
fields will vary. We shall enter a common and typical cost for regular annual management charges.
1. Click once on the Property level again, and add another cost.
2. Label the cost ABC Management Fees.
3. Add a category Management Costs.
4. This time, check the box Apply to each tenant ON. This means that if there is more than one
tenant in the property, the cost will apply to all tenants.
5. The Type section on the right now allows the selection of Revenue Cost (Rent Deduction).
This is the option we want, as the new cost will apply as a deduction from gross rent paid.
6. On the Details page, you can use the “On Date” option or select “On Valuation” from the Cost
Trigger drop-down. This will ensure the cost cycle will run from the valuation date forwards.
ARGUS Valuation-Capitalisation version 2.50 Step-by-Step Guide
Chapter 5: Lesson 3: Costs
23
7. You now need to set the Repeat...Until section to show “Repeat Every”, with the months field
holding 12 to represent an annual charge.
8. Make sure the Until field is selected as “In perpetuity”, so there is no specific time limit for the
deduction.
9. In the Amount section, check the Annual option. (In this case, the “Every 12 months” option
means the same thing.)
10. Our choice for this example will be to type 1.00 in the % rent paid field so we will see a
consistent deduction of 1% from the gross rent to represent the management fees.
11. Once again, ignore the rest of the fields.
12. Close the screen by selecting the File | Save changes and Exit menu option.
Note: If you select the Cancel and Exit option, all your changes will be lost.
Lesson Summary
We have now added a capital cost and a running cost. With the large range of potential costs
that can be added, we have only seen a brief example of the addition of costs.
Valuation-Capitalisation allows unlimited costs and these can be quite detailed, including the
import of the results of a full property development appraisal defined in ARGUS Developer.
Random, related and unrelated costs can be defined using combinations of triggers and
timing types.
We shall encounter more costs and cost types in future lessons, and a more comprehensive
review of costs is to be found in the Valuation-Capitalisation User Manual.
ARGUS Valuation-Capitalisation version 2.50 Step-by-Step Guide
Chapter 6: Lesson 4: Assumptions
24
CHAPTER 6
Lesson 4: Assumptions
Just before the valuation
At this point, we can take a step closer to a valuation. Before doing so, we will examine the
underlying switches and options that affect the valuation.
Make sure you are in the Command Centre.
1. Select the property record by clicking ONCE with the left mouse button on the record.
2. Click the Assumptions button:
Select the Valuation rules option.
3. Look carefully at the Assumptions screen:
4. Note the tick boxes on the right. If they are ticked, this means the particular option applies the
Assumptions setting of the parent portfolio. You can turn any of these settings off by
unchecking the tick box, thus enabling a manual choice for this property.
5. The Valuation-Capitalisation User Manual goes into detail about the meaning of each of these
switches and they will be referred to as necessary in this tutorial but briefly, the various options
provide alternative calculation and math processes.
ARGUS Valuation-Capitalisation version 2.50 Step-by-Step Guide
Chapter 6: Lesson 4: Assumptions
25
6. The first page selects the following:
Hardcore method can apply a single rate to all varying lease income, or add a “layer” rate to
the layer or marginal income.
Term & Reversion method capitalisation can apply the reversionary yield at the next lease
event or at the renewal date.
The “Next Event/Review” definition can be regarded as Open Market rental only or as any
event type.
Initial Yield (Cap Rate) capitalisation can assume zero or a market rent when actual passing
rent is zero.
Ignore the Special INI file option.
For the purposes of calculating the Equivalent Yield where there is over-rented income, the
choice is to capitalise the excess “froth” income at the continuously residualised Equivalent
Yield Rate or to apply the individual “froth” rates set in the tenant or Cap.Group records.
For the purposes of calculating the Equivalent Yield, capital costs can be discounted at the
equivalent yield rate or at the rates set specifically in the Costs Schedule.
The target value used to calculate the Equivalent Yield can be selected as the Unrounded Net
Value or Rounded “Say” Value.
Acquisition Fees calculations can be based on the resulting Unrounded Net Value or the
Rounded Say Value.
In circumstances where leasehold properties are capitalised using the standard approach for
Sinking Fund and Tax, there is a commonly known inherent mathematical error that can be
corrected using Pannell’s Method for Double Sinking Fund Correction.
The order of placement of the Capital Costs in a traditional valuation can vary as being
deducted from the Gross Value before calculation of acquisition fees or after the fees.
Running Yields in the valuation results can be based on several settings from Gross to Net
values with combinations of applying fees and costs.
Valuation Tables provides several choices for the basis of Years Purchase calculations.
Leasehold Sinking Fund and Tax on the Sinking Fund apply to leasehold valuations and work
in conjunction with the Valuation Tables settings. It is to be noted that “Years Purchase” figures
for freehold properties will always assume these settings to be zero.
7. We shall accept the current settings.
ARGUS Valuation-Capitalisation version 2.50 Step-by-Step Guide
Chapter 6: Lesson 4: Assumptions
26
8. Similarly, click on the Rounding page. The boxes control the Rounding settings for the
property. These are also subject to overriding settings in the portfolio record. We shall accept
the current settings.
9. Having inspected these settings, we can now proceed to the valuation stage.
Lesson Summary
It is strongly recommended that you check Assumptions before any valuation or cash flow.
In general, these are corporate rules and preferred methods and approaches to valuation, and
depend on the customs adopted by your company or organisation. Some are obvious, some
are obscure, but it is important to know that these settings could possibly explain the reason
for particular results.
ARGUS Valuation-Capitalisation version 2.50 Step-by-Step Guide
Chapter 7: Lesson 5: Valuation
27
CHAPTER 7
Lesson 5: Valuation
Traditional valuation
For our simple example, we can proceed to the valuation functions. For this process, ensure you are
in the Command Centre.
Make sure the property record is highlighted, although it works the same way when any tenant
record is selected.
Locate the Valuation button on the tool bar:
Remember that commands operate on the focused level so that the valuation will produce a
portfolio valuation if the portfolio record is selected, and a property valuation when the property
record is selected.
Viewing the valuation results
1. On selecting the Valuation button, the calculations are executed and the results are presented in
the Valuation window.
ARGUS Valuation-Capitalisation version 2.50 Step-by-Step Guide
Chapter 7: Lesson 5: Valuation
28
2. There are additional functions relating to the valuation to be found in the menu bar and tool bar
but the main fields on the left side of the screen show capital values and base yields. On the
right there is a targeting section, and running yield profile.
3. The valuation date can be changed, but note that this will change the property valuation date in
the record itself.
The Value Fields
1. The Gross Value is the result of the sum of capital values produced by capitalisation of net (or
net operating) income before deduction of capital expenditure adjustments.
2. Capital costs follow next (depending on the order as selected in the property Assumptions).
Any expenditure defined as capital sums is shown as a discounted amount.
3. Acquisition costs apply to the resulting values. This is the fee calculated on the residual net
value amount (as defined in the property assumptions) and not on the gross value.
4. There are two values that follow. The Net Value is the final residual value calculated exactly.
The “Say” value figure is the rounded net value (based on the rounding settings in the property
assumptions). The small check box with the “lock” enables a manual figure to be entered
according to personal choice, hence the “say” analogy.
5. In cases where Vendors Fees are defined in the Costs Schedule, extra fields appear in the next
position showing the extra adjustment.
The Yield Fields
1. The first of these items is the Equivalent Yield field. The Equivalent Yield is the single
capitalisation rate that produces the current valuation capital value. This means that if there are
multiple capitalisation rates in use, then the individual rates are not physically over-written, but
the equivalent yield displays the single rate that produces the same answer.
2. The Equivalent Yield is affected by the type of valuation tables applied as set up in the property
assumptions. The Assumptions also control the value against which the equivalent yield is
measured. In the iterative process, the value being targeted by the equivalent yield can be the
Net Value (i.e. the natural capitalisation rate override) or the “Say” value (as if this was the Net
Value).
3. There may be two Equivalent Yield fields visible, in which case the first is the general industrystandard basis of measurement using Annually in Arrears valuation tables. The use of
Quarterly in Advance tables produces the second equivalent yield.
4. The Initial Yield field shows the first yield as seen in the running yield profile schedule on the
right of the screen.
5. The Reversion Yield shows the last running yield.
The Rent Fields
The final three fields provide a quick reference to the rents and rental value, and are seen again in
the context of the running yield profile schedule.
Valuation Details
There is not much detail on the screen at this point, but it is essential that the figures shown are
correct and accurate.
Valuation-Capitalisation presents this information in report formats.
ARGUS Valuation-Capitalisation version 2.50 Step-by-Step Guide
Chapter 7: Lesson 5: Valuation
29
Generating a report is simple, and is a flexible way of getting immediate output on screen and on a
printer.
1. Select the File | Reports menu option or click on the Reports button:
2. Select a report as directed.
3. A list of reports will appear. Find one called Detailed Valuation Report, or something similar.
If there are no suitable reports in view, speak to your System Administrator to provide a report.
.
4. Double-click the report name or select the report name and click on the Preview button.
5. You can navigate through the report using the button toolbar:
ARGUS Valuation-Capitalisation version 2.50 Step-by-Step Guide
Chapter 7: Lesson 5: Valuation
30
Move tools to move between pages:
the Zoom tools:
and the Output tools:
The output tools allow you to export a report as a file or for use in other applications, and to print a
report. The File menu contains a Printer Setup option.
The Valuation Log
Each valuation result and all supporting information can be stored in a special database called the
Valuation Log.
1. Following a valuation, select the menu item Log | Save Log or click on the Save Log button.
2. On the dialog box that follows, select “MASTER” to denote a special or significant record, or
“SCENARIO” to save an interim or test valuation.
3. The records build into a list of valuations. View the list by selecting the Log | View Log menu
option or clicking on the View log button.
About reports
There are three reporting systems integrated within Valuation-Capitalisation.
These are the ARGUS custom report generator, the Crystal report generator and the SSRS
report generator.
A range of default reports is included in Valuation-Capitalisation; however, the creation of new or
modified reports is a matter for the System Supervisor. ARGUS Software provides a bespoke report
writing service, but all the necessary skills for ARGUS reports are provided in the documentation
with the system. Note that Crystal and SSRS are third-party products that can be purchased
separately.
Lesson Summary
Valuations are based on the scope of the request to perform the calculations. When focused on
a portfolio, the effect is to value all the valid properties in the portfolio. A property valuation
is performed when a property (or any of its tenants) is selected. The valuation screen provides
a number of functions associated with valuations, and these will be seen shortly.
At any time, even outside the valuation screen, report listings can provide fully formatted
report outputs for presentation or data checking.
ARGUS Valuation-Capitalisation version 2.50 Step-by-Step Guide
Chapter 8: Lesson 6: Cash Flow
31
CHAPTER 8
Lesson 6: Cash Flow
Discounted Cash Flow
ARGUS Valuation-Capitalisation offers a seamless connection between the standard valuation
processes and the generation of Discounted Cash Flows (DCF).
You do not have to go through any special set-up operations to open the cash flow functions. In
fact, the valuation features are all accessible from inside the cash flow screen.
The Cash Flow screen
1. Continuing with our property example, first ensure you are in the Command Centre, and then
highlight the property row in the listing.
To open the cash flow module, click on the Cashflow button:
2. The Cashflow window appears and displays six tabs. We will be concerned only with the first
three pages in this exercise.
The DCF setup page
DCF Setup page with options section
1. This page sets the parameters for the timing and behaviour of the spreadsheet.
ARGUS Valuation-Capitalisation version 2.50 Step-by-Step Guide
Chapter 8: Lesson 6: Cash Flow
32
2. Leave the From (start date) to be the same as the valuation date. The exit date is automatic.
3. Enter 10 years 0 months 0 days in the three Duration fields. You can enter a duration of up to
100 years.
4. In the DCF Calculation Options section, select “Monthly” as the Discounting basis. This
assumes all figures are processed as if timed at the first of the month. This setting matches the
accuracy of commercial spreadsheets that cannot track sums on a daily basis. (For a more
accurate result, you would select “Daily” as the Discounting option.)
5. Set the Calculation Target & Results to “Ungeared IRR”. The result of the last property
valuation appears in the stored value field at the bottom of this section. Other settings allow you
to preset the Present Value (PV) or Internal Rate Of Return (IRR) as the first cash flow sample
target. The IRR for updated value (enabled by the Update Value check box) sets the PV at the
stored value automatically on re-entering the spreadsheet.
6. It is possible to select a Say/Rounded value by selecting Use Valuation as PV and selecting
the “Say/Rounded” option from the drop-down. This allows you to choose to use the rounded
net value, rather than the exact calculated net value result from the property valuation. If this
option is selected, the Say/Rounded value will appear in the stored value field next to it. Do not
select this option for now.
7. The option switches should be set as follows:
Ignore rent apportionments should be OFF. Rent apportionments are the fractional rents that
would appear in a transaction where rents were paid in advance for instance, and the purchaser
or vendor of the investment would be actually paying or receiving a calculated rent balance. As
with the acquisition fees this setting depends on whether this is an actual transaction or the
property is already owned and retained.
Apply cap. ex. defined after exit does not apply in our example, so you can leave this OFF,
but if such costs occur in the future after the end of the cash flow period, then these may have a
significant effect on the final “exit” valuation.
8. ARGUS Valuation-Capitalisation works with ARGUS Developer by using a special file that can
be imported into cashflows. In this case, Attach data from file (in the ARGUS Developer
Link section) should be OFF.
9. On the Finance tab, Enable finance should be OFF since this requires the Finance Module.
When enabled, an additional button (Create/Edit) becomes available, enabling you to open the
finance account set-up. For further details on applying finance, see “Lesson 9: Finance” on
page 45.
ARGUS Valuation-Capitalisation version 2.50 Step-by-Step Guide
Chapter 8: Lesson 6: Cash Flow
33
Finance setup for DCF
Rental Growth / Exit Value
Rental Growth setup
ARGUS Valuation-Capitalisation version 2.50 Step-by-Step Guide
Chapter 8: Lesson 6: Cash Flow
34
Exit Value setup
1. These are presented using two tabs on the Cashflow window. Tabs are displayed on the left of the
window, giving access to the setup pages. The first page defines the basis for market rental
growth. The second defines the basis for capitalising the investment value at the end of the DCF
period. This is referred to as the “Exit Date”.
2. There are several settings for rental growth. Your choice will depend on the nature and
complexity of the investment. The lower part changes when a particular “Basis” is chosen. The
User Manual goes into more detail on the alternative choices, but for our purposes select
“Override”. Make sure Start from... is set to “DCF Start Date”, and Growth variant is
checked OFF.
3. Type the following into the override schedule:
Item
Rate
Months
1
3.00%
12
2
3.50%
12
3
4.00%
0
This will set market rental growth to 3.00% for the first 12 months, 3.50% for the next 12
months, and 4.00% thereafter. Leave all other cells at zero.
4. Now we can set up the Exit Value section - click on the Exit Value tab. Select “Override” as
the basis; once again, the lower section changes depending on the choice of basis.
5. Choose “Hardcore” as the valuation method. This method will discount all future rent and costs
occurring at and after the exit date assuming a “Growth Implicit” capitalisation rate (Hardcore
does not apply rental growth). Other types of exit capitalisation can be based on a Cap.Rate or
Initial Yield method, or Term and Reversion. Be careful with Initial Yield method as the value
will be zero if the rent is zero, unless you have set the option in the property record Assumptions
to apply market rent instead. The Term and Reversion method option uses an equivalent yield
basis and therefore applies the same yield rate to the term and reversion income.
6. In this case, the selection of “Override” allows us to input a set of capitalisation rates to make
variable assumptions depending on the DCF exit date, for example - after 1,2,3,4 years (and so
on).
ARGUS Valuation-Capitalisation version 2.50 Step-by-Step Guide
Chapter 8: Lesson 6: Cash Flow
35
7. Type in the schedule:
Item
Rate
Months
1
8.00%
0
This means 8.00% will be used whenever the cash flow ends. Leave all other cells at zero, and
Calc Method as “Stepped”.
8. Type 1.00% in the Vendors Fees field and 1.00% in the Purchasers Costs field. These fees
apply to the exit capital sum only.
The Spreadsheet
The cash flow is displayed in a spreadsheet or grid of cells representing date columns and data
rows. It is usually not visible until you have performed a calculation.
1. The spreadsheet page shows the central grid with the control palette on the left:
DCF Spreadsheet page
2. To turn the control palette on the left-hand side of the screen on or off, click on the vertical
dividing bar between the palette and the spreadsheet grid.
3. Our set-up should have placed the figure from the last valuation in the Manual PV Value field.
Automatically, this will have calculated the Internal Rate of Return (IRR). Type 10.00% in
the Ungeared IRR field and click the calculator button to calculate the Present Value. Type a
figure in the Manual PV Value field, and press the calculator button to find the IRR.
4. The Cashflow can be viewed as monthly, quarterly, 6-monthly, annual and 5 yearly. Set the
drop-down list in the toolbar to “Annual”. If you change any data in the cash flow, you can
update the display using the Update button or [F5]. The Update Value check box refreshes the
spreadsheet automatically after a change.
5. Other settings in the palette are placed here for convenience and are the same ones as on the setup page.
ARGUS Valuation-Capitalisation version 2.50 Step-by-Step Guide
Chapter 8: Lesson 6: Cash Flow
36
6. The spreadsheet row display can be expanded or contracted for condensing the spreadsheet
when there is a lot of data.
These are controlled by the four buttons
on the toolbar. They represent “Full”
data, “Merged rent+value” data, “Sumary and Rent rows” and “Empty” data showing only the
main summaries.
7. Certain row types in the spreadsheet can be “drilled” into in order to access underlying data
records. To do this, double-click on a row or right-click and select the Expand row menu
option.
Note: Changes to data are actual changes to the records, so be careful when using this feature.
8. You can export and print the cash flow in several ways. Using the Excel button will open
Microsoft Excel and place the current spreadsheet into a new worksheet.
9. The Reports button provides options to produce a formatted schedule or a spreadsheet layout.
The other options in the DCF screen are generally for analysis purposes and are discussed later on
in these lessons and in the main User Manual.
Lesson Summary
The DCF is one of the most important parts of the Valuation-Capitalisation system. It forms
the heart of the Analysis module and provides the valuer or manager with a lot of
information.
The DCF requires attention to the details for basic options, rental growth and “exit”
capitalisation. Costs and inflation are covered automatically in the Costs Schedule. A variety
of outputs can be generated through reports and graphics.
ARGUS Valuation-Capitalisation version 2.50 Step-by-Step Guide
Chapter 9: Lesson 7: Tenure
37
CHAPTER 9
Lesson 7: Tenure
Adding tenures
So far, our simple example has assumed an uncomplicated freehold property so that it has an
outright ownership status.
Many properties, however, are leaseholds so that the rights of enjoyment are limited by time. The
consequence of this brings into play several new factors and we can extend our example property
by making some new assumptions.
First of all, we must make a copy of our example property so we can work with the duplicate and
preserve our original record.
1. In the Command Centre, highlight the original example property.
2. Right-click to open the pop-up menu.
3. Select Copy records and click OK when the prompt appears. The new duplicate record should
appear. Depending on the current sort order, the default setting may place the record at the end
of the list.
4. The Name will probably say “Copy of..(name)”. You may change this if you wish.
Tenure listing
To the left of the Tenant listing, you will find the Tenure “tree” and there will be one item under the
PROPERTY header labelled “Freehold”.
Tenure tree
1. Click ONCE with the left mouse button on the word “Freehold” to highlight it.
2. Click the right mouse button to bring up the tenure menu.
3. Select Change Type.
4. Answer Yes to proceed.
ARGUS Valuation-Capitalisation version 2.50 Step-by-Step Guide
Chapter 9: Lesson 7: Tenure
38
5. Right-click again and select Edit..., or double-click on the word “Leasehold” to open the
Ground Lease Editor screen.
Leasehold screen
Our original template will have filled in the details automatically, but we will change the
parameters.
1. In the Start date field, type or select 29th September 1990 and set the term of the ground lease
as 125 years.
2. In the Review cycle Yrs field, type 5 years.
3. Review type can be selected as “Upward & Downward”. This assumes the ground rent can go
down if the rent on which the ground rent is calculated falls.
4. On the right side of the screen, the ground rent detail can be entered. Payment timing should be
set on Quarter Days for this example. The Current Ground rent payable we shall assume has
been advised to us at £500 per annum, so type 500 into the Current Ground Rent p.a. field.
5. Renewal Ground Rent p.a. is used for the long term assumed rental if the ground lease is
renewed and we can ignore this for this example.
6. Click the Geared Ground Rent ON. This enables various gearing options.
7. Click the Geared to rental value switch ON and type 10% in the adjoining field.
ARGUS Valuation-Capitalisation version 2.50 Step-by-Step Guide
Chapter 9: Lesson 7: Tenure
39
8. Next, click the Valuation setup tab and select “Deduction from gross income” from the Basis
drop-down list. This will reduce the Net Rental Income by the appropriate amount of the
calculated ground rent.
9. Since there is only one tenant, we can select percentage based on tenant rental values. In a
multi-tenant property, the proportion of ground rent deducted from each tenant’s rent for the
purpose of the calculations is a matter of choice by the valuer as to the appropriate basis.
(An alternative option would be the separate capitalisation of the ground rent. The resulting
value would then be deducted from the gross capitalisation of tenants income.)
10. Close the Ground Lease screen.
Multi-tenure
Matters are sometimes complicated when a property is the sum of combined interests where
perhaps two adjoining properties have been purchased, each with different ownership structures.
In such cases, the Tenure tree is expanded using the right-click menu.
It is important to remember that tenants have a tenure “parent” even in our simple original freehold
example and you must be careful to ensure the correct occupancy structure.
To add additional tenures, you must select the “parent” and ensure it is highlighted, open the rightclick menu and select New Tenure.
ARGUS Valuation-Capitalisation version 2.50 Step-by-Step Guide
Chapter 9: Lesson 7: Tenure
40
Complex tenures
The structure of multiple tenures can get quite complex. Valuation-Capitalisation uses a “tree”
construction to show this.
“Concurrent” tenures are added vertically for properties that comprise several head interests. “Subtenures” are added in lower level steps so that ground rent paid out from these tenures is received
as income by the superior interest.
In the above example, we see two freeholds and one head lease at the base or root level, with two
sub-headleases, one attached to one of the freeholds and the other to the base leasehold.
The design is tiered so that it that can be “nested” downwards.
Checking ground rent figures
As a quick reference to the effect of a ground lease deducted from the tenant’s rent, you can inspect
the tenant’s personal valuation sheet.
1. In the Command Centre, select the tenant whose parent tenure is Leasehold.
2. To open the tenant’s Rent Schedule, you can click on the Rent Schedule button:
3. When the Rent Schedule appears, click the Tenant Valuation tab and scroll down to view the
valuation calculations. The valuation process is seen with the gross tenant rent, less the
deduction based on the ground lease settings.
4. Close the Rent Schedule.
Note: An important reminder here is to ensure the property Assumptions hold an
appropriate setting in the valuation tables options for Sinking Fund and Tax on the Sinking
Fund as part of the leasehold valuation processes.
Lesson Summary
Leasehold properties involve more details in the definition and amount of data required to
complete the property record information than for a freehold. Occasionally, leaseholds can be
so complex as to require a separate calculation of ground rent payments with manual inputs
into the ground lease schedule.
ARGUS Valuation-Capitalisation version 2.50 Step-by-Step Guide
Chapter 10: Lesson 8: Portfolios
41
CHAPTER 10
Lesson 8: Portfolios
This lesson applies to users with the portfolio level module enabled.
Portfolio View
The portfolio in Valuation-Capitalisation is the master record that holds and controls a group of
properties.
These properties are not permanently linked to the portfolio since they can be copied and moved
between multiple portfolios.
When a portfolio lists its properties, any actions are undertaken on those property records that are
ACTIVE and TAGGED.
Note: ACTIVE = True (This means that the record is alive and available for operations.
Tagging allows the record to be included or excluded from operations/calculations.)
ACTIVE = False (This means that the record is dead. Tagging has no effect.)
Within each property record, these two flags are shown on the first (Address) page. The TAG is
also seen as the “tick” in the leftmost column of the property listing, and the ACTIVE status is
shown next to it.
Tag and Active indicators
A property that is ACTIVE means it is alive and valid for any operation. If it is turned off to be
inactive, the property record is ignored in all circumstances.
With an active record, the tag indicator must be ON for the property to be included in valuations,
cash flows and other activities.
Portfolio record
When dealing with multiple properties, these may be a collection of individual unrelated buildings,
or a group forming part of a holding owned by a corporate body, etc.
Thus, our sample property might well be in a general portfolio where we can dump anything we
like. On the other hand, this may be just one property as part of an owned group of properties in a
controlled portfolio.
We can take different views depending on the nature and purpose of the portfolio record.
It is possible to have unlimited numbers of portfolios, so be sure to give each one a unique name.
ARGUS Valuation-Capitalisation version 2.50 Step-by-Step Guide
Chapter 10: Lesson 8: Portfolios
42
1. Add a new portfolio record from the Command Centre by clicking in the portfolio listing box
and clicking the New button on the toolbar. Click Yes to confirm adding a new portfolio.
2. Double-click on the new portfolio to open the portfolio record and in the Portfolio name field,
type any label you wish to identify the portfolio.
3. The Valuation date field will not be relevant for a general usage portfolio, but is essential when
performing portfolio level valuation, cash flow and analysis functions.
4. At this point, you should check the Assumptions that will be used in portfolio level actions and
as the defaults being passed to the property level.
5. Click the Assumptions button:
Select the Valuation rules option to review these settings.
6. In a general usage portfolio, the security function may be less important than in a multi-user
“client” portfolio record, although this can be set up to restrict users accessing the record.
7. As the creator of the portfolio you have primary rights to control security.
For multi-user security control
1. Click the Security button in the portfolio record:
2. See the list of groups and users on the left. As you place your mouse pointer over a user name,
the box on the right displays the access rights for that user.
3. For now, we will close the security dialog box without making any changes.
4. Close the portfolio record.
General usage of a portfolio record
The concept of the general usage portfolio is that any number of properties listed in it have no
relationship with other property records in the same portfolio.
ARGUS Valuation-Capitalisation version 2.50 Step-by-Step Guide
Chapter 10: Lesson 8: Portfolios
43
Valuation dates can be quite different in each property record and the valuation and cash flow
parameters are unique.
One major departure from this is the Assumptions settings. You may recall that the system defines a
set of defaults for the general calculation options, tables, rounding (and so on), and the portfolio
record can adopt these as its own defaults and pass these on (modified as appropriate) as a set of
defaults for the property records. In turn, each property record can alter its Assumptions to suit a
particular circumstance.
For a general usage portfolio, other functions of the portfolio record may not be relevant but this
depends on the degree to which the portfolio is required to unify a group of properties.
Specific usage of a portfolio record
When a portfolio represents a collective group of properties, then the portfolio functions rely on
certain important data settings.
1. In the portfolio record, ensure the valuation date is correct, as it will be used in all valuation and
cash flow operations regardless of individual property settings.
2. If you wish to ensure individual property records in the portfolio hold the same valuation date,
click the Align properties to portfolio date button.
Portfolio Actions
From the portfolio record or Command Centre, the main portfolio functions can be undertaken.
The Portfolio Valuation is a batched grouping of Active, Tagged properties.
Note: In normal circumstances, all Active records will be Tagged. However, where the
Analysis module is enabled and the Filter option used, or where property and tenant records
have been manually tagged, the portfolio will only see the tagged records.
The portfolio valuation result is the accumulation of values of individual properties. Portfolio
yields are the result of a true integration of all costs and income as if a single property, thus
ARGUS Valuation-Capitalisation version 2.50 Step-by-Step Guide
Chapter 10: Lesson 8: Portfolios
44
presenting a real-time calculation at the portfolio level. The program does not generate an artificial
averaging of these statistics.
The portfolio cash flow figures require a broader understanding of the principles involved. The
portfolio DCF can assume a single “iterated” capital value, a static calculated value, and separate
individual property values.
The portfolio DCF setup takes control of the portfolio cash flow function, although the user can
select to use the individual property cashflow settings.
Valuation-Capitalisation provides the functionality to obtain a single residual Present Value for a
portfolio with a given single Internal Rate of Return, but for obvious reasons cannot iterate to
multiple values when numerous properties are involved.
Lesson Summary
A portfolio record is the header for a group of properties. Properties may have a common
owner or be totally independent. The scope and scale of a portfolio is practically unlimited
with the added capability of being created to hold copies of properties from multiple
portfolios to form super-portfolios.
Data integrity is paramount, and whilst portfolios can be protected from inadvertent
modification or deletion, much of the activity relies on responsible users understanding the
concepts and limitations.
ARGUS Valuation-Capitalisation version 2.50 Step-by-Step Guide
Chapter 11: Lesson 9: Finance
45
CHAPTER 11
Lesson 9: Finance
This lesson applies to users with the Finance Module enabled.
Debt and funding
The standard valuation process applying capitalisation methodology does not traditionally take
account of debt, other than recognising major commitments incurring expenditure at some point in
time. The element of interest is largely ignored, as this is implied in the capitalisation yields used.
The cash flow, however, is strongly connected with loans and borrowings and explicitly displays
the figures as part of the process.
A simple loan: Interest Only
1. To access the Finance module from outside the cash flow environment, ensure you are in the
Command Centre, select a property or portfolio and click on the Finance button in the toolbar:
Finance setup screen
2. The Finance window displays the list of accounts at the top and settings at the bottom.
ARGUS Valuation-Capitalisation version 2.50 Step-by-Step Guide
Chapter 11: Lesson 9: Finance
46
3. For a simple loan, add a new item by clicking the Add Finance Item button
, and in the
Name column type a name for the loan, like “Simple Loan”. Enter an interest rate in the Debit
% columns. This will provide a single interest rate throughout the term of the loan.
4. Choose “Interest only loan” in the Lending Type field.
5. Select “Purchase” in the Linked to.. field. This will ensure only the investment purchase figure
has the loan applied to it.
6. In the Capital £/% field enter 60.00 representing a loan of 60% of the purchase price. Any
figure over 100 will be regarded as a fixed amount and not as a percentage.
7. Leave the Duration at 0 years and 0 months to infer repayment at the end of the cash flow
period.
8. Select the Rate Type to “Effective”. This is the same as the APR or rate that will be
compounded by the remaining parameters to calculate the final annual rate.
9. Set Compounding to “Quarterly”, and Payments to “Monthly”.
10. Finally, make sure the Interest rolled up to end switch is off, otherwise all interest will be
accumulated at the end of the cash flow.
Other loans: Mortgage
1. To create a Mortgage or amortised loan, add a new Finance item as before, and type 60% in the
Capital £/% field. Select “Mortgage” from the Lending Type drop-down, and type a name and
interest rate in the schedule.
2. All other fields are defined in the same way as a simple loan, except for the Interest rolled up
to end flag that is not available here.
Other loans: Equity
1. Similarly, add a new loan as above.
2. In the Capital £/% field, type 20000 as the equity investor’s capital.
3. Fields previously unavailable are now enabled to set up an equity partner’s input. These are the
Equity at end of DCF flag with its associated input field and the Equity % on monthly
balance field.
4. Set an interest rate in the schedule. This will act as a basic return on equity capital to be
extracted out of tenant income.
5. To represent a lump sum of the profit at the end of the DCF, tick the Equity at end of DCF box
and type 100 so that the investor retains 100% of the profit.
Other loans: Auto-regulating
1. This special purpose loan uses available income in prior months to reduce the debt balance and
to specify the sum or percentage that will be retained in the cash flow.
2. Set the Capital £/% to 100% and Cashflow Surplus Retained to 50%. This means that if there
is a positive surplus, 50% will be used to reduce the loan debt. If negative, then additional
money for the whole of the negative balance will have to be borrowed to redress the shortfall.
Finance in the Cash Flow
Each property cash flow can hold individual definitions of loans. These can also then be applied in
a portfolio cashflow.
1. From the Command Centre, select a property, and click on the Cashflow button.
2. Click on the Finance tab, and check the Enable finance switch ON. The box headed Finance
will now be available.
ARGUS Valuation-Capitalisation version 2.50 Step-by-Step Guide
Chapter 11: Lesson 9: Finance
47
3. The central area on the Finance tab shows the list of defined accounts.
Existing finance accounts can be edited by selecting a name and clicking the Create/Edit
button below to open the Finance window. New accounts can be added in the Finance window
itself.
4. To select accounts from the Finance list, check the appropriate boxes. To remove an account
from the list, select the account and click the Create/Edit button. You can then delete the
account from the Finance window.
5. Select “Simple Loan” for this example.
6. At the top of the box, you can set the interest to be ignored for the purpose of calculation of the
whole investment IRR.
7. Ignoring all the other cash flow parameters, click the Calculate button to display the
spreadsheet.
8. Look at the main spreadsheet and locate the row labelled Simple Loan IRR: <calculated IRR%>
9. The program calculates an internal rate of return for the loan itself as well as the IRR for the
whole investment.
10. Additional loans can be added, and adopt a hierarchy based on the order in which they are
added - assuming the most senior loans are defined first.
ARGUS Valuation-Capitalisation version 2.50 Step-by-Step Guide
Chapter 11: Lesson 9: Finance
48
Lesson Summary
Whilst there are a great many types and formats for loans, the most common types are
available in Valuation-Capitalisation. Loans operate at the local data level when viewed in the
cash flow screen, but are fully implemented when using the portfolio analysis functions from
the Command Centre. This means the Portfolio Performance function will apply the
individual property finance options as per each individual property cash flow.
ARGUS Valuation-Capitalisation version 2.50 Step-by-Step Guide
Chapter 12: Lesson 10: Leases
49
CHAPTER 12
Lesson 10: Leases
With a general knowledge of the structure of Valuation-Capitalisation, we will revisit and reinforce
some of the issues previously discussed.
Recurring income is derived from rent. The frequency and amount of rent for a particular unit or
entity is controlled by an agreement in the form of a lease, licence or other such legal document
setting out rights and obligations for occupancy and payment.
Valuation-Capitalisation offers a whole range of options for setting up leases that reflect as much as
possible these real-life documents.
For this lesson, we shall set up some leases with some breadth of imagination to understand how
both simple and complex leases can be engineered.
1. From the Command Centre, open the example property record, and set the Valuation date to
01/01/2006 (First of January 2006). Next, add a new tenant record to our example property. To
do this, click on the Tenants button to open the Tenancy Schedule and click on the New button.
2. Open the tenant record and type a suitable tenant name in the Name field. Nothing more is
needed on this page at this time.
3. Click on the Lease & Rent tab.
Example 1 Short term lease
Set the start date for the lease to the twenty-first of July 2005 (21/07/2005).
Set the Years field to 3 for a 3-year term.
Type zero in the Market Rent Review cycle (Yrs) field so there are no rent reviews.
The Review Type will not matter in this case.
On the rent section, click the Payment Dates label to select “Monthly” from the top drop-down
box, “In advance”, on day 1 of the month.
Type 30000 in the Current rent field as the annual rent currently being paid.
The Holding over field is unused since the valuation date is within a valid lease term. If our
valuation date had been set within a re-negotiation period between leases, the Holding over
field becomes available to define any income received during that time.
Since we have no rent reviews in the lease, the Outstanding RR option is ignored. If the
valuation date was just after an open market rent review date and the rent has not yet been
agreed, an assumed rent can be entered based on the probable rental figure.
Next, we need to define market rent. We could easily enter a figure for market rental value, but
we shall use the Area schedule to define the floorspace and attach rental rates.
Click the Rental Value label or Areas button
to open the Area Schedule.
ARGUS Valuation-Capitalisation version 2.50 Step-by-Step Guide
Chapter 12: Lesson 10: Leases
50
For a simple single floor unit, add a new row with the Add one or more lines button, accepting
the default Non-retail setup by clicking the Add button on the dialog box.
In the Label column, type “Main Office”. Select “G” for ground floor and an area of “2,000 sq.
ft”.
The Measurements (Property) drop-down can be used to select either imperial or metric
format.
Type 25.00 in the ERV/ft2/pa column representing £25.00 per sq. ft.
The rental of £50,000 appears in the Rental Value pa column and at the bottom of the screen.
Click the Rounded option in the box at the bottom of the screen as the sum to pass back to the
tenant record.
Close the Area Schedule with the File | Save changes & Exit option and the tenant record will
be updated.
Ignore Geared ERV and Indexation Group options in this case.
Do not enter anything in the Current Void months field, as this will force a void period of
ARGUS Valuation-Capitalisation version 2.50 Step-by-Step Guide
Chapter 12: Lesson 10: Leases
51
months from the valuation date and overwrite the existing lease terms.
Type 6 in the Expiry Void months field to add a 6 month reletting period on expiry of this
lease.
It does not matter in this case about the Rent Free months field, since this applies at the start of
the lease and is now well in the past.
The Lease Schedule
The short term lease can be seen more clearly in the Rent Schedule.
1. Click the Rents button
to open the time-based schedule.
Lease Schedule event display
2. The sequence of events in the lease can be tracked from the start showing the date, duration,
event and rent at each step.
3. The content of the schedule can be adjusted by hand to represent any unique or peculiar lease
constructions.
4. Assumptions regarding the leases that follow on the expiry of the current lease are held in the
Renewal page of the Tenant record and should be set to “Full Rental Value” with a review cycle
of zero. Setting the Years and Months fields to zero will repeat the existing lease pattern and
include the reletting void between leases.
Stepped Rents
Often there is a need to define rents that increase from year to year, or perhaps are agreed to be
varied on a fixed sum basis. The Lease Schedule can be used to define these rents.
1. In the Rent Schedule for any required date, select the Event column and use the drop-down list
to select “Interim Step”. This is used to set rent payments between rent review dates.
ARGUS Valuation-Capitalisation version 2.50 Step-by-Step Guide
Chapter 12: Lesson 10: Leases
52
2. Alternatively, select “Fixed Rent” if the step is required to fall on a rent review date. The
importance of this distinction is seen when adding costs to the property for rent review fees.
When these need to be based on rents agreed at official rent review dates, the Fixed Rent event
is recognised and dates between review dates are ignored.
3. For both Fixed Step and Interim Rent, the amount of rent can be typed in manually in the rent
column.
Vacancies
A tenant record can represent a vacant unit with an assumption of a probability of reletting on
certain terms in the future. Thus, unless there is a deliberate requirement to produce a nil value for
a unit, each record should have a form of lease defined.
1. Add a new tenant. You can do this from within a tenant unit record by clicking the Add new
tenant button.
2. Enter a lease start date of 24th March 2009 and a term of 10 years with a market rent review
cycle of 5 years. This is several months after the valuation date, therefore suggesting a current
void.
3. Notice immediately that the Current Rent is zero, the Holding over option is available and the
Status Bar at the bottom of the screen is displaying a sign “FUTURE LEASE”.
4. Let us assume this is a retail shop property. We can enter the rental value using the Area
Schedule again, but we need the more complex zoning options.
5. Click the Areas button
to open the Area window.
6. Click the plus button to add area lines. Select “Retail” from the Line Type field.
7. We need No. of Lines (i.e. retail zones) to be 4. This allows us to see Zones A, B, C and
Remainder.
8. Reduction per zone % should be 50% as the reduction from the previous zone rental rate.
Zone Area does not matter here.
ARGUS Valuation-Capitalisation version 2.50 Step-by-Step Guide
Chapter 12: Lesson 10: Leases
53
9. Click on the Add button to close the dialog box.
10. Four rows have been added with access only on the first row to the rental value rate per sq. ft
(the Zone A Rate).
11. Type 300 into the Area column for all zones, and type 20 into the ERV/sq.ft./p.a. column.
Automatically, you see 20 appear in the greyed out cells, and the rental value calculated at the
lower part of the screen.
Note: The menu item View | Visible Columns... | Column Selector will allow you to change the
column type to display rent per month if required. Used in conjunction with the metric/
imperial option mentioned above, rents for rates per metre per month can be entered.
12. Note the ITZA (Area in Terms of Zone A) has been calculated along with the total floor area in
the Summary section in the bottom pane of the window.
13. Our shop has an upper floor used for storage. Add a new line in the schedule using the plus
button but add one “Non-retail” line.
14. Type 1200 in the Area column and 5 in the ERV/sq.ft./p.a. column. This adds further rent to
the total.
15. Finally, there are 3 car spaces at the rear of the shop, so add one new line with the line type “Car
Parking”.
16. You can only type in relevant fields. In the Units column type 3, and in the Unit Rent p.a.
column, type 1000.
ARGUS Valuation-Capitalisation version 2.50 Step-by-Step Guide
Chapter 12: Lesson 10: Leases
54
17. A total rent of 20250 appears as the total rent. Click on the option labelled Unrounded in the
Rental Value passed back to tenant section and close the window by clicking on the Save &
Exit button on the toolbar.
18. Check the Rent Schedule to see the final effect.
Fixed Value leases
Where it is necessary to define a tenant unit record with a fixed known value, or a value of zero,
you can do this manually, ignoring all capitalisation inputs.
1. In the tenant record, click the Valuation tab and click the Fixed Value box. All fields are then
greyed out and a new field appears for the fixed figure value.
2. Reports, valuations and cash flows now apply the fixed figure.
Fixed Reversion leases
In some circumstances, the value of the reversionary component of a renewed lease might need to
be a fixed figure. For example, an agricultural holding with a tenanted farm that will revert to a
fixed agricultural land value when the current tenanted lease expires.
1. Click the Renewal tab in the tenant record.
2. From the drop-down menu in the Rent basis field, select “Specific Value”.
3. Two new fields appear, enabling you to enter a fixed sum as a reversionary value, and a
discount rate when evaluating for the present date.
Option leases
In many cases, both the landlord and tenant may agree to incorporate Break Options in leases.
These can be favourable to the landlord, tenant or mutually. When an option is exercised, the lease
is terminated and the program treats the situation as a lease expiry with consequent application of
post lease voids and reletting periods.
1. To set Break Options in the tenant record, click the Breaks Schedule button
open the Breaks Schedule.
to
Break options
2. On the left, select None to ignore all break options. To Activate a break, select the appropriate
1st, 2nd, 3rd row, and so on.
ARGUS Valuation-Capitalisation version 2.50 Step-by-Step Guide
Chapter 12: Lesson 10: Leases
55
3. Dates can be entered in all the fields and the tick boxes can be filled in appropriately.
4. Setting both Landlord and Tenant boxes ON signifies mutual break options.
Note: You cannot set a break on a row without specifying Landlord or Tenant choices.
Lesson Summary
Leases, rents and terms for occupancy come in many forms, most of which are handled
automatically and others requiring manual input through the Lease Schedule. Flexibility is
provided in a property where the ownership structure is defined as tenures, each of which
holds the property’s tenants.
ARGUS Valuation-Capitalisation version 2.50 Step-by-Step Guide
Chapter 13: Lesson 11: Complex Properties
56
CHAPTER 13
Lesson 11: Complex Properties
In the earlier examples in these lessons, the focus has been on properties with single or few tenants.
When it comes to dealing with a large shopping centre, for example, there are ways of handling the
volume of data quickly and efficiently.
In such cases, the Tenancy Schedule plays an important part in the input process.
To demonstrate the workings of the schedule, we need a multi-tenanted property. We will create a
small shopping centre with 10 tenants.
The Tenancy Schedule
1. From the Command Centre, select the tutorial portfolio and click once inside the property listing.
Add a new property, enter the record and call it “Sample Shopping Centre”.
2. Return to the Command Centre or stay in the property record, but whichever you choose, open
the Tenancy Schedule by selecting the menu option Schedules | Tenants or clicking on the
Tenants button:
Tenancy Schedule
3. The Tenancy Schedule will appear without any tenants. Add a tenant using the New button.
4. Assuming we are entering data from a schedule document, most of the information would
probably be clearly displayed for us to copy the data into the schedule. However, much time can
be saved by examining the typed schedule first and identifying common characteristics, such as
lease terms, rent, and so on.
ARGUS Valuation-Capitalisation version 2.50 Step-by-Step Guide
Chapter 13: Lesson 11: Complex Properties
57
5. Our list contains several tenants with similar leases. 25 years with 5 year rent reviews. Each unit
is the same size (Zoned 250 sq. ft per zone). Our first tenant can act as a template for the other
tenants if we define much of the data first, then duplicate the record and individually adjust the
variations for each tenant.
Filling in the record data
1. Click once in the name field of our new tenant in the Tenancy Schedule and enter “General
Stores” as the tenant name.
2. In the description field, type “Unit 1”.
3. The Parent Tenure column is the tenure to which the tenant belongs.
4. The Covenant column is available to select the user-defined covenant types.
5. You can use the Show Fields buttons in the button bar to selectively show or hide sections of
the schedule. Click on “Lease” to place the lease section in view.
6. In the Lease Start column, you can type the lease date or click on the arrow to bring up the
calendar. Enter 24/06/2001, being 24th June 2001.
7. The lease fields work the same way as the tenant record. In the following fields type:
Years = 25 Months = 0
Days = 0
RR Cycle = 5
Up only = ON
Current rent = 50000
Using Rent Groups for Rental Value
1. Click the Areas button to define the tenant’s floor areas. In the area schedule, add the automated
retail definition to apply four zones and type 250 sq. ft in each.
Next, click the Rents button
. In the Rental Value Groups schedule, add a new group,
type Retail in the Description column and 150 in the ERV p.a. Rate column.
ARGUS Valuation-Capitalisation version 2.50 Step-by-Step Guide
58
Chapter 13: Lesson 11: Complex Properties
2. Save and close the schedule and return to the Area Schedule. In the ERV Group column, select
the “Retail” rent just entered.
3. Click the Rounded option at the bottom of the Area Schedule. Save and close the screen.
4. The rental value should appear in the Tenancy Schedule with the ERV Update column showing
“Rounded Areas”.
Valuing using the Cap Groups
1. The next column we need is the Capitalisation section. We are going to assume all tenants will be
valued the same way and use the Capitalisation Groups Schedule.
2. Click on the Assumptions button and select the Capitalisation groups option. Add a new
group. Type “Retail Group” in the Group column, choose “Hardcore” as the method and 8.00%
as the Hardcore rate. Save and Close the group schedule.
3. In the Tenancy Schedule’s Cap Rate Group column, select “Retail Group” from the drop-down
list.
4. For any other more specific terms required for the tenant records, we can double-click the row
in the Tenancy Schedule to open the actual tenant record. For this example, we will ignore this
step.
Generating multiple tenants
1. Now we need to duplicate the master tenant record for the other tenants in the list.
2. Click the Copy button
and type 9 in the number field. This generates the multiple
records. We can now make adjustments to each record.
ARGUS Valuation-Capitalisation version 2.50 Step-by-Step Guide
Chapter 13: Lesson 11: Complex Properties
59
Seeing results
1. At this point, one possible course of action might be a quick look at the progress of the valuation.
Firstly, click the Assumptions button to ensure the settings are correct, then click the Valuation
button.
2. You can also use the Cashflow button if you wish.
Adjusting the Schedule
The Tenancy Schedule can be customised to present user defined views of the data. For example,
you may wish to hide unused columns such as the Holding Over and Outstanding Rent Review
columns in the above example.
1. Click on the small button in the top left corner of the schedule:
This displays a list like the following:
2. Check the unwanted column heading items OFF.
ARGUS Valuation-Capitalisation version 2.50 Step-by-Step Guide
Chapter 13: Lesson 11: Complex Properties
60
3. You can set the leftmost columns to be fixed so that only the main part of the schedule scrolls.
To do this, select the menu option Tools | Fixed left columns.
Lesson Summary
The Tenancy Schedule is a powerful and flexible way of entering and viewing large amounts
of tenant data. For properties with complex tenure structures, all tenants are seen in the
schedule with their associated parent tenures, and the job of switching tenants between
tenures is a simple task of re-selecting the parent. See the Valuation-Capitalisation User
Manual for more information.
ARGUS Valuation-Capitalisation version 2.50 Step-by-Step Guide
Chapter 14: Lesson 12: Analysis
61
CHAPTER 14
Lesson 12: Analysis
The addition of the Analysis module for Valuation-Capitalisation opens up a range of functions that
extend and build on the valuation and cash flow modules.
At the portfolio level, analysis works in conjunction with Filters. This enables a total or sub-view
of the portfolio to be valued or analysed.
Before proceeding to use the analysis options, we will see how filters work.
Filters
Every property record and tenant record has a TAG. flag. This is displayed as a “tick” column in the
Command Centre listings.
Only those properties that are ACTIVE and TAGGED apply to the valuation and cash flow
processes.
The filter automates the selection of records by tagging and un-tagging records meeting the filter
parameters.
The filter parameters cover a range of items as shown in the list on the left of the screen and
choosing any one provides a relevant choice of settings. Filters can be combined so that you can
have say, a selected group of regions together with a selected group of sectors.
To access the filter selector from the Command Centre, you must have a property or portfolio
selected.
1. From the Command Centre, select a portfolio with multiple properties for which the category
fields region, sector (and so on) have been defined, such as one of the Sample Portfolios.
2. Click on the Tag Filters button:
ARGUS Valuation-Capitalisation version 2.50 Step-by-Step Guide
Chapter 14: Lesson 12: Analysis
62
The Tag Filter window
3. The selection items are on the left, the available list in the middle and the selected list on the
right.
4. We shall assume we want to target all Retail/Leisure properties. First, make sure the word
“Sector” is selected and click to switch ON the adjoining box.
5. Use the mouse to highlight the labels in the middle box referring to Retail and Leisure. To
highlight multiple entries you can do this by holding down the mouse button and dragging over
a range, or by using the Control key and clicking with the mouse on the selected items.
6. Next, click the Move Selected > button so that the screen appears as shown below:
Filter with Retail and Leisure Sector categories selected
Other items can be added to the filter using the same method, but only those with the category type
ticked on will apply.
ARGUS Valuation-Capitalisation version 2.50 Step-by-Step Guide
Chapter 14: Lesson 12: Analysis
63
7. To apply the filter, click the Apply button. The results are shown at the bottom of the screen
declaring the number of records found matching the filter.
8. We can save this filter as a file so that it can be retrieved later on. Click the Save As.. button.
Type “Sector Filter” and click OK. Click the Close button to close the Filter screen.
9. On returning to the Command Centre, if any properties have matched the filter, a tick appears in
the Tag column next to the property address in the listing, otherwise it is blank.
10. To add or remove properties from the filter, simply click the mouse in the Tag column. Any
valuation or cashflow at this stage will apply only to the tagged properties.
11. We will use a different technique to reset the filter and tags. Place the mouse pointer over the
property listing box and click the right mouse button. Select “Tags”, then “All On”. All tags are
restored and the filter is reset.
Analysis types
•
PROJECTIONS ANALYSIS
•
CATEGORY ANALYSIS
•
PERFORMANCE ANALYSIS
•
DATA ANALYSIS
•
RENT ANALYSIS
To apply portfolio analysis to a single property, set all property tags OFF (right-click popup menu
“Tags”) and then set the required property tag ON (click the leftmost column in the Command
Centre listing).
PROJECTIONS ANALYSIS
Periodic “snapshots” of cash flows providing amount and percentage statistics at each interval.
The cashflow window includes a Projections section to show period-by-period snapshots.
1. From the Command Centre, select a property and click on the Cash Flow button.
2. The Cashflow screen appears. As discussed earlier in “Lesson 6: Cash Flow” on page 31, the
Cashflow options should be set up, particularly Rental Growth and Exit Value assumptions.
ARGUS Valuation-Capitalisation version 2.50 Step-by-Step Guide
Chapter 14: Lesson 12: Analysis
64
3. Click the Projections tab, and click on the Calculate button to immediately calculate the cash
flows for the current settings.
Cash Flow Projections
4. If the control palette on the left is not visible, click the button on the vertical bar on the far left
of the window to reveal the palette.
5. The schedule holds rows that represent various analytical elements at the specified date shown
in each column. These are fixed values or sum of numbers over each period.
6. On the screen next to the Update button there is an “Auto” check box switch. This forces a
refresh of the screen when something is changed. Set this ON.
7. Ensure the period of analysis is set in the Years field to 5.
8. The viewing period frequency is set by the field below the Years field. Set this to “Annual” for
a yearly cycle.
9. We can now make a choice between Money Weighted or Time Weighted analysis. This relates
to the performance statistics for Total Return and Capital Employed. Money Weighted applies
an annual averaging for income over each cycle period. Time Weighted compounds the monthly
figures.
10. The application of the special options below the first section provides variable views of the
data, for including or excluding fees and costs. Leave these on the default settings for now.
11. You can click the two graph buttons on the toolbar for
1) Amount graphs; and
2) Percentage graphs.
12. To print the schedule information, select the menu item File | Reports.
Alternatively, click the Reports button on the toolbar.
ARGUS Valuation-Capitalisation version 2.50 Step-by-Step Guide
Chapter 14: Lesson 12: Analysis
65
CATEGORY ANALYSIS
This is a breakdown of data based on physical attributes displaying results in graphs and schedules
with a set of Views and variable Category types.
As previously mentioned, this is a portfolio level function based on the current set of records in the
filter.
Category Analysis works by reading category settings in property and tenant records. These
categories are often found in drop-down list items such as Region, Sector, Covenant, Use type and
so on. If there is no setting for these fields, they are classed as undefined and so the more detailed
the information that is available, the more useful will be the analysis.
In the Category Analysis screen, there is an important field called Category/Type. Viewing this list
gives a good idea of the basic analytical headings. These can be extended to include user defined
fields. This is an advanced option where extra unique fields can be added to records by the system
administrator.
1. From the Command Centre, select a portfolio that has properties with some category fields
containing data. For example, if you do not have multiple properties in a portfolio try adding a
few using the Copy Selected Record command, enter each record and make selections for the
Region, Sector and Use Type fields.
2. Open the Category Analysis screen by clicking on the Analysis button and selecting the
Category Analysis option.
3. If the default screen is showing a blank area in the middle of the screen, select “Use Type” from
the Category/Type drop-down list.
Category Analysis Screen
4. This shows the Say Value breakdown for Use Type. Say Value is a “View”. Change views by
selecting a different tab. Change categories by selecting a new item from the Category/Type list.
5. Change the displayed result information using the menu item Analysis | As Percentages (or
Analysis | As Amounts), or use the buttons on the toolbar:
.
6. To print the results, select the menu item File | Print.
ARGUS Valuation-Capitalisation version 2.50 Step-by-Step Guide
Chapter 14: Lesson 12: Analysis
66
7. There are many options for the display and format of the graphics, and much useful information
can be obtained through a combination of Filter, View and Category.
A 3-D pie chart display
A 3-D vertical Bar chart
PERFORMANCE ANALYSIS
This is a portfolio overview and statistical profiling of filtered records based on projected cash
flows.
Cash Flows in Valuation-Capitalisation provide the base information for viewing single property or
portfolio projections. The Performance Analysis function brings together the individual property
cash flow projections in a single view.
ARGUS Valuation-Capitalisation version 2.50 Step-by-Step Guide
Chapter 14: Lesson 12: Analysis
67
1. From the Command Centre, select a portfolio containing several properties. Click on the
Analysis button and select the Performance Analysis option from the menu.
2. For the Style field, select “Display single period only”. This will snapshot a single year in the
schedule.
3. Make the period 5 years. The result will be shown for year 5. Ensure Manual Date is OFF.
4. There are two modes in this screen. Select Schedule Mode by clicking the Schedule mode
button:
5. Click Proceed to create the schedule.
Performance Schedule
6. The schedule provides a full view of the statistical data from each property in the current Filter.
The columns represent all the items in the Cash Flow Projections Schedule. Scroll through the
columns to view the range of information.
ARGUS Valuation-Capitalisation version 2.50 Step-by-Step Guide
Chapter 14: Lesson 12: Analysis
68
7. Each column can be sorted by clicking the header for each column. The columns are divided
into three types:
1) Values and incomes, 2) Changes, and 3) Percentages and returns.
These can be isolated using the range buttons:
8. The schedule can be viewed by category. Hold down the left mouse button on the Region
header and drag it to the space above the schedule.
9. Let go, and the schedule is then broken down by region.
Banded view in Performance Schedule
10. Hold down the left mouse button and drag the Sector column header next to the Region header.
The view now changes to show regions broken down by Sector.
11. Collapse and expand the groups using Expand all groupings or Collapse all groupings toolbar
buttons.
12. A report can be generated using the File | Print menu option.
DATA ANALYSIS
Display, grouping and breakdown of properties, lease-by-lease.
Information provided by this function gathers together all the lease and other details, for every
property in the filter, and every tenant and tenure in each property.
1. In the Command Centre, select a multi-property portfolio and click on the Analysis button.
Select the Data Analysis menu option. The screen is presented in a multi-sort schedule and has
two main views:
a) Tenant/lease view
b) Property view
ARGUS Valuation-Capitalisation version 2.50 Step-by-Step Guide
Chapter 14: Lesson 12: Analysis
69
Data Analysis (Lease by lease)
Data Analysis (Property view)
2. Both views offer a wide set of columns showing much of the detailed information from each of
the records, plus some additional information and calculated results. These are generally sums
and percentages of the portfolio, such as percentage of rental value for each tenant or sum of
areas.
ARGUS Valuation-Capitalisation version 2.50 Step-by-Step Guide
Chapter 14: Lesson 12: Analysis
70
3. The lease view columns can be divided into four groups using the section buttons:
4. Each column can be sorted in ascending and descending order by clicking each column header.
5. Breakdowns are easily viewed. Select the Tenant / Lease View using the drop-down list in the
toolbar. Click and drag the Region column header into the space above the schedule and release
the mouse.
6. Open the view with the Expand button:
7. To preview and print a report for the current view, select the File | Print option.
8. Additional graphics are available for the selected view. Click the Graph button:
to open the display screen. Here, you can select different graphs and modify the views.
RENT ANALYSIS
Variable risk analysis showing continuity of income and loss of income projections based on
Doomsday scenarios.
This function provides a date-based schedule from the valuation forwards, measuring the
hypothetical loss of income assuming a “worst-case” scenario until all income ceases.
The conditions assumed for the loss of income can be selected from a menu.
1. Open the Rent Analysis schedule from the Command Centre using the Analysis | Rent Analysis
menu option.
Doomsday Rent Analysis
2. Click the Show Graphs button to see the data more clearly:
ARGUS Valuation-Capitalisation version 2.50 Step-by-Step Guide
Chapter 14: Lesson 12: Analysis
71
Doomsday Graph
3. In the main schedule, expand the basic view by clicking the Show Tenant Info button:
This enlarges the view to provide more useful information giving rental details tenant by tenant.
Doomsday Rent Expanded View
ARGUS Valuation-Capitalisation version 2.50 Step-by-Step Guide
Chapter 14: Lesson 12: Analysis
72
4. To set the criteria conditions for the Doomsday assumption, click the menu Doomsday
Options. In the menu, select the options of your choice.
5. Preview and print a report by selecting File | Print from the menu.
Lesson Summary
Analysis covers a lot of ground, with various views and options at each level. Not every option
and situation can be covered in this lesson and you are encouraged to experiment with the
menus and button options to simulate particular circumstances.
ARGUS Valuation-Capitalisation version 2.50 Step-by-Step Guide
Chapter 15: Lesson 13: ARGUS Zone
73
CHAPTER 15
Lesson 13: ARGUS Zone
ARGUS Zone allows you to collaborate with other people on projects. It provides the tools for
exporting and storing your work externally, for the purposes of group working.
In our example here, we will perform a simple operation, such as storing a file on the Zone.
Before you can begin, you should first sign up to ARGUS Zone. You will be given a user ID and
password to log in. Log into the Zone by clicking on the ARGUS Zone tab to open the ARGUS
Zone pane, and enter your user ID and password.
Once you are logged in, you may see something similar to the following:
ARGUS Valuation-Capitalisation version 2.50 Step-by-Step Guide
Chapter 15: Lesson 13: ARGUS Zone
74
We are going to create a new workspace to hold your files. Click on the Create button and type in
“New workspace”. This will create a fresh workspace.
Select the property we created earlier in the “Training” portfolio.
Right-click on the file and select the ARGUS Zone | Send to Zone menu option. The property will
be saved to the Zone as a CVL file:
You will note that a green dot will appear in the Zone column for the record you have just sent to
the Zone:
You can log out of the Zone by clicking on the Logout button. Your file is now stored remotely,
and can be worked on by other members of your team, wherever they might be in the world.
Lesson Summary
ARGUS Zone is a versatile new method of working. There are many more things that can be
done with ARGUS Zone than we have described here. Please see your User Manual for more
detailed information, and please see http://www.arguszone.com.
ARGUS Valuation-Capitalisation version 2.50 Step-by-Step Guide
Chapter 16: Contact details
75
CHAPTER 16
Contact details
Find us on the Web: http://www.argussoftware.com or http://www.arguszone.com
UK contact details:
ARGUS Software (UK)
London
UNITED KINGDOM
Tel: +44 (0)20 8906 4059 or 0845 6440 400
Fax: +44 (0)020 8959 6079
Support Tel : +44 (0)20 8238 8345
Support email: [email protected]
Info email: [email protected]
US contact details:
ARGUS Software
Houston, TX
USA
Tel: +1 713 621 4343
Fax: +1 713 621 2787
Support Tel: +1 888 472 1005
Support email: [email protected]
Info email: [email protected]
ARGUS Software
Plano, TX
USA
Tel: +1 469 791 1000
Fax: +1 469 791 1810
Support Tel: +1 888 472 1005
Support email: [email protected]
Info email: [email protected]
ARGUS Software
Mount Laurel, NJ
USA
Tel: +1 856 439 2201
Fax: +1 856 439 5019
Support Tel: +1 888 472 1005
Support email: [email protected]
Info email: [email protected]
ARGUS Software
Clearwater, FL
USA
Tel: +1 713 621 4343
Support Tel: +1 888 472 1005
Support email: [email protected]
Info email: [email protected]
ARGUS Valuation-Capitalisation version 2.50 Step-by-Step Guide
Chapter 16: Contact details
76
Canada contact details:
ARGUS Software
Coquitlam, BC
CANADA
Toll-free: 1 888 472 1005
Tel: +1 604 472 1001
Fax: +1 604 472 1002
Support email: [email protected]
Info email: [email protected]
Australia and Asia Pacific region contact details:
ARGUS Software
Sydney NSW
AUSTRALIA
Tel: +61 2 9262 1332
Fax: +61 2 9262 1350
Support email: [email protected]
Info email: [email protected]
Singapore region contact details:
ARGUS Software
SINGAPORE
Tel: +65 6411 2288
Fax: +65 6338 7959
Support email: [email protected]
Info email: [email protected]
Japan region contact details:
ARGUS Software
Tokyo
JAPAN
Tel: +81 3 5404 8138
Fax: +81 3 5404 8585
Support email: [email protected]
Info email: [email protected]
South Africa region contact details:
ABO Software
Cape Town
SOUTH AFRICA
Toll-free: 080 226 7638
Tel: +27 (0)21 447 9592
Fax: +27 (0)21 426 2708
Info email: [email protected]
ARGUS Valuation-Capitalisation version 2.50 Step-by-Step Guide
INDEX
77
A
About reports 30
Acquisition Costs 21
Active records 12, 16, 41
Adding a new portfolio 8
Adding a new property 8, 10
Adding a new tenant 15
Analysis
Analysis types 63
Category Analysis 65
Data Analysis 68
Filters 61
Performance Analysis 66
Projections Analysis 63
Rent Analysis 70
ARGUS Software web address 75
Assumptions 24
Auto-regulating loan 46
B
Break Options 54
Buttons 4
Customising the Button Toolbar 6
C
Capital costs 28
Capital Expenditure 20
Cash Flow screen 31
Category Analysis 63, 65
Command Centre 2
Contact details 75
Costs 20
Acquisition Costs 21
Adding Costs 20
Amount 22, 23
Apply to each Tenant 21, 22
Capital Expenditure 20
Category 21
Cost Definition page 21
Cost Details page 22
Cost Trigger 22
Entering a capital cost 21
Entering a running cost 22
Repeat...Until 22, 23
Running Costs 20
Scope 21
Stamp Duty 21
Type 22
Current Rent 17
Current Void 18
D
Data Analysis 63, 68
Debt and funding 45
Discounted Cash Flow (DCF) 31
DCF setup page 31
Discounting 32
Exit Value 33
Finance 32
IRR 35
Present Value 35
Purchaser’s Costs 35
Rental Growth 33
Spreadsheet 35
Vendors Fees 35
E
Equity loans 46
Equivalent Yield 28
Exit Value 33
Expenditure 20
Expiry Void 18
F
Filters 61
Finance in the Cash Flow 46
Fixed Reversion leases 54
Fixed Value leases 54
G
Geared ERV 17
Getting Started 6
Gross Value 28
Ground Lease Editor 38
Ground Rent
Checking ground rent figures 40
Geared Ground Rent 38
Valuation 39
H
Holding Over 17
How to use the Tutorials 1
I
Indexation 17
Input and data windows 5
Interest Only loan 45
Internal Rate of Return 35
L
Lease 16
Expiry Date 16
Start Date 16
Term 16
Lease Schedule 51
Lease Type 16
Leasehold
Checking ground rent figures 40
Geared Ground Rent 38
Ground Lease Editor 38
Valuation 39
Login window 2, 3
ARGUS Valuation-Capitalisation version 2.50 Step-by-Step Guide
INDEX
78
M
Menus 4
Mortgage 46
Multi-user security control 42
O
Option leases 54
Outstanding Rent Review 17
P
Password 2, 3
Payment Dates 16
Performance Analysis 63, 66
Portfolio
Adding a new portfolio 8
General usage of a portfolio record 42
Portfolio Actions 43
Portfolio record 41
Portfolio security 42
Portfolio View 41
Specific usage of a portfolio record 43
Valuation Date 9
Present Value 35
Projections Analysis 63
Property
Adding a new property 10
Address 11
Buy/Sell + Extras 12
Rent input view 12
Setting up a property record 11
Tenure 12
Valuation Date 11
R
Receipts 20
Re-letting Probability 18
Renewal 18
Rent 17
Payment Dates 16
Rent Analysis 63, 70
Rent Free 18
On renewal 18
Rental Growth 33
Rental Value 17
Revenues 20
Running Costs 20
S
Screens 2
Security 42
Sorting property records 13
Stamp Duty 21
Starting point 5
Stepped Rents 51
Support 1
ARGUS Valuation-Capitalisation version 2.50 Step-by-Step Guide
T
Tagged 12, 16, 41
Tenancy Schedule
Filling in the record data 57
Generating multiple tenants 58
Seeing results 59
Using Rent Groups 57
Valuing using the Cap Groups 58
Tenants
Lease 16
Lease Renewal 18
Lease Type 16
Name and Status 15
Rent 16
Rent Payment Dates 16
Setting up a tenant record 15
To add a new tenant 15
Valuation Set up 18
Tenure 12
Adding tenures 37
Change Tenure Type 37
Complex tenures 40
Multi-tenure 39
Tenure listing 37
The Rent Fields 28
The Tenancy Schedule 56
The Value Fields 28
The Yield Fields 28
Toolbar
Customising the Button Toolbar 6
Traditional valuation 27
U
User Interface 2
User Preferences 6
Username 2, 3
V
Vacancies 52
Valuation
Assumptions 24
Valuation Date 9, 11
Valuation Log 30
Viewing the valuation results 27
Voids 18
Current Void 18
Expiry Void 18