1
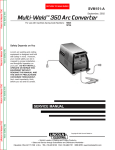
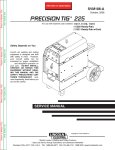
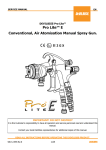
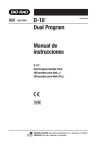
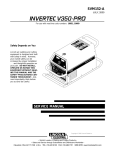
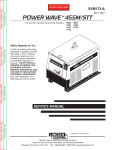
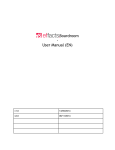
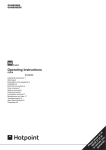
Hemo manual-911:2010
2011/10/27
5:08 PM
Page 1
Table of Contents
2. Before Testing
Monitor Checker Test ..............................................................................................9
Quality Control Testing..........................................................................................10
Table of Contents
1. About your HemoSmart™ Hemoglobin Screening System
Contents of Kit ........................................................................................................4
HemoSmart™ Hemoglobin Meter ..........................................................................5
HemoSmart™ Hemoglobin Test Strip ....................................................................7
HemoSmart™ Control Solution (optional) ..............................................................8
3. Hemoglobin Testing
Coding the Meter ..................................................................................................14
Performing a Hemoglobin Test..............................................................................16
Understanding the test resule ..............................................................................19
4. Using Meter Memory ..........................................................................................20
1
Hemo manual-911:2010
2011/10/27
5:08 PM
Page 2
5. Caring for the Meter
Cleaning the Meter ..............................................................................................21
Storage and Precautions ......................................................................................21
Table of Contents
6. Changing the Battery ..........................................................................................23
7. Messages Interpretation & What to do ..............................................................24
8. Specifications ......................................................................................................27
9. Supplies ................................................................................................................29
10. Symbols Used in this Manual............................................................................30
11. Product Warranty................................................................................................31
2
Hemo manual-911:2010
2011/10/27
5:08 PM
Page 3
Chapter 1. About Your HemoSmart™ Hemoglobin
Screening System
Chapter 1. About Your HemoSmart™ Haemoglobin
Screening System
Thank you for choosing the HemoSmart™ Hemoglobin Screening System. All of the information that will be needed to use and maintain the HemoSmart™ System is included in this
manual. Read it carefully before using the system.
Utilizing Biosensor Technology, the HemoSmart™ System provides an easy and precise way
of measuring the level of total hemoglobin in whole blood. The results are referenced by
CBC cell counter method, which means the data gathered from the HemoSmart™ Screening
System is comparable to the results in a clinical laboratory.
The HemoSmart™ Hemoglobin Screening System is intended for use outside the body (in
vitro diagnostic use) and is useful for quantitative screening of hemoglobin in the range of 4
g/dL to 20 g/dL. The HemoSmart Screening System is for a low or a high concentration of hemoglobin for the health of the patient (e.g. anemias (low Hb), erythrocytosis (high Hb), thalassemias (aberrant chain synthesis), and sickling disorders (abnormal complex shape)).
3
Hemo manual-911:2010
2011/10/27
5:08 PM
Page 4
Contents of Kit
The HemoSmart™ kit package includes the following items.
Chapter 1. About Your HemoSmart™ Haemoglobin
Screening System
4
• HemoSmart™ Meter (1)
• User’s Manual (1)
• Monitor Checker (1)
• Carrying Case (1)
• Adjustable Lancing Device (1)
*The kit contents may vary in some certain areas.
Contact the dealer if you find difference from the above.
Hemo manual-911:2010
2011/10/27
5:08 PM
Page 5
HemoSmart™ Meter
Front
Large, easy-to-read window guides you through testing,
displaying results, and error messages using simple
words or symbols.
Push Button
• Recalls test results in the memory. Refer to chapter 4 p.20
"Using Meter Memory" for details .
Test Strip Holder
Insertion site for test strips and monitor checker.
Chapter 1. About Your HemoSmart™ Haemoglobin
Screening System
Display Screen
5
Hemo manual-911:2010
2011/10/27
5:08 PM
Page 6
Back
Chapter 1. About Your HemoSmart™ Haemoglobin
Screening System
6
Code Card Port
Insertion site for the code card.
I VD
0197
No. 7, Li-Hsin Rd. V, Hsinchu Science Park,
Hsinchu, Taiwan, R.O.C.
Tel:886-3-5641952 Fax:886-3-5678302
HS
S25001
REF S25003
S25004
P/N 59106000028
REV. 8/10
Monitor Checker
Battery Compartment
Holds one 3V Lithium coin
cell battery (CR2032).
Refer to Chapter 6. p.23
"Changing the Battery" .
Use to confirm the Meter
is functioning properly.
Refer to Chapter 2 p.9
"Monitor Checker Test"
for details.
Hemo manual-911:2010
2011/10/27
5:08 PM
Page 7
HemoSmart Hemoglobin Test Strip (Sold Separately)
Contact Points
Reaction Zone: Apply Blood Here
Contact Points ....................Sense the position and orientation of the Test Strip.
Test Strip Handle................The only area to be touched when handling the Test Strip.
Reaction Zone ....................The area where the blood sample is applied.
The HemoSmart™ Hemoglobin Test Strip is a biosensor-based test strip uniquely designed to
specifically detect total hemoglobin in whole blood using the HemoSmart™ Meter. The Test
Strips come in a moisture-proof, light-protected bottle . It is important the bottle is kept well
sealed at all times. Replace cap immediately after taking a strip out of the bottle.
Chapter 1. About Your HemoSmart™ Haemoglobin
Screening System
Test Strip
Handle
7
Hemo manual-911:2010
2011/10/27
5:08 PM
Page 8
HemoSmart™ Control Solution (optional)
Chapter 1. About Your HemoSmart™ Haemoglobin
Screening System
8
Solution with standard concentration of reactive substance in hemoglobin. It is required to
perform the "Quality Control Testing" in Chapter 2, p.10
. Use the solution to check for
system accuracy, practice test procedure, and when using a new lot of HemoSmart™ Hemoglobin Test Strips.
Store the HemoSmart™ Control Solution at temperatures at 2˚C to 8˚C
See the HemoSmart™ Control Solution insert for more information.
Please contact your local supplier to order control solution.
2˚C
8˚C
(36˚F to 46˚F).
Hemo manual-911:2010
2011/10/27
5:08 PM
Page 9
Chapter 2. Before Testing
Monitor Checker Test
Chapter 2.
Before Testing
The Monitor Checker Test will help ensure that the electronics in your HemoSmart™ Meter is
working properly. This test should be done on a brand new meter or when the performance of
the meter needs to be confirmed.
Materials you will need:
• Monitor Checker (included in kit)
• Your HemoSmart™ Meter
Step 1: Insert the Monitor Checker (Arrow end) into the Test Strip Holder until you hear a
“beep”.
Step 2: When the Meter Display Screen shows (happy face) means your Meter is functioning properly. If the display screen shows (sad face) then repeat the procedure once
more. If
continues to appear, refer to Chapter 7, p. 24
“Messages Interpretation & What to do.”
9
Hemo manual-911:2010
2011/10/27
5:08 PM
Page 10
Quality Control Testing
Chapter 2.
Before Testing
Perform Quality Control Testing when:
• You first get your Meter, before performing a hemoglobin test.
• You first begin to use a new package of HemoSmart™ Hemoblogin Test Strips.
• You suspect your HemoSmart™ Meter and Test Strips are not working properly.
• When your Test Strips have been exposed to extreme temperatures (see HemoSmart™ Hemoglobin Test Strip insert for temperature ranges).
• Practice the test procedure.
•
•
•
•
IMPORTANT:
The acceptable range for the control solution is listed on the package of test strips.
Use only the HemoSmart™ Control Solution.
Always check the expiration date . DO NOT use control solution if expired.
Newly opened bottle of control solution must be marked with the date opened; discard any
unused control solution 1 months after opening or expiration date.
• DO NOT freeze Control solutions should be stored at 2˚C to 8˚C
(36˚F to 46˚F).
• If a control solution test is not within the expected range that is printed on the test strip
2˚C
10
8˚C
Hemo manual-911:2010
2011/10/27
5:08 PM
Page 11
Chapter 2.
Before Testing
package, DO NOT use the meter to test. Repeat the test until a control solution test performs within the expected range. If the results continue falling outside the expected range,
call the authorized dealer for service.
• DO NOT touch the test area with the tip of the control solution bottle.
• DO NOT apply a second drop of control solution to the test strip.
• Replace the bottle cap on the control solution bottle immediately after use.
Materials you will need:
• HemoSmart™ Control Solutions (optional items, contact our authorized dealer for purchasing information).
• A fresh, new HemoSmart™ Hemoglobin Test Strip.
• Your HemoSmart™ Meter.
IMPORTANT:
• Please make sure the HemoSmart™ meter is properly coded. Refer to Chapter 3, p. 14
"Coding the Meter"
.
11
Hemo manual-911:2010
2011/10/27
5:08 PM
Page 12
Chapter 2.
Before Testing
Step 1: Insert the Monitor Checker (arrow end) into the Test Strip Holder
until you hear a "beep".
Step 2: When the Meter Display Screen shows smiling face , remove the
Monitor Checker.
Step 3: The screen will then display the current code number being used.
Verify that code number on screen is the same with the code number printed on the strip package.
Step 4: Remove a brand new HemoSmart™ Hemoglobin Test Strip from the strip bottle and
insert it into the test strip holder of the meter. The screen will show "ctr." This will
ensure the control results will not be stored into memory.
Step 5: When the screen show a symbol , apply a drop of HemoSmart™
Control Solution at the reaction zone of the test strip as shown.
12
Step 6: The display screen will show timing bars"-----". The bars will
flash and gradually diminish for countdown.
Hemo manual-911:2010
2011/10/27
5:08 PM
Page 13
“ Y ‡ t¢»ƒ
Step 8: Remove the Test Strip. The meter will turn off automatically.
IMPORTANT:
Chapter 2.
Before Testing
Step 7: After the timing bars disappear (approximately 10 seconds), the
screen will show test result. Compare the reading on the screen to
the control range indicated on the test strip bottle.
The test result falling within the range means the Meter and the Test
Strip are working together properly.
1.Do not use test strip that has expired. Check the expiration date that is printed on the
strip bottle.
2.Use each test strip immediately after removing it from the strip bottle
3.Do not use wet, bent, or scratched strips.
4.Do not reuse test strips and lancets.
5.Keep away from direct sunlight and heat . Store the strips in a dry, cool place.
6.If the test result is not within the expected range, repeat the control solution testing. If the
results continue falling outside the expected range, call our authorized dealer.
13
Hemo manual-911:2010
2011/10/27
5:08 PM
Page 14
Chapter 3. Hemoglobin Testing
Coding the Meter
Chapter 3.
Haemoglobin Testing
Before you can begin testing on your HemoSmart™ Meter, you must code the meter. Coding
the Meter ensures accurate test results when you perform a test. A new code card is packaged
along with each box of HemoSmart™ Hemoglobin Test Strips.
Materials your will need:
• A code card for the HemoSmart™ Hemoglobin Test Strips
• A HemoSmart™ Hemoglobin Test Strip
• Your HemoSmart™ meter
NOTE:
14
Make sure the HemoSmart™ Hemoglobin Test Strips are not expired. Check the test strip expiration date on the box and the test strip bottle. The month printed refers to the end of the
month.
Step 1: Locate the code card ( ) in the package of Test Strip.
Step 2: Verify that the code number on the code card matches the code number on the Test
Strip package.
Hemo manual-911:2010
2011/10/27
5:08 PM
Page 15
Chapter 3.
Haemoglobin Testing
The code number displayed on the
Step 3: Insert the code card with the code number
Meter should match the code number
facing up firmly and completely into the
on the code card and on the front of
Code Card
the Test Strip package.
code card port on the backside of the
meter.
Step 4: Obtain a Test Strip (
) and insert the
strip into the test strip holder located at
front bottom of the meter. The meter will
turn on with a beep sound. Close the Test
Strip bottle immediately after you take out
a strip.
Step 5: A 3-digit code number will display on the
meter screen. Verify the code number on
the screen with that on the code card and that on the test strip package. All three sets
of numbers should be the same.
NOTE:
1.The code card found in the HemoSmart™ Hemoglobin Test Strip package is for use with
that particular package only. Different packages of HemoSmart™ Hemoglobin Test Strips
15
Hemo manual-911:2010
2011/10/27
Page 16
Chapter 3.
Haemoglobin Testing
and other brands of test strips will produce inaccurate results.
2.Re-coding needs to be done when a new package of test strip is opened for use.
3.Code number displayed on screen not matching the code number printed on the test strip
bottle or package will create an inaccurate test result.
Performing a Hemoglobin Test
Materials you will need:
• A brand new HemoSmart™ Hemoglobin Test Strip
• Your HemoSmart™ Meter
IMPORTANT:
16
5:08 PM
1.Do not use test strip that has expired. Check the expiration date that is printed on the Test
Strip Bottle and Box.
2.Use each Test Strip immediately after removing it from the bottle.
3.Close the bottle cap immediately afetr removing a Test strip.
4.Do not use wet, bent, or scratched Test Strip.
5.Keep away from direct sunlight and heat. Store the Test Strip bottle in a dry, cool place .
6.Record the "date opened" on the Test Strip bottle label when you first open it. After 1
Hemo manual-911:2010
2011/10/27
5:08 PM
Page 17
months since first opened date, discard the bottle and any remaining test strips.
7.Do not reuse test strip and lancets.
NOTE:
Chapter 3.
Haemoglobin Testing
Step 1: After you have performed the previous section, "Coding the Meter," the meter will
now self-test the environment temperature. If the temperature is below or above operation range, the screen will display the flashing symbol of thermometer
. When
the temperature is within the testing range of 18˚C to 38˚C
(64˚F to 100˚F), the
screen will show and the Meter is ready to test.
If the temperature is outside of the operating range, the Meter needs to be moved to an area
that is within the Meter's operating range of 18˚C to 38˚C
(64˚F to 100˚F) and allow 10 to
15 minutes for it to reach the new temperature before use. Measurement outside the temperature range will affect accuracy of test result.
Step 2: Wash hands with soap and warm water and dry thoroughly.
Step 3: Hold the lancing device (puncture) or lancet against the side of the finger and lance
the finger. Follow manufacturer’s instruction for how the lancing device (puncture) or
lancet should be used.
17
Hemo manual-911:2010
2011/10/27
Page 18
Chapter 3.
Haemoglobin Testing
O
X
Step 4: Apply blood as shown. When the reaction zone has filled
completely the Meter will beep, indicating that blood has
been received by the test strip.
Gently message your hand and finger toward the puncture site to form a drop of blood (approximately: ). Do not "milk,” or
squeeze around the puncture site.
Step 5: The meter screen will display timing bars "-----" that will flash and
gradually diminish for countdown.
Step 6: After the timing bars disappear (approximately 10 seconds), the screen will display
test result along with a calculated Hematocrit (Hct.) value. Both the hemoglobin test
result and the calculated haematocrit value are automatically stored into the Meter's
memory, refer to Chapter 4, p.20" Using Meter Memory"
. The meter will automatically turn off after the Test Strip is removed or after 3 minutes.
IMPORTANT:
18
5:08 PM
• The HemoSmart™ Hemoglobin Screening System is primarily use for the assay of hemoglobin value in the indicated range of 4 g/dL to 20 g/dL only, and is not intended as a tool
for the diagnosis of anemia or any other hemoglobin related illnesses. If "LO" (under 4
Hemo manual-911:2010
•
•
•
•
•
5:08 PM
Page 19
g/dL) or "HI" (over 20 g/dL) readings appears, a more suitable method may be required to
perform further testing.
Discard used test strip and lancets according to your local disposal regulations where applicable.
Carefully discard used test strip and lancets in proper waste
containers.
DO NOT touch the target area of the test strip.
DO NOT smear the blood drop onto the target area.
DO NOT add or apply a second drop of blood. This may cause false result.
DO NOT proceed testing if the yellow window is not full of blood sample. Insufficient
blood sample may cause inaccurate test result.
O
X
Chapter 3.
Haemoglobin Testing
•
2011/10/27
Understanding the test result
Ideal range for male is 13-18 g/dL, Ideal range for female is 11.5-16 g/dL
If the result is lower than 10 g/dL, it could be low hemoglobin or iron deficiency anemia.
If the result is higher than 19 g/dL, it could be erythrocytosis.
If the result is higher than 19 g/dL or lower than 10 g/dL, please contact your physician or
healthcare professional immediately.
19
Hemo manual-911:2010
2011/10/27
5:08 PM
Page 20
Chapter 4. Using Meter Memory
Chapter 4.
Using Meter Memory
20
Your HemoSmart™ Meter can automatically store 10 test results. When more than 10 test results are stored, the oldest result will be dropped from memory each time a new result is
added. When the test results are recalled from memory, the most recent result is always displayed first.
To recall results from memory:
Step 1: Press the push button to turn on the Meter. The screen will display the latest test result
stored in memory.
Step 2: Repeat pressing the push button for reviewing further test results in memory.
Hemo manual-911:2010
2011/10/27
5:08 PM
Page 21
Chapter 5. Caring for the Meter
Cleaning the Meter
NOTE:
1.DO NOT get water inside the HemoSmart™ Meter. Never immerse the meter or hold it
under running water.
2.DO NOT use glass cleaners or household cleaners on the Meter.
3.DO NOT try to clean the Test Strip Holder.
4.DO NOT contaminate the strip holder with blood or control solution.
Chapter 5.
Caring for the Meter
Your HemoSmart™ Meter does not require special cleaning. If the Meter gets dirty, use a
moist (NOT WET) lint-free cloth dampened with a mild detergent.
Storage and Precautions:
• Handle the Meter with care: Severe shock, such as dropping the Meter, could damage the
electronics.
• The Meter and the Test Strips are designed to be used within the temperature ranges be-
21
Hemo manual-911:2010
Chapter 5.
Caring for the Meter
22
2011/10/27
5:08 PM
Page 22
tween 18˚C to 38˚C
(64˚F to 100˚F) .
• Avoid leaving the Meter in extremely hot or cold place, such as near a heat source or in an
extremely hot or cold car.
• Do not store or use the Meter or Test Strips where they may be exposed to high humidity
levels, such as in a bathroom or kitchen.
• Never immerse or hold the Meter under running water.
• Always replace the bottle cap immediately after removing a Test Strip and make sure the
test strip bottle is closed tightly.
• DO NOT take the HemoSmart™ Meter apart. If there are technical problems or questions
in use of the meter, call the authorized dealer.
Hemo manual-911:2010
2011/10/27
5:08 PM
Page 23
Chapter 6. Changing the Battery
NOTE:
• To save battery power, the HemoSmart™ Meter will turn itself off after 3 minutes of nonuse. All results stored in memory will be saved even if the meter shuts off automatically.
• Discard used battery according to your local regulation.
Chapter 6.
Changing the Battery
The HemoSmart™ Meter operates on one 3V Lithium coin cell battery. When the LCD screen
displays
, this indicates the battery is low and should be replaced as soon as possible.
To replace the battery:
Step 1: Open battery compartment cover on backside of the Meter.
Step 2: Remove the old battery and replace with one new 3V Lithium coin cell battery.
Step 3: Replace the battery compartment cover.
23
Hemo manual-911:2010
2011/10/27
5:08 PM
Page 24
Chapter 7. Messages Interpretation & What to Do
Chapter 7.
Messages Interpretation & What to Do
If there is a problem with the way you are performing a test or if there is a problem with your
HemoSmart™ Meter, any of the following messages may appear on the meter screen.
If you have further questions after reviewing these messages, call our authorized dealer.
Message
“code----”, then
the meter shuts
off in 3 seconds.
“
24
”
Meaning
What To Do
The meter has not been
coded with a code card.
Code your Meter with a HemoSmart™
Code Card, see Chapter 3,
p.14 "Coding the Meter."
The meter has not been
coded with a code card.
Code your Meter with a HemoSmart™
Code Card, see Chapter 3,
p.14 "Coding the Meter."
Hemo manual-911:2010
“
2011/10/27
Message
”
LO
Page 25
Meaning
The temperature of the
surrounding air is outside of system operation
range.
What To Do
The meter needs to be moved to an
area that is within 18°C to 38°C
(64°F to 100°F). Wait for 10~15 minutes to let the meter adjust to the new
temperature.
Not enongh blood sample is applied to the test
strip.
Discard the used test strip from the
meter and retest with a new test strip.
The hemoglobin result
is lower than 4g/dL
Check if you are using the right code
card. Repeat testing.
Chapter 7.
Messages Interpretation & What to Do
Code number and
flashing display
after blood is applied.
5:08 PM
25
Hemo manual-911:2010
Message
HI
Chapter 7.
Messages Interpretation & What to Do
“
”
2011/10/27
5:08 PM
Page 26
Meaning
The hemoglobin result is
higher than 20g/dL
What To Do
1.A used test strip is inserted.
2.The meter does not
function properly.
Remove and discard the used test strip
, then perform the "Monitor
Checker Test" on p.9
. If the problem persists, contact our authorized
dealer for service.
Check if your are using the right code
card. Repeat testing.
If you are unable to correct the problem after following the What To Do procedures, call our
authorized dealer in your country and/or contact your healthcare professional with questions
and concerns.
26
Hemo manual-911:2010
2011/10/27
5:08 PM
Page 27
Chapter 8. Specifications
HemoSmart™ Hemoglobin Test Strips
4 - 20 g/dL
3µL
10 Seconds
Capillary whole blood
Large LCD screen
10 test result
100Lx58Wx21H (mm)
64g
1 x 3V Lithium coin cell battery (CR2032)
18˚C to 38˚C (64˚F to 100˚F ).
Less than 85% (Storage, Operating and Transportation)
4°C to 55°C (39°F to 131°F) for meter
4°C to 30°C (39°F to 86°F) for test strip
Electromagnetic Compatibility: This equipment is complying with EMC
requirement of EN 60601-1-2
Chapter 8.
Specifications
Test Strips:
Test Range:
Sample Volume
Reading Time
Blood Source:
Display Type:
Memory:
Dimension:
Weight:
Power Supply:
Operating Temperature:
Relative Humidity:
Storage / Transport Condition:
27
Hemo manual-911:2010
2011/10/27
5:08 PM
Page 28
NOTE:
For more information regarding the test strips, see the test strip package insert found in each
box of test strips
.
Chapter 8.
Specifications
Applied Product Standards:
IEC 61010-1
IEC 60601-1
EN 61010-1
EN 60601-1-2
EN 61326
EN 62366
EN 61010-2-101
EU directive/classification: 98/79/EC Other IVDs
Classification according to IEC/EN 60601-1:
IPXO, not evaluated as AP/APG equipment, continuous operation.
Electromagnetic Compatibility:
This equipiment is complying with EMC requirement of EN 60601-1-2.
28
Hemo manual-911:2010
2011/10/27
5:08 PM
Page 29
Chapter 9. Supplies
Product Name
HemoSmart™ Total Hemoglobin Basic
HemoSmart™ Total Hemoglobin Test Strips 25's
HemoSmart™ Total Hemoglobin Test Strips 2x25's
Lancing Device
Lancets (28G) 50's
HemoSmart™ Hemoglobin control solution
Chapter 9.
Supplies
Part Number
S25001
S5636036
S5636074
65235010002
80050000003
S5800038
29
Hemo manual-911:2010
2011/10/27
5:09 PM
Page 30
Chapter 10. Symbols Used in this Manual
(EXP) Expiration date (use by last day of month)
Chapter 10.
Symbols Used in this Manual
(LOT) Batch code
Temperature limitations
Consult instructions for use
In vitro diagnostic device
Caution / warning, consult accompanying documents
Product code number
Keep away from sunlight/direct light
Do not re-use
Manufactured by
EC REP
30
Authorised Representative in the European Community
Hemo manual-911:2010
2011/10/27
5:09 PM
Page 31
Chapter 11. Product Warranty
The liability of Apex Biotechnology Corp is limited to repair or replacement and in no event
shall Apex Biotechnology Corp be liable for any collateral or consequential damages or loss.
Chapter 11.
Product Warranty
The HemoSmart™ Meter is guaranteed to be free of defects in workmanship and materials
under normal use for a period of three (3) years from the date of purchase to the consumer.
Instruments subjected to misuse, abuse, neglect, unauthorized repair or modification will be
excluded from this warranty.
This guarantee specifically excludes expendables and consumables (such as test strips and
lancets).
All warranty claims must be directed to the Apex Biotechnology Corp authorized dealer responsible for the sale of the system.
The warranty applies only to the original purchaser of the system.
31