1
addVANTAGE Pro 6.5
User Guide
SMART WIRELESS SOLUTIONS
Proprietary Notice
The Adcon logo, Adcon Telemetry, Smart Wireless Solutions, the A720, A723 and A730 series, addIT,
addWAVE, the A840 and A850 series and Telemetry Gateway, AgroExpert, addVANTAGE®, addVANTAGE Lite
and addVANTAGE Pro are trademarks or registered trademarks of Adcon Telemetry GmbH. Excel® is a
registered trademark of the Microsoft Corporation. Acrobat Reader® is a registered trademark of the Adobe
Corporation. OOo.calc is part of the OpenOffice.org application suite, which is a trademark of Sun
Microsystems, Inc.
Neither the whole nor any part of the information contained in this publication may be reproduced in any
material form except with the prior written permission of Adcon Telemetry GmbH.
This publication is intended only to assist the reader in the use of the product. Adcon Telemetry GmbH shall
not be liable for any loss or damage arising from the use of any information in this publication, or any error or
omission in such information, or any incorrect use of the product.
Document Release 6.5, September 2015
Copyright ©2001-2015 by Adcon Telemetry GmbH.
All rights reserved.
3
Contents
Chapter 1. Introduction ________________________________________________ 6
What’s New in addVANTAGE Pro 6.5 __________________________________________________ 6
What is the Adcon System? _________________________________________________________ 6
System Components ___________________________________________________________ 7
A Modular Approach____________________________________________________________ 7
WAP Access _____________________________________________________________________ 8
Conventions and Terminology _______________________________________________________ 8
Windows and Captions__________________________________________________________ 8
Documentation ________________________________________________________________ 9
Tags _______________________________________________________________________ 10
Summary ______________________________________________________________________ 10
Chapter 2. Getting Started _____________________________________________ 11
Overview ______________________________________________________________________ 11
Connecting to addVANTAGE Pro ____________________________________________________ 11
Navigating the Data ______________________________________________________________ 12
Logging in to the Server _______________________________________________________ 12
The Explorer_________________________________________________________________ 12
Objects in the Explorer______________________________________________________ 12
Functions in Explorer _______________________________________________________ 13
Menubar and Toolbar _______________________________________________________ 16
Chapter 3. Node Properties and Tools_____________________________________ 18
Node Properties _________________________________________________________________ 18
Node Action Properties_________________________________________________________ 19
Node Security Properties _______________________________________________________ 20
RTU/Tag ____________________________________________________________________ 21
Tag General Properties ______________________________________________________ 22
Tag DACQ Properties _______________________________________________________ 22
Tag Threshold Properties ____________________________________________________ 23
Panels ______________________________________________________________________ 24
Extensions and Crops__________________________________________________________ 24
The Tools Menu _______________________________________________________ 24
Selecting User Options _________________________________________________________ 25
My Settings Tab ___________________________________________________________ 25
Panels Tab _______________________________________________________________ 25
Explorer Tab ______________________________________________________________ 26
Crops Tab ________________________________________________________________ 26
Extensions Tab ____________________________________________________________ 27
Engineering Units Tab ______________________________________________________ 28
Security Tab ______________________________________________________________ 28
Using the Chemicals Service ____________________________________________________ 29
addVANTAGE Pro 6.5 User Guide
Chapter 4. Creating Panels _____________________________________________ 30
The List _______________________________________________________________________ 30
Search _____________________________________________________________________ 31
Quick Search ________________________________________________________________ 31
Search from Here _____________________________________________________________ 31
Properties ___________________________________________________________________ 32
The Dataview panel ______________________________________________________________ 32
Viewing Dataview panels with Drag-and-Drop ______________________________________ 33
Viewing data from Explorer _____________________________________________________ 34
Using Settings to Add Tags to Dataview panels _____________________________________ 35
Y-axis Tab ________________________________________________________________ 36
Plots Tab _________________________________________________________________ 37
Thresholds Tab ____________________________________________________________ 37
General Tab ______________________________________________________________ 39
A Dataview Example __________________________________________________________ 40
Saving Dataview panels ________________________________________________________ 40
Create a Dataview panel from a Template _________________________________________ 41
From Charts to Tables _________________________________________________________ 41
Export data on the fly _________________________________________________________ 42
Method 1: Exporting all the data ______________________________________________ 42
Method 2: Export selected data sets only (copy to clipboard) _______________________ 43
Instrument View______________________________________________________________ 44
Events View _________________________________________________________________ 44
Settings ____________________________________________________________________ 44
Selecting Nodes ___________________________________________________________ 44
Displaying Event Types______________________________________________________ 45
Selecting Event Options _____________________________________________________ 46
Event Alarms ________________________________________________________________ 46
Locating the Source of an Alarm ______________________________________________ 46
Using the Events Viewer _______________________________________________________ 47
Chapter 5. Working with Extensions and Crops _____________________________ 48
About addVANTAGE Pro Extensions _________________________________________________ 48
The Info Button ______________________________________________________________ 48
Recalculating Extensions and Crops ______________________________________________ 48
Adding Extensions and Crops to an Area _____________________________________________ 49
Adding Multiple Extensions and Crops_____________________________________________ 49
Using Templates to Add Extensions or Crops _______________________________________ 49
Adding a New Season to a Crop _________________________________________________ 49
Adding RTU Diagnostics to a Tag ___________________________________________________ 49
Properties for Extensions and Crops _________________________________________________ 50
Common Properties ___________________________________________________________ 50
Properties for Crops ___________________________________________________________ 50
The Crop Tab _____________________________________________________________ 51
The Treatments Tab ________________________________________________________ 51
The Irrigation Tab__________________________________________________________ 53
Properties for Calculation Extensions and Disease Models _____________________________ 53
The Extension Tab _________________________________________________________ 54
The Advanced Settings Tab __________________________________________________ 54
The Inputs Tab ____________________________________________________________ 55
Extension Properties for Diagnostic Extensions______________________________________ 55
Contents
4
addVANTAGE Pro 6.5 User Guide
Appendix___________________________________________________________ 57
Third-Party Tools ________________________________________________________________ 57
Index _____________________________________________________________ 63
Contents
5
6
Chapter 1. Introduction
This manual details the installation and use of the addVANTAGE Pro software
product, which is used in conjunction with most of Adcon’s telemetry devices.
For information about the installation and use of the telemetry devices, refer to
the respective device’s manual.
This User Guide describes the features available to users assigned to the
extension_user role, which includes the average_user role. You will not see
features reserved for any of the administrative roles.
What’s New in addVANTAGE Pro 6.5
Following are some of the features in this version:
•
•
•
•
•
•
•
•
•
Usability: Rearranged right-click menu in Explorer + List view to improve
usability.
Merged Trend, Event, Map, and Linked to one panel called Dataview (also
affects User/Trend Options dialogs).
Improved jumping to last value when selecting another time span.
Dataview now has a min/max start/end date; you cannot see data outside
this interval.
We use Javascript engine instead of .png because it produces a faster
response and is easier to develop new features.
You can edit items on the trend line (for example, min/max value and its
position on the plot).
The algorithm used for stacking the Y-Axis on the plot has been improved.
Added time selection bar to quickly see how much data is here and what
part of it you are currently seeing. Also can be used to navigate and change
the selected time duration.
Added (semi-)transparent color selection for a trend line.
What is the Adcon System?
The addVANTAGE Pro software and telemetry devices work together to form the
Adcon system, which can be defined as a system that allows you to:
1.
2.
3.
Measure certain parameters over a predefined area
Send those parameters over relatively large distances to a central point
Process the parameters as needed for various applications such as
agriculture, meteorology, irrigation control, water management, and
environmental analysis
By parameters we mean a physical value that can be converted to an electrical
counterpart. For example, air temperature, relative humidity, and leaf wetness
have values that can be converted to an electrical form by means of sensors. If
a sensor exists for a certain physical parameter, it is very likely that it can be
addVANTAGE Pro 6.5 User Guide
CHAPTER 1
What is the Adcon System?
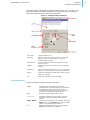
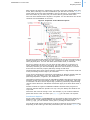
adapted to Adcon’s system. Figure 1 illustrates the components of the Adcon
system.
Figure 1. The Adcon Telemetry System
System Components
The electrically converted parameters are first stored in the memory of a remote
telemetry unit, or RTU. Adcon currently provides a large array of RTUs
employing different wireless technologies, from private radio to GSM/GPRS
based devices.
An RTU has its own intelligence in the form of a built-in microcontroller, which
periodically performs several tasks, for example, interrogate the sensors, store
the measured data, check the radio channel, check the local battery status, and
so forth. It is part of a remote station, which consists of the RTU, its assembly
parts, and its sensors. The RTU is equipped with a radio module or a GSM
modem, which allows for real-time wireless communication with a base station.
Reverse communication is also possible with the Adcon system. The
addVANTAGE Pro software can issue a command that will be sent via the
wireless network to the RTUs to control devices such as switches, pumps,
motors, and relays.
The base station consists of a Telemetry Gateway (or receiver) and your
personal computer. The Gateway acts as a network controller—at regular
intervals (typically 15 minutes, but this can be changed) it requests data via
radio or modem from the RTUs in the network. The receiver stores the incoming
data in its memory, thus allowing the receiver to supervise a large number of
RTUs and keep their data for a period of time without the need to download the
data to the PC. The number of controlled RTUs depends on the receiver type,
and some receiver models can handle over 1000 units
Note:
The period of time a receiver can store data is dependent on the number of
RTUs in the network and the type of receiver. The oldest data is overwritten.
The addVANTAGE Pro software regularly downloads the data from the receiver’s
memory to the PC. The receiver’s internal battery allows it to operate for 12 to
24 hours (depending on the number of RTUs to be requested and the respective
polling interval) in the event of a power outage. After that, the receiver stops
accumulating data, but it keeps the data already retained—even without
power—until you are able to provide power to it.
A Modular Approach
The addVANTAGE Pro software, which is based on a client/server architecture,
collects data from one or several Adcon Telemetry Gateways (receivers) and
makes it available for viewing or for specialized analysis.
The server is that part of the software where all the actual processing takes
place. It usually starts automatically when the computer is started and runs in
the background. The server is responsible for downloading data from the
Telemetry Gateway, storing data into the database, starting and stopping
extensions, and servicing clients as they connect.
7
addVANTAGE Pro 6.5 User Guide
CHAPTER 1
WAP Access
The addVANTAGE Pro server is based on a modular concept, meaning its parts
contribute to the whole but are also independent of it. The server has a
framework that runs various services and each service is responsible for a
function. For example:
•
•
•
•
•
The Security service authenticates the users and checks their privileges.
The Directory service deals with all objects existing on the system.
The Data Acquisition service retrieves the remote data.
The Extension service creates the proper environment for the extensions to
run.
The Database service assures the connection to the database for all other
services.
Extensions are a very important concept of addVANTAGE Pro. They are
standalone modules dealing with raw data and processing it according to certain
rules. Extensions provide events and alarms; in some cases, extensions may
provide output tags (which are also called virtual sensors, but more on this
later).
This modular approach provides a great degree of flexibility both to users and
programmers because it offers, among other things, an open interface for third
parties that want to program new extensions.
Starting with addVANTAGE Pro 5.0, the client software is based on a standard
web browser. Internet Explorer 11.0 and all versions of Mozilla Firefox have been
certified to be fully compatible with addVANTAGE Pro 6.x. Additional browsers
could be supported in future releases.
WAP Access
WAP access is automatically enabled in addVANTAGE Pro 6.5 and it is password
protected. The information accessible via WAP is limited and the users can
access only the last value recorded for each tag. However, you can disable
password protection for WAP access on your server.
To access the addVANTAGE Pro server via WAP, your users need to enter (and
store) a link similar to:
http://yourserver.domain.com:8080/wap?u=username&p=passwd
If the password protection feature is disabled, the link becomes simply:
http://yourserver.domain.com:8080/wap
After the link is entered in the cell phone, the user simply accesses it as a
normal WAP link. The navigation is limited to the areas, RTUs, and tags where
the user has access rights (if password protection is enabled).
Conventions and Terminology
This section explains standard terminology and usage for Adcon software and
manuals.
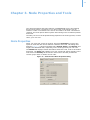
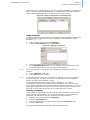
Windows and Captions
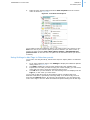
Although you will not see a software window that looks exactly like the one
shown in Figure 2, we have included it to illustrate the various items on a
software window.
Most operations in addVANTAGE can be performed on a context basis. That is,
right-clicking an object displays a context menu from which you select the
desired operation. You can see an example of a context menu in Figure 5 in
Chapter 2.
8
addVANTAGE Pro 6.5 User Guide
CHAPTER 1
Conventions and Terminology
This manual does not attempt to explain basic computer use. Therefore, you
should be familiar with basic computer terminology and the use of typical
computer interfaces like the mouse and keyboard.
Figure 2. A Sample Software Window
Text Field
Type information here.
Checkbox
Select or unselect by clicking the box. A selected
box has an X or a check mark in it, while an
unselected box is empty.
Radio button
These round buttons come in multiples. You can
select only one.
Listbox
This area shows a list of choices you can select by
clicking.
Dropdown
A box with a small down arrow (
) you must click
before you can see the list of choices to select from.
Button
These are rectangular shapes with a name. Select a
button by clicking it.
Tab
Click to see another view of the dialog.
Documentation
Certain conventions apply in this documentation.
Italics
Indicate the text is variable and must be
substituted for something specific, as indicated in
the explanation. Italics can also be used to
emphasize words as words or letters as letters,
and for cross references to other books.
Bold
Indicates special emphasis of the text.
fixed font
Indicates characters you must type or system
messages, as well as default values and file
names.
Help About
Indicates menu selection. For example, select the
Help menu, then the About option. Also indicates
items on the graphical user interface.
Note
Indicates information of interest. Notes appear
after the information they apply to.
9
addVANTAGE Pro 6.5 User Guide
CHAPTER 1
Summary
CAUTION
Indicates that you might get unexpected results if
you don’t follow the instructions. Cautions appear
before the information they apply to.
WARNING
Indicates danger to yourself or damage to the
device if you don’t follow the instructions.
Warnings appear before the information they
apply to.
Tags
You’ll see the terms tag and sensor used throughout this manual. Tag is a
generic term for something that pertains to data, regardless of whether it
collects or controls that data. Tags can represent any of the following:
•
•
•
Physical sensors, such as those for temperature, leaf wetness, or humidity.
Actuators, such as switches, relays, or valves.
Virtual sensors, which are the result of a computation, such as an average,
a sum, or an ET0 (evapo-transpiration reading). Virtual sensors are created
with extensions. With some extensions, you can use a virtual sensor in
combination with other sensors to create a new virtual sensor, which in
itself is another tag.
Summary
Adcon’s Data Acquisition system contains hardware and software parts. The
hardware components are:
•
•
•
•
•
A personal computer and/or a server machine
The receiver or Telemetry Gateway (A840, A850, A440 modem)
The RTUs (also referred to as devices), for example addWAVE A733,
addWAVE A733GSM, addIT A723, and addNODE A740.
Sensors and actuators
Various supplementary parts (accessories such as antennas, cables, and
masts)
The software consists of:
•
•
•
•
The addVANTAGE Pro 6.5 server
Application-specific server extensions
Utilities for configuration and maintenance
A web browser
10
11
Chapter 2. Getting Started
Since the initial introduction of addVANTAGE Pro 5 in 2006, you have been able
to access the client software through a standard Internet browser such as
Microsoft Internet Explorer or Mozilla Firefox. While you still have the option to
install addVANTAGE Pro on your own machine, you can also work through an
internet connection linking up to your data provider’s addVANTAGE Pro 6.5
server, accessing all the features through your web browser on that machine. All
you will need is a reasonably fast internet connection and a user name and
password to access your data.
Overview
For large installations, Adcon recommends that you install the server on a
separate computer. The server must have enough power and memory to sustain
the expected number of clients and RTUs, as well as the number of extensions
that will process the data.
You can consider several types of systems depending on your application and
the corresponding license type you acquired. For example, if you have an
application where you manage only one or two remote stations (RTUs), you
could install the server on the same machine you are using for your day-to-day
use. After installing addVANTAGE Pro you need only point your browser to your
local computer (e.g., http://localhost:8080) and you can analyze your data. You
don’t even need access to the Internet for this type of setup.
At the other end of options, if you intend to offer addVANTAGE Pro services to
other users, running tens or hundreds of RTUs, you most likely will want to
install the software on a powerful server with a good connection to the Internet.
A fixed IP address is mandatory in this case.
In many cases you might not want to run a server at all and would rather use
the addVANTAGE Pro services offered by an addVANTAGE Pro service provider as
described in the previous paragraph. You need only a web browser, an Internet
connection, and an account (possibly subscription-based) with your
addVANTAGE provider.
addVANTAGE Pro 6.5 User Guide
CHAPTER 2
Connecting to addVANTAGE Pro
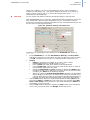
Connecting to addVANTAGE Pro
You connect to addVANTAGE Pro by starting your browser and entering the URL
of your server, for example, http://addvantage.adcon.at:8080. A web
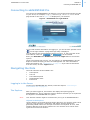
page similar to the one in Figure 3 is displayed in your browser.
Figure 3. addVANTAGE Pro Login Window
If you need browser information for logging in, you can click the question mark
(
) on the login window. A page with login help is displayed.
You can also see the documentation before you log in, or get a preview of the
new features. Click the
or
icon as needed.
Enter your User Name and Password and click the Login button to access the
system.
If the account data was correct, you are logged in to addVANTAGE Pro and an
Explorer window showing you the root node appears. For more information
about the Explorer, see “The Explorer” on page 12. If you want to disconnect
from the server, click the Logout button.
Navigating the Data
The main elements of the software are:
•
•
•
•
•
The Explorer
The List
The Dataview panel
Administration tools
Extensions
Logging in to the Server
To start your addVANTAGE Pro session, follow the steps in “Connecting to
addVANTAGE Pro” on page 11.
The Explorer
After you have logged in, the browser will display the opening page of
addVANTAGE Pro. This is called the Explorer because it allows you to explore all
the objects in an addVANTAGE Pro system.
Note:
Your browser window might be resized when you log in to addVANTAGE Pro.
Objects in the Explorer
Use the Explorer to navigate through all the objects in your system: areas, RTUs
(devices), tags (sensors), extensions, and panels. All such objects are
generically called nodes. You can open more than one Explorer at once, each
showing different levels of the system tree. You can also move certain node
types from one area to another.
12
addVANTAGE Pro 6.5 User Guide
CHAPTER 2
Navigating the Data
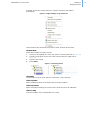
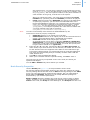
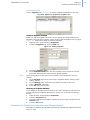
After opening an Explorer, expand the root node, which will probably show only
areas, RTUs, and tags. In order to familiarize you with the new terms, Figure 4
shows most of the node types available in the tree structure. You probably won’t
have all of them in your tree, but you will be able to generate them later.
The root node contains all the objects in a system. You can also think of it as the
container for the database on a server.
Figure 4. Expansion of Root Node in Explorer
An area is an object that defines a certain place that you have associated with a
specific property. It can be a field, a city, a section in a plant, a country, or any
other physical place. You can also have areas within areas, or subareas.
An RTU is placed in an area. You can have as many RTUs in an area as you
want—limited only by the type of license you own and the remote server or
Telemetry Gateway you are downloading data from. All the RTUs in a certain
area have the common property that they belong to that area.
The RTUs have tags, which can be sensors or actuators. A tag can also result out
of the processing of other tags by an extension.
Crops act as containers for extensions (calculations or disease models) that are
specific to one crop field in one year. Crop nodes have all the required
phenological phases, irrigations, and treatments.
Calculation extensions are types of embedded software that process input tags
following certain rules and output events or other tags (virtual tags). This type
of extension can also control output tags (actuators), effectively implementing
remote control functions. Calculation extensions apply to an area rather than a
crop.
Disease models are types of embedded software that track the progress of
common diseases that are specific to a crop. They are always the children of a
crop node.
Panels are the result of saving a view. For example, if you create a Dataview
panel and want to refer to it later (see page 32), you can save it as a panel.
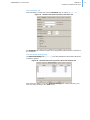
Functions in Explorer
As the “main window” in addVANTAGE Pro, the Explorer offers many features. In
addition to the usual expand/collapse of branches by clicking the plus (+) or
minus (-) sign, you can rename a node just by clicking the name twice.
You can also right-click a node and see a variety of options on the context menu,
depending on the node type and the permissions your user ID has. Figure 5, for
13
addVANTAGE Pro 6.5 User Guide
CHAPTER 2
Navigating the Data
example, shows the context menu for a tag for someone with admin
permissions.
Figure 5. Right-clicking a Tag in Explorer
These features are discussed below and in other sections of this book.
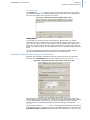
Rename Node
Follow these steps to rename a node:
1.
2.
3.
4.
Click once to highlight the node you want to rename (left side of Figure 6).
Click the node again to turn the name into an edit box (right side of
Figure 6).
Type the new name.
Press Enter.
Figure 6. Renaming Nodes
New Node
Create nodes such as areas, panels, extensions, crops, and tags.
Show only data
Open a Dataview panel to see data from the node’s children.
Show only events
Open a list panel showing the events on the node and all of its subnodes.
Show on map
View the location of the selected RTU on a map.
14
addVANTAGE Pro 6.5 User Guide
CHAPTER 2
Navigating the Data
Manual Event
When you right-click a node in the Explorer, you’ll see a Manual event choice.
Select it to display a dialog similar to the one shown in Figure 7.
Figure 7. Creating a Manual Event
1.
2.
3.
4.
5.
In the Begin Date field, enter or select the date you want to be associated
with the event.
Leave the Duration fields blank if this is an active event. Otherwise, enter a
zero for days, hours, or minutes to indicate a simple, one-time event.
Select a Severity level from the dropdown. Your selection determines
whether the manual event is shown as an Alarm, Event, or entry in the
Service log.
Enter the Comments that will be displayed in the Events viewer.
Click OK to close the dialog.
Connect To
Connect the node to the server by selecting the server and choosing the device
from the dialog that appears.
Reload Data
Retrieve data from the server.
Note:
You need another addVANTAGE Pro server, an A840 (firmware release 3.8.0 or
higher) or an A850 Telemetry Gateway, to be able to retrieve remote data.
Change Values Manually
You might find that the values on one sensor have data errors or need to be
marked as bad. You can use this feature to change the values manually. Follow
these steps:
1.
2.
Right-click the tag whose values you want to replace.
Select Change values manually to display the dialog shown in Figure 8.
Figure 8. Change Values Manually Dialog
3.
Target shows which value you selected to change.
Click the down arrow next to Source to choose what you want to do:
15
addVANTAGE Pro 6.5 User Guide
CHAPTER 2
Navigating the Data
•
4.
Copy values from another tag
Select this when you know another tag has the correct values and you
want to copy them to the current tag. Continue with step 4.
•
Mark values as BAD
Select this to mark a range of values as incorrect. Skip to step 7.
•
Remove manual values
Select this to replace manual values with automatic values for a range.
Skip to step 7.
Click the Source field to display a Tag Chooser dialog similar to the one
shown in Figure 9.
Figure 9. Tag Chooser Dialog
5.
6.
7.
8.
Click the appropriate station in the left pane, then select the tag with values
you want to copy in the right pane.
Click OK to return to the Change Values Manually dialog.
Enter the Start time and End time for the values to copy, mark as bad, or
remove.
Click OK.
If you copied values from another tag, you’ll see that where the values for
both sensors are the same, the old are overwritten by the new.
Explore from Here
Open a new Explorer with this node as the root.
Search from Here
Search only this part of the Explorer.
Settings
View and edit node-specific information.
Menubar and Toolbar
The menubar and toolbar in the Explorer (Figure 10) provide different ways to
access the features of addVANTAGE Pro 6.5.
Figure 10. The Menu Bar and the Toolbar
Menubar
•
•
•
•
Tools: accesses addVANTAGE Pro 6.5 user options and other administrative
tools.
Window: refreshes the current window and allows you to select an
addVANTAGE Pro 6.5 window when multiple windows are open
Help: displays the documentation and information about the software.
Logout: exits the addVANTAGE Pro 6.5 software.
16
addVANTAGE Pro 6.5 User Guide
CHAPTER 2
Navigating the Data
Toolbar
•
•
•
•
•
•
•
•
RTU Creation Wizard: starts a wizard that helps you create an RTU.
New Panel: creates a new Dataview panel, Explorer, List.
Save: saves the settings of the window or panel you have the focus on.
Settings/Properties: shows the properties of the selected node.
Delete: deletes objects you have selected in the Explorer.
Save As: enables you to save the current window or panel with a different
name.
Search Type: provides a quick search option to select an object from the
pop-up and then type search criteria in the text field.
Search: displays the advanced search dialog with more specific options.
17
18
Chapter 3. Node Properties and Tools
The robust Properties and Tools features in addVANTAGE Pro are the building
blocks of the system. Properties let you tinker with node settings such as
whether a node is connected to the server and what to do when a threshold is
reached. The tools options affect system-wide settings such as data acquisition
and email.
The tabs you see on the Properties dialog depend on the node type and, in some
cases, your user role.
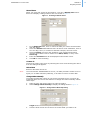
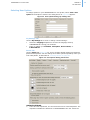
Node Properties
When you right-click a node in Explorer and select Properties, you have the
option to view and edit various features related to the node. The dialog that
appears (Figure 11) has three default tabs—General, Action, and Security—but
might have additional tabs, depending on the node type and your user role.
The General tab displays certain information about the node, such as its location
and name. The Action tab enables you to set events and actions specific to the
node itself. The Security tab shows the node’s owner and the permissions
various groups have in relation to the node.
Figure 11. General Tab of Node Properties Dialog
addVANTAGE Pro 6.5 User Guide
CHAPTER 3
Node Properties
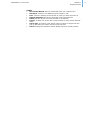
Node Action Properties
With the Action tab, you can specify the action that a certain event will cause.
The example below illustrates the sequence that occurs when an extension’s
threshold event is “Treatment recommended” and action is “E-mail.”
The extension registers itself as listener on the input tag (e.g. the Temp sensor)
as soon as you set the Temp sensor as an input tag of the extension. A possible
event of this extension is the “Treatment recommended” event. This means
when you open the Action tab of this extension, the table shows the “Treatment
recommended” event. For this event, you might choose to send an email. As
soon as this event is issued, the mail is sent. In any case, an issued event is
always written to the node's event list.
Figure 12 shows the Action tab of the Node Properties dialog.
Figure 12. Action Tab of Node Properties Dialog
1.
Click the Add icon to display the dialog shown in Figure 13.
Figure 13. Adding an Action
2.
3.
Select an Event from the list. The choices in the Event list depend on the
node type. For a tag, the choices might include problems with the data or a
threshold being reached. Manual event is a choice for every node type.
Select an Action from the list.
The following actions are available, depending on the node type:
•
Landline call (SIP/VoIP) uses the Session Initiation Protocol (SIP) to
make a landline call through the Voice over Internet Protocol (VoIP) to
the Recipients you specify in the field below. For recipients who are
19
addVANTAGE Pro 6.5 User Guide
CHAPTER 3
Node Properties
also system users, you can enter a shortcut in the format user{name},
such as user{root}. You can also specify a group as a recipient, such
as group{admin}. The user’s phone number, or the phone numbers of
each member of the group, must be set in the system.
•
Note:
When you select this action, you must enter the appropriate Phone
numbers and, optionally, select the Soundfile you want to be played.
E-mail sends an email to the Recipients you specify in the field below.
In specifying recipients, you can enter full email addresses in the
format [email protected]. For recipients who are also system
users, you can enter a shortcut in the format user{name}, such as
user{root}. You can also specify a group as a recipient, such as
group{admin}. For multiple recipients, the order does not matter but
you must separate each with a semicolon:
user{dimi};[email protected];user{root}
In order to successfully send emails from addVANTAGE Pro, the
email service must be properly configured.
•
•
4.
5.
6.
Switch On switches on an output port of an RTU.
Switch On/Off switches on an output port of an RTU and instructs it to
switch it off automatically after a predefined time elapses.
•
Switch Off switches off an output port of an RTU.
If you defined the rule to issue a command (Switch On, Switch Off or
Switch On/Off), you must click the Node button to select the tag to be
acted upon. In the case of Switch On/Off, you must also specify how
long the switch should be on (Open time)
Enter the day (d), hour (h), and minute (m) of the Max. age of event. In
other words, if you enter 6 hours and 30 minutes, the action will not occur
for the selected event if it happened more than six and a half hours ago.
This field is helpful because you would likely find an event that happened
two years ago uninteresting and you certainly wouldn’t want a SIP call
made because of it.
Click OK to close the Add Action dialog.
When you’re finished with the Properties dialog, click OK to close it.
The next time the event you specified occurs in the node, the action you
specified will happen.
You can Edit or Remove only those actions you created.
Node Security Properties
Use the Security tab (Figure 14) to set permissions for the node.
All of these settings show default values for the node. Our example of a tag’s
security settings shows that the owner is dimi and the tag belongs to the admin
group. You will rarely need to change these settings, but you might want to
assign different Privileges. Whether you can assign different privileges is
determined by your account permissions.
Read and Write determine whether the node can be viewed (read) or edited
(write). Therefore, you can use this dialog to determine the permissions the
Owner of the node, the Group the node belongs to, and Everyone else has. You
20
addVANTAGE Pro 6.5 User Guide
CHAPTER 3
Node Properties
can also select None for any of the fields to prevent anyone from viewing or
editing the node.
Figure 14. Security Tab of Node Properties Dialog
For Children Nodes, you select whether to have child notes get the same
privileges as the user or the privileges of the node.
Figure 14 also shows the Availability section. If you select the checkbox in this
section, users who are not logged in will still be able to see the node. In the case
of a Dataview panel, selecting the checkbox makes it publicly available.
If you want the security permissions to apply to all the nodes that the current
node is the parent of, click the Apply to all child nodes button.
Following is a discussion of the tab options for specific node types.
RTU/Tag
Figure 15 shows you the Properties dialog for a tag. One difference between RTU
and tag properties is that you can set thresholds for a tag. A discussion of the
Thresholds tab begins on page 23.
Figure 15. General Tab of Tag Properties Dialog
21
addVANTAGE Pro 6.5 User Guide
CHAPTER 3
Node Properties
The other difference between RTU and tag properties is the addition of the
Climate setting for an RTU immediately above the Attributes button (Figure 16).
You use this setting to select the type of climate applicable to the RTU’s location.
You can also click Detect by GPS to automatically select a climate setting based
on GPS coordinates.
Figure 16. Climate Setting on RTU Properties Dialog
Tag General Properties
Review the General tab for information about the tag, such as its class and
subclass, node ID, number of alarms and events, engineering unit used, time
zone of its server, and so forth.
Updating the addVANTAGE Pro Configuration
The tab also shows you the last time the software configuration database entries
were updated, which will usually be midnight of the current day, unless it’s set to
update at another time. However, if you don’t use automatic configuration—or if
you just want to update the configuration now—click the Update config now!
button. The system retrieves the current configuration from the server and
updates the local one. If any special conditions are reached, an event could be
issued (for example, if you specified an action based on an event such as the
engineering units being changed, the event would be registered.)
Viewing Node Attributes
The General tab has an Attributes button. Click it to display the dialog shown in
Figure 17.
Figure 17. The Attributes Dialog
This dialog shows technical information about the tag’s attributes. You close the
dialog by clicking the X in the upper right corner.
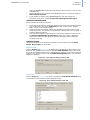
Tag DACQ Properties
As Figure 18 shows, use this tab to view information about the source and
connection status of the tag.
Figure 18. DACQ Info Tab of Tag Properties Dialog
If you disconnect an RTU or tag on the DACQ Info tab, you will need to rightclick the node in the Explorer and select Connect To hostname. Then select the
device in the dialog that appears.
When a tag is acquiring data, the icon for the tag and for the RTU will display in
the Explorer with a tiny moving arrow.
22
addVANTAGE Pro 6.5 User Guide
CHAPTER 3
Node Properties
Tag Threshold Properties
Use the Thresholds tab (Figure 19) to set conditions that will trigger an alarm,
event or service log entry when a threshold has been reached.
Figure 19. Thresholds Tab of Tag Properties Dialog
One of the actions you can set on the Action tab is for the Threshold reached
event. Use the Thresholds tab to create the threshold that causes the action to
occur, as detailed in the following steps:
1.
2.
Select whether to Create “Threshold reached” event when” one of these
choices is true:
•
ALL conditions were met
•
ANY condition was met
Add one or more conditions:
a. In the Conditions pane, click Add.
The dialog shown in Figure 20 is displayed.
Figure 20. Adding a Threshold Condition
b.
c.
Click the Condition dropdown to select the threshold’s condition.
Following are the choices in this dropdown:
•
is greater than
•
is greater or equal to
•
is equal to
•
is less or equal to
•
is less than
•
is between (incl)
The values are inclusive.
•
is between (excl)
The values are exclusive.
•
is between (incl - excl)
The values include the first but exclude the last.
•
is between (excl - incl)
The values exclude the first but include the last.
In the Value1 field, enter the condition’s value.
23
addVANTAGE Pro 6.5 User Guide
CHAPTER 3
The Tools Menu
d.
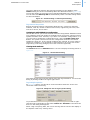
If you used any of the “between” conditions, enter the other value in
the Value2 field that appears. The following table describes how values
are used with these conditions.
Sample
Value 1
Sample
Value 2
is between (incl)
2.0
5.0
2.0, 3.0,
4.0, 5.0
is between (excl)
2.0
5.0
3.0, 4.0
is between
(incl - excl)
2.0
5.0
2.0, 3.0,
4.0
is between
(excl - incl)
2.0
5.0
3.0, 4.0,
5.0
Condition
3.
4.
Condition
Applies to
e. Click OK to close this dialog and continue with adding a threshold.
In the Event pane, click the dropdown to choose whether this threshold will
result in an Alarm, Event, or entry in the Service Log.
Add a Remark to be displayed with the alarm, event, or service log entry.
(optional)
Panels
If you right-click a panel in the Explorer and select Properties from the context
menu, the dialog shows only the three default tabs. To set up Lists and Dataview
panels, see “Creating Panels” on page 30.
Extensions and Crops
If you right-click an extension or a crop in the Explorer and select Properties
from the context menu, the dialog shows the default tabs illustrated in
Figure 21.
Figure 21. Default Tabs for Crop and Extension
To set up Extensions and Crops, see “Working with Extensions and Crops” on
page 48.
The Tools Menu
Use the Tools menu for administrative tasks such as setting users and groups,
administering data sources, administering chemicals (for Plant Protection
extensions), and so on. The menu options you see depend on your role, but
following is a sample of the options:
•
•
•
User options
Server settings
Chemicals database administration (only if at least one Plant Protection
extension is installed)
24
addVANTAGE Pro 6.5 User Guide
CHAPTER 3
The Tools Menu
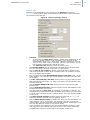
Selecting User Options
To change options in your addVANTAGE Pro user profile, select Tools User
options in the Explorer window. The dialog shown in Figure 22 appears.
Figure 22. User Options Dialog, My Settings Tab
My Settings Tab
Use the My Settings tab to view or change various settings:
•
•
Select the Language dropdown to choose the language used by
addVANTAGE Pro during your sessions.
Enter or update your Full Name, Description, Phone number, or
E-Mail address.
Panels Tab
Use the Panels tab (Figure 23) to view or change default options for Dataview
panels and all panels. You can change all of these options separately when you
work with panels, as described in “Creating Panels” on page 30.
Figure 23. User Options Dialog, Panels Tab
Options for All Panels
•
There are two dropdowns, one for saved and one for unsaved panels. The
dropdown indicates the behaviour of addVANTAGE if the user closes the
25
addVANTAGE Pro 6.5 User Guide
CHAPTER 3
The Tools Menu
•
•
panel, if addVANTAGE should discard changes, ask the user to save or save
automatically.
Select whether to see seconds when displaying time in a panel by clicking
Show seconds in panels.
If you prefer to always open addVANTAGE Pro with the panels you
previously used open, select Re-open last opened panels when log in.
Options for Dataview panels
These options serve three purposes:
1.
2.
3.
At the top of the section, select the default view to use for a Dataview panel
you create when you select View Data from the context menu: graphic,
table, events, instrument or map.
From the boxes that follow, define color defaults for the all views of new
Dataview panels. You cannot use this dialog to change the colors in open or
existing Dataview panels.
Use the last dropdown in this section to select the character to be used as
the Default field delimiter for CSV export. When you export a Dataview
panel into a CSV file, this option shows the character used to separate
columns in the file.
Options for Events
Use these checkboxes to determine whether a new Events list should Show
alarms, Show events, or show both.
Explorer Tab
Use the Explorer tab (Figure 24) to display the internal ID of each object in the
Explorer. You probably won’t need to activate Show Node IDs under normal use,
but it can be valuable when you are debugging the system or you need technical
support. You can also use this tab to install RTU diagnostics when you add RTU
stations in Explorer.
Figure 24. User Options Dialog, Explorer Tab
Crops Tab
Use the Crops tab (Figure 25) to view or change the Crop default start date, that
is, the date to start collecting data about the crops.
Figure 25. User Options Dialog, Crops Tab
26
addVANTAGE Pro 6.5 User Guide
CHAPTER 3
The Tools Menu
This dialog shows which crops will be visible to the user in the Explorer context
menu. If a crop is not selected in this list, the user cannot add it to a node.
You also see an Automatically install crop extensions when the crop is created
checkbox. The addVANTAGE Pro software can automatically include disease
models and calculation extensions (collectively called crop extensions) usually
associated with the crop. If you select this checkbox, those defaults are
automatically added with the crop when it is added to a node. If this checkbox is
not selected, only the crop itself is added to the node. The user can select the
crop extensions separately—but only the extensions that are associated with the
crop.
If a specific crop extension has been made invisible on the Extensions tab (as
described next), the extension will not appear in any list of disease models or
calculation extensions that can be added to the crop.
Your ability to edit this dialog depends on your role.
Extensions Tab
Use the Extensions tab (Figure 26) to select whether to Show advanced settings
in extensions. If selected, the Advanced settings tab displays in an extension’s
Properties dialog.
Figure 26. User Options Dialog, Extensions Tab
You can also make the various calculation extensions and disease models visible
on the context menu.
Your ability to edit this dialog depends on your role.
27
addVANTAGE Pro 6.5 User Guide
CHAPTER 3
The Tools Menu
Engineering Units Tab
Use the Engineering Units tab (Figure 27) to change the engineering units used
to express the tags.
Figure 27. User Options Dialog, Engineering Units Tab
Use the System dropdown to choose how engineering units will be displayed to
you. Metric and Imperial provide a set of default units that are either metric or
American. For example, Figure 27 shows that the original engineering unit for
Area (square centimeter) in the Metric system will be displayed as Area (square
centimeter). If you select the Imperial system, the displayed unit changes to
Area (square inch).
You can also make specific selections for one or more of the original engineering
units. To use a different displayed unit, select the Custom, system and click the
radio button indicating the unit you want to be displayed, such as Area (square
foot).
To change the engineering unit for a specific tag in addVANTAGE Pro, do the
following:
1.
2.
3.
4.
5.
Find the engineering unit you want to change in the upper pane of the
dialog and select it.
Valid alternatives are displayed in the lower pane. Select the one you want.
Click Apply.
To change other engineering units, repeat steps 1 through 3.
When you are finished, click OK to close the dialog.
Your ability to edit this dialog depends on your role.
Security Tab
Use the Security tab (Figure 28) to view or change security settings associated
with your user profile.
Figure 28. User Options Dialog, Security Tab
28
addVANTAGE Pro 6.5 User Guide
CHAPTER 3
The Tools Menu
You can change your password and account privileges, as well as the duration of
your session timeout and whether you must use your password for WAP access
to addVANTAGE Pro.
Some users will see only the User’s name and the password fields. Your ability to
edit this dialog depends on your role.
Using the Chemicals Service
Adcon does not supply lists of chemicals because the rules for their use differ
between locations. For more details about this service, please consult the
addVANTAGE Pro 6.1 Extensions and Crops manual.
29
30
Chapter 4. Creating Panels
Lists and Dataview are panels that offer different ways to view data in
addVANTAGE Pro 6.5.
You can right-click any panel and use the Cut, Copy, and Paste options to
duplicate the panel in another part of the Explorer.
The List
Use the List to display a group of addVANTAGE Pro objects in a different way.
The List is similar to an Explorer view, with the difference that the objects in a
list are not expandable. Use a List when you need to work on a group of objects
with similar properties, for example, configure extensions or synchronize tag
settings.
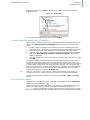
You can create a List by clicking the New Panel icon and selecting List. Use the
Add Nodes button on the List’s toolbar (Figure 29) to add objects to the list. You
can also remove objects that you no longer need by using the Remove Nodes
button on the toolbar.
Figure 29. List Toolbar
Note:
Removing an object from the list does not permanently delete it from the
database. You will continue to see the object in an Explorer panel. To
permanently remove an object, right-click it and select Delete.
When you add objects to a list from the List’s toolbar, the Choose Nodes dialog
opens, as show in Figure 30.
Figure 30. Choosing Objects to Add to a List
Select an object in the dialog and click OK. You can add only one object at a
time.
If you’re using Internet Explorer, you can also add objects to the List by
dragging and dropping them from an Explorer into an open List. If you’re using
Firefox, you can drag and drop an object onto the saved List’s icon in an
Explorer.
addVANTAGE Pro 6.5 User Guide
CHAPTER 4
The List
Search
You can also create a list as a result of a search operation. Suppose you want to
search for all areas in the system having the string “Adcon” in their name.
Follow these steps to search for those areas and populate the List:
1.
2.
3.
4.
5.
In an Explorer, click the Search icon (the magnifying glass icon on the right
side of the text box in the Explorer toolbar) to open the advanced search
dialog (Figure 31).
Node name is displayed by default, with the default property of contains.
Enter Adcon in the text field.
Click the Add criteria dropdown, then select Class.
Another line of search parameters is displayed in the Search dialog.
You can also search by Name, Subclass, ID, and Attribute. Each type of
criteria has its own properties. Click the down arrow to see those
properties.
Keep the default property of is, but from the next dropdown, select area.
Click the OK button.
Figure 31. The Search Dialog
A List appears (Figure 32), containing all the objects fulfilling the selected
criteria. After performing the required operations on the nodes in the list, you
can save the list as a panel or discard it by closing it.
Figure 32. A List Viewer
Quick Search
A quick search option is also available:
1.
2.
Note:
Click the magnifying glass icon on the left side of the text box in the
Explorer toolbar.
Select the search criteria (Name, Class, Subclass, or ID). Add and
remove the search criteria as needed.
The search starts from the node you selected in the Explorer.
3.
Type the string you are searching for and confirm it by pressing the Enter
key.
A list with the criteria you entered is displayed.
Search from Here
You can also right-click a node in the Explorer and select Search from here. The
Search dialog shown in Figure 31 is displayed, but the Search in line shows the
31
addVANTAGE Pro 6.5 User Guide
CHAPTER 4
The Dataview panel
node where you started the search. Complete the Search dialog as described
previously.
Properties
A list is a collection of nodes you want to treat as one object. For this reason,
you should view properties only on the items in the list.
The Dataview panel
Use the Dataview panel to see a plot of tag values stored in the database. To
open a Dataview panel, click New Panel and select Dataview. The dataview
panel toolbar is shown in Figure 33.
Figure 33. Dataview panel’s Toolbar
Prior to explaining the ways to display data in a Dataview panel, please make
yourself familiar with the tool bar and its elements, which you will frequently use
in your daily work with addVANTAGE Pro 6.5.
Button 1
Save
Saves the current panel. If this panel has not
been saved before, clicking this button opens
a dialog you use save it.
Button 2
Save As
Opens a dialog you use to save the current
panel with different name. If the current
panel has not been saved before, this button
functions the same as the Save button.
Button 3
Add to node
template library
Opens a dialog where you choose the
destination for the template.
Button 4
Print
Prints the Dataview panel on the default
printer.
Button 5
Export all values in
time range to PDF
Saves the values shown in Graphical or Table
view as a PDF file.
Button 6
Export all values in
time range to CSV
Saves the values shown in Graphical or Table
view as a CSV file.
Button 7
Settings
Opens the Dataview Options dialog, where
you set the options for each object in the
panel, or add/remove objects from the panel.
Button 8
Go to Begin
Sets the starting date of the dataview panel
to the beginning date of your database.
Button 9
Go 30/7/1 Days
back
Moves the starting date of the Dataview
panel 1, 7, or 30 days back.
Button 10
Go back X
Goes back the specified period of time, where
X is the span shown in 13.
Calendar 11
Date Chooser
Shows the start date of the Dataview panel.
Clicking the downwards arrow to the right of
the Date Chooser opens a calendar you use
to select a specific start date.
Button 12
Go forward X
Goes forward the specified period of time,
where X is the span shown in 13.
Button 13
Go 1/7/30 Days
forward
Moves the starting date of the Dataview
panel 1, 7, or 30 days forwards.
32
addVANTAGE Pro 6.5 User Guide
CHAPTER 4
The Dataview panel
Button 14
Go to End
Sets the end date of your database at the
end of the currently selected span. If you
have, for example, selected to view a 7-day
span, and you click Go to End, the Dataview
panel will show you the data of the last 7
days of your database.
List 15
Span Chooser
Displays the time span being used in the
Dataview panel. Click the downwards arrow
to the right of the Span Chooser to open a
dropdown with predefined time spans to
choose from.
You’ll also see a Custom duration. Select this
to display the Dataview Options dialog, where
you’ll select the Display tab and choose the
duration you want.
Button 16
Graphical view
Displays the Dataview panel’s values on a
graph.
Button 17
Table view
Displays the Dataview panel’s values in a
table. Table View also enables you to export
data with a mouse-click.
Button 18
Event list
Shows the events that are stored in the
nodes that are linked as event source nodes.
Button 19
Virtual instruments
Displays the Dataview panel’s values as they
might appear on an instrument panel.
Button 20
Map view
Shows a map with the location of the stations
and tags that are used in this Dataview
panel.
Button 21
Show Values at
Cursor
Displays the values of each tag in a little flag
next to the cursor. This allows a faster
understanding than looking at the legend.
If you unselect this button, you can click and
drag to see several statistical values for the
selected area.
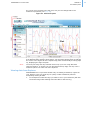
Viewing Dataview panels with Drag-and-Drop
Expand the tree in an Explorer until you reach the desired tag, then drag and
drop it into an open Dataview panel. After a short delay, the tag’s plot is
displayed in the Dataview panel. Figure 34 shows a Dataview panel displaying
data for several tags. Notice that each tag in the graph displays in the color
designated for it in the Legend that is to the left of the graph. You’ll also see that
33
addVANTAGE Pro 6.5 User Guide
CHAPTER 4
The Dataview panel
the Y axis color is linked to the tag color, but you can change that in the
Dataview’s properties (see page 36).
Figure 34. A Dataview panel
You can plot tags coming from different RTUs on one viewer. If you have tags
from different RTUs with the same name, you can easily identify them by placing
the cursor in the legend for the respective tag. After a short delay a tool tip pops
up, displaying the tag’s full path.
Note:
Currently the drag and drop method works only if you are using Microsoft
Internet Explorer. In Firefox you can still drag and drop tags, but only onto a
Dataview panel icon within the same Explorer.
Viewing data from Explorer
addVANTAGE Pro 6.5 provides another way of creating a Dataview, right from
your Explorer. This is a great way to quickly create a Dataview panel for
temporarily looking at data.
1.
In the Explorer select the tags you want to see in your Dataview (left-click
the desired tags while holding down the Shift or the Ctrl key).
34
addVANTAGE Pro 6.5 User Guide
CHAPTER 4
The Dataview panel
2.
Right-click the selected tags and select Show only data from the context
menu as shown in Figure 35.
Figure 35. View Data from Explorer
If you want to keep this Dataview panel, you need to save it by clicking on the
Save icon. Else if you close the panel you will be asked if you want to save it,
unless you have selected Tools User options Panels Automatically save
panels on close. In this case the new panel will be discarded unless you save it
manually.
Using Settings to Add Tags to Dataview panels
If you can’t use drag and drop, follow these steps to display data in a Dataview
panel:
1.
2.
3.
4.
In an active Dataview panel, click Settings to display the Dataview Options
dialog shown in Figure 36.
Click Add to display the Tag Chooser dialog listing the available tags.
Expand the tree until you find the tags you need to display (you can select
more than one tag by using the shift and control keys).
Click OK when you are finished. The selected tags are now displayed in the
Tags list, in the order you chose them.
If you need to add other tags in the Dataview panel, including tags from
different areas/RTUs, repeat Step 2 through Step 4. To delete a tag, select it
and click the Remove button. By using the arrow buttons, you can change the
order of the tags in the list. When the Dataview Options dialog lists all the tags
35
addVANTAGE Pro 6.5 User Guide
CHAPTER 4
The Dataview panel
you want to display, click the OK button. The Dataview panel displays the tags
and their data in a graphic form.
Figure 36. Selecting, Adding, and Removing Tags
Note:
If no plots are displayed, check the date and use the arrows and the calendar in
the Dataview panel to move to a date and time where you have data.
You can also use the extensive features available in the Dataview Options dialog
to customize the way your graph looks by viewing and changing the options on
the Y-axis, Plots, Thresholds, and Display tabs. As you make changes in this
dialog, you can click Apply to see how the changes affect the Dataview panel
before you save the changes. If you’re satisfied with the changes, click OK to
save the Dataview panel.
Y-axis Tab
Following is an explanation of the options on the Y-axis tab shown in Figure 36.
•
•
•
Use sensor color as Axis color. The Y-Axis and sensor colors are assigned by
addVANTAGE Pro and are identical by default. If you leave this checkbox
unselected, you can use the color chooser you see to change the y-axis
color, but the corresponding color of the tag on the graph will not change. If
you select this checkbox, the color of the y-axis will be the same as the
sensor color (as displayed on the Plot tab).
Scale
•
High /Low: The scale refers to the tag’s value range—in other words,
the maximum or minimum value that is expected. If the tag can
deliver data only in the range of
-60°C to +40°C, for example, you need not enter +1000°C for the
High and -200°C for the Low because no one would see the chart
curve.
Normally, only people who know that their value is within a certain
range use the Scale fields. For example, say you have a special Temp
sensor in a production process. Its range is always between 20°C and
25°C but it is very important to see small changes. For this sensor, you
would choose settings of Low=20 and High=25.
•
The Defaults button resets the High/Low settings to the tag’s default.
If you select the Autoscale checkbox, the minimum and maximum values of
the sensor will be determined automatically within the current time range.
The Scale High and Low fields are ignored in this case.
36
addVANTAGE Pro 6.5 User Guide
CHAPTER 4
The Dataview panel
•
•
•
•
•
Use Automatic scale in group to display the scale as an average of the highs
and lows for the tags in a chart. You can display multiple groups of such
autoscaled sensors by assigning each to a group. For example, you could
assign sensor values above a certain point to one group and values below
that point to another group. Groups are entirely arbitrary and of your own
making. Group numbers need not be consecutive.
If you select the Always show y-axis checkbox, the y-axis for the current
sensor (meaning the sensor whose y-axis properties you are viewing) will
be shown on the grid always, even when another sensor is selected.
Normally, when you select a sensor in the Legend section, the y-Axis is
refreshed and the scale of the selected sensor is shown. However, if you
select the Always show y-axis checkbox, you will see the current sensor’s yaxis and the y-axis for the sensor you select in the Legend.
Use the Major Grid to show horizontal lines. The number gives the number
of lines spread over the value range of the sensor and the values between
the lines. To know how many units will be displayed between two major grid
lines, enter a number and press the Tab or Enter key. The line below shows
You will use xx units per gridline, where xx is the number of units.
The xx value depends on the Scale and the number of gridlines used. For
example, if you turn on the major grid for a Temperature sensor, you might
see You will use 6 units per gridline, meaning one gridline might
show 20°C, while the line above it shows 26°C and the line below it shows
14°C.
The Band High (%)/Low (%) is the percentage of available space for this yaxis and the chart curve. The default is 0 to 100% (meaning that the grid
will use all available space). Band is helpful for Dataview panels that
contain many similar tags (e.g. Battery voltages=BV). You can say: Use the
lower 50% for BV 1 and the upper 50% for BV 2. The axis and the chart
curves would not overlap, but be drawn in different parts of the grid. The
settings for BV 1 would be Low=0, High=50 and the lower half of the grid
would display these voltages. BV 2 would have settings of Low=50,
High=100 and the upper half of the grid would display its voltages.
You can also experiment with these fields in conjunction with the autoscale,
autostack, and overlap features to create a variety of interesting charts.
The autoscaling feature introduces the ability to show multiple graph lines
that overlap for multiple sensors, causing graphs that can be difficult to
read. Use the Automatic stack and the Overlap percentage features to
display the graph in several different ways that eliminate any such difficulty.
You can select all of the sensors in the Properties dialog and click the
Automatic stack button to stack the values for each sensor on top of each
other. In some instances, however, you might need to show some overlap.
You can still select sensors to autostack but enter a percentage of overlap
to show.
Plots Tab
Following is an explanation of the options on the Plot tab shown in Figure 37.
Figure 37. Dataview Settings, Plot Tab
•
•
•
•
The Visible checkbox has the same function as the checkbox in the Legend.
If the checkbox is selected, the sensor values appear in the grid. If the
checkbox is not selected, the values do not appear.
You can use a Line or Bar Style for the values in the grid. The Bar style is
useful for sum values, such as precipitation or data flow.
Use the Color chooser to change the color of the Line or Bar.
Select the Line or Bar thickness from the Weight list.
Thresholds Tab
You can define multiple thresholds per tag in a Dataview panel. A threshold is an
interesting value (range), where the chart curve “enters” or “leaves” a certain
37
addVANTAGE Pro 6.5 User Guide
CHAPTER 4
The Dataview panel
range. For example, you can set a threshold for when a value is suddenly
outside its usual range (e.g. “only values between 0 and 10°C are valid”) or
when a certain value is met (e.g. “when value drops below 0°C”). Figure 38
illustrates the Thresholds tab.
CAUTION
Do not confuse this feature with the threshold settings in the tag itself.
With addVANTAGE Pro 6.5, each tag, independent from the Dataview panel, can
have thresholds. When the tag’s thresholds are met, normally an action is
performed. The Dataview panel’s thresholds are only informational and thus are
not the same as the tag’s thresholds.
Figure 38. Dataview Settings, Thresholds Tab
Following is an explanation of the options on the Thresholds tab shown in
Figure 38.
•
•
•
•
In the Thresholds list, use the Add, Remove, Move Up, and Move Down
buttons the same way you use them for Tags. In this case, however, when
you Add a threshold, you will give it a name that has meaning for you.
General
•
Name the threshold you added. If you don’t enter a name,
addVANTAGE names it something like Threshold 1.
•
Enter a Value that determines where the threshold starts.
•
Use the Label Color chooser to pick the color of the name or value of
the threshold displayed in the chart.
•
Select the Show name on y-axis checkbox to display the Name of the
threshold on the grid, in the color you chose. If you do not select this
checkbox, the Value will be displayed instead.
•
When you select the Always show thresholds checkbox, the threshold
always displays on the grid, no matter which sensor is selected in the
Legend. When this checkbox is not selected, the threshold displays on
the grid only when the corresponding tag is selected in the Legend.
Use the Fill fields to determine an area that should be filled (Fill to) from
the entered Value to a Base set in the next field. You can also select Min.
Scale or Max. Scale to draw a fill box in the range between the Value and
the bottom or top of the plot.
Use the Line fields to determine whether to Paint (draw) a line and which
color to use, as well as which line Weight (thickness) to use.
38
addVANTAGE Pro 6.5 User Guide
CHAPTER 4
The Dataview panel
General Tab
Following is an explanation of the options on the General tab shown in
Figure 39. These options apply to the Dataview panel itself, not the individual
tag selected in the Tags list.
Figure 39. Dataview Settings, General
•
•
•
•
•
•
•
•
•
•
Time Axis
•
If you select the Major Grid checkbox, vertical lines will display on the
grid. The number of lines is not selectable, but it depends on the
selected time range (e.g. 7 lines when 1 Week is selected or one line
every 4 hours when 1 Day is selected). Use the color chooser next to
the checkbox to specify the vertical line color.
•
The Time axis color shows the color of the time axis.
The Duration Options are the same as the duration shown in the toolbar.
You can change the duration on this tab or in the toolbar.
Use the Gap at end of data to specify a period of time to appear at the
end of the grid with no data, which could be useful, for example, to show
when a threshold was reached.
You can select the option Automatically jump to last data which - as the
name implies - executes the “Go to end” function everytime you open the
saved panel.
The Min. start and Max. end date can be useful if you don’t want to show
data outside this time range, e.g. when your station got relocated but still
uses the same ID.
Use the Graphic Background Color chooser to pick a color for the grid’s
background.
Use the Axis background color chooser to pick the color that displays in the
background of the Y and X axes.
You can select the Y axis style as Collapsed or Expanded (=default). The
Collapsed style is also known as the “LiveData” style, where you can see all
y axis at once, but there are only 3 values shown: min, max and the middle
of the y axis.
The Show seconds in panels checkbox works as described on page 26 to
determine whether seconds show in displays of time.
Use the Show Values at Cursor checkbox the same way you use Button 13
in the toolbar. That is, if you select the checkbox and then click the left
mouse button, you see the sensor values at that position. Furthermore, you
can click and drag the mouse to see all the values.
If the checkbox is not selected, you see certain statistics on the fly. Click
and drag the mouse between two vertical lines to see a table with SUM/
AVG/MIN/MAX values for all the tags at the bottom of the grid.
39
addVANTAGE Pro 6.5 User Guide
CHAPTER 4
The Dataview panel
•
Show time navigation bar shows/hides the bar at the bottom, where you
can select the time that is currently displayed. It can help to save space
when you hide it.
A Dataview Example
Displaying tags from different areas/RTUs on the same Dataview panel can be
very useful. For example, you could set up a panel showing the battery level for
a group of RTUs and be able to inspect or compare them at a glance, such as the
example shown in Figure 40.
Figure 40. A Dataview panel showing Tags from several RTUs
You can export all of the data from this graphical view the same way as from the
table view, which is described on page 42.
Saving Dataview panels
Now that you’ve configured those tags, you might want to save this panel for
later use. If you are working with a data provider rather than your own copy of
addVANTAGE Pro 6.5, please make sure that you have the privileges to save
your changes.
When you first create a Dataview or any other type of panel, you must click Save
or Save As in the toolbar to save the panel. You typically use Save As when
you’ve made changes to an existing panel and want to save it under a different
name. In either case, the Save dialog shown in Figure 41 is displayed.
If you try to close an existing Dataview panel, one of two things happens. If you
chose to automatically save panels when you close them (page 25), the
Dataview panel closes with any changes you made saved. If you did not choose
to automatically save panels, a pop-up appears, asking if you want to save the
Dataview panel. Click Yes to display the Save dialog.
Select an area (a folder) where you want your custom Dataview panel saved.
It’s best to select an area having a certain relationship with the content of the
Dataview panel, but there is no rule to prevent you from saving it directly under
the root node (except that the name must be unique in that area). Enter an
40
addVANTAGE Pro 6.5 User Guide
CHAPTER 4
The Dataview panel
appropriate name in the Name field, then click OK to save the customized
Dataview panel.
Figure 41. Save Dialog
You can also save a panel any time by clicking Save.
Create a Dataview panel from a Template
If you have to create a large number of identical panels on different areas, you
can use the Dataview panel from template function and save yourself some
work:
1.
2.
3.
4.
Create a panel in a single area by using one of the methods previously
described, then add the tags you need and configure the panel’s properties.
Save the panel in its area. This will be used later as a template panel.
Right-click the areas where you want to save the copied Dataview panels
and select New Node from template Panel from Template. A File Open
dialog is displayed.
Navigate to the area where you saved the template panel and select it, then
click OK.
The system creates a Dataview panel with the same properties as the panel
used as the template in each area you selected. If a tag does not exist in the
respective area, a placeholder for it is included in the panel, and you can choose
to import data from another RTU that does have the tag. The new panels will
borrow the name of the original panel used as the template. If a panel with this
name already exists in an area, the newly created panel will have a running
number appended, for example, Weather (2).
Note:
The term “template” is used only for better understanding the concept of
creating panels from existing panels. Any panel can be used as a template.
You can also right-click a Dataview panel and use the Cut, Copy, and Paste
options.
From Charts to Tables
To switch from a graphical view to a tabular view of data, click the Table view
button previously described (
, page 33).
While the tool bar remains the same, your chart lines will disappear and every
value of the time span you selected will appear as a table, as shown in
Figure 42. Please note that this usually requires several screens, since a single
day of 15-minute data already consists of 96 entries. You can therefore navigate
41
addVANTAGE Pro 6.5 User Guide
CHAPTER 4
The Dataview panel
back and forth in time by either clicking the page number or the navigation
arrows on the bottom left of the table viewer.
Figure 42. Table View
You can click the Graphical view button (
display.
) to return to the graphical
You can now edit data in the table view. One way to do this is to double-click a
value in the table, type what you want the value to be, and press Enter. The
value displays in the table and the cell is highlighted in red. If you change your
mind, you can right-click in the cell and select Remove manual values.
If you want to add values to the table, right-click in the table and select Add new
values to display the dialog shown in Figure 43.
Figure 43. Adding a Value in the Table View
Say you manually recorded values in addition to the u’s values. You can add
them to the table by following these steps:
1.
2.
3.
4.
5.
6.
Note:
Select the Tag from the dropdown.
If you right-clicked a column in the table view, that tag is displayed by
default.
Select the date and time (Timestamp) for the first new value.
The Duration defaults to the recording interval for the selected tag’s values.
Change this duration if needed.
Enter the Value and click Add.
The dialog remains, but the timestamp moves to the interval shown in the
Duration field.
Enter any other new values, clicking Add each time.
When you’ve entered all the values, click Close.
The table will redisplay with the manual values you’ve just entered
highlighted in red.
If you entered values that already existed for the timestamp you selected, they
will overwrite the table’s values as manual entries.
Export data on the fly
While viewing data in the table view you can easily export all or part of it into an
ASCII format file. In the graphical view, you can export only all of the data.
Method 1: Exporting all the data
1.
2.
Right-click in the body of the table.
Choose Export from the menu that appears.
42
addVANTAGE Pro 6.5 User Guide
CHAPTER 4
The Dataview panel
3.
4.
Depending on your browser, you can open and/or save the file on your
computer. The default name of this file is values.csv, which you should
replace with a more meaningful name.
You can now open this file with spreadsheet software such as Excel or
OOo.Calc
Figure 44. Export All Data from Table View
The values exported are not limited to the values you can currently see on the
screen. This tool will export all the data that you could see in the initial table
view, with the start date as shown in the calendar, and the amount of data as
shown in the Span area (List 12 on page 33). Look at the example above. What
we export in Figure 44 is the data as can be seen in Figure 42: 1 week
(calendar), beginning on January 17.
Should you want to export all the data of a selected chart, you need to:
•
•
Set the start date to the beginning of the database (Button 5 - Go to Begin)
Select Custom in the Span Chooser (List 12), then select a reasonable
duration that shows all of the data on the Display tab.
Method 2: Export selected data sets only (copy to clipboard)
If you want to export only a few lines of data from the current screen, you can
copy them to the clipboard.
1.
2.
3.
Select data you want to copy (Ctrl+Click or Shift+Click, as shown in
Figure 45).
Right-click in the body of the table and select Copy to clipboard from the
menu that appears.
Open a text editor or spreadsheet program such as Excel or OOo.Calc and
paste the contents of the clipboard.
Figure 45. Copying Selected Data into the Clipboard
43
addVANTAGE Pro 6.5 User Guide
CHAPTER 4
The Dataview panel
Instrument View
If you click the Virtual Instruments button (
), you can view chart data in one
other view (Figure 46), similar to what you might see on an instrument panel.
Figure 46. Dataview panel Using Virtual Instruments
Events View
Use the Events view to see the events generated by nodes.
You’ll notice that the toolbar is very similar to the Graphical view’s toolbar. You
are not able to print the Events view directly, but you can click
to export the
table values to a PDF file. The other buttons up through the time span chooser
are identical. The differences after the span chooser are that the Events view
has an Acknowledge button.
Settings
The Events view has extensive configuration possibilities to help you display the
events and alarms in the most appropriate way for your needs. In an active
Events view, click Settings to display the dialog shown in Figure 49.
Selecting Nodes
Use the Nodes tab (Figure 47) to select the nodes whose events you want to
display. It is the second tab in the Properties dialog, but you must select a node
before you can select the event types to display alarms for. With addVANTAGE
Pro 6.5, all nodes can issue events. The selected nodes are not necessarily those
that are used to plot the chart in the Graphical view.
Figure 47. Events Options Dialog, Nodes Tab
•
Click the Add button to display the Nodes Chooser (Figure 48), which you
use to add nodes whose events you want to view. You can select the root or
expand it to select areas.
Figure 48. The Nodes Chooser
44
addVANTAGE Pro 6.5 User Guide
CHAPTER 4
The Dataview panel
•
•
To remove a node from the Events viewer, select it on the Nodes tab and
click the Delete button.
Use the Also show events from child nodes checkbox to see alarms/events
from nodes belonging to the node you selected.
Another way to create an Events view is to select the nodes whose events you
want to see from the Explorer, then right-click and select Show only events.
Click Settings in the viewer to see the dialogs discussed here.
Displaying Event Types
The Event Types tab (Figure 49) displays all of the types of events that can issue
an alarm or event. If the tab is blank, you have not selected any nodes (see
“Selecting Nodes” on page 44).
You can drill down in the list to see that all events are selected by default. If you
do not want a specific event to display in the Events view, unselect it in the list.
Use the Check All and Uncheck All buttons to select or unselect all events at
once.
Figure 49. Events Options Dialog, Event Types Tab
The Event Types tab has several options for viewing events.
First, you can select which types of events to view in the Severity section:
•
•
•
Show alarms displays alarms.
Show events displays events.
Show service logs displays messages from the system or from
administrators, such as when an RTU has been replaced.
You can also use the Event filter section to further customize the Event View. For
example:
•
•
Show only active displays only active alarms/events, depending on your
choices for the next two checkboxes. If you leave this checkbox unselected,
all alarms/events for the selected span will be displayed in the Events
viewer. “Active” is defined as an alarm/event whose end date has not been
reached or is unknown.
Only not acknowledged events allows you to display only those messages
you have not set as acknowledged.
45
addVANTAGE Pro 6.5 User Guide
CHAPTER 4
The Dataview panel
Selecting Event Options
The Events Options tab (Figure 50) has customization options for the data to be
displayed in the viewer.
Figure 50. Events Options Dialog, Events Options Tab
•
In the Columns section, each checkbox represents a column. Select the
columns you want to see in the view
Click OK when you are finished. The Events view (Figure 51) shows the events
you selected.
Figure 51. Events View
Note:
If no events are displayed, check the date and use the arrows and the calendar
to move to a date and time where you have data.
Event Alarms
By default, alarms are shown in red. If you click the Acknowledge checkbox or
button, they turn blue or green, which means that the alarms have been
acknowledged.
If an extension issued an alarm, an alarm icon will be shown in the Explorer
window by that extension (Figure 52), and the alarm icon will also be shown
next to all the parent areas (folders) where the extension resides. Therefore,
while it’s the Statistic extension that has an alarm, the Hop crop and the Dimi
area folder also show the alarm icon.
Figure 52. Alarm Icons in the Explorer
Locating the Source of an Alarm
If you notice in an Explorer that an area shows an alarm, you can right-click the
node and select Show Events. An Events viewer properly configured for you is
displayed, showing only the alarms pertinent to the selected object.
46
addVANTAGE Pro 6.5 User Guide
CHAPTER 4
The Dataview panel
Using the Events Viewer
Right-click an event in an Events viewer to see the context menu shown in
Figure 53.
Figure 53. Event Viewer Context Menu
You have several options for working with the events:
•
•
•
•
•
•
•
Select Manual Event to manually add an event.
If you selected a crop event, you can add Irrigation or Treatments to the
crop.
Click Explore from here to an Explorer showing where the event originated.
Use Hide this event type to hide all events similar to the one you selected in
the Events viewer. Show the event type again by going to the Event Types
tab, clicking Select All, and clicking OK.
If appropriate for the event, you can Change climate settings, Change
settings of extension, or Change start date of extension from this context
menu.
Use Export all values in time range to PDF to view the events in a table in a
PDF document.
Select Properties to open the same Properties dialog as when you select
Properties in the Events viewer toolbar.
47
48
Chapter 5. Working with Extensions and
Crops
As with previous versions, the addVANTAGE Pro 6.5 software has extended
functionality through additional software modules called extensions. Extensions
are entities that perform calculations.
The types of extensions you work with are calculation extensions and disease
models. Crops are nodes that store information about phenophases, irrigations,
and treatments. They are not extensions. Disease models and calculation
extensions are relatively new to addVANTAGE Pro. Disease models are
extensions that apply only to crops. They “hear” events issued by the crop.
Calculation extensions usually apply to an area. Although they can be children of
a crop node, calculation extensions do not “hear” events issued by the crop
(such as when a treatment is applied).
Another set of extensions now available is called RTU diagnostics. These
diagnostic extensions are associated with RTU tags and they verify whether the
data coming from a tag is plausible. The configuration of these extensions is
related to climate, which is why you learned about the Climate Manager on page
29 of Chapter 3.
You can right-click any extension or crop and use the Cut, Copy, and Paste
options to duplicate the extension or crop in another part of the Explorer.
About addVANTAGE Pro Extensions
Some extensions are included with the software and others can be installed
separately. For example, Adcon Telemetry provides a collection of calculation
extensions and disease models (still collectively known as extensions) in a
package you can receive free of charge upon request from your Adcon
distributor. These extensions are documented in a separate addVANTAGE Pro
6.1 Extensions and Crops manual. This manual is located on the software CD,
which also contains these free extensions, or you can download it from Adcon
Telemetry’s website at http://www.adcon.at.
The Info Button
You will also find that certain calculation extensions and disease models have
additional information available in the software itself, on their Properties dialog’s
Extension tab. When you see an “info” button like the one shown in Figure 54,
click it to open a dialog with additional information about using the extension.
Figure 54. Info Button for Apply Powdery Mildew (Kast OiDiag) Extension
Recalculating Extensions and Crops
An extension will automatically recalculate some properties in the input data
sets if their options have been changed. This operation usually takes only a
couple of seconds, but in extreme cases (large data sets or many extensions
addVANTAGE Pro 6.5 User Guide
CHAPTER 5
Adding Extensions and Crops to an Area
running in parallel) it can take up to several minutes. The properties in the
Crops, Treatments, Inputs, Irrigation and Extension tabs may force a
recalculation if changed. You can also force a recalculation of one or more
extensions by selecting the respective extension in the Explorer, right-clicking,
and selecting Recalculate.
Adding Extensions and Crops to an Area
Extensions can be added to areas and crops, while crops can be added only to
areas. To add either, follow these steps:
1.
2.
3.
Open an Explorer.
Select where you want the extension or crop added (use the shift and
control keys if you’re selecting multiple locations).
Right-click the highlighted areas and select New Node Calculation
extension extension or New Node Crops crop.
The extension or crop is added to the area in the Explorer, where you can
configure it as needed. When you add a crop, all of the disease models of the
crop are created by default.
Adding Multiple Extensions and Crops
You can add multiple extensions and crops to the same area and create different
settings for each. Subsequent extensions and crops in the same area take the
name of the first, but with a number appended (for example, Apple [1] or
Running Total [1]).
You can also edit multiple extensions and crops. Use Ctrl+Click to select the
nodes, then click Properties. If the selected extensions are not identical, only
their common properties will be displayed.
Using Templates to Add Extensions or Crops
You can add an extension or crop by creating it from a template, that is, from an
existing extension or crop.
1.
2.
3.
Add the extension or crop in a single area using one of the methods
described above and set up its properties as you want to.
Right-click the selected areas where you want a copy of the extension or
crop and select New Node from template Calculation extension or New
Node from template Crops. A File Open dialog displays.
Navigate to the area where you saved the template panel and select it, then
click OK.
The system creates the extension or crop with the same properties as the one
used as the template in each area you selected. All child extensions will also be
created.
You can also install extensions and crops using node template by right-clicking
an areas and selecting New Node from template Using node templates. Select
the appropriate template and click Finish to add the extension or crop. See “” on
page 29 for an explanation of the node template library.
Adding a New Season to a Crop
In a way that is similar to creating a crop by template, you can start a new
season of a crop. This procedure is probably more useful for the previous year’s
crops because it copies the crop properties but uses current dates.
1.
2.
In the Explorer, right-click the crop you want to copy for the new season
and select New Node from template Start new season.
Update the new crop’s properties or move it to another area as needed.
Adding RTU Diagnostics to a Tag
RTU diagnostics can be added only to tags or sensors. To add these diagnostic
extensions, follow these steps:
1.
2.
Open an Explorer.
Select the sensor where you want the diagnostic extension added (use the
shift and control keys if you’re selecting multiple sensors).
49
addVANTAGE Pro 6.5 User Guide
CHAPTER 5
Properties for Extensions and Crops
3.
Right-click the highlighted areas and select New Node RTU
diagnostics extension.
You can also select New Node RTU diagnostics Create all missing. With
the first option, all missing diagnostic extensions are added to the sensor.
The extension is added to the sensor in the Explorer, where you can configure it
as needed.
Properties for Extensions and Crops
Some extensions and crops must be configured. To display the properties
(Figure 55), highlight the extension or crop in the Explorer and click the
Properties icon.
Figure 55. Statistics Extension Properties Dialog, General Tab
Common Properties
Figure 55 shows the properties specific to the Statistics calculation extension.
The General tab displays general information about the extension/crop, and for
calculation extensions and disease models, allows you to enable or disable
individual extensions. If you look closely at the extension’s icon, you can tell
whether the extension is enabled or disabled.
The green triangle
in the bottom left
corner indicates
the extension is
enabled.
The gray square
in the bottom left
corner indicates
the extension is
disabled.
If an extension is being executed, the green triangle appears to move
across the bottom of the icon.
The Action and Security tabs are discussed in Chapter 3, beginning on page 18
Properties for Crops
Three additional tabs pertain to crops.
50
addVANTAGE Pro 6.5 User Guide
CHAPTER 5
Properties for Extensions and Crops
The Crop Tab
Use the Crop tab (Figure 56) to specify and monitor the phenological stages of
crops.
Figure 56. Apple Crop Properties, Crop Tab
Note:
Clicking a phase causes a graphic depiction of the phase to be displayed on the
right side of the dialog, if such a graphic is available.
Changing Dates for Phenological Phases
In principle, the system can be installed anytime, but starting it at the beginning
of the growing season has certain advantages. The software uses a calendar
year with the appropriate phase dates set, but you can change these dates. Do
this by using the Crops panel, which sets the proper phenological phase.
To set the season or phase starting date, complete the following steps
(Figure 57):
1.
2.
3.
4.
Right-click the crop and select Properties.
Click the Crop tab.
Select the desired phase in the Name column.
Click the calendar icon and select the date for the phase to begin, then click
Apply.
Figure 57. Setting a Phase’s Start Date
Generally, the first phenological phase corresponds with the year’s begin in the
northern hemisphere, that is the 1st of January. After you set the date for a
phase, dates for subsequent phases are automatically computed from the
defaults programmed for each crop.
Climatic conditions during certain seasons could differ from the pre-programmed
defaults, so Adcon recommends that you verify at regular intervals whether the
model is in synchronicity with the field conditions. If this is not the case, use the
method described above to change each individual phase’s date accordingly.
The Treatments Tab
Use the Treatments tab (Figure 58) to inform the crop that a chemical treatment
was applied.
51
addVANTAGE Pro 6.5 User Guide
CHAPTER 5
Properties for Extensions and Crops
If the chemical you want to apply is not in the system’s database, you must first
add it. For more details about adding to or modifying the chemicals database,
refer to the addVANTAGE Pro 6.1 Extensions and Crops manual.
Figure 58. Apple Crop Properties, Treatments Tab
Adding Treatments
A spraying application usually follows a treatment recommendation (displayed in
the Events list). To inform the model you applied a field treatment, do the
following (Figure 59):
1.
2.
Right-click the crop and select Properties.
Click the Treatments tab, then the Add icon.
Figure 59. Applying a treatment
3.
4.
Note:
The wording shown to the right of the calendar icon indicates the server’s
location.
5.
6.
Note:
Select the chemical you applied in the field from the list.
In the Application date field, click the calendar icon to select the correct
treatment date and time from the pop-up that appears.
Enter a Remark. (optional)
Press OK when you are done.
If you want to add a spray for more than one disease (even if the chemicals
used are identical), you have to perform this operation for each individual
disease for which the treatment is valid.
If you decide that you don’t need to apply a treatment, e.g. if other
circumstances determine a treatment is not warranted, you must select the
entry “Warning ignored” from the chemicals list. Whatever the case is, you must
either apply a treatment or choose to ignore the warning. Failure to do so will
leave the current alarm active and no new warnings will be issued.
Removing a Treatment
If you added a treatment and you find out at a later date that it was incorrect
(either the date of application, or the type of chemical), you can delete the
treatment and add the correct one, if needed. Proceed as follows:
1.
2.
3.
4.
Right-click the crop and select Properties.
Click the Treatments tab.
Select the treatment from the lower list and click the Remove icon.
Click the OK button.
The system automatically recalculates the model’s new data.
52
addVANTAGE Pro 6.5 User Guide
CHAPTER 5
Properties for Extensions and Crops
The Irrigation Tab
Use the Irrigation tab (Figure 60) to create irrigation schedules for the crop.
Figure 60. Apple Crop Properties, Irrigation Tab
Adding an Irrigation Schedule
When you add an irrigation schedule, you are telling the model what type of
irrigation, how long the irrigation occurs, and how much irrigation the crop gets
(Figure 61). Follow these steps to add this schedule:
1.
2.
Right-click the crop and select Properties.
Click the Irrigation tab, then the Add icon.
Figure 61. Adding Irrigation
3.
4.
Note:
Select the Irrigation Type.
In the Application date field, click the calendar icon to select the correct
treatment date and time from the pop-up that appears.
The wording shown to the right of the calendar icon indicates the server’s
location.
5.
6.
7.
8.
In the Duration field, enter how long the irrigation lasted, in days, hours,
and/or minutes.
In the Quantity field, enter how much water was sent to the crop.
Enter a Remark. (optional)
Press OK when you are done.
Removing an Irrigation Schedule
If you added an irrigation and you find out at a later date that it was incorrect,
you can delete the treatment and add the correct one, if needed. Proceed as
follows:
1.
2.
3.
4.
Right-click the crop and select Properties.
Click the Irrigation tab.
Select the appropriate irrigation schedule from the lower list and click the
Remove icon.
Click the OK button.
Properties for Calculation Extensions and Disease Models
Calculation extensions and disease models have tabs that are different from the
ones for crops.
53
addVANTAGE Pro 6.5 User Guide
CHAPTER 5
Properties for Extensions and Crops
The Extension Tab
Most calculation extensions have an Extension tab, as shown in Figure 62.
Figure 62. Statistic Extension Properties, Extension Tab
The Extension tab contains options and configuration panels that are specific to
the extension.
The Advanced Settings Tab
The Advanced settings tab (Figure 63) provides additional information about the
extension options.
Figure 63. Statistic Extension Properties, Advanced Settings Tab
Note that your ability to see the Advanced Settings tab is determined by your
user role and a setting in the Tools menu.
54
addVANTAGE Pro 6.5 User Guide
CHAPTER 5
Properties for Extensions and Crops
The Inputs Tab
The Inputs tab (Figure 64) allows you to set the input tags for the extension.
The extensions have an intelligent algorithm that searches for the appropriate
tags, but only within the extension’s own area.
Figure 64. Extension Properties Dialog, Inputs Tab
Adding Inputs
If some tags are missing and the auto discovery feature fails, you should
manually intervene to identify the required tags. If multiple tags of the same
type exist on a given area, you will have to manually select which tag type you
want. You can also choose tags from other areas if you need the same type of
tag in more than one area, or if the application can be used with tags from other
areas.
For more details about calculation extensions and disease models, please
consult the addVANTAGE Pro 6.1 Extensions and Crops manual.
Extension Properties for Diagnostic Extensions
Although the diagnostic extensions have the same properties as calculation
extensions, the Extensions tab has some differences, as you can see Figure 65.
Figure 65. Diagnostic Extension Properties, Extensions Tab
RTU diagnostics are tied to the 30 climate options you can choose from. Your
climate was most likely selected for you when you installed the RTU and is based
on your GPS location, although you can select a different climate. Climate
characteristics are controlled through the Climate Manager, discussed in “” on
page 29.
The properties shown in Figure 65 are for a Missing Data diagnostic extension of
a temperature sensor. If you use one of the available climates, you must use the
Algorithm variable and Event settings that are associated with it. However, you
55
addVANTAGE Pro 6.5 User Guide
CHAPTER 5
Properties for Extensions and Crops
can unselect the Use climate settings checkbox and enter or select the data you
want. The Schedule settings are the same as for calculation extensions.
56
57
Appendix. Appendix
This appendix contains information concerning third-party tools Adcon employs.
Third-Party Tools
The following tools are used in the addVANTAGE Project. You can find the actual
license agreement for each tool in our separate addVANTAGE Pro Third-Party
License Agreements document.
ant.jar
Version 1.6.2
http://ant.apache.org
Apache License Version 2.0, January 2004
Used to compile the project with dependencies on other project parts
antlr-2.7.6.jar
Version 2.7.6, Current Version 3.2
http://www.antlr.org/
Freeware
Database framework
backport-util-concurrent-3.0.jar
Version 3.0, Current Version 3.1
http://backport-jsr166.sourceforge.net/
Creative Common Public Domain
Database framework
bcprov-jdk14-131.jar
Version 1.31, Current Version 1.37
http://www.bouncycastle.org/
MIT License
keymanager.RSACipher
commons-beanutils.jar
Version 1.7, Current Version 1.8.3
http://jakarta.apache.org/commons/beanutils/
The Apache Software License, Version 1.1
Toolkit which is used for webdevelopment
commons-codec-1.3.jar
Version 1.3, Current Version 1.3
http://jakarta.apache.org/commons/codec/
Apache License Version 2.0, January 2004
Used to en-/decode binary data
commons-collections-3.1.jar
Version 3.1, Current Version 3.2
http://jakarta.apache.org/commons/collections/
Apache License Version 2.0, January 2004
Helper for webapplication
commons-compress-1.4.1.jar
Version 1.4.1
http://commons.apache.org/proper/commons-compress/
Apache License Version 2.0, January 2004
zipping/unzipping files (backups, mail attachments)
addVANTAGE Pro 6.5 User Guide
APPENDIX
Third-Party Tools
commons-digester.jar
Version 1.8, Current Version 3.2
http://jakarta.apache.org/commons/digester/
The Apache Software License, Version 1.1
Toolkit which is used for webdevelopment
commons-discovery-0.4.jar
Version 0.4, Current Version 0.4
http://commons.apache.org/discovery/
Apache License Version 2.0, January 2004
Webapp programming framework
commons-fileupload-1.3.jar
Version 1.3
http://commons.apache.org/proper/commons-fileupload/
Apache License Version 2.0, January 2004
to upload&import node templates
commons-io-2.4.jar
Version 2.4
http://commons.apache.org/io/
Apache License Version 2.0, January 2004
handling text files
commons-logging.jar
Version 1.0.4, Current Version 1.1
http://jakarta.apache.org/commons/logging/
Apache License Version 2.0, January 2004
Helper for Scheduler (Quartz)
commons-logging-api.jar
Version 1.0.4, Current Version 1.1
http://jakarta.apache.org/commons/logging/
Apache License Version 2.0, January 2004
Helper for Scheduler (Quartz)
commons-net-3.1.jar
Version 3.1
http://commons.apache.org/proper/commons-net/
Apache License Version 2.0, January 2004
export extensions, FTP Queue
commons-validator.jar
Version 1.1.3, Current Version 1.3.1
http://jakarta.apache.org/commons/validator/
Apache License Version 2.0, January 2004
Used to validate entries in webapplication
datetimepicker2.7.jar
Version 2.7, Current Version 2.7
http://www.lavantech.com/datetimepicker/
Bought - http://www.lavantech.com/license.shtml
Used to set addMIN’s update Backup time
dom4j-1.6.1.jar
Version 1.6.1, Current Version 1.6.1
http://www.dom4j.org/
BSD license
For all parts that are by SPG
ehcache-1.5.0.jar
Version 1.5.0, Current Version 1.7.2
http://ehcache.org/
Apache License Version 2.0, January 2004
Database framework
58
addVANTAGE Pro 6.5 User Guide
APPENDIX
Third-Party Tools
ejb3-persistence.jar
Version 3.0 FR (1.0.1.GA)
basically MIT
Database framework
gmaps4jsf-1.1.3-u3.jar
Version 1.1.3
http://code.google.com/p/gmaps4jsf/
Apache License Version 2.0, January 2004
Google maps implementation
gson-2.2.2.jar
Version 2.2.2
http://code.google.com/p/google-gson/
Apache License Version 2.0, January 2004
making webapp programming easier
hibernate-annotations.jar
Version 3.4.0.GA, Current Version 3.4.0.GA
http://annotations.hibernate.org
LGPL
Database framework
hibernate-commons-annotations.jar
Version 3.1.0.GA
http://annotations.hibernate.org
LGPL
Database framework
hibernate3.jar
Version 3.4.0.GA, Current Version 4.0.1.GA
https://www.hibernate.org/344.html
LGPL
Database framework
hibernate-entitymanager.jar
Version 3.4.0.GA, Current Version 3.4.0 GA
https://www.hibernate.org/397.html
LGPL
Database framework
hsqldb.jar
Adcon-Version
http://hsqldb.org/
LGPL (Version 3, June 2007)
Database
iText-2.0.7.jar
Version 2.0.7, Current Version 5.0.0
http://itextpdf.com/
LGPL (Version 2.1, February 1999)
PDF creation
jaas.jar
http://java.sun.com/javase/technologies/security/
Sun binary code license (~Freeware)
Used in authentification
JainSipApi1.2.jar
Version 1.2
http://jain-sip.dev.java.net/
Public Domain, SIP Calls
JainSipRi1.2.jar
Version 1.2
http://jain-sip.dev.java.net/
Public Domain, SIP Calls
javamelody-1.25.0.jar
Version 1.25.0
59
addVANTAGE Pro 6.5 User Guide
APPENDIX
Third-Party Tools
http://code.google.com/p/javamelody/
LGPL (Version 3, June 2007)
Monitoring tool
javassist-3.4.GA.jar
Version 3.4.GA, Current Version 3.11.0.GA
http://www.csg.is.titech.ac.jp/~chiba/javassist/
LGPL
Database framework
javasysmon-0.3.4.jar (com.jezhumble.javasysmon.JavaSysMon)
Version 0.3.4
https://github.com/jezhumble/javasysmon
NetBSD (2-line) license
CPU usage monitor
jaxen-1.1.1.jar
Version 1.1.1, Current Version 1.1.1
http://jaxen.org/
Apache style, Attached
Xpath in DOM4J (webapp)
JbcParser.jar
Version 3.7, Current Version 3.7
http://www.bestcode.com/html/jbcparser.html
Bought
Basic arithmetic extension parser
jcommon-1.0.10.jar
Version 1.0.10, Current Version 1.0.10
http://www.jfree.org/jfreechart/
LGPL (Version 3, June 2007)
Chart drawing tool
jfreechart-1.1.1_adcon.jar
Version 1.1_adcon, Current Version 1.0.6
http://www.jfree.org/jfreechart/
LGPL (Version 3, June 2007)
Chart drawing tool
jmf.jar
http://java.sun.com/products/java-media/jmf/
JMF License
Java Media Framework, used to play Wave files in SIP calls
jsf-api-1.2_04-p02.jar
Version 1.2_04-b16-p02, Current Version 2.0
http://java.sun.com/javaee/javaserverfaces/reference/api/
CDDL (parts Apache)
Webapp programming framework
jsf-facelets.jar
Version 1.1.14
https://facelets.dev.java.net/
Apache License Version 2.0, January 2004
Webapp programming framework
jRegistryKey.jar
Version 1.4.5
https://sourceforge.net/projects/jregistrykey/
LGPL (Version 2.1, February 1999)
Tool to read/write the windows registry (addTray)
jspeex.jar
Version 0.9.7
http://jspeex.sourceforge.net/index.php
BSD License
Used in SIP Calls
60
addVANTAGE Pro 6.5 User Guide
APPENDIX
Third-Party Tools
jta-1.1.jar
1.1
1.1
http://java.sun.com/javaee/technologies/jta/index.jsp
Attached
Database framework
log4j-1.2.14.jar
Version 1.2.14, Current Version 1.2.14
http://logging.apache.org/log4j/docs
The Apache Software License, Version 1.1
Used to create logfiles depending on the loglevel and package name
mail.jar
Version 1.2, Current Version 1.4
http://java.sun.com/products/javamail/
Click Download / you must accept License
Used to handle email
minimalSipCaller.jar
Derived from http://sip-communicator.org
LGPL (Version 2.1, February 1999)
Used in SIP Calls
myfaces-api-1.2.3.jar
Version 1.2.3, Current Version 2.0.0-alpha
http://myfaces.apache.org/
Apache License Version 2.0, January 2004
Webapp programming framework
myfaces-impl-1.2.3.jar
Version 1.2.3, Current Version 2.0.0-alpha
http://myfaces.apache.org/
Apache License Version 2.0, January 2004
Webapp programming framework
nist-sdp-1.0.jar
http://jain-sip.dev.java.net/
Public Domain
Used in SIP Calls
ojdbc14.jar
Version 10.2.0.1.0, Current Version 10.2.0.1.0
http://www.oracle.com
Bought
Used in the Oracle database connection
quartz.jar
Version 1.6.0, Current Version 1.6.0
http://www.opensymphony.com/quartz/
Apache License Version 2.0, January 2004
Scheduling engine used for addTimer and data acquisition
richfaces-api-3.3.1.GA.jar
Version 3.3.1.GA, Current Version 3.3.2 SR1
http://www.jboss.org/richfaces
LGPL
Webapp programming framework
richfaces-impl-3.3.1.GA.jar
Version 3.3.1.GA, Current Version 3.3.2 SR1
http://www.jboss.org/richfaces
LGPL
Webapp programming framework
61
addVANTAGE Pro 6.5 User Guide
APPENDIX
Third-Party Tools
richfaces-ui-3.3.1.GA.jar
Version 3.3.1.GA, Current Version 3.3.2 SR1
http://www.jboss.org/richfaces
LGPL
Webapp programming framework
serializer.jar
Version 2.7.0
http://xml.apache.org/xalan-j/
Apache License Version 2.0, January 2004
Helper to (de-)serialize data, which is needed by Velocity
slf4j-api-1.5.3.jar
Version 1.5.3, Current Version 1.5.10
http://www.slf4j.org/
Freeware
Used for logging in JPA
slf4j-log4j12-1.5.3.jar
Version 1.5.3, Current Version 1.5.10
http://www.slf4j.org/
Freeware
Used for logging in JPA
struts.jar
Version 1.2.4, Current Version 2.0.8
http://struts.apache.org/
Apache License Version 2.0, January 2004
Framework that supports web development
Stun4J.jar
-no versioninghttps://stun4j.dev.java.net/
LGPL (Version 2.1, February 1999)
SIP call tool
velocity-1.4.jar
Version 1.4, Current Version 1.5
http://velocity.apache.org/
Apache License Version 2.0, January 2004
Framework that supports web development
velocity-tools-1.1.jar
Version 1.1, Current Version 1.3
http://velocity.apache.org/
Apache License Version 2.0, January 2004
Framework that supports web development
WinRegistry-4.5.jar
Version 4.5
https://code.google.com/p/java-registry/
LGPL v3
Used for installer
xalan.jar
Version 2.7.0, Current Version 2.7.1
http://xml.apache.org/xalan-j/
Apache License Version 2.0, January 2004
Used in the database framework
xmlsec-1.4.3.jar
Version 1.4.5, Current Version 1.4.5
http://santuario.apache.org/
Apache License Version 2.0, January 2004
Used in the database framework
62
63
Index
A
acknowledged events, 45
action types, 19
active alarm/event, 45
Adcon system, 6–8
adding
actions, 19
areas in Explorer, 14
extensions and crops to areas, 49
irrigation from events viewer, 47
manual events from events viewer, 47
multiple extensions and crops, 49
objects to a List, 30
RTU diagnostics to a tag, 49
RTU diagnostics when adding RTU, 26
tags to dataviews, 35
treatments from events viewer, 47
advanced settings
properties, 54
search, 17
showing for extensions, 27
alarms
acknowledging, 46
displaying in Explorer, 46
events, 45
locating source, 46
showing, 45
American measurements, 28
area
adding extensions and crops, 49
definition, 13
new in Explorer, 14
ASCII export
all data, 42
selected data, 43
automatic
install crop extensions, 27
properties values recalculation, 48
autoscale, 37
autostack, 37
B
band, dataview, 37
base station, definition, 7
button, definition, 9
C
calculation extensions
definition, 48
properties, 53
changing
dataview options, 36
dates for phenological phases, 51
engineering units, 28
password, 29
security settings, 28
sensor values, 15
user options, 25
checkbox, definition, 9
choosing tags for a Trend Viewer, 36
climate setting in RTU, 22
colors of alarms, 46
common properties of extentions and crops, 50
condition, setting, 23
configuring
cell phone for WAP, 8
extensions and crops, 50
update configuration, 22
context sensitivity, 8
conventions document, 9
creating
Dataview panel, 32
Dataview panel from template, 41
events in the viewer, 47
List, 30
nodes, 14
crops
adding multiple, 49
adding to areas, 49
automatically installing disease models, 27
configuring, 50
default start date, 26
definition, 13, 48
hiding, 27
properties, 50
starting new season, 49
tools menu, 26
using templates, 49
D
data storage time in gateway, 7
Dataview panel
adding tags to dataviews, 35
creating from template, 41
default options, 26
definition, 32
displaying data, 32
drag and drop, 33
example, 40
Explorer, 34
exporting data, 42
instrument view, 44
making public, 21
opening, 32
saving, 35
addVANTAGE Pro 6.5 User Guide
saving a view, 40
selecting options, 36
setting thresholds, 37
default options, all panels, 25
defaults
crop start date, 26
Dataview options, 26
event options, 26
definitions
active (alarm or event), 45
area, 13
base station, 7
button, 9
calculation extensions, 48
checkbox, 9
context sensitivity, 8
crops, 13, 48
Dataview panel, 32
diagnostic extensions, 48
disease models, 13, 48
dropdown, 9
Events viewer, 44
Explorer, 12
extension, 8
extensions, 8, 48
List, 30
listbox, 9
panel, 13
parameter, 6
radio button, 9
remote station, 7
root node, 13
RTU, 7
RTU diagnostics, 48
sensor, 6
server, 7
services, 8
tab, 9
tag, 10
text field, 9
virtual sensor, 10
deleting
objects from a List, 30
diagnostics
RTU, 48
disconnecting from the server, 12
disease models
definition, 13, 48
properties, 53
displaying
data in a Dataview panel, 32
engineering units, 28
node IDs, 26
document conventions, 9
dropdown, definition, 9
duration, session timeout, 29
E
editing
account privileges, 29
password, 29
personal information, 25
read/write permissions, 29
INDEX
user profile, 25
e-mail address, 25
engineering units, 28
Events Viewer
choosing nodes, 44
creating events, 47
default options, 26
definition, 44
event types, 45
hiding event types, 47
options, 44
removing areas, 45
sample, 46
showing alarms, 45
showing event types, 47
examples of addVANTAGE Pro installations, 11
Explorer
crops, 13
definition, 12
disease models, 13
displaying alarms, 46
extensions, 13
functions, 14
panels, 13
RTU, 13
tags, 13
tools menu, 26
exporting
ASCII data from trend, 42
selected trend data, 43
extensions
adding multiple, 49
adding to areas, 49
automatic recalculation, 48
common properties, 50
configuring, 50
crop stages, 51
definition, 8, 48
hiding, 27
in Explorer, 13
input tags, 55
showing alarms in Explorer, 46
tab on properties dialog, 54
tools menu, 27
using templates, 49
F
forcing
properties recalculation, 49
full name, 25
G
gateway
data storage, 7
graphical view of data, 33
H
hiding event types in events viewer, 47
I
imperial measurements, 28
importing
tag values, 15
64
addVANTAGE Pro 6.5 User Guide
inputs properties, 55
installing
examples, 11
instrument view of Dataview panel, 44
Internet services
WAP access, 8
irrigation properties, 53
irrigation, adding to events viewer, 47
L
language, selecting, 25
List
adding items through search, 31
adding objects, 30
definition, 30
deleting objects, 30
opening, 30
quick search, 31
listbox, definition, 9
locating the source of alarms, 46
INDEX
inputs, 55
irrigation, 53
permissions, 20
RTUs and tags, 22
treatments, 51
public dataview, 21
Q
quick search for List items, 31
R
manual event, adding to viewer, 47
map view, 14
metric measurements, 28
modularity of Adcon system, 7
radio button, definition, 9
remote station, definition, 7
remote telemetry unit. See RTU.
removing
areas from event viewer, 45
renaming nodes, 14
reopening panels when logging in, 26
root node, definition, 13
RTU
climate setting, 22
definition, 7
in areas, 13
in Explorer, 13
properties, 22
RTU diagnostics, 26, 48, 49, 55
N
S
new features, 6
node IDs, displaying, 26
nodes
creating, 14
renaming, 14
selecting to display events, 44
saving
Dataview as a panel, 40
searching for items to add to a List, 31
security
node, 20
user options, 28
selecting
ASCII data sets to export, 43
language, 25
nodes to display events for, 44
options for a Dataview panel, 36
sensors, definition, 6
server
definition, 7
disconnecting from, 12
service logs, events, 45
services
chemicals, 29
definition, 8
session timeout, 29
settings
conditions that trigger events, 23
dataview thresholds, 37
default start date for crops, 26
events and actions, 19
input tags for extensions, 55
node permissions, 20
plots, 37
tag thresholds, 23
tools menu, 25, 28
showing
advanced settings for extensions, 27
alarms in Events Viewer, 45
crops, 27
extensions, 27
M
O
opening
Dataview panel, 32
List, 30
options in an Events Viewer, 44
overlap, 37
P
panel, definition, 13
panels
default options, 25
reopening last panels, 26
tools menu, 25
parameters, definition, 6
password, needed for WAP access, 29
phenological phases, 51
phone number, 25
plant protection properties, 50
plot properties, 37
properties
actions, 19
advanced settings, 54
calculation extensions, 53
crop, 50
diagnostic extensions, 55
disease models, 53
extensions, 54
65
addVANTAGE Pro 6.5 User Guide
node IDs, 26
showing hidden event types in events viewer, 47
starting
new season of crop, 49
switching from graphical to tabular view, 41
T
tab, definition, 9
tabular view of data, 33
tags
adding to dataviews, 35
definition, 10
in Explorer, 13
properties, 22
setting in extensions, 55
setting thresholds, 23
templates
creating Dataview panel, 41
extension, crop, 49
text field, definition, 9
thresholds
dataview, 37
tag, 23
tools menu
chemicals, 29
crops, 26
engineering units, 28
explorer, 26
extensions, 27
panels, 25
security, 28
settings, 25
using, 24
treatments
adding to events viewer, 47
properties, 51
recommending, 52
types of events for Events Viewer, 45
U
updating the system configuration, 22
user
options, changing, 25
using
imperial measurements, 28
metric measurements, 28
template for Dataview panels, 41
tools menu, 24
V
viewing
data, 14
data in graphical view, 33
data in table view, 33
dataviews, 34
events, 44
RTU on map, 14
switching from graphical to tabular view, 41
virtual instruments of a Dataview panel, 33
virtual instruments
Dataview panel, 33
view, 44
virtual sensor, definition, 10
INDEX
visibility of crops, 27
W
WAP
enabling access, 8
password needed, 29
what’s new, 6
66