1
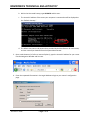
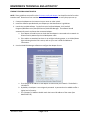
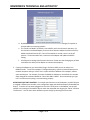
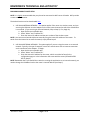
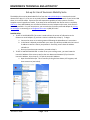
ENVIRONICS TECHNICAL BULLETIN #137
Set-up for Use of Environics Mobility Suite
The Mobility Suite can be downloaded for free from the Android Marketplace. Note that the initial
release of the App, 1.0, is for use on any Android device and allows complete control of your Series 6100
when it is in remote mode. Future version will expand this capability to other systems as well as
complete control regardless of mode. If you want to be notified when the iPhone version is available,
click here. Once downloaded, you will need an Ethernet-to-serial adapter and a router, both of which
are readily available. For your convenience, you can order the Environics preferred adapter by visiting
our webpage or contacting us at [email protected] or (860) 872-1111.
ROUTER SETUP
1. TO SET-UP A NEW ROUTER: The router is used to direct the stream of information to the
Ethernet-to-serial adapter. (If you have a router installed skip to Step 2). To begin:
a. Connect the router to an existing network following the Manufacturer’s Instructions.
b. In the Owner’s Manual provided with your router you will be provided with the internal
IP address as well as a factory set password. Generally, routers have the address
192.168.1.1.
c. Once you have these two numbers, proceed to Step 3.
2. TO SET-UP AN EXISTING ROUTER: In order to set up an existing router, you must know the
internal IP Address of the router as well as the User Name and Password. (If you have the
internal IP Address, skip to Step 3). To find the internal IP Address:
a. Open Command Prompt. This is found by clicking the Start button, All Programs, and
then Accessories (see below).
TECH137.DOC
Page 1 of 6
ENVIRONICS TECHNICAL BULLETIN #137
b. Within the Command Prompt, type IPCONFIG and hit enter.
c. The internal IP address of the router your computer is connected to will be displayed as
the “Default Gateway.”
d. The default User Name and password are provided by the Manufacturer for each router,
and can normally be obtained from the System Administrator.
3. Open a web browser (ie Firefox or Internet Explorer), type the internal IP address for your router
into the Navigation Window and hit enter.
4. Enter the requested information in the Login Window to login to your router’s configuration
page.
TECH137.DOC
Page 2 of 6
ENVIRONICS TECHNICAL BULLETIN #137
5. Go to the “Applications and Gaming” tab. Here you will enter the internal IP address and port
number for the Ethernet-to-serial adapter. This information is supplied by the manufacturer of
the adapter. Both of these can be modified by directly connecting the adapter to your
computer, and logging into it using the same method you used to log into the router (see Step 3
and 4). To begin:
a. You will first forward the port that will be used to send the information from the
application into the adapter, and eventually into the instrument. Assign an “Application
name” of your choosing.
b. Enter the “External Port” and “Internal Port” number that was provided in your Owner’s
Manual for the Ethernet-to-serial adapter (The same Port number should be entered for
both). If you are using a multiple port Ethernet-to-serial adapters, each RS-232 port is
assigned a different port number and must be forwarded as above in order for the
network to recognize them. For more information on port forwarding go to:
http://portforward.com/
c. Change the “Protocol” to TCP and change the IP address to the internal IP address of the
Ethernet-to-serial adapter. If you are setting up multiple ports, be sure to do this for
each one.
d. Click “Enabled” for each entered row to save the changes.
TECH137.DOC
Page 3 of 6
ENVIRONICS TECHNICAL BULLETIN #137
ETHERNET-TO-SERIAL ADAPTER SETUP
NOTE: These guidelines are specific to the Environics preferred adapter, but should be similar for other
brands as well. Please be sure to read the User’s Manual of your adapter to verify the proper set-up.
1. Connect the Adapter to the internet via your router or other switch.
2. Install the Software provided with your adapter per the Manufacturer’s guidelines.
3. Launch the installed software. For the Environics Preferred Adapter, click Start\All
Programs\B&B Electronics\Vlinx\ESP Servers/VLINX ESP Manager. The software should
automatically search and locate the connected adapter.
a. If no adapter is found be sure to check that the adapter is connected to the network via
Ethernet and is powered by the included power cable.
b. If the cables are attached, but there is no red light indicating power, or no Yellow/Green
light indicating that the link is active, refer to your User’s Guide for additional
information.
4. Use the VLINX ESP Manager software to configure the adapter for use.
a. First change the IP Address of the adapter to match how your network. The default is
192.168.0.1.
b. By default, the adapter is not assigned a password. A password can be added to offer a
higher level of security.
c. The “Gateway” IP Address should match the internal IP Address of the router (See
ROUTER SETUP)
TECH137.DOC
Page 4 of 6
ENVIRONICS TECHNICAL BULLETIN #137
d. By default, the TCP/UDP Port is set to 4000. This value can be changed, if required, to
accommodate your existing network.
e. The “Serial Port Mode” by default is set to RS232, and it should remain that way. For
the Environics Preferred adapter, there are three switches adapter itself that are off by
default and should remain off. If one of the switches is moved, return it to the off
position. If communication fails, reconnect to the adapter and update the RS232
setting.
f. All of the other settings should remain the same. Please note that changing any of them
could affect the ability of the adapter to communicate properly.
5. Connect the Adapter to your Series 6100, plug in the Series 6100, turn it on and put it in
REMOTE mode. To test if the adapter is configured properly, open the Command prompt on a
network computer and type “telnet” then a space and the IP Address of the adapter, another
space and the port. For example, if neither the default IP Address nor the Default Port number
were changed the command would be: “telnet 192.168.0.1 4000”. Once connected, type “get
info” to make sure everything is communicating properly.
USE OF MULTIPLE PORT ADAPTERS: For multiple port Ethernet-to-serial adapters, each RS-232 port
is assigned a different port number in the configuration page and should be properly forwarded (see
Step 6). To access an instrument plugged into one of the serial ports on the adapter, set the port
number in the settings of the Mobile App to match the requested item by going to “Menu” and then
“Preferences.” You can then switch between systems simply by selecting the correct Port.
TECH137.DOC
Page 5 of 6
ENVIRONICS TECHNICAL BULLETIN #137
ENVIRONICS MOBILITY SUITE SETUP
NOTE: It is highly recommended that your phone be connected via WiFi versus 3G mode. WiFi provides
a more stable connection.
The Android version can be downloaded here.
1. USE ON AN INTERNAL NETWORK – This option applies if the router is a wireless router, and you
are using the Ethernet-to-serial adapter on the same internal network to which the SmartPhone
is connected. (If you are using an External Network, Skip to Step 2). If so, begin by:
a. Open the Environics Mobile App.
b. Select “Menu” and “Preferences.”
c. Enter the internal IP address and the port number of the wireless router.
NOTE: You cannot use the android phone externally using the internal IP address of the router. To
switch from the internal to an external network, simply follow Step 8.
2. USE ON AN EXTERNAL NETWORK - The option applies if you are using the router on an external
network. Typically, this type of setup will consist of a wired router with an internet connection
and a connection to the adapter. To begin:
a. Open the Environics Mobile App.
b. Select “Menu” and “Preferences.”
c. Enter the external IP address for the router, which can either be found in the
configuration page or in the information that came with the router (follow ROUTER
SETUP, Step 3).
NOTE: Remember that if you would like to switch to running the application on an internal network, you
need to change the IP Address back to the router’s internal address (see Step 1).
TECH137.DOC
Page 6 of 6