1
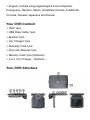
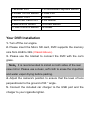
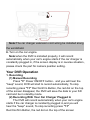
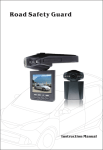
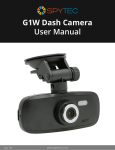
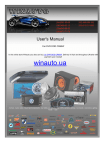
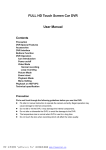
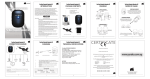
User Manual
Thanks for purchasing this road safety guard
from our company. Please read this manual
carefully and save it for future reference,as it
contains information about the wonderful
features as well as some tips to make this device
easier use and more enjoyable.
Your DVR Features
> Unique design of appearance, and patent product
> Super Wide Dynamic HD image sensor, wonderful video
quality
> 5.0M HD image sensor
> It has 2.5 inch TFT LCD screen, it can record and playback
any time
> 150° wide viewing angle
> Video cycle recording
> Video recording automatically upon power on
> Supports Micro SD card from 4GB-32GB(Class4 above)
> It builds in G-Sensor
> It supports SOS emergency recording,and the video file will
never be overwritten
> It supports audio or mute recording
> Video Output: 1080FHD,720P,WVGA,VGA
> It supports the recording file with or without time-mark
> It supports screen saver, and it extends the time of battery
working
> It supports motion detect
> It supports HDMI output to HDTV
> It supports 50Hz or 60Hz output
> Webcam function, share with your family anytime and
anywhere
> Support multiple Languages:English,French,Spanish,
Portuguese, Deutsch, Italian, Simplified Chinese, Traditional
Chinese, Russian,Japanese and Korean
Your DVR Content
> DVR:1pcs
> USB Data Cable:1pcs
> Bracket:1pcs
> Car Charger:1pcs
> Warranty Card:1pcs
> One User Manual:1pcs
> Memory Card:1pcs (Optional)
> 3-in-1 Car Charger(Optional)
Your DVR Structure
1.Bracket Port
3.Power On/Off Button
5.AV/OUT Port
7.Micro SD Card Port
9.Menu/SOS button
11.Rec/Confirm Button
2.Photo/Mode/Playback Button
4.USB Port
6.HDMI
8.UP Button
10.Down Button
12.Reset
Your DVR Installation
1. Turn off the car engine.
2. Please insert the Micro SD card, DVR supports the memory
size from 4GB to 32G (Class4 Above).
3. Please use the bracket to connect the DVR with the car's
glass.
Note:It is recommended to install on both sides of the rear
view mirror. Please use a clean, soft cloth to erase the impurities
and water vapor drying before pasting.
4. Adjust the camera's position to ensure that the level of lens
perpendicular to the ground of 90 ° angle.
5. Connect the included car charger to the USB port and the
charger to your cigarette lighter.
Note:The car charger extension cord wiring be installed along
the windshield.
6. Turn on the car engine.
Note:when the DVR is installed properly, it will record
automatically when your car's engine starts if the car charger is
constantly plugged in, if the screen display is in reverse situation,
please check the part for camera position setting.
Your DVR Operation
1. Recording
(1) Manual Recording
Press "3" Power ON/OFF button,and you will hear the
"beep" sound, DVR will start to record automatically, To stop
recording press "11" Rec/Confirm Button, the red dot on the top
of the screen disappear, the DVR will save the data to your SD
card and be in standby mode.
(2) Recording With Your Car Charger Plugged In
The DVR will record automatically when your car's engine
starts if the car charger is constantly plugged in,and you will
hear the "beep" sound, To stop recording press "11"
Rec/Confirm Button, the red dot on the top of the screen
disappear, the DVR will save the data to your SD card and be in
standby mode.
(3) Motion Detect Mode Recording
The DVR is equipped with motion detection in case you
wish to leave the unit on and record a vandal or if somebody is
hitting your car or parking too close, In standby mode, Turn on
the DVR, and enable the motion detection from the menu setting,
then the LCD display will appear
mark on the left, if it detect
movement from any object within 3 meters, the DVR start to
record automatically.
2.Video Playback from DVR
In standby mode, Press "2" Photo/Mode/Playback Button two
times from video mode,once from photo Mode to enter into
viewing mode, press UP/DOWN button to choose the video
which you need to play, "11" Rec/Confirm Button to play the
video.then you press “2” Photo/Mode/Playback Button to be
back to standby mode.
Note:In viewing mode,click “9” Menu/SOS button a menu
will pop up that will allow you to delete,lock and slid show the
files you wish without to use computer,press “11” Rec/Confirm
Button to confirm.
3. Taking Photographs
In standby mode, press the “2” Photo/Mode/Playback Button
to switch from video mode to photo mode, press “11”
Rec/Confirm Button to take a picture,while the DVR takes a
picture the screen will blink, It means that photo taking is
successfully. press the “2” Photo/Mode/Playback Button to
switch from photo taking mode to playback mode,The DVR
supports 4X digital, the zoom function can be adjusted by
pressing the "8" UP button (to zoom in) and "10" DOWN
button(to zoom out).
4.Photo Viewing
In standby mode, Press “2” Photo/Mode/Playback Button two
times from video mode,once from photo Mode to enter into
viewing mode, press “8” UP/ “10” DOWN button to check the
pictures.
Note:In viewing mode,click “9” Menu/SOS button a menu
will pop up that will allow you to delete,lock and slid show the
files you wish without to use computer,press “11” Rec/Confirm
Button to confirm.
5.Files Storage and Playback From PC
When you finish recording, connect the USB data cable to
computer, and you can copy or cut the files to computer for
playback, or you can take out the Micro SD card, and insert into
card reader and playback on your PC.We recommend you copy
the video files to your PC first to avoid skipping or slow playback
and using VLC video player to play the video files.
Note:If you use the USB data cable to connect DVR to
computer,you need to enable the Removable Disk feature from
DVR.
6.SOS Emergency Recording
In recording mode, press "9" Menu/SOS button, it will enable
”will
emergency recording, and the LCD screen display “
appear in the top left hand side. And the emergency recording
will not be overwritten.
7.PC Webcam
In power off mode, connect the USB data cable with DVR,
then to your computer, the LCD screen will appear "Mass
Storage", "PC-Camera" two options, then you press "8" UP and
"10" Down button to choose "PC-Camera", press “11”
Rec/Confirm Button to confirm, then you enter into computer's "
My Computer", it will appear the webcam figure
,then
double click it and you can enable Webcam function.
8.Battery Charging
The DVR can be charged from your vehicle cigarette
lighter,you can see the charging icon showing like this
,
normally it takes 1 hour, you can turn off the DVR for charging
also.
Note:Because the voltage of computer not stable, we do not
recommend to charge the DVR via computer.
Your DVR Video Menu Setting
Press "3" Power ON/OFF Button, the DVR has the feature of
recording automatically upon powering on,press the “11”
Rec/Confirm Button to stop recording, then press “9”
Menu/SOS button to enter into setting function, Press “8” UP /
“10” DOWN button to select the menu which you need to adjust,
press “11” Rec/Confirm Button to confirm, press “9” Menu/SOS
button one more time to exit.
Note: The following settings are required that the DVR must
be in MENU setting mode.you can press "9" menu/SOS twice to
change the menu pages.
Menu Setting Include:Resolution(Default:1080FHD),Loop
Recording(Default:2minutes), WDR,Exposure,Motion Detection,
Record Audio, Data Stamp,G-Sensor,Date/Time,Beep Sound,
Language,TV Mode, Frequency, Screen Saver, IR LED, Format,
Default Setting, Version
Your DVR Photo Taking Menu Setting
Press "3" Power ON/OFF Button, the DVR has the feature of
recording automatically upon powering on, press the “11”
Rec/Confirm Button to stop recording, then press “2”
Photo/Mode/Playback Button one time to enter into photo taking
mode, then press “9” Menu/SOS button to enter into setting
function, Press “8” UP / “10” DOWN button to select the menu
which you need to adjust, press “11” Rec/Confirm Button to
confirm, press “9” Menu/SOS button one more time to exit.
Note: The following settings are required that the DVR must
be in MENU setting mode.you can press "9" menu/SOS twice to
change the menu pages.
Menu Setting Include:Capture Mode,Resolution, Sequence,
Quality,Sharpness, White Balance, Color,ISO,Exposure, Anti
Shaking, Quick Review,Date Stamp, Date/Time, Beep Sound,
Language, TV Mode, Frequency, Screen Saver, IR Led, Format,
Defaulting Setting, Version.
FAQ
1.You can not turn on?
Please check the DVR connection to Car Charger whether is
correct.
Press the reset button to restore the DVR.
Press charge the battery first, then try to turn it on.
2. You can not find the removable disk after the DVR
connecting to my PC.
Making sure the USB cable is connected properly and stable.
Be sure the USB of the DVR works well. Try to use other USB
cable to check if USB port has a malfunction.
3. The DVR can not record
Be sure there is enough space for the micro SD card.
Check the card whether be locked
Format the card before you start to record
4.The DVR stop recording automatically, or the DVR is
freezes after inserting Micro SD card to record?
Format micro SD card, or change and use other micro SD
card to record.
5.The Video or Photo not clear with dark.
Please check the DVR’s lens to see whether it has any stain
or finger print; then please clean it.
Specifications
Image Sensor
Video Resolution
5.0M Cmos
1080FHD、720P、WVGA、VGA
Pixel of Picture
12M,10M,8M,5M,3M,2MHD,VGA,1.
3M
Super Wide 150°
4GB--32GB(Micro SD Card Class4
Above)
MOV
2.5" TFT
8pcs ф5 lamps
2,3,5 minutes or off
English,French,Spanish,
View Angle
Capacity of Memory
card
Video Format
Screen
IR led lamps(optional)
Time for File fragment
Muti-Languages
Portuguese, Deutsch, Italian,
Simplified Chinese, Traditional
Chinese, Russian,Japanese and
Korean
Cycle Recording
Supports
G-Sensor
Motion Detect
Audio or Without Audio
Supports
Supports
Supports
Screen Saver
Auto Turn Off
PC Webcam
Power Consumption
Storage Temperature
Operating Temperature
Operation System
Charging time
Weight
Size
Supports
Supports
Supports
280mAh/3.7V(maximum)
-10℃~70℃
-10℃~60℃
PC
1hour
Around 97g
96mm*69mm*30mm
Note:Specifications may be changed due to software update
or any other reasons, please make the object itself as the
standard without any notice.