1
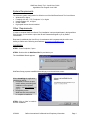
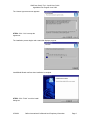
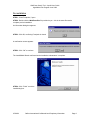
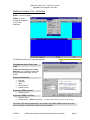
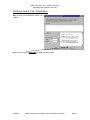
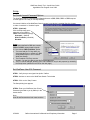
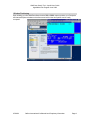
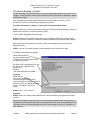
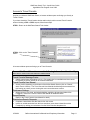
Focalpoint Companions
WebFares Search Tool
Apollo User Guide
Document updated July 2, 2002
(Version 1.17)
AgentWare Pilot Program
June 2002
WebFares Search Tool – Apollo User Guide
AgentWare Pilot Program June 2002
Table of Contents
SYSTEM REQUIREMENTS
1
OTHER REQUIREMENTS
1
INSTALLATION
1
DE-INSTALLATION
3
WEBFARES SEARCH TOOL - ACTIVATION
4
Supported itineraries
Supported $BB modifiers
Supported $BBQ modifiers
4
4
4
WEBFARES SEARCH TOOL - DEACTIVATION
5
SETUP
6
Set Search Launch Command Options
Set WebFares User ID & Password
Change Launch Command F Key
Enable / Disable PNR Remarks Dialog Box
Window Positioning
6
6
7
7
8
“DOCUMENT FARE” FUNCTION
9
“DOCUMENT BOOKING” FUNCTION
10
ACCESS TO TRAVEL CONSOLE
11
Travel Console Message Center
Travel Console User Manual
Preference Settings
Saved Queries
Stand-alone Search Requests
SUPPORT
12
For Travel Console
For the WebFares Search Tool
07/02/02
11
11
11
11
11
Galileo International Confidential and Proprietary Information
12
12
Page ii
WebFares Search Tool – Apollo User Guide
AgentWare Pilot Program June 2002
System Requirements
The minimum system configuration for effective use of the WebFares Search Tool is as follows:
• Windows 95 or higher
• Focalpoint 3.0.18a – TCP, Focalpoint 3.5, or higher
• Internet Explorer 5.5, or higher
• 64 MB of RAM
• High speed Internet Access enabled
Other Requirements
In order to complete WebFares Search Tool installation / setup and participate in the AgentWare
Pilot Program, you must have a pilot User ID and Password assigned to you by Galileo
International.
Requests for additional pilot User IDs (or for assistance with lost passwords) should be sent
directly to Galileo at the following email address: [email protected]
Installation
STEP 1: Close Focalpoint, if open.
STEP 2: Double-click the WebFares.Exe file provided to you.
The InstallShield Wizard appears.
WebFares Setup prepares InstallShield and brings you to the welcome screen:
When reinstalling the application,
note that you will be:
• Prompted to remove the prior
version before proceeding with
installation of the updated
version – see “De-installation” on
•
page 3)
Required to run the
WebFares.Exe a second time
to complete reinstallation.
STEP 3: Click on “Next” to continue
with the installation.
07/02/02
Galileo International Confidential and Proprietary Information
Page 1
WebFares Search Tool – Apollo User Guide
AgentWare Pilot Program June 2002
The License Agreement screen appears:
STEP 4: Click “Yes” to accept the
agreement.
The installation process begins and a status bar displays progress:
InstallShield Wizard confirms when installation is complete.
STEP 5: Click “Finish” to exit the install
dialog box.
07/02/02
Galileo International Confidential and Proprietary Information
Page 2
WebFares Search Tool – Apollo User Guide
AgentWare Pilot Program June 2002
De-installation
STEP 1: Close Focalpoint, if open.
STEP 2: Double-click the WebFares.Exe file provided to you – this is the same file used to
complete product installation.
An information dialog box appears:
STEP 3: Click OK, confirming Focalpoint is closed.
A confirmation screen appears:
STEP 3: Click “OK” to continue.
The InstallShield Wizard confirms when de-installation maintenance is complete.
STEP 4: Click “Finish” to exit the
install dialog box.
07/02/02
Galileo International Confidential and Proprietary Information
Page 3
WebFares Search Tool – Apollo User Guide
AgentWare Pilot Program June 2002
WebFares Search Tool - Activation
STEP 1: Launch Focalpoint
STEP 2: From the
Companion dropdown
menu, select
WebFares.
The WebFares Search Tool application appears:
Release / version number confirmed here
The WebFares Search Tool is now
active
If this is the first time you are using
WebFares, you must also complete the
setup steps described within the next
section.
Supported itineraries
•
•
•
•
•
One-way
Roundtrip
Direct
Single-connect
Double-connect
Supported $BB modifiers
•
Segment select
Supported $BBQ modifiers
•
•
Segment select
Include carrier >$BBQ//+AA.UA.DL
(WebFares Search limited to AA, UA, and DL websites)
If modifiers, other than that listed above, are included in your $BB or $BBQ request, these will
either be ignored or a WebFares Search may not be initiated.
07/02/02
Galileo International Confidential and Proprietary Information
Page 4
WebFares Search Tool – Apollo User Guide
AgentWare Pilot Program June 2002
WebFares Search Tool - Deactivation
Step 1: Return to the WebFares Search Tool
window.
Step 2: Click “Close” to deactivate the WebFares Search Tool.
07/02/02
Galileo International Confidential and Proprietary Information
Page 5
WebFares Search Tool – Apollo User Guide
AgentWare Pilot Program June 2002
Setup
Set Search Launch Command Options
The WebFares Search is automatically initiated whenever a $BB, $BBA, $BBC or $BBQ request
is made against a one-way or roundtrip itinerary.
If automatic initiation of the WebFares Search request is not desired, complete Step 6 to change
to either “controlled” or “disabled” option.
STEP 1: (Optional):
Click the drop-down arrow
appearing next to $BB or
$BBQ.Chose desired option(s):
Automatic (default)
With F12+Enter (controlled)
Disabled
Notes:
1. The option defined for $BB also controls
$BBA and $BBC request made in Apollo.
2. If you choose “With F12+Enter” option:
• You must hold the F12 key while you
also press the Enter to submit your $BB
and/or $BBQ request –and– initiate a
WebFares Search.
• The Focalpoint F12 Pkey must be
cleared – you won’t be able to use this Programmable Key.
• The F12 can be changed, allowing you to use a different F key for this purpose, by accessing
the Setup button (detail will be found on the next page).
Set WebFares User ID & Password
STEP 1: Verify that you are signed into Apollo / Galileo
STEP 2: Activate or return to the WebFares Search Tool window
STEP 3: Click on the “Setup” button
The Setup dialog box appears:
STEP 4: Enter your WebFares User ID and
Password (provided to you by Galileo) in the
boxes shown.
Note:
User ID and Password are both case sensitive.
07/02/02
Galileo International Confidential and Proprietary Information
Page 6
WebFares Search Tool – Apollo User Guide
AgentWare Pilot Program June 2002
Change Launch Command F Key
(Optional)
STEP 1: Verify that you are signed into Apollo / Galileo
STEP 2: Activate or return to the WebFares Search Tool window
STEP 3: Click on the “Setup” button
The Setup dialog box appears:
STEP 4:
Select a function key by clicking on the dropdown arrow appearing here and selecting a
new F key from the list.
Remember that to use the key selected here,
you must clear any Programmable Key
definition set for this F Key in Focalpoint.
If uncertain, we recommend keeping the
default setting (F12). You can return to this
screen and change to another function key at
anytime. See prior page for more detail.
Enable / Disable PNR Remarks Dialog Box
(Optional)
STEP 1: Verify that you are signed into Apollo / Galileo
STEP 2: Activate or return to the WebFares Search Tool window
STEP 3: Click on the “Setup” button
The Setup dialog box appears:
STEP 4:
Check / Uncheck this box
to disable / enable the “PNR Remarks” dialog
box. See “Document Fare Function” section for
further detail on this feature.
STEP 5: Click “OK” to save changes.
07/02/02
Galileo International Confidential and Proprietary Information
Page 7
WebFares Search Tool – Apollo User Guide
AgentWare Pilot Program June 2002
Window Positioning
Upon initiating your first WebFares Search with a $BB or $BBQ request, position your Focalpoint
and Internet Explorer windows so that fares returned from the two systems can be easily
compared.
07/02/02
Galileo International Confidential and Proprietary Information
Page 8
WebFares Search Tool – Apollo User Guide
AgentWare Pilot Program June 2002
“Document Fare” Function
After a WebFares Search has been completed, you can complete a WebFares audit and
document the results of any web fare identified within the active PNR.
STEP 1: Within the Travel Console Search Response, click the radio button appearing next to the
desired fare. (Refer to Travel Console user documentation for additional screen display
examples).
STEP 2: Click the “Document Fare” button.
STEP 3: Review itinerary details and, if you wish to proceed, click on the Document Fare button.
The PNR Remarks dialog box appears:
This window shows text
that will be added to PNR
remarks, within the active PNR,
should you decide to proceed:
By typing in the box appearing
here, you can include one
additional line of freeform text.
Example:
“FARE SAME AS APOLLO”
(Optional)
Check this box
if you wish to disable this screen
from appearing in all future
“Document Fare” requests. Note
that this option can be re-enabled
from Setup screen – see Step 4
in the Set-up section.
STEP 4: Click “Yes” to continue.
(Optional)
STEP 5: Return to Focalpoint and
redisplay PNR.
Web Fare Audit text appears within
PNR remarks.
07/02/02
Galileo International Confidential and Proprietary Information
Page 9
WebFares Search Tool – Apollo User Guide
AgentWare Pilot Program June 2002
“Document Booking” Function
To take advantage of this functionality, you must be using WebFares Search Tool version 1.012
or higher. See the Support section of this document for further information on application updates
and version numbers.
After a WebFares Search has been completed and a web booking is confirmed, you can
document the results of the web booking within the active PNR.
For further information on Steps 1-3, refer to the Travel Console User Guide.
STEP 1: Within the Travel Console Search Response, click the radio button appearing next to the
desired fare and click the “Document Booking” button.
Travel Console displays the Itinerary Wizard.
STEP 2: Review itinerary detail for each flight segment displayed, adding the Vendor Booking
Reference Number (or web site confirmation number) and making any necessary flight changes.
After all flight segments have been reviewed, Travel Console displays the Document Web
Booking summary.
STEP 3: Click the “Document Booking” button reappearing at the bottom of the page.
The PNR Remarks dialog box appears:
This window shows text
that will be added to PNR
remarks within the active PNR, should
you decide to proceed:
By typing in the box appearing here, you
can include one additional line of
freeform text.
Example:
“UAL.COM FARE $40.00 LOWER …”
(Optional)
Check this box
if you wish to disable this
screen from appearing in all future
“Document Booking” requests. Note that
this option can be re-enabled from Setup
screen – see Step 4 in the Set-up
section.
STEP 4: Click “Yes” to continue.
(Optional)
STEP 5: Return to Focalpoint and redisplay PNR. Web Fare Booking text appears within PNR
remarks.
Within PNR remarks note that flight information is formatted such that passive air segments can
be added to the PNR simply by arrowing up, adding a SOM in front of the zero (appearing in front
of the flight number), arrowing past flight arrival time, and pressing the enter key. Repeat for all
flight segments.
07/02/02
Galileo International Confidential and Proprietary Information
Page 10
WebFares Search Tool – Apollo User Guide
AgentWare Pilot Program June 2002
Access to Travel Console
Anytime you initiate a WebFares Search, a browser window opens and brings you directly to
Travel Console.
If you have closed the TraveConsole window and/or simply wish to access Travel Console
without initiating a $BB or $BBQ request, follow these steps:
STEP 1: Return to the WebFares Search Tool window
STEP 2: Click on the “Travel Console”
button
A browser window opens and brings you to Travel Console.
From within Travel Console access the following information / functionality
Note: Refer to Travel Console User Manual for additional detail
Travel Console Message Center
•
Obtain system status information here, e.g. if a supplier site is unavailable and thus cannot
be including in search, details will be communicated here.
Travel Console User Manual
•
Access via link appearing on the bottom of the Airfare Search Screen (click on “Search”
within Travel Console). The Travel Console User Manual should always be accessed from
this location to ensure you are viewing the most current document version.
Preference Settings
•
Select currency, time zone, and website defaults, applied to all searches initiated from
Focalpoint. Refer to the Travel Console User Manual for additional detail.
Saved Queries
(Refer to the Travel Console User Manual for detail.)
Stand-alone Search Requests
•
•
Complete a stand-alone web fare search from this screen.
Include or exclude web sites from all future searches (even those initiated from within
Focalpoint) by making your selections from the Select Vendors dropdown list.
07/02/02
Galileo International Confidential and Proprietary Information
Page 11
WebFares Search Tool – Apollo User Guide
AgentWare Pilot Program June 2002
Support
Pilot support options are as follows:
For Travel Console
Questions concerning specific web fares, web sites searched, Travel Console training
sessions or any information viewed within an Internet Explorer window (displayed as the
result of a WebFares search) should be sent directly to AgentWare at:
[email protected]
For the WebFares Search Tool
1. Current version of the WebFares Search Tool application and documentation
Application version number is confirmed within the title of the WebFares Search Tool
window (see display example on the bottom of page 4).
WebFares Search Tool application updates can be obtained by accessing the following
link:
http://support.galileo.com/acsc/content/webfares/webfares.htm
To access, you will be required to supply your Apollo pseudo city code and customer
support PIN number and you must be a confirmed WebFares pilot participant.
2. Installation assistance and problem support
Please be sure you are using the most current version of the WebFares Search Tool
before requesting installation assistance or problem support (see #1 above).
A. Problem support issues related to the Travel Console application should be directed to
AgentWare (see the “For Travel Console” section above).
B. Installation help and problem support related to the Apollo WebFares Search Tool can
be obtained by contacting the Atlanta Customer Support Center at our Pilot Support
number – this number only should be used to obtain pilot support:
Pilot Support Telephone:
(877) 644-4372:
Support hours:
9:00 a.m. until 5:30 p.m. EDT, Mon - Fri
You will be required to supply your pseudo city code and PIN number.
3. User IDs, Passwords and Pilot Feedback
For assistance with your WebFares User ID or password, or to provide Galileo with pilot
feedback, please send email to Galileo at the following mailbox:
[email protected]
Remember to include your agency name and pseudo city code in all email.
07/02/02
Galileo International Confidential and Proprietary Information
Page 12