1
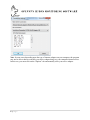
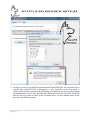
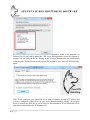
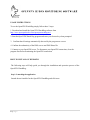
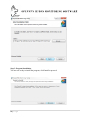
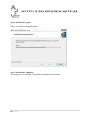
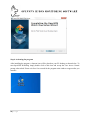
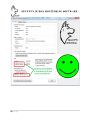
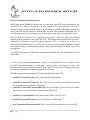
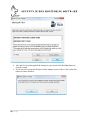
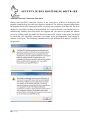
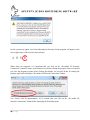
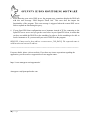
OpenVPN WatchDog v6.0 User Guide
ABOUT OPENVPN WATCH DOG V6.0
OpenVPN Watch Dog is a Windows based application to securely monitor for OpenVPN
encryption tampering while in transit (Man-in-the-middle attacks), prevent exposure of real IP
address & DNS leaks and guard against DNS hijacking or DNS changer malwares thereby
offering the benefits of a reliable encrypted connection to the internet with IP address anonymity
and fully secured OpenVPN tunneling. OpenVPN Watch Dog is a program designed to monitor
your OpenVPN connection and ensures that you do not blow up your anonymity when you lose
your OpenVPN connection.
The program is integrated with a powerful firewall which automatically secures your OpenVPN
connection against IP leaks and DNS leaks and enables you to force all applications on your
computer to only work once connected to your OpenVPN server thereby ensuring Zero IP/DNS
leaks. This ensures that all applications in your PC will only work behind the secure encrypted
connection. This is useful in the event of an unexpected disconnection from your VPN server,
you can be sure that any application will not revert back to using your default unencrypted
internet connection thereby exposing your real IP in the process.
Warning!: OpenVPN like all other VPN software is prone to IP/DNS leaks and DNS IP
Hijack/DNS Hosts file phishing attacks particularly in Windows. It is essential that you are
aware of this and should take adequate measures to safeguard your OpenVPN connection against
such security issues by using a software tool such as OpenVPN WatchDog.
REASONS WHY YOU NEED OPENVPN WATCHDOG
•
•
•
•
To prevent unencrypted traffic while connected to the VPN server and ensure that the traffic
is routed across the VPN tunnel (Man-in-the-middle attacks)
To prevent IP leaks thereby safeguarding the exposure of the real IP of the user while
connected to the OpenVPN server
To prevent DNS leaks thereby preventing the ability of your ISP or any third party entity to
monitor or view the sites you visit while connected to the VPN server.
To protect against all forms of DNS changer malwares aimed at changing your computer
legitimate TCP/IP DNS IPs to rogue DNS servers in order to hijack your DNS queries for
nefarious purposes such as phishing.
1|Page
•
To protect against DNS hosts file phishing attacks by monitoring in real-time the integrity
and authenticity of the hosts file using secure hash algorithm (SHA 512)
Benefits of the Integrated Firewall in WatchDog:
1. In the event of an unexpected disconnection from your VPN server, none of your
applications will revert back to using your default unencrypted internet connection thereby
preventing the exposure of your real IP. (IP Leaks)
2. Prevents the accidental exposure of your real IP when you forget to connect to your
OpenVPN servers and therefore start using applications such as your web browser with your
normal internet connection.
3. By activating the “auto start at system boot time” feature of the WatchDog, the program can
be made to automatically secure your real IP immediately after your system boots and
ensure that you do not forgot to run any application unless through the OpenVPN tunnel
HOW IT WORKS
Simply start the OpenVPN WatchDog before initiating connection to your OpenVPN server. The
program will automatically detect your real connection IP, OpenVPN server IP and your DNS
IPs and will automatically compute and save a SHA 512 cryptographic hash of your windows
Hosts file as a reference hosts hash.
When you run the program for the first time, the program will automatically configure the
application by selecting your current main network interface adapter and the OpenVPN network
TAP adapter. In addition, the program will scan your current OpenVPN Client installation
directory on your system and retrieve all the OpenVPN servers IPs/Hostnames including the
DNS IPs on your active network interface adapter.
Once this process is completed, all outbound connections using your real IP are automatically
blocked and when you attempt to open any application without being connected to your
OpenVPN server, you will not be able to access internet. The only outbound connections
possible when the application is running will be connections to your OpenVPN server.
This ensures that all applications in your PC will only work behind the secure encrypted
connection. This is useful in the event of an unexpected disconnection from your VPN server,
you can be sure that any application will not revert back to using your default unencrypted
internet connection thereby exposing your real IP in the process. In order to allow applications to
2|Page
access internet without connecting to the OpenVPN server, the program must be exited in your
PC.
In addition, the program also performs Hosts file integrity verification and protects against DNS
changer malware/DNS hijacking threats when using OpenVPN and will automatically disconnect
your internet when such threats are detected. In the event a security issue is detected, a barking
dog sound is produced and an alert is given. To enable internet connection again, simply click
the “Enable All Network Connections” button to restore the internet access.
SUPPORTED OPERATING SYSTEMS
Windows Vista
Windows 7
Windows 8
Windows Server 2008
Note: Windows XP is not supported
COMPUTER LAN SETTINGS PRE-REQUISITES
To ensure that all the features of WatchDog works correctly and reliably, there are certain prerequisites that are required for your computer LAN (Local Area Network) settings. These are as
follows:
1. The program will automatically detect your Network Internet Card (NIC) adapter responsible
for your Main connection and OpenVPN connection which will be auto selected in the
WatchDog connection settings window. In most cases, the OpenVPN adapter will have the
“TAP-Win 32 Adapter” description in your PC Network Connection settings. You can
confirm the name of your LAN adapters in Windows 7 by going to Windows Control Panel
then under "Network and Internet", select "View network status and tasks":
3|Page
Click "Change adapter settings":
Then check the names of the Internet connection's icon as highlighted in the screenshot below.
You can easily identify the active adapters by looking beneath the icons. Those will a red cross
indicates that they are not active or in use. For example, as shown in the screenshot below, there
4|Page
are 2 active network adapters; the LAN adapter for your normal internet connection and the TAP
adapter for your OpenVPN connection.
Another sample is shown below which displays an active Wireless adapter for your main
connection and the TAP adapter for your OpenVPN connection.
Note: Your “Main connection” is always the active connection that provides your system internet
connection at any point in time. It can be wireless connection or wired connection.
OpenVPN WatchDog starting from version 6 now automatically detect and select the appropriate
NIC adapter when started as shown in the screenshot below:
5|Page
Note: In some cases depending upon the type of internet adapters on your computer, the program
may not be able to detect accurately your active adapter that gives your computer internet access.
In this case, you must click on the “Options” tab and manually select your active adapter.
6|Page
2. In order to secure your OpenVPN connection from IP and DNS leaks, the program needs to
whitelist your OpenVPN IP(s) or hostname(s) of your OpenVPN servers you intend to
connect while using the program. When Watchdog is launched for the first time, the program
will automatically retrieve your OpenVPN IP(s)/Hostname(s) from the OpenVPN config file
directory on your system as shown in the screenshot below. No more manual entries as the
process is now 100% automated.
7|Page
Please note that only the OpenVPN servers IPs or hostnames added to the program can
connected to. If you wish to update the VPN server IPs/Hostname(s) while the program is
running, you can easily do this by clicking on the “Settings” button under the options menu
of the program. This will automatically instruct the program to auto detect the IPs/Hostnames
again.
Note: If you connect to your OpenVPN server using a hostname instead of IP address and
you have configured a DNS server for your active network interface adapter, the program
needs to whitelist the DNS IPs as well to allow for the hostname to IP resolution and will be
auto detected and added to the IP/Hostname list
8|Page
USAGE INSTRUCTIONS
To use the OpenVPN WatchDog simply follow these 5 steps:
1. Download and install the OpenVPN WatchDog software from
http://www.openvpnchecker.com/openvpnwatchdog.msi
2. Start the OpenVPN Watch Dog program and enter your license key when prompted
3. Confirm that all settings automatically detected by the program are correct
4. Confirm the authenticity of the DNS servers and DNS Hosts file
5. Connect to your OpenVPN server. To disconnect your OpenVPN connection, close the
program first before terminating the OpenVPN connection.
HOW TO INSTALL ON WINDOWS
The following steps will help guide you through the installation and operation process of the
OpenVPN WatchDog.
Step 1: Launching the application
Launch the msi installer for the OpenVPN WatchDog and click next:
9|Page
Step 2: Installation settings
Leave the default location to install the program files for the program and click Next:
10 | P a g e
Step 3: Program Installation
You are now ready to install the program, click Install to proceed:
11 | P a g e
Step 4: Installation Progress
Please wait while the program Installs:
Step 5: Installation Completion
The program is now installed; click Finish to complete the installation:
12 | P a g e
Step 6: Activating the program
After installing the program, a shortcut icon will be placed on your PC desktop as shown below. To
start OpenVPN WatchDog simply double click on this icon and accept the User Access Control
prompt when asked. Please wait for a few seconds for the program main window to appear after you
launch it.
13 | P a g e
After clicking on ‘Yes”, the software activation window will now pop up as shown below:
Proceed to enter the license key which you received when you placed your order for the software
and click on OK.
If you want to test run the application, you can get a free 24-48 hrs activation code by clicking on
the “Get free license code” button.
Step 7: Confirm the automatically detected NIC Adapters and OpenVPN IP/Hostname
OpenVPN WatchDog starting from version 6 now supports full automatic configuration. The
required adapters and the OpenVPN server IP/hostnames are now automatically detected and
used. No more manual configuration.
14 | P a g e
Simply click on the OK button to save the settings and the program is ready to fire-up.
After confirming the auto detected settings, the program will now be in ‘idle” state indicating
that Watch Dog is waiting for OpenVPN connection.
On the system tray applet, a yellow icon indicating an idle state for the program will appear in
the lower-right corner of the screen as shown below:
Step 8: Confirm the integrity of the Windows DNS Hosts File
OpenVPN WatchDog is able to verify and monitor the integrity and authenticity of the DNS
hosts file which can be used to hard code domain name translations. This hosts file is usually
15 | P a g e
located at: C:\Windows\System32\drivers\etc\hosts and in most cases, it is never used. However,
cybercriminals are able to edit this host file and assign the domain names of well-known
companies to IP addresses of phishing websites thereby controlling what sites the user connects
to on the internet.
Note that when a user enters a website URL in the browser address bar, it checks the local DNS
information, such as the hosts file, before sending a DNS query to the Internet. That means if you
type the web address for a website that’s been re-assigned using the hosts file, you’ll be directed
to the phishing website instead of the legitimate one and tricked into divulging confidential
personal information such as credit card numbers, account usernames and passwords, social
security numbers, etc.
It is important to know that advanced malwares and Trojans exists that are now capable of
modifying the hosts file in an unauthorized manner in order to redirect you to their fake websites
for phishing purposes. Please note that although this windows hosts file can be deleted from your
system, this does not address the risks. This is because if your computer is already infected with
a Trojan or malware, the hosts file will keep reappearing or will be prevented from being deleted.
If the hosts file keeps changing or cannot be deleted, there is a good chance you have a Trojan on
your computer. Hence you must take the first step to remove the malware by using a good antimalware or antivirus software such as Malwarebytes.
For example, if you try to visit paypal.com your computer sends the request to a DNS server
which lets your computer know what the IP address of that domain name is so that your request
can then be forwarded to the right server. The Hosts file supercedes DNS so by adding an entry
in the Hosts file with the domain name “paypal.com” and a different IP address your computer
can be redirected. Rather than being sent to the true paypal.com server your request will go to the
address specified in the Hosts file. The hosts file samples below illustrates this:
16 | P a g e
Specimen of a normal Host file:
# Copyright (c) 1993-1999 Microsoft Corp.
#
# This is a sample HOSTS file used by Microsoft TCP/IP for Windows.
#
# This file contains the mappings of IP addresses to host names. Each
# entry should be kept on an individual line. The IP address should
# be placed in the first column followed by the corresponding host name.
# The IP address and the host name should be separated by at least one
# space.
#
# Additionally, comments (such as these) may be inserted on individual
# lines or following the machine name denoted by a '#' symbol.
#
# For example:
#
# 102.54.94.97 rhino.acme.com # source server
# 38.25.63.10 x.acme.com # x client host
127.0.0.1 localhost
With this hosts file, if you try to visit www.paypal.com your computer sends the request to a
DNS server to find out the IP address of that domain name. After the same has been resolved the
request generated from your browser is forwarded to the Paypal Webserver.
Specimen of a normal Host file under DNS Phishing attack:
# Copyright (c) 1993-1999 Microsoft Corp.
#
# This is a sample HOSTS file used by Microsoft TCP/IP for Windows.
#
# This file contains the mappings of IP addresses to host names. Each
# entry should be kept on an individual line. The IP address should
# be placed in the first column followed by the corresponding host name.
# The IP address and the host name should be separated by at least one
# space.
#
# Additionally, comments (such as these) may be inserted on individual
# lines or following the machine name denoted by a '#' symbol.
17 | P a g e
#
# For example:
#
# 102.54.94.97 rhino.acme.com # source server
# 38.25.63.10 x.acme.com # x client host
127.0.0.1 localhost
XXX.XXX.XXX.XXX Paypal.com
This host file is fake because an entry with the domain name "Paypal.com" and a rogue IP
address which is not owned by Paypal has been added which your computer will be redirected.
Rather than being sent to the true Paypal server your request will go to the IP address specified in
the Hosts file thereby exposing your private information to the attacker.
To guard against these kinds of attacks, OpenVPN Watchdog employs a method known as
“Secure Hash Algorithm” to verify the authenticity and integrity of the hosts file against a
reference SHA 512 code in real-time while connected to the VPN server. To accomplish this, a
reference hash code of the hosts file is automatically created when the Watchdog program is
launched and thereafter the system hosts file is then compared against this reference hash in realtime.
Hence any change in the hosts file is immediately detected and you will be alerted with your
internet connection automatically disconnected. If the change in the hosts file was intentional and
made by the user, the “Update Hosts File Hash” button can be clicked to enable the program recompute and save the new hash as the reference hash code.
To benefit from this hosts file integrity verification, it is advisable to manually check your hosts
file first and look out for any suspicious entries before connecting starting the Watchdog
program.
Step 9: Confirm the authenticity of the DNS Servers
After starting the WatchDog program, the program will automatically read and display your
computer Local Area Connection (Local) and OpenVPN adapter DNS IPs in the program GUI.
Before connecting to the VPN server, you must check these displayed IPs to ensure that they are
authentic as configured by you or your VPN service provider. Once you have determined that the
DNS IPs are authentic, you must check the “DNS is authentic” checkbox to allow the program to
save the IPs and watch over them in order to detect any changes while watching over your
OpenVPN connection. If the OpenVPN DNS servers IP are not displayed, you will have to
initially connect to the VPN server first and then restart the program.
18 | P a g e
You should get this reminder popup window immediately the main window of the program is
opened:
In addition to confirming that the DNS IPs are authentic, you must also check to make sure that
one the displayed Local DNS IPs tallies with the displayed Active DNS IP in use. Then tick the
"DNS is authentic" checkbox.
The following screenshots illustrates this.
19 | P a g e
20 | P a g e
Step 10: Enabling Program Auto Start at System Startup (Optional)
OpenVPN WatchDog has auto start feature and can be configured to automatically start at
Windows startup to ensure that you do not forget to start the program before connecting to your
OpenVPN server. To configure the program to start automatically on system startup, tick the
“Automatically start OpenVPN WatchDog on system startup” box under the “Options” tab.
21 | P a g e
Step 11: Connection to OpenVPN Server
After setting up the WatchDog, the last step is to start your OpenVPN client and connect to the
OpenVPN server. Please note that you can only connect to the exact OpenVPN server IP or
hostname which you have already added to the WatchDog. OpenVPN WatchDog is integrated
with a powerful firewall which is automatically activated when launched and enables you to
force all applications on your computer to only work once connected to your OpenVPN server.
Once the firewall is activated, ALL applications on your PC will not be able access internet
anymore until you connect to the OpenVPN server. This ensures that all applications in your PC
will only work behind a secure encrypted connection. This is useful in the event of an
unexpected disconnection from your VPN server, you can be sure that any application will not
revert back to using your default unencrypted internet connection thereby exposing your real IP
in the process.
On exiting the program, the firewall is automatically disabled and your system returns to the
normal state.
As soon as a successful authentication is made to the OpenVPN server, the status of the
OpenVPN WatchDog changes to “Watching” and the yellow icon changes to green. The
program also detects the connection details of the OpenVPN server such as public and private
IPs, host etc. and begins to monitor the OpenVPN connection.
The following details are automatically detected and displayed on the GUI:
•
OpenVPN Connection Name: This is the OpenVPN adapter name
•
OpenVPN Connection Private IP: This is the private IP which is automatically pushed to
the client upon connection to the VPN server.
OpenVPN Connection External/Public IP: This is the public IP of the VPN server which
should replace your real IP when connected to the VPN server
•
•
OpenVPN Connection Host: This is the hostname of the VPN server IP
•
OpenVPN Connection Country: This is the VPN server IP location
•
Real Connection External/Public IP: This is your real IP as assigned to you by your ISP
22 | P a g e
•
Real Connection Host: This is the hostname of your real IP
•
Real Connection Country: This is your real IP location
Note: Once the program status is in “Watching” state, it is impossible to make any changes to
the adapter settings. The “Select Adapter” button will be disabled at shown in the screenshot
below:
23 | P a g e
How to Reset Your Windows Hosts file to the Default Hosts File
If you suspect that your Windows hosts file has been compromised, we recommend that you first
scan your computer for any malware or virus using a reliable anti-malware and then proceed to
reset the hosts file using the steps below:
1. Visit the Microsoft Fixit webpage at http://support.microsoft.com/kb/972034.
2. Click on the Fix It button to download the Microsoft Fix It tool.
3. Check the Agree checkbox to agree with the Microsoft license terms and then click Next.
24 | P a g e
4. After the Fix It tool has applied the changes to your system click the Close button to
close the wizard.
5. It will ask you to restart the Windows for the changes to have effect. Click on the Yes
button to restart Windows.
25 | P a g e
Automatic Monitoring of DNS IPs
OpenVPN WatchDog offers the capability to monitor your DNS information in real time. Your
DNS information configured on your network adapters are automatically read and displayed in
the program GUI. Both your Local Area Connection (Real Connection) IP settings and
OpenVPN adapter DNS IPs are automatically detected and displayed in the program GUI. In
addition, the program will automatically detect and display the real time active DNS which is
used in resolving websites. Using this information displayed, users can easily see the DNS server
which is being used at any point in time and easily know if the DNS is leaking is or not when
connected to the VPN server.
Note that since the program was programmed to automatically cut off your internet when it
detects changes in DNS, you must exit the program first before switching your DNS for your
OpenVPN connection. Also make sure that the OpenVPN DNS IPs displayed by the program
before you connect to the VPN server tally with the DNS IPs that has been configured on your
OpenVPN server to be pushed to you. Ask your OpenVPN provider if you do not know this.
The following DNS details are automatically detected and displayed in the program GUI:
•
Local DNS: This corresponds to the DNS settings that has been configured on your Local
Area Connection or Wireless Area Connection in your computer network adapter
•
OpenVPN DNS: This corresponds to the DNS server that was automatically pushed to you
by the OpenVPN server. The OpenVPN DNS can be a private DNS or a public DNS such as
OpenDNS, Google DNS, Comodo etc. You can confirm the OpenVPN DNS IPs from your
VPN service provider.
•
Active DNS in Use: This is the real-time DNS which is used in resolving websites at any
point in time. Before connecting to the OpenVPN server, the Active DNS IP in Use will tally
with one of your Local DNS IPs as displayed on the program GUI. When connected to the
OpenVPN server, the Active DNS IP in Use should tally with one of your OpenVPN DNS
IPs as displayed on the program GUI. If this is not so, then you have DNS Leaks.
The Active DNS in Use data is automatically refreshed once every 10 seconds.
26 | P a g e
Automatic Internet Connection Shut-down
During your OpenVPN connection session, in the event that a problem is detected by the
program a barking dog alert and visual alerts are produced. The alerts are triggered when either
the program detects that unencrypted traffic is leaving your computer, your hosts file has been
changed or your DNS is leaking or being hijacked. As a security measure, your internet access is
automatically disabled when such alerts are triggered and you need to re-enable the internet
access by clicking on the “Re-enable All Network Connections” button. At this point, you should
be aware that your OpenVPN connection is no longer secure and appropriate steps should be
taken to fix the issue. The following screenshots shows the different alerts that are available in
the program:
27 | P a g e
On the system tray applet, a red icon indicating an alert state for the program will appear in the
lower-right corner of the screen as shown below:
When alerts are triggered, it is important that you click on the “Re-enable All Network
Connections” button to restore your internet access before closing the program. However, should
you close the program in panic before clicking this button; you can still do this by starting the
program again and clicking the “Re-enable All Network Connections” button.
Note: Please wait for approximately 10-15 seconds after you click on the “Re enable All
Network Connections” button before launching the Watchdog again.
28 | P a g e
Troubleshooting and Contacting Support:
The OpenVPN WatchDog program uses private GeoIP servers to determine your real and
OpenVPN IP information. If the program is unable to determine the IP parameters, it might be
due to server issues. Should you experience this, you can submit a trouble ticket using the
contact button as shown below:
Things to Keep in Mind:
====================================================================
1. OpenVPN WatchDog is secure and will not breach your security. It does not transfer any
data from your system nor log any information from your computer.
2. OpenVPN WatchDog is designed to automatically cut-off your internet when it detects that
your OpenVPN connection is no longer secure such as when your IP or DNS is leaking. To
re-enable your internet, simply re-start the watchdog program and click on “Re-enable All
Network Connections”
3. OpenVPN WatchDog will make an outbound secure connection to our secure GeoIP server
which is used in determining the details (hostname and country) of your OpenVPN server IP
and real connection IP.
4. OpenVPN WatchDog uses GeoIP (IP to Location) database which may not be 100%
accurate. Thus you may see a different country being reported for the actual country to which
the IP belongs while using the program. Due to the nature of geo-location technology and
other factors beyond our control, we cannot guarantee any specific future accuracy level.
29 | P a g e
5. When detecting your active DNS in use, the program may sometimes display the DNS info
with this error message “DNS Request Timed Out”. This error does not impact the
functionality of the program. This error message is triggered when the remote DNS server
fails to respond on time during the query.
6. If your OpenVPN client configuration uses a hostname instead of IP for connecting to the
OpenVPN server server and you get the error below in your OpenVPN client, it means that
you have not added the DNS IPs to the watchdog. In order to for the watchdog to be able to
resolve hostname to IP, you must add your active DNS IPs to the program.
RESOLVE: Cannot resolve host address: xxxxxxxxxxxxx: [NO_DATA] The requested name is
valid but does not have an IP address.
=========================================================
For more details, please visit our website. If you have any issues or questions regarding the
application, you can send us a support ticket at our support center:
https://www.anonyproz.com/supportsuite/
Anonyproz.com|Openvpnchecker.com
30 | P a g e