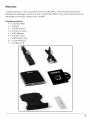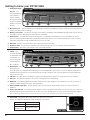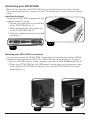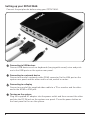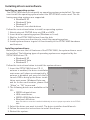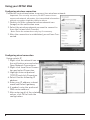
1
Ver : 1.00
9-11-2009
No part of this manual, including the products and software described in it, may be reproduced, transmitted, transcribed, stored in a retrieval system, or translated into any language in any form or by any
means, except documentation kept by the purchaser for backup purposes, without the express written
permission of ZOTAC.
Products and corporate names mentioned in this manual may not be registered trademarks or copyrights of their respective companies, and are used for identification purposes only. All trademarks are
the property of their respective owners.
Every effort has been made to ensure that the contents of this manual are correct and up to date.
However, the manufacturer makes no guarantee regarding the accuracy of its contents, and reserves the
right to make changes without prior notice.
ZOTAC MAG system
Model number:
Serial number:
Date of purchase:
Place of purchase:
i
Table of Contents
Product Specifications ............................................................................................ 1
Safety information .................................................................................................... 2
Welcome .................................................................................................................... 3
Package contents .................................................................................................... 3
Getting to know your ZOTAC MAG ...................................................................... 4
Front view .................................................................................................................... 4
Rear view .................................................................................................................... 4
Positioning your ZOTAC MAG ............................................................................... 5
Installing the stand .................................................................................................... 5
Mounting your ZOTAC MAG to a monitor .............................................................. 5
Setting up your ZOTAC MAG ................................................................................ 6
Connecting to a display ........................................................................................... 6
Connecting to USB devices ................................................................................... 6
Connecting to a network device ............................................................................ 6
Turning on the system ............................................................................................ 6
Installing drivers and software ........................................................................... 7
Installing system drivers ...................................................................................... 7
Using your ZOTAC MAG ........................................................................................ 8
Configuring wireless network connection ............................................................. 8
Configuring wired network connection .............................................................. 8
Using a static IP ..................................................................................................... 8
Using a dynamic IP (PPPoE connection .............................................................. 9
Configuring audio output via an HDMI device .................................................... 9
ii
Product Specifications
Chipset
• NVIDIA ION series
ZOTAC MAG Dimensions
• 7.32 inch x 7.44 inch x 1.50 inch (186mm x 189mm x 38mm)
Microprocessor support
• Intel ATOM 230/330 CPU
• 533MHz FSB
Operating system support
• Supports Windows XP 32-bit/64-bit, Windows Vista 32-bit/64-bit, and Windows
7 32-bit/64-bit
• Supports Linux
System memory support
• Supports DDR2 667/800 up to 4GB of memory
• Supports Dual Channel DDR2 memory
USB 2.0 ports
• Supports Plug ‘n Play
• 6 USB 2.0 ports (one front, one top, four rear panel ports)
• Supports USB 2.0 protocol up to 480 Mbps transfer rate
Onboard Serial ATA 3.0Gbps
• Data transfer rates of 3.0 Gb/s
• 1 eSATA port
Memory card reader
• 4-in-1 (supports SD/MS/MS Pro/xD)
Networking
• Onboard RTL8211CL Gigabit LAN (10/100/1000Mbps)
• Onboard 802.11n WiFi
Onboard Audio
• 8-channel digital LPCM audio (HDMI connection)
• 2-channel High-Definition audio (analog connection)
• Supports intelligent Jack-Sensing function
• Optical S/PDIF output
Eco-friendly design
• Supports ACPI (Advanced Configuration and Power Interface)
Onboard Graphics support
• Integrated 300MHz RAMDAC for analog display with resolutions up to 1920 x
1440 at 75HZ
• Integrated NVIDIA ION graphics processor with DirectX® 10 support
• Simultaneous VGA & HDMI outputs (dual-display ready)
1
Safety information
Your ZOTAC MAG is designed and tested to meet the latest standards of safety for
information technology equipment. However, to ensure your safety, it is important
that you read the following safety instructions.
Setting up your system
• Read and follow all instructions in the documentation before you operate your
system.
• Do not use this product near water or a heat source such as a radiator.
• Set up the system on a stable surface with the provided stand. Never use the
system alone without the stand.
• Openings on the chassis are for ventilation. Do not block or cover these vents
Make sure you leave plenty of space around the system for ventilation. Never
insert objects of any kind into the ventilation openings.
• Use this product in environments with ambient temperatures between 0ºC
and 35ºC.
• If you use an extension cord, make sure that the total ampere rating of the
devices plugged into the extension cord does not exceed its ampere rating.
Care during use
• Use only with power adapter supplied
• Do not walk on the power cord or allow anything to rest on it.
• Do not spill water or any other liquids on the system.
• When the system is turned off, a small amount of electrical current still flows.
Always unplug all power, modem, and network cables from the power outlets
before cleaning the system.
• If you encounter the following technical problems with the product, unplug the
power cord and contact a qualified service technician or your retailer.
• The power cord or plug is damaged.
• Liquid has been spilled into the system.
• The system does not function properly even if you follow the operating
instructions.
• The system was dropped or the cabinet is damaged.
• The system performance changes.
2
Getting to know your ZOTAC MAG
1. Headphone/Audio
Out jack - The
Front view
Refer to the diagram below to identify the components on the front of the system
stereo headphone
jack (3.5mm) is
used to connect
the system’s audio
output to amplified
1
speakers or head-
2
3
4
5
6
7
phones.
2. Microphone jack - The microphone jack is designed to connect a microphone used for video conferencing, voice narrations or simple audio recordings.
3. Memory card reader - The built-in memory card reader is compatible with SD/MS/MS Pro/XD cards used in devices
like digital cameras, MP3 players, mobile phones and PDAs.
4. USB 2.0 ports - The USB (Universal Serial Bus) port is compatible with USB devices such as keyboards, mouse
devices, cameras and hard disk drives. USB ports allow many devices to run simultaneously on a single computer,
with some peripherals acting as additional plug-in sites or hubs.
5. WiFi LED - The WiFi LED blinks when data is being transfered over WiFi.
6. Hard drive LED - The hard drive LED blinks when data is being written to or read from the hard disk drive.
7. Power button - The power switch powers the system ON and OFF.
1. eSATA - The
Rear view
Refer to the diagram above to identify the components on the rear of the system
external SATA port
is compatible with
e.SATA devices
such as external
hard drives and
Blu-ray drives.
2. USB 2.0 port - The
1
2
3
4
5
6
7
USB (Universal
Serial Bus) port is compatible with USB devices such as keyboards, mouse devices, cameras and hard disk drives.
USB allows many devices to run simultaneously on a single computer, with some peripherals acting as additional
plug-in sites or hubs.
3. LAN port- The eight-pin RJ-45 LAN port supports standard Ethernet cables for connection to a local network.
4. VGA port - The VGA port supports connection to analog monitors and displays.
5. HDMI port - The HDMI (High Definition Multimedia Interface) port supports a Full-HD device such as an LCD TV or
monitor to allow viewing on a larger external display.
6. Optical S/PDIF output jack - Plug an optical cable into this jack for digital audio transfer to a stereo receiver or
speakers.
7. Power input (DC19V) - The supplied power adapter converts AC power to DC power for use with this jack. Power supplied through this jack supplies power to the PC. To prevent damage to the PC, only use the supplied power adapter.
Note: the power adapter may become warm to hot when in use. Do not cover the adapter and keep it away from your body.
1. Status LED - The yellow status LED reports the ACPI functions of the
system. The different displays the LED can display is as follows:
4
System is on
LED is on
System is off
LED is off
System is in
standby mode
LED flashes slowly
1
Side view
Positioning your ZOTAC MAG
Note: Do not position the ZOTAC MAG where the ventilation holes are covered.
To guarantee proper use, leave 4 inches (10cm) spacing in front of the ventilation
holes.
Installing the stand
Stand your ZOTAC MAG upright with the
supplied stand. To do so:
1.Locate the keyed hole on the bottom
of the ZOTAC MAG (fig. 1).
2.Align the stand with the keyed hole
on the ZOTAC MAG (fig. 2)
3.Slide the stand forward to lock stand
into place.
Fig. 2
Fig. 1
Mounting your ZOTAC MAG to a monitor
You can also mount the ZOTAC MAG to the back of a monitor that features VESAcompliant mounting holes (VESA 75 or VESA 100 mounting patterns). To do so:
1.Secure the VESA mount to your monitor with four screws (HNM/M4x8) (fig. 3).
2.Place your ZOTAC MAG on the VESA mount noting the correct alignment and
then snap the ZOTAC MAG into place, ensuring the ZOTAC MAG is securely
attached (fig. 4).
Fig. 3
Fig. 4
5
Setting up your ZOTAC MAG
Connect the peripherals before using your ZOTAC MAG.
1
2
3
4
1 Connecting to USB devices
Connect USB devices such as keyboards (varying with areas), mice and printers to the USB ports on the system rear panel.
2 Connecting to a network device
Connect one end of a network cable (RJ45 connector) to the LAN port on the
system rear panel and the other end to a hub, switch or router.
3 Connecting to a display
Connect one end of the supplied video cable to a TV or monitor and the other
end to the HDMI or VGA port.
4 Turning on the system
Plug the supplied AC adapter into the power outlet and then connect the other
end into the DC IN jack on the system rear panel. Press the power button on
the front panel to turn on the system.
6
Installing drivers and software
Installing an operating system
The ZOTAC MAG does not ship with an operating system preinstalled. The user
must install the operating system before the ZOTAC MAG can be used. The following operating systems are supported:
• Windows® XP
• Windows® Vista
• Windows® 7
• Several Linux distributions
Follow the instructions below to install an operating system:
1.Attach external CD/DVD drive via USB or eSATA
2.Insert disk for operating system (Windows or Linux).
3.Wait for the ZOTAC MAG to boot from the disk.
4.Follow the onscreen directions to install the operating system.
5.Install system drivers to gain full functionality of the ZOTAC MAG hardware
and features.
Installing system drivers
Before you can use the full features of the ZOTAC MAG, the system drivers must
be installed. The following types of operating systems are supported by the
ZOTAC MAG driver CD:
• Windows® XP
• Windows® Vista
• Windows® 7
Follow the instructions below to install the system drivers:
1.Insert the ZOTAC MAG driver CD. If
autorun is enabled, the driver installation
main menu will show up automatically. If
autorun is disabled, you may click the file
Launch.EXE to bring up the driver installation main menu. Windows Vista may
ask for further confirmation, please click
“Allow” or “OK” to proceed.
2.The following drivers are available on the
CD:
• NVIDIA chipset driver
• HDA sound driver
• NVIDIA HDMI Audio driver
• Wireless LAN driver
Note: Each driver must be installed individually to ensure proper operation of the ZOTAC
MAG.
3.Select the driver you want to install. The driver installer should launch.
4.Follow the onscreen instructions to install the drivers.
5.Restart the system.
7
Using your ZOTAC MAG
Configuring wireless connection
Follow the instructions below to connect to a wireless network:
Important: For security concerns, Do NOT connect to an
unsecured network, otherwise, the transmitted information
without encryption might be visible to others.
1.Double-click the crossed wireless network icon
(image) on the notification area.
2.Select the wireless network you want to connect to
from the list and click Connect.
Note: Enter the network security key if necessary.
3.After the connection is established, you will see Connected.
Configuring wired connection
Using a static IP
1.Right-click the network icon on
the notification area and select
Open Network Connections.
2.Right-click Local Area Connection and select Properties.
3.Highlight Internet protocol
(TCP/IP) and click Properties.
4.Select Use the following IP
address.
5.Enter your IP address, subnet
mask and Default gateway.
6.If needed, enter the preferred
DNS server address.
7.After entering all of the related
values, click OK to finish the
configuration.
8
Using a dynamic IP (PPPoE connection)
1.Repeat Step 1-3 in the previous section.
2.Select Obtain an IP address automatically and click OK.
3.Click Create a new connection to start the NEW Connection Wizard.
4.Click Next.
5.Select Connect to the Internet and click Next.
6.Select Set up my connection manually.
7.Select your connection
type and click Next.
8.Enter your ISP Name and
click Next.
9.Enter your User name
and Password. Click
Next.
10. Click Finish to finish
the configuration.
11. Enter your user name
and password. Click Connect to connect to the Internet.
Notice : Contact your internet Service Provider (ISP) if you have problems connecting to the network.
Configuring audio output via an HDMI device
If you use your TV with an HDMI connector as an audio output device, connect it to
your ZOTAC MAG and follow the steps below to configure audio settings:
Note: The screenshots shown in this section are for the Windows® Vista operating system.
1.Access the Sound settings via the system Control Panel
2.Under Playback devices, click the NVIDIA
HDMI Audio device
3.Click the “Set as Default” in the lower
right hand corner.
4.Click OK to exit the setup.
9
Copyright© 2009 ZOTAC International (MCO) Limited. All Rights Reserved
No part of this manual, including the products and software described in it, may be reproduced, transmitted,
transcribed, stored in a retrieval system, or translated into any language in any form by any means, without
the express written permission of ZOTAC International (MCO) Limited.
Product warranty or service will not be extended if: (1) the product is repaired, modified or altered, unless
such repair, modification or alteration is authorized in writing by ZOTAC International (MCO) Limited, or (2)
the serial number of the product is damaged or missing.
ZOTAC INTERNATIONAL (MCO) LIMITED PROVIDES THIS MANUAL “AS IS” WITHOUT WARRANTY OF ANY
KIND, EITHER EXPRESS OR IMPLIED, INCLUDING BUT NOT LIMITED TO THE IMPLIED WARRANTIES OR
CONDITIONS OF MERCHANTABILITY OR FITNESS FOR A PARTICULAR PURPOSE. IN NO EVENT SHALL
ZOTAC INTERNATIONAL (MCO) LIMITED BE LIABLE FOR ANY INDIRECT, SPECIAL, INCIDENTAL, OR CONSEQUENTIAL DAMAGES (INCLUDING DAMAGES FOR LOSS OF PROFITS, LOSS OF BUSINESS, LOSS OF USE
OR DATA, INTERRUPTION OF BUSINESS AND THE LIKE), EVEN IF PC PARTNER HAS BEEN ADVISED OF THE
POSSIBILITY OF SUCH DAMAGES ARISING FROM ANY DEFECT OR ERROR IN THIS MANUAL OR PRODUCT.
SPECIFICATIONS AND INFORMATION CONTAINED IN THIS MANUAL ARE FURNISHED FOR INFORMATIONAL USE ONLY, AND ARE SUBJECT TO CHANGE AT ANY TIME WITHOUT NOTICE, AND SHOULD NOT BE
CONSTRUCTED AS A COMMITMENT BY ZOTAC INTERNATIONAL (MCO) LIMITED. ZOTAC INTERNATIONAL
(MCO) LIMITED ASSUMES NO RESPONSIBILITY OR LIABILITY FOR ANY ERRORS OR INACCURACIES THAT
MAY APPEAR IN THIS MANUAL, INCLUDING THE PRODUCTS AND SOFTWARE DESCRIBED IN IT.
Products and corporate names appearing in this manual may or may not be registered trademarks or copyrights of their respective companies, and are used only for identification or explanation and to the owner’s
benefit, without intent to infringe. NVIDIA is a trademark of NVIDIA Corporation. Windows is a trademark of
Microsoft Corp.
10