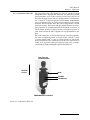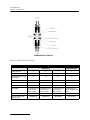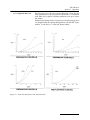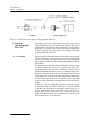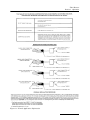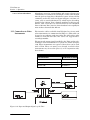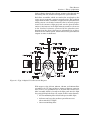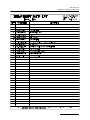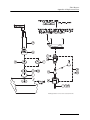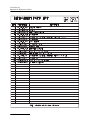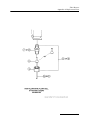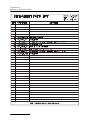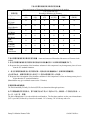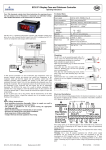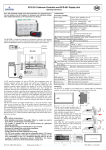
1
UA-6 Absorbance Detector Installation and Operation Guide Part #69-0943-266 of Assembly 60-0943-261 Copyright © 1991. All rights reserved, Teledyne Isco Revision M, October 2013 Foreword This instruction manual is designed to help you gain a thorough understanding of the operation of the equipment. Teledyne Isco recommends that you read this manual completely before placing the equipment in service. Although Teledyne Isco designs reliability into all equipment, there is always the possibility of a malfunction. This manual may help in diagnosing and repairing the malfunction. If a problem persists, call or e-mail the Teledyne Isco Technical Service Department for assistance. Simple difficulties can often be diagnosed over the phone. If it is necessary to return the equipment to the factory for service, please follow the shipping instructions provided by the Customer Service Department, including the use of the Return Authorization Number specified. Be sure to include a note describing the malfunction. This will aid in the prompt repair and return of the equipment. Teledyne Isco welcomes suggestions that would improve the information presented in this manual or enhance the operation of the equipment itself. Teledyne Isco is continually improving its products and reserves the right to change product specifications, replacement parts, schematics, and instructions without notice. Contact Information Customer Service Phone: (800) 228-4373 (USA, Canada, Mexico) (402) 464-0231 (Outside North America) Fax: (402) 465-3022 Email: [email protected] Technical Support Phone: Email: Toll Free (866) 298-6174 (Samplers and Flow Meters) Toll Free (800) 775-2965 (Syringe Pumps and Liquid Chromatography) [email protected] Return equipment to: 4700 Superior Street, Lincoln, NE 68504-1398 Other Correspondence Mail to: P.O. Box 82531, Lincoln, NE 68501-2531 Email: [email protected] Revised September 2012 Warnings and Cautions The lightning flash and arrowhead within the triangle is a warning sign alerting you to “dangerous voltage” inside the product. The exclamation point within the triangle is a warning sign alerting you to important instructions in this manual. Symboles de Sécurité Ce symbole signale la présence d’un danger d’électrocution. Ce symbole signale l’existence d’instructions importantes relatives au produit dans ce manuel. v Warnungen und Vorsichtshinweise Der gepfeilte Blitz im Dreieck ist ein Warnzeichen, das Sie vor „gefährlichen Spannungen“ im Inneren des Produkts warnt. Das Ausrufezeichen in Dreieck ist ein Warnzeichen, das Sie darauf aufmerksam macht, daß wichtige Anleitungen zu diesem Handbuch gehören. Advertencias y Precauciones Esta señal alerta sobre la presencia de alto voltaje en el interior del producto. Esta señal le advierte sobre la importancia de las instrucciones del manual que acompañan a este producto. vi CAUTION: LIQUIDS ASSOCIATED WITH THIS INSTRUMENT MAY BE CLASSIFIED AS CARCINOGENIC, BIOHAZARD, FLAMMABLE, OR RADIOACTIVE. SHOULD THESE LIQUIDS BE USED, IT IS HIGHLY RECOMMENDED THAT THIS APPLICATION BE ACCOMPLISHED IN AN ISOLATED ENVIRONMENT DESIGNED FOR THESE TYPES OF MATERIALS IN ACCORDANCE WITH FEDERAL, STATE, AND LOCAL REGULATORY LAWS, AND IN COMPLIANCE WITH YOUR COMPANY’S CHEMICAL/ HYGIENE PLAN IN THE EVENT OF A SPILL. IN ALL CASES, WHEN USING TELEDYNE ISCO INC. INSTRUMENTATION, PRUDENCE AND COMMON SENSE MUST BE USED. CAUTION: If this instrument is used in a manner not specified in this manual, the protection provided by the equipment may be impaired. vii AVIS: LES LIQUIDES QUI SONT ANALYSÉS DANS CET INSTRUMENT PEUVENT ÊTRE CANCÉRIGÈNES, HASARDS BIOLOGIQUES, INFLAMMABLES, OU RADIOACTIFS. SI VOUS DEVEZ UTILISER CES LIQUIDES HASARDEUX, IL EST TRÈS RECOMMANDÉ QUE VOUS LE FAITES À L'INTÉRIEUR D'UN ENVIRONNEMENT ISOLÉ CONÇU POUR TELS LIQUIDES. CET ENVIRONNEMENT ISOLÉ DEVRAIT ÊTRE CONSTRUIT SELON LES RÈGLEMENTS FÉDÉRAUX, PROVINCIAUX, ET LOCAUX, AUSSI QUE LE PLAN DE VOTRE COMPAGNIE QUI CONCERNE L'ÉVÈNEMENT D'UN ACCIDENT AVEC LES MATIÈRES HASARDEUSES. EN TOUT CAS, UTILISEZ TOUJOURS L'INSTRUMENTATION D'ISCO AVEC PRUDENCE ET SENS COMMUN. AVIS: Si vous employez cet instrument d’une manière autre que celles qui sont specifiées dans ce manuel, la protection fournie par l’instrument peut être affaiblie. Cela augmentera votre risque de blessure. viii ADDENDUM The chart recorder of the UA-6 can be set to produce charts based on cm/ml length of chart per unit volume pumped instead of the traditional cm/hr (length of chart per unit time). For volume based charts, plug the square 4-pin connector on the cable (part number 60-1020-163 or 60-1020-228) into the socket labeled REMOTE CHART DRIVE on the rear panel of the UA-6. The chart length per unit volume (cm/ml) is shown on the table below for each chart-speed setting on the UA-6, the tubing size in the TRIS pump, and line frequency (60 Hz in the USA, 50 Hz in Europe, etc.). CHART LENGTH PER UNIT VOLUME PUMPED (Approximate cm/ml) FOR SINGLE CHANNEL OF PUMP Chart Speed cm/hr 60 Hz Line Frequency 1/16” tubing 1/8” tubing 50 Hz Line Frequency 1/16” tubing 1/8” tubing 300 1.7 0.5 2.0 0.6 150 0.83 0.25 1.0 0.3 60 0.33 0.1 0.4 0.12 30 0.17 0.05 0.2 0.06 15 0.083 0.025 0.1 0.03 6 0.033 0.01 0.04 0.012 3 0.017 0.005 0.02 0.006 1.5 0.0083 0.0025 0.01 0.003 0.6 0.0033 0.001 0.004 0.0012 0.3 0.0017 0.0005 0.002 0.0006 Note Changing the jumper in the Tris pump from the default setting (P104 pin 4-8) to P104 pin 3-7 will double the cm/ml. Refer to Section 5 of the Tris manual for top removal and the circuit board location of P104. The actual chart speed (cm/hr) when generating charts can be calculated from the following equation: (Tris speed) x (Tris range) x (UA-6 chart speed range) x 0.049804867 (UA-6 line frequency) = chart speed 0 to 100% 1 or 10 50 or 60 Hz Example: 100% X 10.300 cm/hr, 60 Hz 100 X 10 X 1 X 300 X 0.049804867 60 = 249.02343 cm/hr Example: 25% X 1, 15 cm/hr, 50 Hz 25 X 1 X 1 X 15 X 0.049804867 50 = 0.3735153 cm/hr. vii TELEDYNE ISCO RESEARCH AND APPLICATION LABORATORY The staff of Teledyne Isco’s Research and Applications Laboratory is available to assist scientists in realizing and utilizing the full research potential of Teledyne Isco Instruments. When an application problem arises, contact the laboratory director for assistance. Our staff will do its utmost in analyzing and solving any problems. If you have developed a unique application for a Teledyne Isco Instrument or are considering a new use, we would be interested in learning about it. TRADEMARKS ® Amphenol is a Registered Trademark of BTC Electronic Components ® Halar is a Registered Trademark of Allied Corporation ® Hastelloy C is a Registered Trademark of Cabot Corporation ® Chemraz is a Registered Trademark of Venitron Corporation ® Locktite is a Registered Trademark of Loctite Corporation viii COMMONLY ORDERED REPLACEMENT PARTS FOR THE TELEDYNE ISCO UA-6 These replacement parts are often ordered by UA-6 owners. All parts are pictured and identified by number and description in Appendix A Replacement Parts in the back of this manual. Description Part Number UV lamp (Hg vapor) for Type 11 optical unit 60-0947-027* chart paper 69-0943-193 pens 68-0947-020 flow cell windows: prep cell (10 mm diameter) 60-0644-052 Type 11 filters: 254 nm 60-1144-001 280 nm 60-1144-002 Type 11 source screens: 254 nm 60-1144-065 280 nm 60-1144-008 flow cell connectors 68-1844-173 right lamp reflector 60-1143-049 left lamp reflector 60-1143-050 flow cell ferrules for 1/16” tubing 68-0084-014 * Replacement lamps are tested to meet specifications. Bubbles, mercury spots, etc. within the quartz envelope are not detrimental to the function of the lamp. ix x Isco UA-6 Table of Contents Section 1 Introduction 1.1 Optical Units for the UA-6 . . . . . . . . . . . . . . . . . . . . . . . . . . . . . . . . . . . . . . . . . . . . 1.1.1 Type 11 . . . . . . . . . . . . . . . . . . . . . . . . . . . . . . . . . . . . . . . . . . . . . . . . . . . . . . 1.2 Applications for the UA-6 . . . . . . . . . . . . . . . . . . . . . . . . . . . . . . . . . . . . . . . . . . . . . 1.2.1 Liquid Chromatography . . . . . . . . . . . . . . . . . . . . . . . . . . . . . . . . . . . . . . . . 1.2.2 Cuvette Reading . . . . . . . . . . . . . . . . . . . . . . . . . . . . . . . . . . . . . . . . . . . . . . 1.3 Technical Specifications . . . . . . . . . . . . . . . . . . . . . . . . . . . . . . . . . . . . . . . . . . . . . . 1.4 Controls and Indicators . . . . . . . . . . . . . . . . . . . . . . . . . . . . . . . . . . . . . . . . . . . . . . 1-1 1-1 1-2 1-2 1-2 1-2 1-2 Section 2 Preparation for Use 2.1 2.2 2.3 2.4 2.5 2.6 2.7 2.8 Unpacking . . . . . . . . . . . . . . . . . . . . . . . . . . . . . . . . . . . . . . . . . . . . . . . . . . . . . . . . . Preparation for Use (Power) . . . . . . . . . . . . . . . . . . . . . . . . . . . . . . . . . . . . . . . . . . . Installing the Chart Paper and Pen. . . . . . . . . . . . . . . . . . . . . . . . . . . . . . . . . . . . . Attachment of the Optical Unit to the UA-6 . . . . . . . . . . . . . . . . . . . . . . . . . . . . . . Changing Wavelengths with the Type 11 Optical Unit . . . . . . . . . . . . . . . . . . . . . Installation of Flow Cells . . . . . . . . . . . . . . . . . . . . . . . . . . . . . . . . . . . . . . . . . . . . . Calibrating to an External Standard . . . . . . . . . . . . . . . . . . . . . . . . . . . . . . . . . . . . Baseline Adjustment for Absorbance . . . . . . . . . . . . . . . . . . . . . . . . . . . . . . . . . . . . 2-1 2-1 2-1 2-3 2-4 2-5 2-6 2-6 Section 3 Operation 3.1 Introduction . . . . . . . . . . . . . . . . . . . . . . . . . . . . . . . . . . . . . . . . . . . . . . . . . . . . . . . . 3-1 3.2 Flow Cell Applications . . . . . . . . . . . . . . . . . . . . . . . . . . . . . . . . . . . . . . . . . . . . . . . 3-2 3.2.1 Preparative Flow Cells (68-0080-001, 002, 034) . . . . . . . . . . . . . . . . . . . . . 3-2 3.2.2 High Flow Rate Cell (68-0080-023) . . . . . . . . . . . . . . . . . . . . . . . . . . . . . . . . 3-2 3.3 Flow Cell Descriptions . . . . . . . . . . . . . . . . . . . . . . . . . . . . . . . . . . . . . . . . . . . . . . . 3-2 3.3.1 Preparative Flow Cells . . . . . . . . . . . . . . . . . . . . . . . . . . . . . . . . . . . . . . . . . 3-3 3.3.2 High Flow Rate Cell . . . . . . . . . . . . . . . . . . . . . . . . . . . . . . . . . . . . . . . . . . . 3-5 3.4 Flow/Pressure Characteristics . . . . . . . . . . . . . . . . . . . . . . . . . . . . . . . . . . . . . . . . . 3-6 3.5 Tubing Connections for Plastic Lead Connectors . . . . . . . . . . . . . . . . . . . . . . . . . . 3-6 3.6 Tubing Connections for High Flow Rate Cell . . . . . . . . . . . . . . . . . . . . . . . . . . . . . 3-7 3.7 Selecting Chromatography Flow Cells . . . . . . . . . . . . . . . . . . . . . . . . . . . . . . . . . . . . . . . . . . . . . . . . . . . . . . . . . 3-8 3.7.1 Pathlength . . . . . . . . . . . . . . . . . . . . . . . . . . . . . . . . . . . . . . . . . . . . . . . . . . . 3-8 3.7.2 Flow Rate . . . . . . . . . . . . . . . . . . . . . . . . . . . . . . . . . . . . . . . . . . . . . . . . . . . 3-10 3.7.3 Preparative Cells . . . . . . . . . . . . . . . . . . . . . . . . . . . . . . . . . . . . . . . . . . . . . 3-10 3.8 Avoiding Bubble Formation and Retention . . . . . . . . . . . . . . . . . . . . . . . . . . . . . . 3-10 3.9 Noise Filter . . . . . . . . . . . . . . . . . . . . . . . . . . . . . . . . . . . . . . . . . . . . . . . . . . . . . . . 3-11 3.10 Built-in Chart Recorder . . . . . . . . . . . . . . . . . . . . . . . . . . . . . . . . . . . . . . . . . . . . 3-12 3.11 Built-In Peak Separator . . . . . . . . . . . . . . . . . . . . . . . . . . . . . . . . . . . . . . . . . . . . 3-12 3.11.1 PEAK SEPARATOR Switch . . . . . . . . . . . . . . . . . . . . . . . . . . . . . . . . . . . 3-12 3.11.2 The Indicator LED . . . . . . . . . . . . . . . . . . . . . . . . . . . . . . . . . . . . . . . . . . . 3-13 3.12 Performance and Use . . . . . . . . . . . . . . . . . . . . . . . . . . . . . . . . . . . . . . . . . . . . . . 3-13 3.12.1 Minimizing Trace Noise and Drift . . . . . . . . . . . . . . . . . . . . . . . . . . . . . . 3-13 3.12.2 Solvent Absorbance . . . . . . . . . . . . . . . . . . . . . . . . . . . . . . . . . . . . . . . . . . 3-16 3.13 Connection to Other Instruments . . . . . . . . . . . . . . . . . . . . . . . . . . . . . . . . . . . . 3-16 3.13.1 Foxy R1 and R2 Fraction Collectors . . . . . . . . . . . . . . . . . . . . . . . . . . . . . 3-17 xi Isco UA-6 Table of Contents 3.13.2 Teledyne Isco Retriever 500 . . . . . . . . . . . . . . . . . . . . . . . . . . . . . . . . . . . . . . . . . . . . . . . . 3-18 3.14 Remote Chart Drive Control by Non-Isco Equipment . . . . . . . . . . . . . . . . . . . . 3-18 3.15 Converting the Internal Recorder for Stand-Alone Operation . . . . . . . . . . . . . . 3-19 Section 4 Theory of Operation 4.1 General Description . . . . . . . . . . . . . . . . . . . . . . . . . . . . . . . . . . . . . . . . . . . . . . . . . 4-1 4.1.1 Optical Unit . . . . . . . . . . . . . . . . . . . . . . . . . . . . . . . . . . . . . . . . . . . . . . . . . . 4-1 4.1.2 UA-6 Detector . . . . . . . . . . . . . . . . . . . . . . . . . . . . . . . . . . . . . . . . . . . . . . . . 4-2 4.2 Detailed Description . . . . . . . . . . . . . . . . . . . . . . . . . . . . . . . . . . . . . . . . . . . . . . . . . 4-3 4.2.1 Auto Baseline Circuit . . . . . . . . . . . . . . . . . . . . . . . . . . . . . . . . . . . . . . . . . . 4-3 4.2.2 Logarithmic Amplifier . . . . . . . . . . . . . . . . . . . . . . . . . . . . . . . . . . . . . . . . . . 4-4 4.2.3 Gain Amplifiers . . . . . . . . . . . . . . . . . . . . . . . . . . . . . . . . . . . . . . . . . . . . . . . 4-4 4.2.4 Noise Filtering . . . . . . . . . . . . . . . . . . . . . . . . . . . . . . . . . . . . . . . . . . . . . . . . 4-4 4.2.5 Recorder Offset/Set Lamp and Optics . . . . . . . . . . . . . . . . . . . . . . . . . . . . . 4-5 4.2.6 Peak Separation . . . . . . . . . . . . . . . . . . . . . . . . . . . . . . . . . . . . . . . . . . . . . . . 4-5 4.2.7 Injection and Event Mark . . . . . . . . . . . . . . . . . . . . . . . . . . . . . . . . . . . . . . . 4-5 4.2.8 Lamp Brightness Regulator . . . . . . . . . . . . . . . . . . . . . . . . . . . . . . . . . . . . . 4-5 4.2.9 Power Supply . . . . . . . . . . . . . . . . . . . . . . . . . . . . . . . . . . . . . . . . . . . . . . . . . 4-6 4.2.10 Built-In Chart Recorder . . . . . . . . . . . . . . . . . . . . . . . . . . . . . . . . . . . . . . . 4-7 4.2.11 Pen Drive . . . . . . . . . . . . . . . . . . . . . . . . . . . . . . . . . . . . . . . . . . . . . . . . . . . 4-7 4.3 Type 11 Optical Unit Theory of Operation . . . . . . . . . . . . . . . . . . . . . . . . . . . . . . . 4-8 4.3.1 General . . . . . . . . . . . . . . . . . . . . . . . . . . . . . . . . . . . . . . . . . . . . . . . . . . . . . . 4-8 4.3.2 Absorbance Detector Circuit . . . . . . . . . . . . . . . . . . . . . . . . . . . . . . . . . . . . 4-10 Section 5 Maintenance and Adjustment 5.1 Removal and Installation of the Case Top. . . . . . . . . . . . . . . . . . . . . . . . . . . . . . . . 5-1 5.2 Part Replacement . . . . . . . . . . . . . . . . . . . . . . . . . . . . . . . . . . . . . . . . . . . . . . . . . . . 5-1 5.2.1 Recorder Replacement . . . . . . . . . . . . . . . . . . . . . . . . . . . . . . . . . . . . . . . . . . 5-1 5.2.2 Recorder Drive String Installation . . . . . . . . . . . . . . . . . . . . . . . . . . . . . . . . 5-3 5.3 Timing Belt Tension Adjustment . . . . . . . . . . . . . . . . . . . . . . . . . . . . . . . . . . . . . . . 5-4 5.4 Cleaning the Enclosures . . . . . . . . . . . . . . . . . . . . . . . . . . . . . . . . . . . . . . . . . . . . . . 5-5 5.5 Troubleshooting. . . . . . . . . . . . . . . . . . . . . . . . . . . . . . . . . . . . . . . . . . . . . . . . . . . . . 5-5 5.6 Type 11 Optical Unit Maintenance . . . . . . . . . . . . . . . . . . . . . . . . . . . . . . . . . . . . 5-11 5.6.1 Type 11 UV Lamp Replacement . . . . . . . . . . . . . . . . . . . . . . . . . . . . . . . . . 5-11 5.6.2 Regulating Photocell Assembly Replacement . . . . . . . . . . . . . . . . . . . . . . 5-13 5.6.3 Filter Assembly Inspection . . . . . . . . . . . . . . . . . . . . . . . . . . . . . . . . . . . . . 5-15 5.6.4 Troubleshooting . . . . . . . . . . . . . . . . . . . . . . . . . . . . . . . . . . . . . . . . . . . . . . 5-15 5.7 Flow Cell Maintenance and Adjustment . . . . . . . . . . . . . . . . . . . . . . . . . . . . . . . . 5-18 5.7.1 Window or O-Ring Replacement . . . . . . . . . . . . . . . . . . . . . . . . . . . . . . . . . 5-18 5.7.2 Correcting for Flow Cell Window Leakage . . . . . . . . . . . . . . . . . . . . . . . . . 5-19 5.7.3 Troubleshooting . . . . . . . . . . . . . . . . . . . . . . . . . . . . . . . . . . . . . . . . . . . . . . 5-20 5.7.4 Flow Cell Cleaning Procedures . . . . . . . . . . . . . . . . . . . . . . . . . . . . . . . . . . 5-20 5.7.5 Cleaning the Back Pressure Regulator . . . . . . . . . . . . . . . . . . . . . . . . . . . 5-21 5.7.6 Service Department . . . . . . . . . . . . . . . . . . . . . . . . . . . . . . . . . . . . . . . . . . . 5-21 5.7.7 How to Ship Returns . . . . . . . . . . . . . . . . . . . . . . . . . . . . . . . . . . . . . . . . . . 5-21 5.7.8 Purchasing Parts . . . . . . . . . . . . . . . . . . . . . . . . . . . . . . . . . . . . . . . . . . . . . 5-22 Appendix A Replacement Parts A.1 Replacement Parts . . . . . . . . . . . . . . . . . . . . . . . . . . . . . . . . . . . . . . . . . . . . . . . . . . A-1 List of Figures 1-1 UA-6 Detector with Type 11 Optical Unit . . . . . . . . . . . . . . . . . . . . . . . . . . . . . . . 1-2 xii Isco UA-6 Table of Contents 1-2 UA-6 Front Panel . . . . . . . . . . . . . . . . . . . . . . . . . . . . . . . . . . . . . . . . . . . . . . . . . . . 1-5 1-3 UA-6 Rear Panel . . . . . . . . . . . . . . . . . . . . . . . . . . . . . . . . . . . . . . . . . . . . . . . . . . . . 1-6 1-4 Type 11 Controls and Connectors . . . . . . . . . . . . . . . . . . . . . . . . . . . . . . . . . . . . . . 1-8 2-1 Recorder Chart Paper and Pen Installation . . . . . . . . . . . . . . . . . . . . . . . . . . . . . . 2-2 2-2 Attaching an Optical Unit to the UA-6 . . . . . . . . . . . . . . . . . . . . . . . . . . . . . . . . . . 2-3 2-3 Changing Wavelengths in the Type 11 Optical Unit . . . . . . . . . . . . . . . . . . . . . . . 2-4 2-4 Changing the Source Screen in the Type 11 Optical Unit . . . . . . . . . . . . . . . . . . . 2-5 2-5 Installing Flow Cells . . . . . . . . . . . . . . . . . . . . . . . . . . . . . . . . . . . . . . . . . . . . . . . . 2-6 3-1 Preparative Flow Cell . . . . . . . . . . . . . . . . . . . . . . . . . . . . . . . . . . . . . . . . . . . . . . . 3-3 3-2 Flow Cell Cross-Section . . . . . . . . . . . . . . . . . . . . . . . . . . . . . . . . . . . . . . . . . . . . . . 3-4 3-3 Flow Cell Flow/Pressure Characteristics . . . . . . . . . . . . . . . . . . . . . . . . . . . . . . . . 3-5 3-4 Medium Pressure (400 psi, 28 kg/cm²) Lead Connector Installation . . . . . . . . . . 3-7 3-5 Lead Connector Assembly for High flow Rate Flow Cell . . . . . . . . . . . . . . . . . . . . 3-8 3-6 Ferrule Application Information . . . . . . . . . . . . . . . . . . . . . . . . . . . . . . . . . . . . . . . 3-9 3-7 Effect of Noise Filter on Baseline Noise . . . . . . . . . . . . . . . . . . . . . . . . . . . . . . . . 3-11 3-8 Sample Chromatogram . . . . . . . . . . . . . . . . . . . . . . . . . . . . . . . . . . . . . . . . . . . . . 3-12 3-9 Absorbance Curves of Four Commonly Used Solvents . . . . . . . . . . . . . . . . . . . . 3-15 3-10 Input and Output Signals of the UA-6 . . . . . . . . . . . . . . . . . . . . . . . . . . . . . . . . 3-16 3-11 Cable Connection to the Foxy R1 or R2 . . . . . . . . . . . . . . . . . . . . . . . . . . . . . . . 3-17 3-12 Cable connection to the Retriever 500 . . . . . . . . . . . . . . . . . . . . . . . . . . . . . . . . 3-18 3-13 Suggested Circuit for a Remote Chart Drive . . . . . . . . . . . . . . . . . . . . . . . . . . 3-19 3-14 Problem Analysis - Drift and Noise . . . . . . . . . . . . . . . . . . . . . . . . . . . . . . . . . . 3-20 3-15 Example Traces for Troubleshooting Analysis . . . . . . . . . . . . . . . . . . . . . . . . . 3-21 4-1 Optical Unit Light Path . . . . . . . . . . . . . . . . . . . . . . . . . . . . . . . . . . . . . . . . . . . . . 4-1 4-2 UA-6 Detector Block Diagram . . . . . . . . . . . . . . . . . . . . . . . . . . . . . . . . . . . . . . . . . 4-2 4-3 Type 11 Optical Unit Functional Diagram . . . . . . . . . . . . . . . . . . . . . . . . . . . . . . . 4-9 4-4 Type 11 Optical Unit Schematic Diagram . . . . . . . . . . . . . . . . . . . . . . . . . . . . . . 4-10 4-5 Type 11/Absorbance Detector Block Diagram . . . . . . . . . . . . . . . . . . . . . . . . . . . 4-11 5-1 Built-In Recorder Removal and Installation . . . . . . . . . . . . . . . . . . . . . . . . . . . . . 5-2 5-2 Recorder String Routing . . . . . . . . . . . . . . . . . . . . . . . . . . . . . . . . . . . . . . . . . . . . . 5-3 5-3 Timing Belt Tension Adjustment . . . . . . . . . . . . . . . . . . . . . . . . . . . . . . . . . . . . . . 5-5 5-4 UV Lamp and Regulating Photocell Removal and Installation . . . . . . . . . . . . . . 5-14 5-5 Window and O-Ring Removal and Installation . . . . . . . . . . . . . . . . . . . . . . . . . . 5-19 List of Tables 1-1 1-2 1-3 1-4 2-1 3-1 3-2 3-3 5-1 5-2 5-3 5-4 5-5 5-6 Technical Specifications for the UA-6 . . . . . . . . . . . . . . . . . . . . . . . . . . . . . . . . . . . 1-3 Front Panel Controls and Indicators . . . . . . . . . . . . . . . . . . . . . . . . . . . . . . . . . . . . 1-5 Rear Panel Controls and Connectors . . . . . . . . . . . . . . . . . . . . . . . . . . . . . . . . . . . 1-7 Type 11 Controls and Connectors . . . . . . . . . . . . . . . . . . . . . . . . . . . . . . . . . . . . . . 1-8 Selectable Wavelengths for Type 11 Optical Unit . . . . . . . . . . . . . . . . . . . . . . . . . 2-4 O-Ring Solvent Compatibility Chart . . . . . . . . . . . . . . . . . . . . . . . . . . . . . . . . . . . . 3-2 Flow Cell Specifications . . . . . . . . . . . . . . . . . . . . . . . . . . . . . . . . . . . . . . . . . . . . . . 3-4 Interface Cables . . . . . . . . . . . . . . . . . . . . . . . . . . . . . . . . . . . . . . . . . . . . . . . . . . . 3-16 Baseline Troubleshooting . . . . . . . . . . . . . . . . . . . . . . . . . . . . . . . . . . . . . . . . . . . . . 5-6 Recorder Troubleshooting . . . . . . . . . . . . . . . . . . . . . . . . . . . . . . . . . . . . . . . . . . . . 5-8 General Troubleshooting . . . . . . . . . . . . . . . . . . . . . . . . . . . . . . . . . . . . . . . . . . . . 5-10 Filter Assembly Inspection . . . . . . . . . . . . . . . . . . . . . . . . . . . . . . . . . . . . . . . . . . 5-16 Type 11 Optical Unit Troubleshooting . . . . . . . . . . . . . . . . . . . . . . . . . . . . . . . . . 5-16 Flow Cell Troubleshooting . . . . . . . . . . . . . . . . . . . . . . . . . . . . . . . . . . . . . . . . . . . 5-20 xiii Isco UA-6 Table of Contents xiv UA-6 Detector Section 1 Introduction The UA-6 detector is a photometric detector used to measure absorbance. It is a dual beam, dual flow cell, fixed wavelength detector with interchangeable wavelength filters for absorbance detection from 214 to 660 nm. Maximum sensitivity is 0.002 absorption units full-scale (AUFS) with ten ranges up to 2.0 absorption units. The UA-6 detector consists of two components, the detector with built-in chart recorder, variable noise filter and peak separator, and, separated by a six-foot cable, one of two optical units. The optical units house the lamp, filters and flow cells and are designed to be plugged into the UA-6 and attached to a ring stand, mast or shelf. 1.1 Optical Units for the UA-6 1.1.1 Type 11 The Type 11 optical unit is the standard absorbance optical unit for detection at 254 and 280 nm with eleven optional wavelengths to 660 nm. A mercury vapor lamp is used for all wavelengths. 1-1 UA-6 Detector Section 1 Introduction Figure 1-1 UA-6 Detector with Type 11 Optical Unit 1.2 Applications for the UA-6 1.2.1 Liquid Chromatography The UA-6 is designed for chromatographic detection for low pressure (classical) LC and high flow LC (flow rates up to 3liters/minute). 1.2.2 Cuvette Reading The UA-6 can operate as a UV/VIS computing colorimeter with optional cuvette holders and 10 mm cuvettes. 1.3 Technical Specifications The technical specifications of the UA-6 are listed in Table 1-1. 1.4 Controls and Indicators The controls and indicators utilized in the operation of the UA-6 are illustrated in Figures 1-2 and 1-3 and described in Tables 1-2 and 1-3. 1-2 UA-6 Detector Section 1 Introduction Table 1-1 Technical Specifications for the UA-6 Dimensions and Weight (Detector cabinet only) Width: 11.2 in (28.4 cm) Height: 6.5 in (16.5 cm) Depth: 13.0 in (33.0 cm) Weight:14.6 lb (6.6 kg) Power Requirements Mains voltage line cord is a “disconnect device” (Factory Set) 100 VAC ± 10 VAC, 0.4 Amps 117 VAC ± 10 VAC, 0.4 Amps 234 VAC ± 23 VAC, 0.2 Amps Line Frequencies 50 Hz or 60 Hz (field convertible) Power Consumption (maximum) 50 watts (117 VAC, 60 Hz), Type 11 Ambient Temperature Range 0 to 40° C Humidity 5 to 25° C, 0 to 100% relative humidity maximum with heaters ON (Type 11 and 12 optical unit) 10 to 40° C, 0 to 95% relative humidity maximum with heaters OFF (Type 11 and 12 optical unit) Full-Scale Absorbance 0.002, 0.005, 0.01, 0.02, 0.05, 0.1, 0.2, 0.5, 1.0, 2.0 Absorbance Units Full-Scale (AUFS) Linearity ± 1.5% of full-scale (maximum deviation measured at mid-point of 2.0 absorbance range) Noise Specifications for the Type 11 Optical Unit ±10 x 10-5 AU - 280 nm ±10 x 10-5 AU - 254 nm (Reference 8 x 10⁻⁵ ASTM) (All noise specifications are for 95% total trace with dry PREP flow cells, and 1.5 second RISE TIME setting, reference 1.5 cm/hr chart speed.) Accuracy (Relative) 3% of full-scale, all ranges Range-to-Range Tracking 2% of reading Noise Filter Bessel (time delay) type. Selectable 0.5, 1.5, and 5.0 seconds RISE TIME settings (10 to 90% full-scale response). Stability (baseline drift after 8 hour warm-up at constant ambient temperature) Type 11 optical unit: 2 x 10⁻³ AU maximum in 4 hours, 254 or 280 nm wavelengths. 4 x 10⁻³ AU maximum in 4 hours, all wavelengths. (measured with dry prep flow cells and the same wavelength in both optical beams) Recorder Outputs 0 to 1 V 1% into 100K ohms or greater. 0 to 10 mV 1% into 1K ohms or greater. Zero common mode voltage. Recorder Input 1 V maximum internal recorder input Integrator Output 1.0 VDC/Absorbance unit; 3% of scale plus 2% of reading 1-3 UA-6 Detector Section 1 Introduction Table 1-1 Technical Specifications for the UA-6 (Continued) Peak Separator Peak Duration Ranges Example: Long Duration Peak Short Duration Peak Maximum Slope Sensitivity 0.3, 1, 3, 10, 30+ minutes One hour base width with a minimum height of 10% of scale 10 second base width with a minimum height of 4% of scale 0.0055% (typical) full-scale per second (positive slope 30+ minutes peak width setting). Sensitivity is inversely proportional to peak width setting. Negative slope sensitivity is 1.5 times as great as positive slope sensitivity. The sensitivity is reduced to 3/4 on the 0.01 range, 1/2 on the 0.005 range and 1/4 on the 0.002 range to minimize detection of noise peaks. Peak Separator for Fraction Collectors OPEN COLLECTOR Max V 30 VDC Max I 0.5 ADC One second TTL low standard across pins 6 and 9. TTL low on zero to positive slope inflection and negative to zero slope inflection. Event Mark Inputs Open collector or contact closure. Recorder Event Mark Display Type: Five to 10% full-scale spike added to recorder signal Indication: Downscale for fraction collector index; upscale for accessory, e.g. Foxy rack change. Duration: 1/2 second Maximum Altitudes 2,000 Meters Pollution Degree 2 Installation Category II Built-In Recorder Chart Width: 10 cm calibrated in fifth cm minor divisions Chart Speed: 0.3, 0.6, 1.5, 3, 6, 15, 30, 60, 150 and 300 cm/hr Chart Paper Length: 3,000 cm/roll Pen Lift: manual External Chart Drive Control: contact closure across pins 1 and 2 of rear panel connection stops the recorder chart drive External Chart Speed Control: 300 cm/hr and slower Operating Wavelengths of Optical Units Type 11: 254, 280, 310, 340, 365, 405, 435, 470, 510, 546, 580, 620 or 660 nm wavelengths Injection Marks Input to allow externally activated injection mark to be placed on the recorder. Activated by open collector or contact closure. 1-4 UA-6 Detector Section 1 Introduction Figure 1-2 UA-6 Front Panel Table 1-2 Front Panel Controls and Indicators Item in Control or Indicator Fig. 1-2 1 STANDBY-OPERATE Switch Description Function 2 position selector switch In OPERATE, applies secondary power to the unit. In STANDBY, applies secondary power to heaters. When unit is connected to the main power source, primary power (100, 117, or 234 VAC) is present at all times. 2 RECORDER Strip chart recorder Traces on graduated chart paper to indicate and record the light absorbency of a medium in the optical unit light path. 3 PEAK SEPARATOR off, 0.3, 1, 3, 10, 30+ Rotary selector switch Turns peak separator on, optimizes the peak separator for various peak widths in minutes. 4 CHART SPEED-CM/HR 0.3, 0.6, 1.5, 3, 6, 15, 30, 60,150, 300 Rotary selector switch Stops and starts recorder chart drive and selects speed ranges from 0.3 to 300 cm/hr. 5 PEAK SLOPE LED Indicator lamp Lights green to indicate positive slope detected. Lights red to indicate negative slope detected. 6 AUTO BASELINE Momentary push button Used to activate baseline circuitry. Provide rapid coarse baseline adjustment. 1-5 UA-6 Detector Section 1 Introduction Table 1-2 Front Panel Controls and Indicators (Continued) Item in Control or Indicator Fig. 1-2 Description Function 7 SENSITIVITY 0.002, 0.005, 0.01,0.02, 0.05, 0.1, 0.2, 0.5, 1.0, 2.0, set lamp and optics Rotary selector switch Used to establish the full-scale absorbance range. Set lamp and optics: This position overrides AUTO BASELINE and provides equal voltage to the optical unit photocells. At this time, the optical unit should be balanced. It also initializes the lamp current adjust circuit. (Type 11 only). 8 RECORDER OFFSET Rotary control Used for fine positioning of the absorbance baseline (zero). 9 NOISE FILTER 0.5, 1.5, 5.0 3 position selector switch Reduces noise by employing a Bessel-type active filter. The 0.5, 1.5 and 5.0 positions indicate the approximate theoretical response time in seconds for 10 to 90 percent full-scale output deflection. 10 Standby-Operate LED Indicator lamp Lights to indicate that secondary power is applied to circuitry and the unit is in operational status. RED: Type 11 lamp is warming up. Red after warm up indicates lamp current needs to be reset! GREEN: Type 11 lamp current is proper, ready for operation. 11 10 Figure 1-3 UA-6 Rear Panel 1-6 UA-6 Detector Section 1 Introduction Note There are fuses located on the circuit board that are not accessible to the user. They are: F401, 0.75 Amp, type “F”; F402, 1.5 Amp, type “T”, and F403, 0.75 Amp, type “F”. Table 1-3 Rear Panel Controls and Connectors Item in Control or Connector Fig 1-3 Description Function 1 OPTICAL UNIT 24-pin Amphenol® socket Connector for attaching a Teledyne Isco optical unit. 2 FRACTION COLLECTOR INPUT/OUTPUT 9-pin Sub-D Outputs: Peak separation Peak duration Inputs: Event mark, INJECT Baseline mark, Auto 3 MAINS 3-pin male manufactured per I.E.C. recommendations 100 VAC, 117 VAC or 234 VAC, power supply input for the detector. 4 CIRCUIT BREAKER 1A 100 and 117 VAC, 0.5A 234 VAC Resettable circuit breakers Limits the detector current drawn from the main power supply. Push to reset. (only one is installed for 100 or 117 volt operation) 5 RECORDER SELECTOR 2 position slide switch Selects signal source for UA-6 recorder. INT: Operates from UA-6 absorbance signal. EXT: Recorder operates on an external 0-1V signal input. 6 RECORDER OUTPUTS 1 V; 10 mV; (common ground); (chassis ground) Banana sockets Connectors for an external voltage sensitive recorder. 7 INTERNAL RECORDER INPUT 1 V Banana sockets Input for operation of the UA-6 recorder from a separate 0-1V instrument. 8 INTEGRATOR Banana sockets For connection of external integrator computer. Provides 1 volt per absorbance unit. 9 REMOTE CHART DRIVE CONTROL 4-pin “Jones” plug Connector for remote control of the built-in recorder. 10 CHASSIS GROUND Banana socket Connecting shield of I/O cables to chassis 11 SIGNAL COMMON Banana socket Return for Digital/Analog signal 1-7 UA-6 Detector Section 1 Introduction 3 2 4 5 1 Figure 1-4 Type 11 Controls and Connectors Table 1-4 Type 11 Controls and Connectors Item in Fig 1-4 Control or Connector Description Function 1 Detector Connect Cable Six individually shielded pairs with a 24-pin connector. Provides interface connection to a Teledyne Isco absorbance detector control system. 2 BASELINE ADJUST-MIN OPEN-MAX OPEN Rotary Control Moves an aperture plate assembly back and forth in the light path to meter the light for zero baseline calibration procedures. 3 COLDROOM HEATER-ON-OFF Toggle Switch SPDT Applies and removes approximately 13 VDC to the UV lamp and photodetector coldroom heaters. 4 SOURCE SCREEN HOLDER Holds source screen in place. 5 SECTION CLAMP Latch Secures optical unit sides. Note Always leave the reference flow cell dry unless you are running a strongly absorbing gradient. 1-8 UA-6 Detector Section 2 Preparation for Use 2.1 Unpacking 2.2 Preparation for Use (Power) Unpack the detector carefully. Check all components and accessory packages against the packing lists. Any damage or shortages should be reported immediately to Teledyne Isco. Retain the shipping containers in the event the instrument needs to be returned to the factory for service. Reference should be made to the warranty located in the back of this manual, prior to assembling the instrument. CAUTION Prior to connecting the UA-6 to power, check the serial tag to ensure that the voltage and frequency requirements of the instrument are compatible with the available voltage and frequency. The UA-6 uses a detachable line cord. Connect the receptacle end to the MAINS plug (Figure 1-3) and then connect the plug to a properly rated mains supply. 2.3 Installing the Chart Paper and Pen To install the paper (refer to Figure 2-1): 1. Raise the pen lift arm so that the pen clears the roller. 2. Unroll several inches of paper from a new roll of chart paper. 3. Fold or cut the leading edge of the paper at a 30° angle. (Don't fold the paper into a point; this tends to cause a snag.) 4. With the printed side of the paper away from you, feed the paper up around the front of the paper guide and behind the roller. 5. Use the manual advance thumb wheel to help draw the paper the rest of the way around the roller. 6. If the paper is feeding crooked, pull the short side forward (allow a few sprocket holes to tear as needed) until the paper is feeding squarely. Advance the paper until the full width of smooth paper has cleared the guide bar. Be sure the sprockets are engaging the sprocket holes in the paper. 7. Lay the supply roll of chart paper in the chart paper compartment under the roller. If necessary, rewind any unwound portion first. 8. The paper can now be advanced either manually or automatically. 2-1 UA-6 Detector Section 2 Preparation for Use Note If the recorder has been sitting overnight, tear off about three inches of chart paper to preclude the possibility of the paper rolling around the drum. To install the pen (refer to Figure 2-1): 1. Slide the pen cartridge into its holder. A dimpled clasp holds it in place. 2. Remove the pen cap (a press fit) and lower the pen with the pen lift arm (left of the roller) to ready the pen for use. Replace the pen cap on the pen when the recorder is not in use to prevent the tip from drying out. 3. To remove the pen, pull the cartridge straight out of the holder. Figure 2-1 Recorder Chart Paper and Pen Installation 2-2 UA-6 Detector Section 2 Preparation for Use 2.4 Attachment of the Optical Unit to the UA-6 The optical unit is plugged into the UA-6 “OPTICAL UNIT” socket as shown in Figure 2-2. The optical unit can then be positioned close to the column while the detector/recorder component remains on the lab bench. If the application calls for coldroom operation, the optical unit can be placed inside the coldroom and the detector left outside by passing the optical unit cable through a port and completing the connection. An optional 20 foot extension cable (P/N 68-1147-017) is available for applications which require additional separation of the optical unit and detector. Each optical unit has a special mounting clamp which can be used to clamp to a ring stand or mast, or by rotating the clamp 90 to the edge of a shelf. Figure 2-2 Attaching an Optical Unit to the UA-6 Note The optical unit should be mounted horizontally for proper operation. 2-3 UA-6 Detector Section 2 Preparation for Use 2.5 Changing Wavelengths with the Type 11 Optical Unit The Type 11 optical unit is designed for wavelength detection from 254 to 660 nm with interchangeable filters and corresponding source screens (see Table 2-1). The two wavelength filters selected must be of the same wavelength and must match the source screen used. When the UA-6 and Type 11 are shipped, filter and source screen for 254 nm are in place. Figure 2-3 Changing Wavelengths in the Type 11 Optical Unit Table 2-1 Selectable Wavelengths for Type 11 Optical Unit Wavelength (nm) Bandwidth (nm) Filters Source Screen (Light Source) 254 Spectral line ca 0.1 254 254 280 15 280 280/310 310 25 310/340 280/310 340 20 310/340 340/365 365 20 365 340/365 405 12 405 405 435 Spectral line ca 0.1 435 435 470 20 470 470 510 10 510 510 546 Spectral line ca 0.1 546 546 580 10 580 580 620 11 620 620 660 12 660 660 To change wavelength operation: 1. Release the two white catches on the front of the unit and open the Type 11 and remove the wavelength filters from each side of the optical unit as shown in Figure 2-3. (The BASELINE ADJUST control on the optical unit will have to be used to clear the access to the filter.) Remove the fil- 2-4 UA-6 Detector Section 2 Preparation for Use ters by pulling gently. Take care not to drop them, they are breakable. 2. Press the selected filters in place and return the BASELINE ADJUST control to its previous position. Close the optical unit. 3. Select the source screen that matches the filters chosen. Remove the source screen holder as shown in Figure 2-4. 4. The source screen holder will have one source screen and one metal blank of the same size. Loosen the thumbscrew and replace the source screen with the slide matching the new wavelength selected. Place the new source screen and the metal blank in the slide holder and tighten the thumbscrew. 5. Return the source screen holder to the slot in the Type 11. Figure 2-4 Changing the Source Screen in the Type 11 Optical Unit Note Always connect flow cells so that the direction of flow is up 2.6 Installation of Flow Cells Select the correct flow cell for your application (see Section 3.2). Using the two white latches on the front, open the optical unit and install the flow cells into the reference and measuring compartments as shown in Figure 2-5. If the reference cell is left dry (as recommended) it is not necessary that the two flow cells used be of identical pathlengths or even equal cell types. It is recommended that the UA-6 always be operated with flow cells in both reference and measuring compartments. Do not operate without a flow cell in the reference compartment. 2-5 UA-6 Detector Section 2 Preparation for Use 2.7 Calibrating to an External Standard As a cross-check, an external standard solution can be used to calibrate the UA-6. Baseline unit at zero. Prepare a solution of potassium chromate. Use a 0.45 AUFS dilution. Place the external standard solution in measuring cell A and 0.05 N KOH in reference cell B. Adjust internal control R224 for 0.45 AUFS on the 0.5 sensitivity range. Observe precautions in Section 5.1. Note The UA-6 was calibrated at the factory such that any optical unit can be connected to it and the accuracy of the system maintained. But when field adjusting R224, the UA-6 will only be accurate with the optical unit with which it was calibrated. Figure 2-5 Installing Flow Cells 2.8 Baseline Adjustment for Absorbance For baseline adjustment when starting operation, set the UA-6 controls as follows: 1. The PEAK SEPARATOR switch to OFF. 2. The CHART SPEED selector to OFF. 3. The STANDBY/OPERATE switch to OPERATE. 4. Allow a minimum of 15 minutes warm up to stabilize lamp current. 5. Set UA-6 to “SET LAMP & OPTICS”. 6. Set the BASELINE ADJUST control to MAX. open. 2-6 UA-6 Detector Section 2 Preparation for Use 7. Adjust the BASELINE ADJUST control of the optical unit until the chart pen moves to near zero. 8. If the indication from the previous step cannot be obtained, turn the BASELINE ADJUST control of the optical unit to maximum open. Move sensitivity switch off of “SET LAMP & OPTICS” to desired absorbance range. 9. Align RECORDER OFFSET control to it's mark. Activate AUTO BASELINE. The pen should deflect near mid scale. 10. The baseline setting may be left at mid scale or moved to any arbitrary baseline by using the recorder offset control of the UA-6. Positioning the baseline will not alter the accuracy of the reading. 11. The AUTO BASELINE function can be activated by an external controller also. Apply a TTL low or contact closure across pins 1 and 9 (common) of the fraction collector connector. 2-7 UA-6 Detector Section 2 Preparation for Use 2-8 UA-6 Detector Section 3 Operation 3.1 Introduction The basic operation of the UA-6 consists of selecting the settings for sensitivity, noise filtering, peak separation (if applicable) and the built-in chart recorder. Once the flow cells and filters have been selected and installed, the following steps should be followed for starting operation. 1. Move the STANDBY/OPERATE switch to the OPERATE position. With a Type 11 optical unit: The LED will be red for the first 10 minutes of operation. After 10 minutes the LED will change to green indicating the lamp current is set and ready for operation. Should the LED change back to red during operation the lamp current may require adjustment. See Section 4 for adjusting lamp current. Note Under normal conditions the LED should not change from green to red. An ambient temperature change of more than 15° C or a weak lamp are generally the cause of lamp current to go out of regulation. After an intermittent power loss, if the UA-6 power LED does not return to green, see Section 4 for adjusting lamp current. Should the UA-6 power LED flicker red/green, this indicates the 1140 lamp is also flickering. See Table 5-1, Section 5. 2. Select the sensitivity setting and allow the UA-6 to warm up until it stabilizes with solvent flowing through the cells. For detection in 0.5, 1.0 and 2.0 AUFS range, a minimum of 15 minutes is needed. For operation at the 0.005 or 0.002 AUFS ranges, several hours of warm-up may be required for stable operation. 3. Baseline the detector (see Section 2.8.) 4. Select the settings for the noise filter (see Section 3.9), peak separator (see Section 3.11.1) and chart speeds. Uncap the chart pen and lower the pen onto the paper. The UA-6 is now ready for operation. 3-1 UA-6 Detector Section 3 Operation 3.2 Flow Cell Applications The UA-6 has different types of flow cells for use with the Type 11 optical unit: preparative cells for low pressure chromatography, a high flow rate cell for LC with flow rates up to 3 liters per minute, microcolumn for extremely small illuminated volumes, and density gradient cells (covered in a separate manual) for scanning centrifuged gradients. 3.2.1 Preparative Flow Cells (68-0080-001, 002, 034) The preparative flow cells are designed for liquid column chromatography applications involving either low or high flow rates and large peak volumes. The preparative flow cells have a straight through flow path that provides relative freedom from bubble problems, but the large internal volume may cause a loss of resolution. 3.2.2 High Flow Rate Cell (68-0080-023) This flow cell is designed for flow rates from 10 ml up to several liters per minute. The cell has a 1/8 inch bore flow path to allow fast flow rates with a minimum of back pressure. The cell has a 5 mm pathlength. 3.3 Flow Cell Descriptions For certain applications, it may be necessary to change the O-ring in your flow cells for increased solvent resistance. Use the solvent compatibility chart (Table 3-1) to determine which O-ring will best suit your application requirements. For a free guide to solvent compatibilities, order a copy of Teledyne Isco Tables. Table 3-1 O-Ring Solvent Compatibility Chart Chemraz® EPR Viton Acids, concentrated or Dilute Excellent Excellent Excellent Acid, Inorganic Excellent Good Good/Excellent Acid, Organic concentrated Excellent Fair/Good Poor/Good Excellent Excellent Good/Excellent Poor Good Excellent Good Excellent Alcohols Excellent Good/Excellent Fair/Excellent Alkalies, Concentrated Excellent Excellent Poor Excellent Excellent Good Chlorinated Hydrocarbons Good Poor Good/Excellent Ethers Excellent Fair Poor Halogenated Solvents Poor Poor Good/Excellent Hydrocarbons, Aliphatic Excellent Poor Excellent Hydrocarbons, Aromatic Excellent Good/Excellent Excellent Ketones Excellent Good/Excellent Poor Dilute Acid, Oxidizing Concentrated Excellent Dilute Dilute Source: Chemical resistance Guide for Elastomers, Compass Publications, 1988 3-2 UA-6 Detector Section 3 Operation 3.3.1 Preparative Flow Cells The preparative flow cells (Figures 3-1 and 3-2) consist of a body fabricated from a fluoroplastic (Halar®), two optically polished quartz windows and a lead connector screwed into each end of the body. All preparative cells are equipped with lead connectors for 1/16 inch or 1/8 inch O.D. plastic or steel tubing. A liquid-tight seal is maintained by an O-ring located between the quartz windows and the window nuts. The cell is shipped with a round aperture in place. Operation with the included optional rectangular aperture is recommended when maximum resolution of small volume peaks is required. If the rectangular aperture is used, make certain the slit is aligned so it is perpendicular to the flow. The lead connectors are fabricated from the same fluoroplastic, the nuts are fabricated from an acetal plastic, and the 1/8 inch (3.2 mm) ferrule and 1/16 inch (1.5 mm) ferrule are fabricated from polyethylene. The combination provides the connection to either steel or plastic tubing. Preparative flow cells are fabricated with the light pathlengths specified in Table 3-2. Low Pressure Lead Connector Direction of Flow Body Window Window Nut PREPARATIVE FLOW CELL Figure 3-1 Preparative Flow Cell 3-3 UA-6 Detector Section 3 Operation PREPARATIVE FLOW CELL Figure 3-2 Flow Cell Cross-Section Table 3-2 Flow Cell Specifications Preparative High Flow Rate Pathlength (mm) 2 5 1 5 Illuminated Volume (µ) 15 37.5 3.7 5 Illuminated Volume (µ per cm/light path) 75 75 37 32 Hold Up Volume (µ) 45 172 9.6 198 Part Number 68-0080-001 kg/cm2) 68-0080-002 200 psi (14 kg/cm2) 68-0080-034 400 psi (28 kg/cm2) 68-0080-023 200 psi (14 kg/cm2) Pressure Rating 200 psi (14 Tubing (OD) Accomodates 1/8 or Accomodates 1/8 or Accomodates 1/8 or Accomodates 3/8 or 1/16 inch steel, 1/16 inch steel, 1/16 inch steel, 1/4 inch flexible or rigid plastic, or glass plastic, or glass plastic, or glass plastic Standard O-Ring Material Optional Replacement O-Rings Part # 3-4 Viton Viton EPR Viton 202-3070-13 202-3070-13 202-2070-17 202-3070-13 UA-6 Detector Section 3 Operation 3.3.2 High Flow Rate Cell The high flow rate cell with a fixed pathlength (5 mm) has the same construction as the preparative cells but has a 1/8 inch flow path. This cell is capable of working with flow rates up to 3 liters per minute. Compression fittings made of stainless steel and polypropylene are provided with the fixed pathlength flow cell and will accommodate 3/8 inch O.D. or 1/4 inch O.D. plastic tubing. Figure 3-3 Flow Cell Flow/Pressure Characteristics 3-5 UA-6 Detector Section 3 Operation 3.4 Flow/Pressure Characteristics Refer to Figure 3-3 for flow versus pressure characteristics of Teledyne Isco flow cells. Note 1. Flow rate vs. pressure drop characteristics were compiled using the lead connector that is packaged with each flow cell on the inlet port and no lead connector on the outlet port. For the variable pathlength high flow rate flow cell, the tubing connector for 1/4 and 3/8 inch OD tubing was used rather than the lead connector it is packaged with. 2. The fluid temperature was 26°C for both water and sucrose solutions. 3.5 Tubing Connections for Plastic Lead Connectors The medium pressure, black and red plastic lead connectors are used with the preparative series 0080-001, 0080-002 (derated to 200 psi; 14 kg/cm²) flow cells. These lead connectors should be used with 1/8 or 1/16 inch OD plastic or steel tubing with the following procedure (see Figures 3-4, 3-5, and 3-6). 1. If the flow cell has been disassembled for cleaning, install the lead connector in the flow cell body and finger tighten. 2. Slide the nut over the end of the tubing. 3. Slide the ferrule over the end of the tubing. Ensure that the larger diameter of the conical shaped ferrule is facing the nut. 4. Insert the tubing into the lead connector and push the tubing in until it bottoms out. When using the red connector and 1/16 inch OD tubing, take care that the tubing does not pass through the end of the connector into the flow cell. 5. Carefully engage the nut with the lead connector and screw the nut down until finger tight. CAUTION Finger tightening is sufficient. Do not overtighten the lead connector nut or allow the lead connector to turn. This can result in extensive deformation of the plastic tubing. The seal quality is assured through compression of the ferrule between the tubing and the conical section of the lead connector. 3-6 UA-6 Detector Section 3 Operation Figure 3-4 Medium Pressure (400 psi, 28 kg/cm²) Lead Connector Installation 3.6 Tubing Connections for High Flow Rate Cell The polypropylene lead connectors provided with the high flow rate flow cell will accommodate 3/8 inch OD and 1/4 inch OD flexible or rigid plastic tubing. The ferrule nut (the ferrule and nut are all one piece) are made of polypropylene as well. To assemble these fittings to the flow cell body, use the following procedure and refer to Figure 3-6. 1. Push the tubing through the threaded ferrule nut. 2. If 3/8 inch OD x 1/4 inch ID flexible tubing is being used, push the tubing insert into the end of the tubing. 3. Insert the tubing into the lead connector and tighten the threaded ferrule nut. CAUTION Use only finger pressure to tighten the lead connector in the flow cell body during step 4 below. Over tightening can result in extensive damage to the flow cell, which would inhibit insertion of the spacer rods for pathlength adjustment on the variable pathlength flow cell. 4. Thread the lead connector into the flow cell body using only finger pressure to tighten it when resistance is felt. 3-7 UA-6 Detector Section 3 Operation Figure 3-5 Lead Connector Assembly for High flow Rate Flow Cell 3.7 Selecting Chromatography Flow Cells 3.7.1 Pathlength Depending on the type of liquid chromatography method, flow cells with different internal configurations, volumes, and optical pathlengths are required for best performance and operation. Generally, you should select a flow cell with an illuminated volume no greater than about 10% of the smallest chromatographic peak volume expected. The best optical pathlength depends on the solute concentration and its absorptivity at the wavelength used. As cell pathlength increases, both signal and flow noise increase, but instrument noise will remain the same. Thus longer pathlengths give highest detectability. For most purposes, an intermediate pathlength is better because of smaller volume and, in the case of preparative flow cells, better liquid flow characteristics. Nonlinear response due to detector bandwidth diminishes greatly as absorbance decreases. Therefore, photometric linearity can be improved with shorter pathlength cells which require high instrument sensitivities (lower absorbance ranges) for the same detectability. This effect is particularly important when absorptivity of the compound varies over the wavelengths encompassed by the detector bandwidth. A UA-6 has a 0.1 nm bandwidth at 254 nm and certain other wavelengths, which is excellent. A UA-6 has a 15 nm bandwidth at 280 nm and certain other wavelengths, which is only fair, so shorter pathlength cells are generally better at these wavelengths. For average applications, use a 5 mm cell. For very highly absorbing solutes, or best quantitative accuracy with a UA-6 at 280 nm, use a 1 or 2 mm cell. 3-8 UA-6 Detector Section 3 Operation Figure 3-6 Ferrule Application Information 3-9 UA-6 Detector Section 3 Operation 3.7.2 Flow Rate The Teledyne Isco high flow rate cell is designed to handle liquid flows up to about 3 liters/min with negligible pressure drop. Liquids with viscosities much greater than water may present difficulties at high flow rates, while most cells can handle higher flow rates of water or other non-viscous liquids if some pressure drop across the flow cell is not objectionable. In principle, flow rates can be as high as that which does not result in a pressure drop exceeding the rated pressure limit of either the flow cell or fittings. However, an excess of pressure drop across the flow cell requires higher total pressure for the chromatographic system, which may present difficulty for some chromatographic pumps. With 60% aqueous sucrose solutions at 800 ml/min as an example of a viscous liquid (58 cP), UA-6 preparative cells show about 6 psi pressure drop. With water at 50 ml/min, the preparative cells show about 2 psi pressure. UA-6 preparative flow cells can often be applied in experiments where flow rates exceed 1 liter/min. At extremely low flow rates (e.g. below 10 ml/hr), preparative flow cells are recommended because of their better gas bubble expelling properties. At very low flow, bubble problems will be increased because of greater increased heating of the eluent as it passes through the detector. 3.7.3 Preparative Cells 3.8 Avoiding Bubble Formation and Retention In low pressure liquid chromatography where the peak volume of eluted components is large (over 1 ml), preparative flow cells are best. These cells have a straight-through vertical flow design to quickly expel trapped bubbles due to outgassing. The larger illuminated volumes of preparative flow cells do not affect the intensity, resolution, or the shape of larger peaks. Bubbles form in a flow cell when it is warmer than the temperature of the column and because the cross-sectional area of the flow path is changing rapidly. The following steps, taken separately or combined, should deal with most bubble problems. 1. Degas the buffer or solvent prior to eluting the column by applying a vacuum. Heating or ultrasound treatment during vacuum degassing is beneficial. 2. Warm the buffer or solvent, if possible, to about 3°C above the column temperature. This decreases the ability of the mobile phase to absorb and hold gases. 3. Be sure the direction of flow through the flow cell is from bottom to top. 4. Be sure the flow cells are clean. Material from a previous application that coats the inside of a flow cell may provide a surface for bubble formation and adhesion. Excellent cleaning results can usually be obtained by using isopropyl alcohol (IPA), water, detergent solution, water, IPA, hexane, IPA, and finally water. In some cases, it may be necessary to remove the flow cell windows and clean them separately (see Section 5.6.2). 5. Select the appropriate flow cell. 3-10 UA-6 Detector Section 3 Operation 6. Apply a back pressure on the flow cell by using a 100 psig back pressure regulator (available from Teledyne Isco, part number 209-9012-22), a long piece of small bore tubing, or some other device on the outlet side of the flow cell. Keep the column-to-flow cell tubing length as short as possible. This is especially true for exclusion chromatography (gel filtration) because of its higher initial pressure. Note A one meter length of 0.005 inch ID stainless steel tubing will provide a back pressure of approximately 75 psig at a flow rate of 0.25 ml per minute, 135 psig at a flow rate of 0.5 ml per minute, and 275 psig at a flow rate of 1.0 ml per minute. 7. Limit the vertical fall of the outlet tubing as much as possible to reduce siphoning action. 3.9 Noise Filter The UA-6 includes a built-in noise filter with RISE TIME settings of 0.5, 1.5 and 5.0 seconds. (RISE TIME is a response speed measurement defined as the time required to make a 10% to 90% pen deflection.) This filter can be used to reduce the noise level on the recorder trace. It is especially useful for reducing or eliminating flow noise caused by pulsatile pumps or noisy solvents (see Figure 3-7). The figure demonstrates the ability of the noise filter to reduce baseline noise at 0.002 AUFS. The filter used is an active Bessel filter. Bessel filters are advantageous because they merely delay rather than distort the shape of peaks. This delay causes some increase in the response time of a peak and reduces the peak height of very short duration peaks, but the peak areas remain constant. Figure 3-7 Effect of Noise Filter on Baseline Noise In many low pressure LC applications, the 1.5 and 5.0 second settings can be used to reduce baseline noise without any negative effect to the chromatogram. Note Use of the 1.5 and 5.0 seconds rise time settings is highly recommended for peak separation in low pressure LC. These set- 3-11 UA-6 Detector Section 3 Operation tings will help eliminate false peak cutting due to baseline and bubble noise. 3.10 Built-in Chart Recorder The UA-6 has a built-in recorder that provides a permanent record of chromatograms that can be conveniently taped in a lab notebook. This paper is printed with a 10 cm wide grid strip with 2 mm minor and 1 cm major divisions. Increasing absorbance causes the pen to deflect to the left. The internal recorder in the UA-6 may be used as a stand-alone recorder (see Section 3.15). 3.11 Built-In Peak Separator 3.11.1 PEAK SEPARATOR Switch Figure 3-8 Sample Chromatogram 3-12 UA-6 detectors include a built-in peak separator for collecting chromatography peaks with a fraction collector. The peak separator is a change of slope detector which cuts peaks based on the first derivative of the curve and not an absorbance threshold or level. The peak separator is designed to collect all peaks, regardless of their degree of resolution. Peak cutting with the peak separator is largely automatic. The PEAK SEPARATOR switch is used to fine tune peak cutting based on the expected peak widths at baseline. The peak separator can most accurately respond to baseline peak widths that range from 0.2 to 2 times the selected peak duration. For peaks shorter than 0.2X, the selected setting of the switch, the peak separator may respond slightly slower in cutting the leading edge of the peak. For peaks greater than 2X, the selected setting of the switch the ending cut may be slightly early, resulting in a certain loss of peak material. Ideally, the PEAK SEPARATOR switch should be set such that the peak width of all important peaks in the chromatogram are greater than 0.2, yet less than 2 times the setting of the switch. UA-6 Detector Section 3 Operation In practice, nearly all peaks will be adequately separated unless the peak duration setting is grossly incorrect (for example, a setting of 30+ MIN for a chromatogram with one minute peaks, or vice versa.) The example in Figure 3-8 shows a chromatogram in which peaks were cut with one minute peak duration setting. Note that all five peaks are adequately cut. The peak separator can control a fraction collector. It will advance the fraction collector to the next tube at the start of a peak and again at the end of the peak (or, in the case of Foxy, send a peak signal for the duration of the peak). 3.11.2 The Indicator LED When the absorbance changes from zero slope (the baseline) to positive slope (leading edge of the peak), the change is sensed by the peak separator circuitry. This initiates a tube change signal to the fraction collector. For a + SLOPE, the LED emits green light to show that the peak separator has sensed the rising slope of a peak. When the maximum of the peak is detected (zero slope), the LED extinguishes. When the trace starts down the trailing edge of the peak the LED emits red light. When the absorbance reaches a minimum at the end of the peak (this may be at a baseline different from the leading edge of the peak, i.e., a shifted baseline), the LED will extinguish, the fraction collector will advance one position. When used with fraction collectors that include a delay timer, the peak separator can be used to precisely collect peaks by synchronizing the action of the fraction collector with the actual arrival of the peak at the drop outlet. When used with fraction collectors without a delay timer, satisfactory peak cutting will occur but the fraction collector will move slightly prematurely at the beginning and end of the peak. For peak cutting in low pressure LC, this is seldom a problem. 3.12 Performance and Use 3.12.1 Minimizing Trace Noise and Drift This section covers generalized information on several aspects of the UA-6 that can help you use the instrument more effectively. One source of noise is the solvent itself. Certain organic solvents, among them chloroform, hexane and methanol, are inherently noisy. In the more sensitive ranges, an alternative solvent may be advisable. Noise from micro particles in the solvent may be noticeable at very high sensitivities. It is caused by a scattering of the light. Filtering all of the components of the mobile phase to remove particulates is the best solution for this problem. A 0.45 µm filter is adequate for almost all cases. Static discharge may also cause noise problems when the humidity is very low. The best way to circumvent this is not to touch the system while a chromatogram is running. Baseline noise can be affected by the lamp in a Type 11 optical unit. Generally, a noisy lamp will produce wider baselines. If a noisy lamp is suspected, the lamp current should be changed. 3-13 UA-6 Detector Section 3 Operation DANGER Risk of electric shock. Disconnect the electric power before servicing. Only trained service personnel may remove the case top. 1. Disconnect the line cord. Remove the two screws from each side of the case top. Slide the case top off. 2. Remove the two screws from the top of the circuit board (power board) on the right hand side of the instrument. Fold the circuit board down exposing the component side of the board. 3. Locate S401, (selectable jumper) on the power board near the adjacent circuit board, toward the front of the instrument. Slide the selectable jumper off S401 and move it to another position, it is not critical which position is selected. Each position provides a different current which will change the lamp characteristics. If the baseline is still noisy, move the jumper until the noise is reduced. 4. Reinstall the circuit board mounting screws, case top, and case top screws. Drift performance is directly related to the stability of the ambient temperature. The UA-6 can operate at any temperature between 0°C and 40°C without affecting drift, as long as it remains stable. Temperature changes of 1°C will cause noticeable drift at a SENSITIVITY setting of 0.002 AUFS. Any step that tends to stabilize temperatures including insulating the system (column, tubing, injection valve) will help minimize drift. Baffles to prevent drafts from room-heating ducts from hitting the system are also helpful. When operating in a coldroom, the temperature may actually vary several degrees, with the result that the baseline drifts accordingly. Baffling or insulating the optical unit from cooling fans that may cycle on and off intermittently, can help limit drifting. Solvent temperature may differ significantly from ambient temperature. As it moves closer to the ambient figure during the chromatographic elution, baseline drift can sometimes be noted on the trace. To correct this problem, allow the solvent to come to ambient temperature prior to injection or equilibrate the column for a period of time to allow the trace to stabilize. 3-14 UA-6 Detector Section 3 Operation Figure 3-9 Absorbance Curves of Four Commonly Used Solvents 3-15 UA-6 Detector Section 3 Operation 3.12.2 Solvent Absorbance 3.13 Connection to Other Instruments Absorbance curves for various buffers and organic solvents vary considerably as a function of wavelength, so that some thought must be given to their choice. Absorbance curves of four solvents commonly used in UV work are shown in Figure 3-9. Some solvents, such as tetrahydrofuran UV, which begins absorbing shortly below 330 nm, have a limited usefulness in this regard. Others, such as hexane UV, remain relatively non-absorbent down to 214 nm. Note, however, that absorbance rises rapidly for most of these solvents below 214 nm. The interface cables available from Teledyne Isco for use with other instruments are summarized in Table 3-3. This table can be used as an ordering guide for cables. The full catalog order number is listed in the table. The cables are tagged with a seven-digit number. The input and output signals handled by the UA-6 and its relationship to other instruments in a system are shown in Figure 3-10. These instruments are typical of those that can be used with a UA-6. There are many cases though, in which other instruments may be used in place of, or in conjunction with, those shown. Table 3-3 Interface Cables Instrumentation Part Number of Cable Fraction Collectors: Foxy R1 or R2 69-2134-173 Retriever 500 60-1020-217 Figure 3-10 Input and Output Signals of the UA-6 3-16 UA-6 Detector Section 3 Operation 3.13.1 Foxy R1 and R2 Fraction Collectors Cable #69-2134-173 should be used to connect a Teledyne Isco Foxy R1 or R2 to the UA-6 for level sensing, slope detection, and tube change event marks (Figure 3-11). This cable has two connectors at the UA-6 end, allowing interface to the recorder output (a dual banana plug) or for peak separator input (a 9-pin plug). It is recommended that the UA-6 peak detector be switched to OFF and the Foxy R1/R2 peak separator be used instead. Note Be sure the polarity of the black, dual banana plug connector is correct. Match the ridge, or “keel”, on the connector with the negative binding post on the detector. FOXY R1 R2 REAR PANEL CONNECTORS UA-6 DECTECTOR CABLE #69-2134-173 Figure 3-11 Cable Connection to the Foxy R1 or R2 3-17 UA-6 Detector Section 3 Operation 3.13.2 Teledyne Isco Retriever 500 Use cable 60-1020-217 to connect the UA-6 with a Teledyne Isco Retriever 500 fraction collector. The information transmitted between the two units consists of tube change and rack change event marks. RETRIEVER 500 UA-6 DECTECTOR CABLE #60-1020-217 Figure 3-12 Cable connection to the Retriever 500 3.14 Remote Chart Drive Control by Non-Isco Equipment The REMOTE CHART DRIVE jack is a polarized, four-pin jack that mates with a Cinch-Jones S-304-CCT plug or equivalent. The pins of the plug are: 1. 50 or 60 Hz time base (at 19 VAC) 2. common 3. pulse input 4. –15 VDC This plug can be used to stop the chart drive motor, or to drive the motor at a variable rate. Connect a manual switch across pins 1 and 2. The chart drive stops when the switch is closed. Short pins 1 and 2. The recorder chart motor may be driven with line frequency (60 Hz at 12 to 120 VAC) across pins 3 and 4. TTL pulses may be used by placing an optoisolator between the TTL signal and pins 3 and 4 using the suggested circuit in Figure 3-13. 3-18 UA-6 Detector Section 3 Operation Figure 3-13 Suggested Circuit for a Remote Chart Drive For a 60 Hz recorder, chart travel will be: pulses per cm = 216000 recorder range cm/hr For a 50 Hz recorder chart travel will be: pulses per cm = 3.15 Converting the Internal Recorder for Stand-Alone Operation 180000 recorder range cm/hr Switch the recessed rear panel switch (INT/EXT) to external. Connect external signal source to the red INT REC socket and the black (common) socket. 3-19 UA-6 Detector Section 3 Operation Figure 3-14 Problem Analysis - Drift and Noise 3-20 UA-6 Detector Section 3 Operation The following traces represent various difficulties as each is noted. All were run with a chart speed of 1.5 and 3 cm/hr with sensitivity at 0.01 AUFS, unless otherwise noted. See Table 5-5, Item 2. Figure 3-15 Example Traces for Troubleshooting Analysis 3-21 UA-6 Detector Section 3 Operation 3-22 UA-6 Detector Section 4 Theory of Operation DANGER Risk of electric shock. Disconnect the electric power before servicing. Only trained service personnel may remove the case top. Do not remove or disconnect earth ground bonding conductor. 4.1 General Description 4.1.1 Optical Unit A minimal monitoring system contains a Teledyne Isco optical unit and the UA-6 absorbance detector. A fraction collector, valve and whatever other equipment needed to collect samples or process optical data can be added as desired. The optical unit contains a flow cell through which the liquid under inquiry moves, a light source, two filters and a pair of photosensors to detect optical activity. The detector has all the necessary electronics to drive the optical unit and prepare its light sensitive signals to be recorded on a chart. All current UA-6 optical units are dual light path devices which use two flow cells, as depicted in Figure 4-1. The optical units all operate with a single light source which emits the desired ultraviolet and visible spectrum. When this light is passed through the two flow cells, it interacts with the liquid. There the light is changed by the absorbing nature of the liquid and its contents. Then it is filtered so only the desired wavelength(s) are passed on to the photo detectors. Electric currents are generated by the detectors which are proportional to the light intensity falling on them. These currents are passed to the detector where they are recorded and used to control other analytical equipment. Figure 4-1 Optical Unit Light Path 4-1 UA-6 Detector Section 4 Theory of Operation 4.1.2 UA-6 Detector The detector, presented as a block diagram in Figure 4-2, receives two current signals from the optical unit. These two signals are subtracted from one another. In general, one signal is generated by a reference liquid, most likely a non-sample injected buffer. If both light paths are buffered with the same substance, any unwanted signal interference generated by the liquid, e.g. temperature drift, optical density or refraction changes are reduced by this subtraction process thus making the system more stable. The difference signal is converted to a logarithmic function. The chart recorder output is the logarithm of the light intensity. Next, the signal is amplified and filtered as necessary. At this point it is sent to the peak separation network and chart recorder. With the help of any external signals that may be present, like event marks from a fraction collector or injection marks from an automatic injection valve, a trace is made on the recorder chart paper. The necessary control signals for indexing a fraction collector are also generated. Figure 4-2 UA-6 Detector Block Diagram 4-2 UA-6 Detector Section 4 Theory of Operation 4.2 Detailed Description Refer to the UA-6 schematics (available online) during the following description. To view the schematic drawings for the UA-6, first find the serial number for your unit. Then go to our Web site at www.isco.com. Select Service and then Fast Thorough Factory Repair Service. The link to schematics is under Circuit Schematics. After you enter your serial number, you will be able to view the schematics online. If you need any assistance, or don’t see the correct schematic for your specific unit, contact our service department. 4.2.1 Auto Baseline Circuit The Auto Baseline circuitry provides rapid coarse baseline adjustment. Maximum adjustment time is ten seconds. An optical unit with an imbalance as great as 0.5 absorbance units can be baselined by this circuit. If an imbalance of greater than 0.5 absorbance units exists in the optical unit, the circuit will continue to hunt until the imbalance is corrected by the operator. When the UA-6 is switched to operate, U211 generates a reset pulse (10mS width) which centers the address register (U201, 203 and 204). With the address register centered, U207 and U210 provide +12 VDC ± 0.5 V to each photocell in the optical unit. By pressing the front panel push-button switch (S2) or applying a TTL low to pin 1 of the rear panel fraction collector connector (J217), the Auto Baseline circuit is activated. Oscillator U208 begins to clock the address register (U201, 203, 204) up or down depending on the signal received from U205C and U205D. U205C and U205D monitor the absorbance signal from the logarithmic amplifier to determine which direction the circuit should count. As the address register advances, the voltage produced by the DAC (U207) and buffer amplifier (U210D, U210B) advances. The measuring photocell in the optical unit is fed directly with this voltage. The reference photocell, however, is fed by an inverted signal derived from the measuring photocell voltage. When the address register is centered, both photocells receive 12 V. As the register advances, one photocell is driven toward 18 V and the other toward 6 V, depending on the direction the register counts. The direction the register counts is based on the value of the absorbance signal. The circuit will continue to operate until the voltages received by the logarithmic amplifier (U214) are balanced and the absorbance signal at TP208 is at zero volts. As TP208 nears zero volts, U205A or B will shift the frequency of U208 from the initial rate of 400 Hz to 80 Hz. Once TP208 reaches zero volts, U205C and D will signal the flip-flop (U209B and C) latching it. The circuit will continue to operate about five more seconds due to the delay created by C223 and R255. The delay is necessary to allow for system settling and to allow the chart pen to come on scale, should the rise time filter be in the 5.0 second position. Once the Auto Baseline circuit has latched the voltage to the optical unit photocells, the voltage will remain constant. The circuit will not become active until signaled again by the user. 4-3 UA-6 Detector Section 4 Theory of Operation Note Auto Baseline repeatability varies depending on the sensitivity range used. The following lists a few examples of Auto Baseline repeatability. Sensitivity Range Repeatability 0.002 ±25% of chart 0.02 ±3% of chart 0.2 ±0.2% of chart 0.5 — 2.0 Repeatable 4.2.2 Logarithmic Amplifier This circuit consists mainly of U214 (amplifier), U216 (logarithmic diodes) and Q203 (buffer). The amplifier functions as a common mode amplifier. When both photocell signals are equal, the output at TP208 is zero. Therefore, any system noise signals seen by both photocells are “common moded” out and not seen on the absorbance signal. 4.2.3 Gain Amplifiers U213 is an adjustable amplifier used to compensate the response of optical units. Resistors inside the optical unit increase or decrease the gain of this amplifier to maintain the amplification of the entire system regardless of the optical unit used. The U213 amplifier couples the absorbance signal from the logarithmic amplifier to the absorbance amplifier. Absorbance amplifier U202B provides the sensitivity ranges based on the front panel switch position (S5B). 0.002 range provides a gain of 100. Gain decreases to 0.1 on the 2.0 range. 4.2.4 Noise Filtering The noise filter (U202A) is a Bessel type time delay filter whose output is the time average of its input. Three filter settings are possible using S04. This filter will reduce the amount of system noise seen by the chart recorder.<%0> In addition to U202A, the absorbance amplifier (U202B) provides filtering in the four most sensitive ranges. The following information relates total system rise time in seconds per sensitivity/rise time setting for a 10-90% of scale signal change. Sensitivity Noise Filter Setting 4-4 0.5 1.5 5.0 0.002 1.6 2.4 6.1 0.005 0.8 2.0 6.0 0.01 0.58 1.8 5.8 0.02 0.52 1.7 5.7 0.05 – 2.0 0.5 1.5 5.0 UA-6 Detector Section 4 Theory of Operation 4.2.5 Recorder Offset/Set Lamp and Optics U215B performs five functions: • Reduces the signal from the noise filter from 1.53 V at full-scale to 1.0 V. • Provides ± 86% of scale recorder offset in conjunction with R01. • Ties the event mark signal to the recorder signal. • Ties the inject mark signal to the recorder signal. • When the sensitivity range switch is set on SET LAMP & OPTICS and the optical unit is properly balanced, U215B works in conjunction with Q204, U213A and S05B to offset the recorder signal to 0% of scale. 4.2.6 Peak Separation U215D offsets and amplifies the noise filter signal for the peak separator. The peak separator, (U401 and U404), outputs a signal that is proportional to the edge slope, or time derivative, of a detected peak. A fast slope causes the output of U404B to be greater than a slow slope. The PEAK DURATION switch (S506), compensates for this fact by making the detector more sensitive for slow peaks. TP402 will give a reading between 0 and 8.5 V for negative peak edges and a reading between 0 and -8.5 V for positive peak edges. Operational amplifier U404D switches from -13 V to +13 V when a negative edge is detected. Operational amplifier U404C switches from -13 V to +13 V when a positive edge is detected. Capacitor C442 or C424 makes a pulse whenever U404D or U404C is turned on. These pulses are used to index a fraction collector when a new peak is detected or an old peak is finished. U406A and Q414 produce a peak duration signal (TTL low to P107, J217 during a peak). 4.2.7 Injection and Event Mark A positive spike can be placed on the chart recorder by shorting pin 4 to pin 9 of J217, the INJECTION MARK input. This action will cause C232 to pass a pulse to operational amplifier U215C and then on to the recorder through the optical unit connector. (Pins 14 and 13 are shorted when the optical unit is plugged in.) The negative event mark spike works the same way when pins 3 and 9 of the FRACTION COLLECTOR connector are shorted together. Here the pulse is made by C228 and operational amplifier U215A. 4.2.8 Lamp Brightness Regulator Located in the left center portion of the schematic, this circuit is only active when UA-6 is used with a Type 11 optical unit. When active, it performs five functions: • 10 minute warm-up cycle. • Limits lamp current to a maximum of 270 mA. • Automatically adjusts lamp current to a pre-selected value. (Value is selected by user, S401.) • Monitors lamp current. • Maintains lamp brightness. 4-5 UA-6 Detector Section 4 Theory of Operation When the UA-6 is switched to operate, U403B begins to oscillate at a rate of 13 Hz. Initially, only U407 is clocked by U403B. During the first 10 minutes of operation U403D limits the lamp current to 270 mA and the power LED will be red. After approximately 10 minutes, U407 pin 3 will go high producing the following results: U403B will begin clocking U405; U403A inhibits any further clocking of U407; U402D and Q405 shift the oscillator frequency of U403B to about 500 Hz. Now that U405 is being clocked, the circuit will begin to adjust the lamp current to the value selected by S401. U405 performs two functions: The three most significant bits adjust the frequency of U403B progressively slower in 8 steps to around 50 Hz. This helps maintain the rate of lamp current change since the amount of change per step increases as U405 advances its count. U405 also adjusts lamp current by biasing U402B and the regulating photocell in the optical unit. As the lamp current decreases from 270 mA, U402A will change the power LED to green and shift the frequency of U403B to around 1 Hz. U403C monitors lamp current through R463. When the current through R463 matches that selected by S401, U403C will stop the oscillator U403B. This latches the entire circuit. Now the bias provided by U405 will remain fixed and the regulating photocell in the optical unit will maintain the lamp brightness. Should the lamp current fall below 183 mA or exceed 260 mA after the 10 minute warm-up cycle, U402A will change the power LED from green to red. This notifies the user that the lamp current is out of regulation and may require adjustment. To reinitialize the circuit, rotate the sensitivity switch (S05) to “SET LAMP & OPTICS”. U402C will send a reset pulse to U403C and U405. Lamp current will change to 270 mA and slowly adjust down to the value selected by S401. Within 2 minutes the current should be set and the power LED green. 4.2.9 Power Supply The UA-6 power supply has five voltage sources: +24 VB, unregulated, supplies power for optical unit lamps; +24 V, unregulated, main +24 V source, also provides power to +15 V regulator VR01; +15 V, regulated by VR01, supplies power to all analog and digital circuitry. (VR01 is a linear regulator); -24 V, unregulated, only -24 V source, also supplies power to -15 V regulator VR401; -15 V, regulated by VR401, supplies power to all analog and digital circuitry (VR401 is a linear regulator). When the UA-6 is connected to an AC power source and is in the standby mode, three heater resistors (R449, 516, and 523) warm the unit. This prevents moisture from condensing inside the unit should it be in a humid environment. CAUTION These resistors should not be touched when power is connected to the UA-6. 4-6 UA-6 Detector Section 4 Theory of Operation In Operate mode, normal circuit operation creates enough heat to prevent condensation. In addition to the main power supplies, there are 2 precision power supplies +10 V and -10 VDC. U212 is a precision +10 V reference utilized to provide very stable voltages to the optical unit photocells. The LM369D is specified to +10 V ± 10 mV and temperature drift of 0.3 mV/°C. U212 provides the reference and stability for the -10 V regulator (U210A/CR208). The -10 V is also used to provide stable voltage to the optical unit photocells. 4.2.10 Built-In Chart Recorder The description of the chart recorder can be broken into two functional sections: the pen drive and the chart paper drive. The schematic (available online) should be referred to for the following circuitry descriptions. The paper is advanced by a stepping motor connected with a belt to the paper drive sprockets. The incoming ac line frequency of 50 or 60 hertz is shaped by U108 and then divided by U105 and U106 to advance the stepper. U105, U106 and dual BCD (binary coded decimal) up counters. The incoming line frequency is divided by 2, 4, 10, 20, 40 and 100 by U106 and additionally by 200, 400 and 1000 by one counter in U105. The chart speed selector switch is used to connect the counter output for the desired chart speed to the other counter in U105. This counter divides by 5 or 6 depending on the position of the jumper (P106) connected to pin 1 of U108A. When operating on 60 hertz, U108D and U107D provide 3 count high, 3 count low (50% duty cycle) pulse train to operate the stepper. For 50 hertz operation, U108B and U107C create a 21/2 count high, 21/2 count low (50% duty cycle) pulse train. This pulse train output from U107C or U107D (depending on the position of the 50 or 60 hertz jumper, P105) is fed into two different clock inputs of U104. One of the clock pulses is inverted by U107B, so U104A will clock on the positive going edge and U104B will clock on the negative going edge. This will create a 90° phase shift between the output of U104A and U104B. The pulse train alternately turns on the four pairs of source drivers U101 to run the stepper motor (B1). 4.2.11 Pen Drive The pen is driven by a cord attached to a pulley. The pulley is gear driven by a DC motor. The pulley is attached to a potentiometer (R1) to provide feedback on the pen's position. U102A is a voltage follower which buffers the incoming signal. U102B then compares the input voltage to the position of the feedback potentiometer R1. The positive or negative resultant output voltage then turns on either Q101 or Q102 to run the servo motor (B2). The motor runs in the proper direction until the pen and feedback potentiometer are in the correct position. 4-7 UA-6 Detector Section 4 Theory of Operation 4.3 Type 11 Optical Unit Theory of Operation 4.3.1 General This section explains the optical unit theory of operation. To provide a clear, basic understanding of the optical unit circuitry, equivalent circuits and mechanical functional diagrams are used in the following paragraphs. An equivalent circuit is a simple electronic symbol which is used in place of the detailed circuitry, but still maintains identical terminal characteristics of the detailed circuitry. The theory of operation is presented at two levels in the following paragraphs. The first level provides general data on the overall optical unit system, and the second level provides information on specific individual system circuits. The optical unit (Figure 4-3) is an electro-optical transducer that develops an electrical signal (varying resistance) in response to changes in sensed light levels. The optical unit consists basically of a UV light source, flow cells, two reflectors, a reference and measuring photocell, two filter assemblies, a regulating photocell assembly, source screen, and a baseline adjusting aperture plate assembly. The UV light source is at one focus of an oblate spheroid (ellipse of revolution) formed by the two reflectors and the source screen is at the other focus, resulting in almost total capture of radiation in the system. When the same wavelength is used in both the MEASURING CELL A and REFERENCE CELL B light paths, only one source screen is used. UV light is reflected from the two reflectors and excites both sides of a light source, which is part of the source screen, resulting in a light emission spectrum at a certain wavelength region. Depending upon the source screen used, the emitted light is either diffused light from the UV lamp, or is fluorescent light excited by the UV lamp. This light emission spectrum is radiated from the source screens to the flow cells, through an aperture in each reflector. Transverse openings in the flow cells provide a path for the light through an absorbing medium by intersecting longitudinal openings in the flow cell which provide the path for the absorbing medium. The spatial integrating action of the elliptical reflectors and the translucent diffusing action of the source screen light source area produce extremely good optical balance between MEASURING CELL A and REFERENCE CELL B light paths. This results in a very low recorder noise and drift regardless of the spatial or angular fluctuations in the light emitted from the UV lamp. This important feature (patent no. U.S. 3,822,097; 3,859,539; other patents pending) contributes to the Type 11 optical unit’s high performance. Light radiating through the reflector aperture to the reference flow cell is interrupted by the aperture plate assembly once it has passed through the flow cell. The aperture plate assembly contains a teardrop-shaped aperture that controls the amount of light passed on to the filter assembly and photodetector. This provides a coarse baseline adjustment during calibration procedures. 4-8 UA-6 Detector Section 4 Theory of Operation Light radiating through the reflector aperture, then through the measuring flow cell, is filtered and passed to a photodetector. Both filter assemblies, which are matched in wavelength to the source screen, transmit a narrow spectral region. The resultant output from the filter assemblies is applied to two photodetectors which generate an electrical resistance that is inversely proportional to the amount of light projected onto the photosensitive surfaces. Any increase in the light intensity results in a decrease in the electrical resistance generated by the photodetectors. Outputs from the photo¬detectors are transmitted to an absorbance detector control system, which reflects these photodetector outputs as units of absorbance. Figure 4-3 Type 11 Optical Unit Functional Diagram With respect to the 254 nm, 280 nm, 310 nm, and 340 nm filter assemblies, the UV lamp produces numerous discrete emission lines, with a very prominent one at 254 nm. The fluorescence filter assembly, which is located in the light path after the light has passed through the flow cell, consist of these main elements. • A UV-transmitting filter that blocks green visible light. • A fluorescent layer that produces green fluorescence when excited by UV light. • Green transmitting filter. 4-9 UA-6 Detector Section 4 Theory of Operation The third element is unique to the Teledyne Isco fluorescence filter assembly and improves performance by blocking violet and red stray light that passes through the first element. CONNECTORPINS 7 CHASSISGROUND 1 REFERENCECELL 2 3 MA TCHEDP AIR MEASURINGCELL 4 5 REGULA TINGCELL 6 8 MERCURY VAPORLAMP (SELECTED) 9 50Ω 5W 220 Ω 3 1\4W 19 220Ω 3 1\4W 20 ON 21 10 22 13 14 COLDROOM HEA TERSWITCH OFF 1 11 1 17 18 THISRESISTORIS INSTALLED AT THE DISCRETIONOF CALIBRATION. EITHERONEOR THE OTHERISUSED. Figure 4-4 Type 11 Optical Unit Schematic Diagram 4.3.2 Absorbance Detector Circuit 4-10 The optical unit resultant output signal is applied to a logarithmic amplifier (Figure 4-5) in the absorbance detector control system, which in turn generates an output signal that is the logarithm of the input signal from the optical unit. This logarithmic amplifier output signal (voltage) is proportional to the optical density or light absorbance of a medium placed in the optical unit light path. When signals from the logarithmic amplifier are applied to a linear inverting amplifier configuration, the signals are inverted and the resultant output is a voltage which is proportional to the optical density of the medium in the light path. Any of the output signals from the optical unit may be used to drive read-out devices or other analytical instruments through circuit selections made on the absorbance detector control system. UA-6 Detector Section 4 Theory of Operation Figure 4-5 Type 11/Absorbance Detector Block Diagram 4-11 UA-6 Detector Section 4 Theory of Operation 4-12 UA-6 Detector Section 5 Maintenance and Adjustment This section presents the maintenance procedures that may be required in the field. These procedures may be performed without the use of specialized equipment. The procedures are limited to the replacement of specific parts and troubleshooting the detector. For problems more serious than those listed, contact Teledyne Isco's Service Department for help. 5.1 Removal and Installation of the Case Top DANGER Risk of electric shock. Disconnect the electric power before servicing. Only trained service personnel may remove the case top. Earth ground bonding connector. Do not remove or disconnect. Remove the four case top screws, (two screws on each side of the case). Slide case top up and off. 5.2 Part Replacement 5.2.1 Recorder Replacement The following paragraphs provide instructions for replacement of parts requiring specific procedures. The majority of replacement parts require soldering. When removing electronic parts with multiple leads, each lead should be labeled for identification prior to being disconnected. Ensure that capacitors, diodes, and transistors are installed in the correct positions, and, where applicable, with the correct polarity. Replace the recorder using the following procedure (see Figure 5-1): 1. Remove the case top using the procedure in Section 5.1. 2. Disconnect P102 on the recorder circuit board. 3. Remove the recorder speed control connector (P104) from the recorder circuit board. 4. Remove the 3 nuts and washer securing the recorder to the detector front panel. 5. Remove 1 screw from L bracket in rear top corner of the recorder. 5-1 UA-6 Detector Section 5 Maintenance and Adjustment 6. Remove 2 screws from case bottom. 7. Remove 1 screw from the top left corner of the circuit boards (it engages the recorder). 8. Carefully remove the recorder from the detector. CAUTION Extreme care must be taken when removing the recorder not to damage any components within the detector. 9. Carefully install the replacement recorder and all fasteners previously removed. 10. Connect P102 to the recorder circuit board. 11. Insert the recorder speed control connector (P104) onto the new recorder circuit board. 12. Install the case top. RECORDER RECORDER SECURING NUT/WASHER (1 OF 3) FRONT PANEL RECORDER SPEED CONTROL CONNECTOR 04 P1 02 P1 RECORDER SPEED CONTROL Figure 5-1 Built-In Recorder Removal and Installation 5-2 POWER CONNECTOR (TO UA-6) UA-6 Detector Section 5 Maintenance and Adjustment 5.2.2 Recorder Drive String Installation Read through the following instructions and refer to Figure 5-2 to replace the recorder drive string. 1. Loosen the two stop bracket securing screws and remove the T-shaped stop bracket. 2. Use a felt-tipped pen to draw a realignment mark across the pulley and gear assembly (hereafter referred to as the hub). This mark ensures that the orientation of the shaft and the hub is maintained during reassembly. STOP REALIGNMENT MARK (SCALE 2=1) (B) (A) PEN HOLDER SPRING (F) SMALL PULLEY (1 OF 2) (D) (E) (C) R DELRIN WASHERS (1 OF 3) STOP BRACKET SECURING SCREW (1 OF 2) STOP BRACKET 1/16" SET SCREW (1 OF 2) (SCALE 1=1) Figure 5-2 Recorder String Routing 5-3 UA-6 Detector Section 5 Maintenance and Adjustment 3. Loosen the two 1/16 inch set screws which secure the hub to the metal shaft and lift the hub completely off the metal shaft. 4. Loosen the pen holder screw (marked (A) in Figure 5-2), remove it, and take off the first two of the three washers. 5. Remove the old pieces of the drive string. 6. Secure one end of the new drive string under the screw marked (B). 7. Route the string through hole (C) and up through hole (D). 8. Place the hub back onto the metal shaft, ensure that is properly aligned, and then tighten the two set screws. 9. Route the string 180 degrees counterclockwise (note arrows in Figure 5-2) around the small pulley marked (F). Then route the string through a washer and around the second pulley. 10. Make one revolution clockwise around the hub and route it up through hole (E) and secure it to the spring. Leave enough tension so that the spring extends about 1 millimeter. Note You may find it difficult to secure the string to the spring while maintaining a slight tension. If so, secure the string to the spring, then loosen the machine screw (B) and draw the tension from that end of the string. Then retighten screw (B). 11. Install the T-shaped stop bracket removed in step 1 and rotate the hub counter clockwise until the trapezoidal stop is against the stop bracket. 12. Complete the string installation by threading the pen holder screw (A) back through the washers. Be sure the washer with the string through it is in the middle. Then tighten the screw to retain the string to the pen holder when the pen is slightly above full scale (100%). 5.3 Timing Belt Tension Adjustment 1. Remove the case following the procedure in Section 5.1. 2. Loosen two screws securing the motor mounting bracket to the side plate of the recorder. Removal of main circuit boards may be necessary unless a right angle (offset) screwdriver is used to loosen motor screws. 3. Slide the motor bracket back to increase tension on the timing belt and tighten the two screws. CAUTION Do not apply too much tension to the timing belt. The timing belt should just be tight enough to ensure that the teeth do not jump out of the sprocket depressions. 4. Install the case following the procedure in Section 5.1. 5-4 UA-6 Detector Section 5 Maintenance and Adjustment Figure 5-3 Timing Belt Tension Adjustment 5.4 Cleaning the Enclosures To clean the enclosures of the UA-6 and the optical units, use a mild detergent in water. For stains of an organic nature, use isopropyl alcohol in a sponge that has been mostly squeezed dry. 5.5 Troubleshooting The following sections identify the most common malfunctions that may occur during normal operation of the detector. These tables identify the most commonly found problems and their causes and remedies. A separate table is provided for each of the detector main systems or functions. 5-5 UA-6 Detector Section 5 Maintenance and Adjustment DANGER Risk of electric shock. Disconnect the electric power before servicing Only trained service personnel may remove the case top. Table 5-1 Baseline Troubleshooting Problem 1. No baseline adjustment when using the Type 11 optical unit. Probable Cause Solution a. The source screen and filter assemblies are not matched sets. a. Install the required source screens and matching filters (see Table 2-1). b. When two different wavelengths are in use, there may be a difference in relative brightness. b. Reverse the cell locations of the matched source screens and filters. c. The detector has not been correctly calibrated. c. Calibrate the detector following the procedure in Section 2.7. d. INTERNAL/EXTERNAL recorder switch set to EXTERNAL. d. Switch to INTERNAL. e. Incorrect adjustment of the optical unit BASELINE ADJUST control. e. Refer to the baseline procedure specified in Section 2.8. f. Flow cell is dirty. f. Clean the flow cell following the procedure in Section 5.7.4. g. Defective UV lamp in the optical unit. g. Replace the UV lamp following the procedure in Section 5.6.1. h. Defective filter cartridge in the optical unit. h. Check the filter cartridge following the procedure in Section 5.6.3, and if required, replace it with a serviceable one. i. Defective photocell in the optical unit. i. Return optical unit to Teledyne Isco for photocell replacement. j. Defective AUTO BASELINE switch in the detector. j. Replace switch. k. Defective RECORDER OFFSET control in k. Replace the recorder offset control. the detector. 2. Auto baseline does not bring chart pen on scale. 5-6 l. Defective recorder. l. Replace following the procedure in Section 5.2.1, or repair as required. m. Defective electronic components on the detector circuit boards. m. Repair or replace components as required. An electronic technician should check the circuit boards using standard test procedures. a. Recorder offset control out of adjustment. a. Set recorder offset control to the center mark. UA-6 Detector Section 5 Maintenance and Adjustment Table 5-1 Baseline Troubleshooting (Continued) Problem Probable Cause Solution b. Optical unit has an imbalance greater than b. Set the UA-6 to “SET LAMP & OPTICS” 0.5 absorbance units. and adjust the baseline control on the optical unit until the chart pen zeros. If the chart pen is below 0% of scale, there is a problem with the reference side of the optical unit. Move the baseline adjust aperture out of the light path and check the reference flowcell and filter for obstructions. If the chart pen is near 100% of chart and can not be zeroed with the optical unit baseline adjust, there is an obstruction in the measuring flowcell or filter. Remove the obstruction. 3. Unstable or noisy baseline when using a Type 11 optical unit (Table 5-2, item 4). a. Normal noise more noticeable on sensitive ranges. a. Turn the NOISE FILTER to reduce noise. b. Lamp current needs to be changed. b. Some lamps’ current becomes unstable or indicates a step characteristic, as observed on the recorder. Decrease the lamp current until the step characteristic disappears. Do this by moving the internal jumper S401 inside the UA-6. c. No flow cell in the Type 11 optical unit REFERENCE CELL B light path (refer to Section 2.6). c. Install the same type of flow cell in the REFERENCE CELL B light path as in MEASURING CELL A light path to improve the optical balance. d. Unstable UV lamp in the optical unit during “coldroom” operation. d. Turn the COLDROOM HEATER switch to ON. e. Unstable UV lamp in the optical unit. e. Replace the UV lamp following the procedure in Section 5.6.1. f. Condensation on the flow cell windows. f. For the Type 11 optical unit, turn the COLDROOM HEATER switch to ON. g. Liquid leaking across the flow cell windows. g. Repair the leakage following the procedure in Section 5.7.2 h. Temperature fluctuations in the “coldroom” h. Turn the COLDROOM HEATER switch to at temperatures below 10°C. ON. i. Draft or air currents hitting a Type 11 optical unit. i. Shield, insulate, or remove the optical unit from the air currents. This is more noticeable in the more sensitive ranges (0.002, 0.005, 0.01, 0.02, and 0.05). j. When operating in the 0.002, 0.005, 0.01, 0.02, and 0.05 ranges, there is noise and drift. j. Make allowances for the normal noise and drift (refer to Table 1-1 “Noise Specifications” for detailed specifications). k. Fluctuations in pressure or flow rate through the flow cell causing noise and drift problems. Noticeable when using reciprocating pump. k. Increase the RISE TIME. Remove the reciprocating pump from the system, and use another type (e.g. Teledyne Isco syringe pump) or install a pulsation damper in the flow system. 5-7 UA-6 Detector Section 5 Maintenance and Adjustment DANGER Risk of electric shock. Disconnect the electric power before servicing Only trained service personnel may remove the case top. Table 5-2 Recorder Troubleshooting Problem Probable Cause Solution a. Install the chart paper following the proce1. Chart paper does not a. Chart paper sprocket holes are not corfeed correctly. Intermit- rectly mated to the recorder drive roll sprock- dure in Section 2.3. ets. tent stoppage of the chart may be due to PROBABLE CAUSE a, b, or c. Pen trace not parallel to printed chart lines may be due to PROBABLE CAUSE “a”. b. Timing belt tension not adjusted correctly. b. Adjust the timing belt tension following the procedure in Section 5.3, step 3. 2. Recorder pen does not write. c. Motor drive sprocket not secured to the motor shaft. c. Tighten the motor drive sprocket set screw (see Figure 5-3). a. Ink cartridge empty. a. Replace the pen following the procedure in Section 2.3. b. The pen manual lift arm is in the full-up position. b. Place the pen manual lift arm in the full-down position. a. INT/EXT recorder switch set to EXT. 3. Pen does not respond to absorbance changes. a. Move switch to INT. b. The recorder 192 tooth gear is not b. Remove the recorder top cover and secured to the feedback potentiometer shaft. tighten the set screws securing the 192 tooth gear to the feedback potentiometer shaft. c. Pinion assembly is not secured to the DC c. Remove the recorder top cover and motor shaft. secure the pinion assembly to the DC motor shaft with Loctite® #601. 4. Erratic trace on the recorder chart. d. Recorder servo string is loose or broken. d. Refer to Section 5.2.2 detector drive string installation. See Figure 5-2. a. Bubbles passing through the flow cell. a. The major remedies are as follows: 1. Thoroughly clean the flow cell. 2. Degas the buffer. 3. Restrict the outlet to obtain head pressure on the flow cell. 4. Restrict flow fluctuations by using a non-reciprocating pump or a pulsation damper. 5-8 b. Condensation on the flow cell windows. b. Turn the optical unit COLDROOM HEATER switch to ON. c. Leakage across the flow cell windows. c. Repair the leakage following the procedure in Section 5.7.2. UA-6 Detector Section 5 Maintenance and Adjustment Table 5-2 Recorder Troubleshooting (Continued) Problem Probable Cause 5. Recorder does not a. Defective components in the detector Event Mark at a fraction Event Mark circuitry. collector movement. Solution a. Using standard electronic techniques, repair or replace as required. b. Incorrect connection to the fraction collec- b. Connect the detector to the fraction collector. tor following the procedure in Section 3.13. a. Incomplete flushing of the flow cell. 6. Recorder does not return to the original baseline after a peak has passed and there is no light-absorbing medium in the flow system.l b. Gradient elution. a. The major remedies are: 1. Ensure that the flow cell is vertical and the effluent is moving upward through it. 2. Use the shortest pathlength flow cell possible. Larger pathlength flow cells have a greater volume, which may decrease the resolution due to mixing in the flow path. b. It is assumed that the correct baseline is the average of the baseline on both sides of the peak. Run the solvent through a flow cell in the REFERENCE CELL B light path. This flow cell should have the same pathlength and should be operated at the same wavelength as the flow cell in the MEASURING CELL A light path. 5-9 UA-6 Detector Section 5 Maintenance and Adjustment DANGER Risk of electric shock. Disconnect the electric power before servicing Only trained service personnel may remove the case top. Table 5-3 General Troubleshooting Problem Probable Cause Solution 1. Slower than normal response. a. Weak UV lamp in the optical unit. a. Replace the UV lamp (see Section 5.6.1). b. Defective optical unit filter. b. Check the filter and, if required, replace it (see Section 5.6.3). c. Defective fluorescent or diffusing light source slide. c. Replace (see item 7, Figure 5-4). d. Defective photocells in the optical unit. d. Return optical unit to Teledyne Isco for photocell replacement. 2. Lamp flickers or a. Defective UV lamp in the optical unit, or UA-6 power LED stays misalignment of lamp regulating photocell. red with a Type 11 optical unit connected. b. Defective electronic components. 3. Automatic Peak Sep- a. Defective components in the detector arator will not cause an Event Mark circuitry. Isco Fraction Collector to operate. a. Replace or realign the UV lamp (see Section 5.6.1). b. Using standard electronic techniques, repair or replace parts as required. a. Using standard electronic techniques, repair or replace as required. b. Incorrect connection to the fraction collec- b. Connect the detector to the fraction collector. tor following the procedure in Section 3.13. c. The fraction collector is defective. 5-10 c. Check this out by shorting pins 6 and 9 on the detector end of the fraction collector cable while the cable is plugged into the fraction collector. This short should cause the fraction collector to index. UA-6 Detector Section 5 Maintenance and Adjustment 5.6 Type 11 Optical Unit Maintenance The following sections present the maintenance procedures that may be required in the field. These maintenance procedures are limited to replacement of specific parts and troubleshooting without the requirement of a service person or sp ecial equipment. 5.6.1 Type 11 UV Lamp Replacement Replace the optical unit UV lamp using the following procedure (Figure 5-4): WARNING Do not expose the naked eye to the UV light inside the optical unit. Common, clear eye glasses will provide adequate protection, providing the UV light cannot reach the eye tissue without passing through the glass lenses. UV light can damage the eye tissue, even from side-angle exposure without looking directly at the source. WARNING The lamp contains a minute quantity of mercury, which is a hazardous substance. Dispose of properly in accordance with local and federal statutes. A broken lamp should also be cleared from the area in accordance with local and federal statutes. La lampe dans la cassette contient une très petite quantité de mercure ou de cadmium ( selon le type de lampe), ces substances sont considérées comme toxiques.Veuillez vous conformer à la législation en vigueur en particulier en cas de destruction de la lampe pour le nettoyage éventuel des zones souillées et la récupération éventuelle de la lampe ou de ses débris. 1. Position the optical unit so that the plastic draw catches are nearest you, then release the two plastic draw catches and open the optical unit to the fullest extent. 2. Remove the source screen. 3. Remove the four screws securing the center top plate sub-assembly to the center bottom plate sub-assembly and hinge end plate. 4. Grasp the center top plate sub-assembly and gently pull toward you, lifting the leading edge at the same time. CAUTION Do not touch inside surfaces of reflectors with fingers as oil deposits from the skin will be baked on the special UV reflecting surface, resulting in permanent damage and attenuation of the UV light. Check the inside surfaces of the reflectors. If the surfaces are dirty they should be replaced. 5. Remove the defective UV lamp. 5-11 UA-6 Detector Section 5 Maintenance and Adjustment CAUTION Do not handle the new UV lamp glass surfaces with bare hands. Oil deposits from the skin will be baked on the UV lamp glass surfaces, resulting in permanent attenuation of the UV light. Clean the UV lamp glass surfaces with clean hexane; then with a spectro quality methanol, or equivalent, to remove dirt or fingerprints. 6. Carefully install the replacement UV lamp. Note It is strongly recommended that locally purchased UV lamp replacement not be used. All lamps utilized in Teledyne Isco optical units are subjected to very stringent test procedures and approximately 50% are found to be unusable. 7. Connect the optical unit absorbance detector and turn the unit ON. 8. If required, loosen the set screw and rotate the UV lamp socket until the bright spot in the UV lamp is facing directly up. Tighten the set screw and turn the optical unit OFF. 9. Replace the center top plate sub-assembly. The reflectors should have equal spacing on each side of the slot in the center bottom plate sub-assembly so they are 3/16 inch apart and not touching the bulb at any point. 10. Install and tighten screws. 11. If required, loosen the two securing screws securing the UV lamp socket assembly to the hinged end plate and move the UV lamp socket assembly to obtain clearance between the UV lamp and the reflector plates. Note The mounting clamp must be removed prior to loosening the two securing screws. 12. Install a 254 nm source screen. Holding a flow cell squarely in position, turn the optical unit ON. Sight through the flow cell and aperture in the UV lamp reflector plate. Center-locate the UV lamp until a blue and red illuminated area is centrally positioned in the light path. If required, loosen the set screw to obtain the UV lamp position, ensuring that the bright spot is still facing directly up. The UV lamp must not touch the reflector plates or the source screen. 13. Tighten the two securing screws, and if required, the set screw. Check to ensure that the blue and red illuminated area is still centrally positioned through the flow cell and light path aperture. 5-12 UA-6 Detector Section 5 Maintenance and Adjustment 14. Turn the optical unit OFF. 15. If required, loosen two photocell adjustment screws and adjust the regulating photocell to point at the UV lamp bright spot with a 1/16 to 1/8 inch clearance between the regulating photocell and the UV lamp glass surface. 16. Sighting through the flow cells, check that the blue and red illuminated area is centered. If not, repeat steps 12 through 15 above. 5.6.2 Regulating Photocell Assembly Replacement Replace the regulating photocell assembly (P/N 60-0994-005) with the following procedure (Figure 5-4): 1. Position the optical unit so that the plastic draw catches are nearest you, then release the two plastic draw catches and open the optical unit to the fullest extent. 2. Remove the source screen. 3. Remove the four assembly screws securing the center top plate sub-assembly to the center bottom plate assembly and the hinged end plate. 4. Grasp the center top plate sub-assembly and gently pull toward you, lifting the leading edge at the same time. 5. Using a low wattage soldering iron, disconnect the two wires to the regulating photocell assembly. 6. Snap the defective regulating photocell assembly out of the mounting assembly. 7. Snap the replacement regulating photocell assembly into the mounting assembly, and using a low wattage soldering iron, connect the two leads. 8. If required, loosen the two photocell adjustment screws and adjust the mounting bracket to obtain 1/16 to 1/8 inch clearance between the end of the regulating photocell assembly and the UV lamp glass surface. 9. Replace the center top plate sub-assembly. The reflectors should have equal spacing on each side of the slot in the center bottom plate sub-assembly so they are 3/16 inch apart and not touching the bulb at any point. 10. Install and tighten the assembly screws. 11. Install the source screen. 5-13 UA-6 Detector Section 5 Maintenance and Adjustment Figure 5-4 UV Lamp and Regulating Photocell Removal and Installation 5-14 UA-6 Detector Section 5 Maintenance and Adjustment 5.6.3 Filter Assembly Inspection If the optical unit malfunctions and the possible cause is a defective filter assembly (Figure 5-4) it is possible to visually check the filter assembly using the correct light source intended for the wavelength involved. The 405 nm through 660 nm filter assemblies can be checked by using an ordinary visible light source. Fluorescent light is recommended for the 405 nm through 620 nm filter assemblies, incandescent light source for the 660 nm filter assembly. WARNING Do not expose the naked eye to the UV light inside the optical unit. Common, clear eye glasses will provide adequate protection, providing the UV light cannot reach the eye tissue without passing through the glass lenses. UV light can damage the eye tissue, even from side-angle exposure without looking directly at the source. The filter assembly should be removed from the photocell and filter holders, and with the optical unit turned ON, held up to the aperture in the reflector plate with the flanged end of the filter assembly towards the light source. The filter assembly can be visually inspected by sighting through the opposite end and viewing the color emissions. Source screens, matching the filter assembly wavelengths, must be installed in the optical unit for these inspection procedures. The filter assemblies are listed numerically in Table 5-4 and the resultant color emissions are identified against each filter with the defects necessitating replacement of the filter presented in the adjacent column. CAUTION Do not disassemble the filter assemblies. This can result in damage to the filter, which will require replacement of the whole assembly. Note The 254 nm through 365 nm filter assemblies can be checked using the light source of the Type 11 optical unit in a semi-dark room. 5.6.4 Troubleshooting The most common malfunctions that may occur during normal operation of the optical unit are identified in Table 5-5, which lists the problem, probable cause, and the solution. 5-15 UA-6 Detector Section 5 Maintenance and Adjustment Table 5-4 Filter Assembly Inspection Wavelength (nm) Serviceable Indication Defective Indication 254 a. Dim but uniform green or yellowish-green a. Uneven glow, very dim glow, dark spots or glow. cracks. 280 b. Same as item a, but dimmer. b. Same as item a. 310 c. Same as item a, but more yellow. c. Same as item a. 340 d. Same as item a. d. Same as item a. 365 e. Opaque e. Cracks or deep pits. 405 f. Violet f. Cracks or dark spots. 435 g. Deep blue. g. Same as item f. 470 h. Blue h. Same as item f. 510 i. Deep green i. Same as item f. 546 j. Yellowish green j. Same as item f. 580 k. Yellow-orange k. Same as item f. 620 l. Red l. Same as item f. 660 m. Deep red m. Same as item f. Table 5-5 Type 11 Optical Unit Troubleshooting Problem 1. No baseline adjustment. Probable Cause Solution a. The source screen and filter assemblies are not matched sets. a. Install the required source screens and matching filters (see Table 2-1). b. When two different wavelengths are in use, there may be a difference in relative brightness. b. Reverse the cell locations of the matched source screen and filter assemblies. c. Flow cell is dirty. c. Clean the flow cell using the procedure specified in Section 5.7.4. d. UV lamp in optical unit is defective. d. Replace the UV lamp using the procedures specified in Section 5.6.1. e. The optical unit BASELINE ADJUST rotary control is incorrectly adjusted. e. Adjust using the procedures specified in Section 2.5. f. Filter assembly in the optical unit is defec- f. Check the filter assembly using the procetive. dures specified in Section 5.6.3. 2. Unstable or noisy baseline. 5-16 g. Defective photocell in the optical unit. g. Return the optical unit to Teledyne Isco for photocell replacement. h. Defective absorbance detector control system. h. Check the detector control system and repair/replace using the procedures specified in Section 4. a. The lamp current is not set correctly. a. Some lamps, while operating at a given current, become unstable or develop a step characteristic as observed on the recorder. Change lamp current by moving S401 in the UA-6. UA-6 Detector Section 5 Maintenance and Adjustment Table 5-5 Type 11 Optical Unit Troubleshooting (Continued) Problem Probable Cause Solution b. No flow cell in the optical unit REFERENCE CELL B light path. b. Install the same type of flow cell in the REFERENCE CELL B light path as that in the MEASURING CELL A light path to improve the optical balance. The flow cell in REFERENCE CELL B light path should be full of a clear, bubble-free liquid. c. UV lamp in the optical unit is unstable during “coldroom” operation. c. Place the COLDROOM HEATER ON/OFF switch to the ON position (Figure 1-4 and Table 1-4). d. UV lamp in the optical unit is unstable. d. Replace the UV lamp using the procedures specified in Section 5.6.1. e. Condensation on the flow cell windows. e. Same as item 2c above. f. Liquid is leaking across the flow cell windows. f. Repair the leakage using the procedures specified in Section 5.7.2. g. Temperature fluctuations in the coldroom g. Same as item 2c above. at temperatures below 10°C. h. Draft or air currents are hitting the optical h. Shield, insulate, or remove the optical unit unit. from the air currents. Fluctuations are more noticeable in the higher sensitivity ranges (0.002, 0.005, 0.01, 0.02, 0.05) i. Regulating photocell assembly is defective. Usually indicated by not being able to adjust the lamp current correctly. i. Replace the regulating photocell assembly using the procedures in Section 5.6.2. j. When operating the optical unit in the j. Make allowances for the normal noise and 0.002, 0.005, 0.01, 0.02, 0.05 ranges, noise drift indications (refer to Table 1-1 for detailed and drift are reflected in the indications. specifications). 3. Slower than normal response. k. Fluctuations in pressure or flow rate through the flow cell are causing noise and drift problems. Noticeable when using reciprocating pumps for high pressure in high speed chromatography in the 0.002, 0.005, 0.01, 0.02, 0.05 absorbance ranges. k. Remove the reciprocating pump from the system and use another type (e.g. Teledyne Isco precision metering syringe pump), or install a pulsation damper in the flow system. l. Metal parts are touching the UV lamp glass surface; this could be the regulating photocell assembly, reflectors (optical units with stamped metal reflector instead of the plated plastic reflector). l. Adjust the UV lamp using the procedures in Section 5.6.1, step 11. Adjust the regulating photocell using the procedures in Section 5.6.2. If required, bend or trim the reflectors. m. Photocell in the MEASURING CELL A and/or REFERENCE CELLB light path is defective. m. Return optical unit to Teledyne Isco for photocell replacement. a. UV lamp in the optical unit is weak. a. Replace the UV lamp using the procedures specified in Section 5.6.1. b. Optical unit filter is defective. b. Check the filter using the procedures specified in Section 5.6.3. c. Photocell is defective. c. Return optical unit to Teledyne Isco for photocell replacement. d. Source screen is defective; the light source is damaged. d. Replace the source screen. 5-17 UA-6 Detector Section 5 Maintenance and Adjustment 5.7 Flow Cell Maintenance and Adjustment 5.7.1 Window or O-Ring Replacement The following paragraphs present maintenance procedures that may be required in the field. These maintenance procedures are limited to replacement of specific parts and troubleshooting without the requirement of special equipment. Replacement of windows or O-rings for all flow cells (except the variable pathlength, see Section 5.7.3) is presented in the following sections. Replace the windows or O-rings using the following procedure (Refer to Figure 5-5). 1. Using the special window nut wrench supplied, carefully unscrew the window nut from the flow cell body. Use the large end of the wrench for the preparative flow cell window nuts. 2. Remove the aperture insert (applicable only to the preparative flow cell). 3. Remove the O-ring. 4. Carefully install the replacement window in the flow cell body. Note Refer to the Replacement Parts List in the back of this manual that is applicable to the flow cell in use to obtain the Teledyne Isco part numbers for the replacement items. 5. Moisten the replacement O-ring with distilled water and carefully install on top of the window. 6. Carefully install the aperture insert (applicable only to the preparative flow cells) on the window nut with the large outside diameter against the nut before assembly of the nut in the flow cell. CAUTION Use extreme care when performing step 7. Do not cross thread or over tighten the window nuts. This can result in damage to the window and/or window nuts and strip the threads in the flow cell body. 7. Install the window nut and tighten with the special window nut wrench. Use the large end of the wrench for the preparative flow cells. Tighten the window nuts only until they are snugged down. 8. Install the flow cell in the system and check for leaks. If there are any leaks around the windows, perform the procedures specified in Section 5.7.2. 5-18 UA-6 Detector Section 5 Maintenance and Adjustment Figure 5-5 Window and O-Ring Removal and Installation 5.7.2 Correcting for Flow Cell Window Leakage The method for correcting leaks that may occur around the flow cell windows is presented in the following paragraphs. This method is applicable to all flow cells: 1. Remove the flow cell window using the procedures specified in section 5.7.1, steps 1 through 3. 2. Inspect the O-ring (Figure 5-5) for signs of damage. 3. If the O-ring is damaged, replace with a new one. 4. If the O-ring shows no signs of damage (applicable to preparative flow cells and high flow rate flow cells only), apply a very small amount of fluorosilicone oil to the O-ring. CAUTION Use the fluorosilicone oil sparingly and DO NOT get any on the window area that is in the light path. Fluorosilicone oil absorbs UV light. Fluorosilicone oil within the flow cell may cause air bubbles to adhere to the window and flow cell inner surfaces. 5. Assemble the flow cell using the procedures specified in section 5.7.1, steps 4 through 8. 5-19 UA-6 Detector Section 5 Maintenance and Adjustment 5.7.3 Troubleshooting The most common malfunctions that may occur during normal operation of the flow cells are identified in Table 5-6, which identifies the problem, probable cause, and the solution. Table 5-6 Flow Cell Troubleshooting Problem 1. Leakage across the flow cell windows. 2. Leakage around the lead connectors or nuts. Probable Cause Solution a. O-ring is damaged (Figure 5-5) a. Replace with a new O-ring. b. Window nut is loose. b. Using the special window nut wrench supplied (Figure 5-5), tighten the window nut until it is snugged down. c. If not items a or b above, a sealant is required. c. Apply fluorosilicone oil using the procedures specified in Section 5.7.2. a. Lead connector is loose in the flow cell body. a. For medium pressure lead connectors, loosen the nut and retighten the lead connector and nut using the procedures specified in Section 3.5. b. Nut is loose on the lead connector. b. For medium pressure lead connectors, tighten the nut using the procedures specified in Section 3.5. c. Ferrule and/or tubing is deformed. c. Disconnect tubing from the lead connector and cut off defective part. For medium pressure lead connectors, install a new ferrule and reconnect using the procedures specified in Section 3.5. d. O-ring between the lead connector and d. Disconnect the tubing and remove the the flow cell body is defective. The prepara- lead connector. Install a new O-ring. tive flow cell requires no O-ring when fluoroFor medium pressure lead connectors, carbon lead connectors are used. install the lead connector and tighten the nut using the procedures specified in Section 3.5. 3. Bubbles in the flow cell. a. Flow cell is dirty. a. Clean the flow cell using the procedures specified in section 5.7.4. b. Liquids require degassing. b. Degas the liquids before they are entered into the system. c. Flow cell pressure is too low. c. Install restriction in the flow cell outlet line. 5.7.4 Flow Cell Cleaning Procedures 5-20 It is recommended that the flow cells and quartz windows (or quartz rods for the variable pathlength) be cleaned before the flow cell is used in a system. To obtain the best cleaning results, remove the quartz windows using the procedures specified in section 5.7.1. Purge the flow cell with a warm detergent solution and then rinse with distilled water or appropriate organic solution. Oily deposits in a flow cell tend to aggravate the trapping of bubbles. Rinse with a non-polar solvent (e.g. hexane) followed by a rinse with a polar solvent (e.g. methanol). If the flow cell has been used with aqueous solutions, precede the non-polar and polar solvent rinses with an aqueous alkaline detergent solution rinse, followed by a distilled water rinse, then the polar solvent rinse. This will usually remove contamination that causes bubble adhesion. UA-6 Detector Section 5 Maintenance and Adjustment To prevent a fungus growth after a flow cell has been used for density gradient fractionation with sucrose solution, it is necessary to either flush with alcohol, or use an alkaline soap before the last distilled water rinse. CAUTION Extreme care must be taken not to scratch any of the optical surfaces of the quartz windows. 5.7.5 Cleaning the Back Pressure Regulator It is not likely that the regulator will become plugged. However, if it should become plugged, remove the pressure regulator cartridge from its housing and place it in an ultrasonic cleaner using 6M nitric acid and then distilled water for ten minutes in each. The regulator should then be thoroughly flushed with distilled water or methanol. 5.7.6 Service Department If you have a problem with the instrument or need parts information, contact Teledyne Isco's Service Department. If you write, please include all pertinent information that may be helpful in solving your problem. Address your letter to: Teledyne Isco, Service Department P.O. Box 82531 Lincoln, NE 68501 We suggest you call the Service Department first, however, before deciding to return the unit for factory repair. Often, a problem can be solved in the field with just a little extra help. Our toll-free number is: 1-800-775-2965 5.7.7 How to Ship Returns Be sure all parts and hardware are back in place before packing. Wrap the unit in heavy paper or put it in a plastic bag. If the original shipping carton is not available, put the wrapped unit in a strong cardboard box at least six inches longer in each basic dimension than the unit. Fill the box equally around the unit with resilient packing material (shredded paper, bubble pack, expanded foam chunks, etc.). Seal it with strapping tape or gummed cloth tape and ship it to the address given previously. The warranty at the end of the manual describes the conditions under which Teledyne Isco will pay surface shipping costs. It is very important that the shipment be well-packed and fully insured. Damage claims must be settled between you and the carrier. This can delay repair and return of the unit to you. 5-21 UA-6 Detector Section 5 Maintenance and Adjustment 5.7.8 Purchasing Parts Only the parts listed in the Replacement Parts List of this manual are stocked for immediate delivery by Teledyne Isco. Virtually all other parts are also available, but there may be some delay in shipping them because they are not normally stocked. The figures in the Replacement Parts section illustrate the immediate delivery items. Each replacement part is given an item number which is shown in the callouts in the illustration and in the item number column of the list. When ordering replacement parts, please supply this information: 1. series number of the unit 2. item number 3. part number 5-22 UA-6 Detector Appendix A Replacement Parts A.1 Replacement Parts Replacement parts are called out in the following pages. Refer to the call-out in the adjacent table to determine the part number for the item. Replacement parts can be purchased by contacting Teledyne Isco’s Customer Service Department. Teledyne Isco Customer Service Department P.O. Box 82531 Lincoln, NE 68501 USA Phone: (800) 228-4373 (402) 464-0231 FAX: (402) 465-3022 E-mail: [email protected] A-1 UA-6 Detector Appendix A Replacement Parts A-2 UA-6 Detector Appendix A Replacement Parts A-3 UA-6 Detector Appendix A Replacement Parts MAIN CIRCUIT BOARD A-4 UA-6 Detector Appendix A Replacement Parts A-5 UA-6 Detector Appendix A Replacement Parts A-6 UA-6 Detector Appendix A Replacement Parts A-7 UA-6 Detector Appendix A Replacement Parts A-8 UA-6 Detector Appendix A Replacement Parts A-9 UA-6 Detector Appendix A Replacement Parts A-10 UA-6 Detector Appendix A Replacement Parts A-11 UA-6 Detector Appendix A Replacement Parts A-12 UA-6 Detector Appendix A Replacement Parts A-13 UA-6 Detector Appendix A Replacement Parts A-14 UA-6 Detector Appendix A Replacement Parts A-15 UA-6 Detector Appendix A Replacement Parts A-16 UA-6 Detector Appendix A Replacement Parts A-17 UA-6 Detector Appendix A Replacement Parts This page intentionally left blank A-18 UA-6 Detector Appendix A Replacement Parts A-19 UA-6 Detector Appendix A Replacement Parts A-20 UA-6 Detector Appendix A Replacement Parts Drawing modified 7-6-11 to remove obsolete flow cells A-21 UA-6 Detector Appendix A Replacement Parts A-22 UA-6 Detector Appendix A Replacement Parts A-23 UA-6 Detector Appendix A Replacement Parts A-24 UA-6 Detector Index A L Applications for the UA-6, 1-2 Leakage, Flow Cell Window, 5-19 B N Baseline Adjustment, 2-6 Bubble Formation and Retention, 3-10 Noise and Drift, Minimizing, 3-13 Noise Filter, 3-11 C O Cables, 3-16 Calibration, 2-6 Changing Wavelengths Type 11, 2-4 Chart Paper and Pen, 2-1 Chromatography Flow Cells, 3-8 Circuitry Auto Baseline, 4-3 Chart Recorder, 4-7 Filtering, 4-4 Gain, 4-4 Lamp, 4-5 Logarithmic Amplifier, 4-4 Peak Separation, 4-5 Power, 4-6 Pulsing, 4-5 Cleaning, 5-20 Connecting to Other Instruments, 3-16 Foxy 200 Fraction Collector, 3-17 Remote Chart Drive, 3-18 Controls and Connectors Rear Panel, 1-7 Type 11, 1-8 Controls and Indicators, 1-2 Controls and Indicators, Front Panel, 1-5 Optical Unit Attachment, 2-2 Optical Units, 1-1 F Filter Inspection, 5-15 Flow Cells Applications, 3-2 Descriptions, 3-2 Installation, 2-5 Front Panel, 1-5 Fuses Type 12, 2-4 I Installation Chart and Pen, 2-1 P Peak Separator, 3-12, 4-5 Power, 2-1 Problem Analysis, 3-20 R Rear Panel, 1-7 Replacement Recorder, 5-1 Recorder Drive String, 5-3 Regulating Photocell, 5-13 Type 11 Lamp, 5-11 Window or O-Ring, 5-18 Replacement Parts, A-1 S Solvent Absorbance, 3-16 T Technical Specifications, 1-2 Theory of Operation Optical Unit, 4-1 UA-6, 4-2 Timing Belt, 5-4 Troubleshooting, 3-20, 5-5 Baseline, 5-6 Flow Cells, 5-20 General, 5-10 Optical Units, 5-15 Recorder, 5-8 Tubing Connections High Flow Rate Cells, 3-7 Plastic Lead Connectors, 3-6 Type 11 Changing Wavelengths, 2-4 Controls and Connectors, 1-8 Index-1 UA-6 Detector Index Lamp Replacement, 5-11 Theory of Operation, 4-8 Type 12 Fuses, 2-4 Index-2 Compliance Statements ompliance Statements NOTICE D ec la ra ti o n of C on fo rm ity Disregard the following Radio Interference Statement and Declaration of Conformity if your instrument does not have a CE label on its rear panel. Isco UA-6 C E RADIO INTERFERENCE STATEMENT FCC NOTE: This equipment has been tested and found to comply with the limits for a Class A digital device, pursuant to Part 15 of the FCC Rules. These limits are designed to provide reasonable protection against harmful interference when the equipment is operated in a commercial environment. This equipment generates, uses, and can radiate radio frequency energy and, if not installed and used in accordance with the instruction manual, may cause harmful interference to radio communications. Operation of this equipment in a residential area is likely to cause harmful interference in which case the user will be required to correct the interference at his own expense. Canada This ISM apparatus meets all requirements of the Canadian InterferenceCausing Equipment Regulations. Ce générateur de fréquence radio ISM respecte toutes les exigences du Règlement sur le matériel brouilleur du Canada. 捷ↅ⚜䱿 Component Name ℶ❐₼㦘㹡㦘⹂䓸德㒥⏒侯䤓⚜䱿♙⚺摞 Name and amount of Hazardous Substances or Elements in the product ᳝↦᳝ᆇ⠽䋼ܗ㋴ Hazardous Substances or Elements 䪙 ∲ 䬝 ݁Ӌ䫀 ⒈㘨㣃 ⒈Ѡ㘨㣃 (Pb) (Hg) (Cd) (Cr(VI)) (PBB) (PBDE) 侺⮥兎䋾 UV Lamp O X O O O O 兎恾㨎 Circuit Boards X O O O O O ℳ㿐䟄㧉 AC Motor X O O O X O 䦃㿐䟄㧉 DC Motor X O O O X O 㘴兎 Wiring O O O O X O 䟄䄟兎 Line Cord O O O O X O ♧☚⣷ Transformer X O O O X O ℶ❐₼㦘㹡㦘⹂䓸德㒥⏒侯䤓⚜䱿♙⚺摞᧶Name and amount of Hazardous Substances or Elements in the product O: 嫷䯉年㦘㹡㦘⹂䓸德⦷年捷ↅ㓏㦘⧖德㧟㠨₼䤓⚺摞⧖⦷ST/ 㪖屓⸩䤓棟摞尐㻑ⅴₚᇭ O: Represent the concentration of the hazardous substance in this component’s any homogeneous pieces is lower than the ST/ standard limitation. X᧶嫷䯉年㦘㹡㦘⹂䓸德咂⺠⦷年捷ↅ䤓㩟⧖德㧟㠨₼䤓⚺摞怔⒉ST/ 㪖屓⸩䤓棟摞尐㻑ᇭ (←₩♾⦷㷳⮓᧨㫈㗽⸭棔㍔⑄⺈ₙ嫷₼㓢“X” 䤓㔏㦾☮⥯扪嫛扪㷴広㢝ᇭ) X: Represent the concentration of the hazardous substance in this component’s at least one homogeneous piece is higher than the ST/ standard limitation. (Manufacturer may give technical reasons to the “X”marks) 䘾≬∎䞷㦮䟀兞洛䫽⸩ᇭ The Environmentally Friendly Use Period (EFUP) was determined through experience. 䞮ℶ㡴㦮嬺冥䪐⦷侊⒦⚆䪐₼ᇭⓜₘ⇜㟿ⷦ䞮ℶ(207 ⅲ嫷2007) ᇭ椞⚝䤓₹ⷦ㹜ⅲ嫷㦗᧶A 㦗᧨Bℛ㦗᧨䷘䷘ᇭ The date of Manufacture is in code within the serial number. The first three numbers are the year of manufacture (207 is year 2007) followed by a letter for the month. "A" is January, "B" is February and so on. Pump/UA Monitor Hazmat Table 60-0943-269 Rev. DECLARATION OF CONFORMITY Application of Council Directive: Manufacturer's Name: Manufacturer's Address: Equipment Type/Environment: Trade Name/Model No: Year of Issue: Standards to which Conformity is Declared: Standard 89/336/EEC The EMC Directive 73/23/EEC The Low Voltage Directive Teledyne Isco, Inc. 4700 Superior, Lincoln, Nebraska 68504 USA Mailing Address: P.O. Box 82531, Lincoln, NE 68501 Laboratory Equipment for Light Industrial/Commercial Environments UA-6 with Type 11 & 12 Optical Units 2000 EN 61326-1998 EMC Requirements for Electrical Equipment for Measurement, Control, and Laboratory Use EN 61010-1 Safety Requirements for Electrical Equipment for Measurement, Control, and Laboratory Use Description Severity Applied Performance Criteria EN61000-4-2 Electrostatic Discharge Level 2 - 4kV contact discharge Level 3 - 8kV air discharge B B EN61000-4-3 Radiated RF Immunity 80 MHz to 1000MHz 80% AM at 1kHz Level 1 - 1 V/m A EN61000-4-4 Electrical Fast Transient Level 2 - 1kV on ac lines B EN61000-4-5 Surge on AC Lines 1kV common mode, 500V differential mode B EN61000-4-6 Conducted RF on AC lines 150 kHz to 80 MHz 3V rms, 80% modulated B EN61000-4-11 Voltage Dips/Short Interruptions 0.5 cycle, each polarity/100% B CISPR11/ EN 55011 RF Emissions Group 1, Class A Industrial, Scientific, and Medical Equipment EN61000-3-2, 3-3 Harmonic, Flicker Group1, Class A We, the undersigned, hereby declare that the design of the equipment specified above conforms to the above Directive(s) and Standards as of April 3, 2000. William Foster USA Representative William Foster Director of Engineering Teledyne Isco, Inc. 4700 Superior Street Lincoln, Nebraska 68504 Phone: (402) 464-0231 Fax: (402) 464-4543 60-0942-121 Rev E Warranty Teledyne Isco One Year Limited Factory Service Warranty* This warranty exclusively covers Teledyne Isco instruments, providing a one-year limited warranty covering parts and labor. Any instrument that fails during the warranty period due to faulty parts or workmanship will be repaired at the factory at no charge to the customer. Teledyne Iscos exclusive liability is limited to repair or replacement of defective instruments. Teledyne Isco is not liable for consequential damages. Teledyne Isco will pay surface transportation charges both ways within the 48 contiguous United States if the instrument proves to be defective within 30 days of shipment. Throughout the remainder of the warranty period, the customer will pay to return the instrument to Teledyne Isco, and Teledyne Isco will pay surface transportation to return the repaired instrument to the customer. Teledyne Isco will not pay air freight or customers packing and crating charges. This warranty does not cover loss, damage, or defects resulting from transportation between the customers facility and the repair facility. The warranty for any instrument is the one in effect on date of shipment. The warranty period begins on the shipping date, unless Teledyne Isco agrees in writing to a different date. Excluded from this warranty are normal wear; expendable items such as pH sensors, charts, ribbon, lamps, tubing, and glassware; fittings and wetted parts of valves; and damage due to corrosion, misuse, accident, or lack of proper maintenance. This warranty does not cover products not sold under the Teledyne Isco trademark or for which any other warranty is specifically stated. No item may be returned for warranty service without a return authorization number issued by Teledyne Isco. This warranty is expressly in lieu of all other warranties and obligations and Teledyne Isco specifically disclaims any warranty of merchantability or fitness for a particular purpose. The warrantor is Teledyne Isco, 4700 Superior, Lincoln, NE 68504, U.S.A. * This warranty applies to the USA and countries where Teledyne Isco does not have an authorized dealer. Customers in countries outside the USA, where Teledyne Isco has an authorized dealer, should contact their Teledyne Isco dealer for warranty service. Before returning any instrument for repair, please call, fax, or e-mail the Teledyne Isco Service Department for instructions. Many problems can often be diagnosed and corrected over the phone, or by e-mail, without returning the instrument to the factory. Instruments needing factory repair should be packed carefully, and shipped to the attention of the service department. Small, non-fragile items can be sent by insured parcel post. PLEASE BE SURE TO ENCLOSE A NOTE EXPLAINING THE PROBLEM. Shipping Address: Mailing Address: Phone: Fax: Email: Teledyne Isco - Attention Repair Service 4700 Superior Street Lincoln, NE 68504 USA Teledyne Isco PO Box 82531 Lincoln, NE 68501 USA Repair service: (800) 775-2965 (lab instruments) (866) 298-6174 (samplers & flow meters) Sales & General Information: (800) 228-4373 (USA & Canada) (402) 465-3001 [email protected] October 11, 2013 P/N 60-1002-040 Rev H