1
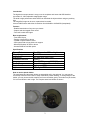
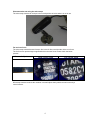
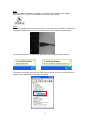
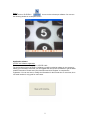
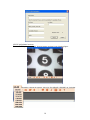
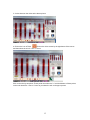
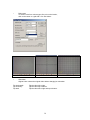
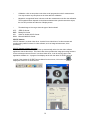
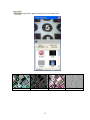
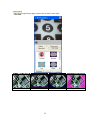
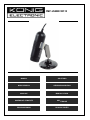
CMP-USBMICRO10 MANUAL ANLEITUNG MODE D’EMPLOI GEBRUIKSAANWIJZING MANUALE MANUAL DE USO HASZNÁLATI ÚTMUTATÓ KÄYTTÖOHJE BRUKSANVISNING NÁVOD K POUŽITÍ Introduction The digital microscope camera is easy to use in workplace and home with USB interface. It provides 10 - 200x adjustable magnification range. The build-in high performance white LEDS can illuminate the object without using any auxiliary light. The magnified image can be seen, captured and recorded. It has a CMOS sensor which has a resolution from 640x480 to 3200x2560 (interpolated). Features - Detailed examination of any area you choose - Capture and time-lapsed video record - Four built-in white LED lights Base requirements - Free USB 2.0 port - Pentium 4 class CPU or above - 128 MB of system RAM or above - VGA system with at least 16bit color support - Microsoft Windows XP SP2 or above - At least 50 MB of hard disk space Specifications Frame Rate Magnifying power Resolution Hardware interface Image sensor Focus Range Controller Light source Max 30fps under 600 lux brightness 10X-200X 640*480 up to 3200*2400 USB2.0 Color CMOS sensor 1280*1024 pixel Manual focus from 10mm-infinite High speed DSP White light LED*4 How to use the plastic holder The metal stand and the plastic holder are assembled well in the package. You may put the microscope camera on the holder to keep observation position steadily. To change angle of the holder, you may loosen the bolt carefully and move the holder gently. The holder may be broken, if it is moved while the bolt is tight. The complete stand and holder are shown 2 Focus adjustment To watch a clear video, be sure to rotate the focus ring to the right position. The good focus range may be narrow, please move the ring slowly and watch the object becoming clear. In VPEYE Camera window, a focus gauge is designed to indicate the clearness of the video. A higher value of the gauge telling you the focus is in a better position. In the figure, a red box shows the focus ring of the microscope camera. The lens side of the microscope camera is shown in a red oval line. This end should be closer to the object for getting a large magnification view. Observing correctly with the stand The stand is used to help you hold the microscope camera steadily when observing an object. The common way to put microscope camera in the holder is shown in the below picture. 3 Placement when not using the microscope The microscope camera can be kept in the normal position as below when it is not in use. Far and near focus The microscope camera has two focuses. One is the far focus and the other is the near focus. The far focus can provide larger magnification than the near focus. Please check the below pictures. A normal object Near focus view Far focus view Microscope camera can show the numbers in a small object clearly which can not be seen by a normal camera. 4 Software installation Step 1 Insert the CD-ROM or click on the icon of the CD device, then select “AutoPlay” option. Step 2 Click on “Next” 5 Step 3 Choose “I accept the terms of the license agreement” and Click on “Next” Step 4 Enter the user name, company name and product serial number, and then click on “Next”. Product serial number is on the CD jacket. 6 Step 5 Click on “Next”, Note: Do not change the file installation folder. Step 6 Program will install the files automatically. 7 Step 7 While the software installation is complete, a VP-EYE 6.6 icon is added to your desktop. Double click on it, you can run the software for the microscope camera. Step 8 Because this product uses universal video driver, it is not necessary to install the camera driver. Just plug the USB connector of the microscope camera into a computer, as shown below. The messages will come up at the lower right corner of the computer screen, as below: They show a microscope has been connected correctly and can be used. You can also see an image device is added in Device Manager, see below: 8 Step 9 Souble click on VD-EYE 6.6 icon to run the microscope software. You can see the following window on a computer screen. Application software CP-EYE 6.6 Software registration The latest version on January 2010 is VP-EYE 6.601. For the first time of using VP-EYE 6.6 software, you will be asked to register on our servers by adding your information. After that you can upgrade the new version of software or get the latest product information. Please enter your information and click “Register” to complete the registration. You can not enter or modify the information for the second time or more time, since one serial number is only good for one license. 9 VP-EYE 6.6 Software functions For the VP-EYE operation software, function buttons are listed in the following figure: Resolution: change the camera video size, like 640x480, 1024x600, etc. As below: 10 Snapshot: take a picture and save it to the specific folder and the icon of this picture is displayed on the bottom. (If you want to change the path to store the files) High resolution snapshot: take a high resolution picture at the video mode of high frame rate. You may take a photo of 1280x1024 in the video mode of 640x480 which delivers 30 frame per second. It is easier to get accurate focus at the high video frames mode. Record: record a video clip and save it to the specific folder and the icon of this video clip is displayed on the bottom. When you click the Record button, the video shown on the interface will become a red circle red square button on the button, some of the button becomes gray, the bottom right corner, and there will be recording the time display. Stop: stop recording and save the video data into a file. Delete: delete the selected pictures or video clips. To select a picture of a video clip, click on the icon. To make multiple selection, press Ctrl or Shift key at the time of clicking icons. Full screen: put the video into the largest size as the display screen. You may use the hot keys to do buttons functions. Press a key other than the hot keys or double click on the screen to return to the normal video. Date and time: switch on or off the date and time label on the right bottom area of video screen. Freeze video: halt the running video as a still picture for inspection This function helps you to keep the object in the video in a still picture for measuring the size or close up inspection. Press the button again to resume normal video. Ruler: switch on or off the ruler for measurement on the object in the video screen. Before making a measurement, you need to do a calibration by a real ruler. Click on the video by right button of the mouse, a pop-up menu is shown for calibration. You may select measure unit by pixels, 1mm or 10mm. The measurement unit of pixels is not needed the calibration processes. Click two points in the video and the distance of this two points should be exactly 1mm or 10mm. A real ruler can be used under this microscope camera for calibration. After doing the calibration, you may click on the video to measure the distance of any two points. 11 Refer to the below picture: 1. Get a standard ruler 2. Put the microscope camera on the ruler 12 3. A ruler shows on the video as the above picture . Click on the video screen by the right button of the mouse 4. Click on the icon of Ruler and then select the unit of 1 mm or 10 mm. Click on the ruler by two points. These points are marked as "+" and the distance of these points on the ruler should be 1 mm or 10 mm as you select the unit on the pop-up menu. 13 Now, we can measure the distance between two points on a hair of 0.84mm. (Note that if you change the position of microscope camera, you will need to do the calibration again, because the magnification factor is different.) Settings: enter a dialog box to select the options of the functions. • Snapshot types (a file format to save a picture) JPG: the compressed JPEG file format. BMP: the standard uncompressed bitmap file format. 14 • Record types (a file format to save a video clip) AVI: the standard Microsoft video file format. WMV: the Microsoft standard compressed video file format. Time lapse: record the video by skipping frames and keep only one Time lapse: 1 second 6 seconds 20 seconds • record the video by skipping frames and keep only one frame in a certain period. one frame per second, record one frame, on average of 30 frames (1/30) one frame per 6 second, record one frame, on average of 180 frames (1/180) one frame per 20 second, record one frame, on average of 600 frames (1/600) Continuous snapshot To take a sequence of pictures quickly. 15 • Ruler types To select a ruler from various types, like ruler on the border, ruler on the center or a grid with 1 mm. See below: Border • Center Orientation Original video: shown the original video without changing its orientation. Flip horizontally: Flip vertically: Flip both: Flip the video left to right. Flip the video top to bottom. Flip the video left to right and top to bottom. 16 Grid Original video • Flip horizontally Flip vertically Flip both File naming convention There are several methods you can use for the file names of snapshot photos or the video clips. System time: Computer name: User name: User define: All combination: The time in your computer system is used for file name. Your computer name is used for file name. Your name is used for the file name. You can enter the file name. Computer name, user name and the name you specify are put together for the file name. • Save Folder To change the way you want to take pictures of documents and record files will be saved to the folder you want to save. • Add To add text or graphics label on the video. The labels will be seen on the video and also on the photo by snapshot or the video clip by recording. The size of bitmap or graphic can be as small as 160x120. Help: enter a on-line help window. Indicators on the video screen 17 • Calibration: click on two points on the video to tell program the units for measurement. You may measure any two points on the video after the calibration. • Magnitude: a magnitude factor is shown under the measurement unit after the calibration. The magnitude factor depends on the distance between the optical lens and the object, the size of input video and the size of display screen. • Thumbnail tags: a blue tag to show the type of the thumbnail. JPG: BMP: AVI: WMV: JPEG file format. Bitmap file format. Video for window AVI file format. Microsoft WMV file format. VP-EYE Camera VP-EYE Camera is a virtual video driver. It works like a video driver of a video camera and provides many useful functions for video software, such as image enhancement, video processing. VP-EYE Camera software Instruction For the VP-EYE Camera software, it shows up automatically at the time the video software applies this virtual video driver. This virtual video driver provides the image processing functions for the microscope camera. Since it is a virtual video driver, it can be used by other video application software too. A program icon displays at the icon bar when VP-EYE Camera is running. If the window of VP-EYE Camera hides from the screen, click on the icon display the window of VP-EYE Camera. 18 to Image attributes Images Settings: apply an image attributes on the live video. “Brightness” You can move the arrow bar to change the video brightness, Default Value is 128. “Contrast” You can move the arrow bar to change the video contrast. Default Value is 16. 19 Image enhancement Image enhancement: Auto level: Manual mode: Auto mode on right: Auto mode on left: Auto mode on both: adjust the range of image input on the population bar chart. use the button on the sides of the bar chart to change adjustment levels. adjust the levels on the right side automatically. adjust the levels on the left side automatically. adjust the levels on both sides automatically. The color of video is much vivid in manual mode. The video processing function in auto mode may change the color of the video. Change the color by hue value. Control the LED light in the microscope camera. Click on the button to turn on or off the LED lights. The light bar chart of the video. It shows the profile of the lights in the video. You may change the left and right limitation of the bar chart to enhance the appearance of the video. The purpose of this function is to place the lighting of the video evenly over the bar chart and the result will display the video in more clear way. Focus gauge: an indicator to show the focus clearness in numbers. The higher value in the gauge means the video is much clear by the focus position. 20 Image effects Image effects: apply an image effect on the camera video. No effect Edge effect Ghost effect 21 Emboss effect Image frames Image frames: apply a photo frame on the live video input. No frame Binocular telescope 22 Oval frame Pink mirror frame Safety precautions: To reduce risk of electric shock, this product should ONLY be opened by an authorized technician when service is required. Disconnect the product from mains and other equipment if a problem should occur. Do not expose the product to water or moisture. Maintenance: Clean only with a dry cloth. Do not use cleaning solvents or abrasives. Warranty: No guarantee or liability can be accepted for any changes and modifications of the product or damage caused due to incorrect use of this product. General: Designs and specifications are subject to change without notice. All logos brands and product names are trademarks or registered trademarks of their respective holders and are hereby recognized as such. Keep this manual and packaging for future reference. Attention: This product is marked with this symbol. It means that used electrical and electronic products should not be mixed with general household waste. There is a separate collections system for these products. 23 Declaration of conformity / Konformitätserklärung / Déclaration de conformité / Conformiteitsverklaring / Dichiarazione di conformità / Declaración de conformidad Megfelelőségi nyilatkozat / Yhdenmukaisuusvakuutus / Överensstämmelseförklaring / Prohláení o shodě / Declaraţie de conformitate / Δήλωση συμφωνίας / Overensstemmelse erklæring / Overensstemmelse forklaring ______________________________________________________________________________________ We, / Wir, / Nous, / Wij, / Questa società, / La empresa infrascrita, / Mi, / Me, / Vi, / Společnost, / Noi, / Εμείς: Nedis B.V., De Tweeling 28, 5215MC, ’s-Hertogenbosch The Netherlands / Niederlande / Pays Bas / Nederland / Paesi Bassi / Países Bajos / Hollandia / Alankomaat / Holland / Nizozemí / Olanda / Ολλανδία: Tel. / Tél / Puh / Τηλ. : 0031 73 5991055 Email / Couriel / Sähköposti / e-post: [email protected] Declare that product: / erklären, dass das Produkt: / Déclarons que le produit: / verklaren dat het product: / Dichiara che il prodotto: / Declara que el producto: / Kijelentjük, hogy a termék, amelynek: / Vakuutamme, että: / Intygar att produkten: / prohlauje, e výrobek: / Declarăm că acest produs: / Δηλώνουμε ότι το προϊόν: / Forsikrer at produktet, / Forsikrer at produktet, Brand: / Marke: / Marque: / Merknaam: / Marca: / Márkája: / Merkki: / Märke: / Značka: / Μάρκα: / mærke: / merke: König Electronic Model: / Modell: / Modèle: / Modello: / Modelo: / Típusa: / Malli: / Μοντέλο: CMP-USBMICRO10 Description: / Beschreibung: / Description: / Omschrijving: / Descrizione: / Descripción: / Megnevezése: / Kuvaus: / Beskrivning: / Popis: / Descriere: / Περιγραφή: / Beskrivelse: EN: USB MICROSCOPE Is in conformity with the following standards: / den folgenden Standards entspricht: / est conforme aux normes suivantes: / in overeenstemming met de volgende normen is: / è conforme ai seguenti standard: / es conforme a las siguientes normas: / Megfelel az alábbi szabványoknak: / Täyttää seuraavat standardit: / Överensstämmer med följande standarder: / splňuje následující normy: / Este în conformitate cu următoarele standarde: / Συμμορφώνεται με τις ακόλουθες προδιαγραφές: / Overensstemmelse med følgende standarder: / Overensstemmer med følgende standarder: EN 61000-6-3:2007, EN 55022:2006 CLASS B, EN 55024:1998/A2:2003, EN 61000-4-2:1995/A2:2001 EN 61000-4-3 :2006/A1 :2008, EN 61000-4-8 :1993/A1 :2001 EU Directive(s) / EG-Richtlinie(n) / Directive(s) EU / EU richtlijn(en) / Direttiva(e) EU / Directiva(s) UE / EU direktívák / EU Toimintaohje(et) / Eu Direktiv(en) / Směrnice EU / Directiva(e) UE: / Οδηγία(ες) της ΕΕ / EU Direktiv(er): EMC 2004/108/EC ‘s-Hertogenbosch, 29-3-10 Mrs. / Mme. / Mevr. / Sig.ra / D. / Fru / Paní / Κα : J. Gilad Purchase Director / Einkaufsleiterin / Directrice des Achats / Directeur inkoop / Direttore agli acquisti / Director de compras / értékesítési igazgató / Ostojohtaja / Inköpsansvarig / Obchodní ředitelka / Director achiziţii / Διευθυντής αγορών / indkøbe ansvarlig Copyright © 24