1
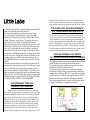
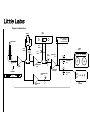
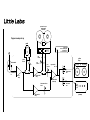
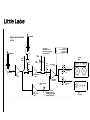
THE PEPPER
PEDAL/PRO/INSTRUMENT BLENDER
DIRECT BOX/RE-AMP
PRELIMINARY
Operators Manual
Dear valued Little Labs customer, Congratulations on your purchase of the Pepper.
With so much new audio gear out there, it was tough to figure
out something new, unique, and utilitarian enough to be used
on all phases of a project. It had to be a product, that sounds
fantastic, and you would find eventually, you couldn't live
without.
So I came up with the Pepper. Like the spice, you will use it
everyday.
Interfacing different gear for an engineer/instrument player
can be a challenge and I saw a need for a one box solution. A
central hub for your instrument that easily interfaced your
pedals, your pro gear, a mixer and the obvious, your amp,
and the less obvious, external gear like a Little Labs PCP or
Redeye 3D.
This product is a useful super interface, and I can't think of
anything quite like it out there (that I know of) that is a truly
professional piece of kit. There are some guitar pedal wet
dry multi interfaces with tone controls etc., but all I looked
at were no where near the quality you find in the Pepper. The
electronics in the Pepper is truly state of the art, and will only
be found in high end audiophile gear. The transformers used
are timeless gems so it really is a combination of the best of
the new with the best of the old.
This manual is preliminary, meaning it will have typos and
grammatical errors, I'm no English major, but it should get you
started. Have fun with the pepper!
manual printing & pdf formatting 04/2014.
using this manual or any part of it without
permission is a violation of copyright laws.
Yours truly,
Jonathan Little
getting started
To get familiar with the Pepper, it's good to hook up the basic whole
chain. Instrument, pedals, pro gear, and your amp.
But first of all before plugging the IEC AC cord check the voltage is
set to the voltage of your country, 110v covers 100 to 120 volts 220v
covers 220v to 240 volts.
The DC power plug is keyed, pin 1 is ground, pin 2 is -16 volts pin 3
is +16 volts. Don't force it, it should slide right in.
We will get into the ins and outs in more detail in this manual but
one thing to keep in mind to keep everything happy is use the proper
cables. That is easy though, all cables can be regular guitar tip sleeve
except for the pro trs out, the pro trs in, and expansion trs out. These
need to be tip ring sleeve balanced connections. If you use a tip sleeve
you will be driving signal into the ground, your gain structure will be
compromised and distortion will result. The only other cable is for the
mic level out which obviously has to be a balanced XLR mic cable.
So read on, the Pepper is pretty simple and once you've hooked it up
with assistance of this manual hopefully you'll never have to use the
manual again.
Instrument input
and the load off button
The instrument in is where you plug your instrument in.
The maximum level that you can feed into this input is approximately
+13dB before clipping distortion (that's a lot for an instrument in).
A typical passive pickup puts out about -14dB. You have plenty of
headroom.
Depending on what type of pick up or if your instrument has a preamp, the load impedance of this instrument input will effect the tone
of your signal. It's subtle, but if you send a lot of time with an instrument and an amp, you'll hear it.
Most vintage passive guitar pick ups like a 1 meg ohm to 500 k ohm
load, too low a load it will sound dull and compressed. Too high a
load will sound clangy and bright.
Piezo pick ups want to see a very high or no load.
I find with bass typically no load brings out the woody character of
the instrument, suitable for a more lead sound, with a higher load
more round back up sound.
If your instrument has a preamp, the load will have no effect on your
tone. The difference between load on and load off won't be noticeable.
The load off button on the front of the Pepper makes the instrument
input impedance 10 meg ohms, effectively no load.
With the button out, load on, you can adjust the load from 100k ohms
to 2.3 meg ohms via the rear trim pot.
The Pepper is shipped with this trim pot adjusted for a 1 meg ohm
load, typical of most guitar amplifiers. So you might find you never
need to touch this. My suggestion is only on a day where you have
the time to have a good listen, carefully adjust and see what you find
works best for your instruments. Compare the sound of plugging
directly into your amp with the sound through the Pepper, adjust accordingly. After that, load on and load off is more than likely, all you
will ever need for the right sound for you, with your instruments.
the pedal insert
After the instrument in and the initial super hi fi buffer on the pepper your signal is directed two ways, a clean untouched signal is
directed to the instrument thru potentiometer (instr thru) feeding that
untouched clean signal to your instrument out, your mic level xlr out
and your expansion trs out (exp trs out).
The second direction is the insert path and the first insert it sees is the
pedal insert labeled pdl insert on the front panel button.
It is lighted green when the insert is activated. It is not dim green
when deactivated (like the other not insert buttons, so it'll be clear
even in a dark room when it's active or not). This insert can also be
controlled by an external trs foot switch, the button must be in to be
controlled by the foot switch, more on the foot switch later.
When not selected this insert is hard wire bypassed with a quality
relay. When not selected the pedals are completely out of the circuit.
You connect with a regular tip sleeve guitar cable the pdl ts out jack
to the input of your pedal or pedal board. The signal feeding your
pedals from the pepper has a 5k ohm impedance. This impedance
was chosen over sending out a low impedance signal (usually 100
ohms) because some pedals won't sound right being fed by a super
low impedance, like germanium overdrive units. 5k ohms was high
enough for these pedals to sound right, but low enough you can run a
reasonably long run to your board.
The pedal return sees the same super hi fi buffer circuit as the instrument in, but with a fixed 1 meg ohm impedance. This buffer is only
used in the circuit when the pedal insert is selected. You could if you
wanted have a whole different instrument plugged in here to mix with
your instrument plugged in the instrument in, but more on that later.
the pro insert
After the pedal insert, is the pro insert. It is, like the pedal insert,
lighted green when the insert is activated. It is not dim green when
deactivated (like the other not insert buttons, so it'll be clear even in a
dark room when it's active or not). This insert can also be controlled
by an external trs foot switch, the button must be in to be controlled
by the foot switch, more on the foot switch later.
When not selected this insert is hard wire bypassed with a quality
relay. When not selected the pro gear is completely out of the circuit.
If the pedal insert is not selected, a very high quality differential amp
is fed directly off the super hi fi buffer, (which is right after the instrument in), or if the pedal insert is selected, it is fed from the pedal
insert return. This differential amp has 18dB of gain, it converts the
signal to balanced lo Z impedance and has an attenuator potentiometer labeled pro send. The pro return also has an attenuator.
The jack on the rear of the Pepper for the pro insert send is labeled
pro trs out which is for connecting a trs cable to your pro gears balanced input. The pro insert return is labeled pro trs in and is for connecting a trs cable to your pro gears balanced output. Interfacing your
pro gear will be a snap now, just plug in, push pro insert in, turn your
pro send up until you get the level you need and turn the return down
if the pro return is too hot. return cut return polarity
and a little on re-amp levels
The return cut mutes the pedal and pro insert chain. You will still
hear the dry signal of your instrument if the instrument thru is turned
up.
The polarity reverse only flips the polarity of the pedal and pro insert
chain. This is handy when combining with your dry instrument thru
signal. Some pedals flip polarity or shift phase enough that when you
combine with a dry track, a thin sound will result. Inserting the polarity switch to flip the polarity will sometimes result in a fatter sounding signal.
A less obvious, but very handy use of the polarity switch is for setting your level so when you insert your pedal or pro gear the level
will stay the same. To do this push the return cut, then adjust your
instrument thru to the unity gain 3 o'clock position, this is where your
level should be the same level as plugging directly into your amp.
Uncut your return cut and push in the polarity reverse button. With
the inserts both pro and pedal not inserted, bring up the pro return
level until it nulls the instrument thru signal. Then with your pedals
attached, but effect out, insert the pedals by pushing pdl insert button
into pro gear (more on that later). It can be used as a feedback which of
course can send you into horrible oscillation, but used sparingly on delay
pedals, and even an mxr phase 90 can be truly trippy and a whole lot of fun!
in. Provided your pedals have a proper hard bypass you should still be
nulled, if not adjust the pro return level until it is.
Next, deselect the pedal insert and select the pro insert. The pro
device can be any line level balanced piece of gear, for example
anything in a 500 series rack (not a mic pre though...Duh..), a LA2A
a Pultec, a Distressor, you get the idea. If re-amping, the pro gear
would be pro tools or a channel of a mutli track tape machine.
Ok now, turn up the pro send until you're hitting the pro device with a
healthy level (on pro tools or any recording device select input monitor) if you'll be using pedals too, insert your pedals by pushing pdl
insert with the effects off, Then if you have to, adjust the pro return
until you have a null. With analog gear (like an analog tape machine)
this will always work. With pro tools, because of slight latency even
on input you just have to adjust level for the thinnest sound. On my
Korg MR-1000 the latency is too much and you can't null it at all, oh
well 8-(.
Now you can take the polarity reverse button out and turn down the
instrument thru. You can rest assured the level with the inserts in and
inserts out will remain the same, this might not matter to you that
much, but for re-amping it's absolutely essential. 99% of the reason
people say that their re-amped signal doesn't sound the same as when
playing the part is, the level being off. Done properly, re-amping with
the Pepper, playing the guitar part directly into the amp, and playing
back the part off tape, or DAW, will be indistinguishable.
the instrument thru and
summing it all together
The instrument thru potentiometer labeled instr thru, controls the
level of your dry signal, (bypassing your pedal and pro inserts), that feed the
instrument out and the DI out (mic level out). This is summed together with
your pro return, which controls the level of the post pedal and pro inserts.
This works just like a wet dry mixer. Sometimes your instrument will lack
intelligibility when using effects and blending in a little dry signal can be
just the ticket to give you more attack while still keeping groovy. Parallel
compression is really nice too, take your best pro compressor like an 1176
put that on the pro insert and blend in a little dry for a nice thick sound.
Another use of this instrument thru is when using the pepper to turn a pedal
the di (mic level out)and instrument
out Transformers and earth lifts
The Pepper uses two vintage UTC style transformers for both the direct
out (mic level out) and the instrument out. These excellent transformers are
sealed in mu metal cans so they are shielded from stray electromagnetic
fields, or in more simple terms, air born hum. This makes the pepper highly
suitable for emf plagued live stage work. They also allow you to have complete ground isolation where you need it, to avoid ground loop caused hum.
The earth lift buttons are labeled di earth and instr earth. Push one or both
of these buttons in, if you need to eliminate ground loop hum, .
using an external foot switch
to control your pedal and pro inserts
The Peppers pedal and pro inserts can be controlled by an external foot
switch. Plug the trs foot switch into the jack labeled ext foot.
The pdl insert and pro insert switches must be pushed in, in order to
control the inserts with the external foot switch.
The dual foot switch you need to use is a standard trs foot switch
which we don't include, but they are cheap and readily available. For
example the Hosa Technology FSC-385 is a very sturdy unit. I bought
one off Amazon for less than 10$. You can get on Amazon, a GLS 25
foot trs to trs cable to use with the Hosa and Pepper for around $15.
No audio runs through the cable so it doesn't need to be fancy. Here is
a diagram of what's needed, you might have one already.
Exp trs out
what is it for?
The exp trs out, is the expansion out tip ring sleeve jack. It is the
line level transformer-less output of the Pepper, with the same signal
(different level and impedance) as what feeds the instrument out and
DI out (mic level out). If you are playing live, you will pretty much
always use the mic level out, because FOH guys always want a mic
level signal, and the transformer on the mic level out provides, if
needed, proper ground isolation for hum elimination.
For recording, definitely check this exp trs output out, no mic pre
needed, transformer-less line level expansion output. It sounds really
good, clean and punchy.
You can also, well maybe obviously, plug both in, the mic level out
(with a mic pre) and the exp trs out (line in)and see what sounds best
for your track. They both are great, I just don't want you to overlook
the less obvious exp trs out.
The other use for the expansion out is for use with other Little Labs
products, the PCP instrument distro and the Redeye 3D phantom.
These both have expansion inputs, made especially for the Peppers
expansion out. Plugging the Pepper into there expansion in will give
you extra guitar level /impedance instrument outs that will have
identical level to the output of the Pepper. They also can be placed
remotely, like very remotely (down the block), with no signal loss.
Remember though you must use a trs to trs cable (It's a balanced line
level signal).
If for instance you use this with the PCP you can have a pretty darn
creative set up with different pro tools tracks feeding the PCP xlr
inputs switching between different amps playing with the tracks. It's
mind boggling the possibilities. I hope someone really creative gets
into this set up. If you need help with this, call me.
using the Pepper to turn a pedal or
pedal chain into pro gear
The Pepper can turn a pedal or a chain of pedals easily in
to a pro piece of gear, with balanced line level inputs and outputs.
Let's say you want to use a pedal on the balanced insert of a console.
First turn your instr thru level on the Pepper all the way down and
push the pro insert button in.
Plug the console send into the Peppers pro trs in (trs cable). or alternatively into the pedal ts in (with pedal insert selected)
Plug your pedal input into the Peppers front panel instrument out (ts
guitar cable).
Plug your pedal output into the Peppers front panel instrument in (ts
guitar cable).
Plug the console return into the pro trs out (trs cable).
Now you turn the pro return up to adjust the level hitting the pedal,
and you turn the pro send up to bring the level up to a healthy line
level for return to the console. If using pedals like a delay or phaser,
and you plugged the pedal out into the instrument in, you can experiment feeding back some signal from the output back to the input of
the pedal (which can cause horrendous oscillation) by carefully increasing the instrument thru level. If this makes you nervous, plug the
pedal out into the pedal ts in, and select pedal insert. Have fun!
playing with a buddy or using two
guitars simultaneously with the pepper
Since the pedal insert return (labeled pedal ts in) uses exactly the
same super hi fi buffer as the instrument in (with a fixed 1 meg ohm
impedance), you can also use it for an extra instrument in.
You could use this two ways. To select between guitars you could
select pdl insert for your second guitar (the dual foot switch would
come in handy here) or you can mix two guitars together with the
instrument thru controlling the level of the front instrument in guitar
and the return level for the guitar plugged in the pdl ts in. This would
work well also if you had two pick ups on an instrument (the polarity
reverse will come in handy here) ah ha!!! See the Pepper is versatile!
Pepper standard set up
pro
gear
pedal
Little Labs
PCP or Redeye 3D
expansion in
or console line in
instrument
pedal
insert
instrument
in
pro
insert
hi z
amp
pro
send
guitar
amp
pro
return
expansion
out
instrument
out
hi z
amp
differential
amp
or
wireless
instrument thru
level
shure
differential
amp
differential
sum amp
mic level
out
mic
preamp
pro tools or pro
analog tape
machine
Pepper re-amp set up
pedal
Little Labs
PCP or Redeye 3D
expansion in
or console line in
pedal
insert
instrument
instrument
in
pro
insert
hi z
amp
pro
send
guitar
amp
pro
return
expansion
out
instrument
out
hi z
amp
differential
amp
instrument thru
level
differential
amp
differential
sum amp
mic level
out
mic
preamp
balanced line level i/o
Pepper pedal to pro i/o set up
pedal
in out
or plug in
pdl ts out
and select
pdl insert
instrument
in
pedal
insert
console send and return or
any place that needs pro i/o
pro
insert
hi z
amp
pro
send
Little Labs
PCP or Redeye 3D
expansion in
or console line in
pro
return
expansion
out
instrument
out
hi z
amp
differential
amp
instrument thru
level
differential
amp
differential
sum amp
caution:
the instrument thru
becomes a feed back
control if pedal out is
plugged into
instrument in
mic level
out
Pepper two instrument
set up
instrument
instrument
pedal
insert
instrument
in
pro
insert
hi z
amp
pro
send
pro return
becomes level of
instrument plugged
into pedal ts in
Little Labs
PCP or Redeye 3D
expansion in
or console line in
guitar
amp
pro
return
expansion
out
instrument
out
hi z
amp
differential
amp
instrument thru
level
differential
amp
differential
sum amp
instrument thru
becomes level of
instrument plugged
into instrument in
mic level
out
mic
preamp
LITTLE LABS
6711 Whitley Terrace
HOLLYWOOD CA 90068
E-MAIL:
[email protected]
WEB:
www.littlelabs.com
SALES, SERVICE
TECHNICAL SUPPORT
& FAX:
323-851-6860
Manual printing & pdf formatting 05/2014


![How To Make A Noise [free version - July 2007]](http://vs1.manualzilla.com/store/data/005953668_1-8b501b70130f0a85eac6cc9cd6ff18b6-150x150.png)