1
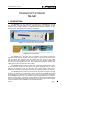
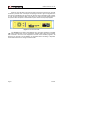
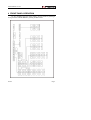
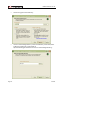
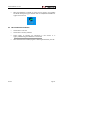
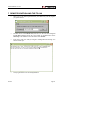
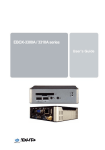
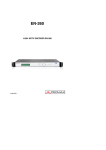
TG-140
TRANSPORT STREAM
RECORDER / PLAYER
USER’S MANUAL. TG-140
T A B L E
O F
C O N T E N T S
1
DESCRIPTION .......................................................................................................... 1
2
FEATURES................................................................................................................ 3
3
BUTTONS.................................................................................................................. 5
4
FRONT PANEL OPERATION ................................................................................... 7
4.1 Play a Transport Stream File............................................................................... 8
4.2 Record a Transport Stream File .......................................................................... 9
4.3 Configure IP Address .......................................................................................... 9
4.4 Setup Data Compact Flash ............................................................................... 10
4.5 See Version....................................................................................................... 10
4.6 Allow for Remote Control .................................................................................. 11
5
ATTACHING SCREEN, KEYBOARD AND MOUSE ............................................... 13
6
WINDOWS INSTALLATION .................................................................................... 15
6.1 Cygwin Installation for the TG-140 .................................................................... 15
6.2 TG-140 Windows Installation ............................................................................ 19
7
REMOTE CONTROLLING THE TG-140 ................................................................. 21
7.1 Software Updates.............................................................................................. 22
8
ACCESSING THE TG-140 HARD DISK.................................................................. 25
9
SETTING UP A NEW HARD DISK.......................................................................... 27
10 USING THE SOFTWARE........................................................................................ 29
10.1 TS Player ........................................................................................................... 29
10.2 TS Recorder ...................................................................................................... 30
10.3 TS Analyzer....................................................................................................... 31
10.4 TS Demuxer ...................................................................................................... 32
10.5 TS Builder.......................................................................................................... 33
07/2007
Page 1
USER’S MANUAL. TG-140
Page 2
07/2007
USER’S MANUAL. TG-140
TRANSPORT STREAM
TG-140
1 DESCRIPTION
The TG-140 is a two units rack electronic equipment. The TG-140 plays, records
and processes Transport Stream files. A Transport Stream is a sequence of bytes
containing audio, video and data. The TG-140 contains software programs to play,
record, analyze, demultiplex and build Transport Streams.
Figure 1.- TG-140 front side, Transport Stream.
Figure 2.- Transport Stream.
The TG-140 has a hard disk with two partitions. One partition contains the
operative system and the software. The other partition is where the Transport Stream
files are stored. The equipment has two outputs and one input: one ASI output
(Asynchronous Serial Interface), one SPI output (Synchronous Parallel Interface) and
one ASI input. The same data are sent to both outputs at the same time. The ASI uses
a BNC type connector while the SPI uses a DB25.
The TG-140 includes a Data Compact Flash. The Data Compact Flash is meant
to store Transport Stream files that have to be played repeatedly and one want to
reduce to the minimum the risk of a disk crash. The Compact Flash is less prone to
breakdowns compared to a hard disk, especially when performing read only operations.
The TG-140 includes a Rescue Compact Flash. Hard disks are fragile and might
fail due to, for instance, an unwanted fall or shock. The user of the TG-140 can replace
the Hard Disk by an equivalent one. Partitioning, creating file systems and installing the
all the TG-140 software in the new hard disk is only four keystrokes away by using the
Rescue Compact Flash. The Rescue Compact Flash will restore the complete system
on the newly plugged hard disk and it will be ready to use after a restart. This drastically
shortens the time to repair a TG-140 whose hard disk has failed.
07/2007
Page 1
USER’S MANUAL. TG-140
When the TG-140 starts it recovers the state of the Player when the TG-140 was
turned off by the last time. If the Player was playing a file with a given configuration the
TG-140 will automatically play the same file with the same configuration after it starts
up. The TG-140 recovers the state of the Player only when this was started from the
front panel. When the power is restored after a power cut the same principle applies.
Figure 3.- TG-140 Rear Side.
The TG-140 can be used in three different ways. The basic operations of the TG140, Player and Recorder, can be controlled by pressing and turning the two buttons
and one Knob in the front of the equipment. The rest of the software programs -TS
Analyzer, TS Demuxer, and TS Builder- are accessed either connecting a keyboard,
mouse and VGA screen or through a network cable.
Page 2
07/2007
USER’S MANUAL. TG-140
2 FEATURES
•
Connectors
-
•
Input BCN 75 Ω
Outputs BNC 75 Ω and DB25
Standard inputs and output
-
ASI according EN 50083-9.
- ASI Spread Mode and ASI Burst Mode.
-
SPI according EN 50083-9.
•
Packet size: 188 bytes
•
Hard Disk Capacity: 160 GB
•
Maximum Transmit Rate: 90 Mbps
•
Maximum Record Rate: 200 Mbps
•
Maximum Combined Rate: around80 Mbps
•
Oscillator Frequency Stability: 10 ppm
•
Control Interfaces
•
07/2007
-
LCD screen and buttons
-
VGA screen, mouse, and keyboard
-
Internet connection
Provided Software
-
TS Player
-
TS Recorder
-
TS Analyzer
-
TS Demultiplexer
-
TS Builder
-
Software Update
Page 3
USER’S MANUAL. TG-140
Page 4
07/2007
USER’S MANUAL. TG-140
3 BUTTONS
On/Off switch:
This is the power switch on the back of the equipment. You have to
turn it on after plugging in the equipment. Do not use this switch to
turn off the equipment, use the On/Off button in the front of the
panel.
On/Off button:
This is the red button on the front of the equipment. To turn on the
TG-140 just press and release the On/Off button. The TG-140 takes
about 1 minute to start up. If it takes more time it is probably due to
a check disk which happens every 30 starts or when recovering
from a bad shut down. You know the TG-140 is ready for operation
when the LCD screen does not display "Initializing...". To turn off
the TG-140 press and release the "On/Off" button. The TG-140 will
take less than one minute to completely power off. Pressing this
button more than four seconds and then releasing it will force an
emergency power off. The emergency power off should only be
used in case of emergency.
Menu button:
When you press the Menu button you go back one item the menus
hierarchy.
Knob:
Pressing the Knob means "Execute" or "Ok" to go to the next level
of the Menu hierarchy. Moving the Knob left and right shows the
menus of the same hierarchy level.
07/2007
Page 5
USER’S MANUAL. TG-140
Page 6
07/2007
USER’S MANUAL. TG-140
4 FRONT PANEL OPERATION
You can navigate through the menus visible in the LCD screen by pressing or
turning the Knob of the TG-140 and by pressing the Menu button.
07/2007
Page 7
USER’S MANUAL. TG-140
By operating the front panel the user can do the following tasks:
- Play a Transport Stream File
- Record a Transport Stream File
- Delete a Recorded File
- Configure IP Address
- Setup Data Compact Flash
- See Version
- Allow for Remote Control
4.1 Play a Transport Stream File
Follow this sequence of menus:
Local Control/Player/Play
Then select a file. You can navigate in the directory tree where the Transport
Stream Files are stored by using the Knob. When you press the Knob on a Transport
Stream file the TG-140 starts playing it. When you press the Knob on a directory name
it goes into that directory. Directory or folder names are marked with the word "Dir:". To
get out of a directory you have to press the Knob on "..". By default the user has access
to the following directories:
/transport_streams
/transport_streams/recordings
/transport_streams/elementary_streams
The user should only play Transport Stream files and not Elementary Stream files.
The elementary_streams folder is only meant to contain Elementary Stream files than
can be used to build Transport Stream files.
Once the TG-140 is playing a file you can turn the Knob to see some information
regarding the file and the play process. You can see the file name. The bitrate is the
bitrate is the bitrate the Transport Stream is build with which is the same bitrate used to
stream the file. Length is the time the Transport Stream File will last. Size is the size of
the file in bytes. Time is the elapsed time since it started playing.
The player functionality has a few configuration options in:
Local Control/Player/Config
Burst Mode can be Yes or No and applies only to the ASI output. In Burst Mode
the Transport Stream file is streamed out in a packetized way where a packet is the
same size as a Transport Stream file: that is 188 bytes. In this mode there is no stuffing
between bytes of a packet. Stuffing is only present between packets. When Burst Mode
is No the file is sent byte after byte and stuffing is inserted between bytes. This mode is
named ASI Spread Mode in literature. The stuffing I mention here exists only at physical
level and it is never present at application level. Note that this stuffing has nothing to do
with null packets in a Transport Stream file.
Page 8
07/2007
USER’S MANUAL. TG-140
When Loop File is Yes the file is played forever or until the users stops it. When
the Player reaches the end of the file it starts reading it from the beginning again and so
on. The TG-140 has Loop File setting to Yes by default. When Loop file is Yes you
might want to perform some corrections to the Transport Stream File so that that are
less discontinuities between the end and the beginning of the file. This is desirable
when you want a smooth playback on some decoders. You can correct Decoding and
Presentation Time Stamps by enabling the setting Correct PTS/DTS. You can correct
Continuity Counters by enabling the setting Correct CC. You can correct Program Clock
Reference Stamps by setting Correct PCR.
Notice that it might be useless to perform any correction on a recorded Transport
Stream File. This is because the file, most likely, does not end at the boundaries of the
Transport Stream internal structures and so these structures are incomplete or broken
by the end of the file. To picture it imagine a Transport Stream file as a broken sentence
and then concatenate it. The full sentence could be "My tailor is rich. " but suppose the
recorded file contains "My tailor is ric". Looping, concatenating, the right sentence
results on a sequence or right sentences but looping the broken sentence results on
"My tailor is ricMy tailor is ric" where we have the word "ricMy" which means nothing
and is an error in the "Transport Stream".
When you are playing a file you can continue to move around the Menus of the
TG-140 to change configuration parameters or to start a recording. To recall the state of
the Player you can go to:
Local Control/Player/State
4.2 Record a Transport Stream File
To play a Transport Stream File follow this sequence of menus:
Local Control/Recorder/Record
If there is no input signal or there is no space in the disk you will see an error
message on the LCD screen.
Hopefully everything will be ok and you will see the name of the file just being
recorded. Turning the Knob you can see some more information about the recording.
Bitrate is the input bitrate. Size is the size of the file in bytes, it will grow as the time
passes by. Time is the elapsed time since the recording was started.
4.3 Configure IP Address
To remote control the TG-140 it must be connected to a network and it must have
an IP address.
07/2007
Page 9
USER’S MANUAL. TG-140
To configure the IP address of the TG140 go to IP Config/Static IP Config/New IP.
Set the IP of your choice. Now you will set the Gateway address. Press Menu one time
to go back. Do not press the Menu button two times or you will loose the IP just filled.
Then, set the Gateway address. If you have no Gateway address fill it all with zeroes.
Press menu only one time and to go to Apply IP Changes. Press the Knob to apply the
changes.
Alternatively you can use a dynamically assigned IP address. If your network has
a DHCP server and you want the TG-140 to take an address from it go to:
IP Config/DHCP
and press the Knob.
4.4 Setup Data Compact Flash
The TG-140 includes a Data Compact Flash. The Data Compact Flash is meant
to store Transport Stream Files that have to be played repeatedly and one want to
reduce to the minimum the risk of a disk crash. The Compact Flash is less prone to
breakdowns compared to a hard disk, especially when performing read only operations.
The Data Compact Flash that is provided is ready for operation but a user might want to
use another compact flash of his own. Say for instance a bigger one. In such case the
compact flash has to be formatted.
With the TG-140 turned off insert the new compact flash. Turn on the TG-140, to
Setup Compact Flash and press the Knob. If the compact flash was unformatted it will
be formatted.
To copy files into the Data Compact Flash you have to remotely access the TG140 through a network. The TG-140 must have a valid IP address. In Windows open an
"Internet Explorer" and, in the address bar, write the address of the TG-140 prefixed
with two backslashes like so "\\192.9.100.93" and press Enter. In Linux write
"smb:\\192.9.100.93" in the address bar of your browser. The protocol the TG-140 uses
to share the files is Samba which works for both Linux and Windows. Then navigate to
the folder named "/transport_streams/compact_flash" and drop the files you want in it.
From the front panel, you can play files located in the compact flash by opening
the folder compact_flash.
4.5 See Version
If you navigate to Version and press the Know you will see the version of the
software pack the TG-140 has. The software pack includes Player, Recorder, Analyzer,
Demultiplexer, Builder, Card Driver and Menus visible in the LCD screen. I does not
include the card firmware.
Page 10
07/2007
USER’S MANUAL. TG-140
4.6 Allow for Remote Control
The TG-140 can be controlled either from the front panel or not. When using it
from the front panel we name it Local Control.
Remote Control includes controlling the TG-140 through a network or by plugging
a keyboard, mouse and VGA screen.
The TG-140 can be under Remote Control, under Local Control or uncontrolled.
When the TG-140 is under Local Control it is not accessible from Remote Control and
the other way round. There is a lock to gain control of the TG-140. This lock is owned by
either the front panel software or the graphical interface software. This lock can be
acquired and released as I explain in the next lines.
To acquire the lock to use the TG-140 from the front panel go to Local Control
and press the Knob. If the lock cannot be acquired because the TG-140 is being remote
controlled you will see an error message. To release the lock go to Remote Control and
press then Knob. When the user presses the Knob on Remote Control the player and
the recorder in Local Control are stopped if they were on.
The lock is acquired in Remote Control when the Player or Recorder Graphical
Interface Software are started. Actually if the TG-140 is in Local Control the Player and
Recorder will display an error message and will refuse to start. To release the lock just
close the Player and the Recorder.
The TG-140 starts up in uncontrolled mode except in the case I explain right here.
When you turn off the TG-140 it stores the state of the of the Local Control Player. If you
were playing a file in Local Control and you turn off the TG-140 when you turn it on
again it will automatically start playing that file in Local Control. In this case it will be
locked to use in Local Control until the user releases it.
07/2007
Page 11
USER’S MANUAL. TG-140
Page 12
07/2007
USER’S MANUAL. TG-140
5 ATTACHING SCREEN, KEYBOARD AND MOUSE
You can plug an VGA screen ,a keyboard and a mouse to the TG-140. The
keyboard and the mouse must be PS2 and you have to use the PS2 splitter provided
with the TG-140. The PS2 splitter is a "Y" like cable that is used to connect a mouse
and a keyboard to a single PS2 input jack.
When the Operative System has finished booting the screen will show:
Multimedia Generator TG-140
Press Enter to Enter Graphical Mode
Press enter and a screen with the software menu will show up.
07/2007
Page 13
USER’S MANUAL. TG-140
Page 14
07/2007
USER’S MANUAL. TG-140
6 WINDOWS INSTALLATION
6.1 Cygwin Installation for the TG-140
•
Go to cygwin_installation folder
•
Double click on setup.exe
•
When asked choose “Install from Local Directory”:
07/2007
Page 15
USER’S MANUAL. TG-140
•
Choose C:\cygwin as Root Directory:
•
Choose “Local Package Directory” as the same directory where setup.exe is
(make sure a folder with a name similar to
http%3a%2f%2fcygwin.basemirror.de is in the Local Package Directory):
Page 16
07/2007
USER’S MANUAL. TG-140
•
Find X11 Category:
•
Under X11 Category select xorg-x11-base package. Some other packages
will be selected automatically:
07/2007
Page 17
USER’S MANUAL. TG-140
•
Find and select openssh under Net Category:
•
Click Next/Siguiente until installation completes:
Page 18
07/2007
USER’S MANUAL. TG-140
•
When the installation is finished run Cygwin once by going to your Desktop
and double clicking the Cygwin Shortcut. This will complete the installation of
Cygwin for the TG-140.
6.2 TG-140 Windows Installation
•
Double click on vccrt.msi
•
Double click on TG140_install.exe
•
Install Cygwin by following the instructions in this manual or in
cygwin_installation\Cygwin Installation for the TG.htm
•
When finished find the installed program in Start/Programs/Promax_TG-140/
07/2007
Page 19
USER’S MANUAL. TG-140
Page 20
07/2007
USER’S MANUAL. TG-140
7 REMOTE CONTROLLING THE TG-140
•
When you run the Start/Programs/Promax_TG-140/Promax_TG-140 program
you get this screen:
•
Introduce the IP of the TG-140 and press OK. You have to have configured
the TG-140 in advance with an IP of your choice. To configure the IP of the
TG-140 go to IP CONFIG in the LCD screen of the TG-140.
•
Every time a new IP is used you will get a message like the following. You
have to answer yes.
•
And you get access to the TG-140 applications:
07/2007
Page 21
USER’S MANUAL. TG-140
7.1
Software Updates
The TG-140 software can be updated by connecting to the Promax Software
Updates Server.
There are three computers involved in the software update of the TG-140: the
internal computer of the TG-140, the user's computer and the Promax Software
Updates Server.
The TG-140 must have a valid IP address so it can access the Internet. The user
must know the address of the TG-140 and the address of the Promax Software Updates
Server. The user uses his User Computer to connect to the TG-140 and to tell the TG140 which is the address of the Promax Software Updates Server.
User
Computer
TG-140
Promax Software
Updates Server
Page 22
07/2007
USER’S MANUAL. TG-140
The steps to do a Software Update go like this:
07/2007
-
The user installs the MS Windows software in his computer. See the
corresponding section of this manual.
-
The user sets up an IP for the TG-140. See corresponding section of
this manual.
-
In the User Computer, the user goes to Start/Programs/Promax_TG140/TG-140 Update and a little window pops up. The user introduces
the IP address of the TG-140 in this windows and presses OK.
-
After pressing OK the little application will try to connect to the TG-140
and if it succeeds another window will appear. This second window is a
little application running on the TG-140. The user has to introduce the
IP address of the Promax Software Updates Server and press OK. The
TG-140 will try to connect to the supplied IP address to update itself. A
text window will appear to show the progress.
Page 23
USER’S MANUAL. TG-140
Page 24
07/2007
USER’S MANUAL. TG-140
8 ACCESSING THE TG-140 HARD DISK
To access the shared folders of the TG-140 it must have a valid IP address.
Search the corresponding section of this manual to setup the TG-140 IP address. In
Windows open an "Internet Explorer" and, in the address bar, write the address of the
TG-140 prefixed with two backslashes like so "\\192.9.100.93" and press Enter. In Linux
write "smb:\\192.9.100.93" in the address bar of your browser. The protocol the TG-140
uses to share the files is Samba which works for both Linux and Windows.
07/2007
Page 25
USER’S MANUAL. TG-140
Page 26
07/2007
USER’S MANUAL. TG-140
9 SETTING UP A NEW HARD DISK
If the hard disk of the TG-140 is broken due to a shake or some other incident it
can be easily replaced by another one. Get a new Hard Disk that can be configured in
SATA 1 mode or IDE and plug it to the embedded computer.
With the TG-140 turned off remove if necessary the Data Compact Flash from the
slot in the back of the TG-140 and insert the Rescue Compact Flash.
Connect a screen, mouse, and keyboard. Turn on the TG-140 and press Del /
Supr. to enter into the BIOS configuration. Check the following BIOS settings so that
the computer boots from the Compact Flash:
Advanced BIOS Features/Hard Disk Boot Priority/ 1. Compact Flash
Advanced BIOS Features/Hard Disk Boot Priority/ 2. Hard Disk
Save the BIOS settings and it will reboot.
The Rescue Compact Flash will boot and the Installation System will start.
With the arrows of the keyboard go to Menu/Install and press Return. If you have
a Sata disk choose:
Device to install: /dev/sda
Boot: /dev/sda1
If you use an IDE disk choose:
Device to install: /dev/hdb
Boot: /dev/hdb1
Push return.
Data in /dev/sda will be wiped. Are you sure about this? [y/N]
Push “y” and wait.
The installation lasts about 10 minutes. Once the installation is finished turn off
the TG-140. Then remove the Rescue Compact Flash and restart the TG-140.
Reconfigure the BIOS settings so that it boots from the hard disk first and save the
settings.
The new hard disk should be ready to go.
07/2007
Page 27
USER’S MANUAL. TG-140
Page 28
07/2007
USER’S MANUAL. TG-140
10 USING THE SOFTWARE
The TG-140 comes with a number of programs to play, record, analyze and build
Transport Streams. This section of the documentation explains what are the capabilities
of these programs and how can they be used.
10.1 TS Player
The Transport Stream Player is probably the main feature of the TG-140. With it
you can select a file and play it. Go to "File/Open" a browse to find the file you want
stream. Then, click on the Play button (little triangle).
The Player calculates the bitrate of the selected file and displays this piece of
information in the GUI. Some other available details about the file are the file duration
and the size in bytes. The duration can be calculated dividing size and bitrate. The file is
streamed out at the bitrate calculated by the Player.
The GUI of the Player has other sections. The Loop Adaptation section is used in
combination with the loop file button. The Loop File button is the button with two little
opposed arrows on it. This is a state button that can be on or off. When on the file will
be played in loop mode.
When Loop File is enabled the file is played forever or until the users stops it.
When player reaches the end of the file it starts reading it from the beginning again and
so on. When Loop file is Yes you might want to perform some corrections to the
Transport Stream File so that the are less discontinuities between the end and the
beginning of the file. This is desirable when you want a smooth playback on some
decoders. You can correct Decoding and Presentation Time Stamps by enabling the
setting Loop Adaptation/ PTS/DTS. You can correct Continuity Counters by enabling
the setting Loop Adaptation/ Continuity Counter. You can correct Program Clock
Reference Stamps by setting Loop Adaptation/ PCR.
Notice that it might be useless to perform any correction on a recorded Transport
Stream File. This is because the file, most likely, does not end at the boundaries of the
Transport Stream internal structures and so these structures are incomplete or broken
by the end of the file. To picture it imagine a Transport Stream file as a broken
sentence and then concatenate it. The full sentence could be "My tailor is rich. " but the
suppose the recorded file contains "My tailor is ric". Looping, concatenating, the right
sentence results on a sequence or right sentences but looping the broken sentence
results on "My tailor is ricMy tailor is ric" where we have the word "ricMy" which means
nothing and is an error in the "Transport Stream".
Burst Mode can enabled or not and applies only to the ASI output. In Burst Mode
the Transport Stream file is streamed out in a packetized way where a packet is the
same size as a Transport Stream file: that is 188 bytes. In this mode there is no stuffing
between bytes of a packet. Stuffing is only present between packets. When Burst Mode
is No the file is sent byte after byte and stuffing is inserted between bytes. This mode is
named ASI Spread Mode in literature. The stuffing I mention here exists only at physical
level and it is never present at application level. Note that this stuffing has nothing to do
with null packets in a Transport Stream file.
07/2007
Page 29
USER’S MANUAL. TG-140
The Status section displays information about what the player is doing: playing,
stopped, paused.
The progress bar shows how much of the file has been streamed out.
The Hardware Alarms sections contains two items that can be green or red. When
green there is no error, if red there is some problem. This alarms are at hardware level
and they are polled every second or so. If Synchronization alarm is red it means that the
Transport Stream packets of 188 bytes length are not well formed because they lack the
starting synchronization byte which is a 0x47. If the Buffer alarm is red it means that the
Card is not able to stream out the file at the desired speed. Currently, the maximum
transmit speed is 90 Mbps. If the processor is heavily loaded doing some other task the
maximum transmit speed will lower. If the hard disk is really a bad quality one the
maximum speed will also get smaller. When simultaneously playing and recording a file
the maximum combined rate is about 80 Mbps say 40 Mbps for the player and 40 for
the recorder.
10.2 TS Recorder
The TS Recorder can record an input Transport Stream to a file in the hard disk.
Click on File/Save as and select the name of the file you want to save.
Page 30
07/2007
USER’S MANUAL. TG-140
If the Hardware Alarm Buffer is red it means that data are being lost because the
input rate is to high. Currently the maximum input rate is about 200 Mbps but this rate is
reduced when the processor is doing some other task or the hard disk is a bad quality
one. When simultaneously playing and recording a file the maximum combined rate is
about 80 Mbps say 40 Mbps for the player and 40 for the recorder.
10.3 TS Analyzer
With the TS Analyzer you can see what are the contents of a Transport Stream
file. The current version of the TS Analyzer decodes the Program Association Tables
and the Program Map Tables.
To analyze a file click on File/Open. Then click on Analyze. It is not necessary to
analyze the whole file to see the tables so you can start the analysis before it has
completely finished reading the whole file by pressing Stop.
With the TS Analyzer you can see the description of the streams (audio, video,
private) and its Packet Identifiers PIDs.
07/2007
Page 31
USER’S MANUAL. TG-140
10.4 TS Demuxer
With the TS Demuxer you can extract video and audio elementary streams from a
Transport Stream File.
Open a File and click Analyze, after a short while click stop because it is not
necessary to analyze the whole file to read the tables. The Demuxer will show a list of
the streams found inside the Transport Stream. Then, check in the check box of the
streams you want to extract and press Demultiplex. After while a dialog box will pop
saying the demultiplexing is finished. The extracted streams are saved in the folder
/transport_streams/elementary_streams. Every stream is saved in a different file with a
name that contains the original PID when the stream was part of the Transport Stream.
Page 32
07/2007
USER’S MANUAL. TG-140
10.5 TS Builder
The TS Builder is used the build a Transport Stream from Elementary Streams
extracted with the TS Demuxer. Use the left pane to navigate to the
elementary_streams folder and click on the files. If the files are recognized by the
software you will see some information in the lower left pane. Currently only MPEG2
Video Elementary Streams and MPEG2 Audio Elementary streams are recognized.
Then, click on either "Add Stream to Last Program" or "Add Stream to New Program" to
add the stream to the Transport Stream. "Add Stream to New Program" will create a
new PMT while "Add Stream to Last Program" will add the stream to the last PMT
created. The SDT and NIT tables are automatically created and are not editable. Finally
click on "Multiplex" and choose the name of the resulting Transport Stream File. An
automatic name is suggested by default.
07/2007
Page 33
USER’S MANUAL. TG-140
Page 34
07/2007