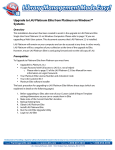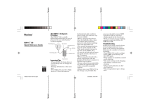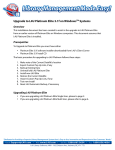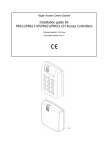
1
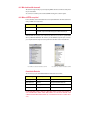
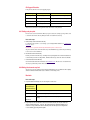
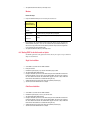
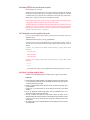
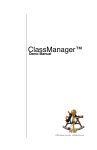
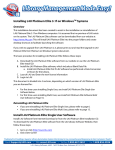
Upgrade Instructions
STATIC'
Statistics for Intensive Care
Upgrade Instructions
by Michael Weisenberger
copyright 2005
0.0.1 Who should read this document?
This document is required reading if you are already using STATIC and wish to retain the data already entered
into your current datafile.
You do not need to read this if you have downloaded STATIC and only plan to evaluate the product.
0.0.2 Where is STATIC on my drive?
If our recommended convention for installation has been used by the Administrator, then all files and directories
relating to STATIC are located as follows:
OS
Installation Path
Windows
C:\Program Files\STATIC\
Macintosh
Contained within a directory called STATIC. This could be anywhere on your drive. Use the
search facilities of your OS to find this directory if you are unsure where it may be.
Within this STATIC directory will be a series of subdirectories. Below are two screen shots of a possible STATIC
directory on Macintosh and Windows. The contents of your own STATIC directory will vary. If, for instance,
you are only interested in the Single User version you will not need the Client or Server related directories.
Files and Directories within the main database folder Mac
Files and Directories within the main database folder Win
Current Active Directories
The active directory of your Current STATIC Installation is named and located as follows:
OS and STATIC Type
Active directory name
Path
Windows Single User
StaticSingleUser
C:\Program Files\STATIC\StaticSingleUser\
Windows Client Server
StaticServer
C:\Program Files\STATIC\StaticServer\
Macintosh Single User
STATICSingleUser
Contained within STATIC directory.
Macintosh Client Server
STATICServer
Contained within STATIC directory.
GUARD THESE DIRECTORIES CAREFULLY. THESE DIRECTORIES CONTAIN YOUR DATAFILE. IF
YOU INADVERTANTLY DELETE THESE DIRECTORIES, YOU MAY HAVE DELETED YOUR
CURRENT DATAFILE RESULTING IN DATALOSS. YOU DO HAVE BACKUPS OF COURSE. DON T
YOU?!
Old Upgrade Directories
In the past these directories were used for upgrade purposes:
OS and STATIC Type
Update directory name
Path
Windows Single User
StaticSingleUserUpdate
C:\Program Files\STATIC\StaticSingleUserUpdate\
Windows Client Server
StaticServerUpdate
C:\Program Files\STATIC\StaticServerUpdate\
Macintosh Single User
STATICSingleUserUpdate
Contained within STATIC directory.
Macintosh Client Server
STATICServerUpdate
Contained within STATIC directory.
These directories will never be used again in the future and can now be safely discarded.
0.0.3 Getting ready to update
First we need to secure the Current Active Directory to protect ourselves in case things go wrong. Then we need
to rename the Current Active directory. Finally we install a new Current Active directory.
Here are the steps:
a
Make a backup of the Current Active Directory
It is imperative that you make a secure backup of your existing STATIC installation (see Current Active
Directories above).
If you do not do so, you run the risk of losing all the data that you have collected so far!
We prefer to burn the whole Current Active Directory to CD or DVD. This way you ensure that you will always
be able to revert to the last installation.
b
Rename the Current Active Directory
Rename your Current Active Directory to something that clearly distinguishes it from all other installations. We
recommend that you rename it to Old_STATIC... Remember this directory contains the current active Datafile.
c
Install a New Current Active Directory
Now run the installer obtained from the Website at www.hxmedical.com. This will create a new Current Active
directory for you. But it only contains a Demo datafile.
0.0.4 Moving the documents required
We now need to move the documents required from the Old Installation to the New Installation. This is slightly
different for Windows and Macintosh because of differences in the naming of files:
Macintosh
Here are the steps:
a
Inspect the Old Active Directory. Select the following files and directories:
Items to copy from the
Purpose
Old Active Directory to
the New Active Directory
STATIC.data
This is the datafile and contains all your data.
STATICItems folder
This contains various logs and reports that may be important.
Backup Project
This contains your Backup specifications and the backup logfile if you have set the database
to backup.
STATICxxx.4dl
b
Drag & drop these files and directories onto the Current Active directory. You may be asked if you
want to overwrite existing files - select Yes. We recommend that you hold down modifier keys in
order to force a Copy of these items from one directory to the other. This preserves the original items
in case something goes wrong with the update.
c
Your updated Current Active directory is now ready for use.
Windows
Here are the steps:
a
Inspect the Old Active Directory. Select the following files and directories:
Items to copy from the
Purpose
Old Active Directory to
the New Active Directory
STATIC.4dd
These two files contains all your data.
STATIC.4dr
STATICItems folder
This contains various logs and reports that may be important.
Backup.4bp
This contains your Backup specifications and the backup logfile if you have set the database
to backup.
STATICxxx.4dl
b
c
Drag & drop these files and directories onto the Current Active directory. You may be asked if you
want to overwrite existing files - select Yes. We recommend that you hold down modifier keys in
order to force a Copy of these items from one directory to the other. This preserves the original items
in case something goes wrong with the update.
Your updated Current Active directory is now ready for use.
0.0.5 Starting STATIC for the first time after an Update
Start STATIC again from the newly updated Current Active directory. The sequence of steps is different for
Single User and Client Server:
Single User Installation:
a
b
c
d
e
f
g
Start STATIC as usual from the new STATIC installation.
Enter your Password.
Hold down the option (Alt) key as you click on OK to validate your password.
The Open Datafile dialog window will open.
Navigate to the datafile you want to use for STATIC and open it. This datafile will be located in the
Current Active directory, unless you have a non standard installation. This ensures you are opening
the correct datafile and associates this datafile with the program. Once this is done, STATIC will
know next time which datafile was associated with it during this step.
STATIC will update the password system and do some preliminary housekeeping.
You will need to restart STATIC after this is complete.
Client Server Installation:
a
b
c
d
e
f
Start STATIC as usual from the new STATIC installation.
Hold down the option (Alt) key as soon as you start the Server.
The Open Datafile dialog window will open.
Navigate to the datafile you want to use for STATIC and open it. This datafile will be located in the
Current Active directory, unless you have a non standard installation. This ensures you are opening
the correct datafile and associates this datafile with the program. Once this is done, STATIC will
know next time which datafile was associated with it during this step.
STATIC will update the password system and do some preliminary housekeeping.
You will need to restart STATIC after this is complete.
0.0.6 Starting STATIC for the second time after an Update
Restart your database for a second time.
STATIC will now update your datafile. This can take a long time and must not be interrupted. The time this will
take depends on several factors: How long since you last updated your installation, the number of records within
your datafile and the speed of your machine. We recommend that you start the update and go and have lunch!!
When the update is complete, you will be asked to restart STATIC one more time.
Before running the update, you will sometimes notice that your installation contains extra documents that appear
to disappear when the update has completed. This is perfectly normal behaviour.
We sometimes supply special documents that contain data that must be pulled into your datafile in order for your
installation to be complete. For example, these documents may include new Adult and Paediatric diagnoses.
During the update the data contained in these documents is read and entered into your datafile by STATIC. The
documents are then deleted as they are of no further use.
0.0.7 Checking the successful completion of the update
You can see what has happened during the update by inspecting the Activity documents located in the
STATICItems folder at:
STATICItems/Information/Activity_Log/Activity_yyyymmddhhmmss
A document is created every time you start STATIC. If the last created document does not show a sequence of
entries that start and end as follows (the Date Time stamp, the Machine and the Owner will of course be
different):
01/04/2004 22:46:02 Database Started Machine: Michael Weisenberger s Computer Owner: Michael
Weisenberger
..... various other entries ......
..... various other entries ......
..... various other entries ......
01/04/2004 22:56:21 Database Ended Machine: Michael Weisenberger s Computer Owner: Michael
Weisenberger
**********
**********
..... then the update did not complete as expected and STATIC exited without warning. In that case see below.
0.0.8 If there is a problem during the Update
If STATIC exits without completing the update it usually means there is a problem with your datafile.
In this case:
a
b
c
d
e
f
Find the original saved STATIC installation. If you followed our instructions above then this would
be saved somewhere other than the drive you are working from. Either CD, DVD, Tape, Zip, Jazz
or some other backup device or medium.
Make a copy of this installation back onto your drive. This way you still have a backed up copy of
your last installation.
Start this copy as you would normally. You are now running the last version of your STATIC
installation.
Run all the Administrator Datafile Integrity options under the Administrator menu. Go to
Administrator> Datafile Integrity menu item to do this.
Once this is complete, exit STATIC and using 4D Tools, Compact the datafile. See the
Administrators Manual for instructions on how to use 4D Tools. By this stage we will not be surprised
if you give us a call as this is an unusual step to have to take and it is unlikely that you have ever
done this before.
Once all these steps have been completed, follow the instructions outlined above once more using
the cleaned datafile.
If the update still does not work after doing all this, then your datafile is severely damaged and you will definitely
need to contact us.
Note: If there is damage you may wonder why you did not have problems before trying to update. The answer
to this is that during normal operations you only access a very small portion of the datafile. Some portions of
your datafile may have been left untouched literally for years. The update operation MUST read and write
EVERY part of the datafile. This will uncover ANY corruption within the datafile and may exit the program in
an uncontrolled way.