1
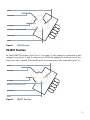
Agilent 1260 Infinity Manual Injector Using the Manual Injector Using the Manual Injector NOTE This guide just briefly describes how to use the manual injector. Please refer to the User Manual for further details and important information. Warnings and Cautions WA R N I N G Ejection of mobile phase When using sample loops larger than 100 µL, mobile phase may be ejected from the needle port as the mobile phase in the sample loop decompresses. ➔ Please observe appropriate safety procedures (for example, goggles, safety gloves and protective clothing) as described in the material handling and safety data sheet supplied by the solvent vendor, especially when toxic or hazardous solvents are used. Agilent Technologies WA R N I N G Splashing of solvent ➔ When using the Needle Port Cleaner, empty the syringe slowly to prevent solvent from splashing back at you. ➔ Please observe appropriate safety procedures (for example, goggles, safety gloves and protective clothing) as described in the material handling and safety data sheet supplied by the solvent vendor, especially when toxic or hazardous solvents are used. CAUTION Potential damage to the valve ➔ Rinse the valve with water after using buffer solutions to prevent crystals from forming, which can cause scratches on the rotor seal. Injecting Sample LOAD Position In the LOAD position (see Figure 1 on page 3), the pump is connected directly to the column (ports 2 and 3 connected), and the needle port is connected to the sample loop. At least 2 to 3 sample-loop volumes (more if better precision is required) of sample should be injected through the needle port to provide good precision. The sample fills the loop, and excess sample is expelled through the vent tube connected to port 6. 2 LVhiZ ;gdbEjbe IdXdajbc CZZYaZedgiXdccZXiZY[gdbgZVg HVbeaZadde LVhiZ Figure 1 LOAD Position INJECT Position In the INJECT position (see Figure 2 on page 3), the pump is connected to the sample loop (ports 1 and 2 connected). All of the sample is washed out of the loop onto the column. The needle port is connected to the vent tube (port 5). LVhiZ ;gdbejbe IdXdajbc CZZYaZedgiXdccZXiZY[gdbgZVg HVbeaZadde LVhiZ Figure 2 INJECT Position 3 Complete Loop Filling In complete-filling, the volume of sample injected is set by the volume of the loop (this includes the valve passages). This method produces the highest precision. At least 2 to 3 sample-loop volumes (more if better precision is required) of sample should be injected through the needle port to provide good precision. The sample fills the loop, and excess sample is expelled through the vent tube connected to port 6. An excess of sample is needed because mobile phase near the wall of the loop is displaced slowly due to the laminar flow effect. 1 Turn the handle to the LOAD position 2 Insert the syringe into the needle port. You should feel slight resistance as the needle passes through the needle seal before it stops against the stator face. 3 Load the sample slowly onto the loop. Repeat this step for higher precision. 4 Leave the syringe in and turn the handle to INJECT. Partial Loop Filling If you only have small quantities of sample, this is the method of choice. In the partialfilling method the volume of sample injected is set by the syringe. In this method, no more than half a loop volume of sample should be loaded into the loop. For example, load no more than 10 μL into a 20 μL loop. With larger than half the loop volume, some of the sample is lost out Vent Line 6. This is because sample flows down the center of the loop at twice the average velocity due to the laminar flow effect. 1 In INJECT, use the Needle Port Cleaner to flush out the needle port with about 1 mL of mobile phase to flush out contamination from the earlier injection. This liquid will exit out Vent Line 5. 2 Insert the syringe into the needle port. You should feel slight resistance as the needle passes through the needle seal before it stops against the stator face. 3 Load the sample slowly onto the loop. 4 Leave the syringe in and turn the handle to INJECT. *G1328-90100* *G1328-90100* G1328-90100 Part Number: G1328-90100 Edition: 01/2013 Printed in Germany Agilent Technologies, Inc 2013 Agilent Technologies, Inc Hewlett-Packard-Strasse 8 76337 Waldbronn, Germany