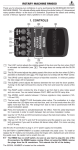
1
PRIMEPOWER, RM
PW250LC and RCA4plus
Installation, Configuration and Administration
E. Hübner-Hatzel
Fujitsu Siemens Computers GmbH Paderborn
33094 Paderborn
e-mail: email: [email protected]
Tel.: (0 5251) 14 888 13
Fax: 0 700 / 372 00001
U41618-J-Z916-1-76
Sprachen: En
Edition October 2005
Comments… Suggestions… Corrections…
The User Documentation Department would like to
know your opinion of this manual. Your feedback helps
us optimize our documentation to suit your individual
needs.
Fax forms for sending us your comments are included in
the back of the manual.
There you will also find the addresses of the relevant
User Documentation Department.
Certified documentation
according DIN EN ISO 9001:2000
To ensure a consistently high quality standard and
user-friendliness, this documentation was created to
meet the regulations of a quality management system
which complies with the requirements of the standard
DIN EN ISO 9001:2000.
cognitas. Gesellschaft für Technik-Dokumentation mbH
www.cognitas.de
Copyright and Trademarks
Copyright © 2005 Fujitsu Siemens Computers GmbH.
All rights reserved.
Delivery subject to availability; right of technical modifications reserved.
All hardware and software names used are trademarks of their respective manufacturers.
This manual is printed on
paper treated with
chlorine-free bleach.
Contents
1
1.1
1.2
1.3
Preface . . . . . . .
Target group . . . . .
Summary of contents
Notational conventions
2
Safety notes
3
Functionality . . . . . . . . . . . . . . . . . . . . . . . . . . . 7
4
4.1
4.2
4.2.1
4.2.2
4.3
4.4
4.4.1
4.4.2
4.5
Preinstallation and Installation . . . . . . . . .
Scope of delivery of the PW250LC . . . . . . . .
Preinstallation of the PW250LC . . . . . . . . . .
Use as SMC . . . . . . . . . . . . . . . . . . . .
Hard disk partitioning . . . . . . . . . . . . . . .
Unpacking and checking the delivery unit . . . . .
Install and detach mirroring . . . . . . . . . . . .
Mirroring the root and swap file systems . . . . .
Detach mirroring of the root and swap file systems
First booting . . . . . . . . . . . . . . . . . . . .
.
.
.
.
.
.
.
.
.
.
.
.
.
.
.
.
.
.
.
.
.
.
.
.
.
.
.
.
.
.
.
.
.
.
.
.
.
.
.
.
.
.
.
.
.
.
.
.
.
.
.
.
.
.
.
.
.
.
.
.
.
.
.
.
.
.
.
.
.
.
. 9
. 9
. 9
10
10
11
11
13
14
15
5
5.1
5.2
5.2.1
5.2.1.1
5.2.1.2
5.2.1.3
5.2.2
5.2.3
5.2.3.1
5.2.3.2
5.2.3.3
5.2.3.4
5.2.3.5
5.2.3.6
5.2.4
5.3
5.4
5.4.1
5.4.2
5.4.2.1
LAN Console . . . . . . . . . . . . . . . . . . .
Architecture . . . . . . . . . . . . . . . . . . . .
Remote Communication Adapter . . . . . . . . .
Connections on the rear of the RCA4plus . . . . .
LAN connection . . . . . . . . . . . . . . . . . .
RCA4plus CONSOLE PORT . . . . . . . . . . .
Serial port for connecting the console . . . . . . .
Cable types . . . . . . . . . . . . . . . . . . . .
Technical specifications of the RCA4plus . . . . .
Power ratings . . . . . . . . . . . . . . . . . . .
Environmental conditions . . . . . . . . . . . . .
Dimensions and weights . . . . . . . . . . . . . .
Standards . . . . . . . . . . . . . . . . . . . . .
Conformity tests . . . . . . . . . . . . . . . . . .
Approvals . . . . . . . . . . . . . . . . . . . . .
Switching on the RCA4plus . . . . . . . . . . . .
Installing software packages on the LAN Console .
Configuration . . . . . . . . . . . . . . . . . . .
Connection between LAN Console and RCA . . .
Configuring the connected servers . . . . . . . .
Configuring the PRIMEPOWER systems . . . . .
.
.
.
.
.
.
.
.
.
.
.
.
.
.
.
.
.
.
.
.
.
.
.
.
.
.
.
.
.
.
.
.
.
.
.
.
.
.
.
.
.
.
.
.
.
.
.
.
.
.
.
.
.
.
.
.
.
.
.
.
.
.
.
.
.
.
.
.
.
.
.
.
.
.
.
.
.
.
.
.
.
.
.
.
.
.
.
.
.
.
.
.
.
.
.
.
.
.
.
.
.
.
.
.
.
.
.
.
.
.
.
.
.
.
.
.
.
.
.
.
.
.
.
.
.
.
.
.
.
.
.
.
.
.
.
.
.
.
.
.
.
.
.
.
.
.
.
17
17
19
21
21
21
22
27
28
28
28
28
29
29
29
29
31
35
36
36
36
U41618-J-Z916-1-76
.
.
.
.
.
.
.
.
.
.
.
.
.
.
.
.
.
.
.
.
.
.
.
.
.
.
.
.
.
.
.
.
.
.
.
.
.
.
.
.
.
.
.
.
.
.
.
.
.
.
.
.
.
.
.
.
.
.
.
.
.
.
.
.
.
.
.
.
.
.
.
.
.
.
.
.
.
.
.
.
.
.
.
.
.
.
.
.
.
.
.
.
1
2
2
4
. . . . . . . . . . . . . . . . . . . . . . . . . . . 5
Contents
5.4.2.2
5.4.3
5.4.3.1
5.4.3.2
5.4.3.3
5.4.3.4
5.4.3.5
5.4.3.6
5.4.3.7
5.5
5.6
5.6.1
5.6.2
5.7
5.7.1
5.7.2
5.7.3
5.7.4
5.8
5.8.1
5.8.2
5.8.3
5.8.4
5.8.4.1
5.8.4.2
5.8.5
5.9
5.9.1
5.9.2
5.9.2.1
5.9.2.2
5.9.2.3
5.9.2.4
5.9.2.5
5.9.2.6
Configuring the RM systems . . . . . . . . . . .
Configuring the LAN Console and RCA . . . . .
Initial configuration of the LAN Console and RCA
Configuring the LAN Console . . . . . . . . . . .
Configuring the RCA . . . . . . . . . . . . . . .
New RCA ports . . . . . . . . . . . . . . . . . .
Connecting further RCAs to the LAN Console . .
Connecting another LAN Console to the RCA . .
Modifying the LAN Console and RCA . . . . . .
Operating the LAN Console . . . . . . . . . . . .
Switching LAN Consoles . . . . . . . . . . . . .
Planned switches . . . . . . . . . . . . . . . . .
Switching because of problems . . . . . . . . . .
Diagnostics . . . . . . . . . . . . . . . . . . . .
Log files . . . . . . . . . . . . . . . . . . . . . .
Status information for the monitors . . . . . . . .
Configuration entries for the LAN Console . . . .
RCA system information . . . . . . . . . . . . .
Error situations . . . . . . . . . . . . . . . . . .
No response from the RCA . . . . . . . . . . . .
Failure to establish a connection . . . . . . . . .
Failure in automatic access to the RCA . . . . . .
Disrupted RCA - LAN Console connection . . . .
LAN connection disrupted . . . . . . . . . . . .
No output in console window . . . . . . . . . . .
Invalid administrator password for RCA4plus . . .
RCA commands . . . . . . . . . . . . . . . . .
Access rights . . . . . . . . . . . . . . . . . . .
List of commands . . . . . . . . . . . . . . . . .
Help command . . . . . . . . . . . . . . . . . .
Port commands . . . . . . . . . . . . . . . . . .
Server commands . . . . . . . . . . . . . . . .
Show commands . . . . . . . . . . . . . . . . .
User commands . . . . . . . . . . . . . . . . .
Serial Connections . . . . . . . . . . . . . . . .
.
.
.
.
.
.
.
.
.
.
.
.
.
.
.
.
.
.
.
.
.
.
.
.
.
.
.
.
.
.
.
.
.
.
.
.
.
.
.
.
.
.
.
.
.
.
.
.
.
.
.
.
.
.
.
.
.
.
.
.
.
.
.
.
.
.
.
.
.
.
.
.
.
.
.
.
.
.
.
.
.
.
.
.
.
.
.
.
.
.
.
.
.
.
.
.
.
.
.
.
.
.
.
.
.
.
.
.
.
.
.
.
.
.
.
.
.
.
.
.
.
.
.
.
.
.
.
.
.
.
.
.
.
.
.
.
.
.
.
.
.
.
.
.
.
.
.
.
.
.
.
.
.
.
.
.
.
.
.
.
.
.
.
.
.
.
.
.
.
.
.
.
.
.
.
.
.
.
.
.
.
.
.
.
.
.
.
.
.
.
.
.
.
.
.
.
.
.
.
.
.
.
.
.
.
.
.
.
.
.
.
.
.
.
.
.
.
.
.
.
.
.
.
.
.
.
.
.
.
.
.
.
.
.
.
.
.
.
.
.
.
.
.
.
.
.
.
.
.
.
.
.
.
.
.
.
.
.
.
.
.
.
.
.
.
.
.
.
.
.
.
.
.
.
.
.
.
.
.
.
6
6.1
6.2
6.3
6.4
6.4.1
6.4.1.1
6.4.1.2
Teleservice . . . . . . . . . . . . . . .
Installation and generation . . . . . . .
Generating the software . . . . . . . .
Selecting validated Teleservice modems
TeleCall . . . . . . . . . . . . . . . . .
Installing Telecall . . . . . . . . . . . .
Preparations . . . . . . . . . . . . . .
Software installation on the PW250LC .
.
.
.
.
.
.
.
.
.
.
.
.
.
.
.
.
.
.
.
.
.
.
.
.
.
.
.
.
.
.
.
.
.
.
.
.
.
.
.
.
.
.
.
.
.
.
.
.
.
.
.
.
.
.
.
.
. 95
. 96
. 97
. 99
105
106
106
106
.
.
.
.
.
.
.
.
.
.
.
.
.
.
.
.
.
.
.
.
.
.
.
.
.
.
.
.
.
.
.
.
.
.
.
.
.
.
.
.
38
38
40
41
48
54
55
55
55
58
63
63
63
64
64
65
65
65
66
66
66
67
68
68
69
69
70
71
72
72
72
78
84
90
94
U41618-J-Z916-1-76
Contents
6.4.1.3
6.4.1.4
6.4.2
Software installation on the PRIMEPOWER . . . . . . . . . . . 106
Software installation on the RM . . . . . . . . . . . . . . . . . 106
Generating the Telecall cluster . . . . . . . . . . . . . . . . . . 107
Glossary . . . . . . . . . . . . . . . . . . . . . . . . . . . . . . . . . . 111
Abbreviations . . . . . . . . . . . . . . . . . . . . . . . . . . . . . . . 113
Related publications . . . . . . . . . . . . . . . . . . . . . . . . . . . 117
Index . . . . . . . . . . . . . . . . . . . . . . . . . . . . . . . . . . . . 129
U41618-J-Z916-1-76
1
Preface
For system administration and monitoring of the Midrange and Entry-level
Servers of Fujitsu Siemens Computers a LAN Console is required. This task
can be performed by a PRIMEPOWER-based LAN Console (PW250LC).
The server systems are connected to the PW250LC via V.24/Ethernet
converters (RCA4plus) located close to the system (max. 15m away) or in the
system cabinets. The LAN Console is placed at any suitable position in the LAN.
The PW250LC is based on a high-performance SPARC processor. Pedestal or
19-inch rack models are available.
The PW250LC is released for the following products:
– PRIMEPOWER 100N/200/400/600/250/450/650/850
with Solaris
– RM300/400/600 with Reliant UNIX
The PW250LC is supplied optionally with the operating system Solaris 8, 9
or 10.
The Teleservice port for all networking PRIMEPOWER or RM servers can also
be managed via the PW250LC (teleservice gateway), which means that only
one line to the Service organization is required for all networking PRIMEPOWER/RM servers.
Use of the System Management Console (SMC) is mandatory for system
administration and monitoring of the Enterprise Servers (models
900/1500/2500/800/1000/2000) of the PRIMEPOWER system family. The tasks
of the SMC can be handled by the PW250LC.
Use as a LAN Console for midrange and entry-level servers
Up to 250 PRIMEPOWER midrange and entry-level servers (models
100N/200/400/600/250/450/650/850) and the RM models (300/400/600,
ServerNode) can be managed from a LAN Console (software installation,
configuration, OBP). Powerful tools (LAN Console software, PRIMEPOWER
ServerView Suite) are available for this purpose.
The Remote Communication Adapter (currently RCA4plus) can be used as a
V.24/Ethernet converter. Up to 8 UNIX servers (MR) of Fujitsu Siemens
Computers can be connected to this RCA4plus. Multiple RCAs can be used on
a LAN console.
The integrated XSCF (extended System Control Facility) LAN port can be used
directly to administer the PRIMEPOWER models PW250 and PW450 such that
no RCA is required.
U41618-J-Z916-1-76
1
Target group
Preface
Use as a System Management Console (SMC) for enterprise servers
The PW250LC can be upgraded to a PW250SMC and is thus suitable for use
as an SMC for administering the PRIMEPOWER enterprise servers
(models 800/900/1000/1500/2000/2500). The System Console Software (SCS)
installed on the SMC controls the hardware configuration and operating status
of the PRIMEPOWER enterprise systems and is used for their administration
(partitioning with partition-related console function, scheduled switching on and
off, clock accordination via Network Time Protocol (NTP), email messaging to
the system administrator in case of error). Depending on its main memory
configuration the SMC can be used for multiple enterprise servers in parallel.
Details of the PW250SMC hardware and on handling the System Console
Software (SCS) functionality are provided in the documentation (see PRIMEPOWER publications in Related publications).
1.1
Target group
This manual is targeted at system administrators. Knowledge of Solaris and, if
possible, Reliant UNIX systems is required. If any problems occur with the
PW250LC, the connected systems or the RCA4plus during system operation,
please contact your local Service organization.
V LAN Console and RCA4plus are not SIDATA-compatible
The PW250LC and RCA4plus do not support SIDATA, i.e. they must be
installed and started up by a technician. System administrators are given
instructions on installing and configuring them.
1.2
Summary of contents
V Safety notes
It is essential to read the chapter “Safety notes” from page 5 before
starting to work with the PW250LC. This chapter contains essential information for proper installation and handling of this device.
This manual describes how to install the PW250LC and the RCA4plus and
explains how to configure and operate the PW250LC as a LAN Console.
The chapter “Preinstallation and Installation” from page 9 tells you everything
about preinstallation and hard disk partitioning of the PW250LC.
2
U41618-J-Z916-1-76
Preface
Summary of contents
The chapter “LAN Console” from page 17 explains how to install the RCA4plus,
cable it and start it up. It goes on to describe how to install the software on the
LAN Console from the Control DVD and how to operate the LAN Console and
RCA. The chapter also tells you how to replace a PW250LC in the event of an
error and provides support for troubleshooting and diagnostics.
The section “RCA commands” from page 70 contains an overview of the
commands for the RCA4plus which are relevant for LAN Console functionality.
The appendix on page 95 tells you how to install and operate Teleservice and
Telecall.
You will find other helpful information in the reference chapters “Glossary” from
page 111, “Related publications” from page 117 and “Index” at the end of the
manual.
I Please follow all instructions in the order they appear in this manual. You
will avoid problems by doing so and get along faster. Always pay attention
to the device-specific information that is supplied with the various
devices.
U41618-J-Z916-1-76
3
Notational conventions
1.3
Preface
Notational conventions
The following notational conventions are used in this manual:
Monospace
This indicates system output, e.g. text on a CRT or
LCD screen (cathode ray tube / liquid crystal
display).
Bold
monospace font
This indicates user inputs in examples.
Italics
This indicates commands, file names, menu names
and inputs in continuous text.
Bold
This indicates emphasis in the text.
[Key]
This indicates keys or key combinations in
continuous text.
I
V Title
This indicates additional information and tips.
This indicates information, which if not heeded may
jeopardize your health, the functioning of your
system or the security of your data.
Ê
This indicates a step that you have to perform.
-->
This indicates the last possible solution to a problem
or the last step in a flow chart.
●
This character and the one below
–
Symbolizes itemized lists.
4
U41618-J-Z916-1-76
2
Safety notes
This section gives advice on safety that you have to heed when using your
PW250LC and the RCA.
Further safety information you will find in the PW250/450 User‘s manual.
The devices comply with the relevant safety regulations for information
technology equipment, including electrical machines for use in office environments. Please contact your local sales office or our Service organization if you
are in doubt about whether the device can be installed in the environment you
envisage.
Please also observe the safety instructions for GP 7000F/PRIMEPOWER
Systems (see Related publications) provided with every device.
V Radio Frequency Interference Statement RCA
●
The following notice is for EU users only:
This is a product that meets European standard EN55022.
●
The following notice is for USA users only:
This equipment has been tested and found to comply with the limits
for a Class A digital device, pursuant to Part 15 of the FCC Rules.
These limits are designed to provide reasonable protection against
harmful interference.
V Safety notes
●
Only transport the device in its original packaging or in other suitable
packaging, which will protect it against impact and jolts.
●
Condensation may occur when the device is brought in from the cold
to its site of installation. Wait until the device has reached a stable
temperature and is absolutely dry before putting it into operation.
●
Heed the ambient conditions described in the “Environmental conditions” on page 28 and for the RCA4plus in the “Technical specifications of the RCA4plus” on page 28 as well as the specifications of the
PW250LC (see PW250/450 User’s Guide or the data sheet) before
installing the device and putting it into operation.
●
This device features a safety-tested power cable and may only be
connected to a grounded socket.
U41618-J-Z916-1-76
5
Safety notes
6
●
Make sure that the socket on the device or the mains socket on the
housing installation are readily accessible.
●
The ON/OFF button does not isolate the device from the mains
voltage completely. To do this, you have to remove all plugs from the
mains socket.
●
In the case of system units that do not have a main switch, the
ON/OFF button does not disconnect the monitor socket from the
mains supply. A monitor connected to this socket must always be
switched off using its own ON/OFF button.
●
Lay cables in such a way that there is no danger of people tripping
over them and damaging them.
●
Do not connect or disconnect communication cables during a
thunderstorm.
●
Make sure that no liquids penetrate the interior of the device (risk of
electric shock, short-circuit).
●
In cases of emergency (e.g. damage to the housing, controls or
power cable, or penetration of liquid) turn the device off immediately,
remove the mains plug and notify your sales office or our Service
organization.
●
This device may only be repaired by authorized personnel.
Unauthorized opening of the housing and inadequate repairs may
pose a considerable danger for users (electric shock, risk of ignition).
U41618-J-Z916-1-76
3
Functionality
The PW250LC can be used as a LAN Console to administer Solaris/UNIX
midrange and entry-level servers of Fujitsu Siemens Computers. It offers the
following properties:
– It can be used for installation, configuration, administration, and diagnostics
management of one or more connected PRIMEPOWER and RM servers.
– All functions of a character-oriented display, including IKDB (Internal Kernel
Debugger) and BDM (Board Debug Monitor) or OBP (Open Boot Prom)
Monitor and the rebooting of a system can be carried out from the
PW250LC.
– The xscon tool is used to select and represent one or more consoles of
PRIMEPOWER and RM servers.
– Support for PRIMEPOWER ServerView Suite
– PRIMEPOWER and RM servers can also be booted and installed remotely
(via LAN).
– The PW250LC can be used as a cluster console with high-availability applications using PRIMEPOWER and RM servers. For this purpose hardware
and software components may be required which are not part of the
PW250LC’s basic configuration. The console handles the monitoring
function via the network and the function of the system console for the
PRIMEPOWER or RM servers connected to it.
– Upgrading the hardware (RAM and DAT drive) and the System Console
Software (SCS) enables the PW250LC to be upgraded to a PW250SMC for
use also as an SMC for the PRIMEPOWER enterprise servers.
– Connection to Teleservice.
I A PW250SMC for administering the PRIMEPOWER enterprise servers
can, if the LAN Console software is used, also be used as a LAN Console
for administering the Midrange Systems.
U41618-J-Z916-1-76
7
4
Preinstallation and Installation
The PW250LC is delivered with preinstalled operating system and predefined
hard disk partitioning. In terms of the disk partitioning it can therefore operate
as LAN Console and as an SMC.
I If a reinstallation is required nevertheless, guidelines regarding pre-
installation and hard disk partitioning should be referenced. This will save
you the task of repartitioning if the system is upgraded to an SMC.
4.1
Scope of delivery of the PW250LC
The PW250LC product consists of the system unit with power supply cable, the
Solaris Media Kit, the CDs for the Enhanced Support Facility (ESF), and
patches (PTF-CD), plus the Control² DVD with the LAN Console software.
4.2
Preinstallation of the PW250LC
The PW250LC is preinstalled as follows:
Component
Preinstallation
Operating system
Solaris 8, 9 or 10
(Entire distribution plus OEM Support 64 bit)
incl. Disk Suite, SUNVTS™, ESF
Patches
Current PTF CD and/or Recommended
Patch Cluster (RS Cluster)
Teleservice
V4.0
Language
German
(English is installed automatically as well)
Table 1: Preinstallation of PW250LC
U41618-J-Z916-1-76
9
Preinstallation of the PW250LC
4.2.1
Preinstallation and Installation
Use as SMC
To enable the PW250LC also to operate as an SMC, the System Console
Software (SCS) must be used in addition to the required hardware configuration. Installation must be performed as described in the “Installation Guide
System Console Software” (see “Online Literature on PRIMEPOWER” on
page 126), and in particular the ESF software must be deinstalled beforehand.
4.2.2
Hard disk partitioning
The following hard disk partitioning is predefined:
Partition Folder
Hard disk partitioning
0
/(root)
overlap - (swap + 64 MByte)
1
swap
4096 MByte
2
overlap
Entire disk
3
4
5
6
32 MByte as metadevice
7
32 MByte as metadevice
Table 2: Hard disk partitioning
With this hard disk partitioning the system can be used as a LAN Console or,
after corresponding upgrading, as an SMC on the PRIMEPOWER Enterprise
Servers.
I If you wish to partition the hard disk differently, the required size of the
root file system must be ascertained in accordance with the documents
“SCS Release Notes” and “SCS Installation Guide” (see Online Literature on PRIMEPOWER) for the SCS version used.
10
U41618-J-Z916-1-76
Preinstallation and Installation
4.3
Unpacking and checking the delivery unit
Unpacking and checking the delivery unit
You should keep the original device packaging in case the device has to be
transported.
Ê Unpack all the parts.
Ê Check the package contents for visible transport damage.
Ê Check that the delivery matches the details on the delivery note.
If you discover transport damage or inconsistencies between the packaging unit
and the delivery note, inform your local sales office immediately.
4.4
Install and detach mirroring
A 2-way mirror can be set up for the swap and root file systems. This ensures
that both disks of the PW250LC are in use.
It is presumed that both hard disks are partitioned identically:
– 4 copies of the state database (2 per disk)
– one 2-way mirror for the root file system
– one 2-way mirror for the swap file system
The extension of the file /etc/lvm/md.tab below contains the configuration entries
for mirroring the root and swap file systems.
U41618-J-Z916-1-76
11
Install and detach mirroring
Preinstallation and Installation
# state data base
#
mddb01 -c 2 /dev/dsk/c0t0d0s7 /dev/dsk/c0t2d0s7
# root mirror
d1 -m d10
d10 1 1 /dev/dsk/c0t0d0s0
d11 1 1 /dev/dsk/c0t2d0s0
# swap mirror
d2 -m d20
d20 1 1 /dev/dsk/c0t0d0s1
d21 1 1 /dev/dsk/c0t2d0s1
I Further information on the commands can be found in the man pages:
man command name
12
U41618-J-Z916-1-76
Preinstallation and Installation
4.4.1
Install and detach mirroring
Mirroring the root and swap file systems
The configuration above is defined by the following commands. Order and
syntax options have strictly to be observed.
metadb -a -f mddb01
metainit -f d10
metainit d11
metainit d1
metaroot d1
metainit -f d20
metainit d21
metainit d2
Change the entry for the swap file system in the file /etc/vfstab to the meta device
/dev/md/dsk/d2:
/dev/dsk/c0t0d0s1
-
-
swap -
no
-
-
-
swap -
no
-
change to
/dev/md/dsk/d2
lockfs -fa
At that time the system has to be rebooted:
reboot
metattach
d1 d11
metattach d2 d21
dumpadm -d /dev/md/dsk/d2
U41618-J-Z916-1-76
13
Install and detach mirroring
4.4.2
Preinstallation and Installation
Detach mirroring of the root and swap file systems
metadetach d1 d11
metaroot /dev/dsk/c0t0d0s0
metadetach d2 d21
Change the entry for the swap file system in the file /etc/vfstab to the device
/dev/dsk/c0t0d0s1:
/dev/md/dsk/d2
-
-
swap -
no
-
-
-
swap -
no
-
change to
/dev/dsk/c0t0d0s1
At that time the system has to be rebooted:
reboot
dumpadm -d /dev/dsk/c0t0d0s1
metaclear -r d1
metaclear d11
metaclear -r d2
metaclear d21
metadb -f -d c0t0d0s7 c0t2d0s7
14
U41618-J-Z916-1-76
Preinstallation and Installation
4.5
First booting
First booting
Identification
When the system boots for the first time, parameters for identification like host
name, network, time zone and root password are required.
Language setting
When the Solaris operating system has booted and signed off, a mask appears
prompting the user name. The desired language can be chosen in the following
menu:
Desktop Login --> Options --> Languages
Once you have entered the password, the CDE (Common Desktop
Environment) is started.
All other parameters are set using the usual Solaris tools.
U41618-J-Z916-1-76
15
5
LAN Console
The LAN Console supports the installation, configuration, administration and
diagnostic management of one or more connected PRIMEPOWER entry-level
or midrange or RM servers.
The serial port (ttya) is the default console access for all PRIMEPOWER and
RM servers. This access is preferable towards the graphical console (mouse,
keyboard, graphics) for reasons of access security and availability in critical
operation and error situations. The concept of the LAN Console with one or
more RCAs offers an optimal administration, especially in clusters of several
servers (single point of administration) or if remote administration is required.
5.1
Architecture
The LAN Console architecture is based on the following components:
●
PW250LC with Solaris
●
LAN Console software
●
One or more RCAs, to which the LAN Console is connected via the LAN
(TCP/IP)
or
●
The XSCF of one or more PRIMEPOWER 250/450 systems, including the
XSCF connection via LAN to the LAN Console
●
RCA4plus, XSCF, RCA4 and RCA3 may be operated in parallel on a LAN
Console.
U41618-J-Z916-1-76
17
Architecture
LAN Console
RM Systems
PRIMEPOWER
(MR) Systems
PRIMEPOWER
250/450 Systems
with XSCF
or
V.24
Remote Communication Adapter
RCA
Ethernet TCP/IP
LAN Console
Figure 1: LAN Console architecture
18
U41618-J-Z916-1-76
LAN Console
5.2
Remote Communication Adapter
Remote Communication Adapter
A Remote Communication Adapter is needed to connect the LAN Console to
the PRIMEPOWER entry-level/midrange or RM servers so that it can monitor
and operate these systems. The existing V.24-based serial console interfacing
concept for the PRIMEPOWER/RM has been retained. The RCA (current
device designation RCA4plus) is available as a standalone model with 8 ports.
One or two devices can be installed side by side in the rack in one height unit
using an optional rack installation kit.
In principle, the XSCF of a PRIMEPOWER 250/450 can be regarded as an RCA
with a console port. Monitoring and operating of PRIMEPOWER 250/450
systems using the LAN Console therefore can be done via direct connection of
the XSCF to the LAN.
For administration purposes the XSCF also is directly accessible via LAN.
The available commands and the XSCF port numbers to be used can be looked
up in the XSCF documentation (see information below).
Alternatively the console connection of a PRIMEPOWER 250/450 system can
be done by an RCA via serial interface - see figure 5 and figure 6 on page 25.
I The following applies to the complete manual: all information on the
XSCF, especially on configuration, connection establishment and
amount on XSCF commands must be looked up in the XSCF documentation, i. e. the eXtended System Control Facility User's Guide available
on the ESF (Enhanced Support Facility) CD, the HCP (Hardware Control
Program) CD and the User's Manual PRIMEPOWER 250/450 (see
“Related publications” on page 117).
V RCA4plus does not support SIDATA
The RCA4plus does not support SIDATA and must therefore be installed
by our Service organization.
The safety aspects of this process are described in the chapter “Safety notes”
on page 5.
I Distinguishing between RCA4plus and previous variants
The designation RCA refers to all existing RCA types.
However, this manual deals primarily with the functionality of the
currently available RCA4plus.
U41618-J-Z916-1-76
19
Remote Communication Adapter
LAN Console
Basic descriptions, in particular of the configuration and establishment of
console connections, still apply for the previous variants. If a distinction
needs to be made between the current RCA4plus and its predecessors,
the earlier versions are referred to as RCA3 and RCA4 or RCA48/RCA4-16. Detailed information on the previous versions is provided in
the manual “LAN Console and System Management Console” (see
“Related publications” in the appendix).
The RCA4plus can be ordered quoting the following number:
RCA4plus
Rack installation
kit
D:GPRAC-RCA4P
D:GPRAC-ZB22E
A3C40071339
Table 3: RCA4plus order numbers
You will find the order numbers for the cables you need in the section “Cable
types” on page 27.
I The RCA4plus requires the LAN Console software from Control² DVD
version 02/2005.
V No RCA4plus and XSCF connection to an Intel-based LAN Console
The RCA4plus or XSCF cannot be operated on the old Intel-based LAN
Console.
20
U41618-J-Z916-1-76
LAN Console
5.2.1
Remote Communication Adapter
Connections on the rear of the RCA4plus
I LAN cables and the port cable are not included in the package and have
to be ordered separately. For the order numbers refer to the section
“Cable types” on page 27.
C O NS O LE
P ORT
LAN
Figure 2: Connections on the rear of the device
1. Serial port connectors 1-8
2. 10/100BaseT Ethernet port
3. RCA4plus CONSOLE PORT
4. Power supply
V Caution
The power supply should be easily accessible.
5.2.1.1
LAN connection
The RCA4plus has a 10/100BaseT Ethernet port (see figure 2) for connection
to the LAN.
5.2.1.2
RCA4plus CONSOLE PORT
For administration and configuration of the RCA4plus also the RCA4plus
CONSOLE PORT may be used. The settings are the same as for the RCA ports
(see “Configuring the RCA” on page 51).
U41618-J-Z916-1-76
21
Remote Communication Adapter
5.2.1.3
LAN Console
Serial port for connecting the console
The RCA4plus has 8 serial port connectors and can thus connect up to 8
servers.
Transmission rate: 50 Baud to 115.2 Kbit/s
Once you have positioned the RCA in a suitable location or installed it in the
rack,
Ê connect the RCA to the LAN
Ê connect the ports to the server system using the appropriate cable, as
shown in the next diagrams.
V Cables must not prevent the rear door from closing
Always make sure when connecting cables that the rear door of the
system cabinet can be closed again effortlessly.
Ê Secure the connector by tightening its screws.
Connecting to the RM server
Figure 3: Connecting the RCA to the backplane of the device (in this case an RM 600 E45
model)
Ê Connect the cable to the connector which is at the top of the basic HIOS or
EHIOS basic controller (9-pin).
22
U41618-J-Z916-1-76
LAN Console
Remote Communication Adapter
Connecting to the PRIMEPOWER (MR) server
Correspondingly, the cables are connected to serial port A on the backplane of
the PRIMEPOWER system cabinet.
SERIAL B
25pol Bu
25pol Bu
SERIAL A
PRIMEPOWER 650/850
KB/MOUSE ETHERNET
Figure 4: Connecting the RCA to PRIMEPOWER rack models
Ê If necessary, remove the inserted adapter before connecting the RCA.
U41618-J-Z916-1-76
23
LAN Console
PRIMEPOWER 200/400/600
SERIAL A
SERIAL A/B
25pol Bu
25pol Bu
RCI
LAN
SERIAL B
25pol Bu
25pol Bu
RCI
LAN
Remote Communication Adapter
Figure 5: Connecting the RCA to the PRIMEPOWER 200/400/600 vertically or horizontally
24
U41618-J-Z916-1-76
LAN Console
Remote Communication Adapter
Connection to PRIMEPOWER 250/450 systems
Serial port (tty-a) for RCA
XSCF LAN port
Figure 6: Connecting the RCA to PRIMEPOWER 250
Serial port for RCA
(tty-a)
XSCF LAN port
Figure 7: Connecting the RCA to PRIMEPOWER 450
U41618-J-Z916-1-76
25
Remote Communication Adapter
LAN Console
Connecting to the PRIMEPOWER 100N
Serial Ports A/B
Serial A
Use of serial port A
RCA4
Serial A/B
Use of serial port B
Adapter
9pole
25pole
SerialB
SerialA
SerialA
RCA4
Figure 8: Connecting to the PRIMEPOWER 100N
26
U41618-J-Z916-1-76
LAN Console
5.2.2
Remote Communication Adapter
Cable types
The RCA4plus comes with a power cable (1.8m) with an earth contact type plug
and an RCA4plus console port cable. The following serial cables are required
for connecting the RCA4plus to the console port of the PRIMEPOWER or RM
server and must be ordered separately.
Name
Length
Order/Part No.
Power cable with rubber
connector for rack installation
1.1m
D:KB258-C110
Power cable with rubber
connector for rack installation
2.5m
D:KB258-C250
Port cable for PRIMEPOWER
(MR) 25-pin DSUB female
2m
10m
D:GPRAC-KB04PE16
D:GPRAC-KB04WE16
Port cable for PRIMEPOWER
250/450
3m
10m
D:GP70P-KA02
D:GP70P-KA03
Port cable for RM*
RJ45 to 9-pin DSUB female
5m
15m
D:GPRAC-KB04RE16
D:GPRAC-KB04ME16
Network cable (LAN) for
connecting to HUB or Switch
2m-100m
D:GP7KB-13xx
xx=02/05/10/15/30/50
xx=A0 for100m
Network cable (LAN) for direct
connection system console to
RCA/CCU (cross over cable)
D:GP7KB-14xx
(Category5 UTP cable xx
meters, xx=05/10/20/50)
xx=A0 for 100m
Table 4: RCA cabling
* the port cable may also be used with PRIMEPOWER systems using the DSub
adapter 9pole to 25pole that is delivered with the system. Thus the cables with
a length of 5m and 15m are also available for
PRIMEPOWER systems.
U41618-J-Z916-1-76
27
Remote Communication Adapter
LAN Console
5.2.3
Technical specifications of the RCA4plus
5.2.3.1
Power ratings
Mains voltage range
(autorange)
100V-250V
Nominal frequency
50-60 Hz
Power consumption
approx. 22 W
Rated current
0.5A
Table 5: Power ratings
5.2.3.2
Environmental conditions
Temperature
0°C to +40 °C
Relative humidity
10% to 90% (non-condensing)
Table 6: Temperature
Requisite intake and exhaust air clearance for ensuring sufficient ventilation:
Front
min. 100 mm
Rear
min. 100 mm
Table 7: Intake and exhaust air clearance
5.2.3.3
Dimensions and weights
Width
222.3 mm
Height
44.5 mm
Depth
203.2 mm
Weight
1 kg
Table 8: Dimensions and weights
28
U41618-J-Z916-1-76
LAN Console
5.2.3.4
Remote Communication Adapter
Standards
Product safety
IEC60950-1
EN60950-1
ANSI/UL 60950-1
CSA C22.2 No.60950-1-CAN/CSA
Electromagnetic
compatibility
EN 55022, class A
EN 55024
EN 61000-3-3
FCC part 15 class A
Table 9: Standards
5.2.3.5
Conformity tests
Europe (CE)
EU Directive: 89/336/EEC (EMC)
73/23/EEC (product safety)
Table 10: Conformity tests
5.2.3.6
Approvals
Global
IEC CB Scheme
Table 11: Approvals
5.2.4
Switching on the RCA4plus
Ê The RCA4plus is switched on by connecting it to the power outlet.
Figure 9: Front view of RCA4plus
U41618-J-Z916-1-76
29
Remote Communication Adapter
LAN Console
Init
V Restart
INIT interrupts operation of the RCA and causes the RCA to
restart.
With the use of INIT the RCA is reset to the default values set at the
factory.
If you want to delete the current configuration, press INIT for about
7 seconds. The ONLINE LED first flashes slowly, then more quickly to
acknowledge the deletion. If you also want to delete the IP address,
press INIT for a further 5 seconds. To acknowledge the deletion, ONLINE
flashes even more quickly.
Thus the state of delivery is re-established
I Before the use of INIT, it is recommended to note the MAC
address to be able to reconfigure the system.
Reset
Interrupts operation of the RCA and reboots it while retaining the set
values.
100MBps
lights up if the RCA is connected to a 100 MBps LAN.
TRAFFIC
lights up when there is data traffic.
LINK-LED
lights up if the RCA detects that it is connected to a network.
ONLINE-LED
lights up (does not flash) if the self-test and the initialization phase of the
RCA are run through successfully. If the ONLINE-LED flashes for
approx. 1 minute after it is switched on, an error has occurred in the selftest or during initialization.
POWER-LED
lights up if the RCA is connected to the power supply system.
30
U41618-J-Z916-1-76
LAN Console
5.3
Installing software packages on the LAN Console
Installing software packages on the LAN
Console
The LAN Console software needs no more than 10 MBytes of storage space.
– The LAN Console software is stored on the Control² DVD. The following
packages are relevant for the LAN Console:
Package
SMAWrtty (communication)
SMAWxsco (console mapping)
SMAWrins (remote installation server)
SMAWtelx (Telecall gate)
SMAWsmon (Secure Device Monitor)
– The LAN Console supports the connection setup via ssh (secure shell) and
telnet. During installation of software you may be instructed to install the
required ssh.
– Select PRIMEPOWER ServerView Suite if the LAN Console is to be integrated
in the ServerView cluster.
Installation procedure:
Ê Insert the Control² DVD. The required packages are installed using the
Webstart wizard.
The File Manager window opens automatically, showing the contents of the
DVD.
U41618-J-Z916-1-76
31
Installing software packages on the LAN Console
LAN Console
Figure 10: File Manager window for the Control² DVD
Ê Double-click Installer and click the Next button until you see the following
mask:
Figure 11: Installation mask for the Control² DVD
Ê Choose the product “LAN Console II (SPARC) - Default Install”.
The following packages are installed in the /opt/SMAW directory:
32
U41618-J-Z916-1-76
LAN Console
Installing software packages on the LAN Console
– SMAWrtty
– SMAWrins
– SMAWtelx
– SMAWxsco
– SMAWsmon
If you want to use the LAN Console to administer several systems simultaneously in one or more domains, you should also install the licensed “Domain
Admin 2.1” product (see PRIMEPOWER ServerView Suite 2.2 manual).
Teleservice 4.0 (SMAWtssv) is already preinstalled.
The SMAWxsco package requires the following packages, which have already
been installed:
SUNWbnur
Networking UUCP Utilities
(Root)
SUNWbnuu
Networking UUCP Utilities
(User)
SUNWdhcsr BOOTP/DHCP Server Services
(Root)
SUNWdhcsu BOOTP/DHCP Server Services
(User)
With respect to the functionality of the components in the individual packages,
it is assumed that the path /usr/openwin/bin is contained in the PATH environment
variable. This path must be set for root.
I Language settings:
In accordance with the preinstallation of the PW250LC (setting as under
“Preinstallation of the PW250LC” on page 9), German is supported as
the standard language. Especially the output of the mask texts of xscon
is in German (see “Operating the LAN Console” on page 58).
If additional languages have been installed and another language setting
is to be used, e.g. en_GB.ISO8859-1, the following adaptation has to be
made to get the output of xscon in English (owner root):
#cd /usr/lib/locale/en_GB.ISO8859-1/LC_MESSAGES
#ln -s /opt/SMAW/SMAWxsco/locale/en_US/xscon
’pwd’/xscon
xscon does not support other languages than German and English.
U41618-J-Z916-1-76
33
Installing software packages on the LAN Console
LAN Console
Starting PRIMEPOWER ServerView Suite
You can start PRIMEPOWER ServerView Suite either at shell level or at desktop
level:
– Starting at shell level
You start the user interface in write mode by entering the following at
command level:
/opt/SMAW/bin/wsa <hostname>
The welcome screen then appears and you proceed as described there
(language setting, root password).
If you only want to invoke the user interface in read mode, enter the
following:
/opt/SMAW/bin/wsa -read only <hostname>
A dialog box then appears and you proceed as described there (user name,
root password, language setting, etc.).
– Starting at desktop level
You will find the PRIMEPOWER ServerView Suite application on the desktop in
the Workspace Menu under Applications -> Application Manager ->
System_Admin -> WebSysAdmin.
34
U41618-J-Z916-1-76
LAN Console
5.4
Configuration
Configuration
In order to be able to configure the system, the LAN Console must have been
connected to the RCA via the LAN and the RCA must have been connected to
one or more PRIMEPOWER or RM servers via a serial port (see figure 2 on
page 21). Alternatively, the LAN Console can also be connected to the XSCF of
a PRIMEPOWER250 or 450 system via LAN.
From the LAN Console, the system administrator manages both the RCA or the
XSCF and the console connections of the attached PRIMEPOWER or RM
servers.
I Distinguishing between available RCA types
This manual deals primarily with the configuration of the current
RCA4plus described in the section “Remote Communication Adapter”.
Because of the comparable functionality of RCA4plus and RCA4, the
type designation RCA4 is also used for RCA4plus, in particular for configuring console connections (see “Configuring the LAN Console and
RCA”). In terms of the possible number of console connections, the
RCA4plus is the same as RCA4-8.
If it is necessary to make a distinction between the current RCA and
previous versions, the current RCA is referred to as RCA4plus and the
previous versions as RCA4(-8/-16) or RCA3.
I Distinguishing between RCA and XSCF
Within this manual the XSCF of the PRIMEPOWER 250/450 systems
functionally is equated with an RCA that enables a console connection
and a read-only console connection. Therefore in the following only the
terminus “RCA“ is used, if no special distinction between RCA and XSCF
is necessary.
All available RCA types, including XSCF, can be operated from the LAN
Console in mixed mode.
U41618-J-Z916-1-76
35
Configuration
5.4.1
LAN Console
Connection between LAN Console and RCA
Between LAN Console and RCA different kinds of encrypted and unencrypted
connections are possible:
rtty
Unencrypted connection type between LAN Console and RCA in the
private LAN. This connection also enables access to the predecessor
types RCA1-3.
This connection type is not possible via the XSCF.
ssh
A secure, i. e. encrypted, connection to the RCA and therefore to the
connected console of the PRIMEPOWER or RM system is possible with
ssh (Secure Shell).
An ssh connection is also possible for PRIMEPOWER 250/450 systems
via the XSCF.
Version 2 of the ssh protocol (SSH2) is supported.
telnet
unencrypted kind of connection between LAN Console and RCA4 or
XSCF.
I Console connections via ssh or telnet can be configured only for
RCA4plus, XSCF, and RCA4.
I If console connections via the RCA4 are set up via rtty, i.e. not via ssh or
telnet, for security reasons the RCA must be connected in the private
LAN.
5.4.2
Configuring the connected servers
5.4.2.1
Configuring the PRIMEPOWER systems
A V.24 cable is used to make the connection at the serial port to the required
port on the RCA in accordance with the description in the section “Serial port
for connecting the console” on page 22, the “Cable types” on page 27 and the
definition in “mklancon - Create LAN Console configuration entries” on page 43.
36
U41618-J-Z916-1-76
LAN Console
Configuration
The line speed for the RCA ports is set by default to 9600 baud, see PORT
commands in the section “RCA commands”.
The terminal type needs to be set for the console login for all PRIMEPOWER
systems:
Ê In the /etc/inittab file, set the terminal type xterm in the entry for the console
login:
...:/usr/lib/saf/ttymon -g ... -d /dev/console -T xterm
-l console
Configuring the PRIMEPOWER 250/450 server
I
Not the PW250LC itself is meant here, but the administered system.
If the console of a PRIMEPOWER 250/450 is not connected via Port A, but via
the XSCF, re-configuration for this console access has to be done according to
the XSCF documentation (see “PRIMEPOWER publications” on page 123).
Here the XSCF configuration is done using the Machine Administration Menu
provided by ESF.
The essential configuration steps for telnet and ssh connections are:
– configure network settings for the XSCF
– create an XSCF user with root rights
If necessary, create a user Admin according to the RCA (see also the section
“mklancon - Create LAN Console configuration entries” on page 43, ssh)
– activate console access via LAN
If a PW250LC with ssh is to access the XSCF or the RCA4, it must support ssh.
This can be implemented using OpenSSH of the Control² DVD for Solaris 8 or
using the ssh which is available by default for Solaris 9 and Solaris 10.
In addition, further XSCF settings have to be made for ssh connections using
ESF commands (see ssh administration in the XSCF User's Guide, appendix
“Related publications” on page 117).
I If a secure console connection is to be used via ssh, also the connections
to the XSCF and to the additionally available read-only console only
should also be configurable via an ssh connection for security reasons
(see ssh administration in the XSCF User's Guide, appendix “Related
publications” on page 117).
U41618-J-Z916-1-76
37
Configuration
5.4.2.2
LAN Console
Configuring the RM systems
The line speed of the respective RCA ports must be set to 19 200 baud for
connecting RM systems to the RCA (RCA4), see “Port commands” on page 72.
5.4.3
Configuring the LAN Console and RCA
This section describes the initial setup of the LAN Console, i.e. the definition of
console accesses to PRIMEPOWER and RM servers and initial configuration of
the RCA.
For an existing LAN Console setup it also describes the addition of further
console connections, configuration of an additional RCA and connection of
another LAN Console to an RCA that has already been configured.
Furthermore, it briefly deals with possible changes to the configuration of the
LAN Console and RCA.
Only the root user can carry out the configuration steps. The dialog language is
English.
Error situations relating to the configuration are described in the section
“Diagnostics” on page 64.
I This chapter does not contain the requested configuration procedures,
which admit the access to the console of PRIMEPOWER 250/450
systems via the XSCF - see also “Configuring the PRIMEPOWER
250/450 server“ and XSCF documentation in the appendix “Related
publications” on page 117.
It is, however, presupposed that the XSCF is known in the LAN, i. e. it is
accessible from the console.
The following sections “Initial configuration of the LAN Console and RCA“
and “Configuring the RCA“ are of no significance for the configuration of
console access via the XSCF.
38
U41618-J-Z916-1-76
LAN Console
Configuration
Configuring the LAN console
Create
configuration entry
mklancon
no
Configuration entry
correct ?
showlancon
Delete
configuration entry
rmlancon
yes
Next
configuration entry?
yes
no
Configuring the RCA
Make the RCA
addressable in the network
Switch on RCA
Configure
RCA
xscon
Figure 12: Configuring the LAN console and the RCA
U41618-J-Z916-1-76
39
Configuration
5.4.3.1
LAN Console
Initial configuration of the LAN Console and RCA
I If console connections via the RCA are not set up via ssh or telnet (see
“mklancon - Create LAN Console configuration entries” on page 43), the
RCA for security reasons has to be connected in the private LAN.
The initial configuration of the LAN Console and RCA takes place in two steps.
The first step is to define the console accesses to the PRIMEPOWER and RM
servers for the LAN Console. In addition, the RCA is made known in the network
from the LAN Console and then configured.
Before a LAN Console and RCA are configured for the first time, certain precautions must be taken and the required information must be made available:
●
The network administrator must define the following in the LAN:
– IP address of the RCA and the LAN Console. The LAN Console must be
accessible using network commands, for example ping.
– System name of the RCA. The RCA system name may have to be made
known to the DNS (Domain Name Service).
– The RCA must be located in the same LAN segment as the LAN Console
to enable the initial configuration of the RCA.
●
Information required about the LAN:
– Netmask of the RCA
– If a gateway has been set up: IP address of the gateway to the network
of the RCA
●
Ascertain the Ethernet address (MAC address) of the RCA
The MAC address is the hardware address that is used to access a device
initially. The Ethernet address (MAC address) is shown on a sticker attached
to the RCA housing (see chapter “Connections on the rear of the RCA4plus”
on page 21).
●
Define the allocation of RCA ports. With RCA4plus COM ports 1-8 are
mapped to port numbers 3001-3016 for rtty and telnet connections, and to
port numbers 3101-3108 for ssh connections:
– Allocate the RCA ports to PRIMEPOWER and RM servers.
– Define a symbolic system name for each RCA port/PRIMEPOWER and
RM server allocation.
40
U41618-J-Z916-1-76
LAN Console
5.4.3.2
Configuration
Configuring the LAN Console
The LAN Console can represent up to 256 consoles on PRIMEPOWER or RM
servers. Of these a maximum of 63 console connections each are possible via
ssh or telnet with RCA4plus/RCA4, and 63 using the XSCF.
When configuring the LAN Console for the first time, the known console
accesses, referred to as configuration entries, can be defined for the PRIMEPOWER or RM servers. This can be done with the aid of the mklancon script by
specifying:
– the type of RCA (RCA Type)
– the type of connection (ssh, telnet, rtty)
– the system name of the RCA (RCA SystemName)
– the RCA port number to be used (RCA PortNumber)
– the console name (ConsoleName). The console name is the logical address
of the PRIMEPOWER or RM server that is to be administered. It is advisable
to use the system name of the PRIMEPOWER or RM server as the console
name.
The showlancon script checks the configuration entries that are created.
Configuration entries can be removed with the aid of rmlancon. If parameters
need to be changed for a configuration entry, this entry has to be deleted and
recreated with the new data.
Commands
For each of these commands there is a description that you can look up with
man command name
U41618-J-Z916-1-76
41
Configuration
LAN Console
telnet and ssh connections
I The RCA (not the XSCF) can operate either in telnet mode for console
connections via telnet and rtty or in ssh mode for console connections via
ssh.
Basically console connections can be implemented simultaneously via the
RCA4plus using both telnet and ssh (see RCA commands).
The section “Activate ssh mode” on page 53 describes only the configuration in
which either telnet or ssh connections are possible exclusively.
The RCA4plus permits up to four simultaneous connections to each port. In
addition, an existing connection can be taken over from a newly established
connection to the same port (see command “Server Share” on page 83).
I Only telnet or ssh connections may be set up to the XSCF.
Configuration entries for the real console connection, but also entries for
administration of the XSCF and for read-only-console connections can
be created. XSCF connections can be configured for the following ports:
in telnet mode
port 23 (console connection PRIMEPOWER system)
admin (port 8010, XSCF administration access)
port 8011 (read-only console connection)
in ssh mode
port 22 (PRIMEPOWER system console connection)
admssh (port 8810, XSCF administration access)
port 8811, 8812 (read-only console connection)
Detailed information can be found in the XSCF documentation
(see “Related publications” on page 117).
As specified in the XSCF documentation, several telnet or ssh connections can
be established to certain XSCF ports at the same time.
If such parallel connections to the RCA4plus or XSCF are also to be used from
the LAN Console, a corresponding number of configuration entries must be
created for the same RCA4plus or XSCF port number with the mklancon
command described below.
I Because of the comparable functionality, “RCA4plus” and “RCA4” should
be regarded as equivalent in the commands described below. In this
manual this is expressed by the type designation RCA4(plus).
42
U41618-J-Z916-1-76
LAN Console
Configuration
Only the term RCA4 is used in the syntax and arguments of the commands. For
the commands you must take into account that the RCA4plus corresponds to
RCA4-8 as regards the port number range.
mklancon - Create LAN Console configuration entries
Syntax:
mklancon -t <RCA Type> [-c <Kind of Connection> -l]]
<RCA SystemName> <RCA PortNumber> <ConsoleName>
The command arguments determine the RCA port for which a configuration
entry is to be generated.
-t RCA Type
The permitted values are “3” for the RCA3, “4” for the RCA4(plus), and
“5” for the XSCF.
-c Kind of Connection
Console connections can be set up via ssh or telnet exclusively for the
RCA4(plus) and XSCF. Valid entries are:
– for ssh: s
– for telnet: t
If the c option is missing, the connection for RCA4(plus, 1-4) is set up via
rtty, and for XCSF via telnet.
-l
For ssh or telnet connections to the RCA (RCA4(plus) or XSCF), the RCA
user name with the associated password used for logging on to the RCA
must be input during processing.
The default for the RCA user name is Admin.
RCA SystemName
The system name of the required RCA.
RCA PortNumber
A unique TCP/IP port number, which is served by the RCA. The port
number of the RCA4(plus) and the XSCF is dependent on the kind of
connection. The port number must be in the following valid range for the
RCA type:
– RCA3: from 3001-3006
U41618-J-Z916-1-76
43
Configuration
LAN Console
– ssh connection:
RCA4 (16 ports): from 3101-3116 or admssh
RCA4plus, RCA4-8 (8 ports): from 3101-3108 or admssh
XSCF: 22, 8811, 8812 or admssh.
– telnet connection or rtty connection (for RCA4(plus) if -c option is
missing):
RCA4 (16 ports): from 3001-3016 or admin
RCA4plus, RCA4-8 (8 ports): from 3001-3008 or admin
XSCF: 23, 8011 or admin.
ConsoleName
The symbolic system name that is going to be used. This name must not
yet exist. It has a maximum length of 14 characters and consists of
alphanumeric characters (except “#” and “:”) only.
The input of RCA system name should always be done in a uniform way, i.e.
always either with or without a domain suffix (e.g. utopia, not utopia.xxx.xxx.de) in
order to avoid ambiguities with the rmlancon and showlancon commands.
If an ssh or telnet connection with -l option is configured for the RCA4(plus), the
automatic logon to the RCA4(plus) is implemented with the specified RCA
user name and password during the connection setup with xscon.
If no -l option was entered, the user name and password are inquired from the
RCA4(plus) when a telnet connection is set up, and the password of the RCA
user Admin when an ssh connection is set up.
If the -l option is specified during the configuration of an ssh connection, the
automatic logon to the XSCF is made using the specified XSCF user name;
especially for the admssh port, XSCF login is made directly.
If no -l option is specified, the password of the XSCF user Admin is asked for in
an ssh connection.
For telnet connections configured via XSCF the -l option need not be specified.
The setup of the telnet connection leads directly to the console window or the
XSCF login. For the setup of telnet connections via the XSCF, only the existence
of an XSCF user with root rights is required.
If a port number in the range of 3009-3016 or 3109-3116 is specified for the
RCA4(plus), you will be notified that a configuration entry for an RCA4 with 16
ports will be generated.
44
U41618-J-Z916-1-76
LAN Console
Configuration
If the port number admin or admssh is entered for the RCA4(plus) or the XSCF, a
configuration entry is created for administering the RCA4(plus)/XSCF, see also
“Configuring the RCA” on page 48 and documentation on the XSCF, appendix
“Related publications“.
To execute the command for an RCA3, a password has to be assigned for the
specified RCA port.
The following are created when a configuration entry is generated for an RCA
type for the first time:
– the monitor lanconsole for the RCA3
– the monitor lanconsole1 for the RCA4(plus) without specification of the kind
of connection (without -c option)
– the monitor lanconsole3 for ssh or telnet connections to the RCA4(plus)
(-c option: s | t) and
– the monitor lanconsole4 for the XSCF.
U41618-J-Z916-1-76
45
Configuration
LAN Console
rmlancon - Remove LAN Console configuration entries
Syntax:
rmlancon <RCA SystemName> |
-t <RCA Type> <RCA SystemName> [<RCA PortNumber >]|
-n <ConsoleName> |
-a |
-t <RCA Type> |
-t <RCA Type> -c <Kind of connection>
[<RCA SystemName>]
RCA SystemName
All configuration entries belonging to the specified RCA are displayed
and can be removed with “y”.
RCA PortNumber
If a configuration entry is found for the specified TCP/IP port number –
on the RCA4(plus) or the XSCF admin or admssh is also possible – which
is served by the RCA, it is displayed and can be removed with “y”.
-n ConsoleName
The configuration entry belonging to the specified symbolic system name
is output and can be removed with “y”.
-a
All configuration entries on the LAN Console for all RCA types are
displayed and can be removed with “y”.
-t RCA Type
The permitted entries are “3” for the RCA3, “4” for the RCA4(plus), and
“5” for the XSCF. All of the configuration entries on the LAN Console of
the specified RCA type - which may fulfill the further conditions - are
displayed and removed with “y”.
-c Kind of connection
The permitted entries are “t“ for telnet and “s“ for ssh, exclusively for the
RCA4(plus) and the XSCF. Only configuration entries of the indicated
kind of connection are displayed and removed.
If the last configuration entry for one of the monitors lanconsole, lanconsole1,
lanconsole3 or lanconsole4 is deleted, this monitor is closed.
46
U41618-J-Z916-1-76
LAN Console
Configuration
showlancon - Show the specified configuration entries
Syntax:
showlancon <RCA SystemName> |
-t<RCA Type> <RCA SystemName> [<RCA PortNumber>]|
-n <ConsoleName> |
-a |
-t <RCA Type> |
-t <RCA Type> -c <Kind of Connection>
[<RCA SystemName>]
The command arguments determine which configuration entries are to be
displayed.
RCA SystemName
All configuration entries belonging to the specified RCA are displayed.
RCA PortNumber
If a configuration entry is found for the specified TCP/IP port number –
on the RCA4(plus) or the XSCF admin or admssh is also possible – which
is served by the specified RCA, it is displayed.
-n ConsoleName
The configuration entry belonging to the specified symbolic system name
is output.
-a
All configuration entries of all RCA types on the LAN Console are
displayed.
-t RCA Type
The permitted values are “3” for the RCA3, “4” for the RCA4(plus), and
“5” for the XSCF. All of the configuration entries on the LAN Console of
the specified RCA type - which may fulfill the further conditions - are
displayed.
-c Kind of connection
The permitted entries are “t“ for telnet and “s“ for ssh, exclusively for the
RCA4(plus) and XSCF. Only configuration entries of the indicated kind of
connection are displayed.
Finally the current state of the associated lanconsole, lanconsole1, lanconsole3 or
lanconsole4 monitors is displayed (e.g. NOTRUNNING). If the -a option is
specified, the states of all monitors are displayed assuming configuration
entries exist for the associated RCA types (for information on the monitors, see
section “Status information for the monitors” on page 65).
U41618-J-Z916-1-76
47
Configuration
5.4.3.3
LAN Console
Configuring the RCA
I This section is irrelevant for console connections via the XSCF.
To be configured successfully, the RCA (RCA4plus) must be known and also
accessible in the LAN, and all serial console connections (V.24 lines) from the
RCA to the required PRIMEPOWER or RM servers must be implemented.
Since the RCA does not have a keyboard or display of its own, it is configured
from the LAN Console. For this purpose the RCA’s network data is transferred
to it using bootp mimicry, which means that the RCA can be addressed after its
initial boot, i.e. after being powered on, from the LAN Console.
The RCA is configured in the following stages:
– The RCA is addressed in the network.
– The configuration data is set in the RCA.
I Initial configuration of the RCA4plus is different from that of the previous
versions. Initial configuration of the RCA4 and RCA3 is described in the
manual “LAN Console and System Management Console”.
Addressing the RCA in the network
The RCA is made accessible in the LAN by means of bootp mimicry. To permit
this the LAN Console must be made available as a bootp server for the RCA to
be configured.
This is done by using the Solaris system commands dhcpconfig, dhtadm and
pntadm (see also the manpages).
If no dhcp or bootp service has yet been configured on the LAN Console, the
following steps must be performed:
– Initial configuration of the dhcp service:
dhcpconfig -D -r SUNWfiles -p /var/dhcp
generates the /var/dhcp folder, the global DHCP table
/var/dhcp/SUNWfiles1_dhcptab, and the configuration file /etc/inet/dhcpsvc.conf,
and starts the dhcp service.
– Configuration of the bootp service under dhcp:
The following line is added to the dhcp configuration file /etc/inet/dhcpsvc.conf:
48
U41618-J-Z916-1-76
LAN Console
Configuration
BOOTP_COMPAT=manual
You use the following command to create the DHCP table for the LAN
segment to which the LAN Console and the RCA belong:
pntadm -C <IP LAN Console>
IP LAN Console: IP address of the LAN Console
A table with the logical name X.X.X.0 is generated (X=decimal value (0<=
X<=255), i.e. the file /var/dhcp/SUNWfiles1_X_X_X_0). The name is derived
from the netmask for the LAN segment (in accordance with the entry
/etc/inet/netmasks on the LAN Console).
The bootp configuration must now be performed for the RCA to be configured.
Execute the following commands for further RCAs which are to be configured
in the same LAN segment:
dhtadm -A -m <RCA> -d ":BootSrvA=<IP LAN Console>:"
RCA:
Unique designation of the RCA in the DHCP configuration, e.g. the
system name of the RCA.
IP LAN Console:
IP address of the LAN Console
Now enter the following command:
pntadm -A <IP-RCA> -f BOOTP -i 01<MAC-RCA> -m <RCA> <DHCP table>
IP RCA
IP address of the RCA
MAC-RCA
MAC address of the RCA (only upper-case letters permitted).
Together with the prefix ’01’ this forms a character string for the ’i’ option.
RCA
Designation of the RCA which must be the same as that used in the
dhtadm command.
DHCP table
DHCP table in the form X.X.X.0 - X=decimal value (0<=X<=255) - designates the table generated with the aforementioned pntadm command.
The bootp configuration is then activated by restarting the dhcp service:
/etc/init.d/dhcp stop
/etc/init.d/dhcp start
U41618-J-Z916-1-76
49
Configuration
LAN Console
The RCA can thus be accessed from the LAN Console, e.g. telnet or ping, when
it is switched on for the first time and has executed its boot phase.
RCA access
I You will find an overview of all available RCA commands in the section
“RCA commands” on page 70.
By default an authentication check is performed for accessing the RCA4plus, i.e.
the user name and password must first be entered correctly before the RCA can
be used. This authentication check can be enabled and disabled for setting up
console connections.
The Admin administrator is predefined in the RCA with all extensive rights,
comparable with the user root on Solaris systems. In addition, additional users
can be created in the RCA with different rights - see “User commands” on
page 90. A maximum of 64 users can be administered in the RCA.
The user name and password must be specified when setting up a console
connection where an access check is in operation in the RCA.
It is therefore recommended - as described under “Configuring the RCA” on
page 51 - that you create a superuser for all configured console connections in
the RCA. This user should have exclusive rights to set up console connections
for all RCA ports and be able to issue a BREAK to the target system via an open
channel. This user, in particular, cannot reconfigure the RCA and also cannot
reboot the RCA because of restricted rights.
Administration of the RCA can be implemented both via telnet-/ssh access and
using the components xscon (see “xscon call” on page 58). If xscon is used, the
configuration entries must have been created beforehand using the mklancon
script:
Configuration entry <RCA SystemName>_adm
mklancon -t 4 -c t <RCA SystemName> admin <RCA SystemName>_adm
Configuration entry <RCA SystemName>_ssh
mklancon -t 4 -c s <RCA SystemName> admssh <RCA SystemName>_ssh
RCA SystemName
System name of the RCA
admin
RCA administration port for telnet
50
U41618-J-Z916-1-76
LAN Console
Configuration
admssh
RCA administration port for ssh
These configuration entries are referred to as administration accesses to the
RCA4plus in the following.
The configuration entry <RCA SystemName>_ssh need be created only if the RCA
is also to be used in ssh mode.
I An ssh connection to the RCA is not possible in the context of initial
configuration.
Configuring the RCA
The RCA is configured from the LAN Console using the administration access
mentioned above and the xscon component described in the section “Operating
the LAN Console” on page 58. In particular the administrator password must be
assigned and the port parameters must be set for this configuration.
I When it is delivered or after a potential initialization (compare “Init” on
page 30) the RCA is in the telnet mode. In this mode the RCA4plus can
only be accessed over the network via telnet or rtty connections. This
applies to the administration access as well as to all console connections
via the individual RCA ports.
The conversion of the RCA to ssh mode is described in section “Activate
ssh mode” on page 53.
I The RCA4plus can be administered at any time via the additional console
port using a serial connection (section “Connections on the rear of the
RCA4plus” on page 21).
Syntax:
xscon <RCA AdministrationAccess>
RCA AdministrationAccess
The administration access to the RCA created using mklancon is referred
to in general as <RCA SystemName >_adm.
The RCA can also be administered if necessary using telnet:
Syntax:
telnet <RCA SystemName>
RCA SystemName
The system name of the required RCA
U41618-J-Z916-1-76
51
Configuration
LAN Console
Once the connection has been set up, the user name Admin must be specified
for initial access; the password has not been assigned at this point, i.e.
<RETURN> should be pressed.The password for the Admin user must then be
reassigned. This concludes the initial configuration of the RCA - the connection
to the RCA is not yet terminated however.
The user named under “RCA access” on page 50 is now created for the console
connections.
Syntax:
user add <User> password=<Password> access=pall,break
User
Freely assignable user name - see “User commands” on page 90
Password
Password for this user (in plain text) - see “User commands” on page 90
When a connection is being set up, it is possible to branch to the Command Line
Interface (CLI) of the RCA. For example, this allows a BREAK to be issued to
the target system. As an example, the CLI access sequence is defined in a
uniform way as [CTRL] “^“ for all ports of the RCA with the following command
(see Server CLI commands).
Syntax:
port all set char=none
server cli char=^^
The same values are predefined for all ports of the RCA in this initial configuration:
Speed
9600 baud
Word size
8 bits
Parity
None
Stop bits
1
Flow control
XON/XOFF
Automatic connection setup
No
Syntax:
port all set baud=9600 size=8 parity=none stop=1 flow=xon
timeout=0
52
U41618-J-Z916-1-76
LAN Console
Configuration
I The line speed must be set to a speed of 19200 baud for every relevant
port when connecting RM systems to the RCA. This can be done - even
retrospectively - with the PORT command (see “Port commands” on
page 72).
Additionally for all the RCA the automatic session timeout must be switched off.
Syntax:
server cli timeout=0
If required, the preset netmask can also be modified or a gateway address can
be entered using the command “Server Set” on page 82.
This terminates RCA configuration.
I If the RCA was initialized - see “Init” on page 30 or the command “Server
Init” on page 80 - all the parameters shown here must be set again.
Activate ssh mode
If ssh connections are to be set up to the consoles of attached target systems
via an RCA4plus, the RCA must be switched to ssh mode. To do this, the logon
via the administration access of the RCA is required (see “Configuring the RCA”
on page 51). ssh mode is activated by the following command (see also “RCA
commands” on page 70):
Syntax:
server security encrypt=ssh
Here the authentication method for the RCA is created.
I After the switchover to ssh mode described above the RCA4plus can only
be reached via ssh connections. This applies both for the administration
access (see above) and for all console connections via the individual
ports of the RCA. The only exception is the serial access via the console
port.
I If switchover to ssh mode takes place using the server ssh enable command
(see page 84), the RCA4plus can be reached via ssh and telnet connections.
U41618-J-Z916-1-76
53
Configuration
5.4.3.4
LAN Console
New RCA ports
New ports on the LAN console
Configuration entry
for <port number RCA>
mklancon
no
Configuration entry
correct ?
showlancon
Another
configuration entry?
Delete
configuration entry
yes
rmlancon
yes
Figure 13: New RCA ports
Further configuration entries for an existing LAN Console are created by means
of the mklancon script - as shown in the figure “Configuring the LAN console and
the RCA” on page 39 and “mklancon - Create LAN Console configuration
entries” on page 43.
If the newly created configuration entries relate to RM system connections, the
speed should be set to 19200 baud for the relevant port in the RCA4plus.
If configuration entries are to be created for the RCA3, a password has to be
assigned for the specified port for each new entry in mklancon. This password
has to be notified to the RCA by entering it under the appropriate port number
on the “Ports” screen page in the RCA setup routine (see manual LAN Console
U41224-J-Z916-1-76).
Existing configuration entries can be checked, removed and changed in the way
described in the section “Configuring the LAN Console” on page 41.
54
U41618-J-Z916-1-76
LAN Console
5.4.3.5
Configuration
Connecting further RCAs to the LAN Console
Another RCA4plus is configured in basically the same way as described for an
initial configuration in the section “Initial configuration of the LAN Console and
RCA” on page 40. First, configuration entries should be created for the existing
LAN Console using the new RCA as described under “mklancon - Create LAN
Console configuration entries” on page 43.
The RCA is configured in keeping with the section “Configuring the RCA” on
page 48.
Finally, the RCA has to be activated and configured as described under
“Addressing the RCA in the network” on page 48 and “RCA access” on page 50.
Another XSCF is connected by creating configuration entries for the XSCF on
the LAN Console. The configuration steps for the XSCF itself that enable the
access to PRIMEPOWER 250/450 systems via XSCF, have to be done
according to XSCF documentation (see “Related publications” on page 117).
5.4.3.6
Connecting another LAN Console to the RCA
To configure another LAN Console connected to an existing RCA, all configuration entries for the existing LAN Console must also be created on the
additional LAN Console with the same parameter settings. You can check the
necessary information about existing configuration entries with the showlancon
command. The entries on the new LAN Console are again created with
mklancon - see the section “Configuring the LAN Console” on page 41.
5.4.3.7
Modifying the LAN Console and RCA
The following sections outline the approach to modifying a configuration entry
on the LAN Console and the RCA4plus. The steps for removing a LAN Console
or RCA configuration are also outlined.
Modifying the configuration entry for an RCA port
Ê Remove the configuration entry with rmlancon and use mklancon to create the
modified configuration entry.
If an ssh or telnet console connection with automatic access to the RCA4plus or
the XSCF (-l option) was configured with mklancon (compare section “mklancon
- Create LAN Console configuration entries” on page 43), the entered password
can be changed, if required.
U41618-J-Z916-1-76
55
Configuration
LAN Console
Syntax:
key_create -p {lanconsole3 | lanconsole4} -s <ConsoleName>
ConsoleName
is the symbolic system name of the target system, which the console
connection was configured for.
The relevant monitor (option -p) for console connections via RCA4plus is
lanconsole3, and for connections via XSCF lanconsole4.
The relevant monitor can also be found out by entering the command
showlancon -n <ConsoleName>
Accordingly for an ssh or telnet connection the automatic logging on to the
RCA4plus or the XSCF can be prevented by deleting the associated password
(command arguments see above).
Syntax:
key_create -r -p {lanconsole3 | lanconsole4} -s <ConsoleName>
Modifying the RCA4plus configuration
Changes can be made to the RCA4plus configuration using the xscon command:
xscon <RCA AdministrationAccess>
RCA AdministrationAccess
The administration access <RCA SystemName>_adm or
<RCA SystemName>_ssh recommended under RCA access if the RCA4plus
is running in ssh mode.
The user name Admin must be used to log on to the RCA4plus.
The main commands for configuring the RCA4plus are listed in the section “RCA
commands”. The RCA command HELP provides an initial overview.
If you are using the LAN Console on an RM system, the line speed for the
connected RCA port should be set to 19200 baud in the RCA setup, see “Port
commands”.
RCA4plus firmware updates
New firmware versions for the RCA4plus are available under
http://service.fujitsu-siemens.com/service/console/RCA4plus
For each firmware version additional installation information is also provided
here and must be observed at any rate.
56
U41618-J-Z916-1-76
LAN Console
Configuration
The firmware is updated via an TFTP server (Solaris system). The update is
executed via the administration access to the RCA - see above - using the
following command (see “Server commands” on page 78)
server flash boot|app hostip=<Address TFTP-Server>
image=<Name of Image>
Removing a LAN Console
Ê Remove all configuration entries, for example using
rmlancon -a
The option of reconfiguration using the bootp service is canceled for each
RCA4plus as follows:
pntadm -D <IP RCA> <DHCP table>
IP RCA
IP address of the RCA
DHCP table
DHCP table in the form X.X.X.0 - X=decimal value(0<=X<=255)
which designates the table generated with the pntadm command (see
“Addressing the RCA in the network” on page 48)
dhtadm -D -m <RCA>
RCA
Unambiguous designation of the RCA in the DHCP configuration,
e.g. the RCA system name
IP LAN Console
IP address of the LAN Console
Ê Uninstall all software packages of the LAN Console software product.
Removing an RCA
Ê For every connected LAN Console, remove all configuration entries for this
RCA (see section “Diagnostics” on page 64).
Ê For the RCA4plus also cancel support by the bootp service (see above).
If required, the removed RCA4plus can be returned to the state it was in when
delivered (see “Switching on the RCA4plus” on page 29).
U41618-J-Z916-1-76
57
Operating the LAN Console
5.5
LAN Console
Operating the LAN Console
The LAN Console can represent the consoles on PRIMEPOWER or RM
servers. All commands are available on each LAN Console, including the
following console diagnostic tools: IKDB (Internal Kernel Debugger), BDM
(Board Debug Monitor) and OBP Monitor. PRIMEPOWER or RM servers can
also be rebooted from the LAN Console.
xscon call
Access to the PRIMEPOWER and RM servers is provided by xscon (SMAWxsco
package), the necessary connection is selected and established internally via
ssh, telnet, or rtty (SMAWsmon package, SMAWrtty package). Connection setup is
supported using all RCA types (RCA4plus, XSCF and RCA4,RCA3). To
establish the connection, data is required, which is defined when the LAN
Console is configured.
Figure 14: xscon mask
58
U41618-J-Z916-1-76
LAN Console
Operating the LAN Console
On the basis of configuration entries for the LAN Console, xscon enables one or
more PRIMEPOWER and RM servers to be selected that are to be represented
on the LAN Console. The names of the selectable systems are the console
names that were specified in the mklancon script when the configuration entries
were created.
The xscon user interface can also be chosen via the Solaris Common Desktop
Environment where there is a corresponding entry in the Application Manager.
– The connection is established in the same way as for cu(1).
– Connection via RCA4plus
By default, the connection is set up via an RCA4plus with an active
access check. If the console connection is set up via rtty, RCA username
and password must be entered.
If the console connection is set up via telnet and ssh, username and
password depend on the configuration arguments of the console
connection. If mklancon was executed without -l option, at a telnet session
any RCA username with password may be entered. At an ssh connection,
the input of a user password for the user Admin is mandatory.
If the console connection was set up with automatic access to the
RCA4plus, (with -l option for mklancon), this data is unnecessary for telnet
and ssh. The logon takes place with the RCA username and password
specified during configuration.
Press the {Ctrl}and “^” key in the opened console window to access the
command interface (CLI - Command Line Interface) of the RCA4plus
(settings see “Configuring the RCA” on page 48).
By now entering the command port history the input buffer can be
exported.
A hardware break (break) can be sent to a PRIMEPOWER (MR) system
via the command port break from the CLI. For this, the abort sequence on
the target system must be set to “enable“. This corresponds to the default
setting of the target system, but can also be set with the help of the
command
kbd -a enable
or by modification of the file etc/default/kbd.
After execution of the port break command you get to the OBP of the
target system on entering the CLI command resume (see section below
“List of commands”).
U41618-J-Z916-1-76
59
Operating the LAN Console
LAN Console
A software break can still be triggered for all connections (rtty, telnet, ssh)
in the executable system using anAlternate Break Character Sequence
(~CTRL/B). To permit this, the abort sequence on the target system must
have been set to “alternate” beforehand. This can be done using the
command
kbd -a alternate
or by modifying the /etc/default/kbd file.
– Connection via XSCF (only PRIMEPOWER250/450)
With console connections via XSCF, the input of username and
password is not required for telnet connections.
If mklancon was executed without -l option for ssh connections, input of
the password for the XSCF user Admin is mandatory during the setup of
the connection.
If the ssh connection was set up with automatic access to the XSCF (with
-l option for mklancon), input of the password is not required. Logon is
executed with the XSCF username and password specified during
configuration.
If the connection is set up via telnet, a hardware break (break) in the
operating system can be executed from the telnet command interface
using send brk, leading it to the OBP. For this, the abort sequence on the
target system must be set to enable (see above “Connection via
RCA4plus“).
There is no equivalent option for ssh connections. By creating an
additional connection directly to the XSCF (XSCF administration
access), the operating system can be led to the OBP using the XSCF
commands available there (the availability of the commands depends on
the actual version of HCP) - see also the XSCF documentation, appendix
“Related publications” on page 117.
Furthermore, for telnet as well as for ssh connections a software break
can be executed per Alternate Break Character Sequence (~CTRL/B) in the
running operating system.
– The connection is cleared down using the “~.” string.
I The RCA4plus can be administered with xscon using the configuration
entry <RCA SystemName>_adm or in ssh mode with
<RCA SystemName>_ssh and the “RCA commands”).
60
U41618-J-Z916-1-76
LAN Console
Operating the LAN Console
xscon – mapping consoles
Prerequisites for using xscon:
I xscon can be called by root only.
The XSCF must have been configured according to the XSCF documentation
(see “Related publications” on page 117).
You can obtain an exact description of the xscon command by displaying its
manual page:
man xscon
Syntax:
xscon [<ConsoleName1>[,<ConsoleName2>[...]]]
Calling xscon without parameters causes a user interface to be displayed which
shows the available PRIMEPOWER and RM servers for selection. The administration accesses created for the configured RCA4plus and RCA4 are also
displayed. You make the selection via “Establish Connections”.
The logging mode option allows you to decide whether the console output is to
be logged. The log file is given the default name /tmp/XSCON_<ConsoleName>.
The log file will be created and stored on the system on which xscon was started.
If the SMAWtssv package has also been installed, you can choose from a menu
whether or not you want to use Teleservice.
A console window is opened for each connection. If the connection to the RCA
cannot be established within 10 seconds, an error message is output and the
console window is closed.
I If connections via ports 9-16 were configured for an RCA4plus, the
following error message is output in the opened console window
Connect failed: CAN‘T ACCESS DEVICE
and the console window is closed.
When you execute xscon ConsoleName, the connection to the selected system is
set up directly.
xscon only supports the xterm terminal emulation.
To be able to operate display-dependent applications on a PRIMEPOWER or
RM server console, the TERM environment variable must be set appropriately:
U41618-J-Z916-1-76
61
Operating the LAN Console
LAN Console
TERM=xterm
Resources:
You can use the normal resources to configure the emulation windows that are
to be started. The instance name of these emulation windows is xscon and their
class name is XTerm.
Example: Entry in .Xdefaults to configure the font on the console terminal:
.xscon.*.font: lucidasanstypewriter-14
The xscon command can also be started under an X terminal emulation, e.g.
XVision from a terminal that is not connected directly to the console.
To ensure correct key binding, (see VirtualBindings(3X), xmbind(1X)), you should
carry out one of the following steps beforehand:
Ê Copy the file /usr/dt/lib/bindings/sun_at under the name .motifbind to the user’s
home directory, or
Ê add an entry with the name of the maker of the X server to xmbind.alias. The
maker name can be ascertained with the xdpyinfo command. For XVision, the
entry would have to be:
"Visionware Limited."
sun_at
Ê If you are using /usr/dt/lib/bindings/xmbind.alias, you must also set
XMBINDDIR=/usr/dt/lib/bindings
in the .profile file.
If you are using a private copy of xmbind.alias in the home directory, you must
also copy /usr/dt/lib/bindings/sun_at to the home directory.
62
U41618-J-Z916-1-76
LAN Console
5.6
Switching LAN Consoles
Switching LAN Consoles
The LAN Console is switched when representation of the consoles of PRIMEPOWER or RM servers, i.e. console access to these systems, is to be handled
from another LAN Console in the future. The connection to the PRIMEPOWER
and RM systems involved must be established via the same RCAs from both
LAN Consoles.
The prerequisite for this is that another LAN Console supporting the same
console accesses has been configured. For access to a PRIMEPOWER or RM
system, the port number of the RCA and, on the RCA4plus and, if required, on
the XSCF in the case of telnet or ssh connections with automatic access, also
the user name and password must be identical.
5.6.1
Planned switches
In this scenario, the activities of a LAN Console are planned to be taken over by
another LAN Console for organizational reasons, i.e. the two underlying LAN
Consoles are fully functional.
So that console accesses to the same PRIMEPOWER and RM servers can take
place from the other LAN Console, all active connections involving the current
LAN Console must be terminated. This can be done with the “~.” string.
The connections to the required PRIMEPOWER and RM servers can then be
established from the “new” LAN Console.
5.6.2
Switching because of problems
In this scenario, console accesses to the PRIMEPOWER and RM servers must
take place from another LAN Console because of problems with the current
LAN Console.
If it was impossible to terminate console accesses from the original LAN
Console properly, these connections may still be open on the RCA side. The
section “Disrupted RCA - LAN Console connection” on page 68 provides information on resetting such connections.
U41618-J-Z916-1-76
63
Diagnostics
5.7
LAN Console
Diagnostics
This section provides information on the diagnostic options in the LAN Console
product. It describes logging properties of the monitors and the internal impact
of creating configuration entries. It goes on to describe diagnostic options and
error situations involving the RCA.
5.7.1
Log files
When the LAN Console is configured, the monitors lanconsole, lanconsole1 and
lanconsole3 are activated internally in the system (see command “mklancon Create LAN Console configuration entries” on page 43).
These monitors are started and stopped via sac (Service Access Control). This
stores status information in the /var/saf/_log log file. The monitors are identified
in this log file by port monitor <lanconsole>, port monitor <lanconsole1>, port
monitor<lanconsole3> or port monitor <lanconsole4>.
Monitor specific details, i.e. information on the connections between the LAN
Console and the RCA, are stored in the /var/saf/lanconsole/log,
/var/saf/lanconsole1/log, /var/saf/lanconsole3/log or /var/saf/lanconsole4/log file.
The degree of detail of this information for the monitors lanconsole and
lanconsole1depends on the current trace level set.
Trace level 0 is enabled by default. To set a different trace level - a maximum of
six levels are possible at present - this must be done separately for every
individual monitor using the following command:
rttyadm -T <level> lanconsole | lanconsole1
Error situations are logged in the basic level (trace level 0). The other trace
levels record additional information on the establishment and clearing down of
connections and other activities on the monitor, including time-outs and control
of access to the RCA.
I The extended trace mode (level > 0) should only be used briefly so that
the log file does not become too big.
For the lanconsole3 and lanconsole4 monitor no further degree of detail of information can be set in the log file.
64
U41618-J-Z916-1-76
LAN Console
5.7.2
Diagnostics
Status information for the monitors
The system uses the sacadm and pmadm tools to manage the monitors
lanconsole, lanconsole1 and lanconsole3 or lanconsole4.
These tools allow the state of the monitors to be viewed and the monitors
themselves to be manipulated - see the manpages for sacadm and pmadm.
5.7.3
Configuration entries for the LAN Console
When a configuration entry is created for the LAN Console with mklancon,
entries are generated in the monitor specific files /etc/saf/lanconsole/_pmtab,
/etc/saf/lanconsole1/_pmtab or /etc/saf/lanconsole3/_pmtab or
/etc/saf/lanconsole4/_pmtab, depending on the type of the RCA.
Under the specified console name, the _pmtab file contains information about
the device used, the system name and port number of the RCA as well as
monitor specific details of the type of connection.
This information on the configuration entries can be displayed with the
showlancon command or the system tool pmadm.
Syntax:
pmadm -l -p lanconsole | lanconsole1 | lanconsole3 | lanconsole4
The mklancon configuration command also modifies the system files
/etc/uucp/Devices and /etc/uucp/Systems.
A record is appended to these files for every configuration entry.
In turn, the rmlancon tool removes such entries from the Systems and Devices
files.
5.7.4
RCA system information
Information on the RCA4plus system settings can be found via the administration access under the user name Admin (in addition to RCA access, the
section “RCA commands” describes the main commands).
For system information on the RCA4 please refer to the LAN Console and
System Management Console manual, and for the RCA3 see the LAN Console
manual in “Related publications”.
U41618-J-Z916-1-76
65
Error situations
LAN Console
The configuration and functionality of the XSCF is described in the XSCF
documentation (see “Related publications” on page 117). An administration
access towards the XSCF can be created as described in “Commands” on
page 41.
5.8
Error situations
5.8.1
No response from the RCA
If the RCA4plus still cannot be accessed after booting either with ping or via the
administration access, the network parameters (IP address, MAC address)
must be checked.
The network parameters can be corrected using the Solaris system commands
dhtadm and pntadm - see the man pages. It is also possible to delete the entire
bootp configuration for the RCA4plus (see page 57) and then create it again (see
“Addressing the RCA in the network” on page 48).
I If you cannot access the XSCF within the LAN, please consult the XSCF
documentation (see “Related publications” on page 117). Among other
things the reset of the console connection to the serial port is here
described, if the configuration commands should not be available under
ESF.
5.8.2
Failure to establish a connection
The establishment of a connection between the LAN Console and the RCA is
rejected if xscon was not called by the root user.
If a connection cannot be set up to a target system, for example the target
system is not responding or the console window of another system is opened,
the configuration entries created with mklancon in relation to RCA name and port
number (#) should be checked (see “mklancon - Create LAN Console configuration entries” on page 43).
A possible cause could also be incorrectly connected V.24 cables, for example
a mix-up of cables between the RCA and target system when upgrading or
replacing the RCA. If this is the case, the connections can be set up again using
rmlancon and mklancon.
66
U41618-J-Z916-1-76
LAN Console
Error situations
If the RCA (RCA4plus or XSCF) is running in ssh mode and the RCA authentication method was modified, (see RCA commands Server Security and Server
SSH or the XSCF documentation in “Related publications” on page 117), further
ssh connections to the RCA are rejected by the ssh running on the LAN Console
because of the modified RCA authentication method. Further ssh console
connections are only allowed, after the former RCA authentication method in
the file /.ssh/known_hosts has been deleted.
5.8.3
Failure in automatic access to the RCA
If the automatic access to the RCA4plus fails for an ssh or telnet connection
although this was configured with mklancon (-l option), the reason may be that
the specified parameters RCA username and password are not appropriate for the
settings in the RCA4plus.
If the password of the RCA4 changed, this can be adapted on the LAN Console:
Syntax:
key_create -p lanconsole3 -s <ConsoleName>
ConsoleName
Symbolic system name of the target system for which the console
connection was configured.
But if the specified RCA user is invalid in the RCA4plus, you must reset the
connection via rmlancon and mklancon and reconfigure the user in the RCA.
If a connection via the XSCF cannot be created automatically, please at first
check the XSCF configuration with the help of the XSCF documentation (see
appendix „Related publications“). If a connection cannot be created because
the password was changed, this can be modified with the following command
key_create -p lanconsole4 -s <ConsoleName>
as with RCA4plus.
U41618-J-Z916-1-76
67
Error situations
LAN Console
5.8.4
Disrupted RCA - LAN Console connection
5.8.4.1
LAN connection disrupted
It can happen that the connection between the RCA and the LAN Console was
not terminated properly. This results in an open, hanging connection on the
RCA side.
The reason for this could be that the LAN connector on the LAN Console has
been detached, or that the connection from the RCA to the LAN has not been
working for some time.
The following command can be used to close an open or hanging connection
like this directly via the administration access in the RCA4plus in the case of
console connections set up via the RCA4plus:
Syntax:
port <Port#> logout
Port#
Port number of RCA:
<TCP Port number>- 3000 for telnet and rtty connections, or
<TCP Port number>- 3100 for ssh connections,
i.e. from 1–8 with RCA4plus.
The TCP port number referred to above is taken from the entry under TCP PORT
from the output of the command
showlancon -n <ConsoleName>
ConsoleName
is the symbolic system name of the target system, which the console
connection is to be set up.
An error message is output if there is no connection for the specified port
number.
Once the opened or hanging connection has been reset on the relevant port, it
can be re-opened.
V Caution
Please note that also an active connection is aborted or reset.
For information on hanging connections in relation to an RCA4 or RCA3, please
refer to the predecessor manual (see the appendix “Related publications”).
68
U41618-J-Z916-1-76
LAN Console
5.8.4.2
Error situations
No output in console window
If output is still not possible in the console window of a connected system
despite the connection being set up successfully, this blockade can be lifted, if
appropriate, from the LAN Console by entering the following command:
echo "\021\c" > <device>
device
is derived from the entry under “DEVICE” from the output of the
command
showlancon -n <ConsoleName>
ConsoleName
is the symbolic system name of the target system.
If there is still no output in the console window, the following command should
be executed on the connected system (e. g. using the rlogin command):
echo "\021\c" > /dev/console
5.8.5
Invalid administrator password for RCA4plus
An RCA4plus can only be configured by the user Admin. If the valid password is
not known for this user, the RCA4plus must be initialized (section “Switching on
the RCA4plus” on page 29) and then re-configured (section “Configuring the
RCA” on page 48).
U41618-J-Z916-1-76
69
RCA commands
5.9
LAN Console
RCA commands
I This section describes only the properties of the RCA4plus.
Functionality and configuration of the XSCF are described in the XSCF
documentation (see “Related publications” on page 117).
Accessing the RCA command interface
The commands for configuring and administering the RCA4plus can be
executed in the Command Line Interface (CLI) of the RCA4plus.
The RCA works either in telnet mode for console connections via telnet and rtty
or in ssh mode for console connections via ssh.
The CLI is accessed from the LAN Console using the xscon command:
Syntax:
xscon <RCA Administration Access>
RCA AdministrationAccess
Administration access to the RCA4plus created using mkrca,
generally referred to as
<RCA SystemName>adm in telnet mode or
<RCA SystemName>admssh in ssh mode.
Access can also be enabled, if required, using the telnet or ssh command:
Syntax:
telnet <RCA SystemName>
or
ssh -l Admin <RCA SystemName>
RCA SystemName
The system name of the desired RCA
In telnet mode afterwards the desired user name, in general Admin and
associated password or in ssh mode only the password for Admin should be
entered.
Furthermore, the RCA command interface can also be accessed within an
opened console connection, i. e. from the console window, via the CLI access
sequence. This is the sequence [CTRL] and “^” as described in the section
“Configuring the RCA”. This type of access is particularly essential for sending
a BREAK and for displaying the history of the characters received.
70
U41618-J-Z916-1-76
LAN Console
5.9.1
RCA commands
Access rights
Certain user-dependent rights are necessary in order to execute RCA
commands, in other words to configure and administer the RCA. The typical
Admin user has access rights for all RCA commands.
Each individual user can be assigned several of the rights listed below - see the
section “User commands”:
PCON
Authorized to modify port settings of the RCA
SCON
Authorized to configure the RCA
SMON
Authorized to display RCA status information
USER
Authorized to create and delete users as well as to change user data
BREAK
Authorized to send a BREAK signal
P
Authorized to set up console connections
Two classes have been predefined in the RCA4plus to facilitate assignment of
these rights:
APPLIANCEADMIN
Covers the rights: PALL, USER, SCON, SMON, PCON and BREAK
ADMIN
Covers the rights: PALL, USER, SMON, PCON and BREAK
All the possible user-specific settings with fewer access rights than APPLIANCEADMIN and ADMIN can be included in a further class, “user”.
This results in the following hierarchy with regard to access rights:
APPLIANCEADMIN > ADMIN > user
The necessary access rights are also specified in the RCA commands
described below.
U41618-J-Z916-1-76
71
RCA commands
LAN Console
I If the identity check for accessing the RCA has been disabled - see the
“Server Security” command, user - independent console connections
can be set up via the RCA4plus. With such console connections access
is only possible to the associated port, including the authorization to send
a BREAK signal.
5.9.2
List of commands
I Commands and keywords are not case sensitive.
I This appendix only lists the most important commands and options for
RCA users. Other commands and more detailed descriptions can be
found in the help texts for the RCA.
5.9.2.1
Help command
The Help command outputs information on all RCA commands.
Access rights:
None
Syntax:
HELP [<command_name>]
Parameter:
command_name
Command name.
Default: Displays all available commands
5.9.2.2
Port commands
Port Break
The Port Break command sends a BREAK signal within an existing console
connection via the associated serial line to the connected target system.
Access rights:
BREAK and ADMIN or APPLIANCEADMIN
Syntax:
PORT BREAK
72
U41618-J-Z916-1-76
LAN Console
RCA commands
Port History
This command switches to history mode of the respective port for an existing
console connection. This can be identified by the prompt PORT HISTORY>. The
content of the history buffer can now be displayed and searched through.
Access rights
None
Syntax:
PORT HISTORY
Parameters:
The following commands are valid in history mode:
Help [command]
Shows additional information on the commands in history mode.
command
One of the commands explained below in history mode.
Bottom
Shows the end of the history buffer.
Clear
Deletes the history buffer.
Draw
Shows the current page of the history buffer again.
Next
Shows the next page.
Prev
Shows the previous page.
Quit
Returns to normal RCA command mode.
Resume
Exits the port history mode of the command mode (CLI) and
returns to the console window of the existing connection.
Search [-u | -d] [-i] "string to find"
Search for a specified string in the history buffer.
"string to find"
Character string being sought; if the character string being sought
contains blanks, it must be enclosed in “quotes”.
U41618-J-Z916-1-76
73
RCA commands
LAN Console
-u (up)
The search direction 'up'; is the default setting.
-d (down)
The search direction 'down'.
-i (ignore)
Search is performed without consideration of upper or lowercase.
Top
Shows the top of the history buffer.
Port Logout
You can use this command to terminate a connection assigned to an RCA port.
Access rights:
USER and ADMIN or APPLIANCEADMIN
Syntax:
PORT <RCA PortNumber> LOGOUT
Parameters:
RCA PortNumber
Port numbers 1-8
I If there is an opened console connection on the specified port, this is
closed without further prompting, after a message has been issued to
this effect in the associated console window.
If multiple active console connections exist for the port, all these connections
are closed.
Port Set
You can use the Port Set command to change the settings of the RCA ports. At
least one of the possible parameters must be specified.
The changes generally come into effect the next time a connection is set up via
this port.
Access rights:
PCON or SCON and ADMIN or APPLIANCEADMIN
Syntax:
PORT [<RCA PortNumber>|ALL] SET
[BAUD=<baud_rate>]
[SIZE=<size>]
74
U41618-J-Z916-1-76
LAN Console
RCA commands
[PARITY=<parity>]
[STOP=<stop_bits>]
[FLOW=<flow_control>]
[TIMEOUT=<time-out>]
[CHAR=<cli_char>]
Parameters:
RCA PortNumber
Valid port numbers: 1-8 or CON
Where ALL is selected, the changes affect all RCA ports.
Default: The port to which the user is connected, if access to the
CLI was requested from an active console connection.
baud_rate
Line speed in baud:
9600, 19200
Default: 9600
size
Number of data bits per character: 7 or 8
Default: 8
parity
Parity:
NONE
none
EVEN
even
ODD
odd
Default: NONE
stop_bits
Number of stop bits per character: 1 or 2.
Default: 1
flow_control
Flow control:
U41618-J-Z916-1-76
75
RCA commands
LAN Console
NONE
No Flow Control
XONXOF
Software XON/XOFF Flow Control
RTSCTS
Hardware RTS/CTS Flow Control
DTRDCD
Hardware DTR/DCD Flow Control
Default: NONE
timeout_seconds
Timeout specification in minutes from 0 to 90.
If no data is sent or received during the specified time when a
console connection is active, the console connection is terminated.
The value 0 means that no timeout check takes place.
Default: The value for timeout set for the entire RCA applies
(Server CLI Timeout).
cli_char
Character for CLI access to the RCA in the range A to _ (underscore) or None. The CLI access character, when pressed simultaneously with the [CTRL] key during an active console connection,
will place you in CLI command mode.
If None is specified, the value specified in the Char parameter of
the Server CLI command will be used (see “Configuring the RCA”
on page 51).
Default: None
Quit
This command closes the active console connection.
Access rights:
None
Syntax:
QUIT
76
U41618-J-Z916-1-76
LAN Console
RCA commands
Resume
You can use this command to exit the RCA command interface (CLI) and return
to the console window of the existing connection.
Access rights:
None
Syntax:
RESUME
U41618-J-Z916-1-76
77
RCA commands
5.9.2.3
LAN Console
Server commands
Server CLI commands
These commands refer to the CLI access. At least one of the possible parameters must be specified.
Access rights:
SCON or APPLIANCEADMIN
Syntax:
SERVER CLI
[TYPE=<type>]
[CHAR=^<character>]
[CONNECT=ON|OFF]
[HISTORY=HOLD|AUTO,CLEAR|KEEP]
[TIMEOUT=<timeout>]
Parameter:
type
Terminal type to be used on CLI port. The entire name of the type
must be specified; abbreviations are not permitted. Valid types
are: ASCII, VT100, VT220 and OFF.
Default: ASCII
character
The CLI access character, when pressed simultaneously with the
[Ctrl] key during a running console connection will suspend the
session and place you in the command level of the RCA (CLI).
ASCII character in the range A to _ (underscore).
Default: ^d
Connect=ON|OFF
Enables or disables the ability to use the Connect command from
the serial console port. When enabled, the console port user may
use the Connect command to establish a console connection via
one of the remaining ports of the RCA. When disabled, you cannot
issue the Connect command from the serial CLI port.
Default: ON
78
U41618-J-Z916-1-76
LAN Console
RCA commands
History=HOLD|AUTO, CLEAR|KEEP
Specifies the kind of output of data from the Port History Puffer
when a console connection is set up (HOLD|AUTO) or cleared
down (CLEAR|KEEP).
HOLD: Upon connection setup only the number of characters in
the History Buffer of the associated port is displayed.
AUTO: Upon connection setup both the number of characters in
the History Buffer of the associated port and the characters
themselves are displayed.
CLEAR: Upon connection setup the history buffer of the
associated port is cleared.
KEEP: Upon connection setup the history buffer of the associated
port is retained.
Default: HOLD, CLEAR
tim-out
Number of timeout minutes in the range 0-90. If no data is
received or transmitted for the specified time during an active
console connection, the session will time out. A zero value
indicates that no timeout check takes place.
This value is used for any RCA port for which no timeout value
was set with the Port Set command. Furthermore this value is valid
for administration access to the RCA.
Default: 15 minutes
Server Flash
The Server Flash command updates the RCA firmware. This command is
needed in order to make new developments available or to install a higher
release version.
The RCA firmware comprises two components that can be updated:
1. The boot image with the RCA start and self-test routines and
2. The application image that provides the actual RCA functionality.
When the Server Flash command is called, you will be asked whether a reboot
should be performed for the RCA. This ensures that the firmware is actually
updated.
U41618-J-Z916-1-76
79
RCA commands
LAN Console
Access rights:
SCON or APPLIANCEADMIN
Syntax:
SERVER FLASH BOOT|APP
HOSTIP=<tftp_address>
IMAGE=<host_filename>.img
Parameters:
BOOT
Updates the Boot Image.
APP
Updates the Application Image.
tftp_address
Specifies the IP address of the TFTP server.
A Solaris system should be used as the TFTP server, for example
the PW250LC.
host_filename
Specifies, in connection with the ending .img, the name of the file
on the TFTP server that contains the desired image. The image
being loaded must be stored on the TFTP server in the /tftpboot
folder.
Server Init
This command permits initialization, i.e. resetting of the factory-set RCA
defaults.
Access rights:
SCON or APPLIANCEADMIN
Syntax:
SERVER INIT CONFIG|ALL
Parameter:
CONFIG
Initialization of the RCA except for the IP address, netmask, and
gateway.
ALL
Complete initialization of the RCA, including network settings.
80
U41618-J-Z916-1-76
LAN Console
RCA commands
Server Reboot
This command performs a boot for the RCA. Operation of the RCA is disrupted
in the process and all active console connections, including this one, are terminated.
All previous changes made that require the RCA to be restarted come into effect
at the end of the boot process.
When you have invoked the Server Reboot command, you have to confirm the
Reboot command in order to actually start the boot process. This means you
also have the possibility at this time to terminate the command.
Access rights:
SCON or APPLIANCEADMIN
Syntax:
SERVER REBOOT
Server Security
This command allows you to enable and disable the authentication check
performed when setting up console connections. The connection type to the
RCA, telnet or ssh can still be selected. You have to confirm the change before
it becomes effective. If this change is rejected, the change does not apply.
The authentication check for administration access cannot be disabled.
When the connection type ssh to the RCA is activated for the first time, the RCA
authentication method is generated. When it is activated again the existing
authentication method is used by default. However, it is also possible to
generate a new method. This process can take a few minutes.
Access rights:
SCON
Syntax:
SERVER SECURITY AUTHENTICATION=<auth_mode> | ENCRYPT=
<conns>
Parameters:
auth_mode
LOCAL
The authentication check is performed for the users
defined in the RCA.
U41618-J-Z916-1-76
81
RCA commands
LAN Console
NONE
No authentication check is performed.
This setting is not possible for ssh connections to the RCA.
Default: LOCAL
conns
SSH
Activates ssh connections to the RCA.
NONE
Activates telnet connections to the RCA.
If one of the parameters is specified, the TCA is accessible only via the
connection type selected. If both parameters are specified separated by
a comma, both ssh and telnet connections to the RCA are possible.
Default: NONE
Server Set
You can use the Server Set command to change the RCA address parameters.
These changes only become effective the next time the RCA is rebooted.
Access rights:
SCON or APPLIANCEADMIN
Syntax:
SERVER SET IP=<ip_address>
MASK=<subnet_mask>
[GATEWAY=<gateway_ip_address>]
Parameter:
ip_address
IP address of the RCA
subnet_mask
Subnet mask for the network in which the RCA is available.
gateway_ip_address
IP address of the gateway in the RCA subnet if a gateway is set
up.
82
U41618-J-Z916-1-76
LAN Console
RCA commands
Server Share
The Server Share command enables the configuration of multiple, simultaneous
connection setups to a console which is assigned to an RCA port. The RCA
permits up to 16 shared console connections with a maximum of 4 parallel
connections per port.
Depending on the Server Share option selected and the users’ access rights
(APPLIANCEADMIN, ADMIN, “user”) it is possible to access the assigned
console via shared connections in read or write mode
or
to take over an active console connection.
To set up multiple connections to one and the same port of the RCA, a corresponding number of configuration entries must be generated using the mklancon
command.
Access rights:
SCON or APPLIANCEADMIN
Syntax:
SERVER SHARE DISABLE|AUTO|QUERY
Parameter:
DISABLE
No shared connections to a port are possible.
AUTO
Depending on the user rights simultaneous, shared connections
to a port are possible. These are implemented without the
agreement of the user of the connection that is already active.
QUERY
Depending on the user rights simultaneous, shared connections
to a port are possible. These are implemented without the
agreement of the user of the connection that is already active.
Depending on the users’ access rights, all options enable an existing
connection to be replaced by one that has been newly set up.
Default: QUERY
U41618-J-Z916-1-76
83
RCA commands
LAN Console
Server SSH
The Server SSH command enables or disables ssh mode of the RCA. If you
enable ssh mode for the first time, RCA authentication method is generated. At
another session, the specified authentication method is used by default. But it
is also possible to generate a new authentication method. This procedure may
require some minutes. When you enable ssh, all console connections will be
terminated.
If connections to the RCA were activated using the Server Security telnet
command, both ssh and telnet connections to the RCA are possible after the
ENABLE option is used.
Access rights:
SCON or APPLIANCEADMIN
Syntax:
SERVER SSH ENABLE|DISABLE
Parameters:
ENABLE
Enables ssh session access to the RCA.
DISABLE
Disables ssh session access to the RCA.
5.9.2.4
Show commands
Show Port
You can use the Show Port command to display configuration and status information for the RCA ports.
Access rights:
SMON or ADMIN / APPLIANCEADMIN
Syntax:
SHOW PORT [<RCA PortNumber>|ALL]
Parameters:
RCA PortNumber
Port numbers 1–8 or CON (CONSOLE PORT).
ALL
Shows the information for all ports, including the console port
(CON).
84
U41618-J-Z916-1-76
LAN Console
RCA commands
Default: Own port, if the CLI was activated from an existing console
connection.
Some of information output by the Show Port command is explained below.
Field
Content
Port
Port number
Serial Port Settings
Port settings (see Port Set command)
TX Bytes
Number of bytes transferred
RX Bytes
Number of bytes received
Errors
Number of TX/RX parity framing errors
User*
User name for active authentication check (see Server
Security, User Add commands)
Level*
Affiliation of the user to a class of access rights when a
user identification is active (see User Add and User Set
commands)
Access*
User access rights when a user identification is active
(see User Add and User Set commands)
Last Login
System time entry for last user login or connection
setup
Duration*
Duration of current console connection
*indicates fields that are only shown if the command was called for precisely
one port and a console connection is set up for this port at this time.
U41618-J-Z916-1-76
85
RCA commands
LAN Console
Show Server
The Show Server command displays configuration and statistics information for
the RCA on the monitor.
Access rights:
SMON or ADMIN / APPLIANCEADMIN
Syntax:
SHOW SERVER
The output of the Show Server command is explained below.
Field
Content
Server
IP address of RCA
Mask
Subnet mask
Gateway
IP address of gateway system, if specified
Up Time
Time (day, hours, minutes and seconds) since the last
RCA reboot
MAC
Ethernet MAC address
S/N
Serial number of RCA
Port
Port number: if a connection is active via the administration access, CLI is shown here.
Username*
User name (see User Add command)
Duration*
Duration of current console connection
Socket*
(Telnet) socket number of RCA (23, 3001 - 3016)
From Socket*
IP address of LAN Console with socket number in
brackets
IP Input and
Output
IP network statistics
(Packets, Delivered, Discarded, Fragments)
TCP
Network statistics (In Segs, Out Segs, Errors, Retrans)
UDP
Network statistics (In, Out, Errors, No port)
BOOT
Version, date and time of Boot Image
APP
Version, date and time of Application Image
Share Mode
Disable, Auto or Query (see Server Share command)
*Information on these fields is displayed for every connection set up to the RCA.
86
U41618-J-Z916-1-76
LAN Console
RCA commands
Show Server CLI
This command shows the settings for RCA command mode (CLI).
Access rights:
SMON or ADMIN / APPLIANCEADMIN
Syntax:
SHOW SERVER CLI
The following information is important in the context of the functionality of the
LAN Console:
Field
Content
CLI Port
NONE
This port is used exclusively for console connections in
the framework of LAN Console functionality (see
“Configuring the RCA” on page 48)
Access
Character
Control character for invoking CLI mode from an active
console connection (see “Configuring the RCA” on
page 48)
History
Specifies whether the content of the history buffer of a
port should be displayed (AUTO) or not (HOLD) at
connection setup or whether the buffer content should
be retained (KEEP) or cleared (CLEAR) at connection
setup - see “Server commands” on page 78.
Server CLI
Timeout
Displays the timeout time set (see “Server CLI
commands”)
Show Server Security
The Show Server Security command displays the current information relating to
user authentication and data encryption - see also “Server Security” on page 81
and “Server SSH” on page 84.
Access rights:
SMON or ADMIN / APPLIANCEADMIN
Syntax:
SHOW SERVER SECURITY
If the RCA is working in ssh mode, the output of Encryption displays the value
SSH. In telnet mode the output None is displayed here.
U41618-J-Z916-1-76
87
RCA commands
LAN Console
After initial configuration of ssh the ssh key is output in MD5 hash and in bubble
babble under Fingerprint.
Show User
The Show User command shows configuration data and information on the
monitor in relation to existing console connections for one or all users defined
in the RCA.
Access rights:
SMON or ADMIN / APPLIANCEADMIN
Syntax:
SHOW USER [<username>|ALL]
Parameters:
username
User name.
ALL
Information is displayed for all users
Default: Users currently logged on
The Show User All command shows minimum information, e.g. the user names
and the relevant access rights, for all defined users.
The Show User <username> command, on the other hand, displays more
extensive information:
88
U41618-J-Z916-1-76
LAN Console
RCA commands
Field
Content
User
User name
Level
Class of access rights. If the user was assigned individual
access rights, the class APPLIANCEADMIN is displayed for
the SCON access right, the class ADMIN for the USER or
PCON rights, and otherwise the class “user”.
Access
User’s access rights
Last Login
System time when the user last logged on to the system
Port
Port number; if a connection is active via the administration
access, CLI is shown here.
Username
User name
Duration
Duration of current console connection
Socket
(Telnet) socket number of RCA
From Socket
IP address of LAN Console with socket number in brackets
U41618-J-Z916-1-76
89
RCA commands
5.9.2.5
LAN Console
User commands
User Add
The User Add command creates a new user (entry) in the RCA. In addition to a
password, every user is assigned specific access rights to the RCA commands.
As soon as this command has been terminated successfully, the new user can
access the RCA in the framework of his/her defined access rights.
A maximum of 64 users can be administered in the RCA.
Access rights:
USER or ADMIN / APPLIANCEADMIN
Syntax:
USER ADD <username> [PASSWORD=<password>]
[ACCESS=<access>]
Parameters:
username
User name comprising 3-16 alphanumeric characters – case
sensitive
password
User password comprising 3-16 alphanumeric characters – case
sensitive
access
Access rights or classes for RCA command groups.
Several access rights can be assigned at the same time, though
these must be separated by commas.
The valid values are:
90
U41618-J-Z916-1-76
LAN Console
RCA commands
P<n>
Authorized to set up console connections for the
specified port number n.
P<x-y>
Authorized to set up console connections for the
specified port numbers in the range x to y.
PALL
Authorized to set up console connections for all
ports.
USER
Authorized to create and delete users as well as
to change user data.
PCON
Authorized to modify the port settings.
SCON
Authorized to configure the RCA.
SMON
Authorized to show RCA status information.
BREAK
Authorized to send a BREAK signal.
ADMIN
Covers the access rights: PALL, USER, SMON,
PCON, BREAK
APPLIANC
E-ADMIN
Covers the access rights: PALL, USER, SCON,
SMON, PCON, BREAK
Default: PALL, SMON
User Delete
The User Delete command deletes a user entry in the RCA. No further connections can then be set up to the RCA with this user name.
There is no message and also no automatic logout.
Access rights:
USER or ADMIN / APPLIANCEADMIN
Syntax:
USER DEL <username>
Parameters:
username
User name that is to be deleted.
U41618-J-Z916-1-76
91
RCA commands
LAN Console
User Logout
The User Logout command can be used to terminate all existing connections to
the RCA for the specified user. A suitable message is output first in each
associated console window.
If no connection is set up for the user to the RCA, an error message is issued.
Access rights:
USER or ADMIN / APPLIANCEADMIN
Syntax:
USER LOGOUT <username>
Parameters:
username
Name of user to be logged out.
Users of the class ADMIN cannot log out users of the class APPLIANCEADMIN.
User Set
You can use the User Set command to change the access rights of a user relating
to the RCA commands or to change the user password.
Access rights:
None to change your own password
USER or ADMIN / APPLIANCEADMIN to change anything else
Syntax:
USER SET <username> [PASSWORD=<password>]
[ACCESS=[+|-]<access>]
Parameters:
username
User name
password
User password comprising 3-16 alphanumeric characters – case
sensitive.
I The input of the new password is displayed on the screen.
For security, clear your screen display after issuing this
command.
92
U41618-J-Z916-1-76
LAN Console
RCA commands
access
Access rights or classes for RCA command groups. Several
access rights can be defined with a single command call. The
individual definitions must be separated by commas.
ACCESS=<access>
Reassigns the user’s access rights.
ACCESS=+<access>
Extends the user’s existing access rights by the
specified rights.
ACCESS=-<access>
Restricts a user’s existing access rights by the
specified rights.
The valid values are:
P<n>
Authorized to set up console connections for the
specified port number n.
P<x-y>
Authorized to set up console connections for the
specified port numbers in the range x to y.
PALL
Authorized to set up console connections for all
ports.
USER
Authorized to create and delete users as well as
to change user data.
SCON
Authorized to configure the RCA.
PCON
Authorized to modify the port settings.
SMON
Authorized to show RCA status information.
BREAK
Authorized to send a BREAK signal.
ADMIN
Covers the access rights: PALL, USER, SMON,
PCON, BREAK
APPLIANC
E-ADMIN
Covers the access rights: PALL, USER, SCON,
SMON, PCON, BREAK
U41618-J-Z916-1-76
93
RCA commands
5.9.2.6
LAN Console
Serial Connections
Connect
The Connect command establishes a console connection from the RCA serial
console port to a target system attached to another port on that RCA. If the
specified port is already in use, you can take over the console connection in
accordance with the SHARE-Mode (Server Share command) set.
To use this command, you must have previously issued a Server CLI Connect
command to activate the connection option.
Access rights:
Port-specific or ADMIN / APPLIANCEADMIN
Syntax:
CONNECT [<RCA PortNumber>]
Parameter:
RCA PortNumber
Port numbers 1-8
The port required can be selected from the display of the available
ports without specifying the port number.
Disconnect
The Disconnect command terminates a console connection that was previously
initiated with a Connect command. This command can only be issued from the
command interface of the RCA (input [Ctrl] and “^”).
Access rights:
Port-specific or ADMIN / APPLIANCEADMIN
Syntax:
DISCONNECT
94
U41618-J-Z916-1-76
6
Teleservice
The LAN Console (PW250LC) is the central point of Teleservice access to the
networking PRIMEPOWER- and RM servers that can be reached from the
PW250LC.
Teleservice gives you fast access to the Service organization and gives Service
fast, selective access to your system where necessary.
The following is needed for Teleservice:
– High-speed modem with the necessary cabling and installation instructions
– A mains power supply (230V)
– A telephone connection (TAE) near the system
– The Teleservice software provided on the FSC Control² DVD
Since multiple PRIMEPOWER or RM servers can be administrated from the
PW250LC, fewer modems are required. The modem is not included with the
PW250LC product.
The software comes with detailed information that you can find under --> y(A)
Information in the administration interface. There is also a HELP function for
every menu item. A CHOICES function is available when there are several
options. You can order manuals for the Teleservice software from your sales
partner.
V Preparatory work for Teleservice
Some preliminary work is needed before getting Teleservice started, but
any user with some technical skill can do this with the aid of these instructions and the online help. Contact the technician responsible for installing
your system if you do not want to do this preliminary work yourself.
If you encounter a generation or registration problem in the course of installation, call your SIEMENS IT Service hotline and report your Teleservice
problem (in Germany the number for the Siemens IT Service hotline is
0180/5-2202).
You can find out more about Teleservice on the Internet under
http://serviceportal.sbs.de/technics/technics/swserv/reliant/
teleserv/teleserv_en.htm
U41618-J-Z916-1-76
95
Installation and generation
6.1
Teleservice
Installation and generation
Hardware installation
The following hardware is needed for Teleservice:
– A high-speed modem
– A serial cable
– An adapter
– A telephone cable
– A power supply unit
– A power supply cable
The modem is connected via a serial connection cable to the free ttyb port on
the PW250LC. The system should be turned off when connecting the modem.
Please refer to the documentation for the modem for information on installation
and operation.
Use the Western <-> TAE cable for the modem/telephone connection. The
Western connector is inserted in the modem and the TAE connector in the
telephone connection socket. Note that the TAE connector will only fit in a TAE
socket that has an N interface. A telephone is normally connected to an F
interface and is coded differently. There are also TAE sockets to which a
telephone and a modem can be connected. In this case, the modem is
connected on the left and the telephone in the middle.
The modem has a low-voltage on one side. Before connecting the power supply
unit to the modem, make sure the low-voltage switch is off. Finally plug the
power supply unit into a normal 230 V mains socket and turn the low-voltage
switch on again.
Software installation
The Teleservice package is preinstalled at the factory.
To reinstall the package, first install the Teleservice (SMAWtssv) package from
the FSC Control² DVD with the pkgadd command.
96
U41618-J-Z916-1-76
Teleservice
6.2
Generating the software
Generating the software
The screens depicted in this section show a sample configuration. Since some
screens depend on the parameters that have been input, the generation
process may involve some different screen texts or different screens.
Logging in
Ê Log in under a user ID with root privileges and issue the teleadm command
from the shell. You will see the following start screen:
The Teleservice SCL is subject to optional contractual agreements. You
should contact your sales partner if you would like to use it. The relevant
service must first be set up so that the modem can be installed.
Ê From the first menu in the first window choose option d “Install Teleservice
channel” and in the next menu, option a “Install/Modify service at Teleservice
channel”. The physical properties are entered in the third window.
Ê The device name of the Teleservice channel should be already displayed. If
you want to use a different port, you have to change this setting here.
Ê For the standard modem that is currently delivered, enter “rob-56kfm.1“. If
you are using a different modem, note the validated Teleservice modems in
the next section.
Ê Enter the call number under which your modem can be reached from your
local telephone network. Enter the number without the area code.
U41618-J-Z916-1-76
97
Generating the software
Teleservice
Ê If the modem is connected to a private automatic branch exchange (PABX),
enter the exchange code (outside line code) that you dial to make a local or
long-distance call on the Teleservice connection. This is “0” on many PABXs.
The fields are not filled in for direct connections to the public telephone
network.
Ê Save these settings by choosing SAVE.
98
U41618-J-Z916-1-76
Teleservice
6.3
Selecting validated Teleservice modems
Selecting validated Teleservice modems
If you are connecting a different modem, the CHOICES function will show you
a list of all validated modems and you can choose the right one. If there are
several entries for one modem type, choose the one with the highest suffix.
Select ENTER to exit the next screen.
Ê When window 2 “Install Teleservice channel” is opened again, choose
option b “Install Modem for Teleservice channel”.
Ê Set the channel speed to 38400.
U41618-J-Z916-1-76
99
Selecting validated Teleservice modems
Teleservice
Ê There are two options for connecting the modem to the telephone network.
Enter pabx if the modem is operated via a PABX. Enter pstn if the modem is
connected directly to the public telephone network.
Ê For the dialing method, you can enter td if the modem is going to operate with
tone dialing or pd for pulse dialing.
Ê The Guard tone and Idle state modem mode items are taken from the parameter
descriptions for your modem and normally do not need to be changed.
Ê Choose the country of installation with the function CHOICES.
Ê Exit the menu by choosing SAVE.
The screen is then refreshed and the following messages are displayed
(example):
ç
ç
ç
ç
ç
ç
ç
÷
÷
÷
÷
÷
÷
÷
Working ...
Modem installation is running, please wait .................
Approved firmware revision:
xxxxx
Actual firmware revision: xxxxx
..................................................
Done
Press ENTER to continue
Ê Confirm this prompt with the <ENTER> key.
This completes installation of your modem. Now you can continue with
administration of the TELESERVICE channel.
Ê In window 2, first choose option b “Parameter for registration (OLR) and
autom. defect reporting (ADR)”.
100
U41618-J-Z916-1-76
Teleservice
Selecting validated Teleservice modems
Input is required for registration, which will be prompted at this point (you
must fill in these fields including Phone/Fax).
Ê Enter the ident number of the computer. If technically feasible this will be
already displayed. This number is unique and identifies you for all subsequent Teleservice activities. The ident number can be found on the
nameplate on your system unit.
Ê Company (abbrev.): Enter a short name for the company and, if there is
sufficient space, the location where you are based.
Ê The Automatic Defect Reporting (ADR) (no) and Administrator’s mail
address (blank) are preassigned default values for the TeleCall function.
You will find further information on the topic of TeleCall on the Internet
under
http://serviceportal.sbs.de/technics/technics/swserv/reliant/
telecall/telecall_en.htm
or by calling your Service hotline (0180/5-2202 in Germany) and quoting
the keyword TeleCall.
Ê Contact person: Here you enter the name(s) of one or more of your
employees who can be contacted about the system if a connection
cannot be established some time. Their phone and fax numbers are also
helpful.
Ê Additional information can be entered under Remark.
Once you have filled in the form, save the settings with the SAVE option.
Window 2 appears “Install Teleservice channel”. The registration must be
done for both Teleservice centers (Munich / Paderborn). Choose “f” for registration and confirm the initial registration for Index 0.
U41618-J-Z916-1-76
101
Selecting validated Teleservice modems
Teleservice
Parameters are entered in this window, which can be used to contact the
TELESERVICE center in Munich or Paderborn.
Ê Enter far under Telephone number if the Teleservice center does not lie in
your local telephone network. The parameter near may apply for you if you
are in the Munich or Paderborn local public network. This field is only shown
in advance if pabx was entered for “Connection between modem and telephone
network”.
Ê A further parameter required is the phone number for contacting the
Teleservice center in Paderborn or Munich. A symbolic name can be used
here or you can also enter the number directly. A symbolic name is
converted by the software. If the number changes, the assignment can be
changed by the center. The following symbolic names and numbers apply
presently for the Teleservice centers in Paderborn or Munich:
Paderborn
0049+D-5
00495251829890
Munich
0049+D-2
00498936012906
The operating mode of the modem is read from the modem parameters and
normally does not need to be changed.
Ê Save the settings with SAVE.
Your system will now try to establish a connection to the defined
Teleservice center. The following screen appears during this. The text on
this screen is variable so the data shown below is just a snapshot.
102
U41618-J-Z916-1-76
Teleservice
Selecting validated Teleservice modems
When the connection has been established, the Teleservice center requests
you to enter the required information.
This includes:
Ê Terminal type: Here you enter the type of terminal from which you will
later monitor and possibly suppress all activities that are performed on
your system.
U41618-J-Z916-1-76
103
Selecting validated Teleservice modems
Teleservice
Ê Phone number of your modem: This must be a number that can be
reached directly from outside. You only need to input the country/area
code because the actual number is displayed automatically. The Service
organization will use this number to access your system if this is
necessary.
Ê When you have completed the form, exit this menu with the SAVE
function.
The following screen appears. At first only the first two lines appear. The
rest is output after a successful test (this can take a while because
connection establishment and the connection data are tested).
Ê Pressing ENTER takes you back to the Teleservice Administration menu.
Now perform the registration for the other Teleservice center. You can leave
the menu by selecting the EXIT function.
Generation and configuration of the Teleservice package have been completed
successfully at this point.
104
U41618-J-Z916-1-76
Teleservice
6.4
TeleCall
TeleCall
The PW250LC is the central point of Teleservice access to the networking
systems that can be reached from the PW250LC. It therefore makes sense to
send TeleCall messages via it too, and not via a local Teleservice connection for
every machine.
The Telecall service is available with the Logging V3.0 software package on the
Solaris for PRIMEPOWER or Reliant UNIX for RM server platforms. TeleCall
enables a specific response to internal events and allows a message to be sent
automatically to the support center.
The TeleCall service can only be used in conjunction with the support center
that is responsible for you. If you are interested in using TeleCall for your
PRIMEPOWER/RM servers, it is essential you get in touch with your contact
person at Service before activating it, or call your hotline telephone number
(0180/5-2202 in Germany) and inquire about a TeleCall connection or call up
the following page on the Internet:
http://serviceportal.sbs.de/technics/technics/swserv/reliant/
telecall/telecall_en.htm
One of the components of Logging V3.0 is event management.
Event management is an instrument that defines events on the basis of error
messages and the frequency with which they occur and initiates reactions
according to these events.
An event occurs when the number of times that an error is reported within a
certain period reaches the defined threshold value.
The events and reactions are described in event and reaction definitions. You
can display and edit these definitions using the event management functions
under PRIMEPOWER ServerView Suite --> Diagnose.
The events are stored under $LOGPATH/filters and the reactions are stored
under $LOGPATH/reactions. For more information about error management with
TeleCall, refer to the manual “Error Diagnostics and Troubleshooting”.
The following software packages allow you to configure a TeleCall cluster for
computers that can be reached from the PW250LC:
– SMAWtelx (Domain Teleservice Distribution) for Solaris
– SItelx (Domain Teleservice Distribution) for Reliant UNIX
U41618-J-Z916-1-76
105
TeleCall
Teleservice
6.4.1
Installing Telecall
6.4.1.1
Preparations
Ê Draw up a list of the node names of all machines that are to belong to the
TeleCall cluster.
Ê Check whether all machines in the above-mentioned list can be accessed
from the PW250LC, for example using
ping <NodeName>
6.4.1.2
Software installation on the PW250LC
Ê Install the Logging 3.0 software package (SMAWlog3, SMAWlog3M,
SMAWdaps), component of FCS Basic Extensions, from the current FSC
Control² DVD (CD-SYS-MGMT-SPARC). The software package is then
installed automatically.
Ê Install the SMAWtelx (Teleservice Cluster Distribution) software package,
component of Domain Admin, from the current FSC Control² DVD (CD-SYSMGMT-SPARC).
Ê Respond to the questions prompted during the installation with yes.
6.4.1.3
Software installation on the PRIMEPOWER
Ê Install the Logging 3.0 software package (SMAWlog3, SMAWlog3M,
SMAWdaps), component of FCS Basic Extensions, from the current FSC
Control² DVD (CD-SYS-MGMT-SPARC).
Ê Install the SMAWtelx (Teleservice Cluster Distribution) software package,
component of Domain Admin, from the current FSC Control² DVD (CD-SYSMGMT-SPARC) on all cluster nodes, partitions and the SMC.
Ê Respond to the questions prompted during the installation with yes.
6.4.1.4
Software installation on the RM
Ê Install the SItelx software package using the pkgadd command, or from the
CD-SYS-MI via the sysadm user interface.
Ê Answer the questions during installation as follows:
106
U41618-J-Z916-1-76
Teleservice
TeleCall
ç Do You want to use DOMAIN TELESERVICE DISTRIBUTION immediately?
ç
ç (Standard: n) [y,n,?] y
÷
÷
÷
ç Select node to collect for TELESERVICE: <PW250LC SystemName>
ç
÷
÷
6.4.2
Generating the Telecall cluster
Before continuing with generation of the TeleCall cluster,
Ê make sure that the SMAWtelx or SItelx software package has been installed
on all machines involved and that the PW250LC has a fully functional
Teleservice connection to a Siemens IT Service Teleservice center in
Paderborn or Munich.
Ê test this if you need to via the Teleservice menu (submenu: – Simple
TELESERVICE Administration, menu item: – Test Connection to a Teleservice
Center, TELESERVICE CENTER PADERBORN, MUNICH).
I Note that this function can only be used in conjunction with the
support center that is responsible for you (see the introduction to the
section “TeleCall”).
The TeleCall cluster now has to be generated on the PW250LC.
1. Log in to the PW250LC under a user ID with root privileges and start the
teleadm command from the shell. You will see the following start screen:
U41618-J-Z916-1-76
107
TeleCall
Teleservice
Ê Enter the identification number of the PW250LC in window 3 “Parameter
for registration (OLR) and autom. defect reporting (ADR)”. This number is
unique and identifies you for all subsequent Teleservice activities. You
will find the identification number on the nameplate on your system unit.
Ê Change the “Automatic Defect Reporting (ADR)” field to yes with the
“Choices” function, and enter the connection index for the Teleservice
center in Paderborn or Munich in the “to center” field.
Ê Enter your customer information in the other fields.
V Mandatory fields
All fields including “Phone/Fax” are mandatory.
Ê Save the “Parameter for registration (OLR) and autom. defect reporting
(ADR)” window with SAVE.
2. Use the node_adm command to make the Telecall cluster aware of the
PW250LC:
node_adm -A -n <SystemName PW250LC> -C telx
Password for <SystemName>:<Password for root>
3. Use the node_adm command to add all other machines to the Telecall cluster:
node_adm -A -n <SystemName> -C telx
Password for <SystemName>:<Password for root>
4. Check the state of the machines in the TeleCall cluster using the command:
node_adm -LI -C telx
108
U41618-J-Z916-1-76
Teleservice
TeleCall
All machines must be in the INTEGRATED state.
Example:
***************** CLUSTER NAME: telx *****************************
NODE
NAME
STATE
SYSTEM VERSION
IDENT
PW250LC INTEGRATED SunOS
5.7 Generic_106541-14
2163305364
Node1
INTEGRATED SunOS
5.8 Generic_108528-01
2163410482
Node2
INTEGRATED SunOS
5.8 Generic_108528-01
2163409787
Node3
INTEGRATED SunOS
5.6 Generic_105181-23
2163409835
5. Define the Teleservice machine for the entire cluster with the command:
event_adm -X <SystemName PRIMESTATION> -t TELEX -C telx
U41618-J-Z916-1-76
109
TeleCall
Teleservice
V Adding a new machine
This step must also be executed when adding a new machine to an
existing cluster.
This completes generation of the TeleCall cluster.
You can initiate a test call on the machines to the Teleservice Center in
Paderborn or Munich with the
$LOGPATH/reactions/calltelex -M "This is a test call please
cancel"
command in order to perform a function test.
110
U41618-J-Z916-1-76
Glossary
bootp
Protocol that is used for booting a system remotely.
cluster
A group of systems (nodes) interacting tightly as a system to provide fast,
uninterruptible computer services.
Console
The operating controls of a computer or a data processing system that
give the user direct access to a system.
DNS
Domain Name Service
MAC
Media Access Control. Hardware address for accessing a device.
Mirroring
Modern hard disks are highly reliable, but even so a variety of methods
is used to ensure the survival of your vitally important data, even if a disk
failure does happen. One of the simplest methods is mirroring, which
basically involves keeping two copies of all data saved to the hard disk.
In this way, even if one copy is lost, the other will remain, ensuring that
no data is lost.
NIS
Network Information Service. Central administration of configuration
information in a network. For instance, IP addresses, security details,
mail, Ethernet interface configurations and other network services can
be administered or provided centrally.
OBP
OpenBoot™ PROM, OpenBoot™ PROM software.
SIDATA
System installation done by the user
Solaris
UNIX operating system by SUN
U41618-J-Z916-1-76
111
Glossary
SSH
Secure Shell. Provides encryption mechanisms for network services.
XSCF
Extended System Control Facility. The System Control Facility is a
dedicated set-up on the systemboard of the PRIMEPOWER 250/450
(with an independent CPU, the service processor). XSCF guarantees a
unique monitoring of the system and controls the status of fans, power
supply and other system components and peripherals.
112
U41618-J-Z916-1-76
Abbreviations
BDM
Board Debug Monitor
BIOS
Basic Input Output System
CCU
Console Connection Unit
CLI
Command Line Interface
CPU
Central Processing Unit
CSA
Canadian Securities Administrators
CTS
Clear to Send
DHCP
Dynamic Host Configuration Protocol
DNS
Domain Name Service
DTR
Data Terminal Ready signal
EMC
Electromagnetic Compatibility
EN
European Norm
ESF
Enhanced Support Facility
U41618-J-Z916-1-76
113
Abbreviations
FCC
Federal Communications Commission
FE
Fast Ethernet
FSC
Fujitsu Siemens Computers
HCP
Hardware Control Program
IEC
International Electronics Commission
IEEE
Institute of Electrical and Electronic Engineers
IKDB
Internal Kernel Debugger
IP
Internet Protocol
LAN
Local Area Network
MAC
Media Access Control
MR
Midrange
NFS
Network File System
NTP
Network Time Protocol
OBP
Open Boot Prom Program
114
U41618-J-Z916-1-76
Abbreviations
PCI
Peripheral Component Interconnect
PTF
Programme Temporary Fix
PW
PRIMEPOWER
PW250LC
PRIMEPOWER250 based LAN Console
PW250SMC
PRIMEPOWER250 based System Management Console
RCA
Remote Communication Adapter
RMS
Reliant Monitor Services
RTS
Request To Send
RTTY
Remote TeleType
SCF
System Control Facility
SCL
Secure Communication Layer
SCS
System Console Software
SMC
System Management Console
SPARC™
Scalable Processor Architecture
U41618-J-Z916-1-76
115
Abbreviations
SSH
Secure Shell
SunVTS™
Sun Validation Test Suite
TCP/IP
Transmission Control Protocol / Internet Protocol
TFT
Thin Film Transistor
UL
Underwriters Laboratories Incorporated
USB
Universal Serial Bus
VGA
Video Graphic Adapter
VTS
see SUNVTS
WSA
Web-based System Administration
XSCF
eXtended System Control Facility
116
U41618-J-Z916-1-76
Related publications
Related publications
The manuals are available as online manuals, see http://manuals.fujitsusiemens.com, or in printed form which must be paid and ordered separately at
http://FSC-manualshop.com.
[1]
LAN-Konsole und System-Management-Konsole
Installieren, Konfigurieren und Bedienen
System Administrator’s Guide
Target group
System administrators
Content
This manual describes the setting up and cabling of the LAN Console,
RCA4 and RM or PRIMEPOWER systems. It describes the installation
of the LAN Console software, the configuration of the LAN Console and
RCA4, the operation and diagnostic options.
U41584-J-Z916-1-76.
[2]
LAN Console
Installation, Configuration and Operation
System Administrator’s Guide
Target group
System administrators
Content
This manual describes the setting up and cabling of the LAN Console,
RCA3 and RM and PRIMEPOWER (MR) systems. It describes the installation of the LAN Console software, the configuration of the LAN Console
and RCA3, the operation and diagnostic options.
U41224-J-Z916-1-76
[3]
Reliant UNIX 5.45
Reliant UNIX Installation
Installation Guide
Target group
System administrators
Content
The manual describes the re-installation and updating of Reliant UNIX as
well as initial installation of it when there is a new system disk.
U41618-J-Z916-1-76
117
Related publications
[4]
Reliant UNIX 5.45
Reliant UNIX Operation
System Administrator’s Guide
Target group
System administrators
Content
Description of the administration of Reliant UNIX.
[5]
Reliant UNIX 5.45
Commands
Target group
Shell users
Content
This document describes the Reliant UNIX commands in alphabetic
order.
[6]
Reliant UNIX 5.45
User’s Guide
Target group
Users
Content
Overview of the Reliant UNIX 5.45 operating system and an introduction
into the general basics for users.
[7]
Reliant UNIX 5.45
System Administrator’s Reference Manual
Target group
System administrators
Content
Commands and application programs for system maintenance, file
formats, special files for system administration of the Reliant UNIX 5.45
operating system.
118
U41618-J-Z916-1-76
Related publications
[8]
Reliant UNIX 5.45
System Administrator’s Guide
User’s Guide
Target group
System administrators
Content
This manual provides an introduction to UNIX system administration.
Among other things, it describes the system administrator tools, UNIX
system configuration and support, calculation of system usage as well as
aspects of system security. The manual applies both for MIPS-based
UNIX and for Intel-based UNIX.
[9]
Reliant UNIX 5.45
Error Diagnostics and Troubleshooting
User’s Guide
Target group
System administrators
Content
This document provides information on event management in RM200,
RM300, RM400, RM600xxx, RM600E systems.
[10]
Reliant UNIX 5.45
Network Administration
Description
Target group
System administrators
Content
Description of the configuration and administration of networks.
[11]
Reliant UNIX 5.45
Networking Reference Manual
Reference Manual
Target group
System administrators, programmers
Content
Quick reference for commands, functions, utilities and system files,
which are required for working with networked computers.
U41618-J-Z916-1-76
119
Related publications
[12]
Reliant UNIX 5.45
RM600 E
Operating Instructions
Target group
System administrators
Content
This document provides information on the multi-user RM600E computer
system running under Reliant UNIX 5.45.
[13]
Reliant UNIX 5.45
RM600
E40/E42/E80 CS42
Operating Instructions
Target group
System administrators
Content
This document provides information on the models E40/E42/E80 and
CS42 on the multi-user RM600 computer system running under Reliant
UNIX 5.45.
[14]
Reliant UNIX 5.45
RM600
E45/E85/CS45/FC45
Operating Manual
Target group
System administrators
Content
This document provides information on the models E45/E85/CS45/FC45
on the multi-user RM600 computer system running under Reliant UNIX
5.45.
120
U41618-J-Z916-1-76
Related publications
[15]
Reliant UNIX 5.45
RM ServerNode
Operating Manual
Target group
System administrators
Content
Description, startup and operation of the RM ServerNode multiprocessor
computer system with the Reliant UNIX 5.45 operating system.
[16]
Reliant Monitor Services
Configuration and Administration of RMS
(Reliant UNIX and Solaris)
System Administrator’s Guide
Target group
System administrators
Content
This document describes the functionality, configuration and administration of the Reliant Monitor Services (RMS).
[17]
Reliant UNIX 5.45
High Availability
System Administrator’s Guide
Target group
System administrators
Content
Description of the hardware and software failover components in the RM
system family.
[18]
PRIMECLUSTER
Reliant Monitor Services
System Administrator’s Guide
Target group
System administrators
Content
Description of configuration and administration of RMS on Solaris
systems.
U41618-J-Z916-1-76
121
Related publications
[19]
SIEMENS Parallel Server (SPS)
Installation, Configuration and Administration
(Reliant UNIX)
Administration Guide
Target group
System administrators
Content
This document describes software installation for the Reliant UNIX SPS,
and administration of a cluster that uses these features.
[20]
RM-/SR2000 Systems
Safety Instructions
Target group
System administrators, technicians
Content
Safety instructions in 12 languages for RM systems.
[21]
Rackvarianten/ Rack Variants
Safety Instructions
Target group
System administrators, engineers
Content
Safety instructions in 25 languages for rack systems.
[22]
Reliant UNIX / Solaris
PRIMEPOWER ServerView Suite 2.2
System Administration within a Domain
Target group
System administrators, Service technicians
Content
Bundling and administration of several computer nodes using Server
View Suite and Domain Admin.
122
U41618-J-Z916-1-76
Related publications
PRIMEPOWER publications
[23]
GP 7000F/PRIMEPOWER Systems
Safety Instructions
Target group
System administrators, technicians
Content
Safety brochure in 25 languages for the GP 7000F/PRIMEPOWER
systems.
[24]
PRIMEPOWER (Solaris)
System Console Software (SCS) User’s Guide
PRIMEPOWER 2500/2000/1500/1000/800/900
Target group
System administrators
Content
Description of the software used on the System Management Console.
Both the PRIMEPOWER200 and the PRIMESTATION as SMC are taken
into account. The manual is available on CD and is included in the scope
of delivery of the SCS.
[25]
PRIMEPOWER (Solaris)
User’s Guide
PRIMEPOWER 100N/200/400/600/250/450/650/850
Target group
System administrators
Content
User Guide for the PRIMEPOWER Midrange Systems
100N/M200/M400/M600/M250/M450/M650/M850.
U41618-J-Z916-1-76
123
Related publications
[26]
PRIMEPOWER (Solaris)
User’s Guide
PRIMEPOWER 2500/2000/1500/1000/800/900
Target group
System administrators, technicians
Content
User’s guide for PRIMEPOWER Enterprise Systems
2500/2000/1500/1000/800/900; also contains the administration of an
SMC.
[27]
PRIMEPOWER (Solaris)
Model 200 Installation Instructions
Target group
Technicians
Content
Installation instructions for the PRIMEPOWER M200 system.
[28]
PRIMEPOWER (Solaris)
Model 400 Installation Instructions
Target group
Technicians
Content
Installation instructions for the PRIMEPOWER M400 system.
[29]
PRIMEPOWER (Solaris)
Model 600 Installation Instructions
Target group
Technicians
Content
Installation instructions for the PRIMEPOWER M600 system.
[30]
PRIMEPOWER (Solaris)
Model 200 Maintenance Manual
Target group
Technicians
Content
Service Manual for the PRIMEPOWER M200 system.
124
U41618-J-Z916-1-76
Related publications
[31]
PRIMEPOWER (Solaris)
Model 400 Maintenance Manual
Target group
Technicians
Content
Service Manual for the PRIMEPOWER M400 system.
[32]
PRIMEPOWER (Solaris)
Model 600 Maintenance Manual
Target group
Technicians
Content
Service Manual for the PRIMEPOWER M600 system.
[33]
PRIMEPOWER (Solaris)
850/650 User’s Guide
Target group
System administrators
Content
User Guide for the PRIMEPOWER 850/650 rack systems.
[34]
PRIMEPOWER (Solaris)
250/450 User’s Guide
Target group
System administrators
Content
User Guide for the PRIMEPOWER 250/450 system. Also contains information on XCSF.
[35]
PRIMEPOWER (Solaris)
800/1000 User’s Guide
Target group
System administrators
Content
User Guide for the PRIMEPOWER 800/1000 system; also includes information on operating the SMC.
U41618-J-Z916-1-76
125
Related publications
[36]
PRIMEPOWER (Solaris)
2000 User’s Guide
Target group
System administrators
Content
User Guide for the PRIMEPOWER 2000 system.
[37]
PRIMEPOWER (Solaris)
900/1500/2500 User’s Guide
Target group
System administrators
Content
User Guide for the PRIMEPOWER 900/1500/2500 system.
Online Literature on PRIMEPOWER
[38]
PRIMEPOWER (Solaris)
System Console Software (SCS) User’s Guide
PRIMEPOWER 2500/2000/1500/1000/800/900
Target group
System administrators
Content
Description of the software used on the System Management Console.
[39]
PRIMEPOWER (Solaris)
Installation Guide System Console Software
Target group
System administrators
Content
Special notes on using System Console Software on Fujitsu Siemens
equipment.
126
U41618-J-Z916-1-76
Related publications
[40]
PRIMEPOWER (Solaris)
PRIMEPOWER 900/1500/2500
Hardware Control Program (HCP)-CD
PW900: COLME-HCP
PW1500:COL0E-HCP
PW2500:COLLE-HCP
PW650:COLMM-HCP
Target group
System administrators, technicians
[41]
PRIMEPOWER (Solaris)
Enhanced Support Facility (ESF)
Manuals & Patches for Solaris Operating Environment
Target group
System administrators, technicians
Content
Contains the XSCF User’s Guide among other things. The CD ROM is
readable on PCs and Solaris systems.
[42]
PRIMEPOWER (Solaris)
PRIMEPOWER 250/450
Hardware Control Program (HCP)-CD
Target group
System administrators, technicians
Content
May contain the updated XSCF User’s Guide. The CD ROM is readable
on PCs and Solaris systems.
U41618-J-Z916-1-76
127
Index
Index
/opt/SMAW/SMAWxsco/misc/
setup.tpl
template file 48
/opt/SMAW/SMAWxsco/sbin/
mklancon 41
/var/saf/lanconsole/log 64
/var/saf/lanconsole1/log 64
/var/saf/lanconsole3/log 64
/var/saf/lanconsole4/log 64
10/100 BaseT 21
100MBps 30
17" monitor 9
21" monitor 9
2-way mirror 11
2-way-mirroring 11
A
abort 63
adapter 35
administration access 51
application manager 59
authentication method 84
automatic access
RCA4 67
B
board debug monitor 58
boot
remote 7
bootp 48, 57
initial configuration 40
request 40
break 59
C
cable 21
console connection 27
order numbers 22
U41618-J-Z916-1-76
cabling 21
console 27
PRIMEPOWER 100N and RCA
26
PRIMEPOWER and RCA 23
RM 22
CCU 2
CDE 15
CLI 59
CLI port 94
command line interface 59
common desktop environment 15
configuration
commands 43
LAN Console 35
RCA 35
RM 38
connect 94
RCA 94
connecting
to LAN 22
to PRIMEPOWER 22
to RM system 22
connection
cable 22
clearing down 59
disrupted 68
hanging 68
connector
console port 21
console 7
console connection 42
RCA 59
RCA4 59
reset 66
Console Connection Unit 2
console connections 35
console input 35
console name 41, 68, 69
console output 35
console port 21, 78
connector 21
RCA 51
Control DVD 96
129
Index
Control² CD/DVD 31, 32
cross over 27
D
detach mirroring 14
dhcp 48
dhcpconfig 48
dhtadm 48
diagnostics
monitor 64
dimensions 28
direct connection 27
disconnect 94
disk mirroring 11
disk partitoning 10
disruption 68
distance
building 1
DNS 40
domain name service 40
E
error situations
trace level 64
Ethernet 21
ethernet address
RCA 40
Ethernet connection 21
Ethernet port 21
exhaust air clearance 28
extended system control facility 112
G
gateway address 66
H
hard didsk partitioning 10
hard disk partitioning 10
hardware
RCA 19
hardware address 66
hardware break 59
help command
RCA 72, 94
130
high-speed modem 96
I
important information 5
Init 30
initializing
RCA 30
input buffer 59
installer 31
installing
LAN console 31
telecall 106
intel-based LAN console 20
internal kernel debugger 58
IP address 66
LAN Console 40
RCA 40
IP address RCA
deleting 30
K
key binding 62
L
LAN Console
configuration 35
disrupted connection 68
intel-based 20
IP address 40
remove configuration entries 46
show configuration entries 47
software 20, 31
lanconsole 47
lanconsole1 47
lanconsole3 47
lanconsole4 45, 47
language setting 9, 15, 33
line speed 37, 56
RCA port 38, 56
Link LED 30
log
logging mode 61
logfile 64
Logging 3.0 106
U41618-J-Z916-1-76
Index
M
MAC address 66
RCA 40
Machine Administration Menu 37
man pages 12
mapping consoles 61
Midrange Servers
system administration 1
mirroring 11, 13, 14
mixed operation
PRIMEPOWER and RM systems
2
mklancon 43, 65
xscon 59
mkrca 48
monitor
diagnostics 64
lanconsole 45
lanconsole1 45
lanconsole3 45
lanconsole4 45
RCA3 45
RCA4 45
XSCF 45
monitors 47
Multiport Console Connection Unit 2
PATH 33
pmadm
monitors 65
pntadm 48
port break command 59
port history 59
port number 75
RCA 41, 65
ports 35
power LED 30
PRIMEPOWER 1
100N/200/400/600/650/850 1
connecting to RCA 22, 27
connection cable 22
Enterprise Server 10
models 800/1000/2000 10
models 800/900/1000/1500/2000/
2500 2
port cable 27
PRIMEPOWER250 17
PRIMEPOWER250/450 35, 37
PRIMEPOWER450 17
prom monitor 58
PW250LC 1
P
packaging 11
partitioning 10
password 54, 63
RCA 50, 59
patches
Solaris 9
R
RCA
authentication check 50
authentication method 84
configuration 35
connect 94
connecting to PRIMEPOWER 22
console port 51
delete configuration 30
delete IP address 30
firmware update 56
help command 72, 94
initializing 30
IP address 40
network cable 27
password 50, 59
port number 65
rear view 19
restart 30
U41618-J-Z916-1-76
131
N
network cable 27
node_adm 108
O
OBP monitor 58
Online LED 30
order numbers
cable 22
Index
RJ45 27
user name 50
RCA configuration
deleting 30
RCA port
line speed 56
RCA1-3 36
RCA3 19, 35
configuration 54
monitor 45
system information 65
RCA4 19, 35, 75
automatic access 67
disrupted connection 68
monitor 45
not responding 66
RCA4-16 19
RCA4-8 19, 75
RCA4plus 35
reinstallation 9, 10
remote
boot 7
Remote Communication Adapter 1
Reset 30
restart
RCA 30
resume 59
RF interference 5
RJ45 27
RM
configuration 38
connecting to RCA 27
port cable 27
RM600 1
rmlancon 46, 65
rtty 36, 40, 43, 59, 65
rtty monitor 64
132
S
sacadm
monitors 65
safety notes 5
SCL 97
scope of delivery 9, 11
PW250SMC 10
SCS 2
secure communication layer 97
secure shell
see ssh 36
serial cable 96
serial ports 22
service
communication 1
service organization
communication 1
short-circuit 6
showlancon 47, 65
SIDATA 2, 19
SMAWrins 31
SMAWrtty 31, 58
SMAWsmon 31
SMAWtelx 31, 106
SMAWtssv 33
SMAWxsco 31, 40, 58
SMC 2
SMC see System Management
Console
software
LAN Console 31
versions 31
software installation
teleservice 96
Solaris 9, 58
common desktop environment 59
Solaris8 9
SPARC processor 1
ssh 31, 36, 37, 40, 43, 44, 53, 59, 60,
70, 87, 112
state of delivery 30
SUNVTS 9
system console 7
cabling 27
U41618-J-Z916-1-76
Index
console 1
System Console Software 2, 10
system management CD
see Control² CD/DVD 31
System Management Console 1, 2,
7, 10
hard disk partitioning 10
T
TCP/IP
RCA 19
teleadm 107
telecall
installation 106
Telecall Gateway 1
Teleservice 1, 9
teleservice
reinstallation 96
software installation 96
telnet 31, 36, 40, 43, 44, 51, 59, 60,
70
template file
/opt/SMAW/SMAWxsco/misc/
setup.tpl 48
terminal emulation
xterm 61
terminal type
setting 37
trace level
error situations 64
traffic 30
V
V.24 1, 27
RCA 19
versions
software 31
W
web-based system administration 7
starting 34
Webstart wizard 31
X
XSCF 1, 17, 19, 35, 36, 37, 38, 43,
112, 127
administration 66
configuration 47
console connection 56
manuals 19
monitor 45
port number 46
ssh 36, 63
telnet 60, 63
xscon 7, 51, 58, 61, 70
mklancon 59
xterm 61
XVision 62
U
unpacking 11
U41618-J-Z916-1-76
133
Fujitsu Siemens Computers GmbH
User Documentation
33094 Paderborn
Germany
Fax: 0 700 / 372 00001
email: [email protected]
http://manuals.fujitsu-siemens.com
Submitted by
✁
Comments on PW250LC
LAN Console and RCA4plus
U41618-J-Z916-1-76
Comments
Suggestions
Corrections
Fujitsu Siemens Computers GmbH
User Documentation
33094 Paderborn
Germany
Fax: 0 700 / 372 00001
email: [email protected]
http://manuals.fujitsu-siemens.com
Submitted by
✁
Comments on PW250LC
LAN Console and RCA4plus
U41618-J-Z916-1-76
Comments
Suggestions
Corrections
Information on this document
On April 1, 2009, Fujitsu became the sole owner of Fujitsu Siemens Computers. This new subsidiary of Fujitsu has been renamed Fujitsu Technology Solutions.
This document from the document archive refers to a product version which
was released a considerable time ago or which is no longer marketed.
Please note that all company references and copyrights in this document have
been legally transferred to Fujitsu Technology Solutions.
Contact and support addresses will now be offered by Fujitsu Technology Solutions and have the format …@ts.fujitsu.com.
The Internet pages of Fujitsu Technology Solutions are available at
http://ts.fujitsu.com/...
and the user documentation at http://manuals.ts.fujitsu.com.
Copyright Fujitsu Technology Solutions, 2009
Hinweise zum vorliegenden Dokument
Zum 1. April 2009 ist Fujitsu Siemens Computers in den alleinigen Besitz von
Fujitsu übergegangen. Diese neue Tochtergesellschaft von Fujitsu trägt seitdem den Namen Fujitsu Technology Solutions.
Das vorliegende Dokument aus dem Dokumentenarchiv bezieht sich auf eine
bereits vor längerer Zeit freigegebene oder nicht mehr im Vertrieb befindliche
Produktversion.
Bitte beachten Sie, dass alle Firmenbezüge und Copyrights im vorliegenden
Dokument rechtlich auf Fujitsu Technology Solutions übergegangen sind.
Kontakt- und Supportadressen werden nun von Fujitsu Technology Solutions
angeboten und haben die Form …@ts.fujitsu.com.
Die Internetseiten von Fujitsu Technology Solutions finden Sie unter
http://de.ts.fujitsu.com/..., und unter http://manuals.ts.fujitsu.com finden Sie die
Benutzerdokumentation.
Copyright Fujitsu Technology Solutions, 2009