1
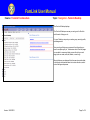
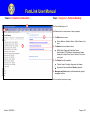
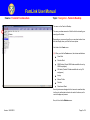
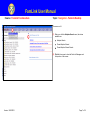
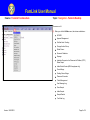
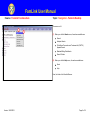
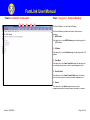
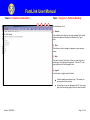
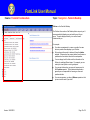
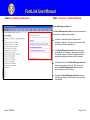
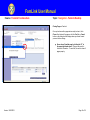
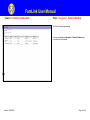
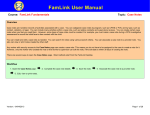
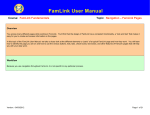
FamLink User Manual
Course: FamLink Fundamentals
Topic: Navigation - FamLink Desktop
Overview
The FamLink Desktop helps you to easily access and enter detailed information into FamLink efficiently and effectively. One of the ways the FamLink Desktop
helps you organize and retrieve work is by employing a series of icons that graphically represent the people and the work of Children’s Administration.
The Desktop contains a set of expandos customized for each worker group according to the work the members of the group perform. For example, on their
Desktops, intake workers see all intakes assigned to them. On their Desktops, social workers see all cases assigned to them.
The Desktop has four main areas that enable you to navigate, access, and enter information.
These areas are:
The Menu
The Banner
The Outliner
Messages and Links
Workflow
Because you use Navigation throughout FamLink, it is not specific to any particular process.
Version: 04/03/2012
Page 1 of 16
FamLink User Manual
Course: FamLink Fundamentals
1
2
Topic: Navigation - FamLink Desktop
This is the FamLink Login page, your starting
point.
To log in to FamLink, you need to enter your user
name.
If you perform multiple tasks in your job, FamLink
may display a list of roles.
The role you use to log in determines your worker
group, security profile, and assignments.
(1) In the Username text box, type your user ID.
(2) In the Password text box, type your password.
(3) Click the Login button.
3
Version: 04/03/2012
Page 2 of 16
FamLink User Manual
Course: FamLink Fundamentals
Topic: Navigation - FamLink Desktop
The FamLink Desktop displays.
The FamLink Desktop serves as your entry point to FamLink
and the work it helps you do.
It is your Desktop, unique to your worker group, security profile,
and assignments.
Your security profile gives you access to the information you
need to complete your job. It determines which FamLink pages
you are able to access and what you are able to do on each
page (such as create, edit, add, delete, or read only).
Security features are designed to limit access to sensitive data,
to allow only authorized workers to do certain functions, and to
control the approval process.
Version: 04/03/2012
Page 3 of 16
FamLink User Manual
Course: FamLink Fundamentals
Topic: Navigation - FamLink Desktop
The FamLink Desktop cont’d
2
1
The Desktop has four major areas for easy navigation:
3
4
1
(1) The Menu has six menus:
2
(2) The Banner has nine toolbar buttons:
Create, Maintain, Adoption Search, Utilities, Search, and
Help.
ADSA Intake (Aging and Disabilities Service
Administration), CA (Children's Administration) Intake,
Casework, Provider Work, Search, Refresh, Print, Help
and Logout
(3) The Outliner has five expandos:
Ticklers, Cases, Providers, Approvals, and Intakes
Supervisors have an additional Workers expando.
(4) Messages and Links displays both statewide and regional
messages and links
Let’s look at each area more closely.
1
Version: 04/03/2012
Page 4 of 16
2
FamLink User Manual
Course: FamLink Fundamentals
Topic: Navigation - FamLink Desktop
The menu on the FamLink Desktop
The menu provides access to all the FamLink functionality your
security profile allows.
1
Depending on your security profile, you can select actions from
lists that display when you click the menu options.
Let’s look at the Create menu:
(1) When you click the Create menu, the actions available are:
Case Work
Provider Work
ADSA Intake (Create ADSA intake available for use by
ADSA employees)
CA Intake (Create CA intake available for use by CA
employees)
Inquiry
Manual Tickler
Provider
Recruitment Event
Security features are designed to limit access to sensitive data,
to allow only authorized workers to do certain functions, and to
control the approval process.
Now, let’s look at the Maintain menu.
Version: 04/03/2012
Page 5 of 16
FamLink User Manual
Course: FamLink Fundamentals
Topic: Navigation - FamLink Desktop
The menu cont’d
1
(1) When you click the Maintain menu, the actions available are:
Automated Message
Checklist Template
1
2
Eligibility
Financial
Messages and Links
Recruitment Event
Security
Service Types
Workers
Let’s look at the Adoption Search Menu
1
2
Version: 04/03/2012
Page 6 of 16
FamLink User Manual
Course: FamLink Fundamentals
Topic: Navigation - FamLink Desktop
The menu cont’d
1
2
(1) When you click the Adoption Search menu, the actions
available are:
Adoption Search
1
Closed Adoption Record
2
1
2
Closed Adoption Record Search
(2) Click the blue arrow to close the FamLink Messages and
Links portion of the screen.
1
2
1
2
Version: 04/03/2012
Page 7 of 16
FamLink User Manual
Course: FamLink Fundamentals
Topic: Navigation - FamLink Desktop
The menu cont’d
1
(1) When you click the Utilities menu, the actions available are:
AFCARS
Approval Management
1
2
Certified Letter Tracking
Change Archival Group
Delete Person
Document Redaction
Expunge
Interstate Compact on the Placement of Children (ICPC)
Status Report
Intake Status Review (ADSA employees only)
Person Merge
Pending Person Merge
1
2
Placement Correction
Tickler Management
View Message Log
Case Sample
Intake Sample
Sample Results
Tran Stats Log
Version: 04/03/2012
Page 8 of 16
FamLink User Manual
Course: FamLink Fundamentals
Topic: Navigation - FamLink Desktop
The menu cont’d
1
2
(1) When you click the Search menu, the actions available are:
Search
1
2
1
2
Adoption Search
Child Abuse Prevention and Treatment Act (CAPTA)
Appeals Search
Medicaid Billing Data Search
Search Ticklers
(2) When you click the Help menu, the actions available are:
About
Help
1
2
Version: 04/03/2012
Now, let’s look at the FamLink Banner.
1
2
Page 9 of 16
FamLink User Manual
Course: FamLink Fundamentals
1
2
3
Topic: Navigation - FamLink Desktop
4
5
The FamLink Banner, on the FamLink Desktop
1
1
1
1
1
The FamLink Banner provides shortcuts to these common
functions:
(1) ADSA Intake
2
2
2
2
2
This takes you to a new ADSA Intake page, the starting point for
ADSA intakes.
(2) CA Intake
This takes you to a new CA Intake page, the starting point for CA
intakes.
(3) Case Work
This takes you to the Create Case Work page, the starting point
for creating various pieces of work for cases assigned to you.
1
1
1
1
1
(4) Provider Work
2
2
2
2
2
This takes you to the Create Provider Work page, the starting
point for various pieces of work for providers assigned to you.
(5) Search
This takes you to the Search page where you can do
navigational searches for cases, persons, providers, or workers.
1
Version: 04/03/2012
Page 10 of 16
1
2
1
FamLink User Manual
Course: FamLink Fundamentals
Topic: Navigation - FamLink Desktop
1
2
3
4
FamLink Banner cont’d
(1) Refresh
1
1
1
1
2
2
2
2
Only available on the Desktop, this button updates FamLink with
new real-time data and refreshes the Desktop to the “log-in”
state.
(2) Print
This allows you to print a page as it appears on your computer
screen.
(3) Help
This opens FamLink Online Help. When you open Help from a
certain page, Help displays that page topic. Click the “X” in the
upper right corner of the Help page to exit.
1
1
1
1
2
2
2
2
(4) Logout
Use this button to logout and exit FamLink.
FamLink updates some data at night. This means you
see some results the next day.
As tempting as it may be, do not use the “X” in the upper
right corner to exit any page in FamLink, other than Help.
2
1
Version: 04/03/2012
Page 11 of 16
1
FamLink User Manual
Course: FamLink Fundamentals
Topic: Navigation - FamLink Desktop
Outliner on the FamLink Desktop
The Outliner is the section of the Desktop that is unique to you. It
uses expandos that display your work and the work of your
group. The work displays vertically, in an outline format
customized for you.
For example:
If you have an assignment to a case or provider, the case
name or provider name displays in your Outliner.
Only workers with security to intakes will have the Intakes
expando. Other workers can access intakes from the case or
provider when the intake is linked to the case/provider.
You can change how FamLink sorts the information in the
Outliner by selecting different views. For example, you can
restrict your view by date or sort by participant.
If you are an intake worker, you may not have any work in
the Providers expando. This is because intake workers
generally are not responsible for licensing or other such
provider activities.
If you are a supervisor, you have a Workers expando so that
you can view the work of your staff.
Version: 04/03/2012
Page 12 of 16
FamLink User Manual
Course: FamLink Fundamentals
Topic: Navigation - FamLink Desktop
FamLink Messages and Links area.
The FamLink Messages and Links area is where statewide and
region-specific messages and links display.
In this area, the State Help Desk can display useful
messages or hyperlinks. All FamLink users across the state
can view the information displayed here.
In the Region Messages and Links section, each region
can display its own messages or region-specific hyperlinks.
For example, a region can choose to display details about
upcoming training opportunities and contact information.
Located at the top left of the FamLink Messages and Links
area is an arrow pointing to the right. Click this arrow to
close the FamLink Messages and Links area and gain
more Desktop space for your Outliner.
To display the FamLink Messages and Links area again,
click the arrow pointing to the left, located on the upper right
of the Desktop.
Version: 04/03/2012
Page 13 of 16
FamLink User Manual
Course: FamLink Fundamentals
Topic: Navigation - FamLink Desktop
Closing Pages in FamLink
Once you’re done with a page and are ready to close it, click
Close at the bottom of the page or click the Yes, No, or Cancel
button on the dialog box that displays when you haven’t saved
your work before closing.
Never close a FamLink page by clicking the “X” in
the upper right-hand corner. Doing so may result in
the loss of information. To avoid this, be sure to close all
pages properly.
Version: 04/03/2012
Page 14 of 16
FamLink User Manual
Course: FamLink Fundamentals
Topic: Navigation - FamLink Desktop
1
Logging Out of FamLink.
To log out of FamLink properly:
1
(1) Click Logout on the FamLink Banner.
2
Do not use the “X” in the upper right-hand corner.
(2) On the dialog box, click Yes.
You return to the FamLink Logon page.
2
1
2
1
2
1
2
Version: 04/03/2012
Page 15 of 16
FamLink User Manual
Course: FamLink Fundamentals
Topic: Navigation - FamLink Desktop
The FamLink Logon page displays.
You have completed the Navigation – FamLink Desktop topic
in the FamLink User Manual.
Version: 04/03/2012
Page 16 of 16