1
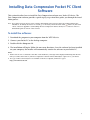
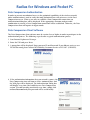
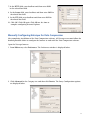
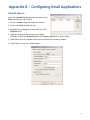
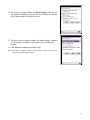
DATA COMPRESSION
User Manual
Version 2.1
mts.mb.ca
Table of Contents
Introduction .............................................................................................................................................. 1
Purpose.............................................................................................................................................. 1
Getting Started.................................................................................................................................. 1
System Requirements .............................................................................................................................. 2
Hardware Requirements .................................................................................................................. 2
Software Supported .......................................................................................................................... 2
Installing Data Compression Windows Client Software ......................................................................3
Data Compression Configuration For Windows .................................................................................. 4
The Data Compression Configuration Window ............................................................................ 4
Accessing the Quick Settings Menu ................................................................................................ 5
Messaging.......................................................................................................................................... 6
Network ............................................................................................................................................ 6
Data Compression Icons .......................................................................................................................... 7
Installing Data Compression Pocket PC Client Software...................................................................... 8
Data Compression Configuration For Pocket PC 2002.......................................................................... 9
Configuration Window .................................................................................................................... 9
General.............................................................................................................................................. 9
Advanced ........................................................................................................................................ 10
Connections.................................................................................................................................... 11
Radius For Windows and Pocket PC .................................................................................................... 12
Data Compression Authentication................................................................................................ 12
Data Compression Client Software .............................................................................................. 12
Errors .............................................................................................................................................. 13
Troubleshooting...................................................................................................................................... 14
Appendix A – Manually Configuring Your Browser .......................................................................... 16
Manually Configuring Internet Explorer 5.x for Data Compression .......................................... 16
Manually Configuring Netscape for Data Compression .............................................................. 17
Manually Configuring your Web Browser for Pocket PC ............................................................ 18
Appendix B – Configuring Email Applications .................................................................................... 19
Outlook Express.............................................................................................................................. 19
Pocket PC Inbox ............................................................................................................................ 20
Appendix C – Uninstalling The Data Compression Client Software ................................................ 22
Disclaimer ................................................................................................................................................ 23
Who to Contact ...................................................................................................................................... 24
Introduction
Purpose
The MTS Mobility Data Compression service provides faster connectivity for wireless applications
using Windows or Pocket PC to access the Internet. This is illustrated in the System Overview
below.
The Data Compression servers are connected to MTS Mobility's switch while the Data Compression
client software is installed on the end users' computer or Personal Digital Assistant (PDA) - either
device can connect to the Internet through a data-capable Digital cell phone or through a wireless
modem card.
System Overview
MTS Mobility
Client
MTS Mobility
Switch
MTS Mobility
Client
Data Compression
Servers
Corporate
Getting Started
MTS Mobility’s Data Compression service consists of a set of elements that provide wireless
connectivity for applications through protocol optimization, compression, session management,
authentication and encryption.
With Data Compression, users of mobile applications benefit through faster data exchange, session
stability and communication privacy over the wireless network. The Data Compression software
resides at both the client and server sides of the network.
This manual contains the information required to install, configure and maintain Data
Compression software at the client site.
The installation procedure in this manual is shown step-by-step with visual representations of the
screens encountered.
1
System Requirements
The system requirements are listed separately for Windows users and Pocket PC users.
Hardware Requirements
Windows Hardware Requirements
The minimum system requirements for the Data Compression Windows client software installation
are as follows:
Hardware
Minimum
Recommended
Processor
Pentium II 266 MHz
Pentium III 350 MHz
32 MB
64 MB
10 MB Free
20 MB Free
RAM
Hard Disk
Pocket PC Hardware Requirements
The minimum system requirements for the Data Compression Pocket PC client software installation are as follows:
Hardware
Minimum
Recommended
Processor
StrongARM SA-1110
StrongARM SA-1110
Memory
16 MB SDRAM
32 MB SDRAM
Note: MTS Mobility currently supports the Compaq iPAQ Pocket PC. Please check http://www.mts.mb.ca for updates
regarding other supported devices.
Software Supported
Operating System
•
•
•
•
•
•
•
Windows NT 4.0 (SP 4 and above)
Windows 95
Windows 98
Windows 2000
Windows Millennium Edition (ME)
Windows XP
Pocket PC (Windows CE 3.0)
Browser Support
•
•
•
Microsoft Internet Explorer 5.0 and above
Netscape Navigator 4.61 and above
Pocket Internet Explorer (for Pocket PC)
FTP Clients
•
•
•
Cute FTP
WS FTP
FTP Explorer
Mail Clients
•
•
•
•
•
MS Outlook
MS Outlook Express
Netscape Messenger
Eudora
Pegasus
Note: The above list represents only a few of the more popular applications supported by MTS Mobility. MTS Mobility
can support several other HTTP, FTP, and email clients.
2
Installing Data Compression Windows Client Software
This section describes how to install the Data Compression client software on a machine using
Microsoft Windows. The Data Compression software provides a quick step-by-step wizard that
guides you through the installation process.
Note: If you have a previous version of the software, uninstall the previous version before continuing with the new installation. Please see Appendix C (Uninstalling the Data Compression Client Software) for instructions on how to uninstall the previous version of the software.
To install the software:
1. Download the program to your laptop.
2. From the Start menu select the Run option and then browse to the executable file from your
directory. Locate and double click on the executable file to begin the installation process.
3. The MTS Mobility Data Compression Setup Welcome Screen opens.
4. The installation program will load all necessary programs and configure the software accordingly.
5. Continue with the installation process by selecting the Yes option to restart your computer.
6. After rebooting your machine, the Data Compression installation will be complete and the Data
Compression icon
will appear on the bottom right corner of your computer screen (in the
system tray).
Note: If the MTS Mobility license agreement appears on the screen, please read and click Yes if you agree to all terms of
the agreement. If you do not wish to proceed, click No. This will end the installation process.
* The prerequisite for installing MTS Mobility’s Data Compression software on Windows 95 is to install a WinSock 2
update on your machine. To install the system WinSock 2 update, please follow the directions on the link provided
below:
http://www.microsoft.com/Windows95/downloads/. then enter “winsock 2” in the search field.
3
Data Compression Configuration For Windows
The Data Compression software’s Configuration Tool allows you to configure the proxy setting,
image quality, access for applications, and other Internet services.
Double click on the Data Compression icon
located on the bottom right corner of your computer screen to open the Data Compression configuration window.
The Data Compression Configuration Window
The Data Compression configuration window holds the following tabs, each addressing a different
subject.
Click on the corresponding tab to select the type of action desired, as listed in the following table:
Tab
Action
Images
Configuring image quality
Blocking
Blocking objects by content
Messaging
Setting the Server IP Address and Port Number for each messaging protocol
Network
Selecting the appropriate connection device for Internet access
Proxy
Entering the hostname/IP address and port number of the proxy servers
The Data Compression service will handle and accelerate your traffic based on these settings.
Configuring Image Quality
Image quality can be configured by selecting the Images tab in the Configuration window.
The Configuration Tool will appear displaying
the Images tab window.
The Images tab allows you to select the level of
image quality. There are five levels of image
quality provided:
•
low quality
•
medium quality
•
high quality
•
superior quality
•
original quality
Note: Selecting low image quality results in the most
optimal browsing speed.
4
Low Quality – The example (right) is an image that provides
maximum compression, and low image quality.
High Quality – The example (right) is an image that provides less
compression with high image quality.
Original Quality – The example (right) is an image that provides no
compression with the original image quality.
Accessing the Quick Settings Menu
Right clicking on the Data Compression icon will open the Settings menu,
which allows you quick access to configuration. Simply select your desired
option and the change will be applied immediately.
Content Blocking
The Blocking tab allows you to block certain objects from being loaded by your Web browser.
Blocking these items will improve your Web browsing speed and prevent selected blocked objects
from being displayed by your Web browser.
The five main blocking options are provided below:
• Animation
– By checking this box you will
improve your Web browsing speed by only downloading the first frame of an animated image file.
• Applets
– By checking this box you will improve
your Web browsing speed by blocking Applets, such
as Java.
• Audio
– By checking this box you will improve
your Web browsing speed by blocking audio files,
such as .wav files.
• Images
–By checking this box you will improve
your Web browsing speed by filtering out images.
• Video
– By checking this box you will improve your
Web browsing speed by filtering out video files,
such as .AVI files.
5
Messaging
The Messaging tab will enable you to set the Server IP Address and Port Number for each messaging protocol (POP3, SMTP, and NNTP). These protocols are designed to configure your email client
program (such as Eudora, Outlook, etc.) and news programs.
After clicking the Messaging tab window, the following window will appear:
After typing in the Server IP Address, type in the Port
Number for each protocol. The default values for
port fields are already entered, based on industry
standards.
• The
default POP3 Port is 110.
• The
default SMTP Port is 25.
• The
default NNTP Port is 119.
The Data Compression service will forward and
accelerate your traffic based on these settings.
Note: You will have to configure your Internet browser in
order to optimize and accelerate performance. Please see
Appendix B (Configuring Email Applications) for
instructions.
Network
The Network tab allows you to choose the wireless device you are using for Internet access.
Note: The Connections window of the Network tab lists the methods of connections you can access by your computer.
The method of communication you use to access Internet determines the NIC you may use. If you
use a landline dial-in connection, most certainly you will use a circuit switch method.
Wireless access can use circuit switching or packet switching, depending on the method used by
the service provider. Verify that your NIC is compatible with the method used by the service
provider.
Click the Network tab and the following window will appear:
The software will automatically set the proxy settings
for Internet Explorer users. Netscape users must
manually change these proxy settings. Please refer to
Appendix A for more information on manual
configuration of proxy settings.
Note: If you regularly utilize other proxy settings, the software
will restore your original settings when you uncheck the
current connection or close the Data Compression
application.
6
Data Compression Icons
The following icons will display in the Windows system tray as a visual indicator of the functional
status of the Data Compression application.
MTS Mobility
Animated Blue
Data Compression is active. A connection to the Data
Compression server has been established and data is
currently being accelerated.
MTS Mobility
Gray
Data Compression is active but currently no data is being
transmitted.
MTS Mobility
Black with Red Circle
The Data Compession server is unavailable. A request for a
connection has been transmitted but the server has not been
found. The current connection is in Bypass mode and a
direct connection will be established as soon as the server
becomes available. Applications are still operational, but not
using Data Compression acceleration.
7
Installing Data Compression Pocket PC Client
Software
This section describes how to install the Data Compression software on a Pocket PC device. The
Data Compression software provides a quick step-by-step wizard that guides you through the installation process.
Note: If you have a previous version of the software, uninstall the previous version before proceeding with the new
installation. To identify the version of software, go to the Today screen and click on the
client icon, then click
‘About’. Please see Appendix C (Uninstalling the Data Compression Client Software) for instructions on how to
uninstall the previous version of the software.
To install the software:
1. Download the program to your computer from the MTS Web site.
2. Connect your Pocket PC to the desktop computer.
3. Double-click the Setup.exe file.
4. The installation will begin. Follow the on-screen directions. Once the software has been installed
on your computer, the installer will automatically transfer the software to your Pocket PC.
Notes:
1. If the Pocket PC is not connected at the time of the installation, a message will be displayed indicating that the next
time you connect the Pocket PC, the Data Compression software will automatically be copied over to your device.
2. If a copy of Microsoft ActiveSync is not available on the host computer, download a copy at
http://www.microsoft.com.
8
Data Compression Configuration for Pocket
PC 2002
This section describes how to configure Data Compression on your Pocket PC.
1. Activate the Data Compression client by clicking on it from
the
menu.
2. Click on the Start button located on the top left-hand corner of
the screen.
3. Select the Today page to verify that the Data Compression icon
is displayed at the bottom of the page.
4. Click on the Data Compression icon located on the bottom
right corner of your Pocket PC.
5. Click on the Controls option.
6. The Data Compression configuration window should appear.
Configuration Window
The Data Compression configuration window holds the following setting tabs: General, Content,
Advanced and Connections.
Click on the corresponding tab to select the type of action desired, as listed in the following table:
Tab
Action
General
Configuring image quality.
Content
Blocking objects based on content type.
Advanced
Setting Mail Server IP address and port number.
Connections
Dial-up network session used by Data Compression.
The Data Compression service will handle and accelerate your traffic based on these settings.
General
The MTS Mobility configuration window will default to the General
tab.
1. Click on the General tab.
2. The window should appear displaying the Image Quality.
3. The user must select between Low, High and Original Quality.
Low Quality – Provides maximum compression and low image
quality.
Original Quality – Provides no compression with the original
image quality.
Note: Selecting Low image quality results in the most optimal browsing speed.
9
Content Blocking
The Content tab allows you to block certain objects from being loaded by your Web browser.
Blocking these items will improve your Web browsing speed.
1. Click on the Content tab.
2. The Content window should appear displaying the Blocking
heading.
3. The user should see the Animation, Audio, Applets and Video
check boxes located below the Blocking heading.
4. Select the appropriate check box to improve your browsing speed.
The blocking options are provided below:
•
Animation – By checking this box you will improve your Web
browsing speed by only downloading the first frame of an animated image file.
•
Applets – By checking this box you will improve your Web browsing speed by blocking Applets, such as Java.
•
Audio –By checking this box you will improve your Web browsing speed by blocking audio files,
such as .wav files.
•
Video – By checking this box you will improve your Web browsing speed by filtering out video
files, such as .AVI files.
Advanced
The Advanced tab will enable you to set the Server IP Address and Port Number for each protocol
(POP3, SMTP, and NNTP). These protocols are designed to configure your email client program
and news programs.
1. Click on the Advanced tab.
2. The Advanced window should appear displaying the Host
Name heading.
3. The user should see the protocol fields located below the Host
Name heading.
4. Type in the Server IP Address and Port Number for each
protocol.
•
The default POP3 Port is 110.
•
The default SMTP Port is 25.
•
The default NNTP Port is 119.
Data Compression will accelerate your traffic based on these
settings.
Note: You can either type in the Server IP Address or type in the Host Name.
Note: You must also modify your mail program settings to talk to the local host.
10
Connections
The Connections tab will enable you to choose the connection that you would like to enhance.
1. Click on the Connections tab.
2. The Connections window should appear displaying the
Connection List.
3. Select the appropriate check box.
4. The user must disconnect and reconnect for the changes to
take effect.
11
Radius for Windows and Pocket PC
Data Compression Authentication
In order to prevent unauthorized access to the optimized capabilities of the wireless network,
radius authentication is used to verify that only authorized users will gain access to the Data
Compression servers. When a user tries to establish a Data Compression connection, an
authentication dialog box will be displayed. If the appropriate username and password
combination is entered, a Data Compression connection will be established. Otherwise, the Data
Compression client will operate in bypass mode.
Data Compression Client Software
The Data Compression client software must be version 2.xx or higher in order to participate in the
authentication process. The following steps describe a typical authentication process:
1. Start Internet Explorer or Netscape.
2. Enter the URL and press Enter.
3. A popup box will be displayed. Enter your user ID and Password. If you did not receive a user
ID and Password, please contact MTS Mobility Customer Service at 225-5687 (CALLMTS).
4. If the authorization information that you entered is correct, the
Data Compression icon will turn to Active (animated blue) and
the Web page will be displayed. The Authentication Dialog box
will display every time you establish a new Data Compression
session. To avoid entering your details every time, simply click
on Save Password and your password will be saved locally.
12
Errors
A user may encounter errors due to incorrectly entering their user ID or password. Other error
messages might be presented in the case of network issues. Please refer to the errors below for
explanation.
Incorrect User ID or Password Entered
This dialog box will be presented if the user entered the wrong user
ID or Password.
The user must correctly re-enter their user ID and Password to be
authorized and to establish a Data Compression connection.
Please note that user IDs and passwords are case sensitive.
Incorrect User ID or Password Set
This dialog box will appear if your user ID and password were not
set correctly in the service provider servers. Please contact your
service provider to obtain a new user ID and password.
Network Problem
This dialog box will appear when a network problem occurs.
Please contact MTS Mobility Customer Service to report this
problem.
13
Troubleshooting
Troubleshooting starts with identifying the problem. Review the possible problems and malfunction
symptoms identified below with recommended actions. If these actions do not solve the
problem please contact MTS Mobility Customer Service at 225-5687 (CALLMTS).
Malfunction Symptoms
Action to Take
There is no Data Compression client icon
in task bar (for Windows) or Today screen
(for Pocket PC).
1. For Microsoft Windows platform users:
Click on the Start button, open Programs and then
select MTS Mobility Client to start the application.
– Indicates that the Data Compression
program is not running.
If this does not work, reinstall the software.
2. For Pocket PC users:
Start the Data Compression application by clicking
on
, and then on the Data Compression icon.
If that does not work, reset the Pocket PC and
make sure the icon is displayed. If the service is still
not running, try reinstalling the software. To syncronize the Pocket PC with your desktop computer
or laptop, locate and click on the
MTSMobilityPPC.exe file and follow all on screen
directions.
MTS Mobility icon displays black
with a red circle.
Verify your wireless connection to the network.
1. Verify that your wireless modem is communicating with the MTS Mobility network and try to
browse the Web without Data Compression.
The black and red icon indicates that
the client software is unable to
communicate with the Data Compression
server.
2. If you are able to browse the Web without Data
Compression, restart the application and try again.
My Web page download is very slow.
What can I do to improve Web page
performance?
Check that the Data Compression software is
being utilized by verifying that the icon is blue
when accessing a Web page. Also, check that
Image Quality is set to Low and all Content
Blocking objects are checked.
During download of a Web page, I noticed
that a red X replaces some of the images.
What is wrong and what can I do?
A red X will appear in lieu of images if you have
chosen to block images. If you would like to see
the images, make sure that setting is not checked.
OR
During Web page access, the connection from the
computer to the MTS Mobility network may cause
timeouts on the browser side, which will result in a
red X instead of the original image.
14
Malfunction Symptoms
Action to Take
After changes to the Image Quality,
I hit the refresh button on my browser but
nothing changes. How can I improve the
image?
For a specific page, you can press the CTRL key
while clicking on the refresh button – this will
prevent the browser from using cached content
for this specific page.
To make sure all future pages will use the new Image
Quality settings please clean your browser cache.
I uninstalled my Data Compression client
software and now Internet Explorer or
Netscape does not work. I am getting a
this page could not be found. What
should I do?
Check the proxy settings in your browser. Make
sure that your browser does not try to access the
Data Compression server but instead goes directly
to the Internet.
After configuring my browser manually to
pages look distorted (garbage-like text and
no images). I tried to Refresh and Restart
the application but the problem persists,
and the Data Compression icon color is
blue. When I disable the application, my
Web pages look all right.
The Web browser might not be compatible with
MTS Mobility’s Data Compression service. Please
verify you are using one of the supported Web
browsers (see section 2.2 or check
mts.mb.ca/datacompression for an updated list of
supported Web browsers).
After installing the Data Compression
application for MS Exchange, I started
my Outlook and a login screen is not
displayed (as stated in the User manual).
The Data Compression icon does not
change when I send and receive emails
(it stays gray) and I am not able to send
or receive new emails.
The following possibilities exist:
It might be that your Outlook session is using old
credentials. Please logout of your Windows
session and retry the service.
•
•
If you still don't see the login screen when you
start Outlook please find extend.dat file (you
can use the Windows Start à Search utility),
delete this file and restart the Data Compression
application.
•
Use your original (non-wireless) Outlook icon to
start Outlook. Verify your Offline Folder File
Settings are set correctly (Tools à Email Accounts
etc).
I was able to get emails using the wireless
link before, but suddenly I don't get any
new emails and emails I wrote are still in
the Outbox.
•
Check your wireless connection.
•
Restart Data Compression (right click on the
icon and select Restart in the sub-menu) and click
the Send/Receive button again.
Back at the office I started to use my
Online profile again but I don’t seem to
get new emails into my Inbox.
Verify that you are using your online profile and
not the offline (wireless) one.
If you are not certain, restart the computer and use
the Online (original) Outlook icon.
15
Appendix A – Manually Configuring Your
Browser
Data Compression supports the following browsers:
•
Intenet Explorer
•
Netscape
•
Pocket Internet Explorer
The browser can be manually configured to work with the Data Compression application.
Manually Configuring Internet Explorer 5.x for Data Compression
Data Compression is compatible with many wireless modem cards and data-capable Digital
phones. To configure a wireless connection, follow the instructions provided below:
1. Double-click the Internet Explorer icon to open browser.
Select Internet Options from the Tools menu.
2. The procedure for configuring the browser is identical for
most wireless cards and phones.
3. Click the Connections tab as shown on next page.
4. Select your connection in the Dial-Up Network settings
sub-window and click Settings.
5. Select Use a proxy server. Check box in the Proxy Server sub-window.
6. Click Advanced to open Proxy Settings window.
16
7. In the HTTP field, enter localhost and then enter 9090
in the related Port field.
8. In the Secure field, enter localhost and then enter 9092 in
the related Port field.
9. In the FTP field, enter localhost and then enter 9093 in
the related Port field.
10. Click OK. Click OK again. Click OK one last time to
complete configuring Internet Explorer.
Manually Configuring Netscape for Data Compression
After completing installation of the Data Compression software, all Netscape users must follow the
detailed procedure below to configure the browser to work with the Data Compression software.
Open the Netscape browser.
1. From Edit menu, select Preferences. The Preferences window is displayed below:
2. Click Advanced in the Category tree and then click Proxies. The Proxy Configuration options
are displayed below.
17
3. To configure the Proxy Server settings, select the Manual Proxy Configuration option by
clicking the View button. The Manual Proxy Configuration window is shown below.
4. In the HTTP field, enter localhost and then enter 9090 in
the related Port field.
5. In the Security field, enter localhost and then enter 9092 in
the related Port field.
6. In the FTP field, enter the localhost and then enter 9093 in
the related Port field.
7. Click OK to save the Proxy server settings.
8. Click OK to exit the Preferences window.
9. Restart your Netscape Browser.
Manually Configuring your Web Browser for Pocket PC
Your browser can be manually configured to work with Data Compression.
Note: To disable Data Compression, uncheck the Use proxy server box.
Data Compression is compatible with many wireless modem
cards and data-capable Digital phones. To configure a wireless
connection, follow the instructions provided below. The procedure for configuring the browser is identical for most wireless modem cards and data-capable phones.
1. Double-click the Internet Explorer icon to open browser.
Select Internet Options from the Tools menu.
2. Click the Connections tab as shown right.
3. Select your connection in the Type field.
4. Check Use proxy server box.
5. Type localhost in the Address field as shown above.
Type 9090 in the Port field as shown right.
6. Click
to apply changes.
Note: localhost and 127.0.0.1 are functionally the same.
18
Appendix B – Configuring Email Applications
Outlook Express
Open the Outlook Express program and point to the
Tools tab along the top task bar.
1. Choose Accounts from the Drop Down menu.
2. Choose the Mail tab from the top.
3. Highlight the appropriate account and select the
Properties box.
4. Click on the Servers tab and place the address
127.0.0.1 in both the Incoming Mail and Outgoing Mail field as shown below.
5. Click OK to close this window and return to the Internet Accounts window.
6. Click Close to return to Outlook Express.
19
Pocket PC Inbox
1. Select Inbox to launch the Inbox service.
2. Click Services from the menu, followed by New Service. This
starts the email setup process.
3. Select POP3 Mail as the service type.
4. Give the service a name. You may have multiple services
installed at some point, so be sure to give the service a name
that describes your account.
5. Click Next.
6. Select the connection you wish to use for this service. If you
don’t see your ISP connection on this list you should press
Cancel, and first configure your ISP connection.
7. In the Server field, enter 127.0.0.1.
8. User ID and Password should be the same as the one for your
dial- up connection. The password can be saved by checking off
the Save Password option.
9. Click Next.
Note: If you don't know your ISP connection, contact your ISP.
10. If you are not connecting to a Windows NT Domain leave the
Domain field blank.
11. In the SMTP field, enter 127.0.0.1.
12. Leave the Return Address field blank.
13. Click Next.
20
14. The screen (on right) outlines the Email Options. You may set
the options according to your preferences or allow the defaults.
Select Next to move to the next screen.
15. The next screen (on right) outlines the Email options. You may
set the options according to your preferences, or allow the
defaults.
16. Click Finish to complete and Exit setup.
Note: Please refer to “Radius for Windows and Pocket PC” when you are ready to
configure your MTS Mobility Client.
21
Appendix C – Uninstalling the Data
Compression Client Software
How to Uninstall MTS Mobility Data Compression software for Windows:
1. From Windows, click Start, go to Programs.
2. After selecting Programs, locate and click on the MTS Mobility Client.
3. Next, locate and click the Uninstall option. This will uninstall the previous MTS Mobility client
software.
4. A question will appear asking, “Are you sure you want to completely remove MTS Mobility Client and all of its components?” Click OK to continue with the Uninstall process.
5. The MTS Mobility client software is now uninstalled from your machine. Click the OK button to
exit and complete the Uninstall process.
Note: To install the latest MTS Mobility client software, please follow instructions detailed in Installing Data Compression
Windows Client Software.
How to Uninstall MTS Mobility Data Compression software for Pocket PC
1. Quit MTS Mobility Data Compression program.
2. Click
Menu then Settings.
3. Click Remove Programs on the System tab.
4. Click MTS Mobility Client.
5. Click Remove button.
22
Disclaimer
The information in this document is subject to change without notice and does not represent a
commitment on the part of MTS Mobility. The software described in this document is furnished
under a license or nondisclosure agreement. The software may be used or copied only in accordance with the terms of the agreement. It is against the law to copy the software on any medium
except as specifically allowed on the license or nondisclosure agreement.
Warranty and Limitations
We do not have a warranty, expressed or implied, in relation to merchantability, fitness or otherwise except for what is stated above. Our liability as assumed above is in lieu of all others, whether
based on warranty, negligence or otherwise, arising out of or in connection with the use or performance of the service, it being expressly understood that we shall in no event be liable for any
indirect or consequential damages including, but not limited to, damages which may arise from
loss of anticipated profits or production, spoilage of materials, increased costs of operation, etc.
Our maximum obligation under the above warranty or otherwise shall be to accept the return of
the software application and to refund to you such part of the purchase price as has been paid.
Important Note
This User Manual has the following conditions and restrictions:
This manual contains proprietary information belonging to MTS Communications Inc. Such
information is supplied solely for the purpose of assisting explicitly and properly authorized users
of MTS Mobility.
No part of its contents may be used for any other purpose, disclosed to any person or firm or
reproduced by any means, electronic and mechanical, without the express prior written permission
of MTS Communications Inc.
The text and graphics are for the purpose of illustration and reference only. The specifications on
which they are based are subject to change without notice.
The software described in this manual is furnished under a license. The software may be used or
copied only in accordance with the terms of that agreement.
Information in this manual is subject to change without notice. Corporate and individual names
and data used in examples herein are fictitious unless otherwise noted.
23
Who can I contact for help?
The instructions and procedures in this manual are presented step-by-step with visual
representations of the windows encountered.
If you need additional help, please call MTS Mobility Customer Service at 225-5687 (CALLMTS).
MTS Mobility Data Compression User Manual v2.1
Copyright © 2001 MTS Mobility
All rights reserved.
24