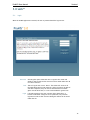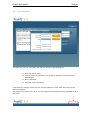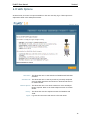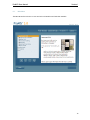
1
ProMIS3 Surgical Simulator
User Manual
Version 1.0
ProMIS3 User Manual
Version1
Contents
1.
INTRODUCTION ..................................................................................................... 4
2.
SYSTEM AND COMPONENTS ...................................................................................... 5
2.1.
2.2.
2.3.
2.4.
2.5.
2.6.
2.7.
2.8.
3.
SAFETY .............................................................................................................. 7
3.1.
3.2.
3.3.
3.4.
4.
BODYFORM ....................................................................................................... 5
POWERVOLTAGE: ................................................................................................. 6
FOOTPEDAL ....................................................................................................... 6
PROMISCAM ...................................................................................................... 6
CABLES ........................................................................................................... 6
COMPUTER ....................................................................................................... 6
ACCESSORIES & TOOLS ............................................................................................ 6
OPTIONAL PARTS ................................................................................................. 6
CIRCUIT PROTECTION ............................................................................................. 7
INSTALLATION RESTRICTIONS ...................................................................................... 7
CONNECTING POWER.............................................................................................. 7
DISCONNECTING POWER........................................................................................... 7
SYSTEM SETUP ..................................................................................................... 8
4.1. BODYFORM SETUP................................................................................................. 8
4.1.1. Set Up Tilt Mechanism .................................................................................. 8
4.1.2. Skin ........................................................................................................ 8
4.2. WIRING ........................................................................................................... 9
4.2.1. Cameras ................................................................................................... 9
4.2.2. Wireless Keyboard and Mouse ......................................................................... 9
4.2.3. Footpedal ................................................................................................. 9
4.2.4. Mount ProMISCam ..................................................................................... 10
4.2.5. Set Up Monitor ......................................................................................... 10
4.2.6. Power on Bodyform ................................................................................... 11
4.2.7. Power on PC ............................................................................................ 11
4.3. INSTRUMENTS ................................................................................................... 11
4.3.1. Mark Instruments ...................................................................................... 11
4.4. MODULE TASKS AND TRAYS ...................................................................................... 12
4.5. PROMIS LAUNCHER ............................................................................................. 12
4.5.1. To Launch ProMIS ...................................................................................... 12
4.6. PROMIS SETUP SOFTWARE ...................................................................................... 14
4.6.1. Run All Checks ......................................................................................... 14
4.6.2. Calibrate Camera ...................................................................................... 14
4.6.3. Registration ............................................................................................ 14
5.
PROMIS™ ........................................................................................................... 16
5.1.
5.2.
6.
LOGIN .......................................................................................................... 16
NEW USER DIALOG .............................................................................................. 17
PROMIS OPTIONS ................................................................................................. 18
6.1. MAIN MENU .....................................................................................................
6.2. VIEW RECORDS .................................................................................................
6.3. CAMERA OPTIONS ...............................................................................................
6.4. HISTORY ........................................................................................................
6.5. LOGOUT ........................................................................................................
6.6. NAVIGATION ....................................................................................................
6.6.1. Select a Module ........................................................................................
6.6.2. Teach Me / Test Me ...................................................................................
6.7. ON SCREEN INSTRUCTION .......................................................................................
6.8. PROMIS EXERCISE/TASK ........................................................................................
6.8.1. ProMIS Keyboard Shortcuts ..........................................................................
19
20
21
21
22
23
23
24
25
26
27
2
ProMIS3 User Manual
Version1
6.9. RESULTS/METRICS ..............................................................................................
6.9.1. Metrics Explanation ...................................................................................
Recorded Metrics ..............................................................................................
Score Indicator Description ..................................................................................
6.9.2. Results/Metrics Playback.............................................................................
6.9.3. Results/Metrics Information .........................................................................
6.9.4. Results/Metrics Advanced View .....................................................................
7.
28
28
29
29
30
32
33
SETUP .............................................................................................................. 34
7.1. SETUP ..........................................................................................................
7.1.1. Test Results ............................................................................................
7.1.2. Install ...................................................................................................
7.2. DATA UPLOADER ................................................................................................
34
35
36
37
3
ProMIS3 User Manual
Version1
4
1. Introduction
ProMIS System
ProMIS is an innovative simulator for learning the skills and techniques of minimally invasive surgery. It
uniquely enables users to interact with virtual and physical models in the same unit while providing
accurate, comprehensive feedback on performance.
This Document
This User Manual explains how to set up the ProMIS system and to use the ProMIS software installed on
the computer which accompanies the system.
Contact / Support
email: [email protected]
Sales
For more information on the ProMIS system and optional parts, new modules, etc., please contact
Haptica or visit the Promis.org website to shop online.
Email:
[email protected]
Online:
www.cae.com
ProMIS3 User Manual
Version1
2. System and Components
2.1.
Bodyform
•
Fitted cover and Base Unit
•
Simulated skin held in place by fitted cover
•
Drawer unit for exercise-specific inserts/trays
•
Rectal Port
•
Power Switch
•
Bodyform
Power
Switch
Camera Power
Plug / Socket
ProMIS3 User Manual
2.2.
Power Voltage:
•
110V – 230V
2.3.
Footpedal
•
2.4.
•
2.5.
•
2.6.
•
2.7.
Version1
Footpedal for hands-free software interaction while performing tasks. Plugs into computer USB
port.
ProMISCam
Mobile camera probe. Plugs into power socket on the back of the Bodyform. Also plugs into
computer USB port.
Cables
USB and Firewire cables for computer connections.
Computer
Dell computer
Accessories & Tools
•
Wireless Keyboard and Mouse
•
Dell computer power lead
6
ProMIS3 User Manual
Version1
3. Safety
Before working with ProMIS, please note the following safety information.
3.1.
•
3.2.
•
3.3.
Circuit Protection
ProMIS relies on circuit protection in the building supply.
Installation Restrictions
Not for use in a computer room as defined in the Standard for the Protection of Electronic
Computer/Data Processing Equipment, ANSI/NFPA 75.
Connecting Power
•
Install the ProMIS equipment near and electrical socket, so it is easily accessible.
•
Ensure that all cables are placed so that they do not present a trip hazard.
3.4.
•
Disconnecting Power
Switch off the ProMIS power switch at the back of the Bodyform and unplug ProMIS at the mains
socket outlet.
7
ProMIS3 User Manual
Version1
4. System Setup
4.1.
Bodyform Setup
Place the Bodyform in a stable position on a table with the leads to the back. Follow the steps in the
following sections to prepare the unit for use.
4.1.1. Set Up Tilt Mechanism
• Using the 4 screws and Allen key provided, secure the
Bodyform to the tilting mechanism.
• Screws are inserted into the four holes in the base tray, and
tightened onto the tilting mechanism.
4.1.2. Skin
• Open the clasps on the Bodyform and lift away the Bodyform
cover.
• Place skin on Bodyform as shown.
• Replace Bodyform cover and close clasps.
8
ProMIS3 User Manual
4.2.
Version1
Wiring
Begin attaching cables.
4.2.1. Cameras
• Insert the Firewire cables into the Firewire ports at the back
of the PC.
• Connect yellow video plugs together on the camera
• Connect the black power plug into the socket on the back of
the Bodyform.
• Insert the ProMISCam USB cable into the bottom USB port on
the front of the PC
4.2.2. Wireless Keyboard and Mouse
•
Insert the wireless transceiver USB cable into an available USB port at the back of the PC.
4.2.3. Footpedal
•
Bring the Footpedal to the front and place on the floor;
insert the Footpedal USB cable into the top USB port on the
front of the PC.
9
ProMIS3 User Manual
Version1
4.2.4. Mount ProMISCam
•
Secure the rotational arm to the camera mount on the back
of the Bodyform.
•
Insert camera into clasp and tighten into place.
•
Position the ProMISCam through the Bodyform skin as
preferred.
4.2.5. Set Up Monitor
• Connect one end of the power lead to the monitor and the
other end to a power source.
• Connect the touch screen USB cable to an available USB port
in the back of the PC and the other end to the monitor.
• Connect one end of the video cable to the right-most port
on the back of the monitor.
10
ProMIS3 User Manual
Version1
• Connect the other end of the video cable to the adapter.
• Connect the adapter to the back of the PC.
• Tighten by turning the two thumb screws clockwise to
ensure proper grounding.
• Press the power button on the front panel to turn the
monitor power on.
4.2.6. Power on Bodyform
•
Connect the white power lead at the back of the
Bodyform to power source.
•
Press the white switch on back of Bodyform.
4.2.7. Power on PC
•
Connect the PC and power lead to power source.
•
Power on the PC.
4.3.
Instruments
•
Ensure appropriate instrument set is available
•
All instruments used in ProMIS must be non-sterile
4.3.1. Mark Instruments
•
From the Instrument Marking Kit, select the appropriate gauge and label.
•
Place the instrument tip in the gauge.
•
Position the label so that the yellow strips are perpendicular to the instrument and the edge of
the label meets the bottom of the gauge.
11
ProMIS3 User Manual
4.4.
Version1
Module Tasks and Trays
•
Open drawer on Bodyform
•
For Basic Skills, insert the appropriate Task Tray.
•
For the HALC procedure, place the task tray on the guideline pillars.
•
Locate the air tube under the tray and connect to valve at back of drawer; place tray firmly in
drawer.
•
Close drawer firmly
4.5.
ProMIS Launcher
The Dell computer which accompanies ProMIS already has the application software installed and ready
to run.
4.5.1. To Launch ProMIS
1. Power on the computer.
2. Double Click on the launcher shortcut that appears in the center of the desktop.
There are a number of different applications in ProMIS to support general use and administration, and
these are all available from the ProMIS Launcher. The list of options is shown below and described in the
subsequent paragraphs.
12
ProMIS3 User Manual
Version1
The ProMIS Launcher gives the user direct access to the following applications:
ProMIS
This is the main application, containing the surgical simulation exercises and allowing the user to
interact with the Bodyform hardware and complete specified tasks.
LMS
This is an administration tool for user management, maintaining user details and records, and setting
proficiency levels. Information on the use of the LMS application is detailed separately in the LMS User
Guide document.
Setup
The Setup application allows the user to run checks the ProMIS System. These checks should be run
when the ProMIS system is first set up, and can be used at any time to test and troubleshoot any
aspect of the system operation. Refer to the Setup section for more details.
User Guides
This button activates a shortcut to the folder on the computer which contains all the user
documentation and guides for ProMIS. Double-clicking on required document will open it in Adobe
Acrobat.
13
ProMIS3 User Manual
Version1
Upload Data
This application is designed to allow multiple stand-alone units to synchronise the data stored for
exercises completed in ProMIS with a central server. This feature is discussed further in the Upload
Data chapter.
Exit
This allows the user to close the ProMIS Launcher and exit.
4.6.
ProMIS Setup Software
When the system is first set up, it is recommended that the Setup software is run. This will identify if
any components are missing or are not functioning correctly. If all tests do not pass, some features of
ProMIS may not function correctly.
4.6.1. Run All Checks
•
Start ProMIS Launcher from the desktop.
•
Click Setup.
•
Select Run All Checks.
•
Ensure all Checks have passed. If there are any failures, re-check power and all connections,
and Run All Checks again.
•
Contact support if problem persists.
4.6.2. Calibrate Camera
•
Insert the Open Module Tray into Bodyform
•
Launch ProMIS.
•
Login as User or Guest.
•
Select Camera Options from the tabs along the top of screen.
•
Select Endo Camera and position camera ensure the feed shows all of the Open Module Tray.
Secure camera to rotational arm once done.
•
Pull the drawer out fully to ensure the calibration checkerboard is showing.
•
Click Main Menu and Navigate to the Open Module under Laparoscopic Skills. Click Teach Me and
Next.
•
On the Task Setup page, click Calibrate, colored lines will appear across the checkerboard.
•
•
•
Click the Calibrate button again to save.
Insert the appropriate Tray and close drawer securely.
Exit ProMIS.
4.6.3. Registration
•
Return to the Setup utility.
•
In the Setup Manager window, scroll to # 16 – Registration, and click Install.
•
Click Options and use the navigation arrows to move desired Available Objects to Visible Objects
list box. Click OK.
14
ProMIS3 User Manual
Version1
•
Refer to Registration document in User Guides to register HALC VR with HALC Tray. When done
click save.
•
Click OK when prompted.
•
Click Back.
•
Click Quit to exit and launch ProMIS.
Note: Registration will only need to take place on initial setup.
15
ProMIS3 User Manual
Version1
5. ProMIS™
5.1.
Login
When the ProMIS application is started, the user is presented with the login screen.
New User
Selecting this option allows the user to register their name and
details so that records of their exercises can be saved under their ID
for future reference.
Trial
This will log the user in as a ‘Guest’. This allows full access to all
the applications and records. However, while records will be kept of
exercises completed, they will not be differentiated from other
guest records and as such, it is not recommended for general use.
Login
If already registered, the user can enter their details here, or
browse to find them. Using the correct password, they can then
login and records of their exercises during the session will be saved
under their ID.
16
ProMIS3 User Manual
5.2.
Version1
New User Dialog
To register as a new user, the fields in the New User dialog box must be filled out:
1) Enter first and last name
2) Select a group to be included in. If no groups are displayed, contact the system
administrator.
3) Enter a username
4) Enter and confirm a password
If any details are missing or invalid, the user will be prompted to re-enter them when they click the
green accept button.
Once logged in, the user’s ID (or ‘guest’ if in trial mode) will be displayed in the top right-hand corner of
the screen.
ProMIS3 User Manual
Version1
6. ProMIS Options
As shown below, there are five options available to the user once they log in. These options are
explained in detail in the subsequent sections.
Main Menu
View Records
Camera Options
This allows the user to view and select all Modules and Tasks that
available.
This allows the user to view any records of previously completed
exercises which have been stored. Refer to View Records section
for further details.
This allows the user to see which cameras are active and adjust
them if required. Refer to the Camera Options section for further
details.
History
This allows the view the completion status of all Modules and
Tasks.
Logout
Logs out the current user and returns to the main menu.
18
ProMIS3 User Manual
6.1.
Version1
Main Menu
The Main Menu allows the user to view and select all Modules and Tasks that available.
19
ProMIS3 User Manual
6.2.
Version1
View Records
The View Records utility allows the user to view the results of exercises previously completed using their
current ID.
Select
Back
This will open the Results window for the exercise record which the
user has highlighted. This will be the same as the Results window
which appears when the exercise is initially completed. See the
Results Page for an explanation of the data which is presented.
This button closes the View Records screen and returns the user to
the Options page.
The records are listed in chronological order. The user can scroll through the records and select any one
which the wish to review by clicking Select.
20
ProMIS3 User Manual
6.3.
Version1
Camera Options
This utility allows the user to adjust brightness and orientation for the Endo camera.
Properties: This button displays the properties dialog which allows the user to:
1) adjust the brightness of the image
2) change the orientation of the image
Clicking the properties button will display the Properties dialog (as shown) for the Endo camera.
Adjustments will be visible immediately in the display, but will only be retained if the Save button is
pressed.
6.4.
History
The History utility allows the view the completion status of all Modules and Tasks.
21
ProMIS3 User Manual
6.5.
Version1
Logout
Logs out the current user and returns to the main menu.
22
ProMIS3 User Manual
6.6.
Version1
Navigation
6.6.1. Select a Module
The menu on the left displays the modules and their exercises which are available in ProMIS.
To view the available exercises the user can expand the relevant menu tree by clicking on the ‘+’ to the
left of the module of interest.
23
ProMIS3 User Manual
Version1
6.6.2. Teach Me / Test Me
For each exercise, the user has the option of an instructional mode, or a test scenario with limited hints
and guidance.
1) Teach Me: When performing the exercise in this mode, the user is given assistance in
the form of a combination of on-screen hints, audio instructions or video samples.
2) Test Me: In this mode, the exercise is the same, but the user is given only limited hints
and guidance.
In both modes the user’s performance is tracked and the results and metrics will be displayed when
the exercise has been completed.
ProMIS3 User Manual
6.7.
Version1
On Screen Instruction
Initially, it is recommended that users progress through all information and instructions before beginning
an exercise. Navigating using the Next button, the user will be given information on proper Task Setup
and walked through all Task Steps.
After the user completes the exercise, they will be brought to the Metrics Screen, where they are given
feedback on their performance.
Task Setup
This screen shows the user the steps required to prepare for the
current task.
Task Steps
This screen displays a graphical representation of how the current
exercise/task is performed using ProMIS.
Task Video
This screen displays a video recording of the exercise, or
procedure being performed in a surgical setting.
Exercise
The user follows on screen text and audio prompts to complete the
task.
Metrics
This screen displays the metrics which are available for this
particular procedure.
Back
This button will return the user to the previous screen.
Next
This button will advance the user to the next screen.
Start
Clicking this button will begin the selected exercise / procedure.
25
ProMIS3 User Manual
6.8.
Version1
ProMIS Exercise/Task
Once the exercise begins, the application will display either:
1) video from the Endo camera allowing the user to see the work area, or
2) a Virtual Reality simulation of the work area.
The image below shows an example of an exercise being displayed. Note that the image displayed in the
application will differ according to which exercise has been selected.
The user should follow any audio of text instructions given to them. These may include:
3) Inserting the instruments through the simulated skin into the Bodyform torso so that the
exercise can begin
4) Performing a task with the instruments as instructed
5) Pressing the footpedal when a given task has been completed to move to the next phase
of the exercise.
The user may use any of the shortcut keys defined in the following table to change settings while the
exercise is in progress.
26
ProMIS3 User Manual
Version1
6.8.1. ProMIS Keyboard Shortcuts
KEYBOARD SHORTCUT
ACTION
P
Pause a Task
R
Repeat video or audio cue
S
Skip video or audio cue
NOTE
These keys control the video playback.
Pausing playback stops the exercise
timer.
ESC
Go to smaller window
F4
Go to full screen
M
Mute / Allow audio (Toggle)
Switches the audio on/off, but will not
take effect until the current section is
finished playing.
J
Find Markers
Re-draws virtual guide markers, if
camera moves or markers are changed.
A
Turn On Augmented Reality
Switches on augmented reality.
Z
Turn Off Augmented Reality
Switches off augmented reality.
The size of the video window is
adjustable.
27
ProMIS3 User Manual
6.9.
Version1
Results/Metrics
Once the exercise has been completed, the user’s results and metrics will be displayed automatically.
View Playback
This plays back the camera recording of the exercise
Advanced View
Opens a window with options for more detailed metrics
Extra Info
This displays additional information about the exercise performance
Task Specific Score
Displays a performance rating on parameters specific to this test
Info
Displays a pop-up window with further information on a particular
metric for the Locating and Coordinating Task.
Metrics Explanation
This gives an explanation of the metrics.
Back
Returns the user to the Main Menu
6.9.1. Metrics Explanation
Each of the metrics is explained below:
Elapsed time is the time, in seconds, spent on the exercise.
Path Length is the physical distance, in millimetres, that each instrument travels.
28
ProMIS3 User Manual
Version1
Economy of Movement is measured according to the number of times the instrument tip changes
velocity and direction during the exercise. In essence, Economy of Movement measures steadiness and
the degree to which movements are refined and smooth versus erratic and purposeless.
Overall Score is the average score of Time, Path Length and Economy of Movement scores.
Hand Dominance is the degree to which - when two instruments are inserted in ProMIS - one instrument
is used more than the other.
Recorded Metrics
The same metrics are recorded for both physical tasks and virtual reality tasks. Separate metrics are
recorded for each instrument inserted in the Bodyform.
Recording begins when the instrument becomes visible to the vision system inside the Bodyform: this
may be slightly different to the user view.
The user may view metrics for each instrument. In the Summary Analysis given directly on completion of
an exercise, the reported metrics show the combined metrics for left-hand and right-hand instrument.
Score Indicator Description
For each of the metrics (time, path length, economy of movement and overall score) the graph is drawn
as follows:
The graph shows the current and previous score drawn as a percentage of the Expert Range,
Proficiency Range or outside both ranges.
If the metric value is inside the Expert Range the score drawn is the percentage distance from
the range midpoint to the max/min of that range.
If the metric value is not in the Expert Range but inside the Proficiency Range the percentage
score is calculated the same way for the Proficiency Range. And similar for the outside range if
the metric value is outside both the Expert and Proficiency Ranges.
29
ProMIS3 User Manual
Version1
6.9.2. Results/Metrics Playback
This feature allows the user to review their performance visually.
Virtual Playback
In this mode, the full range of video replay and graphical imaging
options are available on the control bar.
Real Playback
This mode is only available for exercises that aren’t based solely on
graphical imaging.
Close
This closes the Playback window and returns the user to the Results
page
30
ProMIS3 User Manual
Version1
Standard Video
Controls
Back, Play, Pause,
Forward
Video Speed Controls
4 times(4X), 2 times(2X) 1
normal (1X), one-half (1/2X),
and one-quarter(1/4X)
Normal Speed
Camera Angle
Controls
ProMIS3 User Manual
Version1
6.9.3. Results/Metrics Information
Clicking the Info button beside a metric score opens an additional window with more details.
The table contains:
Your Score
This is the result from the user’s performance of the exercise.
Proficiency
Represents the level of performance required for proficiency.
Expert
Indicates the optimal level of performance for this exercise.
The settings for Proficiency/Expert are set by the System Administrator using the LMS application.
Please refer to the LMS User Guide if you require information on setting these parameters.
32
ProMIS3 User Manual
Version1
6.9.4. Results/Metrics Advanced View
The advanced view provides three different presentations of the details of the user’s performance.
The Information/Metrics/Details tabs, when clicked, display additional information derived from the
metrics.
View Playback
Basic View
Back
This plays the video of the exercise.
This returns to the earlier, less detailed results screen.
Returns the user to the results screen.
33
ProMIS3 User Manual
Version1
7. Setup
The Setup utility allows the user to run checks on the ProMIS system and provides a method of easily
installing software components that are missing or need to be updated.
The systems checks in the Setup Manager should be run when ProMIS is first setup to ensure that all
parts of the systems are functioning correctly.
Haptica support can also use this tool for advanced troubleshooting in the case of any problems arising.
However, users only need to make use of the automated checks which are described in the following
sections.
7.1.
Setup
The Setup screen provides access to all the setup functions. Those that are of interest to regular users
are described below.
34
ProMIS3 User Manual
Version1
Run All Checks
This starts the test procedure.
Install
This will attempt to install any software which might be required
to resolve the problem described.
Test
Clicking this button will repeat the individual test.
Report
Displays a report on the nature of the problem.
Quit
Exits the Setup Manager and returns the user to the Start Menu.
The remaining buttons on this screen are not covered in this document and are not intended for use by
regular users.
7.1.1. Test Results
As an example, if the tests are run while the footpedal is not connected to the unit (and everything else
is functioning as expected), the following results would be displayed.
Main Display Area
-
Green tick denotes tests that have passed
-
Red cross denotes tests that have failed
Feedback Area
-
Details of the failed tests are displayed in this window
35
ProMIS3 User Manual
Version1
In this case, the user is alerted that the footpedal is not connected.
Installing software using the Install button (see the Install section), or connecting a missing
external device as described in the problem report may resolve the issue, and subsequent retests will then pass.
If the problem cannot be resolved in this manner, you should contact Haptica support for further
assistance at [email protected].
7.1.2. Install
In some cases, failures may be easily resolved by clicking the Install button. In the footpedal example,
the user would be presented with the screen below after clicking Install when no footpedal was
detected by the initial test:
The user should read the installation instructions which are automatically displayed in the Notepad
window
The device manager may also displayed should the user wish to see what hardware devices are currently
connected.
36
ProMIS3 User Manual
7.2.
Version1
Data Uploader
The ProMIS system stores the user records locally. If the administrator wishes to transfer this data to a
server, they should use the Data Uploader. This copies the data to the server, but the original data still
remains on the local machine.
For the Uploader to work:
1) The computer must be connected to the LMS
2) There must be a ProMIS server available
3) When the server is selected, the screen must display the CONNECTED OK message
Start Upload
Exit
If there is a connection to the server, this button will
upload the data.
This button will return the user to the Start Menu
Note that a ProMIS server is different from the standard ProMIS software. Contact Haptica for more
information if you wish to set up a server for centralised records.
37