1
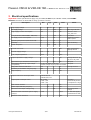
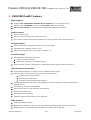
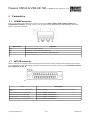
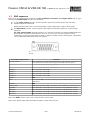
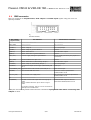
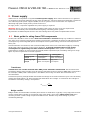
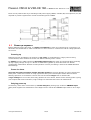
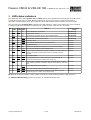
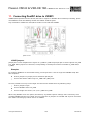
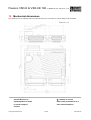
Versatile Servo Drive VSD-E & VSD-XE 160 In DualDC mode Table of Contents 1.Important notices.....................................................................................................................................2 2.Electrical specifications............................................................................................................................3 3.VSD-E/XE DualDC features.......................................................................................................................4 4.Terms and definitions...............................................................................................................................5 5.Physical overview.....................................................................................................................................6 6.Connectors...............................................................................................................................................7 6.1 POWER connector............................................................................................................................7 6.2 MOTOR connector............................................................................................................................7 6.3 ENC connector.................................................................................................................................8 6.4 CMD connector................................................................................................................................9 7.Installation notes....................................................................................................................................11 7.1 Enclosure & power supply wiring...................................................................................................11 7.2 Grounding......................................................................................................................................11 7.3 Shielding........................................................................................................................................12 7.4 Protection......................................................................................................................................12 7.5 Cooling..........................................................................................................................................12 7.6 Example wiring diagram................................................................................................................13 8.Power supply..........................................................................................................................................14 8.1 Basic guide for sizing linear PSU components................................................................................14 8.2 Example circuits............................................................................................................................15 8.3 Power-up sequence.......................................................................................................................16 9.LED status indicators..............................................................................................................................17 10.Using configuration software................................................................................................................18 10.1 Installing DualDC firmware..........................................................................................................18 10.2 Setting parameters with DCtool...................................................................................................18 10.3 Tuning PID gains for optimum performance.................................................................................20 11.Connecting DualDC drive to VSDEPI.....................................................................................................23 12.Troubleshooting & FAQ.........................................................................................................................24 13.Mechanical dimensions.........................................................................................................................25 Please notice: This manual discusses only about VSD-E-160 and VSD-XE-160 models with DualDC firmware installed. In all other cases, please use another manual. If you wish to install DualDC firmware to drive, continue reading this manual. For practical approach to drive installation, please also read Getting Started with VSD-E & VSD-XE manual (downloadable from product site). Specifications are subject to change without notice. Warning! Never operate this drive with non-isolated power supply (I.e. rectified 115VAC mains voltage or with autotransformer). Doing so may be lethal especially due to non-isolated logic circuity and very high earth currents of this product. Granite Devices or its personnel will not carry any consequences or give any warranty if this rule is broken. VSD-E/XE has been designed only for electrically isolated power supply. Fluxeon VSD-E & VSD-XE 160 For DualDC firmware. Manual Ver. D1.05. 1. Important notices Be sure to read through this VSD-E-160/VSD-XE-160 documentation and understand it completely before operating the device. If case of questions, please contact us for support. This manual applies only for VSD-E-160 and VSD-XE-160 (“Rev 2” text in back of drive PCB) models with DualDC firmware installed. If you wish to install DualDC firmware to drive, continue reading this manual. In all other cases, please use another manual. Warnings and hazards This drive has been designed to be operated on isolated DC power supply only. Optoisolator isolation distance (creepage) on circuit board is less than 2 millimeters. A recommended way for emergency stopping is to cut HV bus voltage and activating motor brake if possible. Using optoisolated disable input may not be enough for emergency stopping. Drive should be installed in ventilated enclosure. Dust filters are recommended when fans are used. The worst case operating temperature should not exceed 70 Celsius degrees (measured from aluminum plate). Drive should not be used in applications where failure or malfunction could lead to danger, large financial loss, health hazard, injury, death, or other unbearable loss. Granite Devices can't be held responsible if such risks are taken. This document may contain human errors. When operating with drive, take every precaution you can. Granite Devices do not take any responsibility of damages that may be caused by following or not following this document. Failure to follow given guidelines or operating outside given specifications may damage the device and will void warranty. In uncertain cases always contact us for clarification. Granite Devices reserves rights to make changes to this document and specifications without notice. www.granitedevices.fi 2/25 2009-08-25 Fluxeon VSD-E & VSD-XE 160 For DualDC firmware. Manual Ver. D1.05. 2. Electrical specifications Important! These specifications apply only for VSD-E/XE Rev 2 (the 160VDC model) with DualDC firmware. See back of drive PCB to verify your drive revision. Motor control characteristics CMD port characteristics Encoder Device operating conditions Description Min. Logic supply voltage 8 HV supply voltage Typ. 9 or 12 Max. Units Notes 14 Vdc 12 160 Vdc Max surge 180 Vdc Logic supply current consumption 200 700 mA 200 mA + user +5V_OUT load +5V_OUT load (combined ENC, CMD, EXT) 0 400 mA Total load HV supply current consumption 0.001 38 A Depends on motor load & speed Operating temperature (heatsink & PCB) 10 70 °C Humidity 0 95 % Power dissipation 2 TBD W Encoder count rate 0 500 kHz Encoder supply voltage 4.8 5.2 V A, B, Z inputs impedance 2000 Output optoisolator supply voltage 3 5-20 5.0 Non-condensing After 4X decoding, digitally filtered Ohm Optoisolator input threshold current (logic 1) 6 Vdc Voltage diff. from pin IO_VCC to IO_COM 6.3 mA All inputs Optoisolated digital logic input voltage compatibility 3.0 to 5.5V CMOS or TTL logic. All inputs Greater voltage range by external resistor. Step pulse minimum hold times 150 ns Direction pre-set before rising step edge 800 ns Step frequency 500 Output continuous current per motor (VSD-E-160) 8A (VSD-XE-160) 11A Output peak current per motor All models: (<55℃) 20A (>55℃) 15A Peak current duration 20 Effective motor output voltage swing kHz Current is automatically limited if temperature is high 1 Motor output switching frequency sec kHz 88 % Percentage of HV voltage i.e. with 60V supply: 0.005mH*60=0.3mH Minimum motor inductance (per HV supply voltage) 0.005 mH/V Minimum motor resistance 0 Ohm www.granitedevices.fi 3/25 For logic 0 and 1 2009-08-25 Fluxeon VSD-E & VSD-XE 160 For DualDC firmware. Manual Ver. D1.05. 3. VSD-E/XE DualDC features Motor support ● Supports two independent brushed DC servomotor axis on single drive unit ● Voltage range 12-160VDC, current range 0.1-20A (peak) for each motor ● Two encoder inputs for single ended and differential quadrature encoders Position control ● Infinite motion range ● Soft velocity limited recovery motion from error ● Drive tracks position during fault and restores to correct position after clearing the fault Command inputs ● Dual optoisolated step/direction inputs (step on rising edge) ● Adjustable step multiplier from 1 to 20X ● Step train smoothing filter (active when multiplier > 1) Controller design ● ● Two individual cascaded closed loops ○ Torque (current) controller ○ PID position controller, anti-windup design HV bus voltage variation compensation. Voltage fluctuations doesn't affect performance Fault detection & protections ● Configurable following error limits from 1 to 16383 encoder counts ● Optional motion fault detection with 0.2 second response time ● Sensing of DC motor runaway ● Sensing of encoder failure ● Sensing of mechanically blocked motion ● Overvoltage detection and power stage shutdown to prevent failures caused by regenerative braking current ● Undervoltage detection and shutdown ● Overcurrent & short circuit detection and shutdown ● On-board HV power fuse ● Overtemperature protection ● Internal program & data memory error detection Other features ● Field upgradeable firmware ● Eased panel installation and places for optical fibers for bringing LED signals to front panel ● Mounting holes for standard Half-brick heatsink on VSD-E (not in VSD-XE) www.granitedevices.fi 4/25 2009-08-25 Fluxeon VSD-E & VSD-XE 160 For DualDC firmware. Manual Ver. D1.05. 4. Terms and definitions Term Definition Controller External motion controller or command source that controls VSD drive. Typically a PC, PLC or other step pulse source Drive VSD-E/XE drive Reference, target command, target value A user commanded target position RMS Root Mean Square. FG Frame Ground. A ground potential of enclosure and D-Sub connector metal shells of drive. FG is internally connected to drive GND through a bypass capacitor. GND GND is drive ground potential which is present in following connectors: POWER. ENC, CMD and EXT. All “GND” pins in all connectors are internally connected together to same potential. +5V_OUT 5V output (referenced to GND) from several connectors. All +5V_OUT:s are in same potential and share a common current loading limit (see Electrical specifications). HV+ A high voltage & high current supply for drive. Motor power is drawn from HV+. Logic supply A logic circuity voltage supply for drive Cable shield A metallic EMI shield (foil or braid) inside cable surrounding all wires. www.granitedevices.fi 5/25 2009-08-25 Fluxeon VSD-E & VSD-XE 160 For DualDC firmware. Manual Ver. D1.05. 5. Physical overview All the listed features are documented in more detail in the following chapters. 10 9 8 3 1 5 2 6 4 7 Figure 1: VSD-E physical layout # in Figure 1 Name Description Type Mating part 1 CMD User command I/O port 8x2 pin header (0.1” centers) 16 pin IDC connector (kit) 2 SPI SPI port 6x1 pin header (0.1” centers) GD USB adapter (ordered separately) 3 EXT No function in DualDC mode. Leave unconnected. 4 POWER Power supply & brake resistor connector Removable terminal block (included) 5 ENC Encoder, Hall sensors and home switch input 15 pin female D-Sub connector 15 pin male D-Sub connector (kit) 6 MOTOR Motor output connector 25 pin female D-Sub connector 25 pin male D-Sub connector (kit) 7 F1 HV power fuse 0.25x1.25” (6.35x32 mm) 3AG or 3AB fuse (included) 8 LED1 Green indicator led Green led Plastic core optical fiber (kit) 9 LED2 Blue indicator led Blue led Plastic core optical fiber (kit) 10 LED3 Red indicator led Red led Plastic core optical fiber (kit) Notes ● ● All mating connectors are included in optional VSD-E installation kit (ordered separately) Optional optical fiber can be used to bring led signals to enclosure front panel www.granitedevices.fi 6/25 2009-08-25 Fluxeon VSD-E & VSD-XE 160 For DualDC firmware. Manual Ver. D1.05. 6. Connectors 6.1 POWER connector This is a modular (removable) high current connector for logic supply, high voltage supply and regenerative resistor. For high current (>10 A) applications dual wiring for GND and HV+ should be used to minimize resistance. Figure 2: Power connector pin out Signal name Function +12V Positive logic supply voltage GND Ground (2x), connected parallel internally HV+ High voltage supply (2x), connected parallel internally AO Leave unconnected 6.2 MOTOR connector Motor connector is a 25 pin female D-Sub connector with four power outputs and one frame ground (FG) pin. Six output pins are connected in parallel for higher current carrying capacity and maximum current per output pin is 3.3 A. Figure 3: Motor connector pin out (25 pin female D-Sub) Pin Description 1 (internally connected to D-Sub metal shells) Frame ground (FG). Connect to cable shield and motor frame. 14-19 (internally connected parallel) (output D) Motor 1 armateure - 2-7 (internally connected parallel) (output C) Motor 1 armateure + 8-13 (internally connected parallel) (output B) Motor 2 armateure + 20-25 (internally connected parallel) (output A) Motor 2 armateure - www.granitedevices.fi 7/25 2009-08-25 Fluxeon VSD-E & VSD-XE 160 For DualDC firmware. Manual Ver. D1.05. 6.3 ENC connector This is a 15 pin female D-Sub connector for two quadrature encoders. Both single ended (TTL or open collector) and differential encoders can be used: ● To use single ended encoder, connect encoder outputs to positive inputs only and leave negative inputs unconnected. Single ended encoders are not recommended for much longer than 3 meter cable length. ● For differential encoder, connect positive and negative (inverted) outputs to corresponding input pins. For long cable lengths (beyond 3 meters), it is may be necessary to terminate differential pairs with 120 Ohm resistors (connected from A+ to A-, B+ to B- etc). A 10 nF capacitor can be connected in series with termination resistor to reduce encoder current consumption. Terminators can be soldered inside D-Sub connector housing. Figure 4: Encoder connector pin out (15 pin female D-Sub) Pin number (signal name) Function 1 (HOME_SWITCH) Home switch input, connect switch between this and GND. This has no effect on drive operation but switch status is bypassed to CMD connector pin 12. 2 No function in DualDC, leave unconnected 3 No function in DualDC, leave unconnected 4 (CHB2+) Motor 2 encoder channel B+ 5 (CHA2+) Motor 2 encoder channel A+ 6 (CHB1+) Motor 1 encoder channel B+ 7 (CHA1+) Motor 1 encoder channel A+ 8 (GND) GND 9 (FG) Frame ground (FG), connected internally also to D-Sub metal shells. Connect to cable shield. 10 (GND) GND 11 (+5V_OUT) +5V output (encoder power), see electrical characteristics for maximum load 12 (CHB2-) Motor 2 encoder channel B- (connect only when using differential encoder) 13 (CHA2-) Motor 2 encoder channel A- (connect only when using differential encoder) 14 (CHB1-) Motor 1 encoder channel B- (connect only when using differential encoder) 15 (CHA1-) Motor 1 encoder channel A- (connect only when using differential encoder) Note: both GNDs are the same. Any or both of them can be used. Note: home switch input requires DualDC firmware version 2002 or later. www.granitedevices.fi 8/25 2009-08-25 Fluxeon VSD-E & VSD-XE 160 For DualDC firmware. Manual Ver. D1.05. 6.4 CMD connector This is a connector for step/direction, fault output and enable input signals. Only pins 1-12 are optically isolated. Figure 5: CMD connector (8x2 0.1" centers shrouded header) Pin number (signal name) Pin function Connection to controller 1 Reserved for future use Not connected 2 (IO_COM) Same as pin 8 Not connected 3 (STEP1+) Motor 1 Step in Axis 1 step output 4 (STEP1-) Motor 1 Step in ground reference Ground 5 (DIR1+) Motor 1 Direction in Axis 1 direction output 6 (DIR1-) Motor 1 Direction in ground reference Ground 7 (IO_VCC) 3 to 5V supply voltage for optoisolators 3 to 5V supply (necessary only if pin 11 is connected) 8 (IO_COM) Ground reference for pins 7-12 Ground 9 (DIR2) Motor 2 Direction in (alternatively SPI pin ¹) Axis 2 direction output 10 (STEP2) Motor 2 Step in (alternatively SPI pin ¹) Axis 2 step output 11 (FAULT) Fault status output (active high) (alternatively SPI pin ¹) Fault input 12 (HOMESW_OUT) Bypassed home switch status (from ENC pin 1) Home switch input 13 (GND) Non-isolated GND from drive Ground or external optoisolated disable/enable circuit 14 (+5V_OUT) Non-isolated +5V supply drive Not connected or external optoisolated disable/enable circuit 15 No function in DualDC Not connected 16 (ENABLE) Disable & clear faults input when driving logic 0 state. Drive enabled when this pin is driven in logic 1 state. Disable/enable output or external optoisolated disable/enable circuit. For testing purposes, this pin can be connected to CMD pin 14 to enable drive. ¹) SPI pins are internally wired to SPI connector. Therefore unplug CMD cable when connecting USB adapter to drive. www.granitedevices.fi 9/25 2009-08-25 Fluxeon VSD-E & VSD-XE 160 For DualDC firmware. Manual Ver. D1.05. Figure 6: Making CMD connector fully optoisolated by external disable/clearfaults optoisolator. This circuit is integrated in VSDEPI board. www.granitedevices.fi 10/25 2009-08-25 Fluxeon VSD-E & VSD-XE 160 For DualDC firmware. Manual Ver. D1.05. 7. Installation notes 7.1 Enclosure & power supply wiring Typical installation of drives in metal enclosure is presented in the figure below. For detailed motor wiring diagram, please see next chapters. Figure 7: Suggested VSD-E installation scheme. Only one motor is displayed for clarity. 7.2 Grounding Drive has two separate grounds for separate purposes which are named as GND (ground) and FG (frame ground). GND is the electrical 0V potential shared with power supplies and all connector pins labeled as “GND”. Connect GND to power supply 0V terminal. Frame ground (FG) is the ground for EMI shielding which is located in D-sub connector metal shells and D-sub connector pins labeled as “FG”. FG and GND are electrically floating against each other but are connected by EMI suppression capacitor inside drive. Make sure that D-sub shells make electrical contact to enclosure metal and cable shields are connected to FG through corresponding pins or D-sub shells. www.granitedevices.fi 11/25 2009-08-25 Fluxeon VSD-E & VSD-XE 160 For DualDC firmware. Manual Ver. D1.05. 7.3 Shielding Shielded cables are highly recommended to avoid interference problems and data errors in communication cables. Connect cable shields to FG only from drive end. If a compliance for CE or UL is required, the system should be characterized as whole in appropriate test arrangements. Noise shielding tips ● Minimize the parallel running distance between HV+ and GND power wires to minimize the conductor loop area. In other words, twist the HV+ and GND wires together or use cable with two condcutors ● If wiring distance from drive to power supply capacitors is greater than 30 cm and configured peak current greater than 5A, it may be necessary to connect a 330 µF/200V capacitor directly to POWER connector terminals (between GND and HV+ pins). ● Always use separate cables for motor and encoder, no matter how small the motor is. In shared cable, high dV/dt of motor outputs may easily couple to encoder wires causing errors. 7.4 Protection VSD-E has on board fuses for HV bus. If protection also against wiring failure is required, then an additional fuse after power supply is recommended. VSD-E has been supplied with 20A slow blow fuse which is adequate for most cases. In maximum power DualDC motor operation a higher rating fuse may be necessary (supplied by user). User may also replace default fuse to a smaller one if lower protection threshold is desired. For additional motor protection, fuses can be added in series to motor phase wires. In three phase motor fusing two leads should be enough in most cases and for DC motor one lead will be sufficient protection. It is recommended to do initial testings with reduced HV bus voltage and with lower current fuse rating. 7.5 Cooling Additional cooling should be used if aluminum plate temperature rises near 70⁰ Celsius during intensive load. Improved cooling can be achieved generally by two ways: ● Adding forced air flow by using a dust filtered fan ● Only in VSD-E: mounting a standard Half brick heat sink on VSD-E aluminum plate with thermal grease. Two M3 screws up to 8 mm length can be used to mount the heat sink. The most efficient cooling can be achieved by combining both methods. To reduce drive heat generation, logic supply voltage may be lowered to 8-10VDC. Also avoid using unnecessary high HV voltage to minimize heating. Typical cooling requirements VSD-E can be typically used without additional heat sinks and fans when average output current is below 4 Amps and surrounding air temperature below 35⁰C. VSD-E can be typically stressed to its maximum ratings without additional heat sinks when moderate air flow is passing by the drive surface (fan cooling) and cooling air temperature is below 30⁰C. Drive's built in over temperature protection disables motor control if surface temperature rises above 70⁰C. It is recommended to do careful testing at elevated ambient temperatures before making conclusion of system cooling sufficiency. www.granitedevices.fi 12/25 2009-08-25 Fluxeon VSD-E & VSD-XE 160 For DualDC firmware. Manual Ver. D1.05. 7.6 Example wiring diagram The figure below illustrates VSD-E DualDC wiring in typical setup. Figure 8: Typical controller and motor wiring. Note: CMD pins from 13 to 16 are not electrically isolated. It is always strongly recommended to use the external optoisolator circuit for disable input. It is also recommended to use shielded cable for motor armature. www.granitedevices.fi 13/25 2009-08-25 Fluxeon VSD-E & VSD-XE 160 For DualDC firmware. Manual Ver. D1.05. 8. Power supply VSD-E runs on unregulated or regulated isolated power supply which means that there is no galvanic or conductive connection between the AC mains and DC bus. A linear transformer based PSU is preferred over switching mode power supplies (SMPS) for servo systems since transformers are capable of delivering high peak output power just like motors are. For logic power, a separate regulated 12V power supply is required. Warning: This is only a very brief guide of powering the system in basic cases. An experienced electrician should always be consulted when designing or building power system. Pay attention to RMS and peak terms in this text. Mixing these may lead to unpredictable results. 8.1 Basic guide for sizing linear PSU components In short, PSU should be sizes so that it does not overload or overheat during any condition in machine use. Since servo systems typically have greatly varying load, it might be necessary to find effective power consumption by measuring RMS power consumption of the system during at least 10 second period of heavy use. If measurements can't be done, then maximum RMS power load can be estimated roughly by summing rated power values of motors in the system. However, in typical machines the average power consumption is significantly less than summed motor power. Motor power consumption is proportional to product of actual torque and speed (Power=Speed*Torque). Following chart gives rough figure of power requirement in motion systems: Moving slowly Moving fast Producing low torque Very low power consumption Low to medium power consumption Producing high torque Low to medium High power power consumption consumption Transformer Transformer size can be selected after RMS power demand is determined. One should choose transformer with a safety margin since VA rating of transformers do not equal to RMS watts in linear PSU. For example, if RMS power consumption is 200 Watts, then using of at least 300 VA transformer is recommended. Transformer primary voltage should match with the voltage of AC mains network of your area. Secondary voltage should be about 1.41 times smaller than desired DC bus voltage. To convert DC bus voltage to transformer secondary voltage, use equation Usecondary = U DC 1.41 Bridge rectifier Bridge rectifier should be able to handle peak current of rectification. Typically a very high peak currents can be present during power-up and during motor peak loads. Use at least safety factor of 3 when choosing rectifier current rating compared to RMS current. Rectifier may need cooling to prevent overheating damage. www.granitedevices.fi 14/25 2009-08-25 Fluxeon VSD-E & VSD-XE 160 For DualDC firmware. Manual Ver. D1.05. Capacitors VSD-E HV bus accepts unregulated power with up to 50% ripple voltage, however designing a supply with maximum of 10 to 20% ripple is recommended. To solve required power supply filter capacitor size, use equation C= I load∗T Uripple where C is required capacitance in Farads, Iload is the peak load current, T cycle time of rectified voltage and Uripple is the desired maximum ripple voltage. Calculation example 1. If you need 70 Vdc DC bus voltage and you choose to design for 20% ripple, then 70*20% = 14 V ripple (Uripple) voltage is allowed. 2. If you are using full-wave rectifier for 50 Hz mains voltage, then cycle time T is 0.01 seconds 3. If your peak power load is 500 Watts, then Iload becomes 500W/70V = 7.2 A 4. By substituting these values in equation above, the minimum required capacitor value becomes C= Iload∗T Uripple = 7.2A∗0.01s = 0.00514Farads≈5000 F 14V Note: capacitor voltage rating should be at least 20% greater than rectified DC bus voltage to provide sufficient safety headroom. Warning: during motor deceleration, drive pumps energy back from kinetic energy to power supply which leads to capacitor voltage rise. Power supply capacitors may be charged up to drive's over voltage fault level (up to about 200 Vdc). Fuses Use slow-blowing fuses that can withstand the peak currents required by drive under all normal load conditions. Finding optimal fuse size may require experimenting. 8.2 Example circuits Following figures show simplified PSU cases. Line filters may be required before AC input to comply with local EMI regulations. Note that fuses are optional with VSD-E. Figure 9: Simple transformer based linear PSU up to about 500 Watts www.granitedevices.fi 15/25 2009-08-25 Fluxeon VSD-E & VSD-XE 160 For DualDC firmware. Manual Ver. D1.05. Drive can be powered also by a switching mode power supply (SMPS). A diode (D1) and capacitor (C1) are required to prevent regenerative current from flowing back to SMPS. Figure 10: Switching mode power supply (SMPS) circuit 8.3 Power-up sequence Before powering up the first time, it is highly recommend to check all connections for correctness. It is advised to use multimeter to make sure there is no short circuits in connections and all voltage polarities are correct. Powering up Powering up logic and HV bus can be done in any order or simultaneously. If logic power is being connected first, drive will wait for HV bus rise before initiating motor control. Pin STEP2 (pin 10 in CMD connector) should be held at logic 0 (or keep unconnected) while powering up logic supply voltage. If logic 1 is driven to STEP2 during power-up, drive will enter into DCtool configuration mode which disables normal operation. Correct pin setting is ensured in VSDEPI breakout board design. Power rise times Very fast rise time on HV bus voltage must be avoided to prevent damage on power components. Don't place a mechanical switch or relay right before HV inputs. Instead place switch devices before filtering capacitors or transformer. HV bus rise time should be longer than 5 milliseconds. If logic voltage rise is too slow, drive may generate an error status, which can be reset by power cycling (see chapter LED status indicators). Logic voltage rise should be faster than 50 milliseconds. Delaying power-up If necessary, drive motor control start-up can be delayed by driving logic 0 value to ENABLE input while power supplies are switched on. Drive begins motor control after ENABLE input value is set to logic 1. www.granitedevices.fi 16/25 2009-08-25 Fluxeon VSD-E & VSD-XE 160 For DualDC firmware. Manual Ver. D1.05. 9. LED status indicators The VSD-E has three LEDs (green, red and blue) which have combinations of blinking and steady states to indicate current status or fault. Blinking sequences have varying styles to make them easier to remember and distinguish later. Drive statuses versus led statuses are described in the table below. Only the fault that occurred first is displayed in LED indicators. Other active faults (that can be viewed in GDtool) might have followed consequently as “chain reaction” after first one occurred. No Green Blue Red LED1 LED2 LED3 Status Motor output status 1 Blink Blink Off Drive initialization in progress On (driving) 2 Off On Off Enabled and running On (driving) 3 Blink On Off Recovering from follow error or from disabled state On (driving) 4 Off On Blink Input motion command range error On (driving) 5 Off Off Blink Following error Off (Hi-Z) 6 Blink Off Blink Motion error. Motion stalled or encoder failure. Off (Hi-Z) 7 Off Blink Off Disabled by user Off (Hi-Z) 8 Off Off On Other fault, get details via SPI bus or contact us for support. Off (Hi-Z) 9 Off Blink Blink HV bus over voltage or under voltage fault Off (Hi-Z) 10 Blink On Blink Overcurrent (caused by bad tuning) or short circuit fault. With DC motors also faults if output phases are not properly wired in parallel. Off (Hi-Z) 11 On Blink Blink Overtemperature Off (Hi-Z) 12 Blink Blink Blink Communication error. Check cabling and and possibility of electrical interference (try without HV power on). Off (Hi-Z) 13 Blink On On Internal error, possibly caused by logic undervoltage or too slow Off (Hi-Z) logic voltage rise time. If troubles, contact us for support. See also #11. 14 On Off Blink Drive ready for firmware update Off (Hi-Z) 15 Off Blink Blink Firmware upgrade failed, cycle power and try again Off (Hi-Z) 16 Off Blink Blink Blinking very slowly. Memory checksum error, install upgrade firmware again or contact us if problem stays Off (Hi-Z) Hi-Z stands for high impedance state (output voltages are freely floating between GND and HV+). For fault troubleshooting, please see chapter 12 Troubleshooting & FAQ. www.granitedevices.fi 17/25 2009-08-25 Fluxeon VSD-E & VSD-XE 160 For DualDC firmware. Manual Ver. D1.05. 10. Using configuration software Before proceeding with this chapter, make sure you have installed latest VSD-E PC software. Software installer is available from Granite Devices web site. 10.1 Installing DualDC firmware In order to use drive in DualDC mode, a DualDC firmware must be uploaded to drive. This replaces the default single axis firmware which can be restored at any point by similar process. Figure 11: GDflasher firmware installer Steps to upload a firmware: 1. Disconnect cable from CMD connector 2. Connect USB adapter from PC to drive SPI port. Align black wire of adapter cable to SPI pin 1. 3. Start GDflasher 4. Click Connect button 5. A connect dialog appears, power on drive logic voltage now and press OK 6. Click Open firmware file button and choose a DualDC firmware (I.e. named as vsde-160dualdc-v2000.gdf) 7. Click Flash firmware and wait for completion 8. Close GDflaser 10.2 Setting parameters with DCtool Before using DCtool, you should have properly wired motors, encoders and power supplies. Caution: the Disable drive button is software based and it should not be used emergency stop. Instead, always have a fast way to switch off drive power. Establishing connection to drive 1. Disconnect cable from CMD connector 2. Connect USB adapter from PC to drive SPI port. Align black wire of adapter cable to SPI pin 1. 3. Start GDflasher 4. Click Connect button 5. A connect dialog appears, power on drive logic voltage now and press OK www.granitedevices.fi 18/25 2009-08-25 Fluxeon VSD-E & VSD-XE 160 For DualDC firmware. Manual Ver. D1.05. Figure 12: DCtool configuration software Controls • Connect – Establish a connection to drive via USB adapter and download settings from drive • Disable drive – Sends disable command to drive to let both motors free-wheel • Apply – Upload parameters to drive and save them to drive memory. Apply also clears drive faults and re-enables disabled drive. • Test – This will run a step disturbance test. Test results will be displayed in status bar below. In this test motor is commanded to hold position while drive injects sharp torque command to find out how position control reacts. This test simulates instantaneous load change on motor shaft. Injected test torque amplitude is 75% of continuous current so changing continuous current limit will have effect on results. • File menu – Save and load settings from file • Diagnosis menu – Show drive diagnosis dialog and options for viewing drive response graphs www.granitedevices.fi 19/25 2009-08-25 Fluxeon VSD-E & VSD-XE 160 For DualDC firmware. Manual Ver. D1.05. Motor settings In Motor settings group there are four parameters (continuous current limit, peak current limit, inductance and resistance) that need to be set according to motor specifications. Find correct values from your motor data sheet. After modifying values, click Apply button to upload settings. Tip: for beginning you may use lower current limits for safer operation. Encoder settings Encoder settings group contains parameters that are related to encoder or position information. The most important setting is Invert encoder direction check box that needs to be set correctly. If this setting is wrong, motor will rapidly spin until follow error limit is reached and drive enters in follow error fault mode (red led flashing). If this setting is correct, then motor will hold position (be careful when testing). Parameters are: • Invert encoder direction – reverses encoder counting direction. Correct counting direction is needed for position control stability. • Enable encoder failure detection – Checking this enables encoder failure detection which may prevent motor runaways and mechanical damage. Uncheck this if you are getting false triggering. • Enable anti-dither – Checking this (default is On) enables anti-dither feature that reduces “hunting” noise made by motor. • Axis 2 is a parallel (slave axis) to Axis 1 – Check this to make motor 2 to follow step/dir pulses of motor 1. When using this with mechanically paralleled motors (i.e. a table with two leadscrews), it is strongly recommended that physical system is fully symmetrical. I.e. both axis should have similar motors, similar encoders, same drive parameters and similar coupling to load. Position control settings Position control settings group contains five parameters that are related position control. Parameters are: • Follow error limit – This sets maximum tolerated following error (actual vs commanded position). If limit is exceeded, an follow error fault will be activated. • Step multiplier – This sets input step pulse multiplier. I.e. if multiplier is 4, then motor moves 4 encoder counts with one step pulse. Input smoothing filter is automatically activated if multiplier is over 1. • P gain (Kp) – This is the proportional gain of position PID controller. “P controller” produces output torque directly proportional to position error. • I gain (Kp) – This is the integral gain of position PID controller. “I controller” accumulates position error over time and produces torque that is proportional to the integral. • D gain (Kp) – This is the derivative gain of position PID controller. “D controller” produces torque that is proportional to derivative of position error. 10.3 Tuning PID gains for optimum performance PID is a controller that attempts to create a motor output that optimally eliminates position error of servo motor. Since each mechanical load (machine) is different and behavior of PID controller depends on machine dynamics, it is necessary to tune PID gains for optimum performance. This chapter describes a systematic approach for tuning by using the Test feature and status bar analysis of test. Shortly after Test, status bar will display a message such as “Peak error 41, undershoot 0 counts, settling time 47 ms”. Figure 13: Test results in the status bar www.granitedevices.fi 20/25 2009-08-25 Fluxeon VSD-E & VSD-XE 160 For DualDC firmware. Manual Ver. D1.05. • Peak error – a maximum positive position error in encoder counts during test. Smaller the better. • Undershoot – a maximum negative position error in encoder counts during test. Smaller the better, usually not more than 0 or 1. • Settling time – a time that is elapsed before motor is stabilized within +/- 2 encoder counts from zero error. Smaller the better. Procedure for PID tuning Before proceeding, make sure all other than PID parameters are configured properly and motor is holding position (HV power on). 1. Step-by-step increase D-gain and click Apply and Test until you start hearing quite loud sounds and/or non-stopping noise from motor. 2. Reduce D-gain at least 50% or until motor quietens (press Apply and Test to verify) 3. Click Test and inspect results 4. If undershoot is zero continue to step 5. If undershoot shows greater than 0 value, reduce P and I gains at least 50% and proceed to step 5. 5. Start increasing P-gain until motor starts making noise or if undershoot gets greater than zero (press Apply and Test to verify between gain increase steps) 6. Reduce P-gain about 50% or until motor quietens and undershoot disappears (press Apply and Test to verify) 7. Start increasing I-gain and test each step with Apply and Test buttons. Stop increasing until settling time no longer shortens remarkably or until undershoot gets greater than zero. 8. Reduce I-gain about 30% from previous value 9. Verify motor behavior with response graph. To activate graph, press Ctrl+2 and click Test. While this procedure works on most of the typical cases, it may not work on all machines. Sometimes inspection of response graphs are necessary. The next sections will give a hint how to optimize gains with help of graphs. To activate response graph, select menu item Diagnosis→Show response graph after test→Span 500 ms or press Ctrl+2 and click Test. Example of a good response curve Pay attention to steadily and rapidly decaying position error after initial peak (no multiple direction changings). Also motor current graph shows no oscillations. Motor current graphs should always tightly overlap each other. The final response will strongly depend on machine dynamics and sometimes compromises has to be made if ideal response can't be achieved. Figure 14: An example of proper response curve www.granitedevices.fi 21/25 2009-08-25 Fluxeon VSD-E & VSD-XE 160 For DualDC firmware. Manual Ver. D1.05. Examples of the most typical unoptimal/bad response curves Observation 1: slow decay to zero position error. Reason: low I gain. Observation 2: oscillations after initial peak, Reason: too high P gain or too low D gain. Observation: “slow” oscillations after initial peak. Reason: too low D or P gain, or too high I gain. Observation: instability and “slow” oscillations. Reason: too high I gain or too low D or P gains. Observation: high frequency and audibly loud oscillation. Reason: too high D gain. If tuning procedures don't work In some cases above tuning guides may lead to unsatisfactory results. Possible reasons: • Too high inertial load for given motor. Absolute maximum inertia mismatch (load inertia vs. motor internal inertia) is 10:1. Gear or timing belt reduction is necessary if this ratio is exceeded. Recommended inertia mismatch is below 3:1. Gearing is typically needed especially in rack & pinion systems. • Backlash. With backlash servo sees constantly disconnecting and reconnecting load which causes difficulties in tuning. Backlash may be present especially in rack & pinion systems. • Encoder not mounted directly on motor rear shaft. Encoder must be mounted on back of DC motor, not anywhere else. Not in other end of lead screw or after gearing. • Machine stiffness is low. Low stiffness (I.e. weak construction of machine or bad material selections) may form a “spring & mass” oscillator which naturally vibrates at some frequencies. If problem source can't be located or machine modification is out of scope, then using custom tuning procedure may work. Good response may be achieved with trial and error method. Try different PID gains until response is satisfactory. Also ensure that motor target & achieved current curves overlap perfectly (the lower graph of test graphs). If not, adjust motor inductance and resistance settings until matching is achieved. www.granitedevices.fi 22/25 2009-08-25 Fluxeon VSD-E & VSD-XE 160 For DualDC firmware. Manual Ver. D1.05. 11. Connecting DualDC drive to VSDEPI VSDEPI (VSD-E parallel interface board) has built-in support for DualDC drives. Before proceeding, please read VSDEPI manual and Getting started with VSD-E & VSD-XE guide. Any combination of different motor/drive modes can be used with VSDEPI. Figure 15: VSDEPI with DualDC jumpers marked as green and disabled ports as red. VSDEPI jumpers Jumper JP3 re-routes step/direction signals of Y_CMD to X_CMD and jumper JP2 re-routes signals of A_CMD to Z_CMD. When jumpers are inserted, corresponding re-routed port becomes unusable (Y_CMD and/or A_CMD). Examples To configure VSDEPI for 4 axis DualDC setup, proceed just like in case of single axis VSDEPI setup with two exceptions: • Insert 4 jumpers to jumper places entitled as JP2 and JP3 • Connect flat ribbon cables only to X_CMD and Z_CMD ports It is also possible to mix up to two single axis drives and a DualDC drive by following setup: • Insert 2 jumpers to JP2 • Connect DualDC drive to Z_CMD • Connect single axis drives (1 or 2) to X_CMD and Y_CMD When using DualDC slave axis option (see DCtool), any DualDC specific settings aren't necessary since controller/VSDEPI sees drive as single axis unit. Therefore no jumpers are needed and all ports are usable. This allows connecting up to 8 DC servos to VSDEPI. www.granitedevices.fi 23/25 2009-08-25 Fluxeon VSD-E & VSD-XE 160 For DualDC firmware. Manual Ver. D1.05. 12. Troubleshooting & FAQ Q: I'm getting following error faults In this fault measured motor position differs target position more than user specified limit. Try increasing follow error limit or adjust PID gains or other settings to reduce following error. Q: I'm getting overvoltage or undervoltage faults Measured HV bus voltage is not within user specified fault limits. Most common reasons include: ● Regenerative supply pumping. During motor braking supply voltage tends to increase as motor acts as generator. To verify this, attach voltmeter to PSU to check voltage during fault. To prevent this, use regenerative resistor (see chapter Error: Reference source not found Error: Reference source not found). ● Supply voltage gone below lower voltage limit. This may be caused by undersized power supply. Q: Both motors are always disabled simultaneously (manualy and in faults). Is it possible to make disabling individual? No. www.granitedevices.fi 24/25 2009-08-25 Fluxeon VSD-E & VSD-XE 160 For DualDC firmware. Manual Ver. D1.05. 13. Mechanical dimensions The drawings are for VSD-XE 160 but similar dimensions are found on VSD-E. IGES model available. Granite Devices Oy +358 44 99 175 33 Opiskelijankatu 4 D 644 http://www.granitedevices.fi FI-33720 Tampere VAT code FI20944279 Finland www.granitedevices.fi 25/25 2009-08-25