1
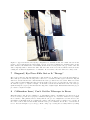
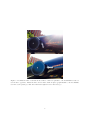
Observatory 8 inch Telescopes:
Tips, Tools & Quick Fixes
Rhiannon Griffin
August 7, 2014
1
Tools Needed
• Allen wrenches for set screws, 2 sizes
• For collimating: Phillips head screwdriver & slotted screwdriver
2
Some Tips for a Smooth Observing Experience
1. If you are setting up the telescopes for a class or a star party, DO NOT let students or the public
set up or take down the telescopes. That’s asking for trouble.
2. Prior to the event, use the Allen wrenches to tighten set screws (not too tight but snug). This will
help to prevent things loosening up during the night.
3. Center the declination arm. (As seen and described in Figure 2)
4. Align the finder scope. When at the observatory on Asp, I like to use the OU symbol on the
stadium sign.
5. Do not turn the RA fine adjustment knob if the RA brake is set tightly. The telescope will resist
movement and it can damage the telescope. Warn your students about this.
6. Make sure your students know to loosen the brakes before moving the telescope so that the brakes
do not become stripped.
7. To properly adjust the height of the eyepiece assembly, loosen the screws holding the diagonal in
place, turn the eyepiece assembly, and then lock into place again. Make sure students know this.
8. Before class/ star party, remove the diagonal/eyepiece assembly, tighten the collar of the diagonal
(shiny metal part in Figure 3) and make sure set screws are tight. This will help to prevent the
eyepiece assembly from falling off the telescope.
9. At the end of an event, make sure telescope is in its proper position so that it fits easily into the
storage crates. 4 things: make sure telescope is pointed toward the mount, with handle bar on top,
with the eyepiece pointed down, also known as ”sad eyepiece”, and check that RA motor is turned
off. Also, when storing the telescope in the crate, make sure the finderscope is on the part of the
telescope that is up (not in the styrofoam). See Figure 6.
10. The telescopes are named and labeled and so are their respective storage crates. At the end of the
night, make sure the appropriate telescope goes in its own crate.
3
The rest of this manual is a description of common problems
and how to fix them.
1
Figure 1: 2 of the knobs that can be loose so that turning them achieves nothing. There is the RA brake
(the silver L-shaped one) and the RA fine adjustment knob (silver wide cylinder) On the L-shaped one,
you can see at the corner of the L is the set screw that can be tightened. The other knob has a set screw
that can be seen on its base.
4
Knobs Won’t Tighten
The knobs sit on posts and the post needs to turn for the mechanism to tighten. If the set screws are
not tight enough, the post won’t turn and turning the knob doesn’t achieve anything. Figure 1 shows
the brake knob (silver and L-shaped) and the fine adjustment knob (wide, silver cylinder). TO FIX:
tighten the set screws using the Allen wrenches provided. Do not over tighten the screws, this will strip
the heads, just tighten until nice and snug.
5
Focus Knob Falls Off
This knob is located at the base of the telescope, by the eyepiece assembly. It has a similar set screw as
the brake knobs and fine adjustment knobs. Use an Allen wrench to tighten.
6
Twisting the Declination Knob Too Much
If you twist the declination knob too much in one direction, what we call the declination arm will get
caught to one side (see Figure 2). If you keep turning past this point, the small knob and copper bushing
opposite the declination knob can fall off and be hard to find in the dark (so don’t do this...). To avoid
this, center the arm before class/ star party. One has to really keep turning the knob to have the arm
reach a side. Also, if you keep turning the knob after the declination arm has reached one side, it can
break the fork ends off the arm itself, which could make the declination adjustment knob unusable.
2
Figure 2: Upper left shows center (best) configuration of declination arm, the central bar seen in the
picture. Upper right shows the arm against one side. If you keep turning the declination knob in the
same direction, the smaller knob and bushing shown in the bottom picture can pop off the other end
and be nigh impossible to find in the dark. Also the forks on the end of the declination arm can break,
causing the declination adjustment to be unusable. To avoid this, center the arm before class/ event.
7
Diagonal/ Eye Piece Falls Out or Is ”Droopy”
The eyepiece sits in a diagonal which has a collar attached to it. These 3 pieces are shown in Figure 3.
The collar piece screws into the diagonal, be sure not to cross-thread. The eyepiece sits in the diagonal
with 2 set screws and then the collar fits inside the telescope with 2 more set screws. These set screws
can be turned by hand. Make sure these screws are tight so the eyepiece does not fall out of the telescope.
To turn the eyepiece to adjust for height, one should loosen the screws that hold it into the telescope
(while holding the eyepiece) and then turn the diagonal to adjust height. Tell students this is the proper
procedure to adjust for height.
8
Collimation Issue/ Can’t Get the Telescope to Focus
This takes time to fix! It is not advisable to do this unless you have ∼20 minutes before the telescope is
needed. A telescope that is not properly collimated will appear out of focus no matter how you adjust
the focus knob. The primary and secondary mirrors can get out of alignment over time and become
uncollimated. TO FIX: Point at a bright star/ planet. Unfocus the telescope until you see a donut. If
the center of the donut is in the middle, then the telescope is collimated, if it is off to one-side then it
is not. As seen in Figure 4, you can pop off the orange cap covering the secondary mirror by taking
3
Figure 3: Eyepiece assembly with current eyepiece, diagonal and collar piece.
4
Figure 4: Figure showing how to remove orange cover over collimation screws. Use a slotted screwdriver
to pry off the cover and a Phillips head screwdriver to adjust the screws using tiny, subtle adjustments.
a slotted screwdriver and applying pressure in the groove. THIS STEP SHOULD BE PERFORMED
WITH CARE. The secondary mirror is mounted such that some pressure is ok however don’t let the
screwdriver slip as this would damage the corrective lense. Under the orange cover is 3 screws for a Phillips
head screwdriver. With the telescope still pointed at a bright point source, unfocused, SLIGHTLY turn
one of the screws in one direction. If the center ring moves towards the edge (i.e. makes it worse), turn
the screw in the other direction. This should only take slight adjustments to fix, so use subtle, tiny
turns. In this manner, put the center ring in the middle so it looks like 2 concentric circles. To place
the orange cover back on the telescope, line up the 2 hooks on the cover (seen in Fig. 4, right) with the
slots on the secondary mirror and press firmly.
9
RA Motor Not Turning On
The RA (right ascension) motor counteracts the motion of the Earth’s rotation so that the telescope
roughly tracks objects across the sky. There is an indicator light that is red if the motor is on. Also if
you listen close to the motor, you should be able to hear it running. If the motor does not start up when
you flip the switch, most likely the 9V battery is dead. To change out, use a key or similar shaped object
to pry open the hatch (seen in lower left of Figure 1, on the base of the telescope mount)and change out
the battery.
10
Declination Brake Won’t Lock Telescope in Place
The declination brake can become loose so that even locked in place, the telescope will move. This has
an easy fix. TO FIX: The declination brake knob has 2 positions, locked and unlocked as seen in the
top and bottom pictures in Figure 5, respectively. In the unlocked position, you can twist the knob to
tighten and then lock the brake again. This will make the declination brake have a tighter hold so the
telescope will not move when the brake is set.
11
RA Brake Won’t Lock Telescope in Place
If you have tightened the set screws on the knob and it still doesn’t lock the telescope, then there is an
issue deep down in the base of the telescope mount and currently we do not have a fix for this.
5
Figure 5: Declination brake. Can unlock the brake so that it is parallel to the mechanism it rests on,
seen in the top picture. Twist the knob and lock the brake in place (perpindicular to the mechanism,
seen in bottom picture) so that the brake has a tighter hold on the telescope.
6
Figure 6: End of night storing position. 4 things: 1. Point telescope so that its facing the mount. 2.
Have handle directly on top of the telescope. Lock both brakes. 3. ”Sad eyepiece” point the eyepiece so
that it hangs down. 4. Check that RA Motor is off.
7