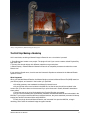
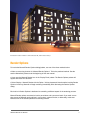
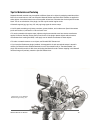
1
Maxwell Render 2.5.1 for
Bonzai3d 2.5
Plugin Manual
Plugin version 2.5.2
Maxwell Render for Bonzai !
1
Compatibility and Versioning!
3
Installation!
3
Windows or Macintosh!
Maxwell Key Shortcuts!
Getting Started!
Bonzai3d / Maxwell Render Integration!
The First Step: Making a Rendering!
Next Step: A Typical Real-World Workflow!
3
3
4
4
5
6
Render Options!
7
Scene!
Image!
Camera!
Simulens!
File!
Prefs!
8
11
12
15
17
20
Lighting!
Emitter Light Types!
Point and Cone Lights!
Softbox!
IES!
Environment Light Types!
Physical Sky!
Sky Dome!
IBL (Image Based Lighting)!
Relative Efficiency of Light Types!
Lighting with Emitter-Mapped Objects!
Materials!
Using ʻTranslate Shadedʼ!
Using ʻReferenced MXMʼ!
The Online MXM Gallery!
Tips for Materials and Texturing!
Organizing Dependency Filepaths!
Maintaining Dependency Filepaths!
Maxwell Object Attributes!
Editing an Objectʼs Maxwell Attributes!
21
22
23
23
24
25
26
27
28
29
29
30
31
36
37
38
39
39
40
40
Importing Projects From FormZ 6!
42
Resources and Assistance!
43
Troubleshooting!
44
Maxwell Render for Bonzai !
2
Compatibility and
Versioning
MaxwellZ plugin version:
• 2.5.2.x
Bonzai versions supported by this
plugin:
• Bonzai 2.5 or higher on Windows or
OSX.
Maxwell Render versions supported by
this plugin:
• Maxwell Render 2.5.1+
Documentation:
• June 2011
Installation
The installation of the Bonzai plugin is
an easy and straightforward process.
Windows or Macintosh
Pylon Technical (for the artist Jeffrey Neale)
www.pylontechnical.com
1) Install Maxwell Render 2.5.2 or greater.
2) Quit Bonzai.
3) Delete any previous versions of the Maxwell plugin from the Bonzai3d plugins folder.
4) Unzip the MaxwellZ plugin package on your desktop.
5) Locate the version of the plugin appropriate for your platform (Windows or OSX), and copy the
Maxwell directory within to the Plugins directory in your Bonzai3d application directory.
6) Copy checker.tif from the plugin package to the Support directory within your Bonzai 3d application
directory. This file replaces the checkerboard file used by Bonzai for the Material preview scene, and will
provide Maxwell material previews which render faster, exhibit less noise, and describe the material more
faithfully. This step is optional but highly recommended.
7) Restart Bonzai.
Maxwell Key Shortcuts
To get the most out of Maxwell, assign custom key shortcuts to Maxwell Render and Maxwell
Render Options. To do so, select Edit > Key Shortcuts... from the Bonzai menubar. In the resulting
key shortcut dialog, Maxwell may be found by navigating to Project > Modeling > Display > Static
Renderers. CMD-M (Mac)/ CTRL-M (Windows) works nicely for activating Maxwell. Option-M (Mac)/ ALTM (Windows) is a good combination for accessing the render options.
Maxwell Render for Bonzai !
3
"Residence Great Room,” Gary Helfand
Getting Started
Bonzai3d / Maxwell Render Integration
This Maxwell Render plugin has been created with the intention of providing an optimum integration of
Maxwell Render with Bonzai .
Maxwell Render is integrated in Bonzai by means of two plugins. The principal plugin, MaxwellZ.fzp,
controls Maxwell Render options and handles the integration of Maxwell materials inside the Bonzai
materials palette.
A second plugin, MaxwellAttributes.fzp, manages several additional Maxwell-specific attributes which
may be added to each Bonzai object.
If you can see “Maxwell Render” as an option in the Bonzai Display menu, the plugins are properly
installed and enabled.
Maxwell Render for Bonzai !
4
"Red," Craig Williams, Becker Morgan Group, Inc.
The First Step: Making a Rendering
At it’s most basic, rendering a Maxwell image in Bonzai is now a ‘one button’ process!
1. Open Bonzai and create a new project. The plugin will ask if you want to create a default Physical Sky
light. Click ‘OK.’
2. Create a few simple objects with different materials on a ground plane.
3. Select Display > Maxwell Render. Maxwell will launch as a separate process and render the current
Bonzai view.
If you receive a filepath error, check to see that Automatic filepaths are selected in the Maxwell Render
Options: File tab.
What Happened
When you selected Maxwell Render, the Maxwell plugin produced a Maxwell Scene File (MXS) based on
your Bonzai project, and saved it in the location you specified.
• All visible geometry was translated into Maxwell’s internal format.
• All your Bonzai views were included in the MXS file, but the the one that will be rendered is the
current view. (The other views can be accessed if you open the scene in Studio, Maxwell’s standalone
scene editor.)
• The scene was set up to be illuminated by the Physical Sky that you created.
• All your active materials were automatically translated into Maxwell Materials and embedded in the
MXS file. If your project used RenderZone procedural textures, they were rasterized (converted to bitmap
images) and saved in the same folder as the MXS file.
• Finally, the plugin launched Maxwell Render, and instructed it to open the MXS file, to begin
rendering, and to save the rendered image at regular intervals.
Maxwell Render for Bonzai !
5
Next Step: A Typical Real-World Workflow
In practice, you will probably want to adjust the lighting, materials, and render options to achieve a more
specific look than provided the defaults. A typical Bonzai/Maxwell workflow follows:
1. Create your geometry in Bonzai.
2. Assign basic Bonzai materials, which will be automatically translated into Maxwell materials. (See
Materials: Using Bonzai Material Automatic Translation.)
3. Set up basic lighting. The plugin will translate native point and cone lights into the Maxwell scene
accurately. There are also many other powerful custom light types that the plugin provides, including
Softbox (parametric emitter plane), IES (measured illumination data from commercial lighting products),
Sky Dome (fast global illumination environment), Physical Sky (sophisticated atmospheric illumination
model), and IBL (high dynamic range Image-Based Lighting). (See Lighting.)
4. Set up views in Bonzai and render. (See Render Options: Camera.)
5. Adjust the lights and/or camera exposure and re-render until correct.
that you can interactively adjust the Shutter Speed in Maxwell; when you find a satisfactory value, enter
it into the Shutter Speed parameter in Bonzai so that subsequent renderings will be correctly exposed.
(See Render Options: Camera.)
For test renders, use the ‘Render Area Rectangle’ to render a smaller section of the image, or set
the Scale parameter in Render Options > Image to a value less than 100%. Note that these two
options may be combined.
6. Decide which materials are critical and require the sophistication of Maxwell-defined materials. For
these, download free materials from http://resources.maxwellrender.com/ or create them from scratch
using the Maxwell Material Editor. Upon export, the data for each MXMs are embedded in the MXS file.
That is, the MXS file does not reference the MXMs, but contains them. (See Materials: Using Referenced
Maxwell Materials.)
7. When needed, enable advanced effects such as bokeh and rendering channels (Render Options:
Camera) or Multilight (Render Options: Scene).
8. After perfecting the lighting, materials, and composition, generate high resolution finish renderings.
Maxwell Render for Bonzai !
6
Illustration: Peder Lindbom / AIX architects AB, Client: Setra Group
Render Options
To invoke the Maxwell Render Options dialog/palette, use one of the three methods below:
• Make a custom key shortcut for 'Maxwell Render Options.’ This is the preferred method. See the
section Maxwell Key Shortcuts at the beginning of this user manual.
• Hover over the Maxwell Render Icon in the 'Display Tools' palette. The Render Options palette will
appear after about two seconds.
• Select Display > Maxwell Render with the Option / Alt key depressed. Note that after invoking Render
Options in this way, Maxwell will begin rendering immediately after dismissing the Render Options
dialog.
Each tab is in Render Options is dedicated to controlling a different aspect of the rendering process.
Maxwell Render options are stored on both a per-window and a per-scene basis. If you need a more
than one set of Maxwell render options in your project, create a window, or alternately, create new
Bonzai Scene in the Scenes palette for an existing window.
Maxwell Render for Bonzai !
7
Scene
Maxwell Action
[Maxwell, Studio, None, Network Render,
Pack-and-Go Project, Pack-and-Go Scene]
When the user invokes Maxwell Render from
the display menu, the plugin performs the
action specified in this pulldown menu.
Maxwell Action: [Maxwell]
The plugin translates the Bonzai project into
an MXS file (Maxwell Scene format), then
launches the Maxwell application, which
immediately renders the scene described in
the MXS file. MXS files contain all scene
information, including geometry, cameras,
render settings, and materials, with the
exception of referenced bitmap images.
MXS files are multi-platform, and can be
used on Windows, Mac OSX, and Linux
alike.
Maxwell Action: [Studio]
The plugin creates the MXS file, then opens
the scene in the Studio application. Studio is
generally used only in cases where a needed
feature is not yet supported by the MaxwellZ
plugin. (As of this writing, almost all features
are supported.)
Maxwell Action: [None]
The plugin creates and saves the MXS file, but no application is launched. This option is sometimes
used in preparation for sending the scene to the Maxwell network renderer.
Maxwell Action: [Network Render]
The plugin creates the MXS file, then launches the Maxwell Network Manager and loads it into the Add
Job Wizard. See the section titled The Network System in the Maxwell user manual for more details.
The use of Automatic filename with the Timestamp option enabled is recommended when doing
network renderings; enabling this will avoid a situation where mxs files might otherwise be
overwritten.
Maxwell Action: [Pack-and-Go Project]
This feature packages all pertinent Maxwell-related files (MXM, bitmap textures, and HDRI maps) in
preparation for moving your Bonzai project to another workstation. See the manual section titled
Transferring Projects Between Workstations for more details. Note that MXS scenes and rendered
procedural textures are not saved with Pack-and-Go Project, because these are not relevant when
transferring a project to another workstation. For convenience, after the Pack-and-Go is exported, the
Maxwell Action menu will revert to its previous setting. Note: Textures in external MXMs must be
referenced correctly in the MXM or they will not be copied. (See the Troubleshooting section in this
manual.)
Maxwell Action: [Pack-and-Go Scene]
Maxwell Render for Bonzai !
8
This feature packages all pertinent Maxwell-related files in preparation for rendering a Maxwell scene on
another workstation or submitting it to a renderfarm. The plugin creates and saves the MXS file, then
copies all rendered procedural textures, bitmap textures, and environment (HDRI) maps into the same
folder with the MXS. The resulting MXS folder is completely portable and ready to render anywhere. Note
that the ‘Create Dependencies Subfolder’ (see below) is intentionally not observed with Pack-and-Go
Scene, for maximum robustness and portability. For convenience, after the Pack-and-Go is exported,
the Maxwell Action menu will revert to its previous setting. Note: Textures in external MXMs must be
referenced correctly in the MXM or they will not be copied.
Quality/Performance
Time (min)
Specify the maximum time to process the rendering, in minutes. The quality of the rendering is
determined by either the maximum render time parameter or the Sampling Level parameter–– whichever
is reached first will terminate the rendering (see below).
The more time reserved for a Maxwell render, the better the result will be (assuming that the full render
time is used before the sampling level parameter is reached). However, the maximum render time
parameter does not affect render quality directly, it only specifies the number of minutes the rendering
will process before stopping. In other words, setting the maximum render time to 10 minutes and
allowing the render to complete will yield the same result as setting the maximum render time to 100
minutes and stopping it after 10 minutes.
Sampling Level
Specify the target quality level for the render. Higher sampling level (SL) values will result in a more
complete lighting solution and less noise in the rendered image.
The rendering will be stopped when either the sampling level is reached or the maximum render time is
reached. Faster processors reach higher sampling values (i.e., a higher quality image) within a given
amount of time than slower processors.
In Maxwell, the image is regularly updated during rendering. You can terminate a Maxwell render at any
point in time, and save the resulting image at the time of render termination. For single image renders it
is generally better to keep the sampling level limit high (the default of 25 works well); the render can
always be stopped at any time if the result is satisfactory with a lower sampling level. Also, renderings
can be resumed (processed further) later, by opening the MXI file in Maxwell and clicking on Render.
For animations, the sampling level is often set to a lower value and the maximum render time left high,
so that a consistent sampling level is achieved for each frame.
CPU Threads
Specifies the number of threads that Maxwell Render is allowed to use. Normally this should be equal to
the number of CPUs (Central Processing Units) available on the system. If this parameter is set to 0,
Maxwell Render will use all available CPUs.
Lights
Multilight
[Off, Intensity, Color + Intensity]
Enables Maxwell’s Multilight. Multilight is a unique and very useful feature that allows you to interactively
adjust the intensity and/ or color of the emitters in the scene and to alter the ISO and shutter speed
during rendering or after the render has finished. The adjustments may be keyframed and animated over
Maxwell Render for Bonzai !
9
time, and a sequence of images can be saved. With Multilight, with just one rendering you can save
different images of the same scene under different lighting conditions or make lighting animations.
Export Point and Cone lights
Enable to export Bonzai point and cone lights. If disabled, these light types will not be exported,
regardless of the ‘enable’ setting on each individual light.
Geometry
Scene Scale
Specifies the scale of the scene, which affects the way the light travels in space. If this value is modified
from the default (1), the render will become more or less dark, and the depth-of-field will be affected.
Allow Maxwell Studio to Export Geometry
This option to allows the MXS file to be exported from Studio to other 3D formats later. If this option
disabled, the geometry from your Bonzai project is protected.
Textures
Disable Textures
Disables all textures in the rendering. This option is typically used to quickly check lighting and/or
geometry. Disabling textures will dramatically speed up both the scene export process and the rendering
itself.
Rendered Textures Resolution
During the export to the MXS process, Maxwell Render translates all the materials in the Bonzai project
(that do not have a referenced MXM file) into Maxwell materials. Maxwell Render requires all textures to
be based on image maps; therefore, procedural textures are converted into PNG files. This option
specifies the resolution in pixels of the procedural textures rasterized to image maps. Using higher
resolutions may result in better quality images, but will also require much more time to export from
Bonzai, and more memory during rendering. To speed up the export process, use lower values, such as
512 x 512.
Globals
Dispersion
In this tab, the plugin provides controls to select if motion blur should be calculated or for cameras and
objects.
Displacement
In this tab, the plugin provides controls to select if motion blur should be calculated or for cameras and
objects.
Command Line
Specifies command options that affect the rendering process, including some lesser-used features not
available through the graphical user interface of the plugin. For example, low:p launches the Maxwell
Render process in low priority mode. Multiple commands may be entered on the same line. A full list of
commands can be found in an appendix of the Maxwell Render manual.
Maxwell Render for Bonzai !
10
Image
The options in this tab control the rendered
image format, tone mapping, and the
creation of optional render channels.
Scale
Scales pixel dimensions of output image by
the factor shown here. Useful for creating
quick draft renderings at lower resolutions.
Image Format
[PNG, Targa, JPEG, TIFF, JPEG2000, HDR,
EXR, BMP] [8 BPC, 16 BPC, 32 BPC]
The image file format that the Maxwell
render will be saved in. The image file format
and bits-per-channel (BPC) are selected
from the pull-down menus to the right. Not
all BPC options are available to all image
formats.
Color Space
Specifies the color space for the rendered
image. Available color spaces include sRGB,
Adobe RGB 1998, Apple RGB, NTSC, and
many others. This parameter may be
adjusted interactively in Maxwell while
rendering.
Tonemapping
Burn
Parameter to control the highlights in a render. Lower burn values will decrease the intensity of the
highlights to avoid “burned out” areas in the image. In most cases this parameter should be left at
default. Lowering it too much may produce unnatural looking images. This parameter may be adjusted
interactively in Maxwell while rendering.
Monitor Gamma
Maxwell Render internally uses a gamma of 2.2 to convert from spectral space to the RGB color space.
This parameter is used to control the gamma conversion. Lower gamma values darken the image, while
higher values lighten the image. Note that you can control this parameter interactively while rendering in
Maxwell. This parameter may be adjusted interactively in Maxwell while rendering.
Channels
These options are used for advanced image compositing. Leaving all options off except for ‘Render’ will
result in faster renderings. See the Maxwell Render manual section titled Setting up the Render Output:
Channels for a full description of each channel.
Illumination and Caustics
These options are used to accelerate renderings when specific visual phenomena are not required for
your image. These controls allow you to deactivate certain aspects of the rendering calculations, such as
Indirect Light or Reflected Caustics. These options are also useful in cases where you want to see the
effect of just the indirect light in the scene, and for compositing purposes.
Maxwell Render for Bonzai !
11
Camera
Maxwell Render renders the active Bonzai
view. To construct a Maxwell camera, the
plugin obtains the eye point, center of
interest, and focal length from the the
Bonzai View Parameters (double-click on a
view in the views palette). The resolution and
pixel aspect ratio are obtained from the
Camera View settings in View Parameters if
these are in use; if not, the values specified
in Display > Image Options... are used
instead.
The Maxwell Camera Model
The Maxwell camera simulates the most
important properties of a real-life physical
camera, and as such requires several
additional parameters not found in Bonzai.
These are specified though the Camera Tab.
The options here will apply to all views/
cameras in a scene. Maxwell Render
options are stored on a per-scene basis, so
if you need a different set of camera
parameters, create a new Bonzai Scene in
the Scenes palette.
Note: Maxwell currently only supports 3-Point Perspective view types. Views similar to 2-Point
Perspective may be created using the plugin’s Shift Lens feature. (Bonzai’s 2-Point Perspective
does not model a shift lens-type camera, and so cannot be directly translated.)
Exposure
EV Lock
When enabled, the current exposure is maintained when adjusting the f-stop, shutter speed, or ISO. If
the f-stop is adjusted, the shutter speed value will be adjusted to compensate, and vice versa. If the ISO
is adjusted, the shutter speed will compensate.
f-Stop
Specifies the diameter of the lens opening, or aperture, as an f-Stop value. Clicking on the triangle to the
right exposes a menu of traditional f-Stop values in third-stop increments. Arbitrary values can be typed
into the text field.
f-Stop is a number representing the diameter of the aperture (d) in terms of the effective focal length (f) of
the lens: f-Stop = f/d. For example, if a given lens has a Focal length of 30 and a lens Diameter of 60,
then f/d = 30/60 = an f-Stop of f/0.5. Using a smaller f-Stop value (bigger aperture) will allow more light
to pass to the sensor, resulting in a ‘brighter’ exposure. Conversely, a higher f-Stop value (smaller
aperture) will allow less light to pass and result in a ‘darker’ exposure.
Maxwell Render for Bonzai !
12
The f-Stop system was conceived to establish a consistent exposure to light, regardless of the focal
length of the lens being used. With this system, f/16 on a 1000mm lens will pass the same amount of
light as f/16 on a 28mm lens.
Image exposure is determined by both shutter speed and f-Stop. (See Shutter, below.)
Aperture size also affects the Depth of Field (DOF) in your rendering. The smaller the f-Stop value (e.g.,
the bigger the aperture), the smaller the DOF, meaning that more of the image before and after the center
of interest will be out of focus. See the Maxwell Render manual for an in-depth discussion of DOF.
To experiment with the depth of field, produce any satisfactory exposure, then enable EV lock.
Adjust the f-stop and make test renderings until you find a depth of field the suits your purposes.
Shutter
Specifies shutter speed, indicated as a fraction of a second. Clicking on the triangle to the right exposes
a menu of traditional shutter speed values in third-stop increments. Arbitrary values can be typed into
the text field. This parameter may be adjusted interactively in Maxwell while rendering.
The shutter speed determines how long the camera sensor will be exposed to light. For example, a
shutter speed value of 1/60 will expose light to the camera sensor for 1/60th of a second.
As longer shutter speeds will expose a scene to the camera sensor for a greater period of time, moving
objects may be blurred. If the camera itself is in motion, the entire image may be blurred. Motion blur
may be controlled by varying the shutter speed. For instance, shutter speed of 1/1000th of a second will
enable you to ‘freeze’ relatively fast motion, while the same motion shot at 1/8th of a second will
probably result in significant motion blur. (If you follow a moving object with your camera and keep the
shutter speed relatively low, the object you are following will remain sharp and the background will show
motion blur.) Greater illumination will be required for a scene that is shot at a higher shutter speed, with
daylight on a bright sunny day being ideal.
Image exposure is determined by the the reciprocal relationship between the f-Stop value and shutter
speed. A given exposure may be produced by any of many combinations of f-Stop and shutter speed.
For example, 1/250 second at f/11, 1/500 second at f/8, and 1/1000 second at f/5.6 all provide
equivalent exposures. However, there are compelling reasons for prioritizing either f-Stop or shutter
speed (selecting a value for one and then adjusting the other parameter to get a satisfactory exposure).
Prioritizing f-stop will allow you to achieve a specific DOF (i.e., ‘deep focus’ or ‘shallow focus,’ see fStop, above). On the other hand, prioritizing shutter speed allows you to finely control motion blur.
Shutter speed may be interactively controlled in the Maxwell Render Edit pane. When a satisfactory
exposure value has been found, copy the shutter speed value back to Bonzai.
Sensor
Sensitivity
Specifies the sensor’s sensitivity to light, as measured by the ISO arithmetic scale. Clicking on the
triangle to the right exposes a menu of traditional ISO ‘speeds’ in third-stop increments. Arbitrary values
can be typed into the text field. This parameter may be adjusted interactively in Maxwell while rendering.
Maxwell Render for Bonzai !
13
The lower the ISO value, the less sensitive the sensor, requiring a more exposure to light (or stronger
emitters) to achieve a satisfactory exposure. Conversely, higher ISO values require less exposure to light
to achieve the same exposure.
In the real world, the sensor may be photographic film or a digital CCD; in Maxwell, the sensor is virtual.
This means that, unlike in the real world, raising the Maxwell ISO will not add noise to the render.
Film Back
[Automatic, Manual]
[Automatic]: Selecting this option will cause the plugin to calculate the appropriate film back size to
match Bonzai ’s focal length setting. Selecting this option will always result in a correct field of view
match between the Bonzai viewport and the resulting Maxwell render.
Bonzai ’s focal length setting always assumes a 36mm wide film back, emulating the use of 35mm film in
an SLR camera. The automatic option adjusts the film back height to match the aspect ratio of the pixel
dimensions. For instance, a 500 x 1000 pixel image will be assigned a 36mm x 18mm film back, while a
1000 x 500 pixel image will result in a 36mm x 72mm film back.
[Manual]: Selecting this option allows for manual control over the size of the film back, in millimeters. The
left parameter is the x (width) of the film, the right is the y (height).
Diaphragm
[Circular / Polygonal]
The diaphragm is the camera mechanism responsible for adjusting the size of the aperture. This option
specifies whether the diaphragm is polygonal or circular. If set to polygonal, it will consist of a number of
strait blades arranged in a circular pattern which are shifted to increase or decrease the aperture’s
diameter.
The diaphragm’s geometry determines the shape of out of focus light in the rendering, a phenomenon
known as the bokeh effect. The bokeh effect is most pronounced in images with a shallow Depth of
Field, particularly around small highlights in out of focus areas, such as light distant sources or specular
reflections.
Blades
Specifies the number of blades when a polygonal diaphragm is used. A diaphragm with six blades will
produce typical hexagonal bokeh aberrations. A greater number of blades (or circular diaphragm type)
will result in a more circular bokeh effect, but will require more render time.
Angle
Specifies the blade rotation angle in degrees. Rotating the angle of the blades will result in the polygonal
bokeh shapes changing their general orientation.
Shift Lens
Specifies the shift of the film plane relative to the lens, as a signed percentage (-100% to 100%). The left
parameter represents the x (horizontal) shift, the right the y (vertical) shift. Shift lens operates analogously
rise, fall and shift with a view camera. Adjusting the y shift (rise) is useful in architectural rendering to
eliminate converging parallels in tall buildings, approximating a two-point perspective.
Shift lens does not tilt or swing the film plane.
Maxwell Render for Bonzai !
14
Simulens
The SimuLens system emulates a number of
optical effects found in camera lenses.
Diffraction
Diffraction effects occur when light goes
through small holes, causing interference
patterns in the shape of the lens aperture.
Light will always cause slight interference
patterns because of the optical components
used, causing the visual “artifact” known as
glare.
This setting controls the intensity of the
diffraction effect.
Frequency
Specifies the frequency of coloring in the
diffraction effect. Higher values will make the
patterns denser.
Aperture Map
The shape of the diaphragm will model the
pattern of light that reaches the film. For
example, a circular diaphragm will create
circular patterns; a hexagonal diaphragm
will create 6 light streaks. You can set the
diaphragm shape using a black & white or
color map called the aperture map. The map should be black, with white specifying the shape and size
of the aperture.
Obstacle Map
Water drops, eyelashes or dirt on the camera lens will also cause diffraction effects. A black & white map
called the obstacle map is needed. If you do not want to use an obstacle map, you can leave this path
blank: you only need an aperture map for diffraction to work. However, if you do want to use an obstacle
map, be aware that it is necessary to load an aperture map too. The map should be white, with black
areas specifying dirt or scratches on the lens surface.
Note: The obstacle map and the aperture map must have the same resolution. Your render and the
maps used do not always need to have the same resolution, but the more similar they are in
resolution, the less diffraction distortion you will get.
Scattering
Scattering: Commonly known as bloom, scattering occurs when the light is scattered inside the lens
before reaching the film.
Note: In almost all cases, you will NOT want to select the checkbox next to the three Simulens
settings previously described. Doing so adds unnecessary processing time to each sampling level
update, and increases RAM usage during rendering. Instead, wait until the render has reached an
acceptable SL for viewing the Simulens effect, stop the render, apply a Simulens effect to give you an
Maxwell Render for Bonzai !
15
idea of its influence, then disable Simulens again and resume the render. For adding Simulens effects to
a range of MXI files after the render is completed, use File>MXI Batch Processing.
When you have determined appropriate Diffraction, Frequency, and Scattering values interactively in
Maxwell, type those values back to this interface so you will not have to input them the next time.
Devignetting
Vignetting is an artifact that darkens an image around the edges, due to camera optics. Setting the
devignetting parameter to 100% will eliminate the vignetting effect entirely; setting it to lower values will
partially remove it.
In the real world, the more wide-angle the lens is (for example, a focal length of 24mm), the more
pronounced the vignetting will be. As you raise the focal length of the camera, the vignetting effect will
be less pronounced. A focal length of around 80mm or higher will have almost no vignetting, no matter
the Devignetting settings used.
Maxwell Render for Bonzai !
16
File
This tab specifies which files will be created
upon initiating a Maxwell rendering, and
where they will be stored.
Output File Paths
[Automatic, Manual, Image Only]
When a Maxwell rendering is made, the
Bonzai project is translated into an MXS file.
The resulting render may be stored as a
standard bitmap image, as a high dynamic
range Maxwell Image (MXI), or as both.
There are three general ways to specify how
and where these files will be saved,
Automatic, Manual, and Image Only.
Output File Paths: [Automatic]
With Automatic filepaths, the plugin
will automatically generate unique
filenames and folders for your MXS,
MXI, and Image files. using the
automatic option ensures that you
will never accidentally overwrite an
important older file. Unique
filenames, called the ‘scene name
stem’, are generated as follows:
Bonzai project name + scene name + view name (or the text ‘no view’ if none is selected + a
unique number to avoid naming collisions (incremented starting at 1).
The scene name stem is then appended with “.mxs”, “.mxi”, or the image file extension, as
appropriate. If there are any illegal file characters in the project, scene, or view names, they will
not be included in the filename. For 100% filename compatibility when exchanging files between
platforms or remote servers, you have the option to automatically replace all blank spaces in the
filename with either dashes or underscores. See Render Options: Preferences for details.
With Bonzai Project
When enabled, all automatically created folders and Maxwell output files will be created within
the folder containing your Bonzai project.
Custom Location
When enabled, all automatically created folders and Maxwell output files will be created in the
location specified in this field.
Select the custom output location.
Delete the custom path location.
Maxwell Render for Bonzai !
17
MXI
When the MXI checkbox is enabled, an MXI will be saved. MXI is a high dynamic range format
containing additional information such as Multilight settings. MXIs are unique in that their
renderings can be stopped and resumed at any time, across multiple sessions. For details, see
the Maxwell Render manual. If disabled, the Image checkbox must be enabled.
Image
When the Image checkbox is enabled, a bitmap image of the type and bit depth specified in
Image Output (see Render Options: Image) will be saved. If disabled, the MXI checkbox must be
enabled.
Folder per Bonzai Project
When enabled, a subfolder will be created for each Bonzai project, named as follows: Bonzai
project name + “Maxwell”
Folder per Maxwell Scene
When enabled, a subfolder will be created with the scene name stem, minus the unique number
at the end. If Folder per Bonzai Project is also checked, the Maxwell Scene folder will be created
within that folder.
Create Dependencies Subfolder
When this option is selected, a folder for dependencies will be created inside the folder which
receives the MXS. This can help to keep complex projects organized. (This option is not used
with Pack-and-Go Scene, for maximum scene robustness and portability.)
Filename Construction
These checkboxes control how the automatic filename is composed. The timestamp option is
recommended when doing network renderings; enabling this will avoid a situation where mxs
files might otherwise be overwritten.
Output File Paths: [Manual]
The plugin will use the filenames and absolute filepaths you specify in the following fields for the MXS.
MXI, and Image outputs.
Specify the name and location of the output path for a given field.
Delete the output path for a given field. If the MXI or Image filepaths are deleted, that file
will not be saved. (At least one of the two must be specified or the plugin will report an
error during the export process.)
To use the same output path and filename stem for all three fields, specify the MXS path
first, then click on the copy icon. The image format is determined by the type specified in
the Image Format pull-down menu (see Render Options: Image).
Create Dependencies Subfolder
Maxwell Render for Bonzai !
18
When this option is selected, a folder for dependencies will be created inside the folder which
receives the MXS. This can help to keep complex projects organized. (This option is not used
with Pack-and-Go Scene, for maximum scene robustness and portability.)
Note that when the Automatic option is selected and a Maxwell Rendering is exported, the
Manual filepaths specified here will be overwritten with the Automatic generated filepaths.
Output File Paths: [Image Only]
Often, you will not need the MXS or MXI files while working, and having them accumulate will
only clutter your hard drive. With the Image Only option, the plugin saves the rendered image to
the current project folder (or a custom folder) and avoids naming collisions automatically, so
you’ll never overwrite an important rendering.
Image Only keeps all the MXS files out of your way, storing them in a temporary, invisible folder
which is deleted upon quitting Bonzai. MXI files are not saved.
The unique image filename is generated as follows:
Bonzai project name + scene name + view name (or the text ‘no view’ if none is selected + a
unique number to avoid naming collisions (incremented starting at 1) + the selected image file
extension
If there are any illegal file characters in the project, scene, or view names, they will not be
included in the filename. For 100% filename compatibility when exchanging files between
platforms or remote servers, you have the option to automatically replace all blank spaces in the
filename with either dashes or underscores. See Render Options: Preferences for details.
With Bonzai Project
When enabled, the output image will be created within the folder containing your Bonzai project.
Custom Location
When enabled, the output image will be created in the location specified in this field.
Select the custom output location.
Delete the custom path location.
Maxwell Render for Bonzai !
19
Prefs
This tab contains the plugin version and
detailed compatibility information, as well as
preferences.
Resources
Plugin Manual
Click to launch the plugin user manual.
Maxwell Manual
Click to launch the Maxwell user manual.
Generated Filenames
Convert Whitespace to
[spaces, underscores, dashes]
Controls how whitespace is treated in
automatically generated filenames. For
workflows that involve remote servers, you
may wish to select ‘underscores’ or
‘dashes,’ for maximum filename
compatibility.
Material Preview
Time (min)
The target time for the material preview, in minutes.
Sampling Level
The target Sampling Level for the material preview.
See the description of the Time (min) and Sampling Level parameters in the Scene tab for details about
how these two parameters are related.
Use Fill Light
A 2’ x 2’ key light at camera left always illuminates the material preview object (sphere, cube, etc.).
Enabling this checkbox adds a 2’ x 2’ fill light to the preview at camera right. Enabling the Fill light will
result in a better material preview in most cases.
Use Kicker Light
Enabling this checkbox adds a 2’ x 2’ kicker light to the preview above and behind the material preview
object. Enabling the Kicker light will provide a clear highlight along the top of the object, which is useful
for certain shiny or metallic objects that otherwise may only reflect the empty (black) scene above.
Maxwell Render for Bonzai !
20
"Ocean City Convention Center, Evening View," Craig Williams, Becker Morgan Group, Inc.
Lighting
The Maxwell for Bonzai plugin supports the export of the native Point and Cone light types. The plugin
also adds several unique Maxwell light types: Softbox, IES, Physical Sky, Sky Dome, and IBL. All these
light types may be created and edited though the Bonzai Lights palette and Light Parameters manager.
Point, Cone, Softbox and IES lights are emitter-based light sources, and are called Emitter Light Types in
the following discussion. These types are intended for artificial lighting in interior lighting instruments and
exterior night shots.
Physical Sky, Sky Dome, and IBL (Image Based Lighting) lights provide global environmental illumination
throughout the scene, and are called Environment Light Types. These types are used for daytime
exteriors and interiors with significant light penetration. IBL is also commonly used for photo-studio type
interiors.
To create a new light, click on the ‘plus’ icon in the Lights palette. To change it to one of the Maxwell
light types, double-click on the name of the light, then adjust the ‘type’ parameter in the resulting dialog.
Click on the Maxwell item in the list on the right to edit the Maxwell-specific parameters of the light.
At least one light must be enabled before a rendering may be initiated.
Maxwell Render for Bonzai !
21
Emitter Light Types
Point, Cone, Softbox, and IES light types
create lamp geometry and MXM emitter
materials behind the scenes when the
Maxwell rendering is invoked. In the Lights
palette, these types are indicated with pale
yellow icons.
Parameters common to most of these types
follow:
Intensity Tab Color
Selecting RGB will assign the color picker
color to the emitter output. Alternately,
select Temperature to specify the emitter
output in degrees kelvin.
Intensity Tab Luminance
The luminance of the source can be
specified via a number of industry-standard
schemes, including by input power and
efficacy, output lumens, lux, etc.
The intensity of light is delivered into the scene is affected by not only by the luminance, but also by the
color and the emitter size (see Parameters, below). Check each of these parameters if you are getting
unexpected results.
Shadows Tab
Maxwell emitters always cast shadows, so this option is removed when editing a Maxwell light type.
Parameters Tab Invisible Geometry
Enabling this option will cause the emitter geometry to be invisible to the camerain the Maxwell scene,
though the emitter will still illuminate the objects around it.
Parameters Tab Quality
[1-Lowest - 5 Highest] Controls the number of faces (polygons) making up the emitter object. The default
value ( 2 ) should work in almost all cases. Increasing this value may eliminate lighting artifacts, but will
also increase render time.
Maxwell Render for Bonzai !
22
Point and Cone Lights
The plugin can automatically translate Bonzai’s Point and Cone light types into emitter-mapped
geometries that Maxwell can use as light sources. In addition to the common parameters detailed in the
previous section, Point and Cone lights have the following unique parameters:
Parameters Tab Enabled
If enabled, the light will be exported to the Maxwell scene; otherwise, it will only illuminate in Bonzai’s
‘Shaded’ mode and not in the Maxwell rendering.
There is a global override for this setting which can be used to disable the export of all cone and point
lights in the scene. See the lighting section in Render Options: Scene.
Parameters Tab Diameter
Sets the diameter of the emitter sphere (bulb). Geodesic spheres are used for an even of distribution and
maximum efficiency.
Softbox
The Softbox type is modeled on the
photographic instrument of the same name, in
which a bulb illuminates the subject though a
rectangular diffusion screen, creating a localized,
yet ‘soft’ light. The plugin equivalent is a
rectangular plane which is mapped with an
emitter material. The Softbox type is the fastestrendering of the emitter type lights.
The Softbox will not only always point toward the
center of interest, but will always remain level
with the ground (XY) plane, regardless of the
position of the origin or COI.
Softbox modeling space indicator shows actual size and
direction
In addition to the common parameters detailed in
the previous section, Softbox lights have the following unique parameter:
Parameters Tab Width, Height
The width and height of the softbox. The width is always level with the ground plane.
Maxwell Render for Bonzai !
23
IES
IES / EULUMDAT files specify the pattern of
intensity and direction of emission from specific
light fixtures. These files are available from
manufacturers.
The base of the fixture, as defined by the IES /
EULUMDAT file (e.g., the negative-Z axis), will
always point toward the light’s COI.
Relative intensity distribution pattern indicators for three
IES files
By definition, it is not possible to change the intensity of an IES emitter, as this data is specified by
the IES/EULUMDAT file. It is possible to change the color of the emitter, however.
Intensity Tab IES
Select the IES or LDT file.
Delete the path to the IES or LDT file.
A 2D representation of the distribution pattern is displayed below the filepath feild.
Parameters Tab Diameter
Sets the diameter of the emitter sphere. The default size is recommended. Geodesic spheres are used
for an even of distribution and maximum efficiency.
Parameters Tab Spin
This parameter controls the rotation of the fixture about the axis defined by the light origin and COI. The
origin of rotation (0 degrees) always points ‘down’ to the ground plane (XY plane).
Parameters Tab Length
Controls the length of the IES distribution pattern indicator in the 3D modeling space.
Maxwell Render for Bonzai !
24
"Ocean City Convention Center, Evening View," Craig Williams, Becker Morgan Group, Inc.
Environment Light Types
The Environment light types are dedicated to the accurate simulation of global and atmospheric light.
Multiple Physical Sky and Sky Dome lights may exist in a scene simultaneously, allowing for the setup of
various shots at different times of day or under different atmospheric conditions. However, only one of
these light types can be active (“shining”) at a time.
Likewise, multiple IBL lights may exist at once, but only one may be active (“shining”) at a time. If a
Physical Sky light or Sky Dome is also active, the sky light will be used for any unused channels in the
IBL. For example, if an IBL and a Physical Sky are both active, and the IBL uses only the background
channel, the illumination, reflection, and refraction channels will be provided by the Physical Sky.
Maxwell Render for Bonzai !
25
Physical Sky
Maxwell Render has a sophisticated atmosphere model that reproduces the skylight conditions at a
given location locations at specific dates and times. The atmospheric parameters allow users to
customize the appearance of the sky and the resulting light in the scene.
For a detailed discussion, see the Maxwell Render manual “Setting up environment lighting” chapter.
Intensity Tab Sun
Enables / disables direct sunlight. This parameter is
linked to the lights ‘Shadows’ button in the Lights
palette. If disabled, only ambient sky light will
illuminate the scene.
Intensity Tab Power
Specifies the light output of the sun as a multiplier,
where a value of 1 is equivalent to the the Earth’s
sun. (i.e., A value of 2 would be twice that of the
Earth’s sun, while a value of 0.5 would be half that
of the Earth’s sun.)
Intensity Tab Temperature
Specifies the temperature of the sun’s spectral
radiation, in degrees kelvin. The default value of
5777ºK is the most common value measured
outside the Earth’s atmosphere.
Intensity Tab Planet Reflectance
Top: Sun Disabled indicator icon
Specifies the percentage of light reflected from the
Bottom: Sun Enabled indicator icon
planet surface back into the atmosphere. Changing
this value will brighten / darken the overall sky and
scene illumination with lower values giving a darker result. Common values are 26-32%.
Location Tab Sun Location
[Origin/COI, Altitude/Azimuth, Site/Time]
Specifies the scheme by which the sun will be located.
Sun Location: [Origin/COI]
The sun will be located according to the origin and COI parameters, and can be adjusted by moving the
sun indicator in the 3D modeling space.
Sun Location: [Altitude/Azimuth]
The sun will be located by sun altitude, azimuth, and site rotation. Site rotation allows you to change the
site north direction without rotating the model itself. In this mode, the Physical Sky will be automatically
locked to avoid moving it within the modeling space.
Maxwell Render for Bonzai !
26
Sun Location: [Site/Time]
The sun will be located by longitude, latitude, day, time, GMT offset, and site rotation. Site rotation
allows you to change the site north direction without rotating the model itself. In this mode, the Physical
Sky will be automatically locked to avoid moving it within the modeling space.
Parameters Tab Ozone, Water, Turbidity Coefficient, Wavelength Exponent, Reflectance, Scattering
Asymmetry
These parameters affect the color distribution throughout the sky. For a detailed discussion, see the
Maxwell Render manual “Setting up environment lighting” chapter.
Parameters Tab Length
Controls the length of the Physical Sky indicator in the 3D modeling space.
Sky Dome
Provides a uniform color or gradient dome to illuminate the scene. Sky Dome is appropriate for interiors
with minimum exterior light penetration, and renders faster than Physical Sky.
Intensity Tab Intensity
Specifies the intensity of the Sky Dome in cd/m2.
Intensity Tab Zenith
Click to specify the color at the zenith.
Intensity Tab Horizon
Click to specify the color at the horizon.
Intensity Tab Midpoint
The midpoint of the color gradient between the horizon (at 0°) and zenith (at 90°).
Intensity Tab Sun, Temperature, Planet Reflectance
These options function identically to those in Physical Sky (see previous section).
Location Tab Sun Location
[Origin/COI, Altitude/Azimuth, Site/Time]
These options function identically to those in Physical Sky (see previous section).
Parameters Tab Length
Controls the length of the Physical Sky indicator in the 3D modeling space.
Maxwell Render for Bonzai !
27
IBL (Image Based Lighting)
Image Based Lighting allows you to light your scene by applying a high-dynamic range image (HDRI) to
a virtual sphere that encompasses your scene. This is useful if you want your 3D model to appear as if it
is actually in a real environment. The scene will be lit according to the properties of the HDRI and
reflections from this environment will also show on your models. You can use an HDRI, MXI or EXR
image for the IBL. These three image formats store high dynamic range data, providing accurate
environment lighting. The images used for IBL should be in the Latitude/ Longitude format (the width
should be twice the height). Images in “strobes” or “cross” formats will not work correctly.
There are four channels that may be
mapped: background, illumination,
reflection, and refraction. The same image
can be mapped to all channels, or different
images can be mapped to each channel.
It is not necessary to use all channels. If a
channel is disabled, the active Sky Dome or
Physical Sky will be used for that channel
instead (or, if no sky is active, the channel
will be unused).
Intensity Tab Simple
In simple mode, the same image is used for
all four channels, and a single set of
controls for rotation and scale affects all the
channels equally. The channels can be
enabled and disabled individually, however,
and their relative intensities can be
independently adjusted.
Intensity Tab Detailed
In detailed mode, each channel is completely
independent from the others, and can be mapped with its own image, have unique rotation and scale
parameters, etc.
Select the HDRI, MXI or EXR file.
Delete the path to the image file.
View the image file.
Intensity Tab Background
When checked, the background channel will be enabled. This channel adds an IBL map that provides a
background image for the scene. This channel does not provide any scene illumination or reflections.
Maxwell Render for Bonzai !
28
Intensity Tab Reflection
The Reflection channel adds an IBL map for reflections on objects within the scene.
Intensity Tab Refraction
The Refraction channel adds an IBL map for refractions within objects in the scene.
Intensity Tab Illumination
The Illumination channel adds an IBL map for illumination.
Intensity Tab Intensity
Adjust the intensity of the map to increase or decrease its contribution to scene illumination, reflections,
or refractions.
Intensity Tab Rotation Azimuth, Rotation Altitude
Rotates the spherical environment. (Degrees)
Intensity Tab Scale Azimuth, Scale Altitude
Scales the current map. (Multiplier)
Intensity Tab Mapping
[Spherical, Screen]
If spherical is selected, the background will be mapped to the entire spherical environment dome; if
screen is selected, the image will mapped to the width and height of the output image. This option is
only available for the background channel in Detailed mode; in Simple mode, the background mapping
with be spherical. The other three channels are mapped spherically in either mode.
Relative Efficiency of Light Types
In general, the Softbox type is the most efficient light type (it will clear noise in the image the fastest),
followed by the Point, IES, and Cone types, in that order.
Sky Dome is faster than Physical Sky.
Lighting with Emitter-Mapped Objects
There are some cases, such as tube-shaped emitters, where the built-in light types may not be sufficient.
In this case, model the emitter geometry in Bonzai, then apply an emitter material created in MXED to
the object. See the chapter Lighting With Emitters in the Maxwell Render manual for more information
about lighting in this manner.
Maxwell Render for Bonzai !
29
“Restaurant,” Modeling and Rendering: Aaron Smithey Architectural Imaging
Materials
There are two approaches to working with Maxwell materials in Bonzai:
• Translate Shaded: Use Bonzai Shaded materials and let the plugin automatically translate them into
Maxwell materials. This approach is very fast, and perfect for production projects where meeting a tight
deadline is more important than perfectly accurate materials.
• Referenced MXM: Use Maxwell Materials (MXM files) directly. This approach allows you to leverage the
full power and realism of Maxwell materials. Each Bonzai material can be set up to reference a unique
MXM file.
Both approaches may be freely combined in a project. In a scene with many materials, it is usually
easiest to let the plugin automatically translate most of the materials and use referenced MXMs only in
cases where material accuracy is critical. All options are located in the Maxwell tab of Material
Parameters.
Material Preview
To create a preview, select a sample object (6” sphere, 6” cylinder, 6” cube, or 6” plane), then click the
green arrow button below the preview window. Because Maxwell previews can take some time, they are
initiated ‘on demand,’ rather than updated continuously. A Maxwell render will be launched in the
background, which will update the preview. The update process can be stopped at any time by clicking
anywhere in the preview window, or by editing a control. (As of this writing, the render will continue in the
background until complete, however.) The material preview target time, SL, and lighting can be adjusted
in Render Options: Prefs Tab.
Maxwell Render for Bonzai !
30
Using ‘Translate Shaded’
Selecting this option will instruct the plugin to
automatically translate the selected Shaded
material into a Maxwell material. The resulting
MXM will be embedded into the MXS scene
file (i.e., it will not be saved separately) upon
rendering.
To understand how the translation is
performed, it is useful to first understand how
Maxwell materials are defined. We
recommend reading the chapter titled
“Maxwell Materials” in the Maxwell Render
manual before continuing with the section
below.
If the Shaded material contains any embedded textures that do not have a valid reference on disk they
will be automatically saved as PNG images. (This will be the case if the texture is a swatch generated by
another renderer, or if an image file was been moved since it was first linked to the Bonzai material.)
Material Hint
By design, the Translate Shaded option is as reduced as possible; it hides all the complex details of
MXM creation from the end user. It has been designed to provide good materials quickly and easily, to
meet a demanding production schedule. Translate shaded offers a single control: Material hint, which
controls how the Shaded material will be interpreted. In the images below, the Shaded render
representation is on the left and the Maxwell translation on the right.
Material Hint Closest Match
The Closest Match material hint attempts to match the Shaded material as closely as possible, while still
allowing enough flexibility to emulate a variety of materials. The description below provides a starting
point for thinking about how to use Closest Match. Details have been omitted in the interest of clarity.
Closest Match creates a Maxwell material whose roughness is controlled by the Specular Roughness
parameter. If Specular Roughness is set to 0, the material will be perfectly smooth, like a mirror. If set to
100, it will be perfectly rough, like a piece of uncoated paper.
Additionally, a clear gloss coat is applied over the base layer. The strength of this coating is controlled by
the Specular Factor parameter. A value of 0 will result in no glossy reflection, while a value of 100 will
result in a very glossy reflection.
To make a surface completely matte, set the Specular Factor to 0 (the Specular Roughness does not
matter in this special case). This type of material (lambertian) renders very quickly.
If the Shaded material uses transparency, the material will become transparent as if it were made of a
thin membrane, not a solid. (Specifically, Maxwell’s transmittance parameter is not used, so materials will
render quickly, but not refract light or generate caustics).
Maxwell Render for Bonzai !
31
Hint: Closest Match
Color: 197, 228, 254
Ambient Factor: 100
Diffuse Factor: 75
Specular Factor: 0
Specular Roughness: 0
Specular Color: 255, 255, 255
Transparency: 0
Uses: paper, matte wall paint
Hint: Closest Match
Color: 197, 228, 254
Ambient Factor: 100
Diffuse Factor: 75
Specular Factor: 50
Specular Roughness: 0
Specular Color: 255, 255, 255
Transparency: 0
Uses: glazed tile, porcelain, lacquer, enamel paint
Hint: Closest Match
Color: 197, 228, 254
Ambient Factor: 100
Diffuse Factor: 75
Specular Factor: 50
Specular Roughness: 25
Specular Color: 255, 255, 255
Transparency: 0
Uses: powder-coat finishes, aluminized surfaces
Hint: Closest Match
Color: 254, 69, 0
Ambient Factor: 100
Diffuse Factor: 75
Specular Factor: 100
Specular Roughness: 25
Specular Color: 254, 147, 123
Transparency: 0
Uses: metallic paints
Closest Match Technical Summary:
2 layers, 1 BDSF per layer, ND 3.0 both BDSFS, Transmittance not mapped
Shaded Parameter
MXM Mapping
Color
Base BSDF Reflectance 0° (attenuated); BSDF Reflectance 90° 255, 255, 255
Ambient Factor
Attenuates Color and Specular Color (not applied to bitmaps)
Diffuse Factor
Attenuates Color and Specular Color (not applied to bitmaps)
Specular Factor
Top Coat Layer Opacity/Mask (Layer is additive)
Specular Roughness
Top Coat Layer BSDF roughness
Specular Color
Top Coat Layer BSDF Reflectance 0° & Layer 1 BSDF Reflectance 90°
Transparency
Top Coat and Base Layer Opacity/Mask multiplier
Maxwell Render for Bonzai !
32
Material Hint Architectural Glass - Normal, Architectural Glass - Clear
These material hints are used for fast-rendering architectural glass. In most cases, they will work well
without adjustment. These materials will reflect, but not refract, light. This allows solid volumes to appear
as if they were composed of a thin glass shell.
The color parameter controls the tint of the glass. The transparency parameter controls the layer weight.
The Clear variant applies an additional top coat to the glass which may be useful for some applications.
Experiment with both types to see which works better for your application.
Hint: Hint: Architectural Glass, Normal
Color: 213, 243, 244
Ambient Factor: 100
Diffuse Factor: 75
Specular Factor: N/A
Specular Roughness: 0
Specular Color: N/A
Transparency: 80
Hint: Architectural Glass, Clear
Color: 230, 242, 241
Ambient Factor: 100
Diffuse Factor: 75
Specular Factor: N/A
Specular Roughness: 0
Specular Color: N/A
Transparency: 80
Architectural Glass, Normal Technical Summary:
1 layer, 1 BDSF, parameters in table below
Shaded Parameter
MXM Mapping
Color
Base BSDF Reflectance 0° (attenuated); Base BSDF Reflectance 90° (full color)
Ambient Factor
Attenuates Color (not applied to bitmaps)
Diffuse Factor
Attenuates Color (not applied to bitmaps)
Specular Factor
N/A
Specular Roughness
Base Layer BSDF roughness
Specular Color
N/A
Transparency
Top Coat and Base Layer Opacity/Mask multiplier
Maxwell Render for Bonzai !
33
Material Hint Aluminum, Copper, Cobalt, Gold, Silver
The metals series creates efficient-rendering metals with minimal effort. The only parameters that need
to be adjusted are the color and roughness.
For highly realistic metal materials, referenced MXM files with complex IOR files and bump or roughness
maps are recommended.
Hint: Aluminum
Color: 195, 196, 197
Ambient Factor: 100
Diffuse Factor: 75
Specular Factor: N/A
Specular Roughness: 41
Specular Color: N/A
Transparency: 0
Hint: Gold
Color: 231, 136, 0
Ambient Factor: 100
Diffuse Factor: 75
Specular Factor: N/A
Specular Roughness: 0
Specular Color: N/A
Transparency: 0
Metals Technical Summary:
1 layer, 2 BDSFs weighted 60:40. ND, K, and Reflectance 90° set appropriately for each metal type
Shaded Parameter
MXM Mapping
Color
BSDF Reflectance 0°
Ambient Factor
Attenuates Color (not applied to bitmaps)
Diffuse Factor
Attenuates Color (not applied to bitmaps)
Specular Factor
N/A
Specular Roughness
BSDF 1 roughness; BSDF 2 attenuated (50%) roughness
Specular Color
N/A
Transparency
Layer Opacity/Mask multiplier
Maxwell Render for Bonzai !
34
Material Hint Water
The water hint will work well without adjustment in most cases. Only the color and transparency
parameters affect the material.
The color parameter controls the tint of the water. Note that the attenuation of light (transparency
parameter) must be set to a relatively low value for the tint to be apparent.
The transparency parameter controls the attenuation of light though the water. At 1% transparency, half
the light will be attenuated after 1 meter; at 100% half the light will be attenuated after 10 meters. If
transparency is set to none (or 0) a default attenuation of 10 meters will be used.
Hint: Water
Color: 255, 255, 255
Ambient Factor: N/A
Diffuse Factor: N/A
Specular Factor: N/A
Specular Roughness: N/A
Specular Color: N/A
Transparency: 80
Hint: Water
Color: 140, 220, 224
Ambient Factor: N/A
Diffuse Factor: N/A
Specular Factor: N/A
Specular Roughness: N/A
Specular Color: N/A
Transparency: 10
Water Technical Summary:
1 layer, 1 BDSF. ND and K set appropriately for water; Reflectance 0° and Reflectance 90° set to 0,0,0;
Roughness set to 0
Shaded Parameter
MXM Mapping
Color
BSDF Transmittance
Ambient Factor
N/A
Diffuse Factor
N/A
Specular Factor
N/A
Specular Roughness
N/A
Specular Color
N/A
Transparency
Attenuation, mapped 1m - 10m
Maxwell Render for Bonzai !
35
Using ‘Referenced MXM’
Each Bonzai material can be linked to a
external Maxwell Material file (MXM) on disk.
Maxwell will render using the referenced
MXM instead of translating the Bonzai
Shaded style.
Select the MXM file to reference.
Delete the path to the MXM file.
Copy the name of the MXM file to the Bonzai material name.
Edit the MXM in MXED, the Maxwell Material Editor application.
Use MXED preview
Enabling this option will use the preview embedded in the MXM by MXED, rather than the Bonzai sample
scene.
Update ‘Shaded’ Renderer
Enabling this option will cause the MXM to be approximated in the openGL-based Shaded Full rendering
representation. The system that translates the MXM into the very basic parameters available to the
Shaded representation is sophisticated, but due to the nearly infinite ways that an MXM shader tree can
constructed, the result will occasionally be inaccurate and require adjustment.
Update ‘Shaded’ Renderer Color Bitmap, #
[None, Layer Opacity, BDSF Weight, Reflectance 0,
Reflectance 90, Transmittance, Bump]
Often, it is desirable to see the MXM texture mapping on
objects in the Bonzai space for purposes of scaling and
alignment. Since bitmaps can be applied to almost any
parameter in the MXM, the MaxwellZ plugin provides the
ability to select the map(s) you wish to see Bonzai’s openGL
Shaded view, which supports two maps: one for color, and the
other for transparency. If this parameter is set to Reflectance 0, for example, the texture map associated
with that parameter (if one exists) will be used for the Shaded color texture map. Maxwell Render for Bonzai !
36
The number parameter indicates which map of a given type encountered will be used for the color
texture. For example, if the Color Bitmap pulldown menu is set to Reflectance 0, and there are 3 BDSFs
in the MXM, this number will indicate whether the first, second, or third Reflectance 0 bitmap
encountered will be used (counting from the top of the MXM tree downward).
If set to a high number which exceeds the number of maps for a given parameter (such as 100, the
default), the last map encountered will be used. (In the Reflectance 0 example above, if set to 100, it
would use the third map.)
Update ‘Shaded’ Renderer Transparency Bitmap, #
[None, Layer Opacity, BDSF Weight, Reflectance 0, Reflectance 90, Transmittance, Bump]
These parameters work identically to the Color Bitmap and # above, but affect the Shaded
representation’s transparency channel, instead.
For most MXMs, the default settings for the ‘Update Shaded’ parameters will ‘just work,’ and will not
need to be adjusted.
The Online MXM Gallery
In addition to making your own MXMs
using MXED, you can take advantage to
the large online library of materials hosted
by Next Limit. Materials can be
downloaded for free from:
http://resources.maxwellrender.com/
Maxwell Resources Site: http://resources.maxwellrender.com/
Maxwell Render for Bonzai !
37
Tips for Materials and Texturing
Separate Maxwell materials may be applied to different faces of an object by assigning materials at facelevel in the normal manner, with one exception: Maxwell Render requires that the emitters are applied to
entire objects. An emitter material can not be applied at face level, otherwise the whole object will render
black. This is not a limitation of the plugin, but the way the render engine works.
• Maxwell supports jpg, tga, bmp, tiff, and png image types for texture maps.
• Use file paths containing only letters, numbers, spaces, dashes, and underscores. Special characters
(such as the bullet, •) will result in a ‘file not found’ error.
• To render materials with texture maps, objects using those materials must have texture coordinates
applied. In Bonzai, the Map Texture tool is used for this. If the plugin detects objects without texture
coordinates when creating the MXS, it will apply a set of default coordinates to those objects.
• To scale or rotate the texture on an object, use Bonzai’s Edit Textures tool.
• If you have the Renderzone plugin installed, a bitmapped tile of each procedural texture is stored in
memory for Bonzai’s native Shaded Renderer to use. If the material is set to ‘Translate Shaded’, the
plugin will save this swatch to disk when performing the Maxwell render. Texture mapping in the Maxwell
rendered image will precisely match the openGL Shaded view.
"Robot Bob," Craig Williams,
Becker Morgan Group, Inc.
Maxwell Render for Bonzai !
38
Organizing Dependency Filepaths
So that referenced MXMs work correctly, It is strongly
recommend that Maxwell resources be organized and
prepared in the following way:
1) Create a materials database within your Documents
folder.
2) Put the MXM and all the bitmaps to which it refers in
a subfolder with the same name as the MXM.
3) Double-click on the MXM file to load it into MXED.
4) Immediately choose ‘Save’ from the file menu, and
close the MXM.
An example of correctly organized texture paths on the
file system is shown at right.
Do not use intermediate folders to contain the bitmaps; they should reside in the same folder with
the MXM.
Do not put more than one MXM in a folder, unless it is absolutely necessary for both MXMs to
depend on the same copies of each bitmap.
Maintaining Dependency Filepaths
When transferring MXMs between workstations, or downloading MXMs from the Next Limit Materials
Database, a problem may occur where MXMs cannot find referenced bitmap files. (As the MXMs still
refer to the bitmaps located on the original author’s computer.) When this happens, Maxwell will issue an
error such as, “Bitmap example.tif not found.”
The fix this problem:
1) Make sure you have followed step 2 in the section above, Organizing Dependency Filepaths.
2) Double-click on the MXM file to load it into MXED.
3) Immediately choose ‘Save’ from the file menu, and close the MXM.
4) Reference the MXM in a Bonzai material.
Maxwell Render for Bonzai !
39
Maxwell Object Attributes
Apart from the main plugin (MaxwellZ), the installation
package includes a second plugin called Maxwell
Attributes. Maxwell Attributes allows the user to set
several rendering parameters for each Bonzai object.
These options are useful for post-process compositing
with other images.
Editing an Object’s Maxwell Attributes
To access the Maxwell attributes of a Bonzai object,
select it with Bonzai’s Pick Tool. Then, under the
Attributes tab in the Tool Options Palette, select Maxwell Attributes... from the pulldown menu.
Currently, only one object may be edited at a time.
Hidden from camera
Enabling this option makes the object invisible to the camera, but still allows it to contribute to the
lighting calculation (it will cast shadows, refract etc).
Hidden from Reflections / Refractions
When enabled, the object will not be reflected or refracted in other objects.
Hidden from Global Illumination
When enabled, the object will be visible, but it will not cast shadows or reflect light back onto other
objects.
Exclude from Zclip planes
Normally, Maxwell follows Bonzai’s clip hither and yon parameters, if they are enabled in View
Parameters. When enabled, Maxwell the object will be excluded from clipping. Useful for technical
illustrations and architectural renderings.
Maxwell Render for Bonzai !
40
“Private Residence,” Modeling and Rendering: Aaron Smithey Architectural Imaging
Transferring Projects Between Workstations
Often it is necessary to share a Bonzai project with others in your office, or work on a project at both
your office and home. Because Maxwell relies on dependencies (referenced files) that Bonzai proper is
not aware of (and are therefore not copied using Bonzai’s ‘Save a Copy As...’ option), MaxwellZ has a
special feature called Pack-and-Go Project which facilitates the transfer of all necessary files between
workstations.
Using Pack-and-Go Project
1. Set your desired output folder using either Automatic or Manual filepath options. (The ‘Automatic’ is
easiest to work with— and makes the most sense— when working on multiple workstations.)
2. In Maxwell Options/General, select ‘Pack-and-Go Project’ from the ‘Maxwell Action’ pulldown menu.
3. Select Display>Maxwell Render (or key shortcut equivalent).
4. All dependencies of the following types will be copied to the output folder: MXM, bitmap textures, and
environment (HDRI) maps. (Note that MXS scenes and rendered procedural textures are not saved with
Pack-and-Go Project, because these are not relevant when transferring a project to another
workstation.)
5. After copying the the Bonzai project and dependencies to the second workstation
6. Open the Bonzai project. You will be asked to find the first missing MXM; after doing so, all remaining
MXM paths will be automatically re-linked and updated. Note: you will still need to manually re-link each
environment map your project references.
Maxwell Render for Bonzai !
41
Importing Projects From FormZ 6
In Maxwell for Bonzai3d, a lot has changed from the 2.0.x plugin series, both for the end user and under
the hood. formZ files imported into Bonzai will be updated to conform to the new system. Maxwell 2.5
plugin data cannot be read by the 2.0.x plugin.
Topic
Import Behavior
Things to Check and Adjust
Point and Cone lights
Point and Cone lights will be
translated using the (greatly
improved) new system.
A default luminance value is
applied, which may need
adjustment
Because the new translation of
cone lights is much more accurate,
inner and outer cone angles or the
light’s distance from the subject
may require adjustment.
Maxwell Render Options:
Environment Tab
Depending on the old
Environment settings, a Physical
Sky, Sky Dome, or IBL light will be
created. If the formZ 6 sun light
was used to specify site and time,
this data will be used to set the
parameters of the Physical Sky or
Sky Dome sun. The new
environment lights will render
identically to the 2.0.x system.
N/A
Surface Styles
Materials (formerly, ‘Surface
Styles’) using referenced MXMs
will render identically to the 2.0.x
system. Auto-translated materials
will offer richer results than the
2.0.x system (and will not match).
By default, the material hint is set to
‘Closest Match.’ The hint, and other
‘Shaded’ parameters may need to
be adjusted for more realistic
results.
Symbols
formZ’s symbols are not imported
into Bonzai3d (as of version 2.5).
N/A
Importing formZ 6 files containing Maxwell Data into Bonzai3d
Maxwell Render for Bonzai !
42
Resources and Assistance
User Manual Access
This manual and the Maxwell Render Manual can be readily accessed for Bonzai via buttons located in
the Maxwell Render Options ‘Prefs’ tab. Information on the plugin version may also be found there.
Software Updates
Maxwell Render and Bonzai Plugin Updates:
https://portal.nextlimit.com/
Training
Maxwell for Bonzai3d Video Tutorial Series by GetMethod:
http://www.getmethod.com/blog/category/maxwell-render
Introduction to Maxwell with Bonzai3d, an Autodesys webinar replay:
http://www.youtube.com/watch?v=WzI6RSJLE5U
Maxwell for formZ Video Tutorials by Intuition USA:
http://intuitionusa.com/maxwell_training.html
Forum Support
Maxwell for Bonzai forum hosted by AutoDesSys. Requires login to post, but not view. Not necessary to
be a customer:
http://www.formz.com/forum/discus41/messages/35953/35953.html
Maxwell for Bonzai forum hosted by Next Limit. Requires login to view. Must be a Maxwell customer to
post:
http://www.maxwellrender.com/forum/viewforum.php?f=68
Maxwell Materials
Next Limit Materials database:
http://resources.maxwellrender.com/visual_catalog.php?t=#page=1
Maxwell Render for Bonzai !
43
"Art Gallery," Craig Williams, Becker Morgan Group, Inc.
Troubleshooting
Problem: Maxwell can’t find the textures in my MXMs
Solution:
• Review the sections Organizing Dependency Filepaths and Maintaining Dependency Filepaths
in this manual.
Problem: When Network Rendering, scenes are sometimes overwritten
Solution:
• Use Automatic filepaths, and enable the Timestamp option.
Problem: Maxwell rendering is too slow
Solutions:
• For test renders, use the ‘Render Area Rectangle’ to render a smaller section of the image, or
set the Scale parameter in Render Options/ Image to a value less than 100%. Note that these
two options may be combined.
• Disable Dispersion and/or Refractions.
• Disable any unnecessary Render Layers (In Render Options: Camera)
• Reduce the number of lights in the scene.
• Merge like emitters into a single object using the ‘Join’ tool (available in formZ only).
• Use simpler MXM materials. Lambertian (100% rough) materials will render very quickly;
materials with complex IORs, translucency, and subsurface scattering take longer to clear noise.
• If you are only doing a lighting or geometry preview, check the ‘Disable Textures’ option (In
Render Options: Export)
Problem: Export process is too slow
Solutions:
• Reduce the display resolution of smooth (ACIS) objects.
Maxwell Render for Bonzai !
44
• Ghost any ‘heavy’ geometry which is not visible in the view.
Problem: Rendered scene is extremely dark (or black)
Solutions:
• Confirm that your camera exposure is correct.
• Maxwell’s Emitters behave according to real-world parameters. Confirm that the Emitter power
is sufficient. Don't forget efficacy for watt-based emitters.
• Confirm that your scene scale is realistic. 100W spread out over 100 sq. meters will result in a
very dim scene.
Problem: Some MXM-referenced textures are not copied by Pack-and-Go
Bad texture filepaths within the MXM file often occur when you download an MXM from the internet, or
and sometimes with MXMs found in the ‘materials database’ in the ‘Maxwell 2’ folder.
Solutions:
• Use the Fix Texture Paths function in the MXED and try the Pack-and-Go again.
• If this does not fix the problem, open the MXM and then immediately save it again.
Problem: Rendering exhibits triangulation artifacts
Maxwell Render works with triangulated, facetted objects only. When Bonzai’s mathematically-defined
ACIS (smooth) objects are encountered, the plugin will use the facetted representation of the ACIS
object. This is the same representation that the Shaded render mode uses.
Solution:
• Adjust the Display Resolution Facet Density option. Increasing the facet density will usually
resolve this issue, but will also result in longer export times. Use the minimum value that
produces acceptable results, especially on complex objects.
Problem: Error 'There is no
MAXWELL_ROOT environment
variable on this machine'
Solution: This issue occurs on
Windows systems only. If you
encounter this error when
attempting to load the plugin, it
means that either:
• Maxwell Render is not installed on
the machine. Download and install
Maxwell Render to fix the problem.
• Maxwell Render is incorrectly
installed on the machine. Uninstall/
re-install Maxwell Render to fix the
problem.
A System Environment Variable is a
value that is available to every
application on your computer. As
such, the MAXWELL_ROOT variable
points to Maxwell's home directory,
and provides the ability for any
application that wishes to locate
Maxwell Render for Bonzai !
45
Maxwell to be able to do so. So, it is very important that it is correctly set when you install Maxwell.
Usually this is no problem, but there are always cases where installation is not completely successful,
and it is possible that you may need to manually create the variable. Note that you should proceed with
caution when accessing Environment Variables. If you alter Environment Variables without having very
specific reasons, you may encounter problems with the applications that rely on them.
Solution:
• To view your System's Environment Variables, go to: Start > right-click My Computer >
Properties > Advanced > Environment variables. If Maxwell Render is installed correctly, there
should be a MAXWELL_ROOT variable present, similar to the one shown. Note that the actual
path may differ, depending on where Maxwell is installed on your machine.
Maxwell Render for Bonzai !
46