1
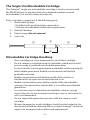
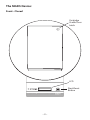
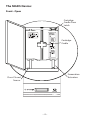
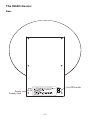
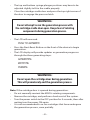
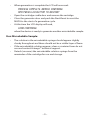
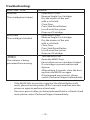
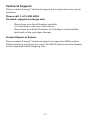
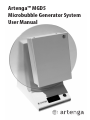
Artenga™ MGD5
Microbubble Generator System
User Manual
Table of Contents
Welcome:
Caution/Warnings:
The Single Use Microbubble Cartridge:
Microbubble Cartridge Handling:
The MGD5 Device:
Front - Closed
1
1
2
2
3
3
The MGD5 Device:
4
Front - Open
4
The MGD5 Device:
5
Rear
MGD5 Power Source:
MGD5 Calibration:
MGD5 Operation and Bubble Generation:
Device Initialization:
Microbubble Generation:
Your Microbubble Sample:
Troubleshooting:
Technical Support:
Please call: 1-613-203-8094Or email: [email protected]
Product Repair or Return:
Contact:
5
6
6
7
7
7
9
10
11
11
11
12
Artenga™ MGD5 Microbubble Generator System
Welcome:
The Artenga™ Microbubble Generator System is comprised of the MGD5
Device and single-use microbubble cartridges.
We endeavour to provide our customers with the finest medical research
microbubbles available through a state of the art on-demand system.
Custom cartridges and MGD5 control software variants may be developed
upon request. Please contact us to discuss your specific needs.
Caution/Warnings:
When using any electrical device, always follow basic precautions,
including the following:
• Please read all instructions carefully before using this device.
• Use only with included XP AED70US15 power supply.
• Do not attempt to run the generation process with the cradle door
open.
• Keep clear of rotating components during generation process.
• Do not open the cartridge door during generation.
• Please Retain These Instructions.
WARNING:
This device is For Research Purposes Only
Not For Human Use
–1–
The Single Use Microbubble Cartridge:
The Artenga™ single use microbubble cartridge is used in concert with
the MGD5 device, to produce 3ml of on demand medical research
microbubbles, for a wide variety of purposes.
Each cartridge is comprised of the following parts:
1. Removable Syringe
• Pre-filled with gas & liquid pre-generation.
• Contains microbubble solution post-generation.
2. Central Chamber
3. Fixed syringe (do not remove).
4. Luer Loks
2
1
3
4
Microbubble Cartridge Handling:
•
•
•
•
•
•
•
•
Store cartridges at room temperature out of direct sunlight.
Do not remove a cartridge from its individual sealed pouch until
you are ready to perform microbubble generation.
For best results use the generated microbubble solution promptly
after bubble generation. Bubble concentration will decline
gradually over time.
Bubble concentration will decline rapidly if the solution is
transferred to an open vessel and exposed to air.
Bubble concentration may decline rapidly if the microbubble
syringe is transported by vehicle after it is used for microbubble
generation.
It is not necessary to shake the microbubble solution syringe
vigorously prior to use however inverting it once or twice prior to
use is recommended.
Do not repeat the generation process with the same or used
cartridge.
Broken, damaged or used cartridges should not be loaded in the
device and should be returned. Please contact Artenga™ technical
support to arrange product return and replacement.
–2–
The MGD5 Device:
Front - Closed
Cartridge
Cradle Door
Latch
LCD
Start•Reset
Button
–3–
The MGD5 Device:
Front - Open
Cartridge
Cradle Door
Latch
Cartridge
Cradle
Generation
Actuators
Door Closed
Sensor
–4–
The MGD5 Device:
Rear
On/Off Switch
Power
Supply Jack
–5–
MGD5 Power Source:
Use only with the included XP AED70US15 power supply
1. Plug the included Power Supply into the Power Supply Jack on the
rear of the MGD5 device.
2. Plug the Power Supply into any 120 VAC or 220 VAC rated outlet.
The power supply can accept either voltage and will switch
automatically. A plug adapter might be required in some countries.
3. Turn the On/Off Switch on the rear of the unit to the ON position.
MGD5 Calibration:
It is recommended that the MGD5 unit be calibrated:
• Upon delivery and after being shipped or transported,
• After every fifty (50) generation cycles,
• If a ‘leakage’ error message occurs but the cartridge appears to
have no leaks.
To calibrate the MDG5 device please complete the following steps:
• If you have not already done so, turn the On/Off Switch on the
rear of the unit to the OFF position.
• Ensure that the cartridge cradle is empty.
• To enter Calibration Mode, press and hold the Start•Reset Button
on the front of the device while turning the On/Off Switch on the
rear of the unit to the ON position.
• Once the On/Off Switch has been turned ON,
release the Start•Reset Button.
• The LCD should now read:
Entering Calibration Mode...
•
•
The generator will then perform a normal initialization cycle
(please see Device Initialization for detailed instruction).
Once initialization is complete, a reminder to ensure there are no
cartridges loaded in the device will be displayed on the LCD.
Ensure No Cartridge Loaded
•
When the LCD reads,
Press LED Button
•
Press the Start•Reset Button on the front of the device to begin
calibration. The LCD should read.
Calibrating...
–6–
•
When the calibration process has been completed, the LCD
should read,
Calibration Process Complete
•
•
•
Turn the On/Off Switch on the rear of the unit to the OFF position.
The MGD5 unit is now calibrated.
Proceed with bubble generation as described in the MGD5
Operation and Bubble Generation section of this manual.
MGD5 Operation and Bubble Generation:
Device Initialization:
•
•
If you have not already done so, turn the On/Off Switch on the rear
of the unit to the ON position.
At this time the MGD5 Device will perform a self-diagnostic.
The LCD will read the following in series:
Artenga MGD5...
Initializing: Rotary Actuation
Initializing: Linear Actuation
Load Cartridge
•
At this time you can open the cartridge cradle door, load a
cartridge, and begin microbubble generation.
Microbubble Generation:
•
Before generation, the LCD display should read.
Load Cartridge
•
•
•
•
•
Open the cartridge cradle door
Remove a cartridge from pouch, and grasp the cartridge by the
central chamber as indicated on the cartridge cradle.
Load the cartridge into the cradle in the appropriate direction as
indicated on the cartridge cradle.
It will be necessary to apply gentle pressure to the syringe barrels
when loading the cartridges into the cradle to seat them correctly.
Avoid excessive pressure and bending of the cartridge.
–7–
•
•
The top and bottom syringe plunger positions may have to be
adjusted slightly to fit in the cradle properly.
Close the cartridge cradle door and press the top right corner of
the door to engage the pressure latch.
WARNING:
Do not attempt to run the generation process with
the cartridge cradle door open. Keep clear of rotating
components during generation process.
•
The LCD will now read:
Push to generate
•
•
Press the Start•Reset Button on the front of the device to begin
generation.
The LCD display will provide updates as generation progresses
through the three generating steps:
Generating
Rotating
Purging
WARNING:
Do not open the cartridge door during generation.
This will prematurely end the generation process.
Note: If the cartridge door is opened during generation:
• Do not manually reorient the MGD5s rotating components.
• Remove the cartridge, and perform a hard reset of the system.
• Turn the power switch to the OFF position for 5 seconds, then after
waiting turn the power ON again.
• It is not recommended to re-use cartridges that have undergone
the generation process, even partially.
–8–
•
When generation is complete the LCD will now read:
Process complete. Remove cartridge
and press LED button to restart
•
•
•
Open the cartridge cradle door and remove the cartridge.
Close the generator door and push the Start•Reset to reset the
MGD5 to the start of a generation cycle.
At this time the LCD display will read,
Load Cartridge
when the device is ready to generate another microbubble sample.
Your Microbubble Sample:
•
•
•
The solution in the microbubble syringe should appear slightly
cloudy throughout and there should not be a visible layer of foam.
If the microbubble solution appears clear or contains foam do not
use and contact Artenga™ technical support.
Detach (unscrew) the microbubble solution syringe from the
remainder of the cartridge for use and storage.
–9–
Troubleshooting:
Error Code – Error:
Leakage
The cartridge has leaked
Blockage
The cartridge is blocked
Jammed
The actuator is being
prevented from moving
•
•
Solution:
• Open MGD5 Door
• Remove Single Use Cartridge
• Dry the interior of the unit
with a soft cloth
• Close Door
• Press Start•Reset Button
to soft reset the system
• Dispose of Cartridge
• Open MGD5 Door
• Remove Single Use Cartridge
• Dry the interior of the unit
with a soft cloth
• Close Door
• Press Start•Reset Button
to soft reset the system
• Dispose of Cartridge
• Turn the MGD5 off
• Open the MGD5 Door
• Ensure there are no cartridges loaded
• If a cartridge is present remove and
dispose
• After waiting 5 seconds, close the door
and turn the MGD5 on again
• If the jammed error persists, please
contact Technical Support immediately
If the MGD5 fails to reset by using the Start•Reset Button (soft
reset), please turn the power off for 5 seconds and then turn the
power on again to perform a hard reset.
If an error persists after you have performed both a soft and a hard
reset, please contact Technical Support immediately.
– 10 –
Technical Support:
Please contact Artenga™ technical support if you experience any system
problems.
Please call: 1-613-203-8094
Or email: [email protected]
•
•
Please have your Serial Number available.
It is indicated on the rear of the device.
Please have your Batch Numbers for Cartridges used available.
Indicated on the cartridge chamber.
Product Repair or Return:
Please contact Artenga™ technical support to request an RMA number
before returning any device for repair. The MGD5 device must be shipped
in the original provided shipping case.
– 11 –
Contact:
Artenga Inc.
169 Ethel St.
Ottawa, ON
Canada
K1L 5X3
1-613-203-8094 (Canada and US)
00-1-613-203-8094 (International)
[email protected]
©2008
MGD5 Device Made in Canada
Printed In Canada
MGD5 User Manual V1.04
– 12 –