1
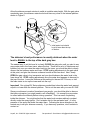
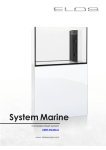
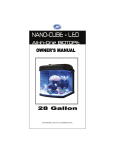
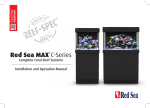
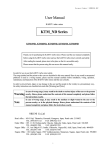
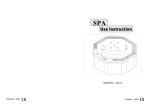
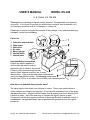
USER’S MANUAL
MODEL EV-240
U.S. Patent # 6,156,209
Thank you for purchasing an AquaC protein skimmer! We appreciate your business
very much. It is our goal to provide you with the best customer service possible, so if
you have any questions at all do not hesitate to contact us!
Please take a minute to inspect the contents of the package. If any parts are missing or
damaged, contact us immediately.
Parts List:
1.
2.
3.
4.
5.
6.
7.
1
Collection cup and drain
Foam tower
Gate valve
Air valve
Spray injector
Internal baffle
Internal plate
Important Safety Instructions
As with any electric appliance,
caution must be used in order to
reduce the risk of shock or fire hazard.
Failure to follow these instructions may
result in flood, skimmer overflow, fire, or even
electrocution. Care must be taken when installing and
using your new filtration device. We strongly recommend
that you use GFCI’s on all outlets involved with your marine aquarium.
How does our patented Spray Injector work?
The spray injector that drives your skimmer is unique. There is no needle-wheel or
venturi adapter providing the air injection – it is simply the downward force of the spray
that generates foam. Imagine a forceful spray from a garden hose that is shooting into
a bucket of water – that is the best way to visualize the AquaC injector at work.
Compared to all the other popular methods of skimming (Beckett, downdraft, venturi, or
needlewheel), our patented Spray Injector generates the greatest air flow for a given
pump size.
AquaC, Inc. © 2005 All rights reserved.
Got questions? Send them to [email protected]
General Do’s and Don’ts:
DO NOT clean your skimmer with any chemicals or soap. Use warm water and a non
abrasive sponge. Cleaners that contain alcohol, ammonia or other chemicals can
damage the acrylic and lead to stress cracks on the plastic’s surface.
DO wash your new skimmer and pump with warm water prior to installation. This will
help remove any oils and manufacturing residues, which can prolong the break-in
period.
DO NOT attempt to modify or retrofit your skimmer.
DO secure all connections between the skimmer and pump with hose clamps to ensure
a tight, leak-proof fit.
DO NOT run the skimmer on a timer with a rapid on/off cycle. It is OK to turn the
skimmer off during feeding, trace element additions, etc. but be aware that repeated
starting/stopping of the pump can wear the impeller and motor out prematurely.
DO use caution when hooking your skimmer up to a waste collection vessel. The
waste reservior can overflow with foam when you are away, leading to a flood.
DO clean your skimmer’s collection cup as often as possible. A dirty cup inhibits the
collection of foam and will lead to poor performance.
Skimmer Features
Our new EV Series skimmers are a significant advancement over the original design we
released in 1998. We’ve listened to customer suggestions and comments and the new
EV’s incorporate many of the features you have been asking for. The new features
include:
•
•
•
•
•
•
•
•
•
•
Flanged and locking collection cup and cap - twist and release for easy cleaning.
Raised gate valve – the skimmer no longer needs to be raised in most sump
installations!
Redesigned exit plumbing keeps microbubble return to a minimum.
Larger mixing chamber (40% more volume) means greater contact time and waste
removal.
Side-mounted gate valve saves critical sump space.
Precision control air flow valve – easy tuning for wet or dry foam.
John Guest “Super Speed Fit” fitting for ozone or calcium reactor connection*
Sealed foam tower means no more salt creep build-up.
Auto-waste container compatible. Two and three liter containers are available.
Redesigned interior baffling system reduces turbulence and increases contact time;
the end result is a two-fold increase in foam production and skimming efficiency.
* JG fitting is optional on EV-120/180 and standard on larger EV models
Choosing a water pump
One of the advantages of buying an AquaC EV Series skimmer is that you have several
different pump options to choose from. You can use an external or submersible pump,
AquaC, Inc. © 2005 All rights reserved.
Got questions? Send them to [email protected]
depending on your application. In our tests, the EV-240 performs best when powered
by a pressure-rated pump capable of producing 1200-1800 GPH unrestricted. Due to
the pressure that the spray injector places on the pump, the true flow through the
skimmer will be quite a bit less than the unrestricted rating.
As of our last printing, the Iwaki 40 RLT is our favorite pump on the EV-240 skimmer. If
you choose to use a submersible pump, we like the Mag Drive 12 or Mag Drive 18 on
this skimmer. The Mag Drive 18 offers extra power and will result in a noticeable boost
in performance over the Mag 12. This will help you fine-tune the flow to the skimmer.
If you choose to use a larger water pump, please be aware that it is very easy to
overdrive the skimmer in such a way that the performance will actually suffer! The EV240 is designed to handle a certain amount of water flow, and it is possible to choke off
the spray injector, which will result in a decrease in performance. If you use a larger
water pump, be sure and add a gate valve to the pump’s output so that you can
fine-tune the flow to the skimmer. At no time should the water level inside the
skimmer be any higher than the the top of the dark gray box.
Skimmer Installation
There are several ways to install and run your new skimmer. If you have the space, we
recommend that you place the skimmer directly in the sump since this requires the least
amount of plumbing and minimizes the risks of a flood. If the skimmer won’t fit in the
sump, however, it is OK to place it outside of the sump. Performance will be the same
in either case.
It is important that the sump water level is not too high. If the sump level is above the
output of the gate valve, the skimmer will perform inconsistently when the level rises
and falls due to evaporation, water changes, etc. As long as the maximum sump level
is below the output of the gate valve, the skimmer’s performance will remain unaffected
and you won’t need to raise the skimmer.
TIP: The EV-240 will run best if it is fed by fresh, unfiltered water that has come directly
from the tank. If possible, position your skimmer and pump so that unfiltered tank water
will get processed, as opposed to letting the skimmer re-skim its own water over and
over again. Watch out for air bubbles, since these will decrease the water flow if they
are getting sucked into the pump.
TIP: Keep in mind that the skimmer will produce some microbubbles during operation
(especially after feeding). Orient the skimmer so that it discharges processed water
away from your return pump. This way, microbubbles will be less apt to make it back to
the tank.
In-Sump Installation: This is the most common and easiest method of installation.
There are a variety of materials you can use if you need to raise the skimmer so that the
gate valve is higher than your sump level. A simple platform can be constructed out of
AquaC, Inc. © 2005 All rights reserved.
Got questions? Send them to [email protected]
PVC pipe and elbows. Plastic light diffuser “eggcrate” can also be used. Any inert
material that won’t rot or leach chemicals into the aquarium will work fine. Wood, cinder
blocks, etc. should be avoided.
In Fig. 2, the skimmer is
placed directly on the
bottom of the sump.
The gate valve is
above the sump
level.
Fig. 2
Fig. 3
In Fig. 3, the sump
level is too high,
so the skimmer is
raised a few inches
on a platform.
External Installation
If your system does not allow for an in-sump installation, it is easy to install your
skimmer outside of the sump. If vertical clearance isn’t an issue, the best solution is to
raise the entire skimmer on a platform so that the gate valve will clear the sump wall. If
you don’t have the clearance to raise the skimmer, you can install a 1” bulkhead through
the side of the sump wall and directly connect the skimmer to the sump.
Fig. 4 demonstrates an external installation where the
skimmer is sitting on the floor and plumbed through
the side of the sump using a 1.5” bulkhead. Notice
how the gate valve is still above the sump
level. If vertical clearance isn’t an issue,
you can simply raise the skimmer so that the
gate valve is above the sump wall. This is
easiest since you won’t have to retrofit your
sump with a bulkhead.
It is best to install the skimmer as close to
the sump as possible. Adding a piece of
flexible hose or PVC pipe between the gate
valve and the sump is ok, as long as it runs
horizontally and it is no longer than 18” with no
Fig. 4
sharp bends. If there is any backpressure
on the gate valve, the skimmer won’t drain
properly and it will be difficult to get it adjust correctly. If, due to space restrictions, you
need to install your skimmer in a manner other than described above, please contact us
so that we can help. There are many different plumbing configurations that will work,
AquaC, Inc. © 2005 All rights reserved.
Got questions? Send them to [email protected]
but the addition of 90 degree bends, longer pipe lengths, etc. might require some
“tweaks” to ensure that the skimmer will run correctly.
Water enters the skimmer under high pressure, but exits the skimmer by gravity. Any
changes or additions to the gate valve and exit plumbing WILL have a noticeable effect
on the skimmer’s performance, and it is important that you contact us for tips if you want
to install any extra or modified drain plumbing!
Important! If you decide to add pipe/fittings to the gate valve to prevent splashing
and/or cut back on the noise of the water returning to the sump, be aware that you must
install a “siphon break” in order to ensure proper function. A siphon break will let some
air into the drain line, which prevents it from sucking water out of the skimmer faster
than It would normally fall due to gravity. If you plumb your skimmer so that the
returning water exits a pipe below the sump level, a siphon break is critical to achieve
good performance. You can add a siphon break to the exit plumbing by drilling a ¼”
hole in the PVC, or by using a “tee” fitting in place of a 90 degree elbow. Leave one
end of the tee facing upwards and open to air flow.
Important! If your skimmer is installed externally to the sump, be sure that the blue air
valve and JG fitting are above the highest possible water level in your sump. If your
main return pump were to fail, water would rise in the sump and it could spill out of the
air valve/JG fitting, if the skimmer isn’t raised high enough.
Pump Connection: Depending on the pump you choose, there are a variety of
different methods of connection to the skimmer. We recommend using ¾” inside
diameter flexible hose, which can be purchased at your local fish store, hardware store,
etc. Flexible tubing is easier to plumb and connect than hard PVC pipe. You cannot
replace the skimmer’s ¾” hose barb input with hard PVC, since this fitting houses the
spray injector. Most submersible pumps accept ¾” ID tubing without any modification.
Important! Secure all connections with hose clamps! You can use the metal screwtype clamps or plastic snap-on clamps (which won’t rust). An unsecured hose
connection will pop off when you least expect it, leading to a flood.
Keep the hose between the pump and skimmer free of any sharp bends, and the length
should be limited to under 3 feet, if possible. Longer hose or increased head pressure
might require that you use a larger water pump.
The Break-In Process
Once your skimmer is situated and the plumbing is in place, you can turn the pump on
and begin the break-in process. At this point, keep the gate valve and air valve open
100%, and watch all the fittings closely to make sure that there aren’t any leaks.
AquaC, Inc. © 2005 All rights reserved.
Got questions? Send them to [email protected]
Allow the skimmer several minutes to settle at a stable water height. With the gate valve
completely open, the skimmer water level should rise very close to the internal platform
shown in Figure 5.
Fig. 5
Initial water level should
be a bit lower than the top
of the box.
The skimmer’s best performance is usually obtained when the water
level is EQUAL to the top of the dark gray box.
The easiest way to set this level is to slowly CLOSE the gate valve until you start to see
some water rise in the foam tower, above the box. There will be a lot of turbulence and
bubbles, but once you raise the water level into the tower, you should be able to clearly
discern the line between water and foam. STOP making adjustments to the gate valve
at this point, and give the skimmer a chance to settle at this new level. Next, slowly
OPEN the gate valve in tiny increments and you should observe the water level in the
foam tower fall. STOP making adjustments once the water level appears to be equal to
the top of the box. Leave the skimmer at this setting for the next 48-72 hours, or until
the foam starts to rise up the tower and into the cup.
Important! Our original EV Series skimmers worked best when the water level was set
equal to or lower than the internal platform. This is not the case with your new EV-240!
Since your skimmer is made of translucent gray acrylic, you should be able to observe
the interior dynamics (you might need to use a flashlight). It is normal for some water
to collect above the internal platform during operation. This is a result of splashing
inside the skimmer. You might notice that the water level remains relatively constant
directly under the spray injector. Don’t mistake this for the real water level – it is the
pressure of the spray that holds the water there. Following the above directions is the
easiest way to set your skimmer correctly. If you have any questions, don’t hesitate to
contact us.
AquaC, Inc. © 2005 All rights reserved.
Got questions? Send them to [email protected]
The break-in period usually lasts for 48-72 hours. During this period, oils get washed
away and a thin “slime coat” forms on the surface of the skimmer and pump. It is best
to avoid making any adjustments or changes to the tank or skimmer during this period.
New tanks, in particular, will often require a longer break-in period since there aren’t a
lot of organic wastes for the skimmer to remove.
During the break-in period your skimmer will run louder than normal and it will release a
lot of microbubbles. This is normal, and you should see a significant reduction in noise
and bubble return after a week or so.
Collection Cup Drain
The collection cup drain is a convenience feature that some people choose to use, while
others do not. All of the air that flows through the skimmer must exit through the
collection cup drain! If the drain fitting is subjected to any backpressure, the skimmer
will not work. Therefore, it is important that you do not plug this fitting, even if you
choose not to hook the skimmer up to a waste vessel. The drain fitting accepts 3/4” ID
flexible hose, and it is important to keep the drain line clean and free of any
obstructions. Do not submerge the end of the drain line in skimmer gunk, as this added
backpressure will prevent the skimmer from working normally.
Important! During the first week or two, we recommend that you run the drain line back
to your sump. When your skimmer “kicks in” it could remove several gallons of liquid in
a short amount of time. Your EV-240 is capable of producing a lot of foam, and if it
suddenly goes haywire when you aren’t expecting it, disaster could result.
Adjusting your EV-240 for Longterm Performance
Your skimmer will have completed the break-in process once the bubbles start rising up
the foam tower, rather than immediately popping at its base. In the lower section of the
tower, the bubbles should be turbulent and resemble rapidly boiling water. These
bubbles will rise up the tower and as they approach the bottom of the collection cup,
they should start to form a more stable, but still wet, foam. The foam will rise into the
collection cup and eventually spill over. Depending on your tank size, bioload, foods
and additives used, etc. your skimmer might start collecting a very watery liquid, or it
could collect a darker, pasty waste product. Small adjustments can now be made to the
gate valve and air valve to fine tune the foam quality.
Wet vs. Dry Foam
The decision to collect a watery, diluted waste product or a darker, pasty foam is a
matter of personal preference. Simply put, one is not better than the other! Wet
foam contains the same amount of waste products as dry foam, but is diluted with tank
water. In other words, the skimmer is removing the same amount of waste whether it
collects a cupful of yellowish liquid or a ¼” of dark gunk. Depending on how often you
AquaC, Inc. © 2005 All rights reserved.
Got questions? Send them to [email protected]
clean and service your system, one might be better than the other. We recommend
frequent cleaning of your skimmer (2-3 times per week) and keeping it adjusted to
collect a reasonably wet, light green-brown foam product.
If the foam you are collecting is less concentrated than you prefer (too wet), open the
gate valve in small increments. This will lower the water level inside the skimmer, which
gives the foam more time to stabilize before it spills into the collection cup. If the gate
valve is open 100%, then you can start closing off the blue air valve in small increments.
If the foam you are collecting is more concentrated than you prefer (too dry), first make
sure that the water level is adjusted to be equal to the top of the box. Next, verify that
the pump is supplying enough flow and that the spray injector and air valves are clean
and unclogged. You can try opening or closing the gate valve a small amount in either
direction to see how this impacts the performance.
Congratulations! Your new AquaC High Performance Protein Skimmer is completely
installed and is already beginning to improve your water quality!
JG Fitting – Ozone or Calcium Reactor Hook-Up
The John Guest Super Speedfit fitting on your skimmer is designed to accept ¼” OD
tubing and allows a hassle-free connection without any tools. If you choose to run
ozone through your skimmer, be aware that you will need to use an air pump with the
ozonizer. We recommend dosing no more than 50-100 mg/hr. Also, be sure and filter
the air with activated carbon after it leaves the collection cup. Ozone is a toxic gas and
you don’t want it to escape back to your home.
Important! In general, skimmers do not remove as much waste when hooked up to an
ozonizer. The ozone breaks down a lot of the organic waste products that the skimmer
would otherwise remove, and you will notice a decrease in foam production. The
skimmate will also be lighter colored, in most cases. For this reason, we recommend
dosing ozone periodically to help keep the water clear, for example 3-4 days each
month.
If you would like to connect your calcium reactor to your skimmer, you can run the
effluent line directly into the JG fitting. Carbon dioxide in the effluent drip will be blown
off to the atmosphere, and this might help prevent pH depression as a result of running
a calcium reactor on your system.
Cleaning and Maintenance
Like any other aquarium filter, normal maintenance is critical to ensuring good longterm
performance. We recommend that you clean the foam tower and collection cup at least
twice a week for best results. This is easily accomplished by wiping the foam tower with
a rag or paper towel and rinsing the cup thoroughly under warm water. The collection
cup can be quickly disassembled for hassle-free cleaning. Never use cleaners or soap
AquaC, Inc. © 2005 All rights reserved.
Got questions? Send them to [email protected]
to wash any part of the unit. The thick brown scum that accumulates along the sides of
the foam tower can impede the performance of the skimmer.
Important! The spray injector and air valve should both be unscrewed and inspected
every 3-6 months, or more frequently if you suspect that they might be clogged.
Decreased skimmer performance is frequently due to debris that has become trapped in
one or both of these parts.
We recommend that you install a mesh prefilter over the intake of the water pump. This
will prevent debris from damaging the pump, and will also keep the spray injector clean!
If you are running your skimmer in a refugium-style sump with lots of critters, algae, etc.
it is very important that you protect the pump from sucking up debris.
Troubleshooting
1. Skimmer isn't collecting any foam
A. Give the skimmer enough time to complete the break-in process, which
can take as long as a week.
B. Check the water level. An incorrect water level will prevent proper
foam production. Adjust the gate valve so that the skimmer’s water
level is equal to the top of the dark gray box.
C. Verify that the water pump, spray injector, and air valve are all clean
and clear of any obstructions.
D. AquaC protein skimmers feature an intense air flow-thru rate, which
means that they are highly influenced by oils, fats, and chemicals
dissolved in the aquarium water or air source. You will notice a drastic
but temporary reduction in foam production after fish feedings or other
events that introduce chemicals into the water. Foam production
should resume within several minutes to a few hours, depending on
the nature of the chemical disturbance. This should not be any cause
for concern since your high performance skimmer will rapidly make up
for any time lost due to the disturbance.
E. Cigarette smoke will prevent the skimmer from working! Smoke gets
sucked into the skimmer and hurts the foaming process.
F. Make sure there is no backpressure on the collection cup drain. You
can try running the skimmer without the lid for a few days to see if
backpressure on the drain fitting is the problem.
G. Certain “Aqua Gloves” will leach chemicals into the water that prevent
the skimmer from working normally.
2. Skimmer water level is too high
A. Make sure that the water pump is not too powerful for the unit. Add a
valve, if necessary.
AquaC, Inc. © 2005 All rights reserved.
Got questions? Send them to [email protected]
B. Raise the skimmer higher by placing it on an elevated platform so that
water can drain the skimmer properly.
C. Open the gate valve until the water level is at the proper height.
3. Skimmer is overflowing with watery foam
A. Lower the water level inside the skimmer by opening the gate valve in
small increments (1st option).
B. Close the air valve in small increments to slow the air flow through the
skimmer (2nd option).
C. If you are using “stress coat” additives, water conditioners, or other
trace element/feeding solutions the skimmer may react by overflowing
with foam. We recommend against the use of any additives that
cause your skimmer to foam excessively.
D. Underwater epoxy will cause your skimmer to foam like crazy for a few
hours.
4. Skimmer releases microbubbles back to the sump
A. The skimmer should release very few microbubbles once it is broken
in. During the first two weeks of operation it will release a larger
number of bubbles since it is still in the break-in process.
B. If you are running the skimmer with too powerful a pump, microbubbles
will escape back to the sump. Use the correct size pump with the
skimmer.
C. After fish feedings, water changes, or trace element additions it is
normal for the skimmer to release microbubbles for a short period of
time. These will normally subside within several minutes to an hour or
two.
D. Don’t mistake bubbles created from drain splash for microbubbles –
These bubbles are usually larger and present less of a problem to
return pumps.
If you have any other problems that are not listed above, do not
hesitate to call or email our technical staff for help! Customer service
is one of our top priorities and we will do our best to find a solution to
your problem.
Please include the following information in your technical support emails or phone
messages:
•
•
•
•
Tank size, age, and type (fish-only, SPS reef, mixed reef, etc.)
Bioload
Any supplemental filtration used (i.e. ozone, w/d filter, other skimmers,
etc.)
Foods and additives used as well as dosing schedule/amounts.
AquaC, Inc. © 2005 All rights reserved.
Got questions? Send them to [email protected]
•
Skimmer model, pump model, and method of installation.
AquaC Limited Warranty
Limited Warranty
AquaC, Inc. (“AquaC”) warrants to the original consumer purchaser that, except for
limitations and exclusions set forth below, this product shall be free from defects in
materials and workmanship for a period of one year from the date of original retail
purchase (“Warranty Period”). The obligation of AquaC under this warranty shall be
limited to repair or replacement, at AquaC’s option, without charge, of any part or unit
that proves to be defective in material or workmanship during the warranty period.
Exclusions From Warranty
This Warranty applies only to defect in factory materials and workmanship. Any
condition caused by accident, abuse, misuse, or improper operation, violation of
instructions furnished by AquaC, destruction or alteration, improper electrical voltages
or currents, or repair or maintenance attempted by anyone other than AquaC, is not a
defect covered by this Warranty. In such cases, AquaC may charge you for materials
and labor, even during the Warranty Period. Parts subject to wear and tear in normal
usage are not covered by the Warranty.
Implied Warranties
Under state law, you may be entitled to the benefit of certain implied warranties. These
implied warranties will continue in force only during the Warranty Period. Some states
do not allow limitations on how long an implied warranty lasts, so the above limitation
may not apply to you.
Incidental or Consequential Damages
Neither AquaC nor your retail dealer or selling distributors has any responsbility for any
incidental or consequential damages including without limitation, commercial loss or
profit, or for any incidental expenses, expenses, loss of time, or inconvenience.
Other Legal Rights
This Limited Warranty gives you specific legal rights. You may also have other rights
which vary from state to state.
Customer Service and Technical Support
858-689-1121 phone
858-564-3419 fax
[email protected]
AquaC, Inc. 7949 Stromesa Ct., Ste. E San Diego, CA 92126
AquaC, Inc. © 2005 All rights reserved.
Got questions? Send them to [email protected]