1
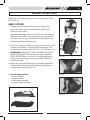
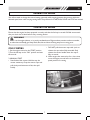
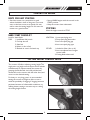
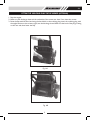
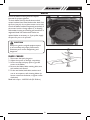
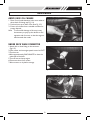
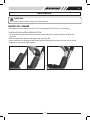
USER MANUAL
Rotary Lawn Mower
SAFETY OPERATION MAINTENANCE
Your lawn mower has been engineered and manufactured to our high standard for
dependability, ease of operation, and operator safety.
WARNING: To reduce the risk of injury, the user must read and understand the
operator’s manual before using this product.
Thank you for your purchase.
SAVE THIS MANUAL FOR FUTURE REFERENCE
Model No. M48A
AU
AU
LAWN MOWER WARRANTY
The benefits conferred by this warranty are in addition to all other conditions and warranties in respect of
this product which the consumer may have taken under the Competition and Consumer Act 2010 or by any
legislation of a State or Territory of Australia.This product is warranted by Husqvarna Australia Pty Ltd (ABN
45 115 475 619) (the “Company”) to be free from defects in material and workmanship for a period of 24
months from the date of original purchase.The Company during the period of the warranty, will at its option,
and subject to the conditions stated herein, repair or replace without charge this product or any component
part, which upon examination by an Authorised Service Agent or by the Company is found to be defective.
Warranty conditions:
This warranty will not apply:
(i)
where this product has been subjected to misuse, abuse, accident or want of care;
(ii)
where this product has been used for a purpose for which it was not designed or is not suited;
(iii)
where the service of this product has been undertaken by a person not authorised by the
Company to carry out such work or where parts that have not been approved by the Company
have been used;
(iv) where this product has been used for industrial purposes.
Should service become necessary during the warranty period, the purchaser should contact an Authorised
Service Agent or the Company. In order to obtain warranty service, the purchaser must present the store
receipt showing the name of the retailer and the date of purchase together with a completed Warranty Card.
The period of the warranty begins from the original date of purchase, notwithstanding any subsequent repair
or parts replacement. No additional warranty or guarantee other than set out in this document, whether
written or verbal, is authorised to be made on the Company’s behalf.The purchaser shall be responsible
for delivery or causing the product to be delivered to the Company or the Authorised Service Agent and
the purchaser shall be responsible for all charges in connection with re-delivery of the product and/or the
delivery of parts. Damage in transit is not covered by this warranty and purchasers should remove from the
product any liquids (if applicable) before sending and pack the product securely to prevent damage.
WARRANTY EXCLUSIONS
Normal wear parts or components are subject to seperate terms as follows: Normal wear parts,
components or service required when performing normal and regular maintenance of this product are
not covered by warranty unless it is found to be defective by an Authorised Service Agent or by the
Company. Normal wear parts include, but are not limited to:
Worn Blades.
Lubricants.
Spark Plugs
Engine Tune-ups.
Carburetor Tune-ups.
Filters.
Returns based on the above listed normal wear parts will not be accepted under this warranty as they
are considered consumable items and are at the expense of the purchaser.
AU
WARNING
Discharge openings must be guarded at all times. Do not hold the safety flap while moving.
1 Inspect the area where the equipment is to be
used and remove all stones, sticks, wire, bones
and other foreign, hard objects before mowing;
they could be thrown by the blade.
2 Never mow while barefoot or wearing open toe
sandals or thongs. Wear long trousers and heavyduty shoes. It is advisable to wear suitable eye
and hearing protection.
3 Read the Owner’s Manual carefully and know the
controls. Learn how to stop the engine quickly in
an emergency.
4 Stop the engine and disconnect the spark plug lead
before attempting to clear blockages, checking or
working on the mower.
5 Never attempt to adjust cutting height with the
engine running.
6 Never operate the equipment in wet grass, always
be sure of your footings, keep a firm grip on
the handles and walk, never run and never walk
backwards while cutting grass.
7 Check all nuts, bolts and screws before starting.
Always be sure your mower is in a safe operating
condition. Use only replacement parts made or
guaranteed by Husqvarna.
8 Refuel outdoors only. Do not smoke while
refueling engine. Add fuel before starting the
engine. Never remove fuel cap with engine running
or add petrol while the engine is running. If petrol
is spilt, do not attempt to start the engine. Clean
all spilt fuel and move the mower away from the
spilled area. Avoid creating any source of ignition
until petrol vapours have dissipated.
9 Replace worn or damaged blades, as worn blades
and worn bolts are major hazards.
10 Mow only in good daylight.
11 Do not operate the engine in a confined space
where exhaust fumes can collect, as they can be
lethal.
12 Do not put hands or feet near or under rotating
parts. Always keep clear of the blades and
discharge opening.
13 Stop the engine whenever you leave the mower
even for a moment, before cleaning and when
making any adjustments or inspections.
14 Mow across the face of slope, never up and
down. Exercise extreme caution when changing
direction on slopes. Do not mow excessively
steep slopes.
15 Stop the engine when crossing gravel driveways,
walks or roads.
16 Start the engine carefully with feet well away
from the blades.
17 Store fuel in a cool place in an approved
container specifically designed for the purpose. In
general, plastic containers are unsuitable.
18 Stop the engine and disconnect the spark plug
lead before inspecting the mower if:
(a) the mower begins to vibrate abnormally, or
(b) after striking a foreign object.
19 Check the catcher for wear and tear, and replace
any worn or broken parts.
20 To reduce fire hazard, keep engine free of grass,
leaves and any spilt fuel.
21 Shut the engine off and wait until the blades
come to a complete stop before removing the
catcher or un-clogging the chute.
22 Never pick up or carry a mower when it is
operating.
23 Replace worn or faulty muffler.
24 Before using, always visually inspect to see that
blades, blade bolts and cutter assemblies are not
worn or damaged. Replace worn or damaged
blades and bolts in sets to preserve balance.
25 Do not mow whilst people, especially children, or
pets are in the mowing area.
26 Do not allow children or people unfamiliar with
these instructions to use the mower.
27 Store the mower in a well-ventilated room away
from naked flames such as may be found in hot
water heaters.
28 Do not over-speed the engine or alter governor
settings. Excessive speed is dangerous and
shortens mower life.
29 Turn the fuel off at the conclusion of mowing and
reduce the throttle setting during engine run-out.
30 Never cut grass while walking backwards.
31 Walk, never run.
32 Never use the mower unless the grass catcher,
or guards provided, are in position.
AU
TABLE OF CONTENTS
■ General safety Rules . . . . . . . . . . . . . . . . . . . . . . . . . . . . . . . . . . . . . . . . . . . . . . . . . . . . . . . . . . . . . . . . . . . . . . . . . . . 1
■ Introduction . . . . . . . . . . . . . . . . . . . . . . . . . . . . . . . . . . . . . . . . . . . . . . . . . . . . . . . . . . . . . . . . . . . . . . . . . . . . . . . . . . . 2
■ Specifications . . . . . . . . . . . . . . . . . . . . . . . . . . . . . . . . . . . . . . . . . . . . . . . . . . . . . . . . . . . . . . . . . . . . . . . . . . . . . . . . . . 2
■ Description . . . . . . . . . . . . . . . . . . . . . . . . . . . . . . . . . . . . . . . . . . . . . . . . . . . . . . . . . . . . . . . . . . . . . . . . . . . . . . . . . . . . 3
■ Assembly Instructions . . . . . . . . . . . . . . . . . . . . . . . . . . . . . . . . . . . . . . . . . . . . . . . . . . . . . . . . . . . . . . . . . . . . . . . . . . 4
■ Preparing the Engine . . . . . . . . . . . . . . . . . . . . . . . . . . . . . . . . . . . . . . . . . . . . . . . . . . . . . . . . . . . . . . . . . . . . . . . . . 5-6
■ Running the Engine . . . . . . . . . . . . . . . . . . . . . . . . . . . . . . . . . . . . . . . . . . . . . . . . . . . . . . . . . . . . . . . . . . . . . . . . . . 6-7
■ Starting the Engine . . . . . . . . . . . . . . . . . . . . . . . . . . . . . . . . . . . . . . . . . . . . . . . . . . . . . . . . . . . . . . . . . . . . . . . . . . . 7-8
■ Cutting Height Control . . . . . . . . . . . . . . . . . . . . . . . . . . . . . . . . . . . . . . . . . . . . . . . . . . . . . . . . . . . . . . . . . . . . . . . . 8
■ Blade Maintenance . . . . . . . . . . . . . . . . . . . . . . . . . . . . . . . . . . . . . . . . . . . . . . . . . . . . . . . . . . . . . . . . . . . . . . . . . . . . 10
■ Maintenance . . . . . . . . . . . . . . . . . . . . . . . . . . . . . . . . . . . . . . . . . . . . . . . . . . . . . . . . . . . . . . . . . . . . . . . . . . . . . . . 11-13
■ Mowing tips . . . . . . . . . . . . . . . . . . . . . . . . . . . . . . . . . . . . . . . . . . . . . . . . . . . . . . . . . . . . . . . . . . . . . . . . . . . . . . . . . . 14
GENERAL SAFETY RULES
safety rules, etc. contained in this manual. Failure to
comply can result in accidents involving fire, electric
shock or serious personal injury. Save this User
Manual and review it frequently for continual safe
operation and for instructing others who may use
this tool.
The purpose of safety rules is to attract your
attention to possible dangers.The safety symbols
and the explanations with them, require your careful
attention and understanding.The safety warning
by themselves do not eliminate any danger.The
instruction or warnings they give are not substitutes
for proper accident prevention measures.
The operation of any tool
can result in foreign objects
being thrown into your eyes,
which can result in severe
eye damage.
SAFETY ALERT SYMBOL
Indicates caution or warning. May be used in
conjuction with other symbols or pictures.
Failure to obey a safety warning can result in serious
injury to yourself or to others.Always follow the
safety precautions to reduce the risk of fire, electric
shock and personal injury.
Before beginning power tool operation, always
wear safety goggles or safety glasses with side
shields and a full face shield when needed. We
recommend Wide Vision Safety Mask for use
over eye glasses or standard safety glasses with
side shields.
Do not attempt to operate this tool until you have
read thoroughly and completely understood the
1
AU
INTRODUCTION
Your new lawnmower has been engineered and manufactured to McCulloch’s high standard of dependability,
ease of operation, and operator safety. Properly cared for, it will give you years of rugged, trouble free
performance. If you use your lawnmower properly and only for what it is intended, you will enjoy years of
safe, reliable service
Keep this manual safe for future reference.
Important: Servicing of a tool with double
Insulation requires extreme care and knowledge
of the system and should be performed only
by a qualified service technician. For service
we suggest you return the tool to your nearest
McCulloch Authorised Service Centre for repair.
When servicing, use only identical McCulloch’s
replacement parts.
WARNING
Carefully read through this entire
owner’manual. Pay close attention to the
general safety rules and rules for safe operation,
before using your new unit.
SPECIFICATIONS
MODEL NO . . . . . . . . . . . . . . . . . . . . . . . . . . . . . . . . . . . . . . . . . . . . . . . . . . . . . . . . . . . . . . . . . . . . . . . . . M48A
Engine Speed . . . . . . . . . . . . . . . . . . . . . . . . . . . . . . . . . . . . . . . . . . . . . . . . . . . . . . . . . . . . . . . . . . . . . 3000 r.p.m
Fuel Tank Capacity . . . . . . . . . . . . . . . . . . . . . . . . . . . . . . . . . . . . . . . . . . . . . . . . . . . . . . . . . . . . . . . . . . . . 900ml
Oil Tank Capacity . . . . . . . . . . . . . . . . . . . . . . . . . . . . . . . . . . . . . . . . . . . . . . . . . . . . . . . . . . . . . . . . . . . . . 500ml
Air Cleaner Element . . . . . . . . . . . . . . . . . . . . . . . . . . . . . . . . . . . . . . . . . . . . . . . . . . . . . . . . . Paper Cartridge
Air Cleaner Location . . . . . . . . . . . . . . . . . . . . . . . . . . . . . . . . . . . . . . . . . . . . . . . . . . . . . . . . . . . . . Handle Bar
Cutting Width. . . . . . . . . . . . . . . . . . . . . . . . . . . . . . . . . . . . . . . . . . . . . . . . . . . . . . . . . . . . . . . . . . .480cm (19”)
Blades . . . . . . . . . . . . . . . . . . . . . . . . . . . . . . . . . . . . . . . . . . . . . . . . . . . . . . . . . . . . . . . . . . . . . . . . . 4 Swing Back
Height Adjustment . . . . . . . . . . . . . . . . . . . . . . . . . . . . . . . . . . . . . . . . . . . . . . . . . . . 12 Position Single Lever
Cutting Heights . . . . . . . . . . . . . . . . . . . . . . . . . . . . . . . . . . . . . . . . . . . . . . . . . . . . . . . . . . . . . 15mm to 55mm
Wheel Size (F/Rmm) . . . . . . . . . . . . . . . . . . . . . . . . . . . . . . . . . . . . . . . . . . . . . . . . . . . . . . . . . . . . . 200/200mm
Bearing Type . . . . . . . . . . . . . . . . . . . . . . . . . . . . . . . . . . . . . . . . . . . . . . . . . . . . . . . . . . Dual Metal Ball Bearing
Tread . . . . . . . . . . . . . . . . . . . . . . . . . . . . . . . . . . . . . . . . . . . . . . . . . . . . . . . . . . . . . . . . . . . . . . . . . . . . . . . Rubber
Grass Catcher . . . . . . . . . . . . . . . . . . . . . . . . . . . . . . . . . . . . . . . . . . . . . . . . . . . . . . . . . . . . . . . . . . . Solid Plastic
Under Deck Wash Port . . . . . . . . . . . . . . . . . . . . . . . . . . . . . . . . . . . . . . . . . . . . . . . . . . . . . . . . . . . . . . . . . . Yes
Weight (Incl. Catcher) . . . . . . . . . . . . . . . . . . . . . . . . . . . . . . . . . . . . . . . . . . . . . . . . . . . . . . . . . . . . . . . . 45.7kg
2
AU
DESCRIPTION
7
1
2
6
5
13
10
4
8
12
11
9
1.
2. 3. 4. 5. 6. Fuel Filler Cap
7. Oil Filler Cap
8. Muffler Housing
9. Under Deck Wash Connector
10. Spark Plug
11. Cast Aluminium Ball Bearing Wheels
12. Above Deck Oil change Tap
13. Fuel Tap
Dash Panel for Key Start and
Engine Control Lever
High Intake Air Cleaner
Air Tube
Locking Knob
Starter Handle
3
3
AU
AU
ASSEMBLY INSTRUCTIONS
ASSEMBLY INSTRUCTIONS
Please
to the
the following
following sections
sectionswhen
whenpreparing
preparingthe
themower
mowerfor
Please refer
refer to
for it’s first use
GRASS CATCHER
GRASS CATCHER
1. Position the two catcher halves as shown in (Figure 1A).
1. Position the two catcher halves as shown in (Figure 1A).
Ensure the catcher door is pushed down firmly onto the
catcher
lock in place.
to
lock intoplace.
Align the locating lugs marked 1 & 2 at the front of the catcher.
Align the locating lugs marked 1 & 2 at the front of the catcher.
With the catcher base on the ground, push the top section on
With the catcher base on the ground, push the top section on
each side of locator lug 1 until it clicks into place. (Figure 1B)
each side of locator lug 1 until it clicks into place. (Figure 1B)
Repeat this process for locator lug 2
Repeat this process for locator lug 2
2. Continue working from the front and push each locator lug into
position from number 1 through 8 until completed. i.e. start
2. Continue working from the front and push each locator lug into
with locator lug number 1 then 2, 3, 4, 5, 6, 7, and 8. (Figure 1A)
position from number 1 through 8 until completed. i.e. start with
3. WARNING:
DO1NOT
locator lug number
then HIT
2, 3, THE
4, 5, CATCHER
6, 7, and 8. WITH
(FigureYOUR
1A)
OR A MALLET.
break
the plastic.
ALWAYS
3. HAND
WARNING:
DO NOTThis
HITwill
THE
CATCHER
WITH
YOUR
START
Do will
not break
try tothe
assemble
catcher
HANDAT
ORPOSITION
A MALLET.1.This
plastic. the
ALWAYS
from
anyAT
other
starting1.point
as this
willassemble
make it the
difficult
to
START
POSITION
Do not
try to
catcher
assemble
the clips.
from any other
starting point as this will make it difficult to
7
5
2
Figure. 1A
AU
INSTRUCTIONS
Figure. 1B
D. Upper Handle Assembly
B
Figure. 1C
A
4
4
4
1
assemble the clips.
1. List of Components:
1. List
Components:
A.
LowerofCatcher
A. Lower
Catcher
B. Upper
Catcher
Mid
B. Upper
C.
HandleCatcher
Assembly
Upper
C. MidHandle
Handle
Assembly
D.
Assembly
6
3
4. Before use, check that all the lugs are completely clipped. Test
4. Before use, check that all the lugs are completely clipped. Test
the assembly by holding the top handle and pushing down on
the assembly by holding the top handle and pushing down on the
the base of the catcher. (Figure 1C)
base of the catcher. (FigureASSEMBLY
1C)
8
AU
PREPARING THE ENGINE
Please read and
and understand the engine
engine instructions prior
prior to
tooperating
operatingthe
thelawnmower.
lawnmower.
OIL - SAE30
CAUTION
CAUTION
DO NOT START your four stork engine before making sure that it has been filled with the right
amount
amount of
of the
the corect
corectgrade
gradeof
ofoil.
oil.
Four
Four stroke
stroke (cycle)
(cycle)engines
enginesare
areshipped
shippedwithout
withoutoil.
Place
the the
mower
on aon
level
position,
unscrew
the
oil. Place
mower
a level
position,
unscrew
‘OIL
FILL’FILL’
cap and
pourpour
oil provided
into
the ‘OIL
cap slowly
and slowly
oil provided
the
Fill toFill
thetofull
on theon
dipstick.
The
intosump.
the sump.
themark
full mark
the dipstick.
capacity
is approximately
500ml.500ml.
To check
engine oil
The capacity
is approximately
To check
engine oil in. Remove cap and observe oil level on
dip stick.
in. Remove cap and observe oil level on dip stick.
NOTE There may be a small amount of oil
NOTE There may be a small amount of oil
in the engine after draining. Fill using dip stick to
in the engine after draining. Fill using dip stick
avoid over filling
Figure 3
CHANGING THE
THE ENGINE
ENGINE OIL
OIL
CHANGING
FOUR STROKE ENGINES should be checked for
FOUR STROKE ENGINES should be checked for
oil level every 8 hours running (or daily), and the
oil level every 8 hours running (or daily), and the oil
oil should be drained and replaced after every 50
should be drained and replaced after every 50 hours
hours of use.
of use.
See Engine Lubrication section for oil change
See Engine Lubrication section for oil change
information.
information.
Figure 4
58
AU
PREPARING THE
THE ENGINE
ENGINE
PREPARING
WARNING
WARNING
Petrol vapour is highly flammable and explosive. Handle with extreme care. Store in an approved
container. Do not fill tank when engine is running or is still hot. Do not allow open flame, matches or
smoking nearby.
nearby. Fill
Fill tank outdoors
outdoors in
thethe
mower
smoking
in aa well-ventilated
well-ventilatedarea.
area.Wipe
Wipeaway
awayany
anyspills
spillsand
andmove
move
mower
awayfrom
from any
any petrol
petrol fumes before
away
before starting
starting engine.
engine.
CAUTION
CAUTION
When filling the fuel tank, always leave an air space of about 5mm to allow for expansion of fuel
FUEL
FUEL
USE ONLY CLEAN FRESH PETROL AT ALL TIMES,
3. Remove the fuel tank cap.
3. Remove the fuel tank cap
4.
funnel
the fuel filler.
5. Place
Fill thea clean
fuel tank
withinunleaded
petrol, allowing
5.room
Fill theinfuel
tank
with
unleaded
tank for fuel expansion. petrol, allowing
in the
tankfuel
fortank
fuel cap.
expansion.
6. room
Replace
6.
7. Replace
Clean upthe
anyfuel
spilttank
fuel.cap.
7. Clean up any spilt fuel.
USE
ONLYunleaded,
CLEAN FRESH
AT ALL
preferably
with anPETROL
octane rating
of TIMES,
at least
preferably
unleaded,
with
an octane
rating offuel.
at least
91. Four stroke
(cycle)
engines
use straight
91. Four stroke (cycle) engines use straight fuel.
FUEL FILLING
FILLING
FUEL
1. Position
Position the
the mower
mower on
1.
on aa level
level surface
surface in
in aa wellwellventilated
area.
ventilated area.
2. Clean
Clean around
around the
the fuel
fuel tank.
tank.
2.
RUNNING
RUNNING THE
THE ENGINE
ENGINE
ENGINE
ENGINE
Regular attention
attention to a few simple
your
mower.
Carry
Regular
simple items
items will
willensure
ensurelong
longand
andtrouble-free
trouble-freeservice
servicefrom
from
your
mower.
out the
regular
maintenance
described
in the manual,
and check
engine
bolts regularly
Carry
out
the regular
maintenance
described
in the manual,
andthe
check
themounting
engine mounting
bolts to be
sure theytoare
regularly
betight.
sure they are tight.
WARNING
WARNING
Before
making
anyany
adjustments
toto
your
mower
Before
making
adjustments
your
mowermake
makesure
surethat
thatthe
theengine
engineisisturned
turned off
off and
and that
that the blade
hasblade
STOPPED
ROTATING.
Always disconnect
the spark
wire
make
cannot
accidentally
has STOPPED
ROTATING.
Always disconnect
theplug
spark
plugand
wire
andsure
makeitsure
it cannot
contact
the spark
plug the
before
touching
anything
underanything
the mower
accidentally
contact
spark
plug before
touching
underhousing.
the mower housing.
ENGINE CONTROL
CONTROL
ENGINE
Thisisis mounted
mounted at the centre of
This
of the
the handle.
handle.It
forfor
starting,
andand
allows
you to
Itoperates
operatesthe
thechoke,
choke,
starting,
allows
set the
governed
speed of
the engine
you
to set
the governed
speed
of the while
enginecutting
or to cutting
stop theorengine.
while
to stop the engine.
Figure 5
69
AU
RUNNING THE
THE ENGINE
ENGINE
RUNNING
You will not need to change the control setting constantly while
while mowing
mowing because
because the
the governor
governor holds
holdsthe
the
selected speed, even under
under varying
varying cutting
cutting loads.
loads.The
The positions
positions for
for START,
START,RUN,
RUN,SLOW
SLOWand
andSTOP
STOPare
aremarked.
marked.
STARTING THE
THE ENGINE
ENGINE
STARTING
Ensure
that the
the engine
engine has
and that
that the
the fuel
fuel tap
tap isisturned
turnedON.
ON.
We
recommend
Ensure that
has been
been prepared
prepared correctly
correctly and
We
recommend
that
that
you check
thelevel
oil level
before
mowing
session.
you check
the oil
before
everyevery
mowing
session.
WARNING
WARNING
Never
monoxide,
Never run
run the
the engine
engine indoors
indoors or in poorly ventilated areas. Engine exhaust contains carbon monoxide,
an
an odourless
odourless and
and deadly
deadly gas.
gas. Keep
Keep hands, feet, hair and loose clothing away from moving parts.
COLD STARTING
STARTING
COLD
• DO NOT pull the starter rope with a jerk or
felt, then pull briskly.
release the rope when fully extended. Only
• DO NOT pull the starter rope with
release the starter handle when the rope is
a jerk or release the rope when fully
fully re-wound.
extended. Only release the starter
4. When engine has warmed up for a short time
handle when the rope is fully re-wound.
move the engine control lever to the desired
4. When engine has warmed up for a short time
speed position for cutting
1. Set the engine control to the START position
1. Set the engine control to the START position
2. Turn the fuel tap to the “ON” position and wait
2. Turn the fuel tap to the “ON” position and wait
60 seconds.
60 seconds.
3. MANUAL START
3.
MANUAL START
Can be used for new season starting
•Stand•behind
the mower. Hold the top the
when the Power Start battery is
moweror
stationary.
Grasp the starter rope and
discharged.
pull slowly
until resistance is felt, then pull
• Ensure the ignition key is in the “ON”
briskly.
move the engine control lever to the desired
speed position for cutting
position
• Stand behind the mower. Hold the top
the mower stationary. Grasp the starter
rope and pull slowly until resistance is
710
AU
STARTING THE ENGINE
AU
HINTS FOR EASY STARTING STARTING THE ENGINE
•Start a WARM engine with the control in the
•Stand the mower on a paved drive or path
IGNITION
1. Loose spark plug wire
START
position.
where
the blade
clear ofSTARTING
the grass. If you must
HINTS
FORis EASY
2. Dirty
spark
plug electrodes
Stand
mower
onto
a paved
drive cut
or path
clean
underneath
start• on
thethe
lawn,
move
an already
areawhere • Keep the mower
3. Incorrect spark plug gap
blade
clear of height.
the grass.
you start
must start
and/orthe
raise
theis cutting
DoIf not
the on
theon
lawn,
movesurface.
to an already cut area and/or raise STOPPING 4. Incorrect spark plug type
mower
a gravel
the cutting height. Do not start the mower on a Move the engine control to STOP.
OTHER
gravel surface.
• Start a WARM engine with the control in the
HARDSTART
START
CHECKLIST
position.
Look •forKeep
these
faults
the mower clean underneath
2. Incorrect adjustment of engine control
cable
blade plug
obstructed
IGNITION 3.
1. Cutting
Loose spark
wire
2. Dirty spark plug electrodes
STOPPING
3. Incorrect spark plug gap
Move the engine
4. Incorrect
spark
plug type
control
to STOP.
FUEL 1. Insufficient fuel in tank
2. Fuel
tap shut
off
HARD
START
CHECKLIST
Stale
fuelfaults
Look3.for
these
FUEL4. Water or dirt in fuel
5. Blocked
vent
fuel tank cap
2. Fuelairtap
shutinoff
OTHER 3. Stale fuel
4. Water or dirt in fuel
5. Blocked air vent in fuel tank cap
1. choked air filter (dirt or oil)
2. Incorrect adjustment of engine
control cable
3. Cutting blade obstructed
CUTTING
HEIGHT
CONTROL
CUTTING
HEIGHT
CONTROLLEVER
LEVER
Turn mower
off before
adjusting
cutting
height.
The
Turn mower
off before
adjusting
cutting
height.
The
singlesingle
pointpoint
cut height
control
adjusts
all all
four
wheels
cut height
control
adjusts
four
wheels
simultaneously.
To operate,
steady
mower
simultaneously.
To operate,
steady
thethe
mower
byby
grasping
the handle
hand,
lever
grasping
the handle
withwith
oneone
hand,
pullpull
thethe
lever
outwards
the mower
other
hand,
and
outwards
fromfrom
the mower
withwith
thethe
other
hand,
and
it todesired
the desired
setting.
movemove
it to the
setting.
For heavy
or very
longlong
grassgrass
it isitrecommended
For heavy
or very
is recommended
settingsetting
the mower
cut height
to #4
or or
more
toto
the mower
cut height
to #4
more
avoid avoid
the possibility
of clogging.
If clogging
becomes
the possibility
of clogging.
If clogging
becomes
persistent
because
of unfavourable
conditions,
trytry
persistent
because
of unfavourable
conditions,
walking
slower,
cutting
a narrower
strip
or or
raising
walking
slower,
cutting
a narrower
strip
raising
the cutting
height
further.
the cutting
height
further.
8
11
AU
FITTING THE MULCHING PLUG TO THE MOWER (OPTIONAL)
FITTING THE MULCHING PLUG TO THE MOWER (OPTIONAL)
1. Stop the engine.
the engine.
2.1.MStop
ake sure
the discharge chute and the underside of the mower are clean. If not, clean the mower.
3.2.RMake
aise the
flap
with
left hand,chute
and using
plug,clean.
insertIfthe
plug, with
sure the
discharge
and the
the hand-hold
undersideon
of the
the mulching
mower are
not,mulching
clean the
the
angled
section
to
the
mowers
right,
into
the
discharge
chute.
Make
sure
the
back
of
the
plug
is sitting
mower.
on the rear axle, then lower the flap.
3. Raise the flap with left hand, and using the hand-hold on the mulching plug, insert the
mulching plug, with the angled section to the mowers right, into the discharge chute. Make
sure the back of the plug is sitting on the rear axle, then lower the flap.
Fig. 8A
Fig. 8B
912
MAINTENANCE INFORMATION
AU
BLADES
Check
the blade
blade mounting
mountingbolts
boltsatatfrequent
frequent
Check the
intervals
for proper
propertightness.
tightness.
intervals for
To check
check blades,
blades,fold
foldtop
tophandle
handledown
downand
andtilt
tilt
mower
backwardand
andview
viewblades
bladesunder
underdeck
deckfrom
from
mower backward
the front.
front. (see
place mower
moweron
onits
itsside!
side!
(see pic) do not place
Check
the blade
blade condition
conditionfrequently,
frequently,particularly
particularlyif if
Check the
the mower
mower has
has hit
hitaaforeign
foreignobject
objectororisisvibrating.
vibrating.
Sub-standard
cuttingand
andcatching
catchingwill
willresult
resultfrom
froma a
Sub-standard cutting
neglected
blade.Your
YourAuthorised
AuthorisedDealer
Dealercan
canreplace
neglected blade.
replace
as necessary,
if you
prefer,
blades asblades
necessary,
or if you or
prefer,
supply
thesupply
parts
the
parts
to do yourself.
for you
tofor
do you
yourself.
CAUTION
CAUTION
Always use
original equipment
equipmentparts
parts
Always
use genuine
genuine original
to
ensure
safety
and
proper
performance.
to ensure safety and proper performance.
Substitute parts
parts can
can be
be disappointing
and
Substitute
disappointing and
dangerous.
dangerous.
BLADE CHANGE
CHANGE
BLADE
1. Disconnect the spark plug wire.
1. Disconnect the spark plug wire.
2. Adjust the mower to the high cut position.
2. Adjust the mower to the high cut position.
3.
3.Lift the rear flap and prop open to give full
to the blades, use only Talon blade kit number
access to the blades.
5223722-01.
4.Remove the blades, blade retaining bolts, nuts
4. Remove the blades, blade retaining bolts, nuts and
and washers and discard.
washers and discard.
5.Fit the new blades, blade bolts, washers and
5. Fit the new blades, blade bolts, washers and nuts
nuts in set sequence, refer drawing below (to
in set sequence, refer drawing below (to loosen
loosen rotate anti-clockwise, to tighten rotate
rotate anti-clockwise, to tighten rotate clockwise).
clockwise).
Blade bolt torque : 14.8-22.0 ft-lb (20-30 N•m)
Blade
bolt torque : 14.8-22.0 ft-lb (20-30 N•m)
16
10
AU
MAINTENANCE
CAUTION
Never tip mower sideways. To gain access to blades or cutting disc tilt backwards so spark plug is up.
CAUTION
Failure to properly service your mower will reduce it’s operating performance and could void
warranty. Service costs are not covered by warranty.
ENGINE LUBRICATION
SPARK PLUG
Check engine oil before every mowing session or
every 8 hours or daily.
Use only genuine replacement spark plug type
5223761-01. For best results, replace the spark
plug every 100 hours of use.
1. Stop the engine and remove the spark plug wire.
2. Remove spark plug
3. Screw the replacement spark plug into the
engine and tighten to 25-30 N•m torque and
replace spark plug wire.
4. Spark plug gap. 0.6 — 0.7mm
ENGINE MAINTENANCE SCHEDULE
First 5 Hours
Change engine oil - Oil SAE30. 500ml.
Every 25 Hours or Every Season Change engine
oil if operated under heavy load or in high ambient
temperature above 35 C. SAE30. 500ml.
CAUTION
Every 50 Hours or Every Season Change engine oil.
Use 500 ml of SAE30 oil.
Clean mower.
Mower service should be carried out by an
authorised McCulloch service agent.
Do not over-tighten the spark plug as engine
damage may occur
DECK CLEANING
STORAGE
Wipe deck with a damp cloth.
If mower is to be stored for over 60 days, you will
need to drain the fuel, if full, to prevent gum from
forming in fuel system or on essential carburettor
parts.
Remove spark plug and pour about 10ml of engine
oil into cylinder, replace spark plug and turn engine
over (pull cord slowly).
CAUTION
Do not hose engine. Water can damage
engine or contaminate the fuel system
11
AU
AU
MAINTENANCE
MAINTENANCE
ABOVE DECK
DECK OIL
OIL CHANGE
CHANGE
ABOVE
1.
Place
1.
Place12mm
12mm(inside
(insidediameter)
diameter)tube
tubeonto
ontooutlet
outletofof
above
abovedeck
deckoil
oilchange
changetap.
tap.Fig.
Fig.11A
11A
2.Push and turn tap to allow oil to flow. Fig 11B
2.
3.
Ensure
3.
Ensureoil
oilisisdrained
drainedinto
intoaasuitable
suitablecontainer
containerfor
for
proper
properdisposal.
disposal.
Note ToToensure
Note
ensurefullfulldrainage
drainageofofoiloilsump
sumpit itmay
may
bebenecessary
onon
the
necessarytotoprop
propupupthe
thewheels
wheels
the
opposite
is is
oppositeside
sideofofmower
mowersosothat
thatthe
theengine
engine
tilted
tiltedtowards
towardsthe
theoutlet.
outlet.
UNDER DECK WASH CONNECTOR
1.
UNDER
DECK WASH CONNECTOR
Fig. 11A
2.AStart
setfitting
enginetospeed
control to FAST.
1.
ttachmower
click onand
hose
the connector.
3.(Fig.11C)
Turn hose on.
4.SAllow
approximately
ONE MINUTE
to clean
2.
tart mower
and set engine
speed control
to the
FAST.
underside
of the deck.
3.Turn
hose on.
5.A
Turn
hose and stop
engine.
4.
llowoff
approximately
ONE
MINUTE to clean the
6.underside
Disconnect
from mower.
of hose
the deck.
7.Turn
Allowoffmower
to dry
storage.
5.
hose and
stopbefore
engine.
6. Disconnect hose from mower.
7. Allow mower to dry before storage.
Fig. 11B
Fig. 11C
12
18
AU
MAINTENANCE
MAINTENANCE
CAUTION
CAUTION
Donot
notallow
allow dirt
dirt or
or dust
dust to clog the
Do
the air
air filter
filter element.
element.
ENGINE AIR
AIR CLEANER
CLEANER
ENGINE
Theengine
engine air
aircleaner
cleaner element
element must
must be
be serviced
serviced (cleaned)
(cleaned) after
after 25
25 hours normal mowing.
The
TOREPLACE
REPLACEHIGH
HIGHINTAKE
INTAKEPAPER
PAPERAIR
AIRFILTER
FILTER
TO
1.1.To access filter element push down air snorkel release clip pull air snorkel away from air filter box.
(Fig.12A)
(Fig.12A)
2.2.Remove old air filter element and replace with new. (Fig.12B)
3.3.Insert new filter into housing so that the end with the opening fits into the inner tube in the housing.
Replaceair
airsnorkel
snorkeland
andclip
clipinto
intoplace.
place.
4.4.Replace
Fig. 12A
Fig. 12B
19
13
AU
MOWING TIPS
•The best time to mow your lawn is the late
afternoon. By this time the grass has had a chance
to dry out. Also the sensitive newly cut grass area
isn’t exposed to the direct sun.
•For healthy growth, grass should not be cut too
short. Using the lowest settings can result in
destruction of the crown of grass, allowing flat
lying weeds to develop.
• Vary your cutting pattern from week to week.
One week mow your lawn from north to south,
the next week, mow your lawn from east to west.
This will help prevent matting and graining of the
grass.
•For best performance, always keep the mower
blade sharp. A blunt blade tends to tear, not cut,
the blades of grass.
• When cutting very long grass, a preliminary
cut on a high setting, followed by a lower cut
(preferably a day or so later), will minimise the
overall time required for the job.
•Do not try to cut too much off the grass at
one time.This can cause excessive loads to be
put on the engine and also affect the mulching
performance.
14
•Clean the mowing chamber frequently to
remove grass build-up.This will keep mowing
performance at its best, especially when mulching.
Avoid cutting your lawn when it is wet.Wet grass
tends to form clumps and interferes with the
mulching action of the mower.
•If you are not collecting the cut grass, mow
in a pattern that deposits the clippings on the
previously cut path. So, if your mower discharges
clippings on the left, the next cut should be to the
right of the previous one, and vice-versa.
• When cutting close to obstructions such as tree
trunks, and when mowing to the edge of a lawn
where there is no wheel support, use the left side
of the mower, giving a useful blade ‘overhang’ for
ready access to awkward areas.
AU
NOTES:
15
AU
NOTES:
16