1
ThorSoft spirometry
software
Getting started - Introduction to the spirometry software
The spirometry software is a professional configurable pulmonary diagnostics software
application that fully supports several spirometry procedures. The software currently supports
FVC (normal, post, and pre), MVV and VC spirometric procedures and oximetry procedure,
measuring the following parameters:
•
•
•
FVC procedure: FVC, FEV1, FEV1/FVC, FEV6, FIVC, FIV1, EV, PEF, PIF, FEF25,
FEF50, FEF75, FIF25, FIF50, FIF75,MMEF2550, MMEF2575, FET, ELA, ZeroTime,
EOTV, PEFT
VC procedure: VC, IVC, IC, ERV, TV, TI, TE, VE, RR, TV/TI, TE/TI
MVV procedure: MVV
Predictions algorithms currently implemented in the application are Knudson, E.R.S. '93 /
Knudson, Crapo & Bass / Knudson, E.R.S. '93 / Zapetal, Barcellona / Zapetal, NHANES III,
Pneumobill / Knudson /Austrian / Polgar for children.
The application is ergonomically designed to be user friendly and easily configurable. The
application can be personalized with a wide range of settings:
•
•
•
•
•
•
language selection
prediction method
spirometer hardware (wavefront device family, internal simulators)
medical report template collection (also editable by the user)
automated repeated use of medical procedures (FVC, MVV, VC) easy control with
hotkeys
enable / disable curve acceptability criteries (selectable: ATS/ERS or NLHEP)
See more configuration possibilities on Setting page description.
Several ways are available for data input and output like:
•
•
•
•
•
•
patient and examination data synchronization between the memory of the stand-alone
spirometer device and the PC based database
directory-tree based or XML based patient and examination data import and export
from PC to PC
GDT interface (input / output)
printout of the reports
picture of the patient
voice commands / automatic interpretation
Also the application is providing an intelligent assistance for Physicians such as:
•
live quality control of new FVC curves
•
•
built-in decision-making uncertainty management system on best FVC curve
innovative visualization of pulmonary tracts and symptoms
The application is built for reduced hardware requirements. The software runs on Windows
2000 or later Microsoft Windows based systems and it's delivered in an easy to use install
package.
Installing the software
Please see the installation guide for more details.
Connecting the Spirometer device to the system and it's usage with the
application
Application supports USB and Bluetooth communication toward wavefront spirometer.
Communication type can be set on Settings page (Connection type parameter). Bluetooth
communication currently supports only Microsoft protocol stack.
•
•
•
•
•
Switch on the Bluetooth enabled flow meter device
Open Bluetooth Configuration dialog.
Click "Discover Bluetooth Devices in Range (it may take a long time)" - the details of
searching for Bluetooth device are displayed in the Details message box
Select SpiroHome#2 from the combo box
Click "Connect" to connect to the flowmeter device. The application will set
automatically the COM port number on the Settings page and opens the COM port to
communication - the details of opening COM port and pairing the device are displayed
in the Details message box
USB / Bluetooth / serial port connected device can be disconnected / connected while running
the application, the reconnection is automatic. On the title of main dialog the connection
status is always displayed.
For more details please see the installation guide and the wavefront spirometer user manual.
Starting the application
Double click on the software’s icon to start the application. When the software starts the
Search/Select Patient screen appears. Every medical procedure has a separate color schema:
FVC - blue, MVV - red, VC - green and each form related to the different medical procedures
have the same corresponding background color. Patient and Visit screen will remain blue for
all the procedures as these screen are common and not part of any of the procedures.
Navigation in the software
Navigation is easy in the software. Beside the mouse control hotkeys/keyboard shortcuts are
also available for the users. Navigation using hotkeys is much faster and convenient
particularly in cases when many people need to be examined in a short time.
Keyboard shortcuts:
•
•
•
•
•
•
•
"Enter" button takes the user to the next screen in the process flow,
Left arrow and right arrow is used for scrolling the parameter grid columns to the left
or to the right on the Session Result Page,
Up arrow and down arrow is used for scrolling up and down in the patients list on the
Patient list screen,
Keyboard can be used for selecting the next user with last name starting with the
pressed character,
Backspace is used for declining the recorded trials on session pages (FVC, MVV, VC),
ESC is used for closing the dialog box in focus.
F1 button can be used to view this help.
For easier access of mostly used features there is a Toolbar available:
From left to right:
•
•
•
•
•
•
•
displays Patient screen
starts FVC measurement (displays Visit page first)
starts MVV measurement (displays Visit page first)
starts VC measurement (displays Visit page first)
starts SpO2 measurement (displays Visit page first)
displays FVC result page
displays MVV result page
•
•
•
•
displays VC result page
displays SpO2 result page
starts Settings page
displays application help
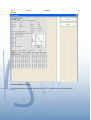
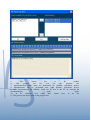
Settings screen - Configuring the application
This screen is reachable from the main menu of the application by navigating to the Settings
menu item and clicking on the Settings button.
At the bottom of the panel there is an information window that can contain two kind of text:
Parameter change processed: the changes take effect immediately, the program will use the
new settings after closing the Settings window.
Parameter change needs restart of the software: the changes will take effect only after
restart of the program.
This form is for the advanced users - parameters of the application can be set and saved. The
following pages can be selected:
•
Riport designer
•
•
•
•
•
•
Spirometry
Connection
Regional settings
Incentive
Export/Import
Services
Riport designer:
Default XXX report template is the default printing template for the FVC, POST FVC, PRE
FVC, MVV ,VC, Compare two FVC, FVC trend and Calibration check procedures. This can
be chosen from available report templates. The procedure result report page is generated
based on the given report template.
Report headers: Here can you configure the report template header.
Printer type: reserved.
Spirometry:
Prediction Method is the method used for calculating the predicted values for the given
patient's details like gender, age, ethnic group, etc. Many Prediction methods are available for
selection.
Procedure is the type of the testing procedure, like FVC, MVV and VC. Only the actual
selected and saved procedure type will be used in the actual testing process even in case of
repeatedly done testing processes. This means that the user needs to set the Procedure
parameter only one time and able to conduct as many test as needed without changing the
settings. To access an other than current procedure the Procedure parameter on the Setting
form should be changed. The default value is FVC.
Automatic control of the curve quality. Three values can be set, "No", "ATS/ERS" or
"NLHEP". If this parameter is set to "ATS/ERS" or to "NLHEP" it means that the flow can be
continued using the Accept button which is activated only when the session is in alignment
with the recommendation of selected criteria. The criteria to accept the session is the
reproducibility in ATS/ERS mode, meaning that there shouldn't be more than 5 percent
difference between the FVC parameters of two of the curves with the highest FVC, FEV1 or
FVC + FEV1 parameters. If the parameter is set to "No" that means that just one complete
FVC curve is enough to accept the session, the Accept button is activated and the process can
be continued on the Result page. The decision support system and the computer interpretation
are not working. For both the values the quality control of the curves are operating (coughing,
not fully forcing expiration, etc.). Every new curve is going through the quality control
evaluation. The Decline button is activated in both the situation, using it will remove all the
curves recorded for the session, from both the diagram and the parameter table and
reinitializes
the
session.
You must restart the program before the new settings will take effect.
Best FVC Curve Calculation is an adjustable method whereof the program calculates the best
curve (FVC, FEV1, FVC + FEV1)
Accept FVC curve after a while: In the FVC measurement window, when the measurement is
done, the program automatically accept the curve after a short time
Enable zero flow correction: In the FVC measurement window, there is a zero flow correction
before the measurement, if it's enabled.
Connection:
Signal Source is the source of the incoming data. Users can select from two options:
•
•
spirometer device, for taking the test the device needs to be connected to the PC
through USB/Bluetooth/Serial port.
the internal FVC curve simulator, which simulates a test recorded from a real
spirometer
COM port number. The number of serial (COM) port if Bluetooth/serial port connection is
selected.
Connection Type: USB / Bluetooth - Serial port
Regional settings:
Language is the language on which the application text (labels, buttons, etc.), help, report
templates are displayed, voices are played back. The language is defined in simple external
text files, so a new language can be added by the user/distributor itself or by the manufacturer
in an easy way. The default value is English.
Measurement unit: Kg/m or lb/inch
Date string format: Here you can configure the date format
Incentive:
Show incentive below age: below the selected age the selected incentive is shown in FVC
session page, in other case the anatomic animation is shown.
Incentive Type: Two kinds of incentive can be set: a teddy bear behind curtains and a cake
with candles.
Incentive Level: Three levels can be set: 60%, 80% and 100% of FEV1 value.
Export/Import:
GDT name: if the program is used in GDT protocol environment, the GDT name of the
application can be specified here. The application only processes GDT file if the file defines it
as sender of receiver the GDT file.
Services:
Camera: Patient camera can be enabled or disabled.
Voice comments: Voice comments and commands can be enabled or disabled ("Please start
the forced expiration and inspiration" etc.).
On Screen Keyboard Automatic Management: reserved.
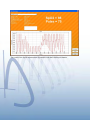
Patient screens - Search/Select Patient and Add new patient screens
The Search/Select Patient screen automatically appears when the application starts. The
screen is reachable from the main menu of the application and by clicking on the Patient
menu item.
The Patent screen is a multifunctional screen. The same screen is used for Searching or
Selecting a Patient, for Adding a new Patient to the database, for Updating Existing Patient
and Deleting Existing Patient. The buttons on the screen are enabled or disabled also the
labels on the buttons shall change depending on the current functionality. The Save / Start
Visit and Cancel buttons are always enabled on the screen. The Start Visit button is available
only on the Search/Select Patient screen and Save button is available on the Add New Patient
and Update Patient screen. The Take snapshot button is available on the Add New Patient
screen and Updating Existing Patient and there is no image already saved to the patient.
Search in the patient's list
Searching/Selecting a patient is the default functionality of the screen. The Search/Select
Patient functionality is active when the form opens or it can be activated by pressing the
Search button on the screen. In the search/select Patient mode the Search button is disabled,
the New, Delete and Update buttons are enabled.
Patients can be search by name, by Id or by last type of measurement by selecting
correspondent method from the dropdown list under the Update button. Then the user has the
following search options:
•
•
browsing the patients with selected method in the combo box under the New button.
The box is populated from the database with the previously saved or uploaded
patient's data. If the patient list has more names than what the combo box can show
one time a scrollbar appears on the left side of the combo box that can be used to
move up and down in the list of the patients.
typing the last name or the Id of the patient into the combo box.
The patients saved to the database needs to be selected to be the actual patient. Once a patient
is selected the details of the patient is populated in the fields. The following data is populated:
•
•
•
•
•
First name
Middle name
Last name
Birth date, the date format is specified next to the date field.
unique ID of the patient ( like Social Security Number )
•
•
Sex
Ethic Group
•
Ethnic Correction
•
•
•
•
•
•
•
•
•
•
•
•
•
•
Phone
Street
Postal code
City
State
Country
Alternative Phone
E-mail
Job Qualification
Job Description
Job Sector
Diseases
Additional Information
Picture of the Patient
The data of the already saved patients can be updated by first pressing the Update button next
to the Delete button then changing the data and pressing the Update button on the bottom of
the screen.
The fields are empty by default.
Only those patient data can be populated which were previously saved in the database by the
user. By pushing the Start Visit button the Patient screen closes and the Visit screen appears,
see section Visit Screen.
Adding a new patient
Add New patient functionality can be activated by pressing the New button on the screen. In
the Add new Patient mode the New button is disabled and the Search, Delete, Update buttons
are enabled. The dropdown list and the combo box are also disabled and all the fields are
cleared out except for the Sex and the Ethnic Group. Those fields are populated with default
values. The data of the new patient needs to be entered. First name, last name, birth date, id
are mandatory fields.
The default date is the date of the current day. In the most cases the birth date does not match
with it. Birth date can be given filling up 3 edit boxes according to pattern YYYY-MM-DD.
Meaning first edit box from left to right is the year on 4 digits (e.g. 1974), the middle one is
the month (e.g. 11), the last one is the day (e.g. 1).
Once the Save button is pushed the input fields are validated and the data can be saved to the
database only if all the mandatory fields are entered and the data format is correct. In case if
the mandatory fields are not filled or any of the values are not entered properly then the field
name of the incorrect data is highlighted in red like shown in the screenshot on the right side.
Data cannot be saved unless the values of the incorrect fields are fixed. By pressing the TAB
key the cursor jumps to the next field or to the next combo box.
By pressing enter or by clicking on the Save button and the data is correct the new patient will
be stored in the database, the screen will change to the Search/Select Patient mode and the
edit boxed will be filled with the previously entered patient's data.
The ethnic correction field is only editable if the Ethnic Group is "not defined".
Taking a photo on patient is possible only once either on New Patient or on Update Patient
pages. If taking a photo is available and camera is available and enabled (Settings page
Camera parameter) there is a live camera on the screen. pressing Take Snapshot button the
image is captured. Storing is done if Save button is hit. The idea behind storing patient's
picture is to remembering better the patient.
Updating a patient
The Update patient process is almost the same as New Patient process. The only difference
that in update there are already valid data filled into page. The Id cannot be updated because
data synchronization process with standalone handheld spirometer needs this unique ID.
Deleting a patient
The patient who will be deleted needs to be selected first. When the patient is selected by
pressing the Delete button the patient's data is removed from the database and the next
patient's data will be displayed from the list.When the Delete button pressed, the following
window pops up, if the User press Yes, the patient will be deleted permanently.
Visit Screen
The screen is reachable by clicking on the Start Visit button on the Search/Select Patient
screen after selecting the correct patient.
When the screen appears the data of the last visit for the selected patient is given to the Visit
form. The patient's first name, last name and birth date is displayed in the header of the screen.
If the actual visit is the first visit for the patient only default values are populated in the fields.
The following data can be entered:
•
•
•
weight: weight of the patient given in kilograms. Needs to be a number. This is a
mandatory field. The default value is 90 kg (198 pounds). This value is required by the
prediction algorithm.
height: height of the patient given in centimeters. Needs to be a number. This is a
mandatory field. The default value is 180 cm (71 inch). This value is required by the
prediction algorithm.
Smoker: a selection to show if the patient is a smoker or not. Options are Yes, No or
Formal. This is an optional field.
•
•
•
•
•
•
Smoke Type: the type of the smoking equipment can be specified. The options are
cigarette, cigar, pipe and other. This field is only enabled in case if answer 'Yes' was
selected for the previous question ('Smoker'). If the option 'None' is selected the
selection for the pervious question (Smoker: Yes/No) will be automatically changed to
No and the answer field for the Smoke Type question is disabled.
Smoke years: the number of years of the smoking period of the patient. Needs to be a
number. Not a mandatory field. The default value is 0.
Quantity/day: number of the cigarettes smoked on a day by the patient. Needs to be a
number, not a mandatory field. The default value is 0.
Comment: any comment that the user needs to mention. Not a mandatory field. Empty
by default.
Symptoms: the symptoms mentioned by the patient. Not a mandatory field. Empty by
default.
Risk: risks specified by the user. Not a mandatory field. Empty by default.
When the Start Session button is pushed the data is validated. Incorrectly entered fields and
empty mandatory fields are highlighted in red. When the user pushes Start Session and the
data is correct the data for the visit is stored in the database.
The screen closes without saving the data to the database when the user pushes the Close
button.
Report Designer screen
This screen is reachable from the main menu (Tools) of the application by navigating to the
Report Designer menu item. Report Designer is the tool for editing existing printing design
templates and creating new printing design templates. The printable form can be designed and
printed out on an A4 paper size. Other paper sizes are available upon patient request.
All the medical procedures are using the same report page design. The design is generated
based on the report template set in the Settings menu. The templates are filled with actual data
at the end of the procedure (actual curves, parameters in the tables).
The following components can be added and edited on a template:
•
•
•
•
•
diagram
worksheet (table) (reserved)
static text (like labels) for text that is fixed and not changed when the screen loads at
the end of the procedure
dynamic text (like the patient's last name) for text which is populated with the data
entered or calculated previously during the procedure.
picture (reserved)
Components can be added / deleted by using the buttons on the left control bar or by using the
right mouse button on the canvas; in this case a pop-up menu appears. Each component has its
own properties. When selecting one component by clicking on it with mouse a light green
outline box is displayed around the component to show which component's properties are
editable at the moment. Only that component can be edited which was previously selected.
A grid is added to the page to allow easier arrangement of the components vertically and
horizontally. This grid can be shown or hidden from a check box.
The following properties can be set:
•
for diagrams:
o type of the diagram: FVC, FVC-Vt, MVV, VC
•
for static and dynamic text:
o the type of the text, static or dynamic
o in case of static labels the text can be given in a textbox
o in case of dynamic text, the source parameters of the data need to be specified.
Page means the group of the data like FVC best params, VC unit,
patient data etc.
The data means the exact data that is displayed from the page. E.g. for
VC_Param_NAME page the Data list is the following : VC, IVC, IC,
ERV, TV, TI, TE, VE, RR, TV/TI and TE/TI.
o type of the font. The button opens the Font panel where the font type, the font
style, the font size, couple of effects and the color code
All the components can be moved and resized by mouse. The items can be moved using the
mouse by dragging and dropping at the correct position when the cursor is displayed as a four
way arrow. The items can be resized using the mouse by holding one side of the outline box
of the item when the cursor is displayed as a two way arrow.
The order of the different components overlapping each other can be changed as well in the
right mouse button menu. In case if any of the components are overlapping each other the
order of the items can be specified by bringing one component to the front or sending it back
behind the other component.
When the reporting screen displays the default template will be shown with actual data.
FVC Procedure Screen
The screen is reachable by clicking on the Start Session button on the Visit Screen. To run the
FVC procedure in the application the Procedure setting on the Settings screen needs to be set
to 'FVC'. For more detailed explanation on how to run a test see the FAQ section
In case of FVC Procedures the color schema for all the related screens is blue.
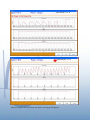
The screen has the following sections:
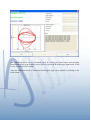
- FVC diagram with predicted points on the top left corner of the screen. On the x axis is the
volume of the air exhaled out by the patient given in Liters and on the y axis the air flow
given in Liter/second. The predicted values (FEF25, FEF50, FEF75 and FVC) are marked
with light green dots. Each curve is matching one measurement trial. Each of the curves is
displayed with different colors matching the colors of the different trials as displayed in the
FVC parameter table below the FVC diagram.
- FVC-Vt diagram is on the top center of the screen over the operator note window. On the x
axis is the time of the exhalation and inhalation given in seconds and on the y axis is the
volume of the air given in Liters.
- FVC parameter table is (for all trials) in the bottom right corner of the screen left to the
function buttons. This table shows the actual result values of the measurement trials. The table
is horizontally scrollable by the left and the right arrows or by mouse. The maximum number
of trials is 8. The first row in the table has the name of the measured FVC parameters. The
parameters are FVC, FEV1, FEV1/FVC, FEV6, FIVC, FIV1, EV, PEF, PIF, FEF25, FEF50,
FEF75, FIF25, FIF50, FIF75,MMEF2550, MMEF2575, FET, ELA, ZeroTime, EOTV, PEFT .
The second row shows the unit for each of the parameters. The third row shows the predicted
values calculated with the patient's details like the height, weight, age, etc. From the forth row
to the last row the actual result values are shown for each of the measurement trials.
- Operator Note: below the FVC - Vt diagram. The user of the program can write notes to this
textbox, which later can be seen on the results page.
- Quality Control display is on the right side of the screen, over the New Curve button.
Quality control images are only displayed if the measurement seems to be corrupted.
Maximum number of quality control images is 3. Issues like cough, early termination, not
fully forced etc. are algorithmically detected and displayed after each completed measurement
to help the user and the patient producing acceptable FVC curve. For more details see below.
- Spirometry Workflow Manager is under the FVC and FVC-Vt diagrams. It displays the
messages from RAM QC (Recommended Automated Maneuver QC) standards assessed on
the basis of the curves.
Function buttons on the screen are:
•
New Curve - beginning of the FVC measurement, where several FVC curves can be
measured but the program selects only the best curve. For more details see below.
•
Accept - accepting the session, the best curve is saved to database. Button is enabled
only when at least one curve is recorded.
•
Decline - not accepting and restarting the session. WARNING: decline deletes all
curves in the session in which it is activated. All data will be lost. Can be pushed
any time.
Best curve is selected automatically while curves are recorded. Adding a new curve to the
curve list runs algorithm of selecting the best curve, which is highlighted - row of the best
curve has black background in the grid. The best curve has the biggest FVC value. The
automatic curve selection can be overridden by the user using popup context menu on the grid.
Three menu items are there:
•
•
Select a curve under the mouse as best
Select best curve automatically -> dropping user selection
Best curve is saved to database and on the result/report pages the best curve will represent the
session. Be careful, best curve cannot be changed on result page.
By selecting the New Curve button, the User will find the following screen:
The patient could continuously blow several curves and the program will select the best trial
which will be saved to the parameter table in the previous page (if it meets the essential
requirements).
This screen has the following sections:
•
•
FVC diagram with predicted points on the top left corner of the screen. On the x axis
is the volume of the air exhaled out by the patient given in Liters and on the y axis the
air flow given in Liter/second. The predicted values (FEF25, FEF50, FEF75 and FVC)
are marked with light green dots.
Volume - Time diagram: on the bottom of the screen. On the x axis is the time of the
exhalation and inhalation given in seconds and on the y axis is the volume of the air
given in Liters.
•
Infobar: in middle of the screen, above the V-T diagram. It represent the state of the
zero flow correction. If the zero flow correction is turned off, the infobar shows the
"Breathe!" sign.
•
For young patients (the age can be set in settings page - Show incentive below age)
there is an incentive animation. A nice picture about teddy bear is showing up behind
a curtain. The volume controls how much the curtain opens - how much portion of
teddy bear's image is visible. Teddy bear is full visible if the young patient can blow
out 90% of his/her predicted FEV1 value. Blowing in closes the curtain. On Settings
page Show incentive below age controls the upper age below incentive is shown
Function buttons on the screen are:
•
Accept - accepting the session, the best curve is saved to a table in the previous screen.
•
Decline - not accepting and restarting the measurement. WARNING: decline deletes
all curves in the screen. All data will be lost.
•
Close - same as decline but closes the New FVC Curve window. WARNING: close
deletes all curves in the screen. All data will be lost.
Quality control
The following table shows the potential issues that can occur during the measurement:
The patient was coughing.
The patient wasn't fully forcing the expiration.
The expiration was stopped prematurely.
FVC Session result screen
The screen is reachable by clicking on the Accept button on the FVC Procedure Screen or
from the menu (View -> FVC Result Page). The screen shows the best measurement result
details.
The screen has the following sections:
•
Patient details (patient card)
o name
o birth date
o sex
o ethnic group
o job qualification
o job description
o job sector
o disease lung
o disease other
•
•
•
•
•
•
•
•
Visit details (visit card)
o weight
o height
o symptom
o risk
o smoker
o smoke type
o smoke years
o smoke quantity per day
Post-FVC drug information (if applicable)
Best FVC curve with relevant predicted parameter points, see section FVC Procedure
Screen - FVC diagram
Decision support system. The Decision support system displays some FVC curves and
its medical description, which are most similar to the current best curve. The support
system displays images based on the computer interpretation generated on the
previous FVC Session page. The main purpose of this module is to support the user in
evaluating the results. See more details below.
FVC parameter table with the result values of the best curve, predicted values and the
result value's deviation from the predicted values in percentage.
List of FVC sessions combo box: the result page is able to list the patient's all previous
sessions (older sessions can be loaded to the result page - on the report page these will
be showed and printed on demand). Using hotkeys Up and Down keys the list scrolls
up and down and the result page is refreshed immediately with the data of the selected
session.
Automatic interpretation text generated by the application, see section FVC
Procedure Screen - Computer interpretation
Medical report: detailed user evaluation of the measurement, it can be entered and
saved to the database (this feature will be implemented in future).
The content of the page especially of the grid and diagram is different a bit for normal, post
and pre FVC types.
Function buttons on the screen are:
•
•
•
•
•
Print button, the report can be printed out if a printer is connected to the system.
Close button: closes the screen.
Post (available only if a POST measurement can be done)
Pre (available only if a PRE measurement can be done)
Export button: export data from selected session to Microsoft Excel
Clicking on Print report button the Report page comes up. The FVC report page is like
this:
POST FVC session
POST FVC session is available after normal FVC session on FVC result page if the normal
FVC session was done within 24 hours and there is no related POST or PRE session already
attached to it. POST FVC session can be started from FVC result page by clicking the POST
button. POST FVC session and normal FVC build a pair.
You can administer the bronchodilator drug in the popup window:
On POST FVC result page you can compare NORMAL and POST FVC data. Grid shows the
best normal curve and best post curve. Automatic interpretation evaluates the normal curve
and tells whether the problem is reversible (percentage of reversibility).
The report template is as follows:
PRE FVC session
PRE FVC session is available after normal FVC session on FVC result page if the normal
FVC session was done within 24 hours and there is no related POST or PRE session already
attached to it. PRE FVC session can be started from FVC result page by clicking the PRE
button. PRE FVC session and normal FVC build a pair.
You can administer the number of steps (at least 1, at most 10) and each drug doses for the
steps in the popup window:
In "Number of steps" section, number can be manually entered or set by clicking on '^' button.
When the number is correct, by pressing "Set" button can be proceeded and the drugs can be
set by clicking on the tab of a step. By pressing the "preview" button, the whole procedure can
be seen in the "summary" window. When finished, by pressing "OK" button can be proceeded.
After the drug doses are set, measurements will be begun. At the end of the step, the "Next
step information" will be seen. By clicking on continue button can be proceeded.
On Result page every single steps can be seen.
The
follows:
report
template
is
Decision Support System
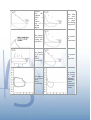
The following table shows the different kind of FVC curves and medical descriptions.
as
Normal
flow, the
diagram
shows
a
flowvolume
loop of a
normal
subject.
More than
one issue
occurred at
the same
time during
the process.
The patient
wasn't fully
forcing the
expiration.
The patient
has
obstruction.
The patient
has a fixed
large
airway
obstruction.
The patient
has
restriction.
The patient
has a fixed
upper
airway
obstruction.
The patient
has severe
air
flow
limitation
indicating a
chronic
obstructive
pulmonary
disease.
The patient
has
a
glottis
closure.
The
strength of
the
expiration
wasn't
stable.
The patient
has
variable
extra
thoracic
obstruction
The patient
has
variable
extra
thoracic
upper
obstruction.
The patient
has
variable
intra
thoracic
obstruction.
The patient
has
variable
intra
thoracic
upper
obstruction.
MVV Procedure
The screen is reachable by clicking on the Start Session button on the Visit Screen. To run the
MVV procedure in the application the Procedure setting on the Settings screen needs to be set
to 'MVV'.
In case of MVV Procedures the color for all the related screens is red.
The flow of the procedure and the displayed data is the same as in case of the FVC procedure,
however there is no quality control of exam on the procedure session screen and there is no
Decision Support System on the session result screen.
After pressing the Accept button, the MVV Result page will appear:
VC Procedure
The screen is reachable by clicking on the Start Session button on the Visit Screen. To run the
VC procedure in the application the Procedure setting on the Settings screen needs to be set to
'VC'.
In case of VC Procedures the color for all the related screens is green.
The flow of the procedure and the displayed data is the same as in case of the FVC procedure,
however there is no quality control of exam on the procedure session screen and there is no
Decision Support System on the session result screen.
After pressing the Accept button the VC result page will appear:
Short SpO2 Procedure
The screen is reachable by clicking on Short SpO2 button on the toolbar.
In case of SpO2 Procedures the color for all the related screens is orange.
After starting the SpO2 session the following page will appear:
This page have the following sections:
Diagrams: Plethystmogram, SpO2 - Time and Rate(bpm) - Time diagrams
Infobar: information about finger clip is displayed here (ex: No finger in the fingerclip,
Searching for pulse...)
After pressing the Accept button, the SpO2 result page will appear:
The result of the SpO2 measurement is printable with the Print Report button:
Comparing Two Fvc Sessions
Two normal Fvc curves of the same patient can be compared on Compare Two Fvc Sessions
page. A list of all sessions of the patients is given into the two combo boxes simultaneously.
On the page there is a patient card with relevant patient data, two visit cards, a diagram for
two Fvc curves and a spreadsheet for parameters of the curves, their relation to the predicted
values and to each other. Predicted values are calculated using prediction method set in the
configuration. Each predicted value set calculated so that the age is the age of the patient at
time the session was recorded. On the dialog there are two sessions selected with different
patient age, so the predicted value sets are different too. Another patient can be selected on
the patient page. To change the patient in this dialog the dialog should be closed and reopened.
Hotkey are available and the same as another result page. LEFT and RIGHT buttons scroll the
columns of the spreadsheet while UP and DOWN keys scroll thorough the active session list
combo box.
FVC Trend
This screen shows the evolution of parameters of curves of the selected patient. On the page
there is a patient card with relevant data and a diagram which has on X-axis the number of
sessions from first to last and on Y-axis the best values of each session.
Available hotkeys are: LEFT, RIGHT and UP, DOWN buttons to scroll thorough the
parameters (FVC, FEV1, PEF, FET ...).
File synchronization between PC software and standalone handheld
spirometer device
Either the portable spirometer device or the PC software has an own-managed database. The
file synchronization option establishes the contact between these 2 different database
structures. Patient data and measurement results can be easily downloaded from the portable
device to the PC, and patient data can also be sent from the PC to the portable device, so
measurements can performed using both of those methods.
To begin the synchronization the portable spirometer device has to be in PC synchronization
mode, the File Synchronization window in PC software has to be opened. The portable
spirometer device and the PC will be connected to each other using the USB cable.
File
synchronization
steps:
1.
Patients
are
to
be
created
in
PC
software.
2. Portable spirometer device will be used in synchronization mode (from settings menu).
3. File synchronization window has to be opened in PC software (from file menu).
4. Patients data to be send have to be chosen. In the left sided list of the window (all available
patients) selecting the patients to be send and by hitting the ">>" button can the patient names
moved to the right sided list, patients from the right sided list can be removed by hitting the
"<<" button. Patients in the right sided list will be chosen to be sent.
5.
"Put"
button
has
to
be
pushed.
6.
The
process
can
be
seen
on
the
progress
bar.
7. Synchronization mode must be terminated on portable spirometer device.
8. Measurements can be performed now with portable spirometer device.
9. After measurements are finished, result can be sent to the PC by entering the
Synchronization
mode
again.
10.
In
PC
software
"Get
exam
data"
button
have
to
be
hit.
11. The process can also be seen on the progress bar.
12. File synchronization report can be seen below.
IN DEVICE DATABASE AVAILABLE: 2 patients, 15 visits, 10 Fvc sessions, 2 Post Fvc
sessions,
1
Mvv
sessions,
2
Vc
sessions;
IMPORTED: 2 patients, 15 visits, 10 Fvc sessions, 2 Post Fvc sessions, 1 Mvv sessions, 2 Vc
sessions
DETAILS:
Patient name: [B B B], Ssn id: [348729] processing successfully. New pateint created!
Visit time stamp: 2010.07.08 13:21:03 processing successfully. New visit added with Id:
1865
.
Post Fvc session time stamp: 2010.07.08 13:21:28 processing successfully. It contains 1
curves.
Visit time stamp: 2010.07.08 13:21:42 processing successfully. New visit added with Id:
1866
.
Fvc session time stamp: 2010.07.08 13:21:42 processing successfully. It contains 1 curves.
Visit time stamp: 2010.07.16 17:32:20 processing successfully. New visit added with Id:
1867
.
Fvc session time stamp: 2010.07.16 17:32:20 processing successfully. It contains 1 curves.
Visit time stamp: 2010.07.16 17:43:37 processing successfully. New visit added with Id:
1868
.
Fvc session time stamp: 2010.07.16 17:43:37 processing successfully. It contains 1 curves.
Visit time stamp: 2010.07.08 13:22:02 processing successfully. New visit added with Id:
1869
.
Vc session time stamp: 2010.07.08 13:22:02 processing successfully. It contains 1 curves.
Visit time stamp: 2010.07.08 13:50:02 processing successfully. New visit added with Id:
1870
.
Vc session time stamp: 2010.07.08 13:50:02 processing successfully. It contains 1 curves.
Visit time stamp: 2010.07.08 14:06:09 processing successfully. New visit added with Id:
1871
.
Mvv session time stamp: 2010.07.08 14:06:09 processing successfully. It contains 1 curves.
Patient name: [B B C], Ssn id: [68943] processing successfully. New pateint created!
Visit time stamp: 2010.07.08 11:32:21 processing successfully. New visit added with Id:
1872
.
Post Fvc session time stamp: 2010.07.08 11:32:52 processing successfully. It contains 1
curves.
Visit time stamp: 2010.07.07 15:02:36 processing successfully. New visit added with Id:
1873
.
Fvc session time stamp: 2010.07.07 15:02:36 processing successfully. It contains 2 curves.
Visit time stamp: 2010.07.07 17:47:52 processing successfully. New visit added with Id:
1874
.
Fvc session time stamp: 2010.07.07 17:47:52 processing successfully. It contains 1 curves.
Visit time stamp: 2010.07.07 17:58:33 processing successfully. New visit added with Id:
1875
.
Fvc session time stamp: 2010.07.07 17:58:33 processing successfully. It contains 1 curves.
Visit time stamp: 2010.07.07 18:00:34 processing successfully. New visit added with Id:
1876
.
Fvc session time stamp: 2010.07.07 18:00:34 processing successfully. It contains 1 curves.
Visit time stamp: 2010.07.07 18:08:32 processing successfully. New visit added with Id:
1877
.
Fvc session time stamp: 2010.07.07 18:08:32 processing successfully. It contains 1 curves.
Visit time stamp: 2010.07.07 18:11:09 processing successfully. New visit added with Id:
1878
.
Fvc session time stamp: 2010.07.07 18:11:09 processing successfully. It contains 1 curves.
Visit time stamp: 2010.07.07 19:04:09 processing successfully. New visit added with Id:
1879
.
Fvc session time stamp: 2010.07.07 19:04:09 processing successfully. It contains 1 curves.
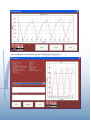
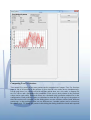
Predictions page
By clicking on "Show predicted value chart" menu item from Tools menu the predictions
dialog window can be opened. This window can be used to examine the different prediction
algorithms and the predicted parameters and see them on a diagram.
On the right side of the window, many adjustable parameters can be seen. Some parameters
are used for define a person with a specified gender, age, height and weight, so the predicted
values for this currently defined person can be seen in the right-bottom corner.
The first 2 settings are used for the diagram, so the spirometry procedure (FVC,VC or MVV)
and the parameters (in connection with the current procedure) can be set, so the predicted
values will be seen for the currently set parameters. Every single prediction method has a
different color on the diagram, which colors can be seen at the middle-right side of the
window.
The X-axis value of the diagram can be set by hitting the "age","height" or "weight" radio
button in the "Independent parameter" section. The Y-value of the diagram shows the chosen
parameter which belongs to the X-values.
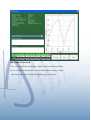
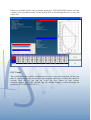
Checking Calibration with 1 or 3 Liter syringe
By clicking on "Calibration Check" menu item from Tools menu the Calibration checking
window can be opened. Calibration check can be done with a 1 or 3 Liter volume calibration
syringe. Make sure that the flowmeter is connected to the PC using USB cable. Connect
the flowmeter to the syringe using bacterial filter so that air does not leak through the
connections. Bacterial filter is necessary at connection to avoid the interference between the
flowmeter and the syringe.
Recomended to measure more than one curve because the measured values will be mean
values
Before starting the calibration check, please make sure that the flowmeter device is connected
to the calibration syringe as shown below :
1. PC based Spirometer
2. Bacterial Filter
3. Calibration syringe
After starting the calibration check the following window will popup:
Please follow the instructions printed in red at the upper left corner of the applications
window:
- Before starting the calibration set the ambient parameters of the room where the
measurement will be carrying out (temperature, humidity and pressure), set the reference
conditions which can be found on a paper in the box of the device (Tint , Hint , Pout ) and set the
syringe volume (1 or 3 liter).
- Please make sure you use a bacterial filter between the calibration synringe and
WaveFront Handheld Spirometer / PC based Spirometer
- Click on Start button to check the calibration.
- Do not generate flow in the flowmeter tube - the program sets the zero point to the
calibration.
- Blow out and blow in with the calibration syringe one or more times (one cycle -out and in is required!).
- Wait 3 seconds
After pressing the Start button, the calibration begins:
When the calibration test in progress, it can be interrupted with the Stop button and the
current measurement will be evaluated.
After these steps the program evaluates the informations and prints the result of the
calibration (successful or failed) to the upper left corner of the screen and prints the details to
the Results message box in the lower right corner of the screen.
The calibration check can be performed again by clicking the Start button and repeating
instructions above or the window can be closed by pressing X in the upper right corner of the
screen or with the Close button.
After the calibration check, a calibration check report page can be printed by clicking on the
Print button:
GDT interface
GDT protocol 2.0 support is under construction. In current version of the application patient
from GDT server can be created / selected to the spirometry software and a complex
FVC/MVV/VC result GDT file is created with the best curve for the patient. In GDT mode no
other patient can be selected or created.
1. 1. call <application’s name>.exe with name of the gdt patient file in form of
gdtfile="LUFU_20090630_1721.txt" and place the file in the subdirectory named
GDT in the install directory of the program. File name in general format:
LUFU_YYYYMMDD_HHmm.txt, where YYYY is the year in 4 digit, MM is the
month on 2 digit, DD is the day on 2 digit, HH is the hour on 2 digit, mm is the minute
on 2 digit. in general form "LUFU_" prefix + timestamp + ".txt" postfix. Command
line
example:
<application’s
name>.exe
gdtfile="LUFU_20090630_1721.txt"
An example of an GDT input file is the following (file is size is 155 bytes, please note
the line feed and carriage return characters at end of the last line too):
01380006301
014810000155
0188315PRO_SPIRO
0128316CRX
0143101Aczel
0163102Katalin
017310313061955
0183000999888777
01031102
0123622172
011362364
2. Important: the GDT name of the application (configurable on Settings page) has
to be used in the input GDT file.
2. After the program successfully started in GDT mode, the Patient Search page appears,
where the GDT file's patient is selected (other patients can't be selected), then press
the Visit start button to start the measurement.If a message appears while starting the
program in GDT mode, You can find the interpretation of the message in the 5. point.
3. The result GDT file is generated automatically after a session is accepted - you receive
about that a message. The name of the file is generated from the GDT input file by
adding
".res"
postfix,
e.g.
LUFU_20090630_1721.txt.res
Example of the content of the file:
01380006310
014810012522
0228315MY_MED_SYSTEM
0188316PRO_SPIRO
01092062
014921802.00
0300066Spirometry
0170067Software
01300901.18
0183000999888777
0143101Test
0163102Patient
017310313061955
0103106
0093107
01031102
0123622180
0123623090
softvvare
0128402FVC
017620002102009
0156201040458
0128410FVC
01384204.84
0108421L
0138410FIVC
01384203.89
0108421L
0138410FEV1
01384204.02
0108421L
0178410FEV1%FVC
014842083.06
0108421%
0128410PEF
01384207.52
0128421L/s
0138410FEV6
01384200.00
0108421L
0148410FEF25
01384206.78
0128421L/s
0148410FEF50
01384204.19
0128421L/s
0148410FEF75
01384202.26
0128421L/s
0178410MMEF2550
01384205.58
0128421L/s
0178410MMEF2575
01384205.59
0128421L/s
0128410FET
01384202.61
0108421s
0138410FIV1
01384200.00
0108421L
0128410PIF
0148420-6.27
0128421L/s
0148410FIF25
0148420-1.08
0128421L/s
0148410FIF50
0148420-4.86
0128421L/s
0148410FIF75
0148420-6.09
0128421L/s
0118410EV
01384200.47
0108421L
0178410ZeroTime
01384200.00
0108421s
0178470Austrina
0098470
0208410Volume,Flow
0648417(+0.01,+1.08)(+0.03,+2.02),(+0.07,+3.31),(+0.12,+4.95),
0648417(+0.18,+6.46)(+0.25,+7.05),(+0.32,+7.25),(+0.40,+7.34),
0648417(+0.47,+7.38)(+0.55,+7.42),(+0.62,+7.49),(+0.69,+7.55),
0648417(+0.77,+7.55)(+0.85,+7.51),(+0.92,+7.51),(+1.00,+7.35),
0648417(+1.06,+7.04)(+1.13,+6.87),(+1.20,+6.78),(+1.27,+6.59),
0648417(+1.33,+6.42)(+1.40,+6.39),(+1.46,+6.36),(+1.52,+6.29),
0648417(+1.58,+6.23)(+1.65,+6.16),(+1.71,+5.91),(+1.76,+5.78),
0648417(+1.82,+5.60)(+1.87,+5.51),(+1.93,+5.47),(+1.98,+5.38),
0648417(+2.04,+5.26)(+2.09,+4.96),(+2.13,+4.89),(+2.18,+4.84),
0648417(+2.23,+4.64)(+2.27,+4.55),(+2.32,+4.42),(+2.36,+4.30),
0648417(+2.40,+4.19)(+2.44,+4.14),(+2.48,+4.09),(+2.53,+4.06),
0648417(+2.56,+3.93)(+2.60,+3.76),(+2.64,+3.70),(+2.68,+3.66),
0648417(+2.71,+3.60)(+2.75,+3.58),(+2.78,+3.57),(+2.82,+3.49),
0648417(+2.85,+3.38)(+2.89,+3.29),(+2.92,+3.28),(+2.95,+3.19),
0648417(+2.98,+3.17)(+3.01,+3.12),(+3.04,+3.08),(+3.07,+3.01),
0648417(+3.10,+2.97)(+3.13,+2.95),(+3.16,+2.85),(+3.19,+2.81),
0648417(+3.22,+2.79)(+3.25,+2.76),(+3.27,+2.70),(+3.30,+2.68),
0648417(+3.33,+2.66)(+3.35,+2.60),(+3.38,+2.56),(+3.40,+2.54),
0648417(+3.43,+2.44)(+3.45,+2.44),(+3.48,+2.41),(+3.50,+2.38),
0648417(+3.52,+2.34)(+3.55,+2.32),(+3.57,+2.26),(+3.59,+2.26),
0648417(+3.61,+2.26)(+3.64,+2.21),(+3.66,+2.19),(+3.68,+2.15),
0648417(+3.70,+2.11)(+3.72,+2.06),(+3.74,+2.01),(+3.76,+2.00),
0648417(+3.78,+1.98)(+3.80,+1.98),(+3.82,+1.92),(+3.84,+1.91),
0648417(+3.86,+1.89)(+3.88,+1.81),(+3.89,+1.77),(+3.91,+1.75),
0648417(+3.93,+1.69)(+3.94,+1.62),(+3.96,+1.55),(+3.98,+1.55),
0648417(+3.99,+1.52)(+4.00,+1.50),(+4.02,+1.48),(+4.04,+1.43),
0648417(+4.05,+1.38)(+4.06,+1.38),(+4.08,+1.37),(+4.09,+1.36),
0648417(+4.10,+1.32)(+4.12,+1.30),(+4.13,+1.28),(+4.14,+1.25),
0648417(+4.15,+1.23)(+4.17,+1.22),(+4.18,+1.19),(+4.19,+1.16),
0648417(+4.20,+1.16)(+4.21,+1.15),(+4.22,+1.10),(+4.23,+1.09),
0648417(+4.25,+1.07)(+4.25,+1.05),(+4.27,+1.04),(+4.28,+1.02),
0648417(+4.29,+1.01)(+4.30,+1.01),(+4.30,+0.93),(+4.31,+0.89),
0648417(+4.32,+0.87)(+4.33,+0.87),(+4.34,+0.87),(+4.35,+0.84),
0648417(+4.36,+0.80)(+4.36,+0.79),(+4.37,+0.77),(+4.38,+0.77),
0648417(+4.39,+0.77)(+4.39,+0.75),(+4.40,+0.72),(+4.41,+0.71),
0648417(+4.42,+0.69)(+4.42,+0.69),(+4.43,+0.69),(+4.44,+0.68),
0648417(+4.44,+0.66)(+4.45,+0.65),(+4.46,+0.63),(+4.46,+0.62),
0648417(+4.47,+0.62)(+4.47,+0.61),(+4.48,+0.60),(+4.49,+0.59),
0648417(+4.49,+0.59)(+4.50,+0.59),(+4.50,+0.59),(+4.51,+0.58),
0648417(+4.52,+0.56)(+4.52,+0.56),(+4.53,+0.56),(+4.53,+0.54),
0648417(+4.54,+0.55)(+4.54,+0.54),(+4.55,+0.54),(+4.55,+0.54),
0648417(+4.56,+0.54)(+4.57,+0.54),(+4.57,+0.54),(+4.58,+0.54),
0648417(+4.58,+0.53)(+4.59,+0.53),(+4.59,+0.53),(+4.60,+0.52),
0648417(+4.60,+0.52)(+4.61,+0.51),(+4.61,+0.50),(+4.62,+0.48),
0648417(+4.62,+0.48)(+4.63,+0.48),(+4.63,+0.46),(+4.64,+0.46),
0648417(+4.64,+0.45)(+4.64,+0.45),(+4.65,+0.44),(+4.65,+0.44),
0648417(+4.66,+0.43)(+4.66,+0.44),(+4.67,+0.42),(+4.67,+0.41),
0648417(+4.67,+0.40)(+4.68,+0.40),(+4.68,+0.41),(+4.69,+0.40),
0648417(+4.69,+0.36)(+4.69,+0.35),(+4.70,+0.35),(+4.70,+0.37),
0648417(+4.71,+0.37)(+4.71,+0.36),(+4.71,+0.35),(+4.71,+0.35),
0648417(+4.72,+0.35)(+4.72,+0.34),(+4.73,+0.34),(+4.73,+0.34),
0648417(+4.73,+0.34)(+4.74,+0.33),(+4.74,+0.33),(+4.74,+0.32),
0648417(+4.75,+0.31)(+4.75,+0.31),(+4.75,+0.31),(+4.75,+0.31),
0648417(+4.76,+0.31)(+4.76,+0.30),(+4.76,+0.29),(+4.77,+0.29),
0648417(+4.77,+0.29)(+4.77,+0.29),(+4.78,+0.27),(+4.78,+0.27),
0648417(+4.78,+0.27)(+4.78,+0.26),(+4.79,+0.26),(+4.79,+0.26),
0648417(+4.79,+0.24)(+4.79,+0.20),(+4.79,+0.19),(+4.80,+0.15),
0648417(+4.80,+0.18)(+4.80,+0.18),(+4.80,+0.16),(+4.80,+0.16),
0648417(+4.80,+0.16)(+4.81,+0.15),(+4.81,+0.15),(+4.81,+0.16),
0648417(+4.81,+0.15)(+4.81,+0.15),(+4.81,+0.14),(+4.82,+0.14),
0648417(+4.82,+0.14)(+4.82,+0.14),(+4.82,+0.14),(+4.82,+0.13),
0648417(+4.82,+0.13)(+4.82,+0.14),(+4.83,+0.13),(+4.83,+0.13),
0648417(+4.83,+0.15)(+4.83,+0.14),(+4.83,+0.14),(+4.83,+0.14),
0648417(+4.83,+0.13)(+4.83,+0.12),(+4.84,+0.12),(+4.84,+0.11),
0648417(+4.84,+0.10)(+4.84,+0.07),(+4.84,+0.07),(+4.84,+0.06),
0648417(+4.84,+0.06)(+4.84,+0.05),(+4.84,-0.22),(+4.83,-0.51),
0648417(+4.82,-1.01)(+4.81,-1.20),(+4.79,-1.74),(+4.77,-2.24),
0648417(+4.74,-2.81)(+4.71,-3.28),(+4.67,-3.59),(+4.64,-3.87),
0648417(+4.60,-4.01)(+4.55,-4.34),(+4.51,-4.54),(+4.46,-4.84),
0648417(+4.41,-5.02)(+4.36,-5.12),(+4.30,-5.30),(+4.25,-5.44),
0648417(+4.19,-5.61)(+4.14,-5.76),(+4.08,-5.87),(+4.02,-5.93),
0648417(+3.96,-6.01)(+3.90,-6.01),(+3.84,-6.10),(+3.78,-6.14),
0648417(+3.71,-6.17)(+3.65,-6.17),(+3.59,-6.24),(+3.53,-6.26),
0648417(+3.46,-6.27)(+3.40,-6.28),(+3.34,-6.28),(+3.28,-6.27),
0648417(+3.21,-6.20)(+3.15,-6.18),(+3.09,-6.17),(+3.03,-6.12),
0648417(+2.97,-6.09)(+2.91,-6.04),(+2.85,-5.99),(+2.79,-5.87),
0648417(+2.73,-5.80)(+2.67,-5.72),(+2.62,-5.68),(+2.56,-5.64),
0648417(+2.51,-5.57)(+2.45,-5.56),(+2.40,-5.46),(+2.34,-5.34),
0648417(+2.29,-5.24)(+2.24,-5.20),(+2.19,-5.16),(+2.13,-5.11),
0648417(+2.09,-4.99)(+2.04,-4.93),(+1.99,-4.86),(+1.94,-4.73),
0648417(+1.89,-4.57)(+1.85,-4.54),(+1.80,-4.40),(+1.76,-4.32),
0648417(+1.72,-4.25)(+1.68,-4.15),(+1.64,-4.04),(+1.60,-3.92),
0648417(+1.56,-3.87)(+1.52,-3.76),(+1.49,-3.68),(+1.45,-3.60),
0648417(+1.41,-3.55)(+1.38,-3.46),(+1.35,-3.31),(+1.31,-3.21),
0648417(+1.28,-3.12)(+1.25,-2.99),(+1.22,-2.87),(+1.20,-2.76),
0648417(+1.17,-2.57)(+1.15,-2.40),(+1.12,-2.29),(+1.10,-2.16),
0648417(+1.08,-1.99)(+1.06,-1.90),(+1.05,-1.78),(+1.03,-1.61),
0648417(+1.01,-1.47)(+1.00,-1.32),(+0.99,-1.20),(+0.98,-1.08),
0648417(+0.97,-0.97)(+0.96,-0.83),(+0.96,-0.54),(+0.95,-0.38),
0148421l,l/s
0208410Time,Volume
0648417(+0.00,+0.01)(+0.01,+0.03),(+0.02,+0.07),(+0.03,+0.12),
0648417(+0.04,+0.18)(+0.05,+0.25),(+0.06,+0.32),(+0.07,+0.40),
0648417(+0.08,+0.47)(+0.09,+0.55),(+0.10,+0.62),(+0.11,+0.69),
0648417(+0.12,+0.77)(+0.13,+0.85),(+0.14,+0.92),(+0.15,+1.00),
0648417(+0.16,+1.06)(+0.17,+1.13),(+0.18,+1.20),(+0.19,+1.27),
0648417(+0.20,+1.33)(+0.21,+1.40),(+0.22,+1.46),(+0.23,+1.52),
0648417(+0.24,+1.58)(+0.25,+1.65),(+0.26,+1.71),(+0.27,+1.76),
0648417(+0.28,+1.82)(+0.29,+1.87),(+0.30,+1.93),(+0.31,+1.98),
0648417(+0.32,+2.04)(+0.33,+2.09),(+0.34,+2.13),(+0.35,+2.18),
0648417(+0.36,+2.23)(+0.37,+2.27),(+0.38,+2.32),(+0.39,+2.36),
0648417(+0.40,+2.40)(+0.41,+2.44),(+0.42,+2.48),(+0.43,+2.53),
0648417(+0.44,+2.56)(+0.45,+2.60),(+0.46,+2.64),(+0.47,+2.68),
0648417(+0.48,+2.71)(+0.49,+2.75),(+0.50,+2.78),(+0.51,+2.82),
0648417(+0.52,+2.85)(+0.53,+2.89),(+0.54,+2.92),(+0.55,+2.95),
0648417(+0.56,+2.98)(+0.57,+3.01),(+0.58,+3.04),(+0.59,+3.07),
0648417(+0.60,+3.10)(+0.61,+3.13),(+0.62,+3.16),(+0.63,+3.19),
0648417(+0.64,+3.22)(+0.65,+3.25),(+0.66,+3.27),(+0.67,+3.30),
0648417(+0.68,+3.33)(+0.69,+3.35),(+0.70,+3.38),(+0.71,+3.40),
0648417(+0.72,+3.43)(+0.73,+3.45),(+0.74,+3.48),(+0.75,+3.50),
0648417(+0.76,+3.52)(+0.77,+3.55),(+0.78,+3.57),(+0.79,+3.59),
0648417(+0.80,+3.61)(+0.81,+3.64),(+0.82,+3.66),(+0.83,+3.68),
0648417(+0.84,+3.70)(+0.85,+3.72),(+0.86,+3.74),(+0.87,+3.76),
0648417(+0.88,+3.78)(+0.89,+3.80),(+0.90,+3.82),(+0.91,+3.84),
0648417(+0.92,+3.86)(+0.93,+3.88),(+0.94,+3.89),(+0.95,+3.91),
0648417(+0.96,+3.93)(+0.97,+3.94),(+0.98,+3.96),(+0.99,+3.98),
0648417(+1.00,+3.99)(+1.01,+4.00),(+1.02,+4.02),(+1.03,+4.04),
0648417(+1.04,+4.05)(+1.05,+4.06),(+1.06,+4.08),(+1.07,+4.09),
0648417(+1.08,+4.10)(+1.09,+4.12),(+1.10,+4.13),(+1.11,+4.14),
0648417(+1.12,+4.15)(+1.13,+4.17),(+1.14,+4.18),(+1.15,+4.19),
0648417(+1.16,+4.20)(+1.17,+4.21),(+1.18,+4.22),(+1.19,+4.23),
0648417(+1.20,+4.25)(+1.21,+4.25),(+1.22,+4.27),(+1.23,+4.28),
0648417(+1.24,+4.29)(+1.25,+4.30),(+1.26,+4.30),(+1.27,+4.31),
0648417(+1.28,+4.32)(+1.29,+4.33),(+1.30,+4.34),(+1.31,+4.35),
0648417(+1.32,+4.36)(+1.33,+4.36),(+1.34,+4.37),(+1.35,+4.38),
0648417(+1.36,+4.39)(+1.37,+4.39),(+1.38,+4.40),(+1.39,+4.41),
0648417(+1.40,+4.42)(+1.41,+4.42),(+1.42,+4.43),(+1.43,+4.44),
0648417(+1.44,+4.44)(+1.45,+4.45),(+1.46,+4.46),(+1.47,+4.46),
0648417(+1.48,+4.47)(+1.49,+4.47),(+1.50,+4.48),(+1.51,+4.49),
0648417(+1.52,+4.49)(+1.53,+4.50),(+1.54,+4.50),(+1.55,+4.51),
0648417(+1.56,+4.52)(+1.57,+4.52),(+1.58,+4.53),(+1.59,+4.53),
0648417(+1.60,+4.54)(+1.61,+4.54),(+1.62,+4.55),(+1.63,+4.55),
0648417(+1.64,+4.56)(+1.65,+4.57),(+1.66,+4.57),(+1.67,+4.58),
0648417(+1.68,+4.58)(+1.69,+4.59),(+1.70,+4.59),(+1.71,+4.60),
0648417(+1.72,+4.60)(+1.73,+4.61),(+1.74,+4.61),(+1.75,+4.62),
0648417(+1.76,+4.62)(+1.77,+4.63),(+1.78,+4.63),(+1.79,+4.64),
0648417(+1.80,+4.64)(+1.81,+4.64),(+1.82,+4.65),(+1.83,+4.65),
0648417(+1.84,+4.66)(+1.85,+4.66),(+1.86,+4.67),(+1.87,+4.67),
0648417(+1.88,+4.67)(+1.89,+4.68),(+1.90,+4.68),(+1.91,+4.69),
0648417(+1.92,+4.69)(+1.93,+4.69),(+1.94,+4.70),(+1.95,+4.70),
0648417(+1.96,+4.71)(+1.97,+4.71),(+1.98,+4.71),(+1.99,+4.71),
0648417(+2.00,+4.72)(+2.01,+4.72),(+2.02,+4.73),(+2.03,+4.73),
0648417(+2.04,+4.73)(+2.05,+4.74),(+2.06,+4.74),(+2.07,+4.74),
0648417(+2.08,+4.75)(+2.09,+4.75),(+2.10,+4.75),(+2.11,+4.75),
0648417(+2.12,+4.76)(+2.13,+4.76),(+2.14,+4.76),(+2.15,+4.77),
0648417(+2.16,+4.77)(+2.17,+4.77),(+2.18,+4.78),(+2.19,+4.78),
0648417(+2.20,+4.78)(+2.21,+4.78),(+2.22,+4.79),(+2.23,+4.79),
0648417(+2.24,+4.79)(+2.25,+4.79),(+2.26,+4.79),(+2.27,+4.80),
0648417(+2.28,+4.80)(+2.29,+4.80),(+2.30,+4.80),(+2.31,+4.80),
0648417(+2.32,+4.80)(+2.33,+4.81),(+2.34,+4.81),(+2.35,+4.81),
0648417(+2.36,+4.81)(+2.37,+4.81),(+2.38,+4.81),(+2.39,+4.82),
0648417(+2.40,+4.82)(+2.41,+4.82),(+2.42,+4.82),(+2.43,+4.82),
0648417(+2.44,+4.82)(+2.45,+4.82),(+2.46,+4.83),(+2.47,+4.83),
0648417(+2.48,+4.83)(+2.49,+4.83),(+2.50,+4.83),(+2.51,+4.83),
0648417(+2.52,+4.83)(+2.53,+4.83),(+2.54,+4.84),(+2.55,+4.84),
0648417(+2.56,+4.84)(+2.57,+4.84),(+2.58,+4.84),(+2.59,+4.84),
0648417(+2.60,+4.84)(+2.61,+4.84),(+2.62,+4.84),(+2.63,+4.83),
0648417(+2.64,+4.82)(+2.65,+4.81),(+2.66,+4.79),(+2.67,+4.77),
0648417(+2.68,+4.74)(+2.69,+4.71),(+2.70,+4.67),(+2.71,+4.64),
0648417(+2.72,+4.60)(+2.73,+4.55),(+2.74,+4.51),(+2.75,+4.46),
0648417(+2.76,+4.41)(+2.77,+4.36),(+2.78,+4.30),(+2.79,+4.25),
0648417(+2.80,+4.19)(+2.81,+4.14),(+2.82,+4.08),(+2.83,+4.02),
0648417(+2.84,+3.96)(+2.85,+3.90),(+2.86,+3.84),(+2.87,+3.78),
0648417(+2.88,+3.71)(+2.89,+3.65),(+2.90,+3.59),(+2.91,+3.53),
0648417(+2.92,+3.46)(+2.93,+3.40),(+2.94,+3.34),(+2.95,+3.28),
0648417(+2.96,+3.21)(+2.97,+3.15),(+2.98,+3.09),(+2.99,+3.03),
0648417(+3.00,+2.97)(+3.01,+2.91),(+3.02,+2.85),(+3.03,+2.79),
0648417(+3.04,+2.73)(+3.05,+2.67),(+3.06,+2.62),(+3.07,+2.56),
0648417(+3.08,+2.51)(+3.09,+2.45),(+3.10,+2.40),(+3.11,+2.34),
0648417(+3.12,+2.29)(+3.13,+2.24),(+3.14,+2.19),(+3.15,+2.13),
0648417(+3.16,+2.09)(+3.17,+2.04),(+3.18,+1.99),(+3.19,+1.94),
0648417(+3.20,+1.89)(+3.21,+1.85),(+3.22,+1.80),(+3.23,+1.76),
0648417(+3.24,+1.72)(+3.25,+1.68),(+3.26,+1.64),(+3.27,+1.60),
0648417(+3.28,+1.56)(+3.29,+1.52),(+3.30,+1.49),(+3.31,+1.45),
0648417(+3.32,+1.41)(+3.33,+1.38),(+3.34,+1.35),(+3.35,+1.31),
0648417(+3.36,+1.28)(+3.37,+1.25),(+3.38,+1.22),(+3.39,+1.20),
0648417(+3.40,+1.17)(+3.41,+1.15),(+3.42,+1.12),(+3.43,+1.10),
0648417(+3.44,+1.08)(+3.45,+1.06),(+3.46,+1.05),(+3.47,+1.03),
0648417(+3.48,+1.01)(+3.49,+1.00),(+3.50,+0.99),(+3.51,+0.98),
0648417(+3.52,+0.97)(+3.53,+0.96),(+3.54,+0.96),(+3.55,+0.95),
0128421s,l
3. Interpretation
of
the
GDT
messages:
- GDT name and name in spirometry database are different. Would you like to
update patient?: this message is displayed if the GDT file contains a patient whose
SSN ID is already in the database, but in the database another name belogs to this SSN
ID. If You select Yes, the patient edit page will appear where the patient with the
given SSN ID can be edited. If You select No, the patient's data will be loaded from
the
software's
database.
- GDT patient found in spirometry database, however, the patient is inactive: this
message is displayed, when the GDT file contains a patient who has already been in
the database previously, but this patient has been deleted. Measurement can not be
started
with
this
patient.
- GDT file not found: there is no GDT file in the GDT subdirectory
- Patient of the GDT result file not found in spirometry database: patient of the
GDT result file not found in the software's database.
About
This module is reachable from the main menu of the application by clicking on the About
menu item. Here the user can see some details about the software, like the name, version
number, copyright, website address of the product. By clicking on the OK button the screen
closes.
Help
The user manual/help is reachable from the main menu of the application by clicking on the
Help menu item. The user manual will open in the default browser.
Application language, editing the langugae files
Application supports multilingualism. New language can be added by the user too. There are
some languages supported by the application by default. There are 3 (optionally 4) different
parts of application which should be translated to have full language support:
•
•
•
•
text appearing in application (located in language subdirectory - *.lng files)
application help (located in Help subdirectory)
report templates
voice (optional) (located in sound subdirectory)
The beginning of the language file contains 3 special lines. "LANGUAGE_NAME English"
causes text "English" to appear in language combo box. "HELP_DIRECTORY english" says
that help file can be found in "help\english" directory. "SOUND_DIRECTORY english" says
that voice files are located in "sound\english" directory. By selecting "Englih" as language the
Help and Voice files are loaded from the mentioned subdirectories. However English is the
default language of the application. If the user selects let's say French language and help or
voices are not available for that language then English versions are used. All files should
preserve their original (English) name.
The language files with the program called LanguageFileMaker.exe can be edited. After
starting this application, the following window appears. Use the Load button to load the
language file which will be edited. By default, the language files for spirometry application
folder will open, if the edited file is somewhere else, you can browse there.
If you succesfully loaded the language file, you will find the following window:
The language keys are on the left side of the window and the corresponding captions are on
the right side of the window, which apper in the spirometry application. Each captions can be
edited by double click on them and type the text you want to display in the window. When
you finished the translation or modifications press Quick Save or Save as ... button to save
your work. Warning! The Quick Save button override the opened language file.