1
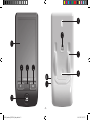
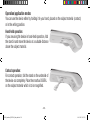
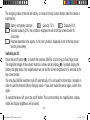
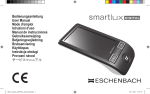
Bedienungsanleitung
User Manual
Mode d'emploi
Istruzioni d'uso
Manual de instrucciones
Gebruiksaanwijzing
Betjeningsvejledning
Bruksanvisning
Käyttöopas
Instrukcja obsługi
Provozní návod
BDA_smartlux_DIGITAL_final_multi.indd1
06.11.201218:53:37
English
Dear customer,
we congratulate you on the purchase of this electronic magnifying glass for hand-held or contact
use - a quality product made by Eschenbach - and we hope you enjoy using the device on a daily
basis
As the market leader for magnifying glasses and reading glasses, we at Eschenbach are able to
look back on many years of experience which are mirrored in the quality, handling and design of
our products.
Before initial use
Before using the device for the first time, please read the entire manual carefully so that you can
get to know all the functions of the device.
- 17 BDA_smartlux_DIGITAL_final_multi.indd17
06.11.201218:53:39
Safety instructions
XXRisk of dazzling and injury! Do not look at the light source on the underside of the housing
for long periods! Risk group 1 in accordance with EN 62471:2008. Exposure hazard
value (EHV): 2200 seconds at 800 mm. The free group limit values are complied with at a .
distance of1.8 m . Retina hazard due to blue light 400 nm to 780 nm.
XXDo not allow children to handle electronic devices without supervision.
XXOnly charge the device with the mains adapter supplied!
XXCheck the device and the mains adapter with power cable for visible damage. If the device, the
mains adapter or its cable are damaged, disconnect the mains adapter from the mains power
immediately. Ask a qualified specialist to check the product before you use it again.
XXNever open the smartlux DIGITAL housing. There are no serviceable parts whatsoever inside.
The guarantee will be void if the device is opened.
XXNever expose the smartlux DIGITAL to moisture.
XXProtect the smartlux DIGITAL from knocks or blows and excessive heat! Never place the smartlux
DIGITAL on heating devices or in direct sunlight!
XXEnsure that other people, particularly children, are aware of these risks!
- 18 BDA_smartlux_DIGITAL_final_multi.indd18
06.11.201218:53:39
-3BDA_smartlux_DIGITAL_final_multi.indd3
06.11.201218:53:37
Items supplied
XXsmartlux DIGITAL electronic reading device
XXCase with cleaning cloth
XXMains cable (with plugs for EU, GB, US, AUS)
XXOperating Instructions
Function elements
• On/off switch for LED illumination
1.LCD (Liquid Crystal Display)
• Deleting saved images
2.Photo button
5.On/off button
• Freeze/save the image displayed on the .
6.Stand
screen
7.Camera
3.Magnifying button
8.LED illumination
• Adjusting the magnification
9.Charging socket
• Adjusting the display brightness
10.LED charging indicator
4.Contrast button
• Selection of display modus (true colour, .
increased contrast image, false colour image)
- 19 -
BDA_smartlux_DIGITAL_final_multi.indd19
06.11.201218:53:39
Operation/application modes
You can use the device either by holding it in your hand, placed on the subject material (contact)
or in the writing position.
Hand-held operation:
If you are using the device in hand-held operation, fold
the stand in and move the device at a suitable distance
above the subject material.
Contact operation:
For contact operation, fold the stand on the underside of
the device out completely. Place the smartlux DIGITAL
on the subject material which is to be magnified.
- 20 BDA_smartlux_DIGITAL_final_multi.indd20
06.11.201218:53:39
Writing position:
You can also use the smartlux DIGITAL for writing underneath it. To do this, fold the stand out as far as the first
snap-in position and position the device vertically.
Charging the internal battery:
Before using the smartlux DIGITAL for the first time,
you need to fully charge the internal battery!
To charge it, connect the cable from the mains adapter supplied to the charging socket (o) on
the smartlux DIGITAL. Now plug the mains adapter into a suitable mains socket using the relevant
mains plug type. Charging takes about 2 hours. The charging indicator LED (a) will illuminate
red during the charging process. The charging check LED goes out once the charging process is
complete. When charging is complete, disconnect the mains adapter from the plug and from the
smartlux DIGITAL. You can use the device during the charging process. This will extend the charging time.
- 21 BDA_smartlux_DIGITAL_final_multi.indd21
06.11.201218:53:39
The charging status of the internal battery is shown at the top screen border when the device is
switched on.
Battery completely charged
Capacity 75 % Capacity 50 %
Residual capacity 25%, the symbol is displayed in red at the top screen border for
5 seconds.
Residual operation time approx. 3 min, the symbol is displayed in red at the top screen
border permanently
Switching on/off
Press the on/off button (t), to switch the smartlux DIGITAL on and to go to live image mode.
The magnified image of the subject material is shown on the display (q). Symbols display the
battery charging status, the magnification last set and the screen brightness for 5 seconds at the
top screen border..
The smartlux DIGITAL switches itself off automatically if it is not used for more than 3 minutes in
order to save the internal battery charging status. If you want touse the device again, switch it on
again.
To switch the device off, press the on/off button. The current settings for magnification, display
mode and display brightness will be saved.
- 22 BDA_smartlux_DIGITAL_final_multi.indd22
06.11.201218:53:40
Adjusting the Magnification
The smartlux DIGITAL can provide 4 magnification levels during contact operation: 5×, 7×, 9×
and 12×. The available magnification is lower when the device is being held in the hand. .
If you raise the smartlux DIGITAL 5 cm from the subject, the resulting magnification levels are .
approximately 1.9×, 2.6×, 3.4× und 4.5×.
In the writing position:.
If you press the magnification button (e) briefly, the next highest magnification will be set.
The magnification currently set will be displayed at the top screen border for 5 seconds.
Adjusting the display brightness
If the display appears to be too bright, you can dim the brightness. To do this, press and hold
the magnification button (e) down. The display will dim to 75% after 3 seconds, and then to a
brightness of 50% after a further 3 seconds, before it repeats the cycle from 100% brightness. To
save the setting, simply release the magnification button at the display brightness which appears
comfortable to you. The brightness currently set will be displayed at the top screen border for 5
seconds.
100% display brightness 75% display brightness 50% display brightness
- 23 BDA_smartlux_DIGITAL_final_multi.indd23
06.11.201218:53:40
Setting the display mode
The smartlux DIGITAL is equipped with a range of display modes so that you can achieve the best
possible image. If you press the contrast button (r) briefly and repeatedly, you will run through
the various display modes from true colour mode through increased contrast mode black/white
and white/black up to false colour display black/yellow and yellow/black.
Switching the LED illumination on/off
There are two LEDs (i) on the underside of the smartlux DIGITAL which illuminate the subject
material to enable optimum contrasting and true-colour images. Under certain circumstances
(e.g. glossy subject material) it may be necessary to switch the LED illumination off to avoid point
reflections..
To do this, press and hold the contrast button (r) for 3 seconds.
If you want to switch the LED illumination on again, press and hold the contrast button for a further 3
seconds. The LED illumination status currently set will be displayed at the top screen border for 5
seconds.
LED illumination switched on
LED illumination switched off
- 24 BDA_smartlux_DIGITAL_final_multi.indd24
06.11.201218:53:40
Freezing and saving images
The smartlux DIGITAL is equipped with a photo button (w) which enables you to temporarily
freeze images and then save them permanently on the device (photo mode).
Temporarily freezing images:.
To freeze an image, press the photo button (w) briefly. The frozen image will be shown on the
display. You can further edit it by using the magnification button (e) and the contrast button (t).
If you press the photo button (w) again briefly, you will return to live image mode.
Saving images permanently:.
Once you have frozen an image, you can save it permanently by pressing and holding the photo
button (w,
) for at least 3 seconds. The image will be saved at position 1 in the smartlux
DIGITAL memory. The memory location is displayed using a diskette symbol at the top screen
border. Images already saved are moved up by one position. Up to 20 images can be permanently
saved. Once the maximum memory capacity has been reached, a red diskette symbol is displayed
at the top screen border. In this case, you should delete some saved images in order to create
more memory capacity (see managing saved images).
- 25 BDA_smartlux_DIGITAL_final_multi.indd25
06.11.201218:53:40
If you switch the smartlux DIGITAL on and there is no memory capacity available for images, this
will be shown on the start screen top border by a red, crossed-out diskette symbol.
Image has been saved in Position 1 of 20.
Image memory is full (symbol is then shown red). Images must be deleted before you can
save new images.
Display when the smartlux DIGITAL is switched on and the image memory is full. No more images can be saved.
Managing saved images
You can manage your saved images in photo mode. Hold the photo button (w) pressed for 3
seconds to change from live image mode to the image saved in Position 1. If you continue to hold
the photo button (w) pressed, the images saved in Positions 2 to 20 will be displayed at 3 second
intervals. Release the photo button (w) once the image you wish to manage is displayed.
- 26 BDA_smartlux_DIGITAL_final_multi.indd26
06.11.201218:53:40
Magnifying saved images:.
If you press the magnifying button (e) briefly, you can change the magnification of the selected
image (see also "Adjusting magnification").
Changing the display mode for the saved image:
You can select the display mode most suitable for the image by pressing the contrast button (r)
briefly (see also "Adjusting the display mode").
Deleting saved images:.
To delete a saved image, press and hold the contrast button (r) for 3 seconds. A waste bin ( )
will be displayed as a query in order to ask you to confirm whether you really wish to delete the
image. Confirm the deletion by pressing the contrast button (r,
) again.
If you do not want to delete the image, cancel the deletion process by pressing the magnification
button (e,
) or the photo button (w,
).
- 27 BDA_smartlux_DIGITAL_final_multi.indd27
06.11.201218:53:40
Technical data
Display size:
Magnification range:
Operating time:
Charging time:
Mains adapter voltage:
Temperature range:
Weight:
12.7 cm (5˝)
Contact operation: 5×, 7×, 9×, 12×
Hand-held at approx. 5 cm: 1.9×, 2.6×, 3.4×, 4.5×
Writing position: 1.7×, 2.4×, 3.1×, 4.2×
Approx. 3 hours
Approx. 2 hours
AC 100 V — 240 V~, 50 — 60 Hz
10 °C — 40 °C
220 g
Care Instructions
XXWhen cleaning the smartlux DIGITAL do not use any soap solutions that contain softening
agents, alcoholic or organic solvents, and do not use abrasive detergents!
XXDo not clean the smartlux DIGITAL in an ultrasonic bath or under flowing water!
XXOnly clean the smartlux DIGITAL with a soft, dry cloth. For heavier soiling (e.g. fingerprints),
moisten the cloth slightly.
XXIf you are not using the smartlux DIGITAL, always keep it in the hard foam case supplied.
- 28 BDA_smartlux_DIGITAL_final_multi.indd28
06.11.201218:53:40
Warranty
Within the parameters of the applicable statutory provisions, we provide a warranty for the functioning of the product described in this manual with regard to faults arising in connection with
manufacturing defects or material defects. In event of damage due to improper handling, including
damage from a fall or impact, no warranty claims can be made. Warranty claims are only accepted upon presentation of the sales receipt!
Disposal
XXWhen the device reaches the end of its useful life, do not dispose of it with the normal household waste. This product is subject to the European directive 2002/96/EC.
XXDispose of the product or parts of the product through a certified disposal facility or your municipal disposal facility. Observe the currently applicable regulations. In case of doubt, contact
your disposal facility. Dispose of all packaging materials in an environmentally friendly manner.
- 29 BDA_smartlux_DIGITAL_final_multi.indd29
06.11.201218:53:40