1
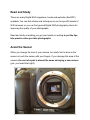
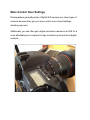
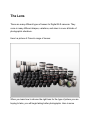
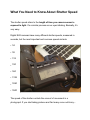
Beginner‘s Guide
to Digital SLR
Photography
Basic skills to create stunning shots!
By Tobias Kneissl
http://www.best-photography-courses.com
A BPC Production
1st Edition
This ebook may not be reproduced, distributed or sold under any circumstances.
Foreword ...........................................................................5
Introduction to Digital SLR Photography ......................6
Keep Your User Manual ...........................................................................7
Experiment and Practice ..........................................................................8
Read and Study .......................................................................................9
Avoid the Sensor ......................................................................................9
Pre-focus Your Shots .............................................................................10
Getting to Know Your Camera ......................................11
Digital SLR Cameras Have Removable Lens ........................................12
More Control Over Settings ....................................................................13
RAW File Format Option ........................................................................14
The Lens .........................................................................15
Choosing Lenses to Fit Your Camera ....................................................16
Choosing Focal Length ..........................................................................16
Prime Lens .............................................................................................17
Zoom Lens .............................................................................................18
General Lens Care Tips .........................................................................19
Exposure Fundamentals ...............................................21
Auto Exposure ........................................................................................22
Correcting Exposure ..............................................................................23
What You Need to Know About Shutter Speed ...........24
When to Use Faster Shutter Speeds .....................................................25
When to Use Slower Shutter Speeds .....................................................26
Aperture Control ............................................................27
Understanding Maximum Aperture .........................................................28
How Do You Know the Maximum Aperture of Your Lens? .....................29
How Do You Know What Maximum Aperture You Need? ......................30
ISO ...................................................................................31
How to Select an ISO Setting .................................................................32
Thanks for Reading .......................................................34
Copyright, Legal Notices and
Disclaimer
Beginner‘s Guide to Digital SLR Photography
Copyright © 2012 Tobias Kneissl, best-photography-courses.com
All rights reserved worldwide
No part of this publication may be stored in a retrieval system, transmitted
or reproduced in any way, including but not limited to digital copying and
printing.
The author, Tobias Kneissl, has made his best effort to produce a high
quality, informative and helpful book. But he makes no representation or
warranties of any kind with regard to the completeness or accuracy of the
contents of the book. He accepts no liability of any kind for any losses or
damages caused or alleged to be caused, directly or indirectly, from using
the information contained in this ebook.
Images available over the Internet may be subject to copyright and other
intellectual rights owned by third parties. Some of the images in this eBook
were bought from photo agencies like iStockphotos.
Foreword
As you might know from my best-photography-courses.com (BPC) website,
I am not only a passionate photographer.
Photography is so much more than just a „job“ to earn money. For me it‘s
even more than passion. It‘s my way of life! And if you are reading this
ebook, chances are good that you also have what I call the „photography
love“ :-)
My intention with this ebook lies solely on YOU, the photographer. I receive
so many questions each day - it‘s unbelievable. But most questions come
up over and over again. That‘s why I came up with the idea of this
beginner‘s guide. I want you to understand the basics of digital SLR
photography. Indeed, you can dramatically increase the quality of your
photographs if you just know the fundamental camera techniques.
Once you understand the functionality of your SLR camera - adopt your
knowledge and you will see that you can create amazing pictures!
Why do I give away this ebook for free? Well, if the information in this
ebook help you in some way (and I strongly believe that), this is actually the
greatest reward for me.
I hope you enjoy reading this ebook as much as I enjoyed writing it!
Introduction to Digital SLR Photography
As you begin using a Digital SLR camera for the first time, there are some
tips and tricks to help you get the most out of the experience.
Like most any new hobby or profession you could undertake – you will
only get better through experience and practice - so get the camera out
and start taking photographs!
Keep Your User Manual
When you are becoming familiar with a new Digital SLR camera, do not
throw your user manual away! You will want to read it from cover to cover
several times, especially when you first begin using the camera.
Also, keep the manual handy even after you have become familiar with
your camera, in case you need to change settings or need some
information after you use the camera more regularly. Many people (myself
including) simply keep their user manual inside their camera bag for
easy reference.
Even after all the years that I am in the photography business the camera manual is always at hand.
Experiment and Practice
Whenever you get a new camera, the first thing you should do is:
Experiment with the settings.
The best way to understand what your camera can do, and how to make it
do what you want when you want it to do it – is through experimentation.
You never want to be learning how to change a setting right at the moment
when you’re attempting to get a picture of something!
The rare animal sighting will be missed if you spend time trying to figure out
your settings before you take a photograph, so learn how to make camera
setting adjustments and practice them so you can make them quickly and
efficiently.
Practice taking different types of photographs at different settings:
• Running water at slow and fast shutter speeds
• Landscapes at different aperture settings
• Or with and without a tripod
You might be surprised to see how different the image comes out when you
take the same photograph using different camera settings.
Read and Study
There are many Digital SLR magazines, books and websites (like BPC)
available. You can find articles and techniques to use for specific brands of
SLR cameras; or you can find general Digital SLR photography advice for
improving the quality of your photographs.
Read and study everything you get your hands on and try to put the tips
into practice when you take photographs.
Avoid the Sensor
When you change the lens of your camera, be careful not to blow on the
sensor or touch the sensor with your fingers. If you damage this area of the
camera, the cost of repair is almost the same as buying a new camera
(yes, you heard that right!).
If you notice smudge marks or spots appearing on your photographs, bring
your camera in for professional cleaning services or purchase Digital SLR
specific cleaning kits or dust blowers to clean the camera sensor the right
way.
Pre-focus Your Shots
As you begin taking photographs with your Digital SLR, inexperienced
photographers may want to press the shutter button just half way at first, to
pre-focus before actually taking the photograph.
It will help you anticipate where the subject will be positioned in your
photograph before the subject reaches the spot you will take the picture;
and you have the opportunity to focus the camera on the spot before you
take the picture which will result in a clearer quality image.
Getting to Know Your Camera
A Digital SLR (single lens reflex) camera is different from a point and shoot
camera in several ways.
The term “SLR” refers to how the camera works: as the shutter button is
pressed to take a photograph, a mirror moves to reveal the sensor.
There is no lag time with a Digital SLR camera. When you push the button
to take a picture, it will take the picture almost instantly, which makes these
cameras ideal for photographing moving objects or people – like sporting
events and children.
One of the most common complaints of people using a point and shoot
digital camera is how long it takes from the time the shutter button is
pressed and the picture is actually taken and sometimes the shot is missed
all together if you don’t time it right.
There may be some differences between Digital SLR cameras created by
the different manufacturers.
In other words, a Sony Digital SLR may not be exactly the same as a
Canon or Nikon, in the way you operate them. They may have different
knobs and buttons to adjust your camera’s settings; and the best thing you
can do with a camera, even if you have used one before, is practice using it
until you become familiar with all of the features.
Digital SLR Cameras Have Removable Lens
One of the primary differences between a Digital SLR and a point and
shoot camera is that SLR cameras have removable lens. Because the
lens’ can be detached, you are not limited to the lens that came with the
camera.
You can change your camera lens based on what you are photographing or
according to the environmental conditions you are taking pictures in.
Within seconds you can change your lens and adopt to the situation!
More Control Over Settings
Photographers generally prefer a Digital SLR camera over other types of
cameras because they give you more control over manual settings,
including exposure.
Additionally, you can often get a higher resolution camera in an SLR for a
more affordable price compared to high resolution point and shoot digital
cameras.
RAW File Format Option
As a beginner, you may want to practice taking photographs using the
camera’s RAW file format. This allows you to adjust the white balance or
picture style on your computer after you take the photograph, if you should
have it set up wrong.
This is extremely useful when attempting to take photographs of a subject
where you only get one chance to get the image – such as an animal
moving past.
The animal isn’t likely to repeat the movement for you over and over until
you get the perfect photograph, so using the RAW file format allows you to
take the photograph and adjust the white balance settings later on your
computer.
The Lens
There are many different types of lenses for Digital SLR cameras. They
come in many different shapes, variations, and sizes to cover all kinds of
photographic situations.
Here‘s a picture of Canon‘s range of lenses:
When you learn how to choose the right lens for the type of picture you are
hoping to take; you will begin taking better photographs. Here is some
basic information about the different lenses available; to help you choose
which lenses you need for your camera:
Choosing Lenses to Fit Your Camera
Before you can go shopping for camera lenses, you need to understand
which lenses will fit your camera. You can buy manufacturer-specific
lenses, which makes the process easier. If you have a Canon camera, you
would then buy lenses sold by Canon.
Digital SLR lenses are designed to communicate electronically with the
camera, so information like aperture settings and other lens settings can be
relayed from the lens to the camera. The connections are not the same
from one manufacturer to the next, so you should buy the same brand of
camera lenses as your camera’s brand.
It is possible to purchase lenses from third-party manufacturers (Tamron is
such an example), which often saves you a little money, but you need to
make sure the lens mount of the third-party lens will work with your Digital
SLR camera.
Choosing Focal Length
Digital SLR lenses are created with different focal lengths. There is no such
thing as a lens that can cover all focal ranges from 11mm to 600mm; which
means you need to know a little about focal lengths to choose a lens for
your photograph.
Short focal length lenses require that you get close to your subject for a
close-up photograph; while a longer focal length means you can be further
away and still take a close-up.
Digital SLR lenses come in different focal lengths. A zoom lens has
variable focal length, which means it can be adjusted, and a prime lens
has a fixed focal length.
There are four main categories of Digital SLR lenses according to focal
length. Choose a lens based on what you intend to photograph:
Type of Lens
Wide Angle
Focal Length
28mm or lower
Standard
Telephoto
Super-Telephoto
35mm to 85mm
100mm to 300mm
300mm or higher
Intended Uses
Indoors, architecture and
landscapes
Portraits, flowers
Sports and Portraits
Sports and Wildlife,
things at great distances
Once you determine which focal length lens you need, you can then
consider whether you should get a prime or zoom lens.
Prime Lens
Digital SLR prime lens have fixed focal lengths that cannot be adjusted.
When you want to get a close up, you have to physically position yourself
closer to the subject. So, if you want to take photographs using different
focal lengths, you would need to purchase multiple prime lenses for each of
the focal lengths.
Having a lens that is dedicated to one focal length gives you a crystal clear
photo, since there are no moving parts in the lens like there are for zoom
lenses.
That being said, however, there are many high quality zoom lenses that
can capture quality images similar to what you can get from a prime lens,
it’s just that it will cost you more money for that type of performance in a
zoom lens.
Zoom Lens
With a Digital SLR zoom lens, you can change the focal length by adjusting
the lens. These are ideal lenses for beginning photographers who will take
photographs of many different objects at different distances.
You won’t need to purchase multiple lenses, although a zoom lens is often
more expensive than buying multiple prime lenses. The advantage of a
zoom lens is that you can stand wherever you are, and adjust the focal
length without physically changing your position in relation to your subject
matter.
When comparing zoom lenses, there are two numbers to compare.
Zooms cover a range of focal length, so the numbers indicate the wide
angle setting and the telephoto setting you can achieve using that particular
zoom lens. You might see a zooms lens described as 28-135mm zoom,
which means the wide angle setting is 28mm and the telephoto setting is
135mm.
The larger the distance between the two numbers, the more powerful the
zoom lens. A zoom lens designated as 28-300mm is more powerful than
one designated 28-135mm; and the 28-300mm can cover a wider focal
range.
General Lens Care Tips
Once you have one or more lenses for your Digital SLR camera, you want
to take care of them to get the best photographs you can for as long as you
can before having to replace the lens.
Make sure you buy a UV filter for each Digital SLR lens you own. This will
provide a layer of protection for the lens, and UV filters are much easier
and less expensive to replace than a scratched lens.
If you are taking photographs outside, do not change your lens outdoors if it
is windy. Dust can easily get on the lens and ruin the clarity of your
photographs. If you must change your camera lens while outside, in any
weather condition, face the body of the camera down. Dust isn’t going to
fall up from the ground to get on the camera sensor.
Exposure Fundamentals
When you are ready to start experimenting with your camera outside the
“AUTO” settings, you can start playing with the three elements of exposure:
ISO, Aperture, and Shutter Speed.
All three of these exposure aspects relate to how much light is allowed
into the camera and how the camera interacts with the light. When you
adjust the amount of light allowed to reach the sensor, you can make a
photograph taken during the day look like it was taken at night; or a
photograph taken at night appear bright.
The three elements of exposure are explained in more detail within this
ebook, but for reference purposes they are:
• ISO – the measurement of the camera sensor’s sensitivity to light;
• Aperture – the measurement of the opening in the lens when the
photograph is taken;
• Shutter Speed – the length of time the camera’s shutter is physically
open.
The exposure of a photograph is dependent upon how these three
elements interact. When you change one element, it impacts the exposure
and all of the other elements involved in taking a photograph!
A Digital SLR camera is the ideal way to experiment with exposure, since
you can take as many photographs as you want at no cost. You can try
taking the same photograph using AUTO mode, Manual Mode, and in
Semi-Automatic, where you adjust only certain settings and allow the
others to set automatically.
Auto Exposure
Digital SLR cameras will monitor the conditions of the environment you are
taking photographs in, the brightness and color of your subject, and adjust
the exposure automatically to give you optimal results.
The Auto Exposure will give you well-lit photographs under most conditions,
but there are times when you might want to play with the exposure settings
to get a brighter or darker image. Changing your Digital SLR camera to
manual settings allows more control over how the final photograph will
look.
A creative photographer may want to emphasize the shadows in an image,
and make the sky seem a deeper shade of blue. This can be done by
reducing exposure.
On the other hand, you could take the same photograph and bring out the
details hiding in the shadows by increasing exposure. Changing the level of
exposure can change the entire mood of a photograph and is an advanced
technique photographers use.
Correcting Exposure
One of the advantages of shooting with a Digital SLR is that you can make
adjustments to your photographs on your computer after you take them.
With a traditional film camera, you pretty much have to get it right before
you take the shot! If you take a photo with poor exposure, you can use
software and your computer to improve it.
Improving exposure with your computer isn’t a miracle cure, however. You
still want to attempt to get the exposure settings correct before taking the
picture, because the following issues can result when attempting to correct
exposure after the photo has been taken:
• Poorly exposed photographs won’t have good contrast, even after digital
correction
• Overexposed and underexposed photographs will have areas without
detail, called “blown highlights”, that cannot be corrected
• Color saturation will be slightly off in a poorly exposed photograph
• Digitally correcting exposure with your computer software is more time
consuming than getting the exposure right the first time
What You Need to Know About Shutter Speed
The shutter speed refers to the length of time you camera sensor is
exposed to light. It’s a similar process as our eyes blinking. Basically, it‘s
very easy.
Digital SLR cameras have many different shutter speeds, measured in
seconds, but the most important and common speeds include:
• 1/4
• 1/8
• 1/15
• 1/30
• 1/60
• 1/125
• 1/250
• 1/500
The speed of the shutter controls the amount of movement in a
photograph. If you start taking pictures and find many come out blurry –
start by changing to a faster shutter speed. Faster shutter speeds reduce
the risks of a shaking camera affecting the photograph.
For example, when you change from 1/60 to 1/125 shutter speeds, you
reduce the amount of light exposure by half. If you go from 1/30 to 1/15
shutter speeds, you double the amount of light that enters the camera.
Getting a clear and sharp picture will require that you use the right shutter
speed. Most beginning photographers should probably start with a shutter
speed of 1/60 or faster.
When to Use Faster Shutter Speeds
When you are photographing things with a lot of movement, such as sports
events or children, it is better to use a faster shutter speed. If you don’t,
you’re going to end up with a motion blur.
When taking everyday photographs in normal light conditions, speeds of
60th-250th/sec should offer a clear photograph. You can also hold the
camera by hand at these speeds without problems with the camera shaking
and causing a blurry image.
If you are hoping to freeze moving objects in a non-blurry image, you will
want to use a shutter speed of 1000th – 8000th/second. Not all Digital SLR
cameras have settings this fast, but if your camera does you can
experiment taking photographs of fast moving objects. You will want to
take the photo in bright sunlight if possible, for the best exposure.
When to Use Slower Shutter Speeds
When taking a photo of city lights at night, you might choose a slower
shutter speed of 30 seconds or more. The lights in your photograph will
glow bright against the night sky. Leaving the shutter open for hours and
pointed at the night sky will give you a photo with the trail of stars as the
Earth rotates!
For a fun effect at a dance club or wedding reception, you can use a
shutter speed of 1 second and an aperture of f.8. Move your camera while
taking photographs – and when the flash goes off it will cause the subjects
of your photographs to “freeze”, while the background receives some fun
effects due to the movement of the camera and lights.
If taking panning images, such as a car moving, you can set your shutter
speed at 15th/30th/sec. The moving image (in this example, the car) will
remain in focus while the background blurs to show motion in the
photograph.
Aperture Control
The aperture of the lens you use with your Digital SLR camera is the
measurement of a circular opening in the lens which allows light
through.
It’s a lot like standing in a dark room that has a single, circular window, if
you could adjust the size of the circular window to let in a small beam of
light or wider to allow the room to fill with light.
The aperture scale is confusing for many people, and looks like this:
1.42.02.84.05.68.011162232. The numbers are confusing because they are
the opposite of what you would expect.
The smaller the aperture numbers the wider the aperture and the more light
there is. The larger the aperture number, the narrower the aperture and
less light there is. In other words, as the numbers get bigger, the opening
and amount of light allowed gets smaller.
This graphic demonstrates the relationship between the aperture number
and the opening of the lens:
Understanding Maximum Aperture
All Digital SLR lenses you buy will allow the smallest setting of f/16 – but
not all lenses will allow an opening of f/2.8. The maximum aperture of a
lens is the total width a lens will open.
The higher the maximum aperture of a lens, the more expensive it will be.
There are many benefits to having lenses with wide maximum apertures,
however, including the ability to take photographs in natural light without
the use of a flash with a maximum aperture of at least f/2.8.
For example, if you prefer not to use the flash to avoid a washed out
appearance, you need to either keep the shutter open for a longer period of
time or open the aperture wider to get enough light for the Digital SLR
camera sensor to create the photograph of the image.
If taking a photograph of your quickly-moving child indoors, if you have a
maximum aperture of f/4 then you would need a shutter speed of 1/30th of a
second and that’s not going to be fast enough to photograph the child.
Unless you have a higher maximum aperture, or children who will sit very
still, you are going to need to use the flash. The higher maximum aperture
of f/2.8 or more lets in more light and allows use of a shutter speed of 1/90
and eliminates the need for a flash.
How Do You Know the Maximum Aperture of Your
Lens?
When you are looking at different lenses for your Digital SLR camera, you
have been presented with a lot of numbers. You might see numbers on
each lens package like “50mm f/1.8” or “28-300mm f/3.5-6.3” – but what do
they mean and how do you know which lens to buy?
The first set of numbers in these examples refers to the focal length or focal
length range. The second set of numbers tells us what the maximum
aperture of the lens is.
Look at the numbers on the lens.
In this case I have a Canon EF 24-105mm 1:4,0 L IS USM
If there is only one number, such as in the example:
50mm f/1.8, then the maximum aperture is f/1.8 and it is a prime lens,
which means there is only one measurement of aperture.
If there are two numbers, such as in the example: 28-300mm f/3.5-6.3, then
we know the focal length ranges from 28-300mm and the aperture is
variable; in this particular example the maximum aperture is f/3.5 and it can
be narrowed to f/6.3 at 300mm.
How Do You Know What Maximum Aperture You
Need?
If you take a lot of photographs during daylight hours, then you don’t have
to be as concerned with a wide maximum aperture.
On the other hand, if you are someone who pulls the camera out at night or
in dim lighting conditions, you will want to spend some time looking for a
lens with a wide maximum aperture.
If you like to manually control the settings of your Digital SLR, a zoom lens
with a constant maximum aperture is a good way to go. If you tend to leave
your camera set in the AUTO mode, however, it’s not going to benefit you
as much.
ISO
In the traditional film-style camera, ISO is a measurement of how
sensitive the film was to light. The measurement would be displayed on
the package of film you purchased for your camera, numbers like 100, 200,
400, 800, etc.
The lower the number, the less sensitivity the film had to light and the finer
the grain in the resulting photographs.
Since there is no film with a digital camera, the ISO measures the camera’s
image sensor’s sensitivity to light. Just like with film ISO measurements,
the lower the number the less sensitive your camera is to the light and
the finer the grain will be.
enerally, photographers will choose a higher ISO setting when taking
photographs in the dark and when they want a faster shutter speed – such
as in a sporting event where your desire is to freeze movement in the
image.
Most Digital SLR cameras will automatically set an ISO speed based on the
conditions you are shooting in, but you can also manually set the ISO.
Most automatic ISO settings will be 100, and the resulting photographs will
be quite crisp with very little grain appearance. There are times when you
might want your photograph to have a grainy appearance or to have a
certain lighting effect.
How to Select an ISO Setting
If you decide to manually set the ISO of your camera, you will also need to
adjust both shutter speed and aperture to correspond with the ISO setting.
For example, if you increase the ISO from the standard 100 to 400 or more,
you will need to choose a higher shutter speed and a smaller aperture to
ensure the photograph has the correct exposure.
For the average photographer, keeping the ISO setting at 100 will be
sufficient for most photographs. If you are learning to set your entire Digital
SLR camera settings manually or simply like to get control over every detail
of your photos, here are some typical photo situations that you may want to
increase the ISO to a higher setting:
• Concerts, low-lighting indoor events, and places where flash photography
is not allowed
• Indoor sporting events with fast movement, or any indoor event with
limited lighting
• Indoor birthday parties, especially when attempting to get the birthday
child blowing out candles in a dark room
• Indoor art galleries, museums, churches
Once you understand the underlying logic - you will be able to get out
much more of your digital SLR camera!
You can‘t learn it all at once - that‘s for sure. Instead, try to learn one
technique at a time. You have to understand how it works the way it does.
Also, try to get a feeling for the consequences that you will face if you
change specific camera settings. Practise a lot and you will see just how
much your photography skills increase with each photo you take!
Thanks for Reading
Thanks for reading my ebook. I know it was short, but I hope you enjoyed
reading this ebook as much as I enjoyed writing it. My goal was to show
you the basics that every digital SLR photographer should know.
Even if you only take away one tip from this ebook that helps you better
understand photography or increase your skills - that‘s what I wanted to
accomplish.
But please keep one thing in mind:
Even the most sophisticated and talented professional photographers I
know once began their careers by learning the basic camera functions and
photography techniques.
Yes, they once started with the basics like everyone else.
And actually they became masters of the basics!
That‘s the point were you do not merely „think“ - you just „act“. All your
energy goes into the creation of the picture - the moment that can become
not just a great photograph, but a true piece of art.
If you found this basic photography guide useful, please share it with your
photography buddies and friends. Just send them to
http://www.best-photography-courses.com/
You can also reach out to me on Facebook:
http://www.facebook.com/BestPhotographyCourses
And Twitter:
http://twitter.com/#!/TopPhotoCourses
I would love to know more about how you intend to use what you have
learned in this ebook.
I wish you success in your photography ventures beyond your wildest
dreams. It doesn‘t even matter if you just want to take better photographs
for your family album or if you want to earn a living with a professional
photography career. It‘s all possible - believe me.
And finally, always enjoy what you are doing...
...and a lot of positive things will follow, guaranteed :-)
All the best,
Founder & Author
http://www.best-photography-courses.com/
© Copyright Best Photography Courses (BPC) -- All Rights Reserved
This book may not be copied, redistributed or sold.
If someone sold this to you, please report it to BPC.