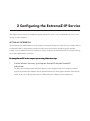
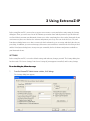
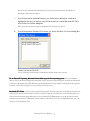
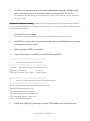
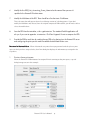
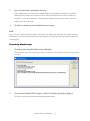
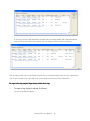
1
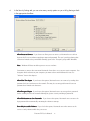
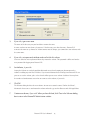
User’s Manual
Group Logic, Inc.
1.703.528.1555
Email: [email protected]
Web: www.grouplogic.com
Copyright
©2003 Group Logic, Incorporated, including this documentation, and any software and its file formats and audiovisual
displays described herein; all rights reserved; may be used only pursuant to the applicable software license agreement;
contains confidential and proprietary information of Group Logic and/or other third parties which is protected by
copyright, trade secret and trademark law and may not be provided or otherwise made available without prior written
authorization.
Use, duplication, or disclosure by the United States Government is subject to restrictions as set forth in subdivision (c)(1)(ii)
of the rights in technical data and computer software clause at DFARS 252.227-7013. Unpublished rights are reserved under
the copyright laws of the United States.
Notice
The information and the software discussed in this document are subject to change without notice and should not be
considered commitments by Group Logic, Incorporated. Group Logic, Incorporated assumes no responsibility for any
errors in this document.
The software discussed in this document is furnished under a license and may be used or copied only in accordance with
the terms of the license. No responsibility is assumed by Group Logic, Incorporated for the use or reliability of software on
equipment that is not supplied by Group Logic or its affiliated companies.
All warranties given by Group Logic, Incorporated about equipment or software are set forth in your purchase contract,
and nothing stated in, or implied by, this document or its contents shall be considered or deemed a modification or
amendment of such warranties.
Trademarks
Group Logic and the Group Logic logo are registered trademarks of Group Logic, Incorporated.
ExtremeZ-IP is a trademark of Intergraph Computer Systems.
AppleTalk, AppleShareIP, Finder, and Macintosh are registered trademarks and Rendezvous is a trademark of Apple
Computer, Inc. Microsoft, the Microsoft logo, Windows, Windows 2000, Windows 2003, Windows NT and Windows XP are
registered trademarks of Microsoft Corporation. InstallShield is a registered trademark of InstallShield Corporation, a
business unit of Stirling Technologies, Inc. Adobe, the Adobe logo, and Acrobat Reader are trademarks of Adobe Systems
Incorporated. Intel, the Intel logo, and Pentium are registered trademarks of Intel Corporation. Hewlett-Parkard is a
registered trademark of Hewlett-Packard, Inc. The Common UNIX Printing System, CUPS, and CUPS logo are trademarks of
Easy Software Products.
Support for Rendezvous includes software developed by the Rendezvous Project
(http://developer.apple.com/darwin/projects/rendezvous/)
This product includes software developed by the OpenSSL Project for use in the OpenSSL Toolkit
(http://www.openssl.org/).
This product includes cryptographic software written by Eric Young ([email protected]).
Other brands and product names are trademarks of their respective owners and are hereby acknowledged.
GLI 090803/3.1
Contents
SETTING UP . . . . . . . . . . . . . . . . . . . . . . . . . . . . . . . . . . . . . . . . . . . . 5
System requirements . . . . . . . . . . . . . . . . . . . . . . . . . . . . . . . . . . . . . . . . . . . . . 5
About This Document . . . . . . . . . . . . . . . . . . . . . . . . . . . . . . . . . . . . . . . . . . . . . 6
Help . . . . . . . . . . . . . . . . . . . . . . . . . . . . . . . . . . . . . . . . . . . . . . . . . . . . . . . . . . . 6
1 GETTING STARTED . . . . . . . . . . . . . . . . . . . . . . . . . . . . . . . . . . . . 7
Installing ExtremeZ-IP . . . . . . . . . . . . . . . . . . . . . . . . . . . . . . . . . . . . . . . . . . . . . 7
Removing ExtremeZ-IP . . . . . . . . . . . . . . . . . . . . . . . . . . . . . . . . . . . . . . . . . . . . 7
Starting ExtremeZ-IP . . . . . . . . . . . . . . . . . . . . . . . . . . . . . . . . . . . . . . . . . . . . . . 8
Stopping ExtremeZ-IP . . . . . . . . . . . . . . . . . . . . . . . . . . . . . . . . . . . . . . . . . . . . . 8
Installing ExtremeZ-IP Print Support . . . . . . . . . . . . . . . . . . . . . . . . . . . . . . . . . . 8
Installing Appletalk . . . . . . . . . . . . . . . . . . . . . . . . . . . . . . . . . . . . . . . . . . . . . . . 10
2 CONFIGURING THE EXTREMEZ-IP SERVICE . . . . . . . . . . . . . . 11
Setting Up ExtremeZ-IP . . . . . . . . . . . . . . . . . . . . . . . . . . . . . . . . . . . . . . . . . . 11
Remote administration of ExtremeZ-IP . . . . . . . . . . . . . . . . . . . . . . . . . . . . . . . 13
Using the Registry Keys . . . . . . . . . . . . . . . . . . . . . . . . . . . . . . . . . . . . . . . . . . 14
Passwords . . . . . . . . . . . . . . . . . . . . . . . . . . . . . . . . . . . . . . . . . . . . . . . . . . . . . . . . . . . 14
Setting the log file size . . . . . . . . . . . . . . . . . . . . . . . . . . . . . . . . . . . . . . . . . . . . . . . . . 14
Added support for Macintosh style permissions . . . . . . . . . . . . . . . . . . . . . . . . . . . . . . 14
3 USING EXTREMEZ-IP . . . . . . . . . . . . . . . . . . . . . . . . . . . . . . . . . . 17
Settings . . . . . . . . . . . . . . . . . . . . . . . . . . . . . . . . . . . . . . . . . . . . . . . . . . . . . . .
Volumes . . . . . . . . . . . . . . . . . . . . . . . . . . . . . . . . . . . . . . . . . . . . . . . . . . . . . . .
Users . . . . . . . . . . . . . . . . . . . . . . . . . . . . . . . . . . . . . . . . . . . . . . . . . . . . . . . . .
Files . . . . . . . . . . . . . . . . . . . . . . . . . . . . . . . . . . . . . . . . . . . . . . . . . . . . . . . . . .
Print queues . . . . . . . . . . . . . . . . . . . . . . . . . . . . . . . . . . . . . . . . . . . . . . . . . . .
17
22
27
28
29
Controlling the Processing of Jobs . . . . . . . . . . . . . . . . . . . . . . . . . . . . . . . . . . . . . . . . 36
Print Accounting . . . . . . . . . . . . . . . . . . . . . . . . . . . . . . . . . . . . . . . . . . . . . . . . . . . . . . 37
Log . . . . . . . . . . . . . . . . . . . . . . . . . . . . . . . . . . . . . . . . . . . . . . . . . . . . . . . . . . 43
4 REMAPPING EXTENSIONS . . . . . . . . . . . . . . . . . . . . . . . . . . . . . 47
APPENDIX A: TROUBLESHOOTING . . . . . . . . . . . . . . . . . . . . . . . . 51
The ExtremeZ-IP service or the Service for Macintosh is failing. . . . . . . . . . . . . . . . . . 51
The Server name does not appear in the Macintosh Chooser. . . . . . . . . . . . . . . . . . . . 51
Running ExtremeZ-IP and SFM . . . . . . . . . . . . . . . . . . . . . . . . . . . . . . . . . . . . . . . . . . 51
INDEX . . . . . . . . . . . . . . . . . . . . . . . . . . . . . . . . . . . . . . . . . . . . . . . . 53
Setting Up
ExtremeZ-IP™ enables Windows® computers to provide AppleShare® IP file sharing services to Macintosh®
computers. The optional ExtremeZ-IP print features provide printing services. ExtremeZ-IP Print Support
allows these same Windows computers to provide IP-printing services to Macintoshes. ExtremeZ-IP is
optimized to provide the fastest file and print services available. ExtremeZ-IP Print Accounting allows your
Macintosh clients to provide information to you when printing jobs.
With ExtremeZ-IP, Macintosh users can connect to and mount directories on a Windows file server just as if
they were native AppleShare volumes. With the optional ExtremeZ-IP Print Support installed, Macintosh users
can create desktop printers which deliver print jobs to printers via the server automatically and just as easily
as with AppleTalk®. ExtremeZ-IP’s integration into the existing network is seamless–Macintosh users continue
using the same tools and applications for accessing the server and printers that they always have, but the
server delivers much higher performance.
ExtremeZ-IP gives Window the ability to serve files to Macintosh clients using AppleTalk Filing Protocol (AFP)
services over TCP/IP which is faster than AppleTalk. In addition, AFP allows enhanced remote access because,
being based on IP, it is easier to route than AppleTalk and is routed over the Internet.
SYSTEM REQUIREMENTS
Windows ExtremeZ-IP file server operates on Windows NT®, Windows 2000®, 2003® or Windows XP®. It
requires a processor of 266 MHz or greater and 128 MB or greater of RAM. ExtremeZ-IP can replace Services for
Macintosh if necessary (for more information see “Settings” on page 17). For optimal results, your Windows
machine should be running the latest service pack from Microsoft. Adding additional RAM to your Windows
machine will greatly enhance ExtremeZ-IP performance.
Macintosh Macintosh clients must have Macintosh OS 8.5 or later and the latest AppleShare Client available
for your Macintosh OS version. To use the IP printing support, Macintosh clients must have a Power Macintosh
computer with Macintosh OS 8.5 or later. Macintosh clients should run the latest Macintosh OS release. If
Macintosh clients are using Mac OS X, they must have version 10.2.4 or later. ExtremeZ-IP supports the latest
Macintosh client technologies, including Rendezvous™, the Service Location Protocol (SLP) and Apple’s built-in
encrypted logon support for long passwords. ExtremeZ-IP supports encrypted logons, but, to avoid problems,
use AppleShare Client 3.8.5 or later.
ExtremeZ-IP supports many features of AFP 3.1 (Apple File Protocol) for Mac OS X users including these.
• File names can be longer than 31 characters. Additionally, the ExtremeZª•IP server uses native Windows
Unicode file system Application Programming Interfaces (APIs) that allow Mac OS X clients to create file/folder
paths that are not restricted in length like most Windows applications.
• Files can be larger that 2GB in size; ExtremeZ-IP can work with files of any size. Volumes can be larger than
4GB.
• ExtremeZ-IP supports Rendezvous which allows Mac OS X clients to find and connect to the Windows-based
server easily. Rendezvous is based on the multicast DNS protocol which allows administrators to remove
AppleTalk from their networks.
• Users can create files using the Unicode character set, which is used worldwide to support the wide variety of
characters found in different languages.
• AFP 3.1 improvements allow the client and server to communicate significantly more information about files in
folders and allows Mac OS X applications to work with folders that contain tens of thousands of files.
• Catalog searches are performed more quickly.
ABOUT THIS DOCUMENT
The ExtremeZ-IP User’s Guide is organized into these chapters.
• Chapter 1, “Getting Started,” provides instructions for installing and removing the ExtremeZ-IP application on
your machine and for starting and stopping the ExtremeZ-IP service.
• Chapter 2, “Configuring the ExtremeZ-IP Service,” provides instructions for administering ExtremeZ-IP on local
and remote computers.
• Chapter 3, “Using ExtremeZ-IP” provides information about the features of ExtremeZ-IP.
• Chapter 4, “Remapping Extensions,” provides instructions for remapping MS-DOS extensions to make files easy
to use for Macintosh users.
• Appendix A provides tips for troubleshooting problems with the ExtremeZ-IP service.
HELP
You can open Help from the Windows menu in the ExtremeZ-IP Administrator. For technical support services,
call 1.703.528.1555 Monday through Friday, 9:00 am to 6:00 pm ET. Technical support for the first year you own
ExtremeZ-IP is included in the price of the product. Have your ExtremeZ-IP serial number ready for verification.
You can visit Group Logic at http://www.grouplogic.com
http://www.grouplogic.com. On these pages, you access the Group Logic Knowledge Base which contains the latest technical information about our products. And you can get news and
product information, software updates and fixes, and more.
Send questions to Group Logic’s email at [email protected]
[email protected].
ExtremeZ-IP User’s Manual
6
1 Getting Started
This chapter provides information on product installation and removal, as well as instructions for starting and
stopping the ExtremeZ-IP service.
INSTALLING EXTREMEZ-IP
ExtremeZ-IP consists of several files installed on your computer. The primary component is a Windows
Service, which is a program that runs automatically in the background even when no one is logged-in to the
Windows machine. ExtremeZ-IP also includes an administrative tool that allows you to configure shared
volumes, printers, and other settings.
If you already have a trial version of ExtremeZ-IP installed, you can install the full version on top of the
existing version. ExtremeZ-IP preserves all users, volumes, settings and log from the trial version.
You must be logged into Windows with Administrator privileges to install ExtremeZ-IP.
To install ExtremeZ-IP, follow these steps.
1.
Run the installer program you downloaded from the Internet or located on the ExtremeZ-IP CD.
2.
Click Yes to start the InstallShield Setup Wizard®, then follow the setup prompts to install
ExtremeZ-IP on your system.
During installation, you can choose to start up ExtremeZ-IP automatically when the Windows system
starts up or you may start it later.
REMOVING EXTREMEZ-IP
You must be logged into Windows with Administrator privileges to remove ExtremeZ-IP. If you have ExtremeZIP Print Support installed, you must uninstall it before attempting to uninstall ExtremeZ-IP.
To remove ExtremeZ-IP, follow these steps.
1.
From the Windows Start menu, go to Programs/ExtremeZ-IP, and select Uninstall ExtremeZ-IP.
If you have ExtremeZ-IP Print Support installed, you see a message reminding you to uninstall it before
uninstalling ExtremeZ-IP (see page 9).
2.
Click Yes when you are prompted to confirm the deletion.
STARTING EXTREMEZ-IP
You must be logged into Windows with Administrator privileges to start the
ExtremeZ-IP service. You may have started the ExtremeZ-IP service when you installed it.
To start the ExtremeZ-IP service, follow these steps.
1.
Open the Services control panel from the Administrative Tools menu.
The Services dialog box displays.
2.
In the Services control panel, select ExtremeZ-IP File Server for Macintosh, then click Start.
The Services dialog box shows that ExtremeZ-IP is started.
STOPPING EXTREMEZ-IP
You must be logged into Windows with Administrator privileges to stop the ExtremeZ-IP service.
To stop the ExtremeZ-IP service, follow these steps.
1.
Open the Services control panel from the Administrative Tools menu.
The Services dialog box displays.
2.
In the Services control panel, select ExtremeZ-IP File Server for Macintosh, then click Stop.
The service stops.
INSTALLING EXTREMEZ-IP PRINT SUPPORT
ExtremeZ-IP Print Support is an optional component that allows the ExtremeZ-IP server to share print queues
for Macintosh computers (in addition to sharing files and directories). You must already have ExtremeZ-IP
installed before installing the print support.
Note It is not necessary to stop ExtremeZ-IP before installing the printing software.
To install ExtremeZ-IP Print Support, follow these steps.
1.
Log into Windows with Administrator privileges.
2.
Run the installer program you downloaded from the Internet or located on the ExtremeZ-IP CD.
After installation, the ExtremeZ-IP Administrator main window displays the Print Queues button. If the
ExtremeZ-IP User’s Manual
8
ExtremeZ-IP Administrator was open during the Print Support installation, close and reopen it in order
to display the Print Queues button.
When you install ExtremeZ-IP Print Support, the installer creates a directory called ExtremeZ-IP Print
Support on an NTFS drive and gives you the option to share that directory for Macintosh clients with
the ExtremeZ-IP file server. If you share the directory, Macintosh clients can mount the volume based
on the directory.
The ExtremeZ-IP Print Support directory includes an installer for a program called Choose IP Printer
for Macintosh OS 9. Although the Choose IP Printer program is not required to print to ExtremeZ-IP
servers from a Macintosh, it provides a much better user experience and higher performance.
Macintosh clients can either install Choose IP Printer locally, or, install it on the server and run from
there.
To remove ExtremeZ-IP Print Support, follow these steps.
1.
From the Start menu, choose Programs/ExtremeZ-IP and select Uninstall ExtremeZ-IP Print
Support.
You can continue to use ExtremeZ-IP without its print support.
2.
Click Yes when you are prompted to confirm the removal.
To install ExtremeZ-IP Print Accounting, follow these steps.
1.
2.
Log into Windows with Administrator privileges.
Run the installer program you downloaded from the Internet or located on the ExtremeZ-IP CD.
After installation, the Print Queues dialog box offers options for enabling print accounting features.
To remove ExtremeZ-IP Print Accounting, follow these steps.
1.
From the Start menu, choose Programs/ExtremeZ-IP and select Uninstall ExtremeZ-IP Print
Accounting.
You can continue to use ExtremeZ-IP and print support without print accounting.
2.
Click Yes when you are prompted to confirm the removal.
ExtremeZ-IP User’s Manual
9
INSTALLING APPLETALK
When the AppleTalk protocol is installed on the server, ExtremeZ-IP attempts to display your server in the
Chooser for Macintosh users. If your server does not appear in the Chooser, ExtremeZ-IP logs an error in the
Windows Event Viewer Application section as it tries and fails to register on the AppleTalk network. The
AppleTalk protocol also allows AppleTalk printing from Macintosh OS 9 or OS X.
Windows NT requires the installation of Services for Macintosh (SFM) in order to install AppleTalk. In newer
versions of Windows, you can install the AppleTalk protocol by adding it as a protocol in the Network Control
Panel. Please note that Windows XP does not support AppleTalk.
ExtremeZ-IP User’s Manual
10
2 Configuring the ExtremeZ-IP Service
This chapter gives an overview of administering the ExtremeZ-IP service. You can administer the service on a
local or a remote computer.
SETTING UP EXTREMEZ-IP
Use the ExtremeZ-IP Administrator to view, disconnect, and send messages to connected users, manage shared
or mounted volumes, assign printers and specified directories (hot folders), and adjust specific machine
settings. You can administer the local computer or remote computers on which ExtremeZ-IP is installed as long
as you have Administrative privileges.
To manage ExtremeZ-IP on the computer you are using, follow these steps.
1.
From the Windows Start menu, go to Programs/ExtremeZ-IP and select ExtremeZ-IP
Administrator.
The ExtremeZ-IP Administrator dialog box appears—in the example below, the Print Queues button
appears so you know the computer has the optional ExtremeZ-IP Print Support installed. Note that the
words ”local server” show you that you are administering the computer you are working on.
Start/Stop
File
Sharing
Services
Displays
the active
TCP/IP
sessions,
open file
forks and
file locks
Start/Stop
Print
Services
View the users who
Set up volumes
are connected;
disconnect users; you want to share
send messages
Print Queues button
visible only if
ExtremeZ-IP Print
Support is installed
View a log of
ExtremeZ-IP
activity
Set up the program
View the files being shared by remote
Macintosh computers; stop sharing
Set up print queues so
that Macintosh clients
can send print jobs to
the server
2.
To stop all file sharing, click Stop File Services. To resume file sharing, click Start File Services.
3.
To stop all IP-printing, click Stop Print Services. To resume file sharing, click Start Print Services.
4.
Use the Print Queues, Volumes, and Settings buttons to set up ExtremeZ-IP.
See Chapter 3, “Using ExtremeZ-IP” for more information on the ExtremeZ-IP commands
5.
Click Close to dismiss the ExtremeZ-IP dialog box.
The ExtremeZ-IP File and Print Servers continue to run even though the Administrator window is
closed.
ExtremeZ-IP User’s Manual
12
Note: In addition to the method described above, you can configure ExtremeZ-IP from DOS using the
EZIPUTIL.EXE. To run this utility, from the DOS Command line go to the ExtremeZ-IP directory and type
EZIPUTIL.EXE. Information about EZIPUTIL.EXE options is listed.
REMOTE ADMINISTRATION OF EXTREMEZ-IP
You can configure ExtremeZ-IP on a remote computer if the program is already installed on that computer.
You must have Windows Administrative privileges on the computer you are using and on the remote computer
as well.
To administer a remote ExtremeZ-IP program, follow these steps.
1.
Hold down the Control key while you launch the ExtremeZ-IP Administrator.
The Remote Administration dialog box appears.
2.
Type the name or IP Address of the remote computer and click OK.
The ExtremeZ-IP Administrator dialog box appears—it is identical to the local server Administrator
dialog box. (see the previous page) However, the title of the dialog box shows the name or IP Address
of the remote computer whose ExtremeZ-IP service you are configuring.
If you get an error message, check that you entered the correct IP address or name for the remote
computer.
3.
To stop all file sharing, click Stop File Services. To resume file sharing, click Start File Services.
4.
To stop all IP-printing, click Stop Print Services. To resume file sharing, click Start Print Services.
5.
Use the Print Queues, Volumes, and Settings buttons to set up ExtremeZ-IP.
See Chapter 3, “Using ExtremeZ-IP” for more information on the ExtremeZ-IP commands
6.
Click Close to dismiss the ExtremeZ-IP dialog box.
ExtremeZ-IP User’s Manual
13
USING THE REGISTRY KEYS
You can use Windows registry keys to change some settings in ExtremeZ-IP beyond what can be configured
using the ExtremeZ-IP Administrator.
Passwords
Optionally, you can notify Macintosh clients if their Windows passwords are about to expire using a registry
key.
To enable password expiration notification, enter this key in the registry.
\HKLM\System\CurrentControlSet\Services\ExtremeZ-IP\Parameters\PasswordExpirationWarning
This is a DWORD key with a value of 1 to enable.
To add the warning threshold in days, specify:
\HKLM\System\CurrentControlSet\Services\ExtremeZ-IP\Parameters\PasswordExpirationWarningThreshold
This is a DWORD key with the value of the number of days prior to expiration to warn the user. The
number of days prior to expiration to begin the warning must be between 1 and 99.
Setting the log file size
By default, ExtremeZ-IP limits the size of the log file to 200 MB; however, you can change the file size using a
registry key. When a line being written to the log passes the specified megabyte limit of log file size, that line is
entered at the beginning of the log file. Before writing this line, ExtremeZ-IP writes a notice in the log alerting
you to the fact that you are overwriting the beginning of the log. You can enable timestamps for log entries, to
help you keep track of when the log is full and it is being overwritten.
To change the registry key to change the log file size, enter this in the registry.
\HKLM\System\CurrentControlSet\Services\ExtremeZ-IP\Parameters\DebugLogLimit
This is a DWORD key with value of x, when x is greater than zero it will enable limiting the size of
the log file. The value of x is in megabytes. If no key is present, the default value is 200 MB.
Added support for Macintosh style permissions
Limiting permissions Enabling this feature will cause ExtremeZ-IP to limit the permissions on folders to an
owner, a single group, "Everyone" and the SYSTEM user. See page 25 for information about permissions. The
default behavior of ExtremeZ-IP (and Windows in general) is to allow any number of users and groups to have
ExtremeZ-IP User’s Manual
14
permissions to a particular folder. By default, changing group permissions from the Macintosh client will
change permissions for the primary group only—any other groups with permissions to that folder will not be
changed. Users that wish to restrict access to only the primary group should enable this feature.
This feature can be configured from the following registry entry
\HKLM\System\CurrentControlSet\Services\ExtremeZ-IP\Parameters
Key Name
Default
Description
-----------------------------------------------------------------------------------------------------------UseMacStylePermissions
off
Enables Mac style permissions value of 1 to enable (DWORD key)
ExtremeZ-IP User’s Manual
15
3 Using ExtremeZ-IP
Before using ExtremeZ-IP, you need to set up your server name, security and other settings using the Settings
dialog box. Then, you can create a list of the Volumes you want to share and the printers or specified directories (hot folders) you want your Macintosh clients to use. After completing these three tasks, Macintosh clients
can connect to your server and use the volumes and printers you set up. You can check the Users, File, and
Print Queues dialog boxes to see who is connected, which volumes they are accessing, and which jobs they are
processing. In addition, you can send messages, disconnect users and delete items from the files being viewed
and the Print Queues dialog boxes. At any time you can modify the list of volumes and printers available to
your Macintosh clients.
SETTINGS
Before using ExtremeZ-IP, review the default settings and make any changes you wish. The Settings dialog box
has three tabs: File Server Settings, Print Server Settings (if print support is installed), and Security Settings.
To use this dialog box, follow these steps.
1.
From the ExtremeZ-IP Administrator window, click Settings.
The Settings dialog box appears.
2.
In the File Server Settings tab, you can make changes to the way ExtremeZ-IP interacts with other
computers when it offers file sharing services.
Server Name The Server name appears in the login window whenever a Macintosh user connects to
the server. This name also appears in the Mac OS X Connect to Server dialog and on earlier Mac OS
systems in the Chooser and the Network Browser when Macintosh users browse the network. You may
change the name, if you wish, using uppercase and lowercase text.
Note: Macintosh users can mount a volume even if they cannot see the server name in the Chooser.
After highlighting AppleShare, the user clicks the Server IP Address button, then enters the server’s
TCP/IP address or name.
WARNING If you are using ExtremeZ-IP and Services for Macintosh on the same server machine, you
must enter a different server name for ExtremeZ-IP from the one used by Services for Macintosh. If you
use the same server name, then either Services for Macintosh will fail, or ExtremeZ-IP will not be able
to show up in the Chooser.
Logon Message The logon message displays on the Macintosh users computer after they have
successfully logged in. Type the message you want displayed.
Leave the message blank if you do not want clients to receive a message when they log in.
File Server Connection Options If required for your connection, make changes to the File Server
Connections Options.
Type a new port number for the TCP/IP port the file server uses; the default is 548.
Type the name of the SLP scope (or Neighborhood) the file server appears in when Macintosh clients
use the Network Browser.
Type a host name which will be the name of the server provided to Macintosh clients when they use
the Network Browser.
Decide which network protocols the server attempts to register with—AppleTalk, TCP/IP with SLP or
TCP/IP with Rendezvous—by placing a check in the appropriate checkboxes.
•
When AppleTalk is selected, Mac OS 9 users can see volumes and print queues in the Chooser
without having to specify the IP address, and Mac OS X users can see them in Connect to Server
ExtremeZ-IP User’s Manual
18
•
•
and Add Printer dialogs. To register the server on AppleTalk, the AppleTalk protocol must be
installed on the Windows NT or 2000 server. Windows XP does not support AppleTalk. Note that if
you use the Chooser (AppleTalk) to find print queues, you will print using AppleTalk, not TCP/IP.
SLP allows Mac OS 9 users to see volumes and print queues in the Network Browser. Using Choose
IP Printer to find print queues is the easiest way to setup TCP/IP print queues on MacOS 9; this
uses SLP
Rendezvous allows Mac OS X users to see volumes in the Connect to Server dialog and print
queues in the Print Center. You cannot use Rendezvous with Windows NT.
Sessions If required for your connection, make changes to the Sessions Options.
If you wish, limit the number of users who can access the server at a given time by typing a number in
the Limit to text box. This limitation is used in combination with your license agreement. If you have a
license for ten users, you cannot have more than ten users regardless of this setting.
Advanced File Server Options The file server provides two advanced settings.
If you want to allow the client to request that the server perform search operations (such as Sherlock
searches), place a check in the Support ‘Catalog Search’ Operations checkbox. Allowing the server to
make the searches greatly reduces the network bandwidth required for the search.
To use the default for copying files (allowing the server to perform copy operations when the source
and destination are both on the same server), leave the check in the Support ‘Copy File’ Operations
checkbox. When the client does not have to read and write each file across the network, the network
bandwidth required is greatly reduced.
If you wish, click the Types and Creators button to fill out the Macintosh Type/Creator to Extension
Mappings dialog box to meet your specifications. See Chapter 4, “Remapping Extensions,” for information on remapping MS-DOS extensions to Macintosh types.
3.
In the Print Server Settings tab, you can set Print Server options.
ExtremeZ-IP User’s Manual
19
Print Sever Connection Options Changes you make to these options take effect immediately after you
click the Apply or OK button.
If you wish, you can change default port settings by typing different numbers in the appropriate boxes.
The default TCP/IP Port for Print Configuration is used by the Choose IP printer program when creating
a desktop printer on a Macintosh client. The default TCP/IP Port for Print Jobs is the LPR port which
the ExtremeZ-IP print server uses to receive print jobs from a Macintosh client.
As with the File Server, you may configure SLP options such as Scope/Neighborhood and host name by
typing the entries. These entries appear as a Neighborhood and a Server Name, respectively, in the
Choose IP Printer main window.
As an option, except on Windows XP, you may allow Macintosh users to print over AppleTalk. When
you check the Register Server on AppleTalk Network checkbox, the print queues you create show up on
the Chooser on the Macintosh. This allows Macintosh users to use the print queues over AppleTalk
which is slower, but offers an alternative to installing the Choose IP Printer program on the Macintosh.
You may register the print server on TCP/IP with SLP or Rendezvous. You must have TCP/IP with
Rendezvous on if you want Macintosh OS X clients to see ExtremeZ-IP printers using Rendezvous (see
age 31). You cannot use Rendezvous with Windows NT.
Advanced Print Server Options Check the checkbox for Log Print Job Processing Results to keep a log
of job processing. If you wish, specify the location for storing temporary files; otherwise ExtremeZ-IP
uses the default system temporary directory.
ExtremeZ-IP User’s Manual
20
4.
In the Security Settings tab, you can set as many security options as you wish by placing a check
in the appropriate checkbox.
Allow Guests to Connect If you choose to allow guests to connect, a Macintosh user is able to
login to the file server without supplying a name and password. The user’s privileges during that
session are limited to the permissions normally given to the ‘Everyone’ group under Windows.
Note: Windows XP does not allow guests to access a volume.
Permission to connect does not mean Macintosh clients have access to your entire computer. You
designate which volumes on your computer you want to share with Macintosh clients. See
“Volumes” later in this chapter.
Allow Clear Text Logins If you choose this option, Macintosh users can connect by sending their
password in clear-text form over the network. This may be a security problem and clear-text
passwords are limited to 8 characters.
Allow Encrypted Logins If you choose this option, Macintosh users can encrypt their password
before sending it across the network allowing for greater security and longer passwords.
Allow Workstations to Save Passwords If you choose this option, Macintosh users can store the
login password for automatically mounting the volume at startup.
Show Only Accessible Volumes If you check this option, Macintosh users who connect to the
server see only volumes which they can access.
ExtremeZ-IP User’s Manual
21
Allow Mac Clients to Change Folder Permissions The default option allows Macintosh clients to
change folder permissions. When you disable this option by removing the check, the file server
ignores attempts by Macintosh users to specify security settings on folders.
A Macintosh client can change permissions for a folder by highlighting it and accessing the Sharing
section of the Get Info window in the Macintosh Finder®.
Allow Remote Administration of Server This option allows Windows users, who have Administrative privileges, to configure the server remotely using the Remote Administration features of
ExtremeZ-IP.
5.
Click Close to return to the ExtremeZ-IP Administrator window.
VOLUMES
You can share NTFS directories located on your Windows system for Macintosh users. When Macintosh users
connect, they will see these directories as remote AppleShare “volumes.” Use the Volumes dialog box to create,
modify or delete individual volumes to share with Macintosh users. In addition, you can create a volume by
using a right-click mouse button shortcut which uses the Share with ExtremeZ-IP Windows Explorer plug-in.
This plug-in is installed with ExtremeZ-IP.
Note ExtremeZ-IP and Services for Macintosh (SFM) should not be configured to share the same volumes. If
ExtremeZ-IP detects the SFM is running and sharing the same volume, ExtremeZ-IP shuts down this volume
and logs an error in the Event Viewer.
To create a volume, follow these steps.
1.
Create a new directory on an NTFS-formatted volume on the server machine or find an existing
directory that you want to use.
Volumes can only be shared if they reside on an NTFS formatted disk. If you try to create a volume that
is not on an NTFS formatted disk, ExtremeZ-IP gives an error message.
2.
From the ExtremeZ-IP Administrator window, click Volumes and, then, Create. Type a name for
the new volume and click OK.
-orFrom Windows, right-click on a directory (folder) on an NTFS disk. Choose Share with
ExtremeZ-IP.
ExtremeZ-IP User’s Manual
22
If you choose Create from the Volumes window, the Browse for Folder dialog box appears.
Using the Browse for Folder, locate and select the folder (directory) you want to share from an
NTFS formatted disk, then click OK.
The dialog box appears named either Volume Properties or Share with ExtremeZ-IP depending on the
method you used to display it. ExtremeZ-IP enters the name of the folder in the Volume Name text box.
ExtremeZ-IP User’s Manual
23
3.
If you wish, type a new name.
The name of the directory on your hard drive remains the same.
A name can have no more than 27 characters. If the directory you chose has more, ExtremeZ-IP
truncates the name to 27 characters. Volume names must be unique; you cannot have two volumes with
the same name.
4.
If you wish, set a password, attributes and user limit for this volume.
Users are asked to enter a password when they mount the volume. This password is different from the
user password for logging onto ExtremeZ-IP.
5.
Set Attributes, it you wish.
Setting the Volume to read-only prohibits Macintosh users from changing any documents on the
volume or adding any new files or folders. If you want a Macintosh user who logs into ExtremeZ-IP as a
guest to access the volume, place a check in the Allow guests to use volume checkbox. You may limit
the number of simultaneous users who can connect to this volume, if you wish.
6.
Click OK
The Volumes dialog box lists the new volume. As soon as its status becomes “Online for Clients”,
Macintosh clients can see and mount this volume when they go to their Chooser and click AppleShare.
7.
Create more volumes, if you wish. When you have finished, click Close in the Volumes dialog
box to return to the ExtremeZ-IP Administrator window.
ExtremeZ-IP User’s Manual
24
Modifying a volume
You can modify or delete an existing volume. If Macintosh clients are connected to the volume when you
modify it, they are not disconnected. Instead, for those users, the new settings take effect after they dismount
and attempt to connect again.
To modify an existing volume, follow these steps.
1.
In the Volumes dialog box, select the volume you want to change and click Modify.
The Volume Properties dialog box is displayed.
2.
Make the changes you want.
3.
Click OK to return to the Volumes dialog box.
To delete an existing volume from the Volumes list, follow this step.
On the Volumes dialog box, select the volume you want to remove and click Remove.
The directory and its contents are still intact, but Macintosh clients can no longer access the volume.
Properties of shared files and folders
ExtremeZ-IP enforces all Windows user logon and passwords so file and folder security is identical to that
provided by Windows Services for Macintosh (SFM). Because Windows and Macintosh computers handle folder
and file properties differently, not all Windows access information is displayed on Macintosh sharing information dialog boxes. The Administrator may give other users the ability to make changes.
Because ExtremeZ-IP enforces Windows security settings, you should normally use Windows’s built in tools for
adjusting directory and file access permissions. These tools provide greater flexibility for setting up your
security policy. However, if you are unfamiliar with Windows security settings and would like to adjust
permissions quickly from a Macintosh user’s perspective, you can use the Adjust Macintosh Permissions plugin for Explorer as described below.
1.
To change the permissions, right-click the directory.
A pulldown menu appears.
ExtremeZ-IP User’s Manual
25
2.
Choose Adjust Macintosh Permissions.
The Adjust Macintosh Permissions dialog box appears.
3.
Make changes to the Read and Write privileges, as you wish, using each button’s drop-down
menus.
ExtremeZ-IP User’s Manual
26
4.
Click OK.
The changes take effect immediately for the affected directory.
USERS
The Users dialog box lets you view the users connected to the server, disconnect those users, or send
messages to them. ExtremeZ-IP supports Microsoft networking domains, including Active Directory. See the
section on the next page ‘Macintosh user” for information on user name and password entry.
To view the Users dialog box, follow these steps.
1.
On the ExtremeZ-IP Administrators dialog box, click Users.
Those Users who are currently connected are identified by their name and IP Address. Their connection and idle times are given. The dialog refreshes automatically.
Note that individual user accounts are defined by the Windows User Manager. ExtremeZ-IP uses this
information to determine the user status and access privileges.
2.
To disconnect a user, highlight the user’s name and click Disconnect. To disconnect all users, click
Disconnect All.
3.
To send a message to a single user, highlight the user’s name and click Send Message. Or click
Send Message All to send a message to all connected users.
The Send Message dialog box appears. Type the message and click Send or click Cancel if you decide
not to send the message. You are returned to the Users dialog box.
4.
Click Close to return to the ExtremeZ-IP Administrator dialog box.
ExtremeZ-IP User’s Manual
27
Macintosh Users
ExtremeZ-IP supports Microsoft networking domains, including Active Directory. When Macintosh users
connect to the ExtremeZ-IP server, they enter their user name and password. ExtremeZ-IP authenticates this
account against the primary domain of the Windows machine that it is running on. If this machine is not a
member of a domain, the account must be a member of the local accounts that appear in User Manager. If the
machine is a member of a domain, then the user name you give the Macintosh user must be either a member of
the primary domain, the local accounts, or a trusted domain. You may specify to be authenticated against a
specific domain by prefixing the user name with the domain name and a backslash (\|\\). For example, to
authenticate the user name joe from the Marketing domain, in the user name portion of your AFP client logon
enter these words.
MARKETING\\joe
Note A Macintosh client has only limited support for passwords longer than 8 characters. ExtremeZ-IP uses
the same technique for accessing owners and groups for folders in the sharing information using the Finder.
FILES
The Files Opened by Macintosh Users dialog box shows you which files are currently in use. Macintosh users
may open the data or resource fork of a file.
To view the Files Opened by Macintosh Users dialog box, follow these steps.
1.
From the ExtremeZ-IP Administrators dialog box, click Files.
The dialog refreshes itself as new files are used by the Macintosh Users. The dialog box lists information about each file being used:
ExtremeZ-IP User’s Manual
28
•
•
•
•
•
2.
the name of the Macintosh user using the file
the name of the file being used
the fork being accessed by the user—either the Resource or Data fork
access information (for example, read access or write access)
a count for the number of locked sections on a file if a user has locked portions of that file for
exclusive access which happens often for database programs.
It is better to disconnect the user from the Users dialog box rather than to close the user’s files.
However, you may select a file and choose Close File to close the selected file or choose Close All
Files to close all files from the File dialog box.
You should use caution when closing a file this way because a user may experience data loss and
possibly a crash. Instead, disconnect a user using the Users dialog box; this automatically closes all
files opened by that user.
3.
Click close to return to the ExtremeZ-IP Administrators dialog box.
PRINT QUEUES
ExtremeZ-IP offers optional Print Support which provides support for IP-based printing from Macintosh
computers. IP printing allows Macintosh clients to print without using AppleTalk. Macintosh OS X clients set up
printers using the Print Center to select the ExtremeZ-IP Printer Browse Module. Macintosh OS 9 clients set up
printers using Choose IP Printer, an Apple menu item.
When you purchase and install ExtremeZ-IP with Print Support, two programs are placed on the Windows
server in a folder called ExtremeZ-IP Print Support. (1) an installer for the ExtremeZ-IP Printer Browse Module
for Macintosh OS X clients and (2) an installer for Choose IP Printer for Macintosh OS 9 clients. You are given
the option of sharing this volume during installation. Macintosh clients do not need to use either program to
print to the ExtremeZ-IP server, however, using it provides easy IP printing and makes it easy for Macintosh
clients to find the EZIP server using Rendezvous (OS X), SLP (OS 9), or an IP address. You can set ExtremeZ-IP
to allow Macintosh clients to download a PPD or force them to use the one you select.
After receiving a print job from a Macintosh, ExtremeZ-IP processes it using one of several processing
methods, including Windows print queues, AppleTalk printers, LPR printers, and “hot folders” (special output
directories where the job can be processed by additional software such as a RIP or OPI server). In addition,
you can view the print jobs in progress, speed or delay processing of jobs, and delete jobs from the list.
Macintosh clients can print to the EZIP print server using IP or AppleTalk.
ExtremeZ-IP Print Support logs many aspects of the print jobs that your users have sent to the server: job
name, user name that printed, time and date of printing, page size, number of pages, size of job in bytes,
address of the computer that printed the job, and the name of the print queue used. This log can be displayed
ExtremeZ-IP User’s Manual
29
or exported automatically to a text file that can be imported into an accounting or other cost tracking system.
If you purchase the optional ExtremeZ-IP Print Accounting module, you can capture and track additional
information of your choosing and require the Macintosh client to enter one or more codes you set up before
printing to a queue. The accounting information is added to the log of the print job and can be imported into
standard accounting and cost tracking systems. See page 37 for additional information on using Print Accounting. See page 43 for information on viewing or retrieving the log.
Setting up Print Queues
A print queue is a virtual printer that Macintosh users can use. When Macintosh users print files to one of your
printers, the resulting print job is delivered to your server and can be tracked and processed there.
To create a list of print queues, follow these steps.
1.
On the ExtremeZ-IP Administrators dialog box, click Print Queues.
The Print Queues dialog box appears. It lists the print queues available to Macintosh clients.
2.
Click Create to define a print queue based on a printer or hot folder/specified directory which
you want to make available to Macintosh clients.
ExtremeZ-IP User’s Manual
30
Enable Spooling is always checked.
If you have installed the Print Accounting option, you see a checkbox allowing to you to Require Client
Validation Codes. See page 39 for information about setting up print accounting for a print queue.
3.
Type a name for the print queue you are setting up.
Queue names must be unique; you cannot have two queues with the same name.
4.
If you wish, you can place and choose a PostScript Printer Definition (PPD) file on the server that
Macintosh clients can download.
You may associate a PPD with each queue. If you provide a PPD file for the print queue, Macintosh
clients are able to download and configure the printer for use on their desktop without needing a PPD
on their machine ahead of time. The ExtremeZ-IP server includes an option to automatically download
the specified PPD to Mac users when they create printers. If possible, you should obtain and use PPD
files that were created on a Macintosh, since they include additional information such as special icons
to deliver the user experience that Macintosh users expect. PPDs are used on the Macintosh when
creating printers. Specifying a PPD when you set up a queue makes it available for download but its
presence on the server does not affect printing.
You can type the path or use the Browse button to search for the correct PPD. These files must be on a
disk accessible by the server.
ExtremeZ-IP User’s Manual
31
5.
Choose the type of processing method you wish to set up.
You can assign one of four processing methods to the print queue: an AppleTalk printer, an LPR print
queue, a specified directory or folder which you may then have an application ‘watch’, or a Windows
Print Queue.
a.
If you choose Send to AppleTalk Printer, you see the AppleTalk Printer dialog box.
Type the zone in which the printer is located, or an asterisk (*) if you do not have zones on
your AppleTalk network, and the name of the printer. You can click the Browse button to
search for the printer on your network.
When you return to the Print Queues dialog box, the print queue is listed.
b.
If you choose Send to LPR Printer Queue, you see the LPR Printer dialog box. Enter the host
name or IP address of the printer and a queue name.
Note: When printing using an LPR Printer Queue to certain Hewlett-Packard® printers it may be
necessary to set the queue name to BINPS in the LPR configuration dialog to properly handle
ExtremeZ-IP User’s Manual
32
print jobs that contain binary information. The queue name that ExtremeZ-IP publishes to
Macintosh clients does not matter.
c.
If you choose Send to Specified Directory, you see the Browse dialog box. Locate and
highlight the directory you want to use as the destination for received jobs and click OK to
return to the Print Queues dialog box.
When you return to the Print Queues dialog box, the print queue is listed.
d.
If you choose Send to Windows Print Queue, you see the Windows Print Queue dialog box.
Choose a printer and click OK.
You are returned to the Print Queues dialog box and the print queue is listed.
To use ExtremeZ-IP printing, Macintosh clients follow steps for their operating system. Once you add print
queues to the Print Queues dialog box, Macintosh clients can print to any print queue. Installers for Macintosh
clients are copied onto your NTFS disk when you install ExtremeZ-IP Print Support. Macintosh clients copy the
one they need to their computers or they can run it off of the server.
Macintosh OS X clients
clients, once they have installed the ExtremeZ-IP Printer program, can find the print queues by
choosing ExtremeZ-IP Printers on the Print Center Print List pop-up. You must have selected Rendezvous as a
Print Server Connection Option when you set up the ExtremeZ-IP Administrator (see page 20) and it must be
routable on your network. If Macintosh clients cannot see the ExtremeZ-IP server using Rendezvous, they can
specify it in the IP Address field.
ExtremeZ-IP User’s Manual
33
After choosing ExtremeZ-IP Printers on the pop-up list, a list of the ExtremeZ-IP Printers on the network
appears.
ExtremeZ-IP User’s Manual
34
Select the PPD you want to use. If the Server chooses a PPD that the Macintosh client must use, the following
pop-up is displayed.
Macintosh OS 9 clients
clients, once they have installed the Choose IP Printer program, find the ExtremeZ-IP printers
by using Choose IP Printer on the Apple menu instead of the Macintosh Chooser to set up desktop printers.
To modify a print queue, follow these steps.
1.
To modify a print queue, highlight an item on the Print Queues dialog box and click Modify.
The Print Queue Properties dialog box appears. The dialog box gives the configuration information of
the print queue. Use the dialog to reconfigure the print queue. You cannot change the name.
2.
Click OK to return to the Print Queues dialog box.
To delete an item from the Print Queues list, follow this step.
Highlight an item on the Print Queues dialog box and click Remove.
ExtremeZ-IP User’s Manual
35
Controlling the Processing of Jobs
You can control the processing of jobs sent to the ExtremeZ-IP server by Macintosh users. You can suspend
processing of all jobs in a print queue and a particular job in a print queue and resume processing when you
want. In addition, you can control which jobs are processed first and delete jobs, if you wish.
To suspend and resume processing on a print queue, follow these steps.
1.
On the ExtremeZ-IP Administrators dialog box, click Print Queues.
The Print Queues dialog box appears. It lists the print queues available to Macintosh clients.
2.
On the Print Queues dialog box, highlight a print queue and click Suspend Processing.
Processing of all jobs on that print queue is suspended.
3.
To resume printing on a print queue, highlight the print queue in the Print Queues dialog box and
click Resume Processing.
To see the jobs being processed in a print queue, follow these steps.
1.
On the ExtremeZ-IP Administrators dialog box, click Print Queues.
The Print Queues dialog box appears. It lists the print queues available to Macintosh clients.
2.
Highlight a print queue and click View Jobs in Queue.
The Print Queue Jobs dialog box appears; it lists the jobs being processed. When a job is being
processed, you see the progress indicator and the name of the job being processed.
ExtremeZ-IP User’s Manual
36
3.
Before changing the processing order of jobs, stop processing on the print queue by clicking
Suspend Queue Processing.
The job being processed is not affected; it continues to process.
4.
To control a job in the queue, highlight it and click the button you wish—Move Job to Front of
Queue, Move Job Up in Queue, Move Job Down in Queue, Move Job to End of Queue, Suspend
Job, Resume Job or Remove Job.
5.
When you are finished, click Resume Queue Processing.
Print Accounting
If you have purchased the optional ExtremeZ-IP Print Accounting component, you have additional choices
when setting up a print queue which allow ExtremeZ-IP to capture, validate and track cost accounting
information with each print job as it is printed by a user. Information obtained through Print Accounting is
logged with other information in the Print Processing log. You can use the print account information to for
these and other tasks:
• allocate proofing costs between clients and jobs
• track usage of shared printing resources, and assign costs correctly to departments and jobs
• track the use of printers between students, administrators, or projects.
• ensure that only authorized users can print to certain printers
ExtremeZ-IP User’s Manual
37
You can configure print queues to require Macintosh user to enter accounting "codes" before accepting jobs
from them. You decide how many accounting codes are required for each print queue, the names of the codes,
and whether the codes are optional or required. When codes are required, Macintosh users cannot print a job
until codes are entered. You may allow clients to browse a list of valid accounting codes, or pick from the most
recently used codes on their computer if you wish.
Each print accounting code is associated with a text file that contains valid codes and descriptions. For
example, an employee number/name ( 2312, Jane Smith), or project number/name ( Q98331A, Mockup for Acme
Corp Annual Report). When a client prints to a queue, they are prompted to enter the print accounting codes
based on the configuration on the server. Validation is performed against this text file when the client prints,
so you can update these codes and descriptions on the server without having to reconfigure the client.
ExtremeZ-IP does not require clients to mount file server volumes to perform Print Accounting.
Setting up print accounting
Print Accounting supports Macintosh clients using Mac OS 9.1 or later and 10.2.3 or later. You must modify a
PPD for use with Mac OS X before using print accounting. See “Using Mac OS X with print accounting” on
page 41 for directions for modifying a PPD. Print accounting is supported via TCP/IP or AppleTalk on Macintosh
OS X and TCP/IP on Macintosh OS 9. It is not available when printing from applications running in Classic
mode under Mac OS X.
ExtremeZ-IP also supports an option called Direct Printing in which print accounting can be routed through the
ExtremeZ-IP server, while Macintoshes send job directly to a printer that supports the CUPS (Common UNIX
Printing System) printing architecture. For more information about this option, contact Group Logic at
1.703.528.1555.
Creating a list of codes for customers To use Print Accounting, first, create text files containing the codes and
descriptions for each field.
Note: If the codes already exist in a system, such as an accounting system, you may export them and make
any adjustments necessary to conform to the ExtremeZ-IP Printing format.
1.
For each print queue for which you want to use print accounting, plan the number of code fields
you want to use from one to five.
2.
Create a separate file for each code field containing the code and its description, separated by a
tab, in a word processor or text editor. If you use a word processing program, you must save the
file as a text file.
ExtremeZ-IP User’s Manual
38
For example, enter the information this way for employee identification:
123 <tab> Sue <return>
124<tab> Jim
Note: If you change the code text files, ExtremeZ-IP does not reload them automatically. To reload the
codes after making changes, restart the ExtremeZ-IP service or use the command line argument
EZIPUTIL.EXE PRINT /REFRESH_CODES
Setting up a print queue to provide print accounting information Once you define your codes and code
descriptions, assign them to print queues as you set print queues up or modify them.
1.
In the ExtremeZ-IP Administrator, click Print Queues.
The Print Queues dialog box appears. It lists the print queues available to Macintosh clients.
\
2.
Open a Print Queue Properties dialog box to modify a print queue you have already defined or
click Create to create a new print queue.
You set up validation codes for each print queue; every Macintosh client using that Print Queue enters
the same fields.
3.
Check the checkbox Require Client Validation Codes.
The Print Queue Validation Codes dialog box appears.
ExtremeZ-IP User’s Manual
39
4.
To add the first code, use the Configuration of Validation Code section. Type a new name, if you
wish.
This name appears next to the field on the Macintosh Print dialog box.
If you want to require the Macintosh user to fill in a field before printing, check the checkbox
Requires Validation.
Use fields that do not require validation for information such as comments. When you require
validation, a star appears next to the code name in the Macintosh Print dialog box; the Macintosh user
is notified that they must enter information in this field that corresponds to the list of acceptable codes
in order to print the job.
To provide a pop-up menu for the Macintosh user of codes the user has recently used, type a
number of codes to display in the text box Number of Codes to Save on Client (enter 0 for none).
If you want the Macintosh user to be able to browse the code list, place a check in the checkbox
Allow User to Browse Codes
Type the Location of the Code Text File or click Browse to locate it. When you click Browse, locate the
folder in which you placed the text file you created. Select the appropriate code text file and click OK.
ExtremeZ-IP User’s Manual
40
5.
Click OK to save the entered code or click Add to add additional code fields. Highlight a code
and use the Remove, Move up or Move down buttons to rearrange the list, as you wish.
The Add button does not add a new code until you have supplied the location of the Code Text File for
the previous code.
Using Mac OS X with print accounting On Mac OS X, the PPD selected for each print queue must be modified
to include additional information, including the IP address of the server. A sample PPD called EZIPSample.PPD
is included with the software.
1.
Find the PPD you want to modify.
Mac PPDs are normally in the folder Library/Printers/PPDs/Contents/Resources/en.lprog.
2.
Default PPDs are compressed in the gzip format. Expand one using StuffIt Expander or the gunzip
command from a terminal window.
3.
Edit the uncompressed PPD in a text editor.
4.
Copy the following lines to the PPD from the ExtremeZ-IP sample PPD.
*%******************************************************************************
*%
ExtremeZ-IP Print Accounting CUPS Filter
*%******************************************************************************
*cupsFilter: “application/vnd.cups-postscript 0 EZIP_filter”
*EZIP_Print_Accounting_IP:
“192.168.1.5”
*EZIP_Print_Accounting_Queue_Name: “My Queue Name”
*%******************************************************************************
*%
ExtremeZ-IP Print registering UI element for plugin invocation
*%******************************************************************************
*OpenUI *EZIPValidationRequired/ValidationRequired: Boolean
*DefaultEZIPValidationRequired: False
*EZIPValidationRequired True/Required: “”
*EZIPValidationRequired False/Not Required: “”
*?EZIP_Validation_Required: “query code”
*CloseUI: *EZIPValidationRequired
5.
Modify the line EZIP_Print_Accounting_IP to be the TCP/IP address of the ExtremeZ-IP server.
ExtremeZ-IP User’s Manual
41
6.
Modify the line EZIP_Print_Accounting_Queue_Name to be the name of the queue as it’s
specified in the ExtremeZ-IP Administrator.
7.
Modify the NickName of the PPD. There should be a line that starts *NickName:
This is the name that will appear when selected during creation of a desktop printer. If you don’t
modify the NickName and, instead, leave the original compressed PPD installed, you will not be able to
select the modified one.
8.
Save the PPD from the text editor, with a .ppd extension. The standard TextEdit application will
ask you if you want to append a .txt extension. Click Don’t Append. Do not re-compress the PPD.
9.
Provide the PPD for each Mac by sending the new PPD or by placing it on the ExtremeZ-IP server
and configuring the print queue to make it available for download to Mac users.
Directions for Macintosh Users When a Macintosh user prints from a program and sends the job to a print
queue to which you have assigned codes, their Print dialog box displays the information you assigned in the
step above.
1.
Print to a Server print queue.
When the ExtremeZ-IP Administrator has assigned Print Accounting to that print queue, a special
dialog box appears as in this example.
ExtremeZ-IP User’s Manual
42
2.
Type in the information requested by the Server.
In the example above, the ExtremeZ-IP Administrator has provided Browse buttons for each field
allowing the Macintosh user to browse the list of codes for that field. Four of the five fields have
astericks (*) before their names; these fields must be completed before the job can be sent; those
without astericks are optional.
3.
Click Print to send the job to the selected Server print queue.
LOG
You can view a log of ExtremeZ-IP activities. The log tells you what connections have been made and other
information. If you have installed ExtremeZ-IP Print Support, the log has two tabs—Operation Log and Print
Processing Log.
To view the log, follow these steps.
1.
Click Log on the ExtremeZ-IP Administrators dialog box.
The log appears. You can view the type of entry, the time the entry was made, and the message about
the entry.
2.
If you have the ExtremeZ-IP Print Support, click the Print Processing Log tab to display it.
The Print Processing log contains standard printing information.
ExtremeZ-IP User’s Manual
43
If you have purchased and installed the optional Print Accounting module and required Macintosh
users to fill out code fields before printing, these are displayed in the Print Processing log.
You can export either Log in a tab-delimited text file for use in other programs. Once the log is exported to a
text file you can import it to a spreadsheet or system designed to make use of the information.
To export either log using the Export button, follow these steps.
1.
To export a Log, display its tab and click Export.
The Save As dialog box appears.
ExtremeZ-IP User’s Manual
44
2.
Click Save to save the log. If you export the printing jobs, the file is named
ExtremeZ-IP Print Jobs.txt.
3.
Click Close to return to the ExtremeZ-IP Administrators dialog box.
To export either log using the DOS command line, follow these steps.
1.
Navigate in a DOS prompt to the folder where ExtremeZ-IP is installed.
2.
Type EZIPUTIL PRINT /EXPORT_LOG /PATH:fullpathoflog where fullpathoflog specifies the
location and name of the log file that should be exported, such as C:\Logs\PrintAccounting.txt.
See the included sample batch file Export_Print_Log.bat that came with ExtremeZ-IP.
To cconfigure
onfigure the ExtremeZ-IP server to add each new print log entry to a specified text file, follow these steps.
1.
Add the following in the registry.
HKEY_LOCAL_MACHINE/SYSTEM/ControlSet/Services/ExtremeZ-IP/Paramaters
2.
Add a String Value (REG_SZ) named PrintAccountingLogFilePath
3.
Set the value to the full path where you want the logs (e.g., C:\Logs\Log.txt)
ExtremeZ-IP User’s Manual
45
4 Remapping Extensions
Macintosh programs use a document’s type and creator to automatically launch particular applications from
the Finder®. MS-DOS and Windows users normally do not have access to the Macintosh-specific type and
creator information. ExtremeZ-IP allows you to automatically map MS-DOS extensions to particular type/
creator combinations. For example, you can map Adobe® Acrobat documents, which have a PDF extension, to
the Macintosh type “PDF” and creator “CARO.” ExtremeZ-IP installs a number of default mappings for certain
document types; you can change these at any time. You can create a new type and creator to assign to a
document. You can edit and delete types and creators.
To associate files with a type and creator or to create new types and creators, follow these steps.
1.
From the ExtremeZ-IP Administrator, click Settings, then click Types and Creators.
The Macintosh Type/Creator to Extension Mappings dialog box appears.
You can associate MS-DOS file extensions with Macintosh types and creators, create new types and
creators, and edit or delete types and creators.
To associate file extensions, follow these steps.
1.
From the Files with MS-DOS Extension drop list at the top of the Macintosh Type/Creator to
Extension Mappings dialog box, select a new extension.
2.
From the list of types and creators, select the entry you want to remap.
3.
Click Associate.
The extension is associated with the selected type and creator.
To create a new type and creator, follow these steps.
1.
Click Add on the Macintosh Type/Creator to Extension Mappings dialog box.
The Macintosh type and Creator dialog box appears.
2.
Fill out the dialog box to meet your specifications, then click OK to return to the Macintosh Type/
Creator to Extension Mappings dialog box.
The new type and creator are listed in the database.
To edit a type and creator’s comments, follow these steps.
1.
From the Macintosh Type/Creator to Extension Mappings dialog box, select an entry in the
database and click Edit.
The Macintosh type and Creator dialog box appears.
2.
Change the comment; click OK to accept the changes and return to the Macintosh Type/Creator
to Extension Mappings dialog box.
ExtremeZ-IP User’s Manual
48
To delete a type and creator, complete this step.
From the Macintosh Type/Creator to Extension Mappings dialog box, select an entry in the
database and click Delete. The entry is removed from the database.
ExtremeZ-IP User’s Manual
49
Appendix A: Troubleshooting
If you are having problems using ExtremeZ-IP, consult this section for a solution. In addition, you may check
the Group Logic website (www.grouplogic.com) to access the Knowledge Base which contains the latest
technical information about our products. See the Help section on page 6 of the Preface, or contact Group
Logic support or your regional sales manager for assistance.
The ExtremeZ-IP service or the Service for Macintosh is failing.
If you are using both programs and one or both fails, check to see if you have used duplicate names for
servers. Volumes for each service must have unique names or one or both programs may fail. See “Settings” on
page 17 of Chapter 3 for information on configuring the ExtremeZ-IP server.
The Server name does not appear in the Macintosh Chooser.
ExtremeZ-IP clients on Macintosh OS see a server name in their Chooser only if the AppleTalk protocol is
installed on the Windows NT/2000 machine and the client’s connection to the server supports AppleTalk.
Macintosh users can connect to a server, even if they cannot see the server name in the Chooser, by clicking
AppleShare then Server IP Address in the Chooser and entering the server IP address or DNS name. See page
17, Chapter 3, “Settings,” for more information.
Running ExtremeZ-IP and SFM
By default, ExtremeZ-IP and SFM use different default names. SFM’s default name is the name of the Windows
computer; ExtremeZ-IP uses the name of the Windows computer and adds the suffix IP. If you use the default
for SFM and ExtremeZ-IP, you can run ExtremeZ-IP and SFM on the same computer.
If you change the default names so that ExtremeZ-IP and SFM have identical names, either SFM or ExtremeZ-IP
does not function properly. If SFM is started first, ExtremeZ-IP works but does not appear in the Chooser;
ExtremeZ-IP logs an error in the Event Viewer. If ExtremeZ-IP is started first, SFM cannot start up because it
cannot register on the AppleTalk network.
Index
A
about this document 6
access to your computer 21
Active Directory 28
advanced print server options 20
AFP 6
allow guests to connect 21
Apple File Protocol 6
AppleTalk 18
installing 10
assigning
a specified directory 33
a Windows printer 33
an AppleTalk printer 32
an LPR Print Queue 32
C
changing folder permissions by Macintosh users
22
Choose IP Printer 35
Chooser
Server not displaying 10
codes
setting up for print accounting 38
using existing files of codes 38
configuration 11
conflicts between ExtremeZ•IP and SFM 51
connections options 20
controlling job processing 36
creating volumes 22
creators 47
D
deleting extensions 49
deleting jobs from a print queue 37
dialog box
Administrator 28
File Server Settings 17
Files 28
Log 43
Print Queue Jobs 37
Print Server Settings 20
Security Settings 21
Settings 17
Type/Creator, Extension Mappings 47
Users 27
Volume Properties 24
DNS name 18
domain 28
E
editing extensions 48
email address 6
encrypted logons 5
ExtremeZ•IP
installing 7
removing 7
starting 11
stopping 8
EZIPUTIL.EXE. 13
F
File Server Settings dialog box 17
File, Stop/Start Services 12
Files dialog box 28
folders, properties of 25
G
getting started 7
guests
allowing 21
not allowed on Windows XP 21
H
help 6
I
installation 7, 8, 9
IP-based printing 29
J
job processing, controlling 36
L
log
print server options 20
Log dialog box 43
log messages 43
logons, encrypted 5
LPR port 20
LPR Printer Queue 32
M
Mac OS X 6
printing 33
Macintosh
permissions 25
Type/Creator 47
viewing files being shared by 28
viewing those connected 27
modifying a volume 25
moving jobs to print sooner 37
N
naming ExtremeZ•IP and SFM 51
number of users 19
O
Operations Log 45
owners and groups 28
P
password 24
expiration notification 14
length 5
permissions 26
Macintosh style 14
port settings 20
PPDs
creating for Mac OS X users 41
print accounting 30, 37
logging information 44
setting up 38
setting up PPDs for Mac OS X users 41
using information 44
Print Queue Jobs dialog box 37
Print Queues dialog box 30
Print Server Settings dialog box 20
Print Sever Connection Options 20
Print Support 29
printer description
create 31
printers
IP-based 29
printing over TCP/IP
Mac OS 9 and Mac OS X 33
properties
of files and folders 25
of shared files and folders 25
R
register server on networks 18
removing
ExtremeZ•IP 7
jobs from a print queue 37
print queues 36
volumes 25
Rendezvous 6, 18
print server 20
resuming job processing 36
S
security for volumes 21
Security Settings dialog box 21
Service Location Protocol 5
Services for Macintosh 51
avoiding conflicts with ExtremeZ•IP 51
warning about using on same machine 18
setting up
printers 29
specified directories 29
shared files and folders 25
shortcut to sharing a volume 23
SLP options 20
Start File Services 12
starting ExtremeZ•IP 11
Stop File Services 12
stopping
a file from being viewed 29
a print job 36
file services 12
print services 12
stopping ExtremeZ•IP 8
support 1 703 528-1555 6
suspending job processing 36, 37
T
TCP/IP 18
ExtremeZ-IP User’s Manual
54
technical support 6
troubleshooting 51
types and creators 47
U
Unicode character set 6
user name and password 28
Users dialog box 27
V
validation codes
directions for Macintosh users 42
requiring for printing 30, 40
setting up 38
viewing
files being shared 28
jobs being processed 37
Macintosh users 27
volumes
creating 22
deleting 25
modifying 25
W
warning
for password expiration 14
ExtremeZ-IP User’s Manual
55