1
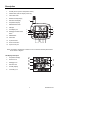
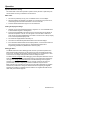
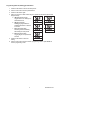
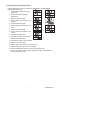
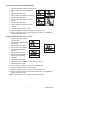
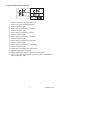
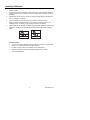
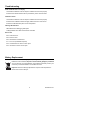
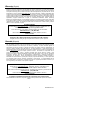
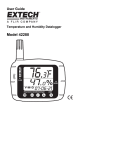
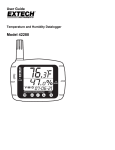
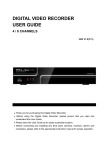
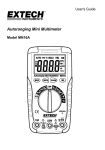
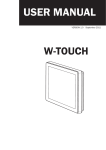
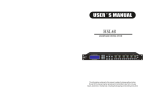
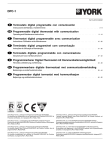
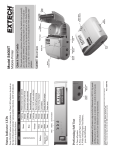
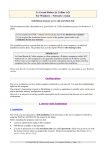
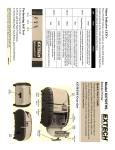
User Guide Temperature and Humidity Datalogger Model 42280 Introduction Congratulations on your purchase of the Extech 42280 Thermometer and Relative Humidity Datalogger. The 42280 is a wall-mount, tripod mount, or desktop indoor air quality monitor with an internal memory capable of storing 16,000 readings (8000 temperature readings and 8000 relative humidity readings) that can later be transferred to PC using the USB interface. Real-time meter-to-PC logging is also supported. This meter is shipped fully tested and calibrated and, with proper use, will provide years of reliable service. Material list Supplied Materials Meter User Guide USB cable Program CD Four (4) batteries; 1.5V ‘AA’ Optional accessories 9V adaptor Calibration bottles (33% and 75%) for Relative Humidity Calibration Features Large LCD display shows temperature, humidity, and date/time clock simultaneously 16,000 internal memory capacity (8000 temperature; 8000 RH%) Visual and Audible (with 117V AC adaptor only) Alarms Easily configure datalogger through the keypad or via PC interface USB PC interface with Windows Wall mount, tripod mount, or for desktop use TM software 2 42280-EN-V4.3-2/11 Description Meter Description 1. Humidity Sensor (internal Temperature sensor) 2. Audible alarm (with AC adaptor power only) 3. Visual Alarm LED 4. Relative Humidity display 5. Date and Time display 6. Temperature display 7. RECORD status LED 8. USB port 9. AC Adaptor jack 10. Datalogger START-STOP button 1 2 4 6 3 7 5 8 9 11. MODE button 12. SET button 13. Up Arrow button 14. Down Arrow button 10 11 15 12 13 14 15. Tripod mount jack Notes: The battery compartment is located on rear of instrument. Desktop stand footers are not shown in diagram. LCD Display Description 1. Temperature Display 2. Dew Point icon 3. Datalogger icon 4. Date and Time 5. Humidity Display 6. Low battery icon 2 3 6 4 3 DP REC Y-M-D H:M:S 1 % 5 42280-EN-V4.3-2/11 Operation Important Note before starting This meter relies on firm button presses to operate correctly. Be sure to press firmly and hold the button for as long as directed in the instructions. Meter Power 1. The meter is powered by four (4) ‘AA’ 1.5V batteries or the 117V AC adaptor. 2. When the batteries are installed or the adaptor is connected to an AC power source, momentarily press the START-STOP button to turn the meter ON. 3. Press the START-STOP button again to turn the meter OFF. Viewing the displayed readings 1. Normally, the top line indicates temperature in degrees C or F. Use the MODE button to switch between degrees C and degrees F. 2. Press and hold the MODE for at least 2 seconds. This will change the top display to Dew Point temperature. The ‘DP’ icon will appear on the LCD when in Dew Point mode. Press and hold the MODE button for at least 2 seconds to return the top display to the normal temperature display mode. 3. The middle line displays Relative Humidity in %. 4. The bottom line automatically alternates between Time and Date displays. 5. If the ALM status LED illuminates and the display flashes, one of the Alarm limits has been reached. Program the High and Low Temperature/Humidity limits in Programming parameter P5 (detailed later in this user guide). Datalogger Basics The Model 42280 has a built-in Datalogger that can store up to 8000 temperature and 8000 humidity readings. Readings can be stored in the meter and transferred at a later time to a PC. The meter can also display real-time readings on a connected PC; in other words, the PC can display readings at the instant the readings are taken. The meter must be configured before datalogging can be attempted. Parameters such as Real Time Clock and Datalogger Sample Rate must be programmed before datalogging can begin. It is strongly recommended that the user take advantage of the supplied software to configure the meter. Instructions for manually configuring the meter are provided below; however configuring the meter via software is very convenient. Basic instructions for connecting the meter to a PC and getting started with the supplied software are provided later in this guide. Detailed instructions regarding the supplied software are provided in a separate manual included on the supplied CD-ROM and the HELP utility in the software program. 4 42280-EN-V4.3-2/11 Manual Programming The Model 42280 has several programming modes (P1, P2, P3, P4, P5, and P6). These parameters must be programmed before the Datalogger or the Alarm can be used. List of Programming Modes P1 - Number of samples to record (1, 2, 4, 8, 12, or 16 x 1000; 1=1000, 2=2000, etc.) P2 - Datalogging Start Methods (Immediate, Keypad, Scheduled, and Repeat modes) P3 – Start Time (set the time and date when Datalogging will automatically begin); Note that P3 will not appear in the menu if ‘SCh’ is not selected in P2. P4 - Sample Rate (set the datalogging interval from 1 second up to 12 hours) P5 - Alarm Mode (set High and Low Temperature/Humidity limits) P6 - Real Time Clock (set the meter’s internal date and time clock) Programming Mode P1; Number of readings (sample points) to record 1. Press the SET button to access the setup mode 2. Use the arrow buttons to select parameter P1 (see sample display below) 3. Press the SET button again 4. Use the up/down arrow buttons to select the desired number of samples (in thousands) to record for a datalogging session (1, 2, 4, 8, 12, or 16; where 1=1000, 2=2000, 4=4000, and so on) 5. Press the SET button to save setting 6. Use the arrow buttons to select another programming mode or press MODE to exit the programming mode. 5 42280-EN-V4.3-2/11 Programming Mode P2; Datalogger Start Modes 1. Press the SET button to access the setup mode 2. Use the arrow buttons to select parameter P2 3. Press the SET button again 4. Select one of the four Start modes using the up/down arrow buttons (see list and diagram below) a. rEp (Repeat Start mode): Logger starts once readings are downloaded to PC b. hEy (Keypad Start): Datalogging begins after the START/STOP button is held for 2 seconds c. imm (Immediate Start): Recording starts immediately after exiting the setup mode d. SCh (Scheduled Start): Logging begins at a preset date and time 5. Press the SET button to save the setting 6. Use the arrow buttons to select another programming mode or press MODE to exit the programming mode. 6 42280-EN-V4.3-2/11 Programming Mode P3; Datalog Start Time Note that parameter P3 will only be visible if the Start MODE is set to SHCEDULE (Parameter P2 set to ‘SCh’). 1. Press the SET button to access the setup mode 2. Use the arrow buttons to select parameter P3 Y-M-D 3. Press the SET button again 4. Use the up/down arrow buttons to set the year Y-M-D Y-M-D 5. Press the SET button again 6. Use the up/down arrow buttons to set month 7. Press the SET button again 8. Use the up/down arrow buttons to set the day H:M:S H:M:S 9. Press the SET button again 10. Use up/down buttons to set the hours 11. Press the SET button again H:M:S 8 12. Use up/down buttons to set the minutes 13. Press the SET button again 14. Use the up/down arrow buttons to set the seconds 15. Press the SET button again to store the settings 16. Press the MODE button to back out to the top level of this menu. 17. Use the arrow buttons to select another programming mode or press MODE to exit the programming mode. 7 42280-EN-V4.3-2/11 Programming Mode P4; Datalogger Sample Rate 1. Press the SET button to access the setup mode 2. Use the arrow buttons to select parameter P4 3. Press the SET button again 4. Use the up/down arrow buttons to set hours H:M:S 5. Press the SET button again 6. Use the up/down arrow buttons to set the minutes 7. Press the SET button again 8. Use the up/down arrow buttons to set the seconds H:M:S H:M:S 9. Press SET again to store the settings 10. Press the MODE button to back out to the top level of this menu. 11. Use the arrow buttons to select another programming mode or press MODE to exit the programming mode. Programming Mode P5; High and Low Alarms 1. Press the SET button to access the setup mode 2. Use the arrow buttons to select parameter P5 3. Press the SET button again 4. Use the up/down arrow buttons to set the High Temperature Alarm limit 5. Press the SET button again 6. Use the up/down arrow buttons to set the Low Temperature Alarm limit 7. Press the SET button again 8. Use the up/down arrow buttons to set the High Humidity Limit 9. Press the SET button again 10. Use the up/down arrow buttons to set the Low Humidity Limit 11. Press the SET button again to store the settings 12. Press the MODE button to back out to the top level of this menu. 13. Use the arrow buttons to select another programming mode or press MODE to exit the programming mode. Note: The AC Adaptor must be used for the audible alarm to sound 8 42280-EN-V4.3-2/11 Programming Mode P6; Real Time Clock H:M:S 1. Press the SET button to access the setup mode 2. Use the arrow buttons to select parameter P6 3. Press the SET button again 4. Use the up/down arrow buttons to set the year 5. Press the SET button again 6. Use the up/down arrow buttons to set month 7. Press the SET button again 8. Use the up/down arrow buttons to set the day 9. Press the SET button again 10. Use the up/down arrow buttons to set the hours 11. Press the SET button again 12. Use the up/down arrow buttons to set the minutes 13. Press the SET button again 14. Use the up/down arrow buttons to set the seconds 15. Press SET again to stores the settings 16. Press the MODE button to back out to the top level of this menu. 17. Use the arrow buttons to select another programming mode or press MODE to exit the programming mode. 9 42280-EN-V4.3-2/11 Datalogging Starting a Datalogging session The 42280 can automatically store up to 16,000 readings (8000 temperature and 8000 humidity) for later transfer to PC. Program the controller, as discussed earlier, before Datalogging. If the Datalogger has not been configured at this point, configure as necessary. If programming is complete, continue with the next section. Starting the Datalogger by push-button (Key Mode) 1. Programming mode P2 (Datalogging Start Modes) must be set to KEY (hEy) mode for this method. 2. When P2 is set to ‘hEy’, press and hold the START-STOP button for 2 seconds. 3. The REC front-panel status light will blink indicating that readings are currently recording at the rate programmed in parameter P4 (sample rate) 4. To stop recording, press and hold the START-STOP button for at least 2 seconds. The REC status light will stop blinking. Starting the Datalogger in Immediate Mode 1. Programming mode P2 (Datalogging Start Modes) must be set to ‘Imm’ mode for this method. 2. When the programming mode is exited, Datalogger automatically begins. 3. The REC front-panel status light will blink indicating that readings are currently recording. 4. To stop recording, press and hold the START-STOP button for at least 2 seconds. The REC status light will stop blinking. Starting the Datalogger in Schedule Mode 1. In Schedule Mode the meter begins recording at a specific date and time, as programmed by the user. 2. Programming mode P2 (Datalogging Start Modes) must be set to ‘SCh’ mode for this method. 3. After setting P2 to ‘SCh’, set the desired time and date in Programming Mode P3 (P3 only appears in the menu when ‘SCh’ is selected in P2. 4. Datalogging will start at the programmed date and time. Note that the Real Time Clock (Programming Mode P6) must first be set to the current date and time. 5. When datalogging begins, the REC front-panel status light will blink indicating that readings are currently recording at the rate programmed in parameter P4 (sample rate) 6. To stop recording, press and hold the START-STOP button for at least 2 seconds. The REC status light will stop blinking. Starting the Datalogger in Repeat Mode In Repeat Mode the meter simply begins datalogging again after readings are downloaded to a PC. This allows the user to maintain the same programming selections time after time. Datalogging is indicated by the flashing REC light as described in the other Start Modes above. To stop recording, press and hold the START-STOP button for at least 2 seconds. The REC status light will stop blinking. 10 42280-EN-V4.3-2/11 Connecting the Meter to a PC A USB cable is provided with the meter. One end of the cable connects to the meter’s USB jack and the other end connects to a USB port on the PC. Running the supplied PC software The supplied PC software is included on the supplied CD-ROM. Insert the CD into the computer’s CD-ROM drive and follow the on-screen prompts and instructions. In the software COM PORT SETTING field, select the COM port to where the meter is connected. Software Datalogging Parameters From the main software screen, select LOGGER SET and set the sample rate, sample points, and start mode. These are described in some detail in the separate software manual and the software HELP utility on the supplied CD-ROM. Remember to press ‘OK’ after changing a setting to ensure that the software processes the changes. The meter is now ready to record. Transferring readings to PC 1. Connect and run the supplied software as previously described. 2. Press the DOWNOAD START button on the main software screen to transfer the readings. 3. The separate software instructions supplied in the software’s HELP utility explain how to view, graph, save, export and print the downloaded data. NOTE: The Software’s HELP utility provides in-depth software and downloading instructions, which is beyond the scope of this user guide; please refer to the HELP utility in the supplied software program for detailed guidelines and instructions. 11 42280-EN-V4.3-2/11 Humidity Calibration 1. With the meter OFF, plug the humidity sensor probe into the 33% Calibration Reference bottle. 2. Simultaneously press and hold the START-STOP and the SET buttons for at least 2 seconds to enter the 33% Calibration mode. The display ’32.8%’ will begin to flash on the display. 3. Approximately 30 minutes later, the ’32.8%’ display will stop flashing, indicating that the 33% calibration is complete 4. Plug the humidity sensor probe into the 75% Calibration Reference bottle. 5. Press and hold the START-STOP button for at least 2 seconds to enter the 75% Calibration mode. The display ’75.3%’ will begin to flash on the display. 6. Approximately 30 minutes later, the display will stop flashing, indicating that the entire calibration is complete. The meter will automatically return to the normal operating mode % % Calibration Notes: • The user can exit the calibration without finishing by pressing the START-STOP button for 2 seconds (before reaching step 6 above). • For best accuracy, perform the calibration at room temperature. • Calibration Reference bottles are available optionally through Extech Instruments distributors 12 42280-EN-V4.3-2/11 Specifications General Specifications Display Multi-function LCD with status LED indicators Measurement ranges Temperature: -4 to 144 F (-20 to 70 C) o o Humidity: 0 to 100% o o Dew Point temperature: -4 to 144 F (-20 to 70 C) o o Resolution 0.1 C / F / % Accuracy Temp: 1.0°F (+/- 0.6°C) from 32 to 122°F (0 to 50’C) 2.0°F (+/-1.2°C) outside of this range Humidity: +/-3% from 10 to 90% (+/-5% outside of this range) Datalogger memory 16,000 total (8000 temperature and 8000 humidity readings) Over range indication Error code appears on the LCD Low battery indication Battery symbol appears on the LCD Power supply Four (4) 1.5v ‘AA’ batteries 13 42280-EN-V4.3-2/11 Troubleshooting Power is ON but there’s no display Check that the batteries or the AC adaptor is installed and connected properly Ensure that the START-STOP button is pressed firmly and for at least 100ms Calibration Failure Check that the batteries or the AC adaptor is installed and connected properly Ensure that the calibration bottles are tightly sealed around the meter sensor Ensure that calibration takes place at room temperature Flashing LED Indicators REC flashes when datalogging takes place ALM light flashes when alarm limit has been exceeded Error Codes E02 - Under flow error E03 - Over flow error E04 - E02 and E03 combined error E11 - CAL error (recalibration required) E32 - IC read/write error. Return unit for repair E33 - Circuit Error. Return unit for repair Battery Replacement You, as the end user, are legally bound (Battery ordinance) to return all used batteries and accumulators; disposal in the household garbage is prohibited! You can hand over your used batteries / accumulators at collection points in your community or wherever batteries / accumulators are sold! Disposal: Follow the valid legal stipulations in respect of the disposal of the device at the end of its lifecycle 14 42280-EN-V4.3-2/11 Warranty (English) EXTECH INSTRUMENTS CORPORATION (A FLIR COMPANY) warrants this instrument to be free of defects in parts and workmanship for one year from date of shipment (a six month limited warranty applies to sensors and cables). If it should become necessary to return the instrument for service during or beyond the warranty period, contact the Customer Service Department at (781) 890-7440 ext. 210 for authorization or visit our website www.extech.com for contact information. A Return Authorization (RA) number must be issued before any product is returned to Extech. The sender is responsible for shipping charges, freight, insurance and proper packaging to prevent damage in transit. This warranty does not apply to defects resulting from action of the user such as misuse, improper wiring, operation outside of specification, improper maintenance or repair, or unauthorized modification. Extech specifically disclaims any implied warranties or merchantability or fitness for a specific purpose and will not be liable for any direct, indirect, incidental or consequential damages. Extech's total liability is limited to repair or replacement of the product. The warranty set forth above is inclusive and no other warranty, whether written or oral, is expressed or implied. Product Support Technical Support: [email protected] -- Calibration and Repairs: [email protected] Product specifications subject to change without notice For the latest version of User Guides, Software updates, and other information: www.extech.com (781) 890-7440 Extech Instruments Corporation, 285 Bear Hill Road, Waltham, MA 02451 ISO9001 Certified Copyright © 2011 Extech Instruments Corporation (a FLIR company) All rights reserved including the right of reproduction in whole or in part in any form. Garantía (Español) EXTECH INSTRUMENTS CORPORATION (UNA EMPRESA FLIR) garantiza este instrumento para estar libre de defectos en partes o mano de obra durante un año a partir de la fecha de embarque (se aplica una garantía limitada a seis meses para los cables y sensores). Si fuera necesario regresar el instrumento para servicio durante o después del periodo de garantía, llame al Departamento de Servicio a Clientes al teléfono (781) 890-7440 ext. 210 para autorización, o visite nuestra página en Internet www.extech.com para Información del contacto. Se debe otorgar un número de Autorización de Retorno (RA) antes de regresar cualquier producto a Extech. El remitente es responsable de los gastos de embarque, flete, seguro y empaque apropiado para prevenir daños en tránsito. Esta garantía no se aplica a defectos resultantes de las acciones del usuario como el mal uso, alambrado equivocado, operación fuera de las especificaciones, mantenimiento o reparación inadecuada o modificación no autorizada. Extech específicamente rechaza cualesquier garantías implícitas o factibilidad de comercialización o aptitud para cualquier propósito determinado y no será responsable por cualesquier daños directos, indirectos, incidentales o consecuentes. La responsabilidad total de Extech está limitada a la reparación o reemplazo del producto. La garantía precedente es inclusiva y no hay otra garantía ya sea escrita u oral, expresa o implícita. Ayuda de producto Soporte Técnico [email protected] - Reparación / Retornos: [email protected] Las especificaciones del producto están sujetas a cambios sin aviso Para la última versión de esta Guía del usuario, actualizaciones de software y otra información www.extech.com (781) 890-7440 Extech Instruments Corporation, 285 Bear Hill Road, Waltham, MA 02451 Certificado ISO9001 Copyright © 2011 Extech Instruments Corporation (una empresa FLIR) Reservados todos los derechos, incluyendo el derecho de reproducción total o parcial en cualquier medio. 15 42280-EN-V4.3-2/11 Garantie (Français) EXTECH APPAREILS CORPORATION (Une société FLIR) garantit que cet appareil est exempt de défauts matériels et de fabrication pendant un an à compter de la date d’envoi (une garantie limitée de six mois s’applique aux capteurs et câbles). Si le renvoi de l’appareil pour réparation devient nécessaire durant ou après la période de garantie, contactez le service client au (781) 890-7440 poste. 210 pour autorisation ou visitez notre site Web à l’adresse www.extech.com pour obtenir nos coordonnées. Un numéro d’autorisation de retour (AR) doit être délivré avant tout retour de produit à Extech. L’expéditeur prend à sa charge les frais d’expédition, le fret, l’assurance et l’emballage correct de l’appareil afin de prévenir toute détérioration durant le transport. Cette garantie ne s’applique pas aux dommages imputables à l’utilisateur tel que l’usage impropre ou abusif, un mauvais câblage, une utilisation non conforme aux spécifications, un entretien ou une réparation incorrecte, ou toute modification non autorisée. Extech déclinera spécifiquement toute garantie ou qualité marchande ou aptitude à l’emploi prévu et ne sera en aucun cas tenu responsable pour tout dommage conséquent direct, indirect, ou accidentel. La responsabilité totale d’Extech est limitée à la réparation ou au remplacement du produit. La garantie définie ci-dessus est inclusive et aucune autre garantie, écrite ou orale, n’est exprimée ou implicite. Appui de produit Service d’assistance technique [email protected] - Réparations et retours :[email protected] Spécifications produit sujettes à modifications sans préavis Pour obtenir la dernière version de ce manuel d’utilisation, des mises à jour logicielles et autres informations www.extech.com -(781) 890-7440 Extech Appareils Corporation, 285 Bear Hill Road, Waltham, MA 02451 Certifié ISO 9001 Copyright © 2011 Extech Appareils Corporation (une société FLIR). Tous droits réservés, y compris le droit de reproduction, en tout ou en partie, sous quelque forme que ce soit. 16 42280-EN-V4.3-2/11