1
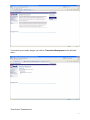
AccessOnline
AccessOnline
Training Guide
Arlene Szestopalow, SCMP
Purchasing and Payables Officer
KPDSB – Kenora Ed Centre
807-468-5571 ext 253
January 6, 2011
1
2
PLEASE NOTE: In this new AccessOnline program, you cannot click
the back arrow or you will be kicked out of the site.
Open your internet browser and type in the URL:
https://access.usbank.com/cpsApp1/index.jsp
Save this link as a favourite.
Enter the company information:
Organization Short Name: The Organization Short name is KPDSB
User ID: Your UserID is the same as it was. The only change is: if your User ID had six (6)
characters only, ie. smitha, you now have a number 1 added to it, ie, smitha1. If you have any
problems please contact Arlene Szestopalow, Plan Administrator.
Password: When you first log on this site, your password is: usbank02. You will be prompted
to answer an authentication question. The answer is fido
3
You now have to change your password.
After a successful login, you will see the following screen:
4
To reconcile your monthly charges, you click on Transaction Management on the left hand
menu…
Then click on Transaction List.
5
If you are a viewer of other cardholders (Principals/Managers/etc) you will see the following
screen. To reconcile your own or another cardholders charges, you must type the last name in
the search box “Last Name” and click “Search”:
If you are a single cardholder (most cardholders) you will see the following screen:
6
You will now choose from the drop down box titled Billing Cycle Close Date. Open refers to
interim charges since your last statement. You will choose the cycle date that is required to be
reconciled and then click Search. You will see the following:
To reconcile each charge separately and one at a time, check off the box in the “Select” column
and click the Reallocate button.
Check box
Reallocate Button
7
You will now see this screen. You can change the code, add your comments and create a split
transaction if you need to do so. You can leave the code as your default, change only one
segment, change the entire code or you can utilize the look-up function by clicking on the
magnifying glass next to each segment of the code:
Add Split Transaction
Insert
Comment
Change
Coding
When you have completed entry on this screen, click the Save Allocations button. Then Click
the “Back to Transaction List”. You cannot click the back arrow or you will be kicked out of
the site.
After you assign the correct GL code and insert your description of the purchase and
save the allocations, you must click on the “Check All Shown” and then “Change Review
Status”. By completing this step you will have “reviewed” all of your transactions.
8
We will walk through the steps to split a transaction:
Check the appropriate box in the Select column and click “Reallocate”
Check box
Click here
You are brought to this screen. You will click on “Add Alloc”:
Click here
9
The following screen appears:
If you want to do a 50/50 split between two different codes, you will type 50 in the boxes shown.
You will note that the Amount Remaining box should always be “0”. You simply type in the
correct codes and click “Save Allocations”. To return to the transaction summary screen, click
“Back to Transaction List”
10
You must now print and sign the Account Activity sheet:
Click “Print Account Activity”
The following report appears. Please print and attach your receipts to this report. Please sign
this, have your supervisor sign it and fax it to the Kenora Ed Centre to the attention of Arlene
Szestopalow, Plan Administrator.
11