1
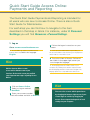
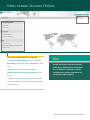
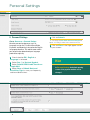
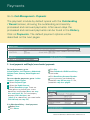
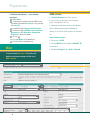
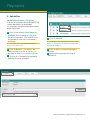
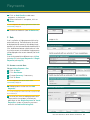
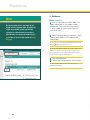
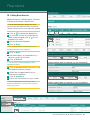
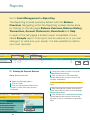
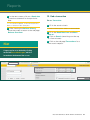
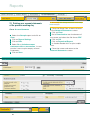
AA_reversed_fullclrC.eps
ABN AMRO reversed full-colour for coated paper
Width shield: 20 mm
Overlap: 0,05 mm
Quick Start Guide Access Online:
SnelstartgidsAccessOnline:BetalingenenRapportage
Payments and Reporting
Frontcover
Start
quickly
Heading
with Access Online
Contentof the application
›› Usage
Content
of the commonly used functionalities
›› Description
Content
››
Quick Start Guide Access Online:
Payments and Reporting
The Quick Start Guide Payments and Reporting is intended for
all users who are new to Access Online. There is also a Quick
Start Guide for Maintenance.
For each step you can find how to navigate to the item
described in that step in italics. For instance, under 2. Personal
Settings you will find Resources > Personal Settings.
1. Log on
Go to: www.accessonline.abnamro.com
i Access Online can only be used with Internet
Explorer (Microsoft).Select
the language
English.
d Follow the log on instructions on your
screen.
i A new account number has been opened for you.
The account number is only used for log on. No payments
can be made to or from this account.
e The main screen of Access Online will
be visible. In the upper right corner you
can change the language.
Hint
i The language preference will be stored on your
Add the internet address www.
accessonline.abnamro.com to your
favorites. On the main screen you can find
some important messages regarding Access
Online.
a Click on Access Online.
computer only. Working from another computer means
that the language preference needs to be set again. The
language preference is only valid for the main screen.
Hint
b Select as log on method
e.dentifier2.
c Enter your account number
and card number and click on Submit.
2
You can resize screens which opened once
by changing the browser right corner of your
screen larger or smaller by dragging the
mouse. Correct operation depends on local
settings on your computer.
Main screen Access Online
e
The main menu of Access Online:
›› Under Cash Management the reporting module
(Reporting) and payment module (Payments) can be
found.
›› Under Resources the maintenance module
(Administration) and Personal Settings can be
found.
Hint
Use the menu items on the left to navigate
within Access Online. Please note that the
Previous button in your browser can’t be
used to go to the previous page due to the
secured environment (https://).
›› In order to use the payment- and reporting module the
maintenance module and the personal settings need to be
configured initially.
Quick Start Guide Access Online: Payments and Reporting 3
Personal Settings
a
b
2. Personal Settings
Go to: Resources > Personal Settings
Here the personal preferences such as
Language can be set. This Quick Start Guide
Payments and Reporting is based on the English
language preference. The administrator within
your organisation determined your language
preference originally.
e Click on Submit.
i A message that the details have been changed will
appear. Your changes will be active within 45 minutes.
f Click on Close in the right upper corner
of your screen.
a Check whether EN - English at
Language is selected.
b Select Dot (.) at Decimal Symbol.
Hint
c Select Default SEPA Credit Transfer on
Single ACH.
d Select New at Default Bank and
Beneficiary Type in case you frequently
add new beneficiaries.
In Personal Settings the default opening
screen of the payment module can be
changed.
c
d
e
4
Pageheader
Payments
Go to Cash Management > Payments
The payment module by default opens with the Outstanding
/ Recent screen, showing the outstanding and recently
processed and removed payments. After seven days the
processed and removed payments can be found in the History.
Click on Payments. The default payment options will be
described on the next pages.
b
c
3. Local payments and Single (cross-border) payments
For local payments, go to:
Initiate Payment > Local Payments > Netherlands
Belgium, France, Germany, United Kingdom and
Mexico.
III Fill in City.
For cross-border payments, go to: Initiate
Payment > Single Payment
VI In case you want to save the beneficiary,
a Select Payment Type.
IV Select Standard or IBAN beneficiary
account number.
V Fill in Beneficiary Account Number.
proceed with step XIII on page 7. If not,
proceed with step d on page 8.
b Select the Debit Account.
c Select Beneficiary type. There are
three options to choose from: a new
beneficiary local/foreign (New, see step
3.1a and step 3.1b), an intracompany
payment (Own Account, see
step 3.2) or a beneficiary you saved earlier
(Pre-defined, see step 3.3).
I
II
III
IV
3.1a New beneficiary – local payment
I Select New.
II Fill in Name.
Quick Start Guide Access Online: Payments and Reporting 5
V
Payments
SEPA criteria:
3.1b New beneficiary – cross-border
payment
›› The Debit Account is a Dutch account.
I Select New.
II Is the payment compliant with the SEPA criteria
(see below), proceed with step IV. If not, proceed
with step III.
III Deselect the option Sepa Credit Transfer.
IV Deselect the option Validate International
payments as EU Directive Compliant
Payments, which will appear.
V Click on
.
VI Fill in the Name of the beneficiary.
VII Fill in the City of the beneficiary.
i In case you want to do SEPA payments from non-Dutch RBS
accounts, a SEPA agreement is necessary.
›› The payment takes place within the EU Member
States, Switzerland, Iceland, Liechtenstein or
Norway. A list with all SEPA-countries can be found
on
www.abnamro.nl/sepa.
›› The currency is EUR.
›› A correct IBAN account number and SWIFT ID
are available.
Hint
›› The option Charges For is SHA - Shared.
In case the option Charges For has been left
blank, by default the charges will be set to
SHA – Shared.
III
I
XIII
V
VI
XI
VII
VIII
XI
6
X
Pageheader
Payments
i City beneficiary at Single (cross-border) Payment is
not marked with an asterisk (*), however it is a mandatory
›› In case of initiating a local payment, select New for
Bank type and fill in a Bank Name.
›› Click on Save.
field.
VIII Fill in the Country of the beneficiary.
IX Select Standard or IBAN account
number.
X Fill in the Beneficiary Account
Number.
XI Fill in the SWIFT ID; click on
i The message Beneficiary saved successfully.
Please submit for authorisation. appears.
›› Click on Submit.
›› Follow the authorisation instructions on your
screen.
i The message Beneficiary authorised successfully
.
i In case the SWIFT ID appears multiple times, the first
and it will be active after 10 minutes. will appear. You
will return to the main payment screen automatically,
where you can proceed with your payment.
occurrence can be chosen.
XII Click on the correct SWIFT ID in the
list of search results.
XIII For saving the beneficiary, execute
the following steps.
›› Click on
.
Hint
XIV Proceed with step d on page 8.
3.2 Intracompany transfer
I Select Own Account.
II Click on
.
III Select the desired account in the list of search
results by clicking on the green account code in the
column name Acc. Code.
IV Proceed with step d on page 8.
3.3 A pre-defined beneficiary
The Beneficiary Code can be copied to
Account Code and Beneficiary Name to
Account Name.
I Select Pre-defined.
II Fill in (part of) the beneficiary name and click
on
.
III If necessary select the desired beneficiary in the
›› Fill in a Beneficiary Code.
›› Fill in an Account Code and an Account
search results by clicking on the green beneficiary
code in the column name Bene Code.
IV Proceed with step d on page 8.
Name.
Quick Start Guide Access Online: Payments and Reporting 7
Payments
d Select the desired currency.
d
e Fill in the Transfer Amount.
e
f Fill in the Execution Date.
f
i Payments cannot be scheduled for execution more
g
than 90 days into the future.
g Optionally fill in the Payment Details.
h Click on Submit.
i On the screen one or more messages
will appear. When the message is in black,
the payment has been successfully sent
to the bank and you can continue with
step k.
j When the message is in red, an error
occurred. Data is not or is incorrectly
entered into the payment initiation.
Proceed with the next steps:
I Recover the incorrect or missing data.
II Click again on Submit.
i The message Payment submitted successfully. will
appear.
k Authorise the payment (see 9.
Authorise).
Hints
h
4. Edit / complete payments
Go to: Initiate Payment > Hold / Rework
As long a payment has not been authorised, it can be
found under Hold / Rework, where the payment
can be edited and submitted for authorisation.
a Click on the green account code in the
column Debit Account for the payment
you want to edit.
b Make the changes and click on Submit.
i The message Payment submitted successfully
appears.
c Authorise the payment (see 9.
By clicking Submit, the validation
(Validate) of the payment will be
performed automatically.
JJ
The payment can be saved as a model
payment for future use by clicking Save
as Model.
A model reference number can then be
added to the payment. The model payment
can be found via Initiate Payment > Model
Payments. The reference number is shown
in the column Model Reference.
JJ
8
Authorise).
a
Pageheader
Payments
5. Upload files
Go to: Initiate Payment > File Upload
In Access Online payment files like ClieOp03, BTL91
or direct debit batches can be uploaded.
For the upload of a payment file the default upload
profiles can be used.
a
a
a Click in the column Short Name on
ClieOp03 for the upload of a file with
domestic payments. Click on BTL91 for
the upload of a file with cross-border
payments.
i To be able to view salary payment details a user
d Click on Upload.
i The progress of the upload will be shown in a new
window. A message that the file has been uploaded
successfully will appear.
needs to have specific roles.
e Click on Close to close the progress
b Click on Browse… to select a file.
Select the file and click on Open. It is
possible to select a maximum of 5 files.
c In case of a ClieOp03 file, the Batch
Reference can be changed.
window.
f Authorise the payment file (see 9.
Authorise).
d
b
c
Quick Start Guide Access Online: Payments and Reporting 9
Payments
e
a
b
c
d
f
i
6. Batch
c Select Salary Payment if this is a salary
Go to: Initiate Payment > Batch ACH
A batch is a collection of payments. On the account
statement a batch will be displayed with the total
batch amount. The amounts of the underlying single
payments will not be shown. Batches can be created
manually in Access Online, however we recommend
to import the batch from your accounting system. For
the import of a batch see
5. File Upload.
a Fill in a Batch Reference.
i For example: fill in the date of today.
b Fill in the Execution Date.
batch. Only users with specific roles
will be allowed to view individual salary
payment details.
d Choose the Debit Account.
e Click on Save.
i The message Batch Payment saved successfully
will appear.
f In the header Ordering Customer the
button Add Credit appears. Click on this
button.
g Click on
and fill in the mandatory
fields. Please note that City needs to be
filled in also.
i See 3. Local Payments and Single (cross-border)
Payments for extra information about the mandatory
fields.
h
h Click on Submit. The payment is added
to the batch.
i A message that the batch has been successfully
submitted will appear.
g
10
Pageheader
Payments
i Click on Add Credit to add more
payments to the batch.
j When the batch is complete, click on
Submit.
i A message that the batch payment has been sent
successfully will appear.
k Authorise the batch (see 9. Authorise).
a
7. Sets
A set is a collection of single payments which can be
authorised in one go. The total amount of the set will
be displayed, but the amounts of the individual single
payments can also be viewed. Besides the difference in
costs, the difference between a batch and a set is that
for a set the amounts of the individual single payments
will be displayed on the account statement (see also 6.
Batch).
A set can be created in two different ways: via Sets
(see step 7.1) or via Local Payments / Single
Payment (see step 7.2).
b
c
7.1 Create a set via Sets
Go to: Initiate Payment > Sets
a Click on New.
d
e
b Fill in Set Name.
c Change Currency if necessary
d Click on Save.
i A message that the set has been saved
successfully will appear.
e Add payments to the set via Add
Payment.
i In case no payment can be selected, no payment has
been initiated yet.
f In case you want to add payments but
no payments have been initiated yet,
please go to the Single Payment or Local
Payments screen to create a payment
and click on Add to Existing Set.
f
Quick Start Guide Access Online: Payments and Reporting 11
Payments
7.2 Create a Set via Local or Single
Payment
Go to: Initiate Payment > Local
Payments > Netherlands
a
ór
Go to: Initiate Payment > Single Payment
a Click within the local or single payment
screen on Add to New Set.
b Fill in a Set Name.
c Click on Save.
d The payment is added to the set
and you will automatically return to the
payment screen.
c
i In the Local Payment screen the name of the set
can be found below the Execution Date. In the Single
Payment screen the name of the set can be found below
the Payment Details.
b
Hint
A direct debit can also be saved as a model
payment for future use by entering a Direct
Debit Reference. This model payment
can be found under Initiate Payment >
Model Payments. It can be recognised by the
direct debit reference in the column Model
Reference.
12
Pageheader
Payments
f
a
b
c
d
e
g
j
8. Direct Debit
Go to: Initiate Payment > Direct Debit
In Access Online direct debits can be initiated.
Please note that your organisation needs to have the
debtor’s permission.
a Select Domestic Direct Debit or SEPA
Direct Debit at Direct Debit Type.
b Fill in a Direct Debit Reference.
i For example: fill in the date of today.
c Fill in the Execution Date.
d Select the Beneficiary Account.
e For a SEPA Direct Debit select the
Creditor ID.
i Your organisation received this Creditor ID when
h Click on
and fill in the mandatory
fields, the fields marked with an asterisk
(*).
i Click on Submit.
i The message that the Direct Debit has been
submitted successfully will appear.
j Click on Add Debit to add more direct
debits.
k When the direct debit is completed,
click on Submit in the Direct Debit
screen.
i The message that the Direct Debit has been
submitted successfully will appear.
l Authorise the direct debit (see 9.
Authorise).
making the SEPA Direct Debit-agreement.
f Click on Save.
i A message that the Direct Debit has been saved
i
successfully will appear.
g In the header below Credit Account
on the right side the button Add Debit is
now visible. Click on this button.
h
Quick Start Guide Access Online: Payments and Reporting 13
Payments
9. Authorise
Hint
Go to: Authorise
m After the payment or direct debit has
By checking the master checkbox in the
header of each payment type, all payments
and/or direct debits of that type will be
selected for authorisation. In case more
than 50 items are ready to be authorised, it
is possible to increase the number of Rows
per page.
been submitted, it will appear under
Authorise. The Authorise functionality
is only visible for users who have the
authorise role.
a Select the payment(s), batch(es), set(s)
and/or direct debit(s) that need to be
authorised.
i You can view the underlying individual payments by
clicking
behind the batch or the set.
i In case the payment, batch, set or direct debit is not
b
visible for a user, the user has not been added to the
authorisation policy (see chapter Authorisation Policy in
the Quick Start Guide for Maintenance).
b Click on Authorise.
c Follow the instructions on your screen.
i The message that the payments have been
authorised will appear.
a
14
Pageheader
Payments
10. Editing Beneficiaries
Go to: Resources > Administration > Account
& Company Data Setup > Beneficiaries
!! Note: the beneficiary details are to be
found in the User Administration module of
Access Online and not in the Payment module.
a
a Click on
for editing the beneficiary.
b In case the account of the beneficiary
needs to be changed, click on . If not,
proceed with step f.
c Edit the Account Number.
d Click on Save.
b
i The message that the accountnumber of the
beneficiary has been saved will appear.
e Click on Back.
f Edit other details of the beneficiary if
necessary and click on Save.
d
e
g Click on Submit.
i The message that the beneficiary has been
submitted will appear.
h Click on Authorisation Overview in the
User Administration module.
i Select the changed beneficiary by
checking the checkbox.
j Click on Authorise.
f
g
k Follow the instructions on your screen.
i The message that the beneficiary has been
authorised will appear. The changes will be activated
within a few minutes.
j
h
i
Quick Start Guide Access Online: Payments and Reporting 15
Pageheader
Reports
Go to Cash Management > Reporting
The Reporting module opens by default with the Balance
Overview. Navigating within the Reporting module can be done
by clicking on the tab pages Balance Overview, Balance History,
Transactions, Account Statements, Downloads and Help.
In each of the tab pages a default report is available, the so
called Sample report. This report can be used as is, or you can
change it to what suit your needs. It is also possible to define
your own report(s).
a
b
c
e
11. Viewing the Account Balance
d Close the screen to return to the tab
Go to: Balance Overview
e Click on the icon in the Same Day
column behind the account to view the
intraday statements.
a Select the Sample report.
i If no icon is displayed, no intraday transactions are
b Click on View.
c Click on the Account Code of the
account to view the latest account
statement.
h
16
page Balance Overview.
available
f After viewing the intraday transactions,
close the screen to return to the tab page
Balance Overview.
g Click on the icon in the Balance History
column behind the account to view the
balance history or statements of previous
days.
g
Pageheader
Reports
h In the next screen, click on a Book date
to see the statement for that particular
date.
12. Find a transaction
Go to: Transactions
i If no statement appears, or when the statement is
blank, no transactions have taken place
a Fill in the search criteria.
i After viewing the Balance History,
i Enter a word or a part of sentence as search criteria.
close the screen to return to the tab page
Balance Overview.
b Fill in the Book Date from and Book
Date to.
c Click on Search (searching can take up
to a few minutes).
Hint
d Click on the tab page Transactions for a
new search request.
A report can be set as default by clicking
on the link Set as default report, which is
located near the bottom of the screen.
d
b
c
Quick Start Guide Access Online: Payments and Reporting 17
Reports
a
b
13. Printing your account statements
of the previous working day
i The message Your changes have been successfully
saved will appear.
f Close the Setup View screen and return
Go to: Account Statements
to the Account Statements screen.
g Click on View.
a Select the Sample report and click on
View.
b Click on Report Settings.
c Click on Edit.
d Select No at Include account
statement with no transaction, in case
you don’t want to print empty account
statements.
e Click on Save.
h Go to Download to near the bottom of
the screen and select the file format PDF.
i Click on OK.
j Click on Download Report.
k In Acrobat Reader click on print and/or
save.
l Close the screen and return to the
Account Statements screen.
c
d
e
h
18
i
Reports
14. Exporting account statements to
your accounting system
Go to: Account Statements
a Go to Select Report. Select the
Hint
Sample report and click on View.
b Go to Download to near the bottom
of the screen and select the file format
MT940 SWIFT.
c Click on OK.
d Click on Download Report.
e Click on Save and save the file.
f Close the Report Download screen
and return to the Account Statements
screen.
b
On the tab page Downloads you can find an
overview of all your reports.
In this screen you can execute, download,
edit or delete your reports.
c
Extended information
In Access Online on the main screen under
Help you can find the User Manual and the
Frequently Asked Questions (FAQ).
JJ
The Quick Start Guide Payments and
Reporting is also available in Dutch.
JJ
Quick Start Guide Access Online: Payments and Reporting19 19
AA_reversed_fullclrC.eps
ABN AMRO reversed full-colour for coated paper
januari 2012
Width shield: 20 mm
Overlap: 0,05 mm