1
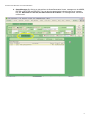
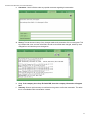
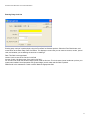
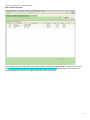
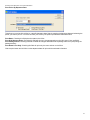
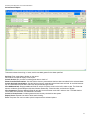
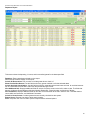
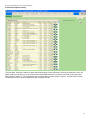
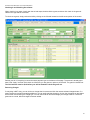
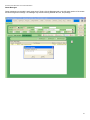
FRONTClerk
For Windows
User Documentation
Last Updated 7-31-08
FrontClerk for Windows User Documentation
Table of Contents
Introduction
3
Chapter 1: What is in this documentation?
New Windows Screen
Windows Screen Field Definitions
Guest Data
Folio Charges
Guest Messages
Loyalty Card Information
Day Rates
Packages / Add-ons
Comments
History
Corporate Information
Summary Information
Petty Cash
Cash and Credit Limit Report
Phone List
Room Status
Out of Order
Folios by Departure Date
Arrival/Cancellation Report
Departure Report
Telephone Listing Report
Tape Chart
Rack & Tree Report
Maids’ Housekeeping Report
Folio Code Spreadsheet
Journal Breakdown Report
Security System
3
4
5
8
8
9
10
11
11
12
12
12
12
14
14
15
16
17
18
19
20
21
22
23
25
27
28
29
Chapter 2: How do I use the software?
Logging In
Changing Password
Changing Shift Information
Making a Reservation
Editing a Reservation
User Messaging
Check In/Check Out
Reverse Charges
Revising Charges After Checkout
Guest Messages
Chapter 3: Frequently Asked Questions
30
30
30
30
31
33
35
36
36
37
38
39
Notes
40
2
FrontClerk for Windows User Documentation
Introduction
Welcome to the Hotel Software Systems Front Clerk for Windows. This software acts as an intermediary between your
Linux based property management system and any Windows terminal in which this software is installed.
Designed with the hospitality industry in mind, this software encompasses all of the fundamentals of property management and places its ease of use at your fingertips.
FrontClerk is an evolving property management solution. As such, we have many features to offer the properties that use
our software. All functions can be used by clicking on the appropriate navigational button, and mousing over the intended
feature.
Note that we have check marks next to certain features. These features are the features described in this documentation.
Our response to an overwhelming demand for a Windows based product has allowed us to utilize key features that are
used on an every day basis at properties across the globe. All features are usable from the FrontClerk for Windows system. Those features that do not yet have a graphical interface are displayed in console mode. Console Mode allows you
to be able to use all features without the need to have several terminals.
A separate user guide is available for console mode, please contact us at 1-800-634-9248 if you need this guide.
This documentation describes what the FrontClerk property management system can be used to accomplish. This documentation is not an all-encompassing substitution for a certified Hotel Software Systems training course. If you feel that
you need training with this software, please contact us at 1-800-634-9248 to schedule a training session.
3
FrontClerk for Windows User Documentation
Did you know?
Front Clerk for Windows supports multiple tab functionality, so you may open several tabs and have access to vital information while making reservations, checking in guests, and more.
4
FrontClerk for Windows User Documentation
New Reservation/Guest
Did you know?
Front Clerk has a system parameter to force the front desk clerk to enter an address, city, and state upon creating or editing guest information.
1. Folio #: To change this field click on the lookup button to enter a folio number for guest records. This may
reference a guest in house, in history, or a reservation.
2. Clerk: This field is the initials of the person making the reservation (or has made in history, guest in house,
guests checked out, and reservations already made). This field cannot be changed.
3. Confirmation #: Enter your own confirmation number or the confirmation number from your central reservation system.
4. Web Conf #: Reservations taken from the Hotel’s Website or other Web based system such as Expedia or
Hotels.com will show their unique reservation number here. This field cannot be changed.
5. Reg. Card: This field is used by properties that use pre-numbered registration cards. The registration card
number can be entered here. If the guest is checked out to a Direct Bill account, this number can be printed
on the Direct Bill statements with the related folio charge.
6. Source: This indicates whether a reservation came from an In-house reservation call, a CRS, a Travel Agent,
or a Web based source (e.g., the Hotel’s website or GDS source).
7. Arriving: This is the arrival date including day of the week. Click the calendar button to pull up a calendar to
choose your date, or type in the arrival date manually.
8. Nights: Entering a number in this field indicates how many nights the guest will be staying. This field updates
Departing and Departing updates this field.
9. Departing: This is the date the guest is due to check out. This field is updated when the number of Nights is
entered, and if the date is changed it will update the number of nights field.
10. CRS Group ID: This is the name or ID of the group this reservation belongs to if made by CRS (primarily,
Best Western Interface). If making a normal reservation, this field is grayed out and not able to be edited. If
this reservation is part of a group, the information in this field indicates the group number of this reservation.
11. Group Event: This field is used to search for a group number provided by the group master folio. Click on the
lookup button to search from a list.
12. Adults: Select the number of adults staying in the room. This field may affect your rates depending on your
property charging for extra persons in a room and cannot exceed the maximum occupancy set for the
room type.
13. Child 12: Select the number of children the age of 12 and under staying in the room.
Child 17: Select the number of children the age of 17 and under (to age 12) staying in the room.
14. Tape Chart: Use lookup button to search the tape chart for an available room. This shows a listing of what
rooms are occupied and by what folio/guest name and which rooms are currently available. The user can select different options at the top of the tape chart to change how the rooms are displayed. This feature also
shows the status of rooms.
15. Rm Type: Enter the type of room that you wish to use for this guest or use the search to view all room types.
16. SRP: Enter your Standard Rate Plan you wish to use for this guest here or use the search on the RM Type to
view all valid SRP codes.
17. Mk Code: Will default from the SRP entered.
18. Rm #: This is the room number field. Enter a room number here to pre-assign a room number to a reservation
or to assign a room number to a walk-in or use the search to locate an available room number.
19. Status: The status explains what type of screen you are looking at. If this is a reservation then the reservation
tab is green. If the guest is a guest, the guest tab is green. If the guest is from history, then the history light is
green.
20. Last Name: Enter the last name of the guest. Use the lookup button
to find an existing reservation, in
house guest, or to use the guest history, for the guest to book a reservation. After selecting the reservation,
that reservation will update the current reservation the user is updating.
21. First Name: Enter the guest first name in this field.
22. Title: This is a selectable field using the arrow . It is not required, but is good for foreign titles such as Mssr.
23. Address: Enter the guest street address on this line. There is a secondary line included should you need an
extended address. (Can be forced by a system parameter.)
24. City: Enter the guest city information here. This field is automatically populated when a zip code is entered.
5
FrontClerk for Windows User Documentation
25. State: Enter the guest state information here. This field is automatically populated when a zip code is entered.
26. Country: Enter the guest country here
27. Zip Code: Enter the guest zip code. This field populates the City and State fields if the Zip Code is in the
Master Zip Code Database, if it is not found in the Master Zip Code Database you will be prompted to add
the zip code and city to the database. You can also use the lookup button
to find a city or zip code..
28. Home phone number : enter guest phone number
29. Business phone: Enter business phone if applicable ( not required)
30. Fax Number: Enter guest fax if applicable. ( not required)
31. Email Addr: Enter guest email address if applicable. ( not required ). Click a Box to mark whether this is a
HOME or BUSINESS Email Address.
32. Company: Enter company name if applicable. Use the lookup button to browse a list of AR accounts. You
can also use the lookup button
33. Frequency #: Enter Frequency Number or guest rewards number in this field. ( not required )
34. Points: This indicates the guest’s number of Loyalty Points (e.g., Best Western Gold Club)
35. Tier: This indicates the guest’s Loyalty Tier (e.g., Executive, Premeir, etc.)
36. Corporate ID: Enter guest corporate identification information here ( not required )
37. Travel Agent: Enter travel agent IATA number here. Use the lookup button to select from a list. You may
add, and edit travel agents in this field as well. ( not required )
38. Alt Folio : Enter an alternate folio number for this guest. Entering a folio number in this field will charge room
and tax to the alternate folio. ( not required )
39. Promo Code: Use this field to indicate what promotional code this reservation was made. ( not required )
40. Make: Enter the make of the car here. (not required)
41. Car #: Enter the guest license plate information here. State two letter abbreviation followed by plate number.(not required)
42. Origin: This field is populated by the property management system. This field lets you know if the reservation
was made locally or through a supported CRS.
43. Booked By: Enter who this reservation was booked by. ( not required )
44. Smoker: Use this check box to signify if this guest is a smoker. This does not have any effect on the room
type selection. If left unchecked, the answer is defaulted to no. If checked, the answer is yes. (Required)
45. Keys: Enter the number of keys given to the guest. ( not required )
46. Drv Lic ST-#: Enter the guest identification in this field. State followed by license number.
47. Tax Exempt: Enter the guest tax exempt status. Use the pull down menu to select which tax or taxes guest is
exempt from.
48. Payment Type: Enter the guest payment information. Use the drop down menu to select.
49. GTD Code: This is the guarantee code that the guest is guaranteed a reservation with. Having a payment
type selects an appropriate guarantee for the guest.
50. Cancel By Date: This is the date that the guest must cancel by before incurring any penalty. You may set a
specific date by pressing the calendar button.
51. Cancel By Time: This is the time on the cancel by date in which the guest must call before incurring any penalty. This is set in 24-hour clock notation.
52. Deposit Amt: This field indicates a deposit amount for guaranteeing a room. The due date is set with Dep.
Due Date.
53. Dep. Due Date: This field indicates a date in which a deposit is due for guarantee of this reservation
54. A/R #: Enter an accounts-receivable account number here if the payment type is Direct Bill. Use the lookup
button
to lookup and select from a list.
55. Credit Limit: Enter the credit limit for the guest. The credit card interface updates this field every time it obtains an authorization on the credit card.
56. CC #: This is the credit card number field. You may use a credit card swipe when in this field to enter the credit card information automatically; otherwise you may type the credit card number in.
57. Exp Date: A valid Credit Card Month and Year expiration date is entered here
58. Card Holder: This field is the name of the cardholder as printed on their credit card. It does not need to
match the Guest Name.
59. Menu Buttons: Use these to access the drop down menus for various reports, utilities, etc.
60. Tabs: These tabs will change based upon the windows and activities open. Click on any tab to go to that activity. Up to 10 tabs can be open at any one time.
61. Registration Options: These buttons are used to change the status or save this registration.
a. Quit: Close this tab. If the reservation has not been saved, it will prompt you to save.
6
FrontClerk for Windows User Documentation
I.
Yes: Verifies all required fields have been filled and saves the current reservation.
II.
No: Cancels all changes and closes the tab.
III.
Cancel: Returns you back to the reservation tab.
b. Save: Verifies all required fields have been filled and saves the current reservation.
c. New Res: Clears the guest information fields so a new reservation may be made. This will not
change the arrival, departure, room type, SRP, market code, or room number.
IV.
Yes: Verifies all required fields have been filled and saves the current reservation.
V.
No: Cancels all changes and closes the tab.
VI.
Cancel: Returns you back to the reservation tab.
d. Chk In: Verifies all required fields have been filled and checks in the reservation.
e. Chk Out: Checks out the current guest. Will check to see if there is a balance first due.
f. Cancel Res: Cancels the current reservation.
g. Print: Prints a registration card for the guest.
VII.
Reg Card: Select the printer you wish to use for printing your registration card.
VIII.
Print Rates: Uncheck this box if you do not wish the guest to see the rate chosen.
IX.
Print Blank Card: Prints a blank registration card. This function is only usable on a blank
reservation.
X.
Print: Prints the registration card to the selected printer.
XI.
Email: Emails the confirmation to the email address provided.
XII.
Preview: Preview the registration card before printing.
XIII.
Done: Close this screen.
7
FrontClerk for Windows User Documentation
62. Guest data, Select the appropriate tab for entering guest data, making folio charges/payments, and viewing
guest messages. Folio Charges are grayed out while making a reservation /walk in until the record is saved
and Guest Messages tab is not accessible until checked in.
a. Folio Charges: This tab shows the Charges a Guest has accumulated during their stay and can be selected by Clicking on the Folio Charges tab. When data is in this tab, the tab will title will be in BOLD.
If no folio charges exist, the tab will not be in bold.
8
FrontClerk for Windows User Documentation
b. Guest Messages: By Clicking on this tab from the Guest Reservation Screen, messages can be ADDED,
EDITED or DELETED and PRINTED. They can also be categorized to indicate what type of message
they are. When data is in this tab, the tab will title will be in BOLD. If no messages exist, the tab will
not be in bold.
-
9
FrontClerk for Windows User Documentation
Loyalty Information (Best Western)
This tab can be selected for Best Western properties or other properties where HSS has implemented a 1-way or 2-way
loyalty program. For Best Western, the Guest can be searched for their loyalty information from the central Best Western
database. New Loyalty Members can also be registered with Best Western to earn rewards by completing this screen
and clicking on
SUBMIT
The information on this screen is either:
a. Automatically entered when the BWI loyalty card is swiped. Swiping the BWI Loyalty Card will also
enter the Guest Data on the Main Guest Information Screen
b. Automatically entered when the Guest Data is completed on the main screen.
The Guest BWR # will be automatically populated when the Guest card is swiped or can be typed in and the Guest Data
found by clicking on
LOOKUP
10
FrontClerk for Windows User Documentation
Utility Tabs:
a. Day Rates: Double Click any line in this field to change the rate of stay for the guest. Use the Save
button to save the change to this line. The Rest button changes this rate and all rates after to the
number you enter. Use the Cancel button to cancel your changes and exit this screen.
b. Packages/Addons:
Addons/Amenities: Allows the user to be able to add a charge that will be billed with room and
tax.
Packages: Selects a package of Addons/Amenities to be charged with room and tax.
Journal: The journal code associated with each charge being applied. Cannot be edited in this
screen.
Description: A short description of what is being charged.
Charge: The amount charged for the Addon/Amenities. This field allows you to edit the price.
Press the undo button to clear all fields of this entry.
Pkg: Is this an all-inclusive package to be billed multiple nights? Y for Yes, N for No, Number for
number of nights.
11
FrontClerk for Windows User Documentation
c. Comments: Use this field to make any special comments regarding this reservation.
d. History: This tab shows a history of any changes made to the reservation of the current guest. This
log includes date, time, and user information as well as what fields were changed, what they were
changed from and what they were changed to.
e. Corp: If the company has a Corp ID # with BWI, then their company information will appear
here.
f. Summary: Gives a quick summary to read back to the guest to confirm the reservation. This selection is not available until the reservation is saved.
12
FrontClerk for Windows User Documentation
Entering Petty Cash Out
Entering petty cash out is made simple using the FrontClerk for Windows product. Select the Front Desk button, and
mouse down to the Enter Petty Cash Out feature. This displays a screen that you can enter an amount, vendor, journal
code, and whether you are debiting the account or crediting it.
Date: This field is auto populated
Vendor: List the name of the Vendor in this field
Amount of cash: List the amount of the cash in this field.
GL Journal Code: Enter the General Ledger journal code for this item. This is the same journal codes set up when your
system was installed. Not all properties use general ledger journal codes and this field is optional.
Debit/Credit: Is this transaction a debit or credit? Mark the appropriate field.
13
FrontClerk for Windows User Documentation
Cash Credit Limit Report
This report can be run to indicate the Room, Payment Method, Guest Name, Departure Date, Credit Limit and Amount
Due. It can be sorted by any column by double clicking on the column of choice. Several copies of the report can be
printed by selecting the number in the upper right hand corner prior to printing.
14
FrontClerk for Windows User Documentation
Phone List
The phone list is a report that shows a listing of each guest that is currently checked into a room. By double clicking on
this guest, you can quickly retrieve guest data and edit it, or duplicate and create a new reservation. (See Chapter 1 Section 1) The check boxes note any guest that is currently a part of a group. Use the Show Checked Out Guest check box
to show all guests that were checked out today.
15
FrontClerk for Windows User Documentation
Room Status
The Room Status screen provides a quick and easy reference for which rooms are available and which rooms are occupied or out of service. This list can be printed with the printer icon located on the right.
Double click any room to change the status. See Change Status screen below.
Click on Mark All Rooms as Clean to mark all rooms as clean. WARNING: Use this button only if you know all rooms
have been cleaned otherwise the room will be reported as clean even if it is not.
16
FrontClerk for Windows User Documentation
Out of Order: This option sets the room out of order. Enter the Start date and the end date. The start date can be any
time today or beyond, but cannot be before. This allows the user to easily schedule a date when a room can be set out of
order. The end date automatically sets the room back to an in order status. Out of order comments may be added to allowing the user to give a reason for why the room is out of order. You can have your out of order Effect your Availability by
checking the Effect Availability. This will pull the room out of the total inventory.
Key Change Date: This is the date in which the key was last changed.
Comment for Maids: This section allows the user to set a comment for the maids. This field prints on the maids housekeeping report so special circumstances can be reported to the maids. The Room Clean box can be checked - in this field
to set the room to clean, unchecked is not clean.
17
FrontClerk for Windows User Documentation
Print Folios By Departure Date
This allows you to print all the folios by a specific departure date. Start by entering the departure date and selecting the
printer you wish to print on. You then can filter your folios by the options provided and described below.
Print Rates: Checking this field prints the rates on the folios.
Print $0.00 Amount Items: Checking this field will print any charges appearing on the folio even if they are $0.00.
Print Package Detail: Checking this field will detail all charges associated with a package rather than just printing the
package amount.
Print Room & Tax Only: Checking this field will print only the room and tax on the folios.
Click the print button and all folios on that departure date will print with the selected information.
18
FrontClerk for Windows User Documentation
Arrival/Cancel Report
This screen shows the arriving, in house, and/or cancelled guests for the dates specified.
Arriving: Enter a start date to display on the report.
To: Enter an end date to display on the report.
Include Arrivals: Do you wish to include guests due to check in?
Show Cancelled Reservations: Use this field to show any reservations that have been cancelled for the selected dates.
Include Archived Cancellations: Use this field to show any reservations that have been archived. An archived reservation is a reservation that has been rolled over and packed during the audit.
View Additional Info: Displays additional fields for arrivals. Scroll the screen to the left in order to view. The fields that
become visible are Special Request, Member Number, Booked By, Phone Number, and Number of Nights.
View Comments: Displays additional fields for arrivals. Scroll the screen to the left in order to view. The fields that become visible are Comments, and Additional Comments.
Include In House Guests: Includes guests that are currently checked into the system.
Expand Lines: Expands line width to allow easier viewing.
Print: The printer icon can be used to print this report with the selected options.
19
FrontClerk for Windows User Documentation
Departure Report
This screen shows the departing, in house, and/or cancelled guests for the dates specified.
Departing: Enter a start date to display on the report.
To: Enter a end date to display on the report.
Include All Reservations: Do you wish to include guests due to check in?
Show Checked Out Guests: Use this field to show any guests checked out for the selected dates.
Include Archived Cancellations: Use this field to show any reservations that have been archived. An archived reservation is a reservation that has been rolled over and packed during the audit.
View Additional Info: Displays additional fields for arrivals. Scroll the screen to the left in order to view. The fields that
become visible are Special Request, Member Number, Booked By, Phone Number, and Number of Nights.
View Comments: Displays additional fields for arrivals. Scroll the screen to the left in order to view. The fields that become visible are Comments, and Additional Comments.
Include In House Guests: Includes guests that are currently checked into the system.
Expand Lines: Expands line width to allow easier viewing.
Print: The printer icon can be used to print this report with the selected options.
20
FrontClerk for Windows User Documentation
Front Desk Telephone Listing
The Front Desk Telephone Listing is a report that shows a listing of each guest that is currently checked into a room. By
double clicking on this guest, you can quickly retrieve guest data and edit it, or duplicate and create a new reservation.
(See Chapter 1 Section 1) The check boxes note any guest that is currently a part of a group. Use the Show Checked
Out Guest check box to show all guests that were checked out today.
21
FrontClerk for Windows User Documentation
Tape Chart
The Tape Chart is a fast and efficient way for the user to view what rooms are available for a block of days. When the
name is listed in a red bar, the status of that guest is Reservation. When the status bar is green the guest is in house. If
the status bar appears black, the room has been set to be out of order. If there is a yellow bar, the room is dirty. The user
can double click on any room to get the information about that guest.
Arriving: Enter an arriving date to begin showing on the tape chart.
Departing: Enter a departing date to show on the tape chart.
Days/Hours/Weeks: Choose to display by Days Hours or Weeks.
Full View/200%/100%/50%/33%: Change the zoom on the tape chart. By decreasing the %, the more dates can be seen.
Regular/Breaks/Priority/General/Milestone: Changes the display of the bars.
Print: Use the printer icon to print this report with the selected options.
All Rooms: This selection allows the user to see all rooms. This includes unsold, reserved, dirty, and occupied rooms.
Assigned Rooms: This selection changes the display to show only rooms that have been assigned to guests and reservations.
Available Rooms: This selection changes the display to show only rooms that have not been assigned to guests and
reservations.
Show Dirty Rooms: This selections toggles whether dirty rooms are displayed or not.
Selected Room Types: This feature allows the user to filter the tape chart by room type.
22
FrontClerk for Windows User Documentation
Rack and Tree Report
The Rack and Tree Report indicates the
Occupied Rooms by room number
Number of Guests in the Room
Type of Room
Guest Name
Source of the Reservation
Market Code (e.g., Rack Rate, etc.)
Departure Date
Folio Number
Credit Authorization Balance
Type of Payment by Payment Code
Total Amount Currently Due
Registration Number, if any
Several Report Options are available, Click on the box to select or de-select each option:
• Include Folio Balances
• Show In-House Balance
• Show only Occupied Rooms
• Show the Guest Credit Limit
• Show the Avg Room Rate
23
FrontClerk for Windows User Documentation
• Show any Special Requests
• Print a Guest spreadsheet for each Guest’s folio charges
A number of copies can be printed by selecting the number in the top right hand corner before selecting the PRINT button.
24
FrontClerk for Windows User Documentation
Maids’ Housekeeping Report
This report shows the hotel rooms and which are Empty, Clean, Occupied or Out of Service. Multiple copies can be
printed by Maid to assign rooms to each Maid. The Dirty Rooms are indicated by a YELLOW highlight .In House Guests
are indicated by a GREEN highlight, and Out of Order Rooms are indicated by a BLACK highlight
Several Report Options are available:
•
•
•
•
•
•
Use New Format – this is an optional new format (see detail below)
Show Arrival / Departure (dates) – this will display the Arrival and Departure dates for each guest assigned to a
room to help the Hotel plan cleaning options
Show Occupied Rooms Only
Show Dirty Rooms Only
Print Extra Blank Line – this is handy for the Maids to make comments regarding the room on the reports printed
out for them on their cleaning day.
Separate Report for Each Maid – this allows each Maid (assigned as 1,2, 3 etc or A, B, C, etc.) to receive a list
of only those rooms for them to clean. The Maid assignments can be changed for the work day. In the PRINTING area in the top right hand corner, the number of copies can be adjusted to print the number needed for the
number of maids.
25
FrontClerk for Windows User Documentation
Housekeeping Report – Optional New Format A new format has been added that is optional. When the user takes this option it prompts ‘Do you want the new report
format?’ If answered Yes, it prints the report in a little different format. Also, if answered Yes, the user is prompted
‘Change Sheets every X day’. Depending on what number you enter here it calculates if the sheets need to be changed
and prints ‘Shts’ under the Status column on all stay over guests.
The new report headings are:
Room - the room number
Type - the room type
Status - the room status
VR = Vacant Ready
OUT = means the guest due out today has already checked out
Dirty = means the room is empty and dirty (no guest checked out today)
NEW = a guest has checked into that room today
S/O
= Stay Over (‘Shts’ also prints as indicated above)
Res
- is this room assigned to a reservation due in today?
If so, it will have ‘Yes’ in this column.
C/O Date
- the date the guest is due to check out.
Guest Name
BWR Tier
- as required by BWI, not applicable for hotels that are not a Best Western brand
Comment/Rqsts - this is the Maid comments or special requests from the guest record.
Notes -space for the housekeeping staff to make notes.
26
FrontClerk for Windows User Documentation
Folio Code Spreadsheet
This report shows the Guest Room Number, Guest Name, Departure Date, Market Code and all Folio Code Charges. It
can be sorted by any column by double clicking on the column of choice. Users can select the number of copies to print
and can click on one or more Guest Names and open their Guest Information and Folios by clicking on
OPEN SELECTED.
27
FrontClerk for Windows User Documentation
Journal Breakdown Report
This report provides information regarding Guest Journal charges. It is especially helpful as it indicates when a credit
card has been denied. . It can be sorted by any column by double clicking on the column of choice. Users can select the
number of copies to print and can click on one or more Guest Names and open their Guest Information and Folios by
clicking on
OPEN SELECTED.
28
FrontClerk for Windows User Documentation
Security System
The HSS FrontClerk software for Windows allows us to have single click user security. When stepping away from the system simply press the Key icon in the top right corner of the screen.
This allows the user to lock down the software so only authorized access is obtained in the FrontClerk System. When the
key button is red, the system is locked down and you must log into the system again. To do this, click the red key
button and the FrontClerk Login will appear.
Login with the proper username and password, and the software will be unlocked.
29
FrontClerk for Windows User Documentation
Using the Software
Logging In
Upon the starting the software, you will notice that the system has a box prompting you to log in. The FrontClerk system
has been designed with security in mind. Each user will need a user name and password and will be setup with our installer onsite. This can further be changed in the console version of our software explained later in this chapter.
A valid login and password are required to use the software. Usernames and passwords are maintained at the property.
After logging in, a user will see the HSS logo. The user has the options of choosing what they would like to do by accessing the menu buttons on the top navigational bar.
The user then chooses what shift it currently is. Choose between Shift A (check-out shift), Shift B (check-in shift), and
Shift C (the night audit shift) WARNING: Changing the shift information on this screen will do so for all users, so
please communicate to your coworkers what shift is the current one.
If you need to step away from your computer, simply lock the interface using the Key button up in the top right corner. This
will lock all screens. When you are ready to resume click the red key button in the same location.
Should you feel that your password has been compromised, you can use the change pwd button to change your password. To do this, lock the interface, and then resume the interface. You will see a login screen with the Change Pwd button. Select your user name and enter your password then click the Change Pwd button. After clicking this button the system will show two fields for a new password. Enter your password in the first field and confirm in the second. Click OK to
proceed logging in and using the new password, and click cancel to stop logging in and cancel the change of your password.
FrontClerk is an evolving property management solution. As such, we have many features to offer the properties that use
our software. All functions can be used by clicking on the appropriate navigational button and mousing over the intended
feature.
Note that we have check marks next to certain features. These features are the features described in this documentation.
Our response to an overwhelming demand for a Windows based product has allowed us to utilize key features that are
used on an every day basis at properties across the globe. All features are usable from the FrontClerk for Windows system. Those features that do not yet have a graphical interface are displayed in console mode. Console Mode allows you
to be able to use all features without the need to have several terminals.
A separate user guide is available for console mode.
30
FrontClerk for Windows User Documentation
Making a Reservation
With the FrontClerk Property Management System, making a reservation has never been easier. To make a new reservation, simply click on the Front Desk button in the navigation bar as shown in the image below.
Choose the option New Reservation /Guest Screen.
This launches a new tab with multiple functions. This tab may be used to create a reservation, check-in a walk-in guest,
update an existing reservation, or check-in an existing reservation. Fill in the arriving date and the number of nights followed by how many guests will be staying in the room. You can select a room by clicking on the search button located
next to the room type field. This will display a new screen.
31
FrontClerk for Windows User Documentation
Simply at the top of the screen choose a room type that fits the reservation that you are making. A list of rates associated
with that room type appears in the box labeled “2. Select SRP”. On the right are options that allow you to look at different
time periods. You can filter this screen by hours/days/weeks and zoom.
This screen also allows us to see what room types are at your property and how many of each room type you have available for each day for a spread based on the options you have chosen above. The center of the screen shows the total
number of each room type on the left and the amount available for each room on the central screen on the right. The view
is based off of the active options you choose on the top of the screen – the default being normal zoom, and based on a 7
day spread. The bottom pink boxes show any rate changes that may happen over the course of the reservation.
Click the room you wish to select and click save to continue with the reservation. Update the fields remaining with the
guest information and when finished save the reservation using the save function <F10> or click save. For questions on
what fields are which, please see Chapter 1.
32
FrontClerk for Windows User Documentation
Editing a Reservation
After making a reservation, it is possible to edit the existing reservation. To do this, simply click the Reservations button
and then click Edit or Check in a Reservation.
This opens a new reservation screen that you can pull up an existing reservation with. Simply click on the search button
next to the folio field if you have a folio number, or you can do a guest last name search by pressing the search button
next to the last name field.
This opens a new window so you can look for the appropriate guest. This screen allows you to view reservations, in house
guests, or even search your guest history.
33
FrontClerk for Windows User Documentation
Double click any of the guests to open a tab with the reservation/in house guest/guest history.
If you change the amount of days and/or make any changes to the guest’s rate you will see a new screen.
This screen indicates that you have made a change to the rates. The system then prompts you with three options. You
may choose any of the following:
Use Current Rates for Changes: Select this option if you have done a rate override that the system may not be aware
of. This allows you to continue with user-defined rates.
Recalculate All Rates From System Rates: This forces the system to recalculate all of the rates for this reservation
against those that the system already has. It then changes the rates to what they should be for the given dates as defined
in the rates databases.
Use System Rates For Changes: This option allows you to use the system rates for changes only. Any changes that
have been made the system will calculate the rates based on what they are in the rates database.
34
FrontClerk for Windows User Documentation
User Messaging
The FrontClerk system allows users to communicate via messaging. Simply click the envelope button in the top right corner of your screen and click create. This allows you to leave a message for any other user and/or shift, multiple selections
may be made by holding down your control key and clicking on several different names in the users box list. Type your
message in the box and click send.
35
FrontClerk for Windows User Documentation
Checking In and Checking Out a Guest
When checking in a guest, simply open the arrivals report, double click the guest, and then click check in the guest located on the right side of the screen.
To check out a guest, simply review their bill by clicking on the folio tab located on the left center portion of the screen.
Review your bill. If everything is correct choose a payment type on the bottom of the page. The amount is already populated. Click “Apply” and then click check out. After that, you are given an option to print the bill. The guest is checked out.
The folio balance must be $0.00 before you will be allowed to check the guest out.
Reversing Charges
If everything is NOT okay; you can click on a charge that is incorrect and click the reverse selected charges button. If a
guest chooses to purchase something additional, you can easily add that charge by click on the charge tab on the bottom
of the screen and choosing the charge type. You can then enter an amount and apply the charge to the bill. Check the
guest out as normal, after all charges have been added.
36
FrontClerk for Windows User Documentation
Revising Charges After Checkout
It is now possible with the HSS system to adjust charges on a folio after the guest has checked out without the need to
check the guest back in. This procedure only requires a few steps. It is as simple as locate the guest in your history, opening the folio charges screen, and clicking Adjust Charges. From there, you will be able to post new charges and payments
to this folio. The folio balance must be $0.00 before you will be allowed to close this tab.
37
FrontClerk for Windows User Documentation
Guest Messages
Guest messages are recorded in each guest record. Simply click the Messages tab on the left center portion of the screen
and enter the guest’s message. The message may include choosing between text, fax, and package.
38
FrontClerk for Windows User Documentation
Frequently Asked Questions
How do I apply an advance deposit?
Applying an advance deposit has never been easier. Simply open a reservation using the Edit or Check in a Reservation
screen and search for your guest. From there, click on the folio charges tab located in the middle left of the screen. Add a
payment for the amount of the advance deposit that you have received.
Where can I get a list of unsold rooms?
A list of unsold rooms can be obtained through the tape chart. Open the tape chart and click the option to filter by available rooms. You can then print this report for easy access using the print feature.
Where can I get a list of in house guests?
A list of in house guests can be obtained by your front desk telephone listing. This allows a quick and easy reference point
that may also be printed and placed next to your telephone for easy access. Just click the printer icon to print the report.
Where can I get a list of arriving guests?
A list of arriving guests can be found in the reports menu on the Arrival report. You may filter this report as shown in
Chapter 1 of this user manual and print it as necessary.
Where can I get a list of departing guests?
A list of departing guests can be found in the reports menu on the Departures report. You may filter this report as shown
in Chapter 1 of this user manual and print it as necessary.
The software isn’t doing anything. There is a red box in the top right corner with a key in it.
The software is locked. Please see “Security System” in chapter one of this manual.
This software doesn’t do “X”. How can I submit feedback?
The FrontClerk property management system has evolved because of customers’ needs. As such, we always welcome
feedback at [email protected] . While we are able to implement some concepts that properties would like to see, it is not
certain that all ideas will be used.
Help! I am stuck!
We understand that your time is precious and that sometimes the answers cannot always be found. We are here for you.
Simply give us a call at 1-800-634-9248 and we will be able to assist you.
How do I get technical assistance?
If you should need technical assistance, we are available 24 hours a day 7 days a week. Simply call us at 1-800-634-9248
and speak to one of our technicians live or leave a voicemail and someone will get back to you as soon as possible.
39
FrontClerk for Windows User Documentation
Notes:
40