1
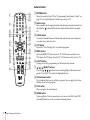
calls when the phone is available. If the phone jack is used for another
phone, use the provided splitter.
WARNING
To reduce the risk of fire or shock hazard, do not expose the unit to rain or
moisture.
You are cautioned that any changes or modifications not
expressly approved in this manual could void your authority to
operate this equipment.
The Satellite Receiver is intended for use only within the United States.
Local Programming
This symbol is intended to alert the user to the presence
of uninsulated “dangerous voltage” within the product’s
enclosure that may be of significant magnitude to
constitute a risk of electric shock to persons.
This symbol is intended to alert the user to the presence
of important operating and maintenance (servicing)
instructions in the literature accompanying the appliance.
Note to the Satellite Dish Antenna Installer
This reminder is provided to call the Satellite Dish Antenna installer’s
attention to Article 810 and in particular Article 810-15 of the NEC (National
Electrical Code), which covers proper installation and grounding of
television receiving equipment, as well as to Article 820-40 of the NEC,
which specifies that the Satellite Dish Antenna cable ground shall be
connected to the grounding system of the building as close to the point of
cable entry as practical.
Attention
With this Digital Satellite Receiver and the proper Satellite Dish Antenna,
you may be able to receive local channels from DIRECTV in certain
markets. Additional equipment may be required in some areas. Check with
your retailer or visit www.directv.com for information on availability of local
channels from DIRECTV in your area
Owner’s Record
The model and serial numbers are located on the back of the Satellite
Receiver. Record these numbers in the space provided below. Refer to these
numbers whenever you need to call your sales or service representative
regarding this product.
Model Number:
Serial Number:
Customer Support
Telephone Line Interruption
For Hardware and Installation
A continuous, land-based phone line connection is required for DIRECTV®
Pay Per View functionality and sports subscriptions. Periodically,
information on your TiVo Service is sent, free of charge, via your telephone
line. If you use your telephone during the time the information is being
forwarded, you will hear static noise for approximately 30 seconds. It is not
necessary to install a separate phone line. Simply plug the receiver into any
existing phone jack; it can detect when your phone line is in use and make
To arrange for the installation of your Satellite Receiver, call the dealer from
whom you purchased your system.
For general information, or to resolve problems related to the operation of
your Satellite Receiver, please contact your Sony dealer. If your dealer or
installer is unable to answer your questions, call the Sony Direct Response
Center at 1-877-585-SONY (7669).
3
DIRECTV® Programming
Trademark, Copyright, and License Information
For subscription information and activation, or to resolve problems related
to programming, call:
DIRECTV at 1-800-DIRECTV (347-3288)
Sony and Remote Commander are trademarks and the Sony Partnership
and Express Support are service marks of Sony.
DIRECTV, the Cyclone Design logo and DIRECT TICKET are trademarks
of DIRECTV Inc., a unit of Hughes Electronics Corp., and are used with
permission.
TiVo, TiVo Central, and the TiVo logo are trademarks of TiVo Inc. 2000
TiVo Inc. All rights reserved. TiVo Inc., 2160 Gold Street, Alviso, CA 95002.
Manufactured under license from Dolby Laboratories. “Dolby”, the
double-D symbol and Pro Logic are trademarks of Dolby Laboratories.
Confidential Unpublished Works. © 1992–1997 Dolby Laboratories Inc. All
rights reserved.
Macrovision is a trademark of Macrovision Corporation.
TiVo Service
To use the digital recording features of your Satellite Receiver, you will
need to activate the TiVo Service (see the back cover of this Installation
Guide or the Viewer’s Guide for details). You can activate the TiVo Service
through DIRECTV when you activate your programming.
Macrovision Information
This product incorporates copyright protection technology that is protected
by U.S. patents and other intellectual property rights. Use of this copyright
protection technology is granted by Macrovision for home and other
limited pay per view uses only. Reverse engineering or disassembly is
prohibited.
Note on Recording Programming
Programming may be recorded for home viewing only. All other recording
is expressly prohibited. Some programming may not be recorded. An
additional recording fee may be applied. Call your program providers for
details.
Software Downloads
Your Satellite Receiver is able to receive upgrades or modifications to some
of its features and functions. These modifications will occur automatically,
usually at times when the receiver would likely be turned off.
A continuous, land-based phone line connection is required in order for
your receiver to receive downloads. If your receiver is on when an upgrade
or modification is sent, you may experience a disruption in reception for a
short period of time. Your reception should return to normal after the
modification is complete. Your receiver must be plugged in to receive any
upgrades. Do not unplug your receiver while an upgrade is in progress.
4
About This Installation Guide
This Installation Guide is part of the complete documentation for your
Satellite Receiver. This Installation Guide describes how to connect the
Satellite Receiver. The Start Here poster provides an easy to read summary
of this Installation Guide and includes information on how to activate
DIRECTV® programming and the TiVo Service. The Viewer’s Guide
provides detailed information about how to activate and use your
DIRECTV® Service/TiVo Service, and how to use the different features of
this product.
A Note provides information that may be necessary to complete the task.
A z Tip provides information that may make the task easier to perform.
Table of Contents
Getting Started
6 Overview
7 Carton Contents
8 Parts, Controls, and Functions
8 Front Panel
10 Back Panel
12 Remote Control
15 Installing Batteries
Connecting Your Equipment
17
18
19
20
21
22
23
24
25
Cables You Can Use
Connection Overview
Step 1: Connecting the Satellite Dish Antenna and Telephone Line
Step 2: Connecting Your TV
Step 3: Adding a VCR (Advanced Connection)
Step 4: Connecting the IR Controller (Advanced Connection)
Step 5: Adding an Audio System (Advanced Connection)
Step 6: Connecting the AC Power Cord
Step 7: Inserting the Access Card
Additional Information
27 Programming Your Remote Control
29 Code Search Method
30 Troubleshooting
36 Specifications
37 FCC Regulations and Information
39 Sony Software License Agreement
41 Limited Warranty
Getting Started
5
Overview
Congratulations on your purchase of the Sony SAT-T60 Digital Satellite
Receiver/Recorder. You will soon be enjoying total control over your
television viewing. To enjoy DIRECTV® programming and the TiVo Service,
you must complete the following tasks.
6
Overview
1
Connect your Satellite Receiver.
2
Install the Satellite Dish Antenna.
3
Set up the Satellite Dish Antenna.
4
Activate your services.
Use this Installation Guide to help you connect the Satellite Receiver to
your other audio/video equipment.
Refer to your Satellite Dish Antenna’s installation instructions, or have
the Satellite Dish Antenna professionally installed.
Refer to the Viewer’s Guide to complete the setup of your Satellite Dish
Antenna.
Call DIRECTV at: 1-800-DIRECTV (347-3288) to activate your DIRECTV
programming and TiVo Service, then refer to the Viewer’s Guide.
Getting Started
Check your carton to make sure all of the following items are included. If you
are missing any items, contact your Sony dealer.
Satellite Receiver/Recorder
Getting Started
Carton Contents
Remote Control
POWER
1
2
3
4
5
6
7
8
9
0
Size AA (R6)
batteries (2)
AC power cord
RG-6 Coaxial cable
Audio/Video cable
S-Video cable
SELECT
IR Control cable
Notes
• Your Satellite Receiver comes with 50 feet of
phone cord for you to connect to your nearest
phone jack. You don’t need a dedicated
phone line (your Satellite Receiver only
needs to share the phone line for five to ten
minutes a day), but you may wish to consider
installing a jack nearby.
• Your Satellite Receiver cannot be used with
any digital phone system. Doing so will
damage your Satellite Receiver and void
your warranty.
IR Emitters
Phone cord
Access Card
Phone splitter
(Check the Access Card slot
in the back panel.)
Carton Contents
7
Parts, Controls, and Functions
Front Panel
1
2
3
4
56
7 8
9
1 POWER button
Press to turn on/off your Satellite Receiver. The indicator lights when the
Satellite Receiver is on.
B RECEIVING indicator
Yellow indicates that the Satellite Receiver is receiving a signal from the
Remote Control.
C Remote Control Signal Reception Window
Receives control signals from your Remote Control.
8
Parts, Controls, and Functions
E Guide button
Press to open the Program Guide.
Getting Started
D RECORDING indicator
Red indicates that the Satellite Receiver is recording a program.
Yellow indicates that the Satellite Receiver is currently using the telephone
line.
The indicator may appear orange if the unit is both recording a program
and using the telephone line.
F MENU button
Press to open the DIRECTV Menu.
G
/ / / /SELECT button
Press the / / / buttons to move the highlight within menus and
guides. Press SELECT to select the highlighted item.
H TiVo button
Press to open the TiVo Central Menu.
I DISPLAY button
Press to open a display that shows information about the current program.
When you press this button while viewing the Program Guide, “Display
Option” appears.
Parts, Controls, and Functions
9
Back Panel
AC
In
2
SATELLITE IN
1
2
TEL LINE
CNTRL
OUT
SERIAL
OPTIONAL
REQUIRED
2
OUTPUT
1
4
5
DIGITAL
AUDIO OUT
VHF/UHF IN
(OPTICAL)
POWER OFF
PASS-THRU
ONLY
VHF/UHF
CH
3 4
VIDEO
ACCESS CARD
3
AUDIO L AUDIO R
1
IR
qa
0
98
(SAT) OUT
VHF/UHF
POWER OFF
PASS-THRU
S-VIDEO
76
1 SATELLITE IN jacks
Input satellite signals from your Satellite Dish Antenna using RG-6 coaxial
cable (not supplied).
You must connect a Satellite Dish Antenna to the REQUIRED jack to use
your Satellite Receiver. If you have a dual LNB dish, connect an RG-6
coaxial cable from the second LNB to the OPTIONAL jack.
B CNTRL (control) OUT SERIAL jack
Reserved for future products and applications.
C A/V OUTPUT jacks
Output audio and video signals to your TV and other audio/video
equipment using A/V cables and S-Video cable (supplied).
D DIGITAL AUDIO OUT (OPTICAL) jack
Outputs digital audio signals to the digital optical input of your audio
system.
E VHF/UHF IN jack
Inputs analog non-satellite signals from your TV antenna or cable TV
connection. Some antennas require an adapter (not supplied).
10
Parts, Controls, and Functions
G CH 3|4 switch
When you use an RF connection (VHF/UHF (SAT) OUT jack) to your TV,
this setting determines the TV channel on which you can view programs
from the Satellite Receiver.
Getting Started
F VHF/UHF (SAT) OUT jack
Outputs audio and video signals to the VHF/UHF input on your TV or
VCR using RF coaxial cable (supplied). The signal from the VHF/UHF IN
jack passes through when the power is off.
H CNTRL (control) OUT IR jack
Outputs control signals to your Sony VCR so the Satellite Receiver can
operate your Sony VCR using the IR controller (supplied).
I TEL LINE jack
Connects the Satellite Receiver to a telephone outlet using a telephone cord
(supplied).
J ACCESS CARD slot
This is the slot where you insert your DIRECTV Access Card (supplied).
After you have inserted the Access Card, do not remove the Access Card
unless instructed to do so by your service provider.
Caution: Please insert card slowly and insure that it protrudes out about a
¼" from the back panel. Avoid inserting card at an angle as this may cause
card to drop inside the receiver.
K AC~In jack
Inputs AC power from a power outlet using the AC power cord.
Parts, Controls, and Functions
11
Remote Control
POWER
1
MUTING
TV
2
SAT
1
2
3
4
5
6
7
8
9
ENTER/JUMP
0
3
4
5
6
7
8
9
0
qa
qs
TV/VIDEO
CLEAR
LIST
MENU
DISPLAY
LIVE
TV
qf
qg
qh
qj
qk
ql
w;
wa
GUIDE
SLOW
BACK
REPLAY
REC ON/OFF
VOL
ADVANCE
CH
qd
PAGE
RM-Y809
®
C CLEAR button
Closes the Channel Banner and Status Bar, and clears the text characters
you enter in any text entry box.
D LIST button
Opens the “Now Playing List” of recorded programs.
wd
wf
wg
E MENU button
Opens the DIRECTV Menu when the TV/SAT function switch is set to
SAT. Opens the TV Menu when the TV/SAT function switch is set to TV.
wh
wj
F LIVE TV button
Changes to the live programming on the last selected channel.
wk
G
FWD
PAUSE
B Number keys
Enter numbers for changing channels and entering setup information. Use
the delimiter (subchannel) button to select subchannels (for example,
2.1).
ws
SELECT
PLAY
1 MUTING button
Mutes the sound of your TV. See “Programming Your Remote Control” on
page 27 to set up the Remote Control to operate your TV.
/ / / /SELECT buttons
Press the / / / buttons to move the highlight within menus and
guides. Press SELECT to select the highlighted item.
H Thumbs Down button
Use to indicate that you do not like a program. You can apply up to three
thumbs down for any program.
I PLAY button
Plays a program at normal speed.
J PAUSE button
Pauses playback. Once in pause mode, you can use the BACK and FWD
(forward) buttons to reverse or advance frame-by-frame.
12
Parts, Controls, and Functions
L (Instant) REPLAY button
Replays the previous eight seconds of the current program.
M VOL (volume) +/– buttons
Controls the volume of your TV. See “Programming Your Remote Control”
on page 27 to set up the Remote Control to operate your TV or audio
system.
Getting Started
K BACK button
Plays a program in reverse fast search mode. Shows a program in reverse
frame-by-frame when in pause mode. Press up to three times to increase
the speed of the search or frame-by-frame viewing.
N POWER/TV button
Turns your TV or audio system on and off. See “Programming Your
Remote Control” on page 27 to set up the Remote Control to operate your
TV or audio system.
O POWER/SAT button
Turns the Satellite Receiver on and off. When the power to the Satellite
Receiver is off, the antenna (or cable) signal passes through to your TV (see
VHF/UHF (SAT) OUT on page 11).
P Remote Active indicator
Flashes while the Remote Control is transmitting signals or being
programmed.
Q ENTER/JUMP button
Selects the currently entered number as the channel to watch, or jumps
back to the previously set channel.
R TV/VIDEO button
Switches between the various inputs of your TV. See “Programming Your
Remote Control” on page 27 to set up the Remote Control to operate your
TV.
S DISPLAY button
Opens a Channel Banner that shows information about the current
program. You can select either the grid-type guide or TiVo guide by
pressing this button while the Program Guide is open.
continued
Parts, Controls, and Functions
13
T TV/SAT function switch
Move up to set the Remote Control to operate your TV functions. When
you set this switch to TV, the buttons with a “•” mark operate your Sony
TV (see “Programming Your Remote Control” on page 27).
Move down to set the Remote Control to operate the Satellite Receiver
functions.
U TiVo button
Opens TiVo Central, which provides access to features and options.
V GUIDE button
Opens the Program Guide.
W Thumbs Up button
Use to indicate that you like a program. You can apply up to three thumbs
up for any program.
X SLOW button
Plays a program in slow speed.
Y FWD (forward) button
Plays a program in fast search mode. Shows a program frame-by-frame
when in pause mode. Press up to three times to increase the speed of the
search or frame-by-frame viewing.
wh ADVANCE button
While watching a live program, pressing this button advances viewing to
the current time.
While watching a recorded program, pressing this button advances
viewing to the end of the program. Press again to go to the beginning of
the recorded program.
wj REC (record) ON/OFF button
Starts or stops recording of the current program.
wk CH (channel) +/– or PAGE buttons
Changes the Satellite Receiver’s channel shown on your TV. Also pages up
and down in menus and guides.
14
Parts, Controls, and Functions
Installing Batteries
1
Pull the latch and lift the cover to open the battery
compartment.
2
Insert two size AA batteries (supplied).
Getting Started
Before you can use the Remote Control, you must insert the supplied batteries.
If you want to use this Remote Control to operate other audio/video
equipment, such as a TV or stereo, you must program the Remote Control (see
page 27).
Be sure to match the + and – marks on the batteries with the + and –
marks inside the battery compartment.
Notes
• When the batteries become weak, the Remote
Active indicator flashes. If the Remote
Control does not work properly, the batteries
may be weak.
• When replacing batteries, replace both
batteries with new ones. Do not mix different
types of batteries together.
3
Close the cover.
Insert the tabs on the cover into the gaps in the rear of the battery
compartment. Then, lower the cover onto the Remote Control until you
hear the latch click.
Parts, Controls, and Functions
15
Connecting Your
Connecting Your Equipment
Cables You Can Use
Below is a description of the cables you can use to make connections. Not all
cables are supplied with your Satellite Receiver (see page 7).
Coaxial (RF) Cable with F-type connectors (not supplied) for VHF/UHF jacks
RG-6 Coaxial Cable with F-type connectors for SATELLITE IN jacks
Use the SATELLITE IN jacks to receive signals from DIRECTV Satellites through your
Satellite Dish Antenna.
Audio/Video Cables with RCA-type plugs for Audio/Video (A/V) jacks
Use the audio/video jacks to send good quality analog video and stereo audio signals.
Connecting Your
Equipment
Use the VHF/UHF IN jack to receive signals from a TV antenna or from a cable TV
connection. You can also use the VHF/UHF (SAT) OUT jack to send audio and video
signals to your TV or VCR.
S-Video Cables with S-Video plugs for S-VIDEO jacks
Use the S-VIDEO jack to send excellent quality analog video signals.
Optical Cable with Optical plug (not supplied) for DIGITAL AUDIO
(OPTICAL) jack
Use the DIGITAL AUDIO OUT (OPTICAL) jack to send excellent quality audio signals
to a Dolby Digital receiver.
RJ-11 Phone Cord for TEL LINE jack
Use the TEL LINE jack to connect to a telephone outlet. Periodically, information on
your DIRECT TICKET®, Pay Per View selections, and TiVo Service is sent, free of
charge, via your telephone line.
17
Connection Overview
Notes
• Before you begin connecting your Satellite
Receiver, unplug all of your audio/video
equipment from the power outlet to
reduce the possibility of shock hazard.
• This section explains the basic steps for
connecting the Satellite Receiver. Your
programming source signal(s) and
equipment may allow for other
connection possibilities. If you have any
questions, refer to the operating
instructions for that equipment or contact
your programming provider(s).
Follow the procedures or make the connections in each of the steps to connect
your Satellite Receiver to your other audio/video equipment.
Step 1: Connecting the Satellite Dish Antenna
and Telephone Line
Page 19
v
Step 2: Connecting Your TV
Page 20
v
Step 3: Adding a VCR (Advanced Connection)
Page 21
v
Step 4: Connecting the IR Controller (Advanced Connection)
Page 22
v
Step 5: Adding an Audio System (Advanced Connection)
Page 23
v
Step 6: Connecting the AC Power Cord
Page 24
v
Step 7: Inserting the Access Card
18
Page 25
Step 1: Connecting the Satellite Dish
Antenna and Telephone Line
You must connect a DIRECTV Satellite Dish Antenna to the SATELLITE IN
REQUIRED jack to use your Satellite Receiver.
You must connect the TEL LINE jack to a telephone line wall jack to use the
DIRECTV and TiVo Service.
If you have a dual LNB dish,
connect the RG-6 coaxial
cable from the second LNB
to the OPTIONAL jack.
Connect the TEL LINE jack to a
telephone line wall jack using the
supplied telephone cord.
Connecting Your
Equipment
RG-6 Coaxial Cable from
Satellite Dish Antenna
1
Satellite Receiver
Note
Your Satellite Dish Antenna
installation manual provides
detailed instructions on how to
install RG-6 coaxial cable from your
Satellite Dish Antenna.
AC
In
2
SATELLITE IN
1
TEL LINE
CNTRL
OUT
SERIAL
ACCESS CARD
OPTIONAL
REQUIRED
2
AUDIO L AUDIO R
2
Connect the SATELLITE IN
REQUIRED jack to your Satellite
Dish Antenna using RG-6 coaxial
cable (not supplied).
OUTPUT
1
DIGITAL
AUDIO OUT
IR
VHF/UHF IN
(OPTICAL)
POWER OFF
PASS-THRU
ONLY
VHF/UHF
(SAT) OUT
CH
3 4
VIDEO
1
S-VIDEO
VHF/UHF
POWER OFF
PASS-THRU
2
CAUTION
Only connect your authorized
Satellite Dish Antenna to the
SATELLITE IN jack as described
in the Installation Instructions.
Connecting any other equipment
to this jack could result in damage
to the equipment and/or receiver.
Telephone
Cord
19
Step 2: Connecting Your TV
Connect your TV to the Satellite Receiver as shown below.
If you have a local TV antenna or cable
company service
Connect it to the VHF/UHF IN jack on your
Satellite Receiver using a coaxial cable or RF
adapter (not supplied). You can view local
stations using your TV controls when the
power to the receiver is off.
Note
Satellite Receiver
You must use the VHF/UHF (SAT) OUT jack to
2a
20
If your TV has A/V input jacks
Connect the AUDIO/VIDEO OUTPUT
jacks on your Satellite Receiver to the A/V
input jacks on your TV using the supplied
A/V cable. If your TV has only one audio
input, connect it to the AUDIO L jack on the
receiver. (Be sure to match the colors on the
jacks with the colored plugs on the
A/V cable.)
2b
If your TV has an S-Video input
Use the S-Video cable instead of the yellow
video connection shown in 2a .
2c
If your TV does not have A/V jacks
Connect the VHF/UHF (SAT) OUT jack to
the VHF/UHF input jack on your TV using
coaxial cable.
Notes
• With this connection, your input source is
channel 3 or channel 4 on your TV depending
on how you set the CH 3|4 switch on the
Satellite Receiver.
• If you connect using 2a or 2b , you can connect
your local TV antenna or cable company service
to the TV’s VHF/UHF input directly.
AC
In
2
SATELLITE IN
1
TEL LINE
CNTRL
OUT
2
SERIAL
ACCESS CARD
OPTIONAL
1
DIGITAL
AUDIO OUT
OUTPUT
1
REQUIRED
VHF/UHF IN
(OPTICAL)
AUDIO L AUDIO R
connect to your TV or VCR when a local TV
antenna or cable company service is connected to
the VHF/UHF IN jack (see 2c below and 1c on
page 21). When the power to the Satellite
Receiver is off, the antenna signal passes through
to your TV.
Coaxial
Cable
POWER OFF
PASS-THRU
ONLY
VHF/UHF
IR
S-VIDEO
2a
2b
S Video Cable
IN
Coaxial
Cable
VHF/UHF
S VIDEO
VIDEO
L(MONO)
-AUDIOR
VHF/UHF
POWER OFF
PASS-THRU
2c
A/V Cable
TV
(SAT) OUT
CH
3 4
VIDEO
1
Step 3: Adding a VCR (Advanced Connection)
You can save recorded programs by adding a VCR.
Satellite Receiver
In
2
SATELLITE IN
1
TEL LINE
CNTRL
OUT
2
SERIAL
ACCESS CARD
OPTIONAL
DIGITAL
AUDIO OUT
OUTPUT
1
REQUIRED
VHF/UHF IN
(OPTICAL)
AUDIO L AUDIO R
AC
POWER OFF
PASS-THRU
ONLY
VHF/UHF
CH
3 4
IR
(SAT) OUT
VHF/UHF
POWER OFF
PASS-THRU
S-VIDEO
1b If your TV and VCR have S-Video jacks
1a
Use an S-Video cable (supplied) instead of
the yellow video connection shown in 1a .
1b
1c
z Tip
A/V Cable
To allow your Satellite Receiver to control
the recording functions of your Sony VCR,
see “Step 4: Connecting the IR Controller
(Advanced Connection)” on page 22.
1c
If your TV and VCR do not have A/V
jacks
Connect the VHF/UHF (SAT) OUT jack
on the Satellite Receiver to the VHF/UHF
input jack on your VCR using coaxial
cable.
Then, connect the VHF/UHF output jack
on your VCR to the VHF/UHF input jack
on your TV using coaxial cable.
Set the CH 3|4 switch of your VCR to the
channel that does not carry broadcasts in
your area.
S Video Cable
VCR
AUDIO
1a
LINE
IN
IN
LINE
OUT
OUT
1b
1c
Coaxial
Cable
VIDEO S VIDEO
Coaxial
Cable
TV
S Video Cable
IN
S VIDEO
Note
With this connection, your input source is
channel 3 or channel 4 depending on how
you set the CH 3|4 switch on your VCR.
Connecting Your
Equipment
If your TV and VCR have A/V jacks
Connect the AUDIO/VIDEO OUTPUT
jacks of your Satellite Receiver to the A/V
input jacks of your VCR using the
supplied A/V cable.
Then, connect the A/V output jacks of
your VCR to the A/V input jacks of your
TV using an A/V cable. (Be sure to match
the colors on the jacks with the colored
plugs on the A/V cable.)
VIDEO
1a
VHF/UHF
VIDEO
A/V Cable
L(MONO)
-AUDIOR
21
Step 4: Connecting the IR Controller
(Advanced Connection)
If you connected a Sony VCR in Step 3, you can let the Satellite Receiver
control recording functions by connecting the IR (Infrared) Controller.
Satellite Receiver
In
2
SATELLITE IN
1
TEL LINE
CNTRL
OUT
2
AUDIO L AUDIO R
AC
SERIAL
OPTIONAL
REQUIRED
DIGITAL
AUDIO OUT
IR
1
2
Connect the IR Controller to the IR
CNTRL OUT jack on the Satellite
Receiver.
POWER OFF
PASS-THRU
ONLY
VHF/UHF
If the infrared sensor is not marked on
your Sony VCR, refer to your VCR’s
operating instructions.
1
IR Controller
IR Sensor
VCR (front view)
2
/2" to 1"
1
IR Controller
22
(SAT) OUT
CH
3 4
S-VIDEO
Place the IR Controller under and in
front of the VCR.
The IR Controller must extend just in
front of the infrared sensor of the VCR.
z Tip
VHF/UHF IN
(OPTICAL)
VIDEO
ACCESS CARD
OUTPUT
1
VHF/UHF
POWER OFF
PASS-THRU
Step 5: Adding an Audio System
(Advanced Connection)
You can connect your Satellite Receiver to an audio system for enhanced sound
enjoyment.
Audio System
If you have a stereo or Dolby® Pro
Logic® audio system
Connect the AUDIO R and L jacks on the
Satellite Receiver to the audio inputs of
your audio system.
1b
1a
Stereo
Cable
If you have a digital or Dolby Digital
audio system
Connect the DIGITAL AUDIO OUT
(OPTICAL) jack on the Satellite Receiver
to the optical digital input of your audio
system.
Optical
Cable
Satellite Receiver
z Tip
If you connect your Satellite Receiver to a
Dolby Digital receiver, refer to the
Viewer’s Guide for more information on
how to set up Dolby Digital.
AC
In
2
SATELLITE IN
1
TEL LINE
CNTRL
OUT
SERIAL
ACCESS CARD
OPTIONAL
REQUIRED
2
AUDIO L AUDIO R
1b
OPTICAL
IN
LINE
IN
OUTPUT
1
DIGITAL
AUDIO OUT
IR
VHF/UHF IN
(OPTICAL)
POWER OFF
PASS-THRU
ONLY
VHF/UHF
(SAT) OUT
CH
3 4
VIDEO
1a
AUDIO
Connecting Your
Equipment
LINE
OUT
S-VIDEO
VHF/UHF
POWER OFF
PASS-THRU
23
Step 6: Connecting the AC Power Cord
After all other connections are complete, connect the AC power cord to the
Satellite Receiver and a power outlet.
Satellite Receiver
In
2
SATELLITE IN
1
TEL LINE
CNTRL
OUT
SERIAL
OPTIONAL
REQUIRED
OUTPUT
1
DIGITAL
AUDIO OUT
IR
AC Power
Cord
to power
outlet
24
VHF/UHF IN
(OPTICAL)
POWER OFF
PASS-THRU
ONLY
VHF/UHF
(SAT) OUT
CH
3 4
VIDEO
ACCESS CARD
2
AUDIO L AUDIO R
AC
S-VIDEO
VHF/UHF
POWER OFF
PASS-THRU
Step 7: Inserting the Access Card
You must verify that the Access Card is securely inserted into your Satellite
Receiver to make your DIRECTV service available. Refer to the Access Card for
instructions on which direction to insert the card.
Satellite Receiver
In
2
SATELLITE IN
1
TEL LINE
CNTRL
OUT
REQUIRED
DIGITAL
AUDIO OUT
IR
VHF/UHF IN
(OPTICAL)
POWER OFF
PASS-THRU
ONLY
VHF/UHF
(SAT) OUT
CH
3 4
VIDEO
OPTIONAL
OUTPUT
1
S-VIDEO
VHF/UHF
POWER OFF
PASS-THRU
Connecting Your
Equipment
SERIAL
ACCESS CARD
2
AUDIO L AUDIO R
AC
Access Card
Installation is complete
After you insert the Access Card, the installation of your Satellite Receiver is
complete. The remaining steps you must complete to begin enjoying your
Satellite Receiver are:
• Install your Satellite Dish Antenna outside your home.
– Refer to the Satellite Dish Antenna installation manual.
• Aim the Satellite Dish Antenna to get the strongest possible signal.
– Refer to the Viewer’s Guide.
• Activate DIRECTV programming and TiVo Service.
– Refer to the Viewer’s Guide and call 1-800-DIRECTV (347-3288).
25
Additional Information
Additional Information
Programming Your Remote Control
You must complete “Guided Setup” in the Viewer’s Guide
before you can program your Remote Control.
You can program your Remote Control to operate your TV’s power, muting,
volume, and change the TV’s input source using the TV/VIDEO button. You
can also program your Remote Control to operate the volume of your audio
system if your audio system is connected to your TV.
Remote Setup
PTV Remote – TV
PTV Remote – A/V Stereo System
Notes
1
Start at TiVo Central or the DIRECTV Menu.
2
Open “Remote Control Setup” using the
/ / / /SELECT buttons.
Press the TiVo button to go to TiVo Central, or press the MENU button to
go to the DIRECTV Menu.
a)Highlight and select “Messages & Setup”. The Messages & Setup
screen appears.
b)Highlight and select “Receiver and Phone Setup”.
c)Highlight and select “Remote Control Setup”. The Television Brand
screen appears.
Additional
Information
• The actual screens that appear may be
different from those shown in this
manual.
• This Remote Control cannot operate
your VCR. Use your VCR’s remote to
operate your VCR.
Follow these steps to program your Remote Control using the on-screen Code
Entry method. If this method does not work, try the Code Search method (page
29).
continued
Programming Your Remote Control
27
3
Television Brand
Press SELECT to choose your TV brand and continue.
The available codes for your TV brand appear.
SEARS
SHARP
SIEMENS
SIGNATURE
SONY
SOUNDESIGN
4
FPO
0043, 0067, 0075, 0117, 0130, 0136, 0170
MUTING
POWER/TV
POWER
SAT
2
3
5
6
7
8
9
TV
1
4
0
SELECT
Note
If you connected an audio system to
your Satellite Receiver, you can
program the Remote Control’s
POWER/TV, VOL (volume) and
MUTING buttons to operate your audio
system rather than your TV. In step 2c
on the previous page, select “Remote
A/V Stereo System”, and continue the
procedure.
28
Programming Your Remote Control
a)Cover the IR emitter on the front end of the Remote Control. This
prevents the Remote Control from operating your Satellite Receiver
while you program the Remote Control.
c)Use the number keys to enter one of the four-digit codes listed for your
TV brand. The indicator flashes three times, indicating that you
entered the code correctly.
Possible codes for this device are:
Program your TV PWR, VOL, and MUTE
buttons: Point the PTV Remote away
from the Recorder and hold down the
TV PWR and TIVO buttons on the
Remote for 5 sec. Enter the first code TiVo
Button
using the numbers on the Remote.
Test the TV PWR button. If it doesn't
work, try the next code.
Enter the Remote Control code.
b)Press and hold the TiVo and POWER/TV buttons at the same time
until the Remote Active indicator lights (about three seconds), then
release the buttons. The indicator remains lit.
Codes for SONY
FPO
Highlight and select your TV brand using the
/ / / /SELECT buttons.
d)Test the code by aiming your Remote Control at the TV and pressing
the POWER/TV button. If the TV turns off, you have programmed the
correct code.
e)If the Remote Control did not turn off your TV, repeat steps 4a through
4d and try the next code listed for your TV.
Code Search Method
The Remote Control has hundreds of available codes. The correct code for your
TV might be available, even if it is not listed for your TV brand in the on-screen
Code Entry method.
1
Set the Remote Control to Code Search mode.
a)Press and hold the TiVo and POWER/TV buttons at the same time
until the Remote Active indicator lights (about three seconds), then
release the buttons. The indicator remains lit.
b)Using the number keys on the Remote Control, enter 0999.
2
Notes
a)Aim the Remote Control at the TV, press POWER/TV and see if the TV
turns off or on.
b)If the TV does turn off and on, press MUTING and VOL (volume) +/–
to make sure they operate the TV. If these buttons operate the TV, go to
step 4 below.
3
Press the CH (channel) + button to cycle to the next
code, then test the code by repeating step 2 above.
The Remote Control has hundreds of available codes. If the Remote
Active indicator goes out, you have tested all of the codes.
4
Press ENTER to set the code and exit Code Search
mode.
Press CLEAR to exit Code Search mode without setting a new code.
Programming Your Remote Control
Additional
Information
• The Code Search method automatically
programs the POWER/TV, VOL +/–,
and MUTING buttons on the Remote
Control.
• If you have an audio system connected
to the Satellite Receiver, you can
program the POWER/TV button on the
Remote Control to turn on and off both
the audio system and your TV. To do
so, use code 1999 instead of 0999 in step
1b.
• To reset the Remote Control back to the
manufacturer’s settings, enter code
0981 in step 1b.
Test the code.
29
Troubleshooting
DIRECTV, TiVo and Sony are dedicated to providing you with quality support
and customer service. If you have any questions or difficulties, first refer to the
troubleshooting section in each manual. If you still need help, see below for
the appropriate customer service department to contact:
Contact Sony at 1-877-585-SONY (7669) if you need assistance with:
• Connecting your Satellite Receiver with your TV and other A/V
equipment.
• Initial Guided Setup difficulties (e.g. phone calls failing).
• Programming the Remote Control to control your TV or A/V equipment.
• A system that does not function properly after restart.
• Questions about your Limited Warranty.
Contact DIRECTV and TiVo customer support at 1-800-DIRECTV (347-3288) if
you need assistance with:
• Activating DIRECTV® programming.
• Activating or using a feature of the TiVo Service.
• Getting correct Program Guide data.
• Understanding an on-screen message from TiVo regarding your TiVo
Service account.
You can also refer to the FAQ’s listed in the web sites below.
DIRECTV: http://www.directv.com
TiVo: http://www.tivo.com
Sony: http://www.sony.com/service or email at [email protected]
When you call DIRECTV, you will need to reference your account number
and/or Access Card number.
When you call either DIRECTV or Sony, you will need to reference your model
and serial number located on the inside of the back cover of the Viewer’s
Guide.
30
Troubleshooting
Symptom
Solution
My Satellite Receiver isn’t making the
setup phone calls.
• Do not use a wireless phone connection.
• Verify that your phone line is working by disconnecting the phone cord
from your Satellite Receiver, connecting it to a phone, and checking for a
dial tone.
• Make sure the phone cord is connected to the Satellite Receiver and the
wall jack.
• If you are getting a busy signal when connecting, try another local dial-in
number from the Dial-In Number screen or try the call during off peak
hours, before 3 pm or after 11 pm.
• Try changing your phone dialing options by following the steps below.
After making changes to phone dialing options, make a test call (press the
TiVo button to go to TiVo Central, then choose Messages & Setup, then
Receiver & Phone Setup, then Phone Connection and select “Make Test
Call”).
• If you have voice mail or other non-standard dial tone, press the TiVo
button to go to TiVo Central, then choose Messages & Setup, then
Receiver & Phone Setup, then Phone Connection, then Change Dialling
Options and turn off “dial tone detection”.
• If you use a dial prefix for outside lines, press the TiVo button to go to
TiVo Central, then choose Messages & Setup, then Receiver & Phone
Setup, then Phone Connection, then Change Dialing Options and set the
“Dial Prefix” (for example, “9,”).
Additional
Information
• If you have call waiting, press the TiVo button to go to TiVo Central, then
choose Messages & Setup, then Receiver & Phone Setup, then Phone
Connection, then Change Dialling Options and disable call waiting by
entering the correct prefix in “Call Waiting Prefix” (usually “*70,”).
continued
Troubleshooting
31
Symptom
My Satellite Receiver isn’t making the setup
phone calls. (continued)
Solution
• If you have a low-voltage phone line, press the TiVo button to go to TiVo
Central, then choose Messages & Setup, then Receiver & Phone Setup,
then Phone Connection, then Change Dialling Options and turn off
“phone availability detection”.
• If you have a caller ID box, try removing it from the line since some models
interfere with the Satellite Receiver modem’s ability to make a call.
• If you use a fax machine or computer modem connected to the same phone
line, make sure they are not using the line while your Satellite Receiver is
trying to make a call.
• It could be that you have too much line noise to make a connection. The
Satellite Receiver ships with a 50 foot cord. try a shorter cord, or you can
buy a line noise filter at your local electronics store.
When I turn on my TV, “Searching for
Satellite Signal...” appears.
Your Satellite Receiver is having trouble tuning to the channel you are on.
Follow these steps to restore the video:
• Try changing channels. If you see the same message on every channel, your
video cable may not be connected. Check to make sure all the satellite
connections on the back of your Satellite Receiver are secure.
• Disconnect the AC power cord, wait 15 seconds, then connect the AC
power cord again.
• Try using another set of video cables to determine if one of your cables is
not working.
• Check the position of the dish antenna.
32
Troubleshooting
Symptom
Solution
Audio/Video is out of sync.
• Try changing channels.
• Press the PAUSE button on the Remote Control, press the BACK button to
move back a frame or two, then press PAUSE again to resume play.
• Press the MENU button to go to the DIRECTV Menu, then press the LIVE
TV button to return to live television.
• Disconnect the AC power cord, wait 15 seconds, then connect the AC
power cord again.
• If you are using your stereo to reproduce the audio portion of the program,
it must be hooked up to the Satellite Receiver to avoid an audio/video
delay.
I do not see the Welcome Screen when I
turn on my Satellite Receiver for the
first time.
• If you are using Composite Video and L/R Audio cables or S-Video cables,
make sure your TV is displaying the appropriate video source. You may
need to use the “Input”, “Source”, “Select”, or TV/Video” button on your
TV to change video sources. If you are having trouble changing the video
source, refer to the instructions that came with your TV.
• If you used coaxial RF cable to connect your Satellite Receiver, make sure
you are viewing the same channel (3 or 4) that you selected using the
switch on the back of your Satellite Receiver.
• If your Satellite Receiver is connected to a VCR using coaxial RF cable,
make sure the VCR’s input is set to the same channel (3 or 4) that you
selected using the switch on the back of your Satellite Receiver.
• Make sure cables are connected from the output jack of one device to the
input jack of another device. Cables should never be connected from
output jack to output jack or input jack to input jack.
Additional
Information
• If your Satellite Receiver is connected to an A/V receiver or switch box, try
connecting it directly to the TV instead.
continued
Troubleshooting
33
Symptom
Solution
I do not see the Welcome Screen when I turn
on my Satellite Receiver for the first time.
(continued)
• The cables you are using to connect your Satellite Receiver to your TV or
other equipment may be damaged or defective. Try exchanging the cables
connected to the Satellite Receiver with other cables that you know are
working properly.
I’m having trouble watching antenna or
cable channels.
• If you have connected the antenna or cable directly to your TV, make sure
your TV is using the correct video source. Use the “Input”, “Source”,
“Select”, or TV/Video” button on your Remote Control (if programmed),
or your TV, or your TV remote control to change to change the video
source. Some TVs also have a “Menu” button that allows you to change the
video source using an on-screen menu. If you are having trouble changing
the video source, refer to the instructions that came with your TV.
• If you have the antenna or cable connected to your Satellite Receiver, make
sure the Satellite Receiver is in standby mode by pressing the POWER
button on the front of the Satellite Receiver or POWER/SAT on the Remote
Control. The green power light on the front of the Satellite Receiver goes
out when the Satellite Receiver is in standby mode.
• While you are watching antenna or cable channels you will be unable to
use DIRECTV and TiVo functions (such as purchasing pay per view
programs, using parental controls, viewing on-screen program guides, or
pausing live TV).
I’m having trouble using my Satellite
Receiver to record antenna or cable
channels.
34
Troubleshooting
• The Satellite Receiver only records DIRECTV Channels. You can watch
antenna or cable channels while recording DIRECTV channels. However,
you will not be able to use your Satellite Receiver to record cable or antenna
channels.
Symptom
Solution
My Remote Control is not working
properly.
• Make sure that the batteries are inserted correctly.
• Try removing the batteries and reinserting them without touching any
buttons on the Remote Control.
• Replace the batteries with new ones.
• If you are watching antenna or cable channels, you must set the TV/SAT
switch on the Remote Control to “TV”.
• If you are using the Remote Control to operate your TV, stereo, or A/V
receiver, make sure you have programmed the Remote Control properly.
I’m having problems with my Access
Card.
• Make sure the Access Card is inserted properly. If the card is not protruding
at least one quarter inch from the back panel of the Satellite Receiver, the
Access Card has been inserted incorrectly.
• If you are replacing an existing Satellite Receiver, make sure you are using
the Access Card that came with this Satellite Receiver, not the Access Card
that was used your old Satellite Receiver.
Additional
Information
Troubleshooting
35
Specifications
Inputs and outputs
Supplied accessories
Video Out
S-Video 4-pin mini DIN (1)
Composite Video RCA (2)
Audio Line Out
Stereo L/R RCA (2 pairs)
Satellite In
F-connector Female (2)
VHF/UHF In
F-connector Female (1)
VHF/UHF (SAT) Out
F-connector Female (1)
Digital Audio Out
Optical (1)
Telephone
RJ-11 female, 2 wire (1)
Control Out
3.5 mm mini jack sockets (2)
Remote Control (1)
Size AA (R6) batteries (2)
AC power cord (1)
RF Coaxial cable (1)
Audio/Video cable (1)
IR Control cable (1)
S-Video cable (1)
Phone cord (1)
Phone splitter (1)
Access Card (1)
General
Power requirements
120 V AC, 60 Hz
Power consumption
60 W
Operating temperature
21°C to 45°C (70°F to 113°F)
Operating Humidity
5% to 80%
Dimensions
Approx. 381 × 76 × 325 mm (w/h/d)
(Approx. 15 × 3 × 12 13/16 inches) including
projecting parts and controls
Mass
Approx. 4.6 kg (10 lbs)
36
Specifications
Optional Sony-brand Digital Satellite
Receiver Accessories
Local TV Antenna
ANJ-AA1
Installation Kit
ANJ-DS2
Amplifier
EAC-DA1
Diplexer
EAC-DD1
Voltage Switch
EAC-DV2
Satellite Dish Antenna
SAN-18D3
SAN-24MD1
FCC Regulations and Information
This device complies with Part 68 of the FCC rules.
The FCC Part 68 label is located on the back of this
product. This label contains the FCC number for this
equipment and the Ringer Equivalence Number
(REN). If requested, this information must be
provided to your telephone company.
Your Satellite Receiver has been registered by the Federal Communication Commission (FCC) as
not being harmful to the telephone network when connected directly to the telephone lines. In
order to fully comply with the Rules of the FCC, the following instructions should be read carefully
and followed completely where applicable:
1 The Federal Communication Commission (FCC) has established Rules which permit this
device to be directly connected to the telephone network. Standardized jacks are used for
these connections. This equipment should not be used on party lines or coin phones.
2 If this device is malfunctioning, it may also be causing harm to the telephone network; this
device should be disconnected until the source of the problem can be determined and until
repair has been made. If this is not done, the telephone company may temporarily disconnect
service.
3 The telephone company may make changes in its technical operations and procedures; if such
changes affect the compatibility or use of this device, the telephone company is required to
give adequate notice of the changes. You will be advised of your right to file a complaint with
the FCC.
4 If the telephone company requests information on what equipment is connected to their lines,
inform them of:
a. The telephone number to which this unit is connected.
b. The ringer equivalence number.
c. The USOC jack required.
d.The FCC Registration Number.
5 Items (b) and (d) are indicated on the label. The Ringer Equivalence Number (REN) is used
FCC Regulations and Information
Additional
Information
to determine how many devices can be connected to your telephone line. In most areas, the
sum of the RENs of all devices on any one line should not exceed five (5). If too many
devices are attached, they may not ring properly.
37
Service Requirements
In the event of equipment malfunction, all repairs should be performed by Sony or an authorized
agent. It is the responsibility of users requiring service to report the need for service to our company
or to one of our authorized agents. For service, call 1-877-585-SONY (7669).
Radio Interference Information
Declaration of Conformity
Trade Name:
Model No.:
Responsible Party:
Address:
Telephone No.:
Sony
SAT-T60
Sony Electronics Inc.
1 Sony Drive, Park Ridge, NJ
07656 USA
201-930-6972
This device complies with Part 15 of the FCC
rules. Operation is subject to the following two
conditions: (1) This device may not cause harmful
interference, and (2) this device must accept any
interference received, including interference that
may cause undesired operation.
This equipment has been tested and found to comply with the limits for a Class B digital device,
pursuant to Part 15 of the FCC Rules. These limits are designed to provide reasonable protection
against harmful interference in a residential installation. This equipment generates, uses and can
radiate radio frequency energy and, if not installed and used in accordance with the instructions,
may cause harmful interference to radio communications. However, there is no guarantee that
interference will not occur in a particular installation. If this equipment does cause interference to
radio or television reception (which you can determine by turning the equipment off and on), you
are encouraged to try to correct the interference by one or more of the following measures:
• Reorient or relocate the receiving antenna (the antenna for radio or television that is receiving the
interference)
• Change the position of the Satellite Receiver with respect to the radio or television equipment that
is receiving the interference
• Move the Satellite Receiver away from the equipment that is receiving the interference
• Plug the Satellite Receiver into a different outlet so that the Satellite Receiver and the equipment
receiving the interference are on different branch circuits
Shielded I/O cable and cords must be used for this equipment to comply with the relevant FCC
regulations. Changes or modifications not expressly approved in writing by Sony Electronics, Inc.,
void the user’s authority to operate this equipment.
If these measures do not eliminate the interference, you should consult your Satellite Receiver
dealer or an experienced radio/television technician for additional suggestions. In addition, you
may find the following booklet prepared by the Federal Communications Commission helpful:
“How to Identify and Resolve Radio-TV Interference Problems.” This booklet is available from the
U.S. Government Printing Office, Washington, D.C., 20402 Stock No. 004-000-00345-4.
38
FCC Regulations and Information
Sony Software License Agreement
ATTENTION: USE OF THE SOFTWARE IS SUBJECT TO THE SONY
SOFTWARE LICENSE TERMS SET FORTH BELOW. USING THE
SOFTWARE OR THE PRODUCT IN WHICH IT IS INCORPORATED
INDICATES USER’S ACCEPTANCE OF THESE LICENSE TERMS. IF
THE USER DOES NOT ACCEPT THESE LICENSE TERMS, THE USER
SHOULD IMMEDIATELY RETURN THE ENTIRE PRODUCT IN ITS
ORIGINAL PACKING IN ORDER TO RECEIVE A FULL REFUND OF
THE PURCHASE PRICE.
License and Restrictions
Sony Electronics Inc. (“Sony”) grants User a license to Use one copy of the
software which is provided to you as part of this Sony product
(“Software”). “Use” means storing, loading, installing, executing or
displaying the Software. User may not copy, modify the Software or disable
any licensing or control features of the Software. No portion of the Software
may be reproduced in any form, or by any means, without prior written
permission from Sony. User is not permitted to modify, distribute, publish,
transmit or create derivative works of any Software included for any public
or commercial purposes. In consideration of this authorization, User agrees
that any copy of this Software which User makes shall retain all copyright
and other proprietary notices in the same form and manner as on the
original. Except as specified above, nothing contained herein shall be
construed as conferring by implication, estoppel or otherwise any license or
right under any patent, trademark or copyright of Sony, its affiliates or any
third party licensor. User may not in any way sell, lease, rent, license,
sublicense or otherwise distribute the Software. The Software may only be
accessed by the functionality of the Sony product in which the Software is
incorporated by Sony (the “Product(s)”), and a User shall not intentionally
make the Software directly accessible to others or to hardware other than
the Products, or otherwise expose an API. Nothing in this Agreement
grants User any rights, license or interest with respect to source code of the
Software. User shall not modify, translate, reverse engineer, decompile or
disassemble the Software or any part thereof or otherwise attempt to derive
source code or create derivative works therefrom, and shall not authorize
any third party to do any of the foregoing unless Sony's prior written
consent is obtained. Sony may elect to provide to User updates and other
support services for the licensed Software. All updates provided to User
shall constitute licensed Software under this License, and such updates
shall be governed by the terms hereof.
Intellectual Property
The Software is owned and copyrighted by Sony, its affiliates or its third
party licensors. User's license confers no title or ownership in the Software
and is not a sale of any rights in the Software. Sony's affiliates and/or third
party suppliers may protect their rights directly in the event of any User's
violation of this Agreement. The trademarks, tradenames, Product
designation, logos and service marks (“Marks”) displayed with this
Software are the property of Sony, its affiliates or third party licensors, and
User shall acquire no rights of any kind in or to any Mark under which the
Software and/or Products are marketed. User is not permitted to use these
Marks without the prior written consent of Sony, its affiliates or the
applicable third party licensor which may own the Mark. “Sony” is a
registered trademark of Sony Corporation. User agrees not to remove, alter
or destroy any patent, trademark or copyright markings or notices placed
upon or contained within the Software, User Manuals or documentation.
User further agrees to insert and maintain with the Software and any
documentation a copyright notice in User's name.
Termination
User's license will automatically terminate upon any transfer of the
Product. Upon transfer, User must deliver the Software, including any
copies and related documentation, to the transferee. The transferee must
accept these License Terms as a condition to the transfer. Otherwise, Sony
does not authorize the transfer and the User and transferee will be in
violation of this Agreement should the transferee use the Product. This
license will automatically terminate upon User's failure to comply with any
of these License Terms. Upon termination, User must stop using the
Product and immediately destroy the Software, together with all copies,
adaptations and merged portions in any form and/or return it to Sony.
Export Requirements and U.S. Government Restricted Rights
User may not export or re-export the Software or any copy or adaptation in
violation of any applicable laws or regulations. The Software and
documentation have been developed entirely at private expense and are
provided as “Commercial Computer Software - Restricted Rights” in
accordance with FAR 52.227-19 (1987) or limited rights in technical data in
accordance with FAR 52.227-14 (1987). User has only those rights provided
for such Software and documentation by the applicable FAR or DFARS
clause or this Sony Software License Agreement.
Sony Software License Agreement
39
40
Limited Warranty
General
Sony warrants to User that the Software will not fail to execute its
programming instructions due to defects in material and workmanship for
a period equal to the warranty period provided for the Product when
properly installed and used. Warranty does not apply to defects resulting
from (a) improper or inadequate maintenance, (b) software, interfacing,
parts or supplies not supplied by Sony, (c) unauthorized modification of
the Software or the Product, or (d) improper site preparation or
maintenance. If Sony receives notice of a covered defect(s) during the
warranty period, Sony will replace Software that does not execute its
programming instructions due to such defect(s). Sony does not warrant
that the operation of the Software and/or Product will be uninterrupted or
error free. If Sony is unable, within a reasonable time, to repair or replace
any Software to a condition as warranted, User shall be entitled to a refund
of the purchase price upon prompt return of the Product. EXCEPT AS
SPECIFICALLY STATED ABOVE, THE SOFTWARE IS PROVIDED
“AS IS” WITHOUT WARRANTY AND SONY, IT S AFFILIATES AND
ITS THIRD PARTY LICENSORS DISCLAIM ANY IMPLIED
WARRANTY OF NONINFRINGEMENT, MERCHANTABILITY OR
FITNESS FOR A PARTICULAR PURPOSE. THE REMEDIES IN THIS
WARRANTY STATEMENT ARE USER’S SOLE AND EXCLUSIVE
REMEDIES. EXCEPT AS INDICATED ABOVE, IN NO EVENT WILL
SONY, ITS AFFILIATES OR ANY OF ITS THIRD PARTY LICENSORS
BE LIABLE FOR LOSS OF DATA OR FOR DIRECT, INDIRECT,
SPECIAL, INCIDENTAL, CONSEQUENTIAL (INCLUDING LOST
PROFIT), EXEMPLARY, OR OTHER DAMAGE, WHETHER BASED IN
CONTRACT, TORT, OR OTHERWISE, EVEN IF SUCH PARTY HAS
BEEN ADVISED OF THE POSSIBILITY OF SUCH DAMAGES. IN NO
EVENT WILL SONY OR ANY OF ITS AFFILIATES OR THIRD PARTY
LICENSOR'S LIABILITY UNDER AGREEMENT, WHETHER IN
CONTRACT, TORT OR OTHERWISE, EXCEED THE COST OF THE
PRODUCT.
This Agreement shall be deemed to have been made and executed in the
State of California and both parties agree that any dispute arising
hereunder related to this Agreement or the Product will be governed by
laws of the State of California, exclusive of its conflicts of law principles and
that the courts in the County of San Diego, California will have exclusive
jurisdiction over all such disputes. FURTHER THE PARTIES HEREBY
WAIVE TRIAL BY JURY IN CONNECTION WITH ANY ACTION OR
SUIT ARISING UNDER THIS AGREEMENT OR OTHERWISE ARISING
FROM THE RELATIONSHIP BETWEEN THE PARTIES HERETO. This
Agreement shall be binding upon the parties' authorized successor and
assignees. Neither party's waiver of any breach or failure to enforce any of
the provisions of this Agreement at any time shall in any way affect, limit
or waive such party's right thereafter to enforce and compel strict
compliance with every other provision. No modification of this Agreement
shall be effective unless in writing signed by both parties.
Sony Software License Agreement
Limited Warranty
Digital Satellite Receivers
SONY ELECTRONICS INC. (“SONY”) warrants this Product against defects in material or
workmanship as follows:
1.
Labor: For a period of 90 days from the original date of purchase, if the Product is determined
to be defective, SONY will repair or replace the Product at no charge. After this 90 day period,
you must pay for all labor charges.
2.
Parts: For a period of one year from the original date of purchase, SONY will supply, at no
charge, new or rebuilt replacements in exchange for defective parts. Any replacements will be
warranted for the longer of the remainder of the original warranty period or 90 days from the
installation of the parts by a SONY authorized DIRECTV System installer or facility.
To obtain warranty service:
– If the Product was installed by a SONY authorized DIRECTV System installer, contact that
installer for instructions.
– If the Product was not installed by a SONY authorized DIRECTV System installer, you must
take the Product or deliver the Product in either its original packaging or packaging affording
an equal degree of protection (with freight prepaid), to a SONY authorized DIRECTV System
service facility. To locate the closest such facility, please call the telephone number listed
below.
This warranty does not cover customer instruction, installation, set up adjustments or signal
reception problems. This warranty does not cover cosmetic damage or damage due to accident,
misuse, abuse, negligence, commercial use, or modification of, or to any part of the Product. This
warranty does not cover improper installation (if not installed by a SONY authorized DIRECTV
System installer), loss of use of the Product, or wasted programming charges due to Product
malfunction. This warranty does not cover damage due to improper operation or maintenance,
connection to improper voltage supply, or attempted repair by anyone other than a facility
authorized by SONY to service the Product. This warranty does not cover Products sold AS IS or
WITH ALL FAULTS. This warranty is valid only in the United States. Proof of purchase in the form
Additional
Information
Limited Warranty
41
of a bill of sale or receipted invoice which is evidence that the Product is within the Warranty period
must be presented to obtain warranty service.
REPAIR OR REPLACEMENT AS PROVIDED UNDER THIS WARRANTY IS THE EXCLUSIVE
REMEDY OF THE CONSUMER. SONY SHALL NOT BE LIABLE FOR ANY INCIDENTAL OR
CONSEQUENTIAL DAMAGES FOR BREACH OF ANY EXPRESS OR IMPLIED WARRANTY
ON THIS PRODUCT. IN NO EVENT SHALL SONY BE LIABLE FOR ANY INCIDENTAL OR
CONSEQUENTIAL DAMAGES WHATSOEVER ARISING OUT OF THE USE OR INABILITY
TO USE THE PRODUCT. UNDER NO CIRCUMSTANCES SHALL SONY’S LIABILITY, IF ANY,
EXCEED THE PURCHASE PRICE PAID FOR THE PRODUCT. EXCEPT TO THE EXTENT
PROHIBITED BY APPLICABLE LAW, ANY IMPLIED WARRANTY OF MERCHANTABILITY
OR FITNESS FOR A PARTICULAR PURPOSE ON THIS PRODUCT IS LIMITED IN DURATION
TO THE DURATION OF THIS WARRANTY.
This warranty is invalid if the factory applied serial number has been altered or removed from the
Product. Some states do not allow the exclusion or limitation of incidental or consequential
damages, or allow limitations on how long an implied warranty lasts, so the above limitations or
exclusions may not apply to you. In addition, if you enter into a service contract with the SONY
Partnership within 90 days of the date of sale, the limitation on how long an implied warranty lasts
does not apply to you. This warranty gives you specific legal rights, and you may have other rights
which vary from state to state.
For your convenience, SONY ELECTRONICS INC. has established telephone numbers for
frequently asked questions:
For assistance with installation, contact the dealer from whom you purchased your Digital Satellite
Receiver/Recorder.
For product information or operation, for service assistance or for resolution of a service problem,
call:
SONY SATELLITE SYSTEM INFORMATION CENTER
1-800-838-SONY (7669)
For an accessory or part not available from your authorized dealer, call:
1-800-488-SONY (7669)
42
Limited Warranty
Printed in U.S.A.
Refer to the Viewer's Guide for
questions about DIRECTV and
TiVo Service activation, Program
Guide data, or on-screen
messages from TiVo regarding
your Service account. If you still
have questions, contact
DIRECTV and TiVo at:
1-800-DIRECTV (347-3288)
http://www.directv.com
Refer to this Installation Guide (specifically
the Troubleshooting section) for questions
about your Warranty, connecting the Satellite
Receiver, initial Guided Setup difficulties (e.g.
phone calls failing), programming the
Remote Control, or if your system does not
function properly after restart. If you still
have questions, contact Sony at:
1-877-585-SONY (7669)
http://www.sony.com/dnr