1
SIP-DECT Aastra 600c/d
Messaging & Alerting Applications
Handset Release 5.0
User’s Guide
https://pbxweb.aastra.com/doc_finder/DocFinder/_en.pdf?get&DNR=
Welcome to Aastra
Thank you for choosing this Aastra product. Our product meets the strictest
requirements with regard to quality and design.
The following operating instructions will assist you in using the SIP-DECT
Messaging and Alerting features of your Aastra DECT telephone and answer most
of the questions that may arise.
If you should require further technical support or information about other
Aastra products, please contact the person responsible for your system or get in
touch with your local dealer.
You can also find information about this device and other products on our website
at http://www.aastra.de or http://www.aastra.com.
We hope you enjoy using your Aastra DECT telephone.
Contents
Introduction . . . . . . . . . . . . . . . . . . . . . . . . . . . . . . . . . . . . . . . . . . . . . . . . . . . . . . . . . . . 1
Other Valid Documentation . . . . . . . . . . . . . . . . . . . . . . . . . . . . . . . . . . . . . . . . . . . . . . . . . 1
Safety Instructions . . . . . . . . . . . . . . . . . . . . . . . . . . . . . . . . . . . . . . . . . . . . . . . . . . . . . . . . . . 1
Notes on Authorisations and Licences . . . . . . . . . . . . . . . . . . . . . . . . . . . . . . . . . . . . . . . 1
Message Types . . . . . . . . . . . . . . . . . . . . . . . . . . . . . . . . . . . . . . . . . . . . . . . . . . . . . . . . . . . . . 2
Message Options . . . . . . . . . . . . . . . . . . . . . . . . . . . . . . . . . . . . . . . . . . . . . . . . . . . . . . . . 3
Menu: Text messages . . . . . . . . . . . . . . . . . . . . . . . . . . . . . . . . . . . . . . . . . . . . . . . . . . . . 4
Menu: Info . . . . . . . . . . . . . . . . . . . . . . . . . . . . . . . . . . . . . . . . . . . . . . . . . . . . . . . . . . . . . . 4
Receiving Text Messages / Jobs . . . . . . . . . . . . . . . . . . . . . . . . . . . . . . . . . . . . . . . . . . 5
Message Pop-up Window . . . . . . . . . . . . . . . . . . . . . . . . . . . . . . . . . . . . . . . . . . . . . . . . . . . 5
Key Behaviour . . . . . . . . . . . . . . . . . . . . . . . . . . . . . . . . . . . . . . . . . . . . . . . . . . . . . . . . . . . . . . 5
Audible Signalling . . . . . . . . . . . . . . . . . . . . . . . . . . . . . . . . . . . . . . . . . . . . . . . . . . . . . . . . . . 6
Optical Signalling in the Icon Line . . . . . . . . . . . . . . . . . . . . . . . . . . . . . . . . . . . . . . . . . . . 7
Optical Signalling with Info Box . . . . . . . . . . . . . . . . . . . . . . . . . . . . . . . . . . . . . . . . . . . . . 7
Message Window Re-pop-up. . . . . . . . . . . . . . . . . . . . . . . . . . . . . . . . . . . . . . . . . . . . . . . . 8
Confirmation of a Text Message . . . . . . . . . . . . . . . . . . . . . . . . . . . . . . . . . . . . . . . . . . . . . 9
Confirmation of a Job . . . . . . . . . . . . . . . . . . . . . . . . . . . . . . . . . . . . . . . . . . . . . . . . . . . . . . . 9
Normal Job . . . . . . . . . . . . . . . . . . . . . . . . . . . . . . . . . . . . . . . . . . . . . . . . . . . . . . . . . . . . . 9
Urgent Job . . . . . . . . . . . . . . . . . . . . . . . . . . . . . . . . . . . . . . . . . . . . . . . . . . . . . . . . . . . . .10
Receiving Confirmation Messages . . . . . . . . . . . . . . . . . . . . . . . . . . . . . . . . . . . . . . . . . .11
Receiving Information Messages . . . . . . . . . . . . . . . . . . . . . . . . . . . . . . . . . . . . . . . . . . .12
Menu: Inbox / Jobs (Lists) . . . . . . . . . . . . . . . . . . . . . . . . . . . . . . . . . . . . . . . . . . . . . . . . . .12
Sending Text Messages / Jobs . . . . . . . . . . . . . . . . . . . . . . . . . . . . . . . . . . . . . . . . . . 14
The Message Editor . . . . . . . . . . . . . . . . . . . . . . . . . . . . . . . . . . . . . . . . . . . . . . . . . . . . . . . .14
Text Editor . . . . . . . . . . . . . . . . . . . . . . . . . . . . . . . . . . . . . . . . . . . . . . . . . . . . . . . . . . . . .15
Address Editor . . . . . . . . . . . . . . . . . . . . . . . . . . . . . . . . . . . . . . . . . . . . . . . . . . . . . . . . .15
Menu: Outbox (List) . . . . . . . . . . . . . . . . . . . . . . . . . . . . . . . . . . . . . . . . . . . . . . . . . . . . . . . .16
Menu: Use last text . . . . . . . . . . . . . . . . . . . . . . . . . . . . . . . . . . . . . . . . . . . . . . . . . . . . . . . .16
Menu: Pre-defined messages. . . . . . . . . . . . . . . . . . . . . . . . . . . . . . . . . . . . . . . . . . . . . . .17
Creating a Pre-defined Message . . . . . . . . . . . . . . . . . . . . . . . . . . . . . . . . . . . . . . . .17
Sending a Pre-defined Message. . . . . . . . . . . . . . . . . . . . . . . . . . . . . . . . . . . . . . . . .17
Using the Options Menu . . . . . . . . . . . . . . . . . . . . . . . . . . . . . . . . . . . . . . . . . . . . . . . 18
Setting Options for Messages Receipt . . . . . . . . . . . . . . . . . . . . . . . . . . . . . . . . . . . 20
Menu: Overwrite. . . . . . . . . . . . . . . . . . . . . . . . . . . . . . . . . . . . . . . . . . . . . . . . . . . . . . . . . . .20
Menu: Melodies (for Message Receipt). . . . . . . . . . . . . . . . . . . . . . . . . . . . . . . . . . . . . .20
i
Menu: Volume (for Message Receipt) . . . . . . . . . . . . . . . . . . . . . . . . . . . . . . . . . . . . . . . 21
Message List Access via Programmed Keys . . . . . . . . . . . . . . . . . . . . . . . . . . . . . . .22
Special Functions . . . . . . . . . . . . . . . . . . . . . . . . . . . . . . . . . . . . . . . . . . . . . . . . . . . . . .23
Locating Alert . . . . . . . . . . . . . . . . . . . . . . . . . . . . . . . . . . . . . . . . . . . . . . . . . . . . . . . . . . . . . 23
Locating Menu . . . . . . . . . . . . . . . . . . . . . . . . . . . . . . . . . . . . . . . . . . . . . . . . . . . . . . . . . . . . 23
Call-back Function / Paging . . . . . . . . . . . . . . . . . . . . . . . . . . . . . . . . . . . . . . . . . . . . . . . . 24
Sending a Paging Message . . . . . . . . . . . . . . . . . . . . . . . . . . . . . . . . . . . . . . . . . . . . . 24
Receiving a Paging Message / Call-back . . . . . . . . . . . . . . . . . . . . . . . . . . . . . . . . . 25
Personal directory Entries as vCards . . . . . . . . . . . . . . . . . . . . . . . . . . . . . . . . . . . . . . . . 25
Activating vCard Reception. . . . . . . . . . . . . . . . . . . . . . . . . . . . . . . . . . . . . . . . . . . . . 26
Sending vCards . . . . . . . . . . . . . . . . . . . . . . . . . . . . . . . . . . . . . . . . . . . . . . . . . . . . . . . . 26
Receiving vCards. . . . . . . . . . . . . . . . . . . . . . . . . . . . . . . . . . . . . . . . . . . . . . . . . . . . . . . 27
Switching the Handset On/Off . . . . . . . . . . . . . . . . . . . . . . . . . . . . . . . . . . . . . . . . . .27
Index . . . . . . . . . . . . . . . . . . . . . . . . . . . . . . . . . . . . . . . . . . . . . . . . . . . . . . . . . . . . . . . . . .28
ii
Introduction
Introduction
Your OpenMobility SIP-DECT solution can be operated with message and alarm
solutions. Message and alarm management is possible by connecting external
alarm servers or by using the basic functions of the OpenMobility Integrated
Messaging & Alerting service (OM IMA). In addition, the system can be equipped
with the “OpenMobility Locating application (OML)” which enables to locate
handsets accordant to the used base stations.
The Aastra 610d / 620d / 630d, the Aastra 612d / 622d / 632d, and the Aastra 650c
DECT handsets provide comfortable features for handling messages. They are particularly suitable for use with these Aastra applications.
Other Valid Documentation
This user guide describes the special messaging features of the Aastra 6x0d DECT
handset series and how to use them. For the basic handset operation, please
observe also the information given in the “Aastra 600 c/d series SIP-DECT® User's
Guide”.
Safety Instructions
Please observe the safety instructions which are accompanied with the device.
You find further important safety instructions in the elaborated user guides for the
devices. These user guides are available in the “Support” section of the Aastra
website. Please read these safety instructions first before using your handset.
Notes on Authorisations and Licences
Sending and receiving of text messages and tasks is subject to licensing and also
depends on user rights. This means, that not every subscriber in a DECT system
can use these features automatically. Ask your system administrator which particular features are enabled for your DECT handset. Sending text messages to a
FAX gateway or to an SMS gateway (for GSM phones) also requires additional
applications available on the communications system. Sending text messages to
an e-Mail gateway is possible without additional applications.
1
Introduction
Message Types
Messages can be managed by an integrated data processing of your communications system or by an external application (server). In the following, all possible
message types are described. It depends on the application which message types
are available.
Messages which are sent by the handset are distinguished in normal and urgent
ones and furthermore in text messages and jobs. Text messages require no or a
simple confirmation to the sender. Jobs are messages containing tasks. They have
to be confirmed as “read”, “accepted” and – in case of urgent jobs – as “done”.
In addition, an application can send information messages (e.g. news ticker), alarm
messages, and messages to locate a person.
Message type
Send from …
With acknowledgement
by receiver /
confirmation to sender
Text message as info
(e.g. news ticker)
Alarm server
No / No
Text messages with
low priority
(e.g. confirmation
message)
Alarm server
Yes / No
Normal text messages
(normal priority)
Alarm server
Yes / No
and/or
between handsets *]
or
as fax*], SMS*], e-mail*]
Urgent text messages
(high priority)
Alarm server
Yes / Yes
and/or
between handsets *]
Alarm message
Alarm server
Yes*] / Yes*]
Normal jobs
(normal priority)
Alarm server
Yes / Yes
and/or
between handsets *]
2
Introduction
Message type
Send from …
With acknowledgement
by receiver /
confirmation to sender
Urgent jobs
(high priority)
Alarm server
Yes / Yes
and/or
between handsets *]
Alarm job
Alarm server
Yes / Yes
Locating alert
Alarm server
Yes / Yes
*]
Depends on system configuration. Fax, SMS (e-mail): features must be supported
by an external messaging / alarm application. E-mail is supported by the internal
message / alarm application.
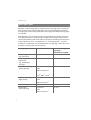
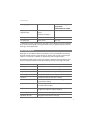
Message Options
Messages can use options when sent from the alarm server. Options include settings for melody, volume, ringer, vibrator, or display color as well as they may disconnect a call, initiate a callback, or suppress the in-band signalization.
The following tables shows all message options. Note that message options overwrite the respective DECT handset local settings when the message is received.
Option Attribute
Description
melody
Overwrites handset melody setting.
volume
Overwrites handset volume setting.
ringerTone
Overwrites handset “use ringer” setting.
increasingVol
Overwrites handset “increasing volume” setting.
vibraCall
Overwrites handset “vibration” setting.
noInband
Overwrites handset “In-band new message
signalization” setting.
disconnectCall
Automatically disconnects a call when the message is
received at the handset.
autoCallback
Establish automatic callback from the message
recipient’s handset to a phone number.
textColour (R, G, B)
Text color for the message.
bgColour (R, G, B)
Background color for the message.
3
Introduction
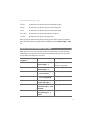
Menu: Text messages
Messages are saved and managed in a separate handset menu. To call up this
menu do the following:
When idle, briefly press
. Navigate to the Text messages menu entry and
press Ok. The following options are available:
■
New message *] to create new messages (see page 14)
■
Use last text to make further use of the last message and recipient
(see page 16)
■
Outbox *] with the sent messages / jobs list (see page 16)
■
Inbox *] with the received messages list (see page 12)
■
Jobs *] with the undone jobs list (see page 12)
■
Pre-defined messages *] with the pre-defined messages list (see page 17)
■
Message options amongst others to configure ringing melodies and volume
for received messages (see page 20)
*] The access to these lists and entries can be programmed on a key (see page 22).
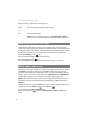
Menu: Info
Access to new received text messages and jobs is possible via the Inbox / Jobs
lists and also via the Info menu. To call up the Info menu do the following:
■
Press the left navigation key
or
■
press
and select Info
or
■
4
press the programmed key
(delivery setting)
Receiving Text Messages / Jobs
Receiving Text Messages / Jobs
Please note:
■
If you have programmed a call diversion, received text messages and jobs will
not be diverted.
■
If you have switched on the silent charging feature (in the Settings > Device
options > Silent charging menu), messages will not be signalled acoustically
except the Locating alert/message (see page 23).
■
The Info LED flashes until all messages are read.
Message Pop-up Window
On message receipt, an information pops up in the display. Depending on the
message type, the receipt will also be indicated acoustically.
The pop-up window contains information on the message type, the sender, send
date and time, and the message text.
Key Behaviour
When a text message or a job is received (pop-up window), the following keys are
usable:
■
The left softkey indicates the action which you should perform now (e.g. Read).
■
The middle Esc softkey allows you to hide the pop-up window, e.g. if you are
currently in a conversation or if you want to make a call just now. The window
will pop-up again after a couple of seconds (see the table on page 8).
■
On the right softkey
, the Options menu is available. This menu comprises
all actions which can be currently performed.
■
Pressing the end key
■
Long press on the end key
■
The SOS key (programmed as SOS softkey or – with an Aastra 630d or an
Aastra 632d – the separate SOS key on top of the handset) is also usable.
■
If there is an incoming call while a pop-up message window is displayed, the
message is hidden automatically for the duration of the call. You can accept the
call by pressing the call key
.
briefly stops message signalisation.
switches the device off.
5
Receiving Text Messages / Jobs
Audible Signalling
Received messages are signalled acoustically:
Acoustic signalling of incoming messages
Message type
in idle mode
in conversation
Information message
(e.g. news ticker)
no tone
no tone
Low priority message
(e.g. confirmation
message)
short “beep” 1]
short “beep” 1]
Normal message / job
melody played once 2]
two “beeps” 3]
Urgent message / job
melody played once 2]
two “beeps”
Alarm message / job
melody played until
handset user confirms or
hides the message 2]
five “beeps”, melody
played until handset user
confirms or hides the
message 2]
Locating alert
increasing special
locating alert
starts with signalling
tones, then warning
beeps with increasing
volume from buzzer, the
vibra call is switched on
automatically 4]
1]
The “beep” will only be signalled if you have enabled the Confirm tones setting
in the Audio > Attention tones device menu.
2]
Signalled according to the individual settings: melodies (see page 20) and
volume (see page 21)
3]
not with a Bluetooth® headset
4]
A locating alert will always be signalled via the loudspeaker, even if you have
deactivated the ringer (Off setting in the in the Audio > Ringer settings >
Device > Headset menu).
Notes on using a headset
■
6
If a corded headset is plugged, acoustic signalling on receipt of low priority/
normal/urgent messages will be played in the headset, according to setting
(On/Off ) in the Audio > Ringer settings > Device > Headset menu.
Receiving Text Messages / Jobs
■
If a Bluetooth® headset is registered, no melodies and attention tones will be
played in the headset. All acoustic signals will be played only in the handset.
■
If you have switched off the ringer volume (in the Audio > Ringer settings >
Volume > Ringer menu), there is no acoustic signalling to indicate incoming
calls and receipt of low priority/normal/urgent messages (even in the headset).
However, alarm messages and locating alerts will be signalled via the
loudspeaker.
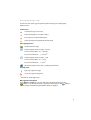
Optical Signalling in the Icon Line
New or unread text messages and jobs are indicated in the upper icon line of the
display:
new/unread normal messages
new/unread urgent messages
new e-mail 1]
new fax 1]
new/unread jobs
1] depends on used application
Note: The icon line provides placeholders for up to seven icons which are dynamically displayed dependent on the current device settings, call state and message
information. When there is no placeholder left but needed to display current information (e.g. the loudspeaker is switched on), the message indication icons will be
pulled out of the icon line. They will be displayed again when there is space in the
icon line.
Optical Signalling with Info Box
In the idle state of the handset new or unread text messages / jobs and pending
jobs are also indicated in an info box in the upper part of the display. You will see
one of the following status messages:
1 new message
Indicates the number of new messages in your Inbox list
1 unread message Indicates the number of not read (not confirmed) messages
in your Inbox list
7
Receiving Text Messages / Jobs
New info
Indicates that there are several new entries in your Info
menu e.g. new entries in your Caller list, new
Text messages, or new Jobs
1 new job
Indicates the number of not read jobs in your Jobs list
1 pending job
Indicates the number of not accepted / done jobs in your
Jobs list
Message Window Re-pop-up
You can hide the message window by pressing Esc, e.g. if you want to make a call
just now and read the message after the call. The message will be displayed again
later, see the table below.
8
Message type
When Esc was pressed,
pop-up again after …
List entry to …
Low priority messages
(e.g. confirmation
messages)
None
Text messages > Inbox
and
Info > Text messages
Normal text messages
60 seconds if handset is in Text messages > Inbox
idle mode or calling state and
Info > Text messages
Urgent text messages
30 seconds if handset is in Text messages > Inbox
idle mode or calling state and
Info > Text messages
Alarm text messages
10 seconds if handset is in Text messages > Inbox
and
idle mode, calling state,
device menu or editor is Info > Text messages
opened, or keyboard is
locked
Normal jobs
30 seconds if handset is in Text messages > Jobs
idle mode or calling state and
Info > Jobs
Urgent jobs
20 seconds if handset is in Text messages > Jobs
idle mode or calling state and
Info > Jobs
Receiving Text Messages / Jobs
Message type
When Esc was pressed,
pop-up again after …
Alarm jobs
10 seconds if handset is in Text messages > Jobs
and
idle mode, calling state,
device menu or editor is Info > Jobs
opened, or keyboard is
locked
Locating alert
5 seconds independent
from handset state
List entry to …
None
If the handset receives a new message, a displayed pop-up window will be
updated with the new information. The former message will only be visible in the
Info > Text messages resp. Info > Jobs list and in the Inbox or Jobs lists of the
Text messages menu.
Confirmation of a Text Message
When receiving a text message, press …
Read
The message is saved to your Text messages > Inbox list (see
page 12).
If it was an urgent message, the sender gets a read confirmation
message (see page 11).
Confirmation of a Job
Jobs are messages that are containing a task to complete or to accept. Depending
on the job priority (normal or urgent), it requires several steps to complete the job.
Normal Job
When receiving a normal job message, press …
Read
The job is saved to your Text messages > Jobs list (see page 12).
The sender gets a read confirmation message (see page 11).
then …
9
Receiving Text Messages / Jobs
Accept
You accept the job. The job is thus finished and will be deleted from
your Text messages > Jobs list.
The sender gets an order confirmation message (see page 11).
Using the Options menu
The message pop-up window is displayed. Press
Confirm the job message with:
to call up the Options menu.
Read
to inform the sender that you have read the job.
Accepted
to inform the sender that you have accepted the job.
Reject
to inform the sender that you have rejected the job.
When accepted or rejected, the job is finished and will be deleted from your Text
messages > Jobs list.
Urgent Job
When receiving an urgent job message, press …
Read
The job is saved to your Text messages > Jobs list (see page 12).
The sender gets a read confirmation message (see page 11).
then …
Accept
You accept the job. The sender gets an order confirmation message
(see page 11).
then …
Done
You have finished the job. The job will be deleted from your Text
messages > Jobs list.
The sender gets an executing confirmation message (see page 11).
Using the Options menu
The message pop-up window is displayed. Press
Confirm the job message with:
10
to call up the Options menu.
Read
to inform the sender that you have read the job.
Accepted
to inform the sender that you have accepted the job.
Receiving Text Messages / Jobs
Reject
to inform the sender that you have rejected the job.
Delay
to inform the sender that you have noticed the job.
Done
to inform the sender that you have finished the job.
Not done
to inform the sender that the job was not done.
Failed
to inform the sender that the job failed.
When you have confirmed the job by selecting one of these options (except the
Read and Delay options), the job will be deleted from your Text messages > Jobs
list.
Receiving Confirmation Messages
When you have sent a message which requires confirmation, you will get back a
confirmation message from the recipient. The following table gives an overview
on the different confirmation messages:
Acknowledgement by
recipient
Confirmation to sender
Message type
Read
Read confirmation for
the message […].
Urgent text message,
Accept / Accepted
Order confirmation for
the message […].
Normal / urgent job
Reject
Order in the message
[…] was refused.
Normal / urgent job
Delay
Order in the message
[…] was recognized.
Urgent job
Done
Executing confirmation Urgent job
for the message […].
Not done
Execution of the order
in the message […] not
finished.
Urgent job
Failed
Execution of the order
in the message […]
failed.
Urgent job
Normal / urgent job
11
Receiving Text Messages / Jobs
When receiving a confirmation message, press …
Read
The message will be deleted automatically.
or …
Esc
You hide the message.
Note: You can read the message in the Text messages > Inbox
menu later. After acknowledgement it will be deleted automatically.
Receiving Information Messages
Information windows which contain general messages (e.g. current company
news) can be displayed on your handset. The window is shown in the lower part of
the display and the received text is switched automatically double-spaced. To view
the display information which is hidden by the window, proceed as follows:
When idle: briefly press the
key.
The information window is hidden for 10 seconds.
When idle: long press the
key.
The information window is deleted until the next messages is received.
Menu: Inbox / Jobs (Lists)
Received text messages and jobs are saved in lists. Up to 15 entries can be saved in
your Inbox list and up to 10 entries in your Jobs list. If the list is full, you will
receive an information in the idle display. In this case you should delete entries in
the lists. You can switch the list behaviour to the Overwrite mode. If Overwrite is
enabled, old messages are overwritten if the buffer is full (see page 20).
Note: Confirmation messages and the failed message information by the alarm /
message server you received (and confirmed with Read) are not saved in your
Inbox list.
To open the lists you can use the Info menu entry or press a programmed key (see
page 22) to access the Inbox list ( ) or the Jobs list ( ).
You can also use the Text messages menu:
When idle, briefly press
. Select the Text messages > Inbox or Jobs menu
entry.
12
Receiving Text Messages / Jobs
In these lists the status, type and priority of the messages are displayed by
different icons:
Status icons
unread (message is not read)
finished (message is read, job is done)
final reject, final confirmation failed
open (message was opened but not finished)
Message type icons
confirmation message
normal/urgent/alarm message – unread
e-mail (received from ..@..) – unread *]
fax (received from fax:…) – unread *]
normal/urgent/alarm message – read
e-mail (received from ..@..) – read *]
fax (received from fax:…) – read *]
job (which requires more than a reading confirmation)
Priority icons
high, e.g. urgent message
alarm message, locating alert
*]
depends on used application
Message info and options
In the Inbox and Jobs lists, you can display the complete message via the
softkey or call up further options (e.g. forward message) via the
softkey –
see the chapter entitled Using the Options Menu on page 18.
13
Sending Text Messages / Jobs
Sending Text Messages / Jobs
Please note:
■
If the transmission of a message was not successfully, you will receive an errorinformation (Error: Invalid addressing).
■
Sent messages will be added to your Outbox list (see page 16).
To send a new message, proceed as follows:
■
When idle, briefly press
menu entry.
■
Press Ok. The display shows the text editor.
■
Enter the message text (see the chapter entitled Text Editor on page 15).
■
Press the Next softkey. The display switches to the address editor.
■
Enter the message address (call number or address).
Use the
key to switch between entering of numbers and text (see the
chapter entitled Address Editor on page 15).
. Navigate to the Text messages > New message
By pressing
you alternatively have the option to choose the message
address from the personal or central directory (if available) or to save the
message as predefined (see also page 17).
■
Press the Send softkey.
■
When sending the message to a telephone number, now select the message
type: Normal message, Urgent message, Normal job, Urgent job.
■
Press Ok to send the message.
When sending the message to an e-mail address, a confirmation box is
displayed. Press Ok to confirm.
The Message Editor
The message editor provides a two-step procedure to send messages. First the
text is entered in the text editor and after that the address is entered in the address
editor.
14
Sending Text Messages / Jobs
Text Editor
Entered message text will be auto-formatted. One message can be up to
1,000 characters long. In the headline, the number of remaining characters is
indicated. This indication applies to the ASCII character set. Entering one special
character in different languages (which are not included in the ASCII character set)
cuts the number of remaining characters by two or more.
When entering a message text:
■
Use the number keys and the
■
Use the
key to switch between upper and lower case characters or to
switch to entering of numbers in the text. The window in the display alternates
between A, a, 123, Aa to indicate the operation mode. A long press on a
number key while entering text allows to enter the number.
■
Use the
key to delete characters. A long press on the
entire message or number/address.
key to enter the text.
key deletes the
Address Editor
When entering the message address, use the
and text (e.g. to enter an e-mail address).
key to switch between numbers
Key functions
Key
Number mode
Text mode
*
switch to text mode
switch to number mode
#
#
#@ € $£¥§<>{|}[\]
0
0
space , . return 0 : ; _ ” ‘ ˆ ˜
1
1
?!1-+*/=&()%¿¡
2
2
abc2äåàáãæç
3
3
def3èéêë
4
4
g h i 4 ğ ı ì í î ï
5
5
jkl5
6
6
mno6ñöòóôõø
7
7
p q r s 7 ß ş
8
8
tuv8üùúû
9
9
wxyz9
15
Sending Text Messages / Jobs
Menu: Outbox (List)
Sent text messages and jobs are saved in a list. Up to 15 entries can be saved in
your Outbox list. If the list is full, old messages are overwritten.
To open the list you can press a programmed key (see page 22) to access the
Outbox list ( ).
You can also use the Text messages menu:
When idle, briefly press
. Select the Text messages > Outbox menu entry.
In this list the status of the messages is displayed by different icons:
in progress (message is on the way)
the message was successfully sent
sending failed
Message info and options
In the Outbox list, you can display the complete message via the
softkey or
call up further options (e.g. forward message) via the
softkey – see the chapter
entitled Using the Options Menu on page 18.
Menu: Use last text
The handset stores the last entered text (message text and address) in a temporary
buffer. This may help you in different situations:
■
You have closed the message editor by pressing the Esc softkey (e.g. to do an
outgoing call in between).
■
A message transfer failed, and you want to repeat the transfer.
■
You want to send the same information to a different recipient.
To send a message using the last entered text, proceed as follows:
16
■
When idle, briefly press
menu entry.
■
Press Ok. The display shows the text editor. Edit the message text if necessary
(see page 15).
■
Press the Next softkey. The display switches to the address editor showing the
address of the recipient to whom the used last text was sent.
. Navigate to the Text messages > Use last text
Sending Text Messages / Jobs
■
Accept the address or enter a new one (call number or address, see page 15).
By pressing
you can call up further options – see the chapter entitled Using
the Options Menu on page 18.
■
Press the Send softkey. When sending the message to a telephone number,
now select the message type: Normal message, Urgent message, Normal
job, Urgent job. Press Ok to send the message.
Menu: Pre-defined messages
You can save up to 10 pre-defined messages. Besides the message text, optionally
the message address can be saved in a pre-defined message.
Creating a Pre-defined Message
■
When idle, briefly press
messages menu entry.
■
When there is no pre-defined message, press the New softkey. Otherwise, select
the New message menu entry after pressing
again. The display shows the
text editor.
■
Enter the message text (see page 15). By pressing
the option to enter the last used text.
■
Press the Next softkey. The display switches to the address editor. Enter the
message address (call number or address, see page 15). By pressing
you
can call up further options – see the chapter entitled Using the Options Menu
on page 18.
■
Save the new pre-defined message via the
. Navigate to the Text messages > Pre-defined
you alternatively have
softkey.
Note: If an identical message is already saved in the pre-defined messages list, an
information (nothing changed) will be displayed and the message will not be
stored.
Sending a Pre-defined Message
■
When idle, briefly press
. Navigate to the Text messages > Pre-defined
messages menu entry and select the message.
■
Press the Send softkey. When there is no address stored within the pre-defined
message, the address editor (see page 15) is displayed. Enter the address and
press the Send softkey.
17
Using the Options Menu
■
When sending the message to a telephone number, now select the message
type: Normal message, Urgent message, Normal job, Urgent job. Press Ok to
send the message.
Using the Options Menu
You can call up different options in the lists (Inbox, Outbox, etc.) of the Text messages menu by pressing the
softkey. In the following, you find an overview of
these options. The composition of the options differs depending on the selected
menu.
18
Option
Function
Add recipient
Opens the address editor of your
message.
Use last text
The message from the Use last text
menu will be transferred to the
message editor.
Personal directory
Opens your personal directory. Select a
name and press
. Select a call
number and press
again. Confirm
with Ok, the call number will be added
to the address editor of your message.
Central directory
Opens the central directory. Enter a
name, select a call number and press
Ok. The call number will be added in
the address editor of your message.
Save as predefined
The message is saved as pre-defined
message. This menu entry is not
available if an identical message is
already saved as pre-defined.
Send message
Sends the message after selecting the
type of message.
Details …
Shows the complete message.
New message
Opens a new window to create a new
message.
Response
Opens a list with up to three numbers
for calling back
Using the Options Menu
Option
Function
Forward
The display shows the address editor to
enter a new recipient. If you press
again, you can select a call number
from the directories.
Edit
Shows the message editor in case the
text has to be edited.
Dial number …
Initiates a call to the stored call number.
Predial
The stored call number will be
transferred to the predial status.
Add to …
The stored name and call number can
be added to the personal directory, the
call filter, or the VIP list.
Delete
Deletes the entry. This menu entry is
only offered after you have read the
message.
Note: You can also press the
key to
delete the message. If the message is
unread, the display shows Please read
the text first.
Delete all
Deletes all entries in the list. This menu
entry is only offered when there is no
unread message in the list.
Note: You can also press the
key
(long press) to delete the entire list. In
case of unread messages, the display
shows Please read all messages first.
Response
Opens the message editor to create an
answer to the sender.
Save
Saves a pre-defined message in the list.
Other Options menus for normal and urgent jobs are described in the chapter
entitled Confirmation of a Job starting on page 9.
Tip:
To delete all messages in the Inbox list or in the Jobs list
including unread messages, you can use the Security > Reset
to default > Inbox/Text message menu entry. The Security
19
Setting Options for Messages Receipt
menu can be accessed via the PIN (Personal Identification
Number). The default is “0000” (4 digits of 0 (zero)).
Setting Options for Messages Receipt
For the receiving of messages different settings regarding the inbox buffer,
melodies, and ringer volume can be made.
Menu: Overwrite
The following setting applies to the buffer for the Inbox list and the Jobs list.
■
When idle, briefly press
Overwrite.
■
Press the Change softkey to switch the setting:
. Select Text messages > Message options >
On: Old messages are overwritten if the buffer is full (recommended setting).
Off: New messages will not be displayed and saved if the message buffer is full.
■
Briefly press the end key
to end the menu.
Up to 15 entries can be saved in your Inbox list and up to 10 in your Jobs list. If a
list is full and overwrite is disabled, an information is indicated in the idle display.
In this case you should delete entries in your Inbox and Jobs list (see page 12).
Menu: Melodies (for Message Receipt)
Received messages can be signalled by different melodies. To distinguish message
receipt from other call types, make sure to select other melodies for message signalling than e.g. for internal or external calls. For this, check the settings in the
Audio > Ringer settings > Melodies menu.
20
■
When idle, briefly press
. Select Text messages > Message options >
Melodies or Audio > Ringer settings > Melodies.
■
Select one of the following entries: Normal message, Urgent message, Alarm
message.
■
To change the currently selected melody, press the Change softkey.
■
You can listen to the melody before saving via the
■
Save the melody via the
softkey.
softkey.
Setting Options for Messages Receipt
■
Briefly press the end key
to end the menu.
Note: To ensure to notice the receipt of low priority messages (signalling by a
short “beep”), enable the Confirm tones setting in the Audio > Attention tones
menu.
Menu: Volume (for Message Receipt)
Received messages can be signalled with different volume. To distinguish
message receipt from other call types, make sure to select other volume settings
for message signalling than e.g. for incoming calls. For this, check the settings in
the Audio > Ringer settings > Volume menu.
■
When idle, briefly press
. Select Text messages > Message options >
Volume or Audio > Ringer settings > Volume.
The currently set ringer volume is displayed.
■
Select one of the following entries: Normal message, Urgent message, Alarm
message. If the ringer is switched off, the menu line will be grayed. You can
change the volume but the indication will stay as Off unless the ringer is
switched on again.
■
To change the currently selected volume, press the Change softkey.
■
Set the volume: use the
and
navigation keys or enter a number (1 … 7).
Select Off to deactivate the volume setting (Normal message and Urgent
message only).
When Increasing is activated (Alarm message only), an alarm message is
signalled with increasing volume.
■
Save the volume setting via the Ok softkey.
■
Briefly press the end key
to end the menu.
Note: If you have switched of the ringer volume (in the Audio > Ringer settings >
Volume > Ringer menu –
is displayed in the icon line), there is no acoustic signalling to indicate incoming calls and receipt of low priority/normal/urgent messages. However, alarm messages and locating alerts will be signalled acoustically.
21
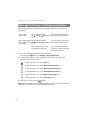
Message List Access via Programmed Keys
Message List Access via Programmed Keys
Your handset provides the possibility of assigning frequently used functions to
specific keys.
Aastra 610d
Aastra 612d
left and middle softkey
keys can only be used when
left and right navigation the handset is in idle mode
keys
keys can only be used when
Aastra 620d / 630d left and middle softkey
Aastra 622d / 632d left and right navigation the handset is in idle mode
Aastra 650c
keys
three sidekeys (on the left)
the hotkey (on the right)
keys can be used when the
handset is in idle mode and in
the connected state.
■
Press the respective key and hold it for a moment.
Or: briefly press
and select Settings > Key programming.
■
To obtain information on messages with one key click, select one of the
following entries from the list:
assigns key with access to the Jobs list
assigns key with access to the Inbox/Text messages list
assigns key with access to the Outbox/Text messages list
assigns key with access to the Pre-defined messages list
assigns key with access to the New text message input
assigns key with access to the Locating function
■
Save your selection with the
softkey.
Note: The “Aastra 600 c/d series SIP-DECT® User's Guide” provides the description
of all other functions which can be programmed on a key.
22
Special Functions
Special Functions
The functions described in this section can only be applied if the system version
offers them, these functions have been activated and/or the relevant licences for
using them have been purchased. Please contact your system administrator for
information on the range of functions available on your device.
Locating Alert
Emergency calls can be sent from your handset to a specific other telephone and
in parallel the alarm server will be informed to generate the alarm handling. On
the Aastra 610d / 620d, on the Aastra 612d / 622d and on the Aastra 650c this is
done via a programmed key (SOS). On the Aastra 630d and on the Aastra 632d this
is done via the SOS key resp. the integrated alarm sensor (mandown, no
movement alarm, escape alarm). For more information please refer to the “Aastra
600 c/d series SIP-DECT® User's Guide”.
If the locating server is used and the system detects an emergency call, a locating
alert can be initiated so that helpers can fast locate the distressed person.
The locating alert is indicated by signalisation tones in the earpiece, followed by
beeps with increasing volume via the loudspeaker.
Locating Menu
Your communications system can be equipped with a locating system. Using this
function, the base station to which the handset is or was connected can be identified. The system evaluates this information for fast locating and providing help.
The locating information can also be queried from individual handsets. This
function must be activated by the system administrator.
Querying locating data on the handset (Locating menu)
To query locating data proceed as follows:
■
When idle, briefly press
Ok.
■
Select Edit number and enter the sought phone number,
. Navigate to the Locating menu entry and press
or
23
Special Functions
■
Select No. by phone bk (personal directory). Select a name and press
Select a call number and press
again. Confirm with Ok.
.
or
■
Select Corp. directory (central directory). Enter a name, select a call number
and press Ok. The location of the call number will displayed.
The locating message will be saved in your Inbox list.
Programming locating access on a key
For an overview of programmable keys, please refer to page 22.
■
Press the respective key and hold it for a moment,
or
■
briefly press
■
Select
■
Safe your selection with the
and select Settings > Key programming.
to assign the key with access to the Locating menu.
softkey.
Call-back Function / Paging
Paging is a special type of messaging. Paging messages are sent with a call-back
telephone number which the recipient can call back at the push of a button. Messages are sent either from a central site or from handset to handset.
Sending a Paging Message
■
While the handset is idle press
or
while the handset is idle, press
longer to access the System menu,
briefly and select System menu.
■
Select Paging und press Ok.
■
Enter the call number of the recipient (target) under Edit number
or
select a number from the Central directory / Personal directory.
Press Ok.
■
Enter the call-back call number which the recipient is to call back under Edit
number
or
select a number from the Central directory / Personal directory.
Press Ok.
24
Special Functions
When sent successfully you see an acknowledgement display which you have to
confirm using Read. When sending the paging message from handset to handset
the message is sent to the recipient as a “Normal message”. When sending paging
messages from a central site (system server) the type of message may be different
(e. g. as a “Job”).
Receiving a Paging Message / Call-back
The text of the paging message is automatically generated by the system. The
message received indicates that a call-back is desired. When you receive a paging
message, press…
■
the call key
. The call number within the message is called back
immediately. The message itself is saved in your Inbox list
or
■
the Read softkey. The message is saved under Text messages > Inbox. You can
also initiate a call-back from the Inbox list using the call key
or
■
press
and select Response, then select the number to be called back.
Notes
Upon receiving a paging message you can also initiate the call-back by pressing
the handsfree key
or by pressing the “Connect key” when using a corded
headset / Bluetooth headset.
A call-back cannot be made when the Key lock and/or Phone lock features are
activated.
Personal directory Entries as vCards
Directory entries in the personal directory can be sent as so-called vCards between
the Aastra 600 c/d handsets or by a system server. These vCards are structured to
match the existing entries on the phones and can contain the following data:
Name, Private, Business and Mobile call numbers, e-mail address, fax no., Quick call
and Melody.
The advantage of using vCards within the telephone system is that directory information can be exchanged without having to manually enter this information in
time-consuming fashion.
Large system installations (e.g. in hospitals) have so-called Feature Access Codes
(FAC) for controlling important applications via the telephone. These usually
25
Special Functions
consist of defined series of numbers and characters (e.g. 9#1#3) and are transferred to the system like a call number. The codes can be conveniently saved in the
personal directory of each telephone by sending vCards (usually from a central
site). This also eliminates time-consuming manual entry.
The directory then contains the application name (e.g. Gate A door opener), the
FAC and if applicable, a suitable Quick call number. When the Auto quick hook
menu item is activated (see SIP-DECT user guide of the telephone) a telephone
entry can be immediately called by pressing the corresponding quick call number
key longer and the corresponding application is executed.
The system administrator is the one who authorises sending and receiving vCards
for each handset.
Note
Please note that the quick call number of a vCard can only be transferred when
that Quick call number has not yet been assigned by the recipient.
Activating vCard Reception
If vCard reception has not been activated by the system administrator the Receive
vCard menu entry is offered in the menu. The handset then has to be activated for
reception. Then vCard reception is available for 10 minutes respectively.
■
While the handset is idle press
or
while the handset is idle press
longer to access the System menu,
briefly and select the System menu.
■
Select Receive vCard and press Ok.
■
Confirm Switch on with Ok, you receive the Is on confirmation.
Sending vCards
26
■
While the handset is idle, open the personal directory using the bottom
navigation key
.
■
Select the desired directory entry and press
■
Select Send and press Ok.
■
Now you can select from the following…
vCard of entry < Name >: sends the directory entry selected.
VCards < all entries >: sends all directory entries.
■
Confirm your selection with Ok.
.
Switching the Handset On/Off
■
If necessary, use the
key to switch to numeric entry when entering an
address and enter the call number of the recipient.
■
Press Send and confirm with Yes.
Receiving vCards
When you receive vCards the display shows “vCard / Personal directory / Name /
Number (FAC)”. The data of the vCards are automatically sorted into the directory.
Note
vCards can also be sent by the system server in your VIP list.
Switching the Handset On/Off
It is possible to switch off the handset manually when a message is displayed.
When the battery runs low, the handset powers off automatically.
When the handset is switched on again and logged on to the communications
system, the last unread messages resp. the last jobs which have been not acknowledged are displayed again. Messages which cannot be delivered because the
handset was switched off, are stored in the integrated message server only for a
limited time.
27
Index
Index
A
Address editor 15
Authorisations 1
C
Call-back function 24
Confirmation
normal job 9
receiving confirmation
messages 11
text message 9
urgent job 10
E
Emergency calls 23
I
Inbox list 12
Information messages 12
J
Jobs
receiving 5, 9
sending 14
Jobs list 12
K
Key behaviour 5
L
Licences 1
Locating alert 23
Locating menu 23
M
Melodies 20
Menu
Inbox 12
Info 4
Jobs 12
28
Melodies 20
Options 18
Outbox 16
Overwrite 20
Pre-defined messages 17
Text messages 4
Use last text 16
Volume 21
Message
options 3
pop-up Window 5
types 2
window re-pop-up 8
Message editor 14
O
OpenMobility Integrated Messaging &
Alerting service 1
OpenMobility Locating application 1
OpenMobility SIP-DECT solution 1
Options
message receipt 20
Options menu 18
normal job 10
urgent job 10
Outbox (list) 16
Overwrite messages 20
P
Paging message
receiving 25
sending 24
Pre-defined Message
creating 17
sending 17
Programmed keys 22
S
Safety instructions 1
Signalling
Index
audible 6
optical 7
Special functions 23
Switching handset on/off 27
T
Text editor 15
Text messages
receiving 5, 9
sending 14
V
vCards
activating reception 26
directory entries 25
receiving 27
sending 26
Volume 21
29
Copyright © 2012 www.aastra.com
All rights reserved
Version: 16.12.2012
Subject to changes