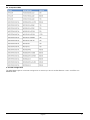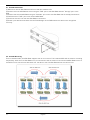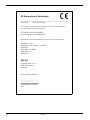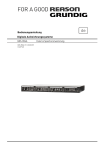
1
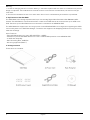
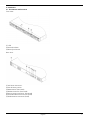
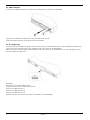
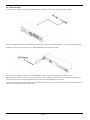
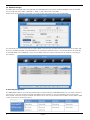
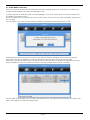
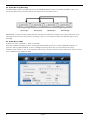
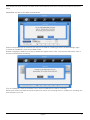
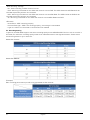
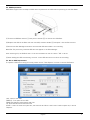
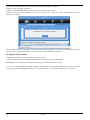
Owner´s Manual
Digital Recording Systems
GDS-R04A
GDS-R04A.15.1.02.08.2011
© ASP AG
External Storage
Content:
1. Enable HDD for Recording
7
1. Introduction
1
2. Enable Mirroring Recording
8
2. Key Features of the GDS-R04A
2
3. Enable Mirror-HDDs
8
3. Package Contents
2
4. Recording Setting
10
4. Installation
3
5. HDD Replacement
11
6. Mirror-HDD Replacement
11
7. Playback of Mirrored Data
12
8. Compatible HDDs
13
6. Cascade Configuration
13
1. Part Names and Functions
3
2. HDD Installation
4
3. ID Configuration
4
4. Cable Connection
5
5. DVR Disk Manager
6
5. Recording Configuration
6
1. Cascade Connection
14
2. Cascade Mirroring
14
1. Introduction
Thank you for purchasing the storage expansion GDS-R04A for a GRUNDIG digital video recorder.
The GDS-R04A is compatible for the digital recorders GDV-C4416A and GDV-B8832A. Before product installation
and operation, please become thoroughly familiar with this user manual and other manuals referenced by this
manual.
This user manual, the software and the hardware described here are protected by copyright law. With the
exception of copying for general use within fair use, copying and reprinting the user manual, either partially or in
entirety, or translating it into another language without the consent of ASP AG is strictly prohibited.
This specification may change without prior notice for improvement of product performance.
Product Warranty and Limits of Responsibility
The manufacturer does not assume any responsibility concerning the sale of this product and does not delegate
any right to any third party to take any responsibility on its behalf. No warranty is offered for any attachments or
parts not supplied by the manufacturer. The product warranty does not cover cases of accidents, negligence,
alteration, misuse or abuse, for example:
- Malfunctions due to negligence by the user
- Deliberate disassembly and replacement by the user
- Connection of a power source other than a properly rated power source
- Malfunctions caused by natural disasters (fire, flood, tidal wave, etc.)
- Replacement of expendable parts (HDD, FAN, etc.)
- The warranty period for the HDD and Fan is one year after purchase.
This product is not for exclusive use of crime prevention but also for assistance in cases of fire. We take no
responsibility for damage from any incident.
Caution:
This equipment underwent EMC registration and is suitable for business purposes. Distributors and users are
aware of this point.
Warning:
This is a class A product. In a domestic environment this product may cause radio interference, in which case the
user may be required to take adequate measures.
English
1
Warning:
1. In case of changing the built-in lithium battery, it should be replaced with the same or a kindred one to prevent
danger of explosion. Since old batteries could be a factor of environment contamination, be cautious how you
treat them.
2. Do not throw the batteries into fire or other heat. Short circuit or disassembly of the device is prohibited.
2. Key Features of the GDS-R04A
The GDS-R04A is the Storage expansion device for the Grundig Digital Video Recorders GDV-B8832A & GDVC4416A. The GDS-R04A is connected with a CAT-6 cable to the DVR and can be used to attach up to 32TB to the
DVR. Therefore up to 8 GDS-R04A can be connected in a cascade to the GRUNDIG DVR.
The GDS-R04A also supports the mirroring function of the GRUNDIG DVRs. All configuration regarding the HDDs
can be easily done in the DVR Disk Manager. The device also supports Hot Swapping HDDs for an easy mirroring
hard disk exchange.
Other Features:
- Each GDS-R04A takes up to max. 8TB HDD (2TB x 4 HDDs)
- Cascade of up to 8x GDS-R04A devices for a max. of 32TB HDD expansion to the GRUNDIG DVR
- 4x SATA Hot Swap Bay
- Max. Recording Rate: 10MB/sec
- Mirroring supported (RAID 1)
3. Package Contents
These parts are included:
2
English
4. Installation
4.1. Part Names and Functions
Front View:
(1) LED
(2) Hard Disk Rack
(3) Rack Eject Button
Rear View:
(1) AC Power Connector
(2) Set ID Rotary switch
(3) Mode Switch (Not Used)
(4) RS232 Connector (Not Used)
(5) Alarm Output Connector (Not Used)
(6) Cascade Network Connector (RJ45)
(7) DVR Network Connector (RJ45)
English
3
4.2. HDD Installation
(1) Press the HDD Rack button (①) and pull the handle (②) to remove the HDD Rack.
(2) Screw the HDD into the HDD rack using the HDD-rack screws.
(3) Put the HDD-rack back in while pulling up the handle.
4.3. ID Configuration
If more than one GDS-R04A is going to be used, they need to have different IDs, so that the DVR can differentiate
them. The ID is set by using the rotary switches at the rear panel of the GDS-R04A.
This ID is used in a similar way as an IP Address. The full number is 10.10.20.XXX, but for the configuration only
the last 3 digits are important.
(Example)
Setting the ID of a GDS-R04A to 105:
(1) Use a screw driver to rotate the switches
(2) Turn the 100x switch to 1
(3) Turn the 100x switch to 0
(4) Turn the 100x switch to 5
(5) After the ID is set, continue to connect the cables to the GDS-R04A
4
English
4.4. Cable Connection
(1) Connect the “DVR” Port of the GDS-R04A and the “Storage” Port of the DVR with a CAT-6 cable.
NOTE: The Gigabit Ethernet Cable (CAT 6) is mandatory, otherwise the GDS-R04A will not be recognised properly.
(2) After you connect the power plug, the GDS-R04A will boot up automatically.
NOTE: It will take about 1 minute for the GDS-R04A to connect to a running DVR after powering it on.
While attempting the connection, the 4 front LEDs will blink. When the connection to the DVR is established, all
LEDs will be on and the connected HDDs will be listed in the Disk Manager of the DVR.
NOTE: If the DVR and the GDS-R04A are booted up at the same time (e.g. after a power loss), the establishment of
the connection might take up to 3 minutes.
English
5
4.5. DVR Disk Manager
All HDDs that are connected to the DVR with the GDS-R04A will be listed in the Disk Manager menu of the DVR.
You can find this menu under “SYSTEM” > “DISK” in the main menu of the DVR.
Please refer to the manual of the DVR if you need further information about the Disk Manager.
The following screenshot shows that one GDS-R04A is connected to the DVR that has an ID with the number 105.
There are 2 HDDs installed in the GDS-R04A. The first HDD is installed in bay 1, the second HDD in the third bay
of the GDS-R04A. The “ENABLED” status of the HDDs is NO, this means that they are not used for recording at
the moment.
5. Recording Configuration
The GDS-R04A supports all recording modes that are supported by the GRUNDIG DVRs. You can either choose to
just record, or you can choose to activate the RAID function and mirror the recorded data. The mirroring will
work similar to the mirroring in the DVR. The HDD in rack 1 will mirror the data of the HDD in rack 3 and the HDD
in rack 2 will mirror the data of rack 4.
6
English
5.1. Enable HDD for Recording
After the connection between the GDS-R04A and the DVR via Gigabit Ethernet is established, the HDD can be
configured and enabled in the DVR’s Disk Manager menu.
(1) Check whether all HDDs are listed in the Disk Manager. If not all are listed, make sure that the cabling and
all HDDs are installed correctly.
(2) The “Enabled” status of the HDD can be set to YES or NO. If the status is set to YES, the HDD is already used
for recording.
(3) If the status is set to NO, you can enable the HDD for recording by switching the status to YES.
(4) Depending on the file format that is used on the HDD, the HDD can be added with or without formatting.
Select YES in the pop-up window to format the HDD (Note: This will delete all the data on the HDD).
Select NO to activate the HDD without formatting. Old recorded data will be available for playback in this case.
(5) The “ENABLED” status of the HDD will switch to YES and the HDD will be used for recording.
(6) If the HDD works properly, the front LED of the HDD will blink. This indicates that the HDD is recording. If the
HDD is not enabled, the LED will be deactivated.
English
7
5.2. Enable Mirroring Recording
The GDS-R04A supports the RAID function of the GRUNDIG DVRs. Similar to the DVR, the HDD in rack 1 will
mirror the HDD of rack 3 and the HDD in rack 2 will mirror the HDD of rack 4.
IMPORTANT: To ensure stability and flawless recording, the HDD that is used for mirroring needs to be of the
same type and size as the one used for recording. If you try to use different HDDs, the DVR will give an error
message.
5.3. Enable Mirror-HDDs
(1) Enter the menu “SYSTEM” > “DISK” of the DVR.
(2) If other HDDs are already used for recording, please disable them first in the Disk Manager submenu. If
there are still any HDDs enabled, an error message will pop up when you try to activate the mirroring.
(3) Select either “GDS” or “All” in the submenu “Mirroring”. The point “DVR” will only activate the mirror function
for the HDDs that are inside the DVR.
8
English
(4) To enable the mirror function, all HDDs need to be formatted. Select YES in the pop-up window to format the
HHDs.
IMPORTANT: All data on the HDDs will be deleted!
(5) All mounted HDDs will be formatted, but they are not used for recording yet. Enter the Disk Manager again
to switch the “ENABLED” status of the HDDS to YES.
(6) After changing the HDD status, a pop-up window will appear. Select “YES” to format the HDD, select "NO" to
activate the disk without formatting.
(7) If the “ENABLED” status of the HDDs is set to YES, the HDDs will be used for recording.
(8) The front LEDs of the HDDs will blink frequently to confirm the recording status. If a HDD is not recording, this
front LED will turn to red.
English
9
“Disk mirroring” settings:
- Off : Plain recording, no data will be mirrored
- DVR : Mirroring is activated for the HDDs that are built into the DVR. The HDDs inside the GDS-R04A will be
recorded sequentially without mirrored data.
- GDS : Mirroring is activated for the HDDs that are built into the GDS-R04A. The HDDs inside the DVR will be
recorded sequentially without mirrored data.
- All : Mirroring is activated for the HDDs that are built into the GDS-R04A & the DVR.
LED status:
- Green Blink : HDD is working properly
- Constant Red Light : HDD is not working properly, even though it was enabled
- Light off : HDD is not connected or connected but not enabled
5.4. Recording Setting
In general, the GDS-R04A supports the same recording quality as the GRUNDIG DVR. But if the mirror function is
activated, the maximum recording quality needs to be reduced because of the high data amount. Please check
the following tables for your reference:
Model GDV-C4416A:
Model GDV-B8832A:
(Example)
Max. recording performance per Mirroring type based on GDV-C4416A:
10
English
5.5. HDD Replacement
GDS-R04A supports the Hot Swap of HDDs and a replacement of HDDs without powering off the GDS-R04A.
(1) Press the HDD Rack button (①) and pull the handle (②) to remove the HDD Rack.
(2) Replace the HDD in the Rack with the new HDD, hold the handle (②) and push it into the Rack mount.
(3) Access the Disk Manager and select the mounted HDD and enable it for recording.
WICHTIG: The previously removed HDD will also appear in the Disk Manager.
After selecting this, the DVR will ask if it can be removed from the list. Select “YES” to do so.
(4) After adding the HDD successfully, the front of the HDD will blink to confirm the recording.
5.6. Mirror-HDD Replacement
To replace a HDD that is being mirrored, please use the “Disk Replace” function in the the DVR menu.
LOC : name of the HDD
FREE(%) : Free space of the HDD
FROM : Recorded first block date and time
TO : Recorded last block date and time
STATE : If there is some free space left, the state will be 'Mirror' and if there is 0% of space left, it will be
'Replace'.
English
11
(1) Select the HDD that needs to be replaced and a pop-up window will appear.
(2) Select “YES” to replace the HDD.
(3) Remove the HDD. 2NGCUGTefer to section 5.5. for physical replacement.
(4) When the pop-up window appears to insert the new HDD, put it in and click “YES”. The DVR will check if the
HDD works properly.
(5) If the HDD needs to be formatted, another pop-up window will appear. If no pop-up window appears and the
front LEDs of the HDDs start to blink, you can leave the “DISK REPLACE” submenu.
5.7. Playback of Mirrored Data
To playback the data of a removed HDD, you have 2 options:
1. Build the HDD into another GRUNDIG DVR and enable the HDD in the Disk Manager.
IMPORTANT: Do not format the HDD when enabling, otherwise all data will be lost!
2. You can connect the HDD with a SATA, eSATA or USB connection to a Windows PC and get access to the data
of the HDD using the GRUNDIG Control Center Software. Refer to the software manual for more details.
12
English
5.8. Compatible HDDs
6. Cascade Configuration
The GDS-R04A supports a cascade configuration to attach up to 8 units of GDS-R04A or a max. of 32TB to one
GRUNDIG DVR.
English
13
6.1. Cascade Connection
(1) Make sure that all GDS-R04A that will be used have a different ID.
(2) Connect the first GDS-R04A as usual using the “DVR” port of the GDS-R04A and the “Storage” port of the
DVR.
(3) Connect the second GDS-R04A using the “Cascade” port of the first GDS-R04A that is already connected to
the DVR and to the “DVR” port of the second GDS-R04A.
(4) Continue with this until the last GDS-R04A is connected.
(5) Power up all devices and check with the Disk Manager of the DVR whether all devices are recognised
correctly.
6.2. Cascade Mirroring
Even in cascade mode, the GDS-R04A supports the mirror function. The installed HDDs will be used for recording
sequentially. After the first GDS-R04A is full, the second one will be used until all connected GDS-R04A are full. If
the DVR is set to overwrite the data when full, the data on the first GDS-R04A will be overwritten first.
14
English
Specifications GDS-R04A
Operating System
Embedded Linux
Recording Speed
10 MB/sec
Raid
Normal, RAID 1
Rack Mount
19" Rack mounting brackets provided
Interfaces
RS-232, RJ45 (DVR Connection), RJ45 (Cascade)
Operating Temperature
5°C ~ +45°C
Harddisk bay
4x Hot Swap SATA bays
Storage Max. Expansion
8 TB
Power Consumption
<85 W
Weight
5.5 kg
Dimensions (wxhxd)
430x44x362 mm
English
15
EC Declaration of Conformity
GDS-R04A
External Storage
It is hereby certified that the products meet the standards in
the following relevant provisions:
EC EMC Directive 2004/108/EC
Low Voltage Directive 2006/95/EC
Applied harmonised standards and technical specifications:
EN 60950-1 Part 1
EN 55022 Class A (2006 + A1: 2007)
EN 55024
EN 61000-3-2 (2006)
EN 61000-3-3
EN 50130-4
ASP AG
Lüttringhauser Str. 9
42897 Remscheid
Germany
Remscheid, 04.08.2011
Ludwig Bergschneider
CEO
16
English