1
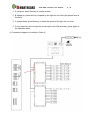
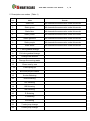
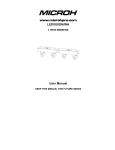
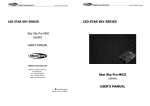
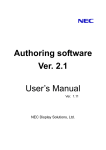
T910 DMX Controller User Manual T910 DMX512 Controller User Manual Before using this controller, please read this notebook carefully. 1 / 8 T910 DMX Controller User Manual 2 / 8 Instructions Thank you for choosing our T910 DMX512 controller. Before installing and using it, please read this notebook carefully to ensure fully understand the functions and characters of the production to avoid the unnecessary damage. Install direction 1. Please avoid the mine field, strong magnetic field and high voltage when you install. 2. Ensure the connection is right, the positive, negative polarity, signal lines and RGB Output lines must be defined consistent to the user manual. 3. Please install the controller in well-ventilated places to ensure moderate temperature condition. 4. Input voltage is from DC 12v to 24v; please choose the right electrical source. 5. Prohibit live wiring, check the lead wiring is correct, and then work! 6. If any problems do not make unauthorized repairs, any doubts please contact your local supplier. After-sale services Warranty of this product is one year, in this period we guarantee repairing or replacement service with no charge if it is normally used according to the instruction. If the customer does not follow the instructions and following provisions in this manual, which results in product damage, the supplier is not responsible for any problems arising and defects, even in the warranty period, maintenance costs borne by the customer. 1. Damage caused by wrong operation, such as not according to the using specification. 2. Damage caused by wrong connection, removing, servicing and changing electro circuit and exchanging the CMOS chip privately. 3. Damage caused by transportation, shock, fall after purchase. 4. Damage caused by earthquake, fire, flood, lightning strike and abnormal voltage. 5. Damage caused by negligence or improper maintenance, such as storage at high temperature and humid environment, vicinity of hazardous chemical substances. 6. Replacement of products. This manual applies only to this product of our company, subject to changes without notice. T910 DMX Controller User Manual 3 / 8 Introduction T910 DMX 512 controller is dedicated to LED light controlling for indoor or outdoor decoration. 256 levels grey scale of each R, G, B, can mix out 16 million colors. Remote control or Panel control is optional. More than 30 color changing modes, 255 levels grey scale adjustment and 16 levels speed adjustment. Pause function can easily save certain unique colors. Welcome to use T920(RGB)DMX512 30 channels decoder. This production uses advanced micro-electronics control technique, converts the international standard digital control signal into virtual control signal. Having 30 separate channels, each channel can realize 256 levels brightness adjustment. Through dial up the state of the “10” can choose DMX working mode or Manual working mode. In the manual working mode, it can help you test your wire connection better. Use this decoder, with other DMX master controller or DMX512 control plat, the user can make a complete controlling system for led lamps. 1. Technology specifications Type T910-DMX512 Input power DC12V Output signal DMX512 Control method Asynchronous control Max load power <5W transmission speed 250Kbps 2. Functions (1).Control way: Panel keys control with remote control, valid in 50M (No barriers), (2). Meet the standards of DMX 512 international protocol. (3).Can realize 256 levels grey scale for each color of RGB, totally about 16 million colors. (4).Many changing modes are built in as well as Pause function. (5).Good performance in anti-interference, can recover automatically when system fails.. (6).Simple wiring and easy installation (7). Output port supported: XLR-3(female and male)/1: GND; 2: DMX-(B); 3: DMX+(A) (8). Lamp controlled: 50 pixel, 170 pixel the most (1 pixel is 3 channel, set up according to the pixel point) (9). Can control projection lamps, contour lights, underground lamps, underwater lamps etc. T910 DMX Controller User Manual 4 / 8 3. Structure (1).View of major controller and functions: (chart 1) ① LCD screen: (LMB162A) ② MODE: press this key to change modes ③ SET: press this key to keep the present color ④ UP: press this key to speed up. ⑤ DOWN: press this key to speed down. Operation: Two state, one is operating state and the other is pause. Use SET key to realize mode shift. Under the mode of operation, use MODE key to choose the effects, and UP or DOWN key to change the speed or grey scale for current light effect. The first line in the LCM shows “PROGRAM: XX”, “XX” stands for the current mode number(this controller has 30 modes totally), program 1~7; The second line shows “Brightness: XX”, “XX” stands for the grey scale of current effects (Max is 255, min is 1, the larger the number, the brighter, otherwise the darker), Program8~30; the “SPEED: XX”, “XX” stands for the speed of current effect (Max is 16, min is 1, the larger the number, the slower, otherwise the faster) Under PAUSE state, press UP or DOWN to change the pixel value (Stepping is 1, range: 50~170), the first line in the LCM shows “PAUSE STATUS” the second line shows “PIXEL VALUE: XXX”, “XXX” stands for the current pixel value. T910 DMX Controller User Manual (2).View of backside settings: (chart 2) ① Voltage input port ② Power switch ③ XLR 3 male output port ④ XLR 3 male input port (3).View of remote controller: (chart 3) 5 / 8 T910 DMX Controller User Manual 6 / 8 ① A: program: press this key to change modes. ② B: speed up: press this key to speed up the light for one level (the fastest level is the fault) ③ C: speed down: press this key to down the speed of the light for one level ④ D: set: press this key to keep the current light color (Pause state); press again to the operation state. 4. Connection diagram of controller (Chart 4) T910 DMX Controller User Manual 7 / 8 5. Descriptions on modes. (Table 1) No. Mode 1 Static red All channels the same color under this mode 2 Static green All channels the same color under this mode 3 Static blue All channels the same color under this mode 4 Static yellow All channels the same color under this mode 5 Static light blue All channels the same color under this mode 6 Static purple All channels the same color under this mode 7 Static white All channels the same color under this mode 8 7-color gradual change 9 Full color gradual change 10 Change like rainbow 11 Change like running water 12 Chase one by one 13 Colors piling up 14 Blue and purple chases 15 6-color flickering 16 RGB flickering 17 RG flickering 18 RB flickering 19 GB flickering 20 R flickering 21 G flickering 22 B flickering 23 7-color jump change 24 6-color jump change Remark T910 DMX Controller User Manual 25 RGB jump change 26 RG jump change 27 RB jump change 28 GB jump change 29 White color jump change 30 Mode1~29 automatically change 8 / 8 6. Failure analysis and solutions (Table 2) Failure Analysis Solutions 1. Check the power 1. No power. 2. Make sure the polarity is right. 2. Reversed the polarity. No light 3. Re-check the wire connection, 3. Wrong connection or poor contact. make sure 4 groups signal lines 4. LED light is bad. and GND line connect right. 1. Input wire is too long to cause wire 1. Shorten wire or use loop circuit. loss. 2. Calculate the current, and then Brightness of LED 2. Diameter of wire is too thin to cause is not consistent wire loss. replace thick wire. 3. Replace larger power. 3. Power overload. 4.Add a power amplifier 4. Controller overload. Tips: The effective power is generally only 80% of the marked power, so it is recommended in selecting the power supply, the user choose a slightly larger one than the LED load power, at least for more than 20%!