1
Pinnacle MediaCenter
Pinnacle MediaCenter
User’s Guide
GB/US
October 2005
© Pinnacle Systems GmbH 2005
All rights reserved.
No part of this manual may be reproduced or transferred to other media without
explicit written permission from Pinnacle Systems GmbH, Braunschweig,
Germany.
All brand or product names are trademarks or registered trademarks of their
respective holders.
This manual is printed on chlorine-free, bleached paper using solvent-free ink.
Pinnacle Systems GmbH has written this manual to the best of its knowledge,
but does not guarantee that the programs/systems will fulfill the users’ intended
applications.
No warranty is made as to the specifications of features.
Pinnacle Systems GmbH retains the right to make alterations to the content of
the manual without obligation to inform third parties.
All quotes, sales, supply and manufacturing contracts from Pinnacle Systems
GmbH, including consulting, installation and other contractual services are
subject exclusively to the General Sales and Delivery Terms of Pinnacle
Systems GmbH.
Table Of Contents
Introduction...........................................................................................................1
Welcome............................................................................................................1
Pinnacle MediaManager ................................................................................2
Pinnacle MediaCenter ....................................................................................2
Pinnacle Hardware .........................................................................................2
PCTV MediaCenter Remote Control.............................................................2
The Contents of Your Package..........................................................................3
Hardware........................................................................................................3
Software .........................................................................................................3
Documentation...............................................................................................3
Online Help .......................................................................................................4
Online Manual...................................................................................................4
Pinnacle MediaCenter - System Setup..................................................................5
Installing the Hardware .....................................................................................5
Installing the Software.......................................................................................5
The tvtv Manager ..............................................................................................6
Opening a User Account ................................................................................6
Assigning TV Channels .................................................................................6
Scheduled Recording List ..............................................................................7
Advanced Settings.............................................................................................8
Advanced Settings - Overview ......................................................................8
Advanced General Settings..........................................................................10
Advanced Remote Control Settings.............................................................12
Advanced Display Settings ..........................................................................13
Advanced Capture Settings..........................................................................15
Advanced Data Services Settings ................................................................17
Advanced Playback Settings........................................................................19
Advanced Audio Settings ............................................................................22
Advanced Channel Settings .........................................................................24
Advanced Import/Export Settings................................................................32
Advanced PMCS Settings............................................................................33
Advanced Settings - About the Pinnacle MediaCenter................................34
Advanced Update Settings ...........................................................................35
iii
Pinnacle MediaCenter
Advanced Services Settings .........................................................................36
Pinnacle MediaManager .....................................................................................37
Overview .........................................................................................................37
What the Pinnacle MediaManager Does......................................................37
Main Window of the Pinnacle MediaManager ............................................38
The Media Library...........................................................................................40
Introduction to the Media Library................................................................40
The Sort View in the Media Library............................................................43
Searching in the Media Library ...................................................................44
Deleting Files in the Media Library.............................................................45
The Media Player ............................................................................................46
Using the Media Player and Its Controls .....................................................46
Importing Media Files .....................................................................................48
Introduction to the Import Tab.....................................................................48
Import - Folder.............................................................................................49
Import - Files................................................................................................50
Import - Drives.............................................................................................51
Import - Audio CD.......................................................................................52
Import - Digital Camera...............................................................................55
Import - Watch Folder .................................................................................57
Import - Rhapsody Playlists.........................................................................59
Organizing Media Files ...................................................................................60
Organizing File Tags....................................................................................60
Customized File Tags (Keywords) ..............................................................61
Introduction to the Organize Tab .................................................................62
Using Playlists.................................................................................................64
Introduction to the Playlists Tab ..................................................................64
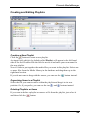
Creating and Editing Playlists......................................................................65
Exporting Media Files .....................................................................................67
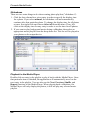
Introduction to the Export Tab.....................................................................67
Exporting to a Folder ...................................................................................68
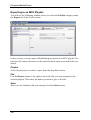
Exporting to an M3U Playlist ......................................................................70
Exporting to a Burner...................................................................................71
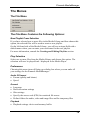
The Menus.......................................................................................................73
The File Menu..............................................................................................73
The Edit Menu .............................................................................................75
iv
Table Of Contents
The Tools Menu...........................................................................................77
Real Rhapsody Music Service.........................................................................78
Real Rhapsody Music Service - Overview ..................................................78
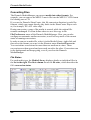
File Formats.....................................................................................................81
Supported File Formats................................................................................81
Converting Files...........................................................................................82
Pinnacle MediaCenter.........................................................................................85
Pinnacle MediaCenter Functions.....................................................................85
Pinnacle MediaCenter User Views..................................................................87
Pinnacle MediaCenter Window Formats.........................................................89
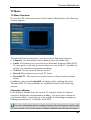
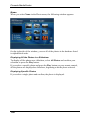
Remote View (optimized for operation with the remote control) ...................93
Overview......................................................................................................93
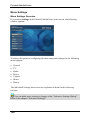
TV Menu......................................................................................................97
Radio Menu................................................................................................114
Music Menu ...............................................................................................124
Movies Menu .............................................................................................138
Photo Menu................................................................................................148
Online Menu ..............................................................................................161
Menu Settings ............................................................................................162
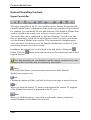
PC View (optimized for operation with a mouse).........................................175
Overview....................................................................................................175
General Operating Controls .......................................................................176
Operating Controls While Watching TV ...................................................180
Operating Controls During DVD Playback ...............................................186
Operating Controls During File Playback..................................................190
Teletext ......................................................................................................194
Electronic Program Guide (EPG) and Recording ......................................198
Technical Support .............................................................................................207
Getting Technical Support.............................................................................207
License Agreement ...........................................................................................209
Pinnacle End User License Agreement .........................................................209
Glossary ............................................................................................................213
Index .................................................................................................................221
v
Introduction
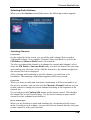
Welcome
Your new Pinnacle product offers you a completely new experience in
multimedia entertainment. From now on, you can access and process all sorts of
media such as television, radio, movies, music and photos, either from your
computer or from the comfort of your armchair.
You can watch both analog and digital television (optional) on either your
computer monitor or your television screen.
The fun gets even better with the following features. Watching TV just got
easier and you don't have to miss a second of your favorite shows, thanks to the
latest timeshift recording technology. This makes spontaneous or scheduled
recording to your hard disk a breeze. With you new Pinnacle product, you have
immediate access to the latest news using teletext. In addition, an Electronic
Program Guide (EPG) gives you an overview of a complete range of television
programs. Scheduling your recordings is also quick and easy.
You also have the option of listening to radio at any time and recording your
favorite broadcasts quickly and easily. In addition, your Pinnacle product lets
your receive Internet radio stations.
You can play video, music, and display photo files from your hard disk or from
a CD and/or DVD. You can also burn your own CDs or DVDs.
In addition, you can arrange your media files in an intelligent multimedia
database so that they can be found quickly. This is done according to various
playback criteria based on specific categories (for example, all the movies in a
certain genre or all the photos from a particular vacation). Pinnacle MediaCenter
gives you simple and targeted access to all your media files.
The Pinnacle MediaCenter also gives you direct access to many different online
services thereby opening all the doors to an incredible world of media and
information.
Now you can access all of these different media quickly and easily with just one
device: your PC. The Pinnacle MediaCenter interface has been especially
designed so that all the menu options are very legible even at a distance of
several yards. Plus they can be easily navigated with your remote control.
The following components of your new Pinnacle product put all the following
functions at your fingertips:
1
Pinnacle MediaCenter
Pinnacle MediaManager
The Pinnacle MediaManager is installed on your PC and is used to import music
files, movies, and digital photos into the MediaManager database. You also
manage these files and keep them in order in the MediaManager. You can create
your own playlists for collecting your favorite music, movies and photos. The
media files on your PC can originate from almost anywhere, for example, from
the Internet, your own audio CDs or your digital camera.
Pinnacle MediaCenter
The Pinnacle MediaCenter is also installed on your PC and is used for media
playback.
You can watch and record TV with the Pinnacle MediaCenter, play back
recordings, and display teletext. You can also listen to and record radio
broadcasts. Music, movies, and photos from CDs, DVDs or your hard disk are
shown in the Pinnacle MediaCenter. You can access the categories created in the
Pinnacle MediaManager to display media sorted according to your criteria. This
helps you select the medium best suited to your particular mood or for any
occasion.
Pinnacle Hardware
If your new Pinnacle product comes with the optional reception device, you can
receive TV and radio (optional) and take advantage of, for example, the teletext
or timeshift functions.
PCTV MediaCenter Remote Control
With the remote control, you can navigate the on-screen menu from anywhere in
your room – without having to bother going back and forth to your computer.
Now go have fun with your new Pinnacle product!
2
Introduction
The Contents of Your Package
Before you begin with the installation, check the contents of the package to
make sure that they are complete. If any part is missing or damaged, contact
your retailer. Keep the packing material in case you have to transport the
original parts again in the future.
Hardware
The hardware included in the box depends on the version of the Pinnacle
package you have bought.
Software
Software designed for Windows XP is found on the CD-ROM included in the
box.
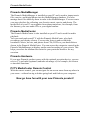
Documentation
User Manual on CD
Hardware operating instructions on CD
Remote control
operating instructions
on CD
Online Help
Please note that the actual contents of the package may differ from the items
shown above depending on which version of the product you bought!
3
Pinnacle MediaCenter
Online Help
Your Pinnacle product gives you access to Online Help at any time.
If you are searching for a specific topic, select the Help Topics function in the
Help menu or simply press the F1 key on your keyboard.
Online Manual
If you have questions about the function and operation of your Pinnacle product,
you can consult the online manual in addition to the printed manual. The online
manual is installed automatically and can be read directly on-screen.
To open the online manual, you need the free program Adobe Acrobat Reader.
To start the online manual, do the following:
Use your mouse to click and open the Windows Start menu.
Move your mouse over Programs to open the Program menu.
Move your mouse over Pinnacle MediaCenter to open the Pinnacle
MediaCenter menu.
Now click Pinnacle MediaCenter.
Any new modifications or supplements that did not make it into the
documentation are described in the ReadMe file on the CD-ROM included in the
box.
4
Pinnacle MediaCenter - System Setup
Installing the Hardware
Hardware installation depends on the type of hardware included in the package,
for example, whether it is an internal or external device. You will find a detailed
description in the corresponding hardware manual on the CD.
Installing the Software
This section describes how to install the Pinnacle software on your PC. During
installation, a program group along with its corresponding subgroups will be
created. This is where all the necessary software components will be copied.
As a part of the installation, you will be asked for the serial number. This is
located on the CD or the CD case.
Insert the installation CD in the CD drive of your computer.
The setup program now either starts automatically or you can start
autorun.exe in the setup directory on the CD-ROM.
Now follow the installation instructions displayed on the screen.
During installation, an installation wizard leads you through the Advanced
Settings Dialog. This is where you can configure the Pinnacle MediaCenter
settings. For more information about this, refer to the chapter "Advanced
Settings".
After installation, you will be prompted to restart your computer. This restart
needs to be done in order for your settings to take effect and for the Pinnacle
MediaCenter to function properly.
5
Pinnacle MediaCenter
The tvtv Manager
The Pinnacle MediaCenter gives you convenient access to the services offered
by the EPG provider tvtv. With the help of the TV listings on the tvtv pages,
you can quickly and easily select the shows you want to record and then import
the recording list into the Pinnacle MediaCenter. The shows you have selected
are then automatically recorded - without you having to configure the recording
any further.
Opening a User Account
To use this method of recording TV shows, you need to register with tvtv.
Click the Windows Start menu once.
Move your mouse to Programs to open the Programs menu.
Move your mouse to the Pinnacle MediaCenter to open the menu.
Click the tvtv Manager option.
A wizard for guiding you through the registration process now appears.
Select whether you are registering with tvtv for the first time or you are
already a registered user.
If you are registering for the first time, enter a user name and password in the
next dialog window and select one of the services. You will then be
forwarded to the tvtv Web site.
In order to use the tvtv service, you need to activate your user account on the
tvtv Web site.
To do this, enter your user name and password.
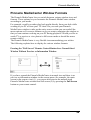
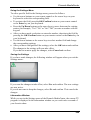
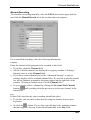
Assigning TV Channels
After activating your user account, you can now synchronize the Pinnacle
MediaCenter channel list with the tvtv channel list. This lets you record shows
selected on tvtv with the Pinnacle MediaCenter.
To do this, a two-column channel list appears. On the left are all the channels on
your Pinnacle MediaCenter channel list.
If you click a field on the right part of the channel list, all your tvtv channels
will be displayed in separate window. Now choose the tvtv channel to be
associated with the Pinnacle MediaCenter channel on the same line.
This is how you link your Pinnacle MediaCenter channels to the tvtv
channels.
It is now easy for you to select shows as well as keep track of them directly
on the www.tvtv.de Web site. All you have to do is import them into the
Pinnacle MediaCenter.
6
System Setup
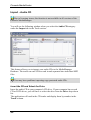
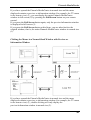
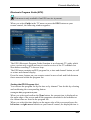
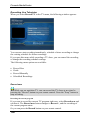
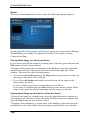
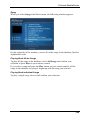
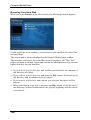
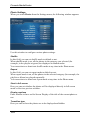
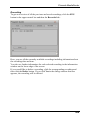
Scheduled Recording List
In the next window, all the shows scheduled to be recorded via the tvtv Web site
are displayed.
After the tvtv recording list has been imported into the Pinnacle
MediaCenter, you can modify the shows scheduled to be recorded in the TV
menu under "TV Recorder".
7
Pinnacle MediaCenter
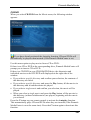
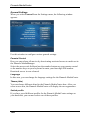
Advanced Settings
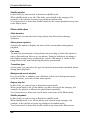
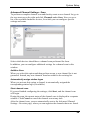
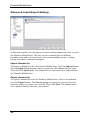
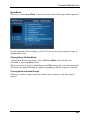
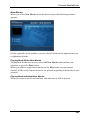
Advanced Settings - Overview
During the installation of the Pinnacle MediaCenter software, a wizard will lead
you through the some of the areas in the Advanced Settings dialog where you
can configure the most important settings for the Pinnacle MediaCenter.
After installation, you can access the Advanced Settings dialog at any time by
double-clicking the Settings icon in the Pinnacle program group. Then you can
edit the current settings or configure new ones:
Note that the Advanced Settings dialog can only be operated with your
keyboard or your mouse.
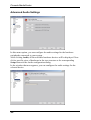
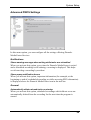
In the left part of the Advanced Settings dialog window, you see a tree structure
that outlines the following areas:
8
General
Remote control
Display
Capture
Data services
Playback
Audio
System Setup
Channels
ImportExport
PMCS
Services
Update
About
When you click an entry, the corresponding menu opens and you can modify the
settings for that area.
9
Pinnacle MediaCenter
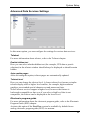
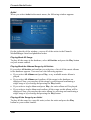
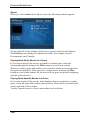
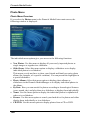
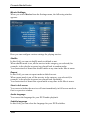
Advanced General Settings
In this menu option, you can configure various general settings.
Appearance
Language
In this area, you can set the language for the Pinnacle MediaCenter.
Theme
You can choose different skins for the Pinnacle MediaCenter here.
"Skip" buttons on remote control
This is where you can set the time interval that the Skip buttons on your remote
control should jump during media playback.
Timeshift settings
You can find more information about the timeshift feature in the Timeshift
chapter or in the Operating Controls While Watching TVl chapter.
Automatically enable timeshift at TV startup
If you select this option, every time you watch TV, the program currently
showing is saved in the temporary area of your hard drive. This recording can be
played back from any point at any time, while at the same time live TV is still
being recorded. Not even an unexpected interruption will make you miss even a
second of the show you are watching.
10
System Setup
Maximum duration / Timeshift file size
In this field, you can set the maximum duration of your timeshift recording in
minutes. Since the maximum size of the timeshift file is dependent on this value,
enter the maximum recording time and the resulting maximum file size will be
displayed.
Overwrite buffer if completely filled
After activating this option and if the maximum duration is exceeded during the
timeshift recording, previously recorded parts will be overwritten starting from
the beginning of the recording.
Timeshift file path
After clicking the Browse... button, you can enter the path to where you want
your timeshift recording to be temporarily saved on your hard drive. The Free
disk space: field displays how much disk space is still available for recordings.
(This value is dependent on your hard disk capacity and on the maximum
duration for timeshift recordings.)
Screen saver
In this section, you can decide whether to activate or deactivate a screen saver
for the Pinnacle MediaCenter.
11
Pinnacle MediaCenter
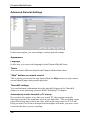
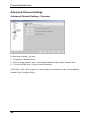
Advanced Remote Control Settings
Click an option button to select the type of remote control you received in the
package.
12
System Setup
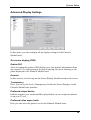
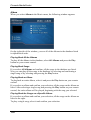
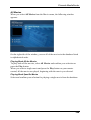
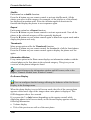
Advanced Display Settings
In this menu, you can configure all the display settings for the Pinnacle
MediaCenter:
On-screen display (OSD)
Enable OSD
After activating this option, OSD displays give you detailed information about
the current TV or radio program, the music playing, the movie showing or the
photo displayed in the Pinnacle MediaCenter.
Duration
In this section, set how long an On Screen Display should remain on the screen.
Transparency
Here, you can set the level of transparency for the On Screen Displays on the
Pinnacle MediaCenter interface.
Preferred output device
Indicate whether your media should be played back on your computer monitor
or on your TV set.
Preferred video aspect ratio
Here you can select the picture size for the Pinnacle MediaCenter.
13
Pinnacle MediaCenter
Video display
2 fields interlaced
If this option is active, two fields are "woven" into a full screen. However, this
may result in the edges becoming pixilated.
This setting is optimal for displaying images without a lot of movement, for
example, news broadcasts, or for playing back non-interlaced images, for
example, DVDs.
2 fields de-interlaced
Activating this option smoothes the edges of pixilated images so that a sharper
image is produced. This setting is therefore optimal for displaying images with a
lot of quick movement, for example, sports broadcasts, but should be
deactivated when playing back images which have previously not been
interlaced (for example, DVDs).
Cropping
Activating this option suppresses any interference patterns on the upper and
lower edges of the image.
Acceleration by graphics card
If this option is active, the MPEG stream is partially decoded by the graphics
card, which reduces the CPU load.
Note that this function is only available if your graphics card is suitable for
decoding.
Initial size of video
This is where you select whether your video should appear in fullscreen or in a
window after starting the program.
Page switching effects
In this field, you can activate or deactivate 3D effects and/or audio effects for
the transitions between menus.
14
System Setup
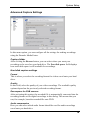
Advanced Capture Settings
In this menu option, you can configure all the settings for making recordings
using the Pinnacle MediaCenter.
Capture folder
After clicking the Browse button, you can select where you want your
recordings to be saved on your hard drive. The Free disk space: field displays
how much disk space is still available for recordings.
Hard disk capture settings
Format
This is where you select the recording format for videos saved onto your hard
drive.
Quality
In this field, select the quality of your video recordings. The available quality
options depend on the previously selected recording format.
Recompress for DVB sources
After activating this option, the recorded file is automatically converted into the
recording format set for digital recordings in this dialog. This means that you
can, for example, burn the recorded file onto DVD.
Audio compression
Here you can select which audio format should be used for audio recordings
saved onto you hard drive.
15
Pinnacle MediaCenter
Direct to DVD capture
With the Pinnacle MediaCenter, you can quickly and easily burn files directly
onto DVD - without having to waste time saving it to your hard drive
beforehand.
If the Pinnacle MediaCenter cannot find a suitable DVD recorder for direct
DVD recording on your system or if no suitable medium has been placed in the
recorder, this field displays the name of the directory where the recorded files
will be saved on your hard drive.
Would you like your DVD to include chapters?
Here you can decide whether the recorded file will be saved on DVD with or
without chapter divisions. If you decide to have chapter divisions, set the length
of the individual chapters.
Video quality
Here you can select the quality level of your direct DVD recording.
Note that lower video quality requires less disk space. This also means that
the maximum recording time is dependent on the video quality. Therefore better
and best quality reduces the possible recording time.
16
System Setup
Advanced Data Services Settings
In this menu option, you can configure the settings for various data services:
Teletext
For more information about teletext, refer to the Teletext chapter.
Enable hidden text
Here you can select whether hidden text (for example, VPS data or puzzle
solutions) in the teletext window should always be displayed or should remain
hidden.
Auto update pages
After activating this option, teletext pages are automatically updated.
Teletext level
Here you can change the teletext level. A lower teletext level means a simpler
teletext display while a higher level enables, for example, high-resolution
graphics, an extended special character set and numerous fonts.
Not all teletext services support a higher level, however the feature is
backwards-compatible so that even if you select a high level that is not
compatible, the teletext can be displayed at the lower level.
Electronic program guide
For more information about the electronic program guide, refer to the Electronic
Program Guide (EPG) chapter.
Activate this option if the NextView system be available by default for an
analog electronic program guide (EPG) via antenna.
17
Pinnacle MediaCenter
Sync tvtv
Click the titanTV site button to got to the tvtv Internet site, where you have
access to an online electronic program guide (EPG).
If you would like to set up a tvtv user account and take advantage of tvtv
services (for example, the convenient recording function), click tvtv Internet
access and follow the instructions.
For more information, refer to the tvtv Manager chapter.
18
System Setup
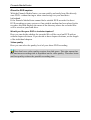
Advanced Playback Settings
In this menu, you can configure the settings for the playing back music, photos
and movies.
Music playback
Static visualization
Here you can choose between different visualizations that can be displayed on
your screen while you listen to music.
Show MP3 tag info
Activate this option to display different types of information during MP3
playback, for example, artist and title.
Local database for CD titles
After clicking the Browse button, select the path for your music database.
Repeat playlist
In this field, you can activate or deactivate repeat mode.
When repeat mode is on, all of the titles you have selected in the category (for
example, the playlist or album) are played repeatedly.
You can activate or deactivate repeat mode for the current playback at any time
in the Music menu.
19
Pinnacle MediaCenter
Shuffle playlist
In this field, you can activate or deactivate shuffle mode.
When shuffle mode is on, all of the titles you selected in the category (for
example, in the playlist or genre) are played in random order.
You can activate or deactivate shuffle mode for the current playback at any time
in the Music menu.
Photo slide show
Slide duration
In this field, you can enter how long a photo should be shown during a
slideshow.
Show photo captions
Activate this option to display the name of the current photo during photo
playback.
Pan scan
To make the presentation of your photos more exciting, activate this option to
place a Pan and scan filter over your photos. During a slideshow, an image is
then lightly zoomed in on so that only a cutout of the image is visible as the
image moves back and forth during the photo presentation.
Transition type
At this point, you can select the type of transition between the individual photos
during photo playback.
Background music playlist
If you would like to enhance your slideshow with a bit of background music,
select the music you want via this menu option.
Repeat playlist
In this field, you can activate or deactivate repeat mode.
When repeat mode is on, all the photos you have selected in the category (for
example, the playlist or album) are played back repeatedly.
You can activate or deactivate repeat mode at any time in the Photo menu.
Shuffle playback
In this field, you can activate or deactivate shuffle mode.
When shuffle mode is on, all the photos you selected in the category (for
example, in the playlist or genre) are displayed in random order.
You can activate or deactivate shuffle mode at any time in the Photo menu.
20
System Setup
CD/DVD start
Activate the Auto playback option to allow a DVD to start playing immediately
after you put it in your DVD drive.
Movies and DVD playback
Audio language
Here you can set the default language for the soundtrack of your DVDs.
Menu language
Here you can select which language should be used by default to the display the
menu of your DVDs.
Subtitle language
Here, you can set the default language for the subtitles on your DVDs.
Enable subtitles
When you activate this option, subtitles are displayed by default when you play
your DVDs.
Repeat playlist
In this field, you can activate or deactivate repeat mode.
When repeat mode is on, all the movies you have selected in the category (for
example, in the playlist) are played back repeatedly.
You can activate or deactivate repeat mode at any time in the Movie menu.
Shuffle playback
In this field, you can activate or deactivate shuffle mode.
When shuffle mode is on, all the movies you selected in the category (for
example, in the playlist) are played back in random order.
You can activate or deactivate shuffle mode at any time in the Movie menu.
21
Pinnacle MediaCenter
Advanced Audio Settings
In this menu option, you can configure the audio settings for the hardware
peripherals connected to your system.
After clicking Audio, all the available hardware devices will be displayed. Now
click a specific piece of hardware in the tree structure or the corresponding
Setup button in the Audio configuration dialog.
In the window that now appears, you can configure the audio settings for the
selected device:
22
System Setup
Audio Source
This is where you select the sound card that you want to use.
When you select your TV hardware at this point, PCI audio streaming occurs so
that the sound card is not used for recording and you therefore do not need to
select an audio input.
Audio Input
At this point, you can select which sound card input should be used for audio
playback.
This option is not available if you have selected your TV hardware as an audio
source.
23
Pinnacle MediaCenter
Advanced Channel Settings
Advanced Channel Settings - Overview
In this menu option, you can:
Configure a channel scan.
Edit existing channel lists or individual channels and export channel lists.
Create and edit lists of your favorite channels.
To do this, click of the respective entry in the tree structure or the corresponding
button in the Settings dialog.
24
System Setup
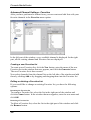
Advanced Channel Settings - Scan
To perform a complete channel scan and thereby create a new channel list, go to
the tree structure on the right and click Channels under Scan. Now you see a
list of the available hardware devices, for which you can configure specific
settings and scans.
Select which devices should have a channel scan performed for them.
In addition, you can configure additional settings for a channel scan in this
window:
Additive Scan
When you select this option and then perform a scan, a new channel list is not
generated. Instead, any new channels found are added to the existing list.
Automatically assign station logos
When you activate this option, a channel is automatically assigned the
corresponding station logo (if available).
Start channel scan
If you are finished configuring the settings, click Start, and the channel scan
will begin.
During the scan, the current status of the channel scan is displayed in a separate
window. Click Cancel to cancel the channel scan at any time.
After the channel scan, you are automatically sent to the Advanced Channel
Settings - Favorites page, where you can organize the channels that were found.
25
Pinnacle MediaCenter
Specific Settings
To configure addition settings for the hardware used for the channel scan, click
the corresponding hardware in the tree structure or in the Settings dialog:
Note that depending on the hardware selected, it is possible that only a few
of the settings listed are configurable.
Import channels from file
If you would like to import an already existing channel into the Pinnacle
MediaCenter, activate this menu option. In the Open dialog that now appears,
select the corresponding file and import it by clicking Open.
Country
Select the country where you are currently located.
Video Standard
Select a suitable video standard from this field (for example, PAL, NTSC,
SECAM).
Scan Mode
At this point, you can decide how the channel scan should be performed. Do you
want a channel scan that is as quick as possible, or would you prefer to receive
the channels in the best quality possible, or should the channel scan take place at
normal speed and include all the channels that can be received?
Input Type
Indicate here whether you receive TV/radio via antenna or cable.
Allow Scrambled Channels
After activating this option, scrambled channels will also be included in the
channel list during a channel scan.
Signal Amplifier
If this option is selected, channel signals are strengthened during the channel
scan.
Automatically delete invalid channel URLs from storage
When you activate this option, Internet radio stations are automatically deleted
from the channel list if the station URL is not longer valid. Note that Internet
access is required for this.
After you have finished configuring the settings, click the → Scan button.
You will be taken back to the Scan page, where you can start the channel scan.
26
System Setup
Advanced Channel Settings - Editing Channel Lists
After you have performed a channel scan, you have the option of editing
existing channel lists, changing individual channels or exporting channel lists
from the Pinnacle MediaCenter via the menu option Editor.
Viewing the channel list
In the middle part of the window, the channel list with all the available channels
is displayed. This list is sorted according to various criteria (for example, All
radio channels, All TV channels).
To list the channels from a specific grouping, click the corresponding entry.
Editing a channel
If you would like to edit a channel in the channel list, click that channel. Under
Common Channel Information, the station logo (if available) and the channel
name are displayed. Under Channel Details, you will find additional channel
information, for example, the URL, the frequency or the video standard.
When you click the Edit button after selecting a channel, a window appears
where you can modify the settings for the selected channel:
Note that depending on the channel selected (TV or radio, analog or digital),
it is possible that only a few of the settings listed are configurable.
Channel
In this field, you can change the channel number.
27
Pinnacle MediaCenter
Frequency
Here you can change the frequency.
Fine Tuning
Use the fine tuning slider to optimize the reception quality of the channel if
necessary.
Country Code
Select the country where you are currently located.
Video Standard
For analog reception, select the TV standard for your area (for example, PAL
BG).
Media Type
Indicate here whether you receive the channel via antenna or cable.
URL/link for streaming source
Here you can enter a new link for the audio source for Internet radio stations.
Internet/Radio audio stream / video stream
Indicate here whether the channel uses an audio or video data stream.
Deleting a channel
To delete a channel from the channel list, select the channel and click the Delete
button.
Adding a channel
After clicking the New button, a window opens which displays the channel list
where you can add a new channel.
Depending on your TV hardware, the settings available in this menu option
may vary.
Channel name
Here you can enter the name of the new channel.
Name/device
In this field, select the hardware which should receive the new channel.
Channel
In this field, enter the desired channel number.
Frequency
Here you can enter the frequency of the new channel.
28
System Setup
Fine Tuning
Use the fine tuning slider to optimize the reception quality of the channel if
necessary.
Country Code
Select the country where you are currently located.
Video Standard
For analog reception, select the TV standard for your area (for example, PAL
BG).
URL/Link for streaming source
Here you can enter the link for the audio source of the new channel.
Internet/Radio audio stream / video stream
Indicate here whether the channel uses an audio or video data stream.
Deleting a channel list
To delete a channel list, select the channel list and click the Delete button.
Exporting a channel list
To export a channel list from the Pinnacle MediaCenter, select a list and then
click the Export button. In the Save as dialog that now appears, select the
directory where the channel list should be saved, and then click Save.
29
Pinnacle MediaCenter
Advanced Channel Settings - Favorites
After you have performed a channel scan, you can create and edit lists with your
favorite channels in the Favorites menu option.
In the left part of the window, every available channel is displayed. In the right
part, all the existing channel and Favorites lists are displayed.
Creating a new Favorites list
To create a new Favorites list, click the New button, enter the name of the new
Favorites list in the window that now appears, and click the Generate button.
The new Favorites list is then created.
Now select channels from the channel list on the left side of the window and add
them by clicking Add or by dragging and dropping them into the Favorites list.
Editing or deleting a Favorites List
If you would like to change an existing Favorites list, you have the following
options:
Renaming the Favorites list
To rename a Favorites list, select the list in the right part of the window and
click the Name button. In the window that now appears, enter the new name and
click OK.
Removing a Favorites list
To delete a Favorites list, select the list in the right part of the window and click
the Remove button.
30
System Setup
Removing channels from a Favorites list
To delete a single channel from the Favorites list, select the channel and click
the Remove button. The channel including the channel number is deleted. All
the subsequent channels retain their original number, however, the Favorites list
has a gap in the numbering sequence.
Clicking the Compact button after the deleting a channel will remove the gap in
the channel numbers and make them consecutive again.
Add a channel to a Favorites list
To add a new channel to a Favorites list, select a channel from the channel list in
the left part of the window and import it into the Favorites list by clicking the
button Add button or by dragging and dropping.
Changing the channel sequence
To change the sequence of the channels in a list, select a channel and click the
Down or Up buttons until the channel is located in the desired position. Or you
can change the position of a channel by dragging and dropping it in the desired
position.
31
Pinnacle MediaCenter
Advanced Import/Export Settings
In this menu option, you can import or export existing channel lists into or out of
the Pinnacle MediaCenter. This lets you save channel lists for different
broadcast areas and to activate them at the corresponding location - without
having to perform a channel scan again.
Import channel list
To import a channel list into the Pinnacle MediaCenter, click the Import button.
Now the Open dialog appears where you can select the channel list you want.
After that click Open again. The channel list you selected is now imported into
the Pinnacle MediaCenter.
Export channel list
To export a channel list from the Pinnacle MediaCenter, select a list and then
click the Export button. The Save as dialog now opens so you can select the
directory where you want to save the file. Then click Save. The channel list is
now exported into the directory you selected.
32
System Setup
Advanced PMCS Settings
In this menu option, you can configure all the settings effecting Pinnacle
MediaCenter Services.
Notifications
Show warning message when exiting while tasks are scheduled
When you activate this option, every time the Pinnacle MediaCenter is exited
and a scheduled recording is still running, a warning is displayed. This helps
avoid canceling a recording by accident.
Show popup notification boxes
When you activate this option, important information (for example, at the
beginning or end of a scheduled recording or while accessing EPG information)
is displayed above the Pinnacle MediaCenter icon in the task bar.
General
Automatically delete missed tasks on startup
When you activate this option, scheduled recordings which did not occur are
automatically deleted from the recording list the next time the program is
started.
33
Pinnacle MediaCenter
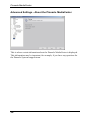
Advanced Settings - About the Pinnacle MediaCenter
This is where certain information about the Pinnacle MediaCenter is displayed.
This information may be important, for example, if you have any questions for
the Pinnacle Systems support team.
34
System Setup
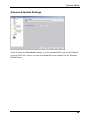
Advanced Update Settings
After clicking the Check now button, you are automatically sent to the Pinnacle
Systems Web site, where you can download the latest updates for the Pinnacle
MediaCenter.
35
Pinnacle MediaCenter
Advanced Services Settings
This menu option lists various services offered by the Pinnacle MediaCenter.
Clicking these services enables them so that the respective service is executed in
the background and is available in the Pinnacle MediaCenter at any time.
If you would prefer not to use a specific service, you can disable it. This also
reduces the CPU load on your system.
36
Pinnacle MediaManager
Overview
What the Pinnacle MediaManager Does
The Pinnacle MediaManager is installed on your PC so that you can import the
following:
Music files
Movies and other video files
Digital photos
You can manage and organize these files in the MediaManager database which
is constantly updated.
You can also create personal playlists – compilations of your favorite songs,
movies or photos organized according to your own criteria. These playlists can
also be exported so that, among other things, you can burn an audio CD.
37
Pinnacle MediaCenter
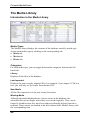
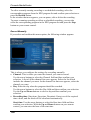
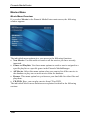
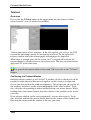
Main Window of the Pinnacle MediaManager
You can launch the Pinnacle MediaManager from the Pinnacle program group
in the Start Menu or by double-clicking the Desktop shortcut. The following
window will open:
The window contains the following sections:
Section 1:
The Tools section with the Import, Organize, Playlists and Export tabs,
located in the upper left-hand corner.
Section 2:
The Media Player in the upper right-hand corner.
Section 3:
The Media Library with the Music, Movies and Photos tabs, located in the
bottom half of the window.
38
Pinnacle MediaManager
Menu Bar:
At the very top of the window is the menu bar, which contains the File, Edit,
Tools and Help menus.
The window layout varies depending on what tools and lists you have selected;
the three sections work together closely and interactively. How the sections
work individually is explained in detail in the following chapters.
We will first focus on the Media Library and the Media Player to give you the
basic tools you need to use the application.
In later chapters, we will look at the more advanced functions – Import,
Organize, Playlists and Export – as well as the menus.
39
Pinnacle MediaCenter
The Media Library
Introduction to the Media Library
Media Types
The Media Library displays the contents of the database sorted by media type.
Access each media type by clicking on the corresponding tab:
Music tab
Movies tab
Photos tab
Categories
For each media type, you can toggle between the categories listed on the lefthand side.
Library
Displays all the files in the database.
Last imported
Displays the most recently imported files. For example, if you import 3 CDs in a
row, you will only see the tracks from the third CD.
New Media
All the files imported over the past twenty-four hours.
Missing Media
Although the media displayed here exist as entries in the database, the
associated files are no longer where they were saved originally. They can no
longer be found because they have been either accidentally deleted, moved or
renamed. These entries are marked in the left column of the Media Library with
the corresponding icon.
40
Pinnacle MediaManager
The Pinnacle MediaManager automatically looks for missing media at certain
time intervals. You can set the time interval via the File under Settings. If you
want to do a manual search, select Find missing media from the Shortcut menu
or via the Tools menu.
You can access the Shortcuts menu by right clicking the entry you want in the
Media Library list. From here, you can use the Repair missing media function
to browse for missing files or you can "repair" broken links by entering the new
file location or file name.
Modified Media (applies only to music file)
If you use a different software program to modify the ID3 tags of your music
files, the data no longer corresponds to the values in the Pinnacle Media
Manager database. This situation is automatically detected in a way similar to
Missing Media. The entries are marked in the left column with the
corresponding icon.
You can now enter new values for the ID3 tags via the function area Organize.
Or you can also update the database by reading the values of the modified ID3
tags from the file. To do this, select the entries, right click and then select
Update values from file in the Shortcut menu.
Highest Rating
Files given a four or five star rating are displayed here. The rating is assigned
either via the Shortcut menu or via the function area Organize and displayed
using star icons.
Playback Counter
The Pinnacle MediaManager contains a playback counter, which displays and
categorizes media files according to the following categories:
Frequently played:
The media files displayed are the ones played most frequently by the user.
Rarely played:
The media files displayed are the ones played least frequently by the user, but
have been played at least once.
Not yet played:
The media displayed are the ones, which have not yet ever been played.
The playback counter can be reset via the Shortcut menu.
Automatic playlists are created and constantly updated for the categories
Highest rating, Frequently played, Rarely played, and Not yet played.
User-Defined Playlists
The files in the selected playlist are displayed.
41
Pinnacle MediaCenter
Details
The right-hand list displays details for individual files. These details will vary
depending on whether you have selected the Music, Movies or Photos media
type tab. These sorting criteria are also called tags.
Depending on which media type you select, you may see the following
information: file status, track/movie/photo name, date created, etc.
As in Windows Explorer, you can left-click a column header to resort the files in
the list.
You can change the order of the columns by left-clicking the column headers
and dragging them to a new location.
Right-clicking a column header will bring up a pop-up menu where you can
choose which columns to display and which not.
Icons
The icons in the left column of the Media Library have the following meanings:
The file has accidentally been deleted or moved or it can no longer be found
because it has been renamed.
The original organizational identifiers of the file have been modified.
The file originates from the Rhapsody Music Service.
The file is currently being played back.
The playback of the file is currently on hold.
There are further icons associated with file conversion. They are explained
in the section "File Conversion".
Shortcut Menu
Please note that you only need to right click on a list entry in the Media Library
to access the extensive Shortcut menu. Most Media Library functions are
available here in order to access them more quickly. Simply select the option
you want.
Read the following sections carefully to learn how the Media Library can help
you find, sort, and delete your media files.
42
Pinnacle MediaManager
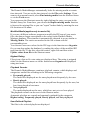
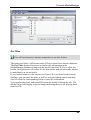
The Sort View in the Media Library
button to the right of
You can toggle the sort view on and off by clicking the
the tabs.
Clicking this button will split the list horizontally into two new sections.
The upper half of the list can be used to sort or filter the media files displayed in
the lower half. In other words, in the upper half you set a filter that selects which
files can be displayed in the lower half.
Example: You have activated the Music tab and now want to display all the
tracks in your database in the Soul genre.
button and determine which columns
You can open the menu with the
should be displayed in the sort view. We recommend listing photos, for
example, according to date.
43
Pinnacle MediaCenter
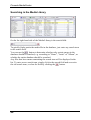
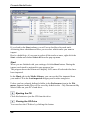
Searching in the Media Library
On the far right-hand side of the Media Library is the search field:
To quickly find a particular media file in the database, just enter any search term
in the search field.
button to determine whether only certain ranges in the
You can use the
database should be searched, e.g. according to "Name", "Artist" or "Album", or
whether the entire database should be searched.
Any files that have names containing the search term will be displayed in the
list. To enter a new search term, simply click in the search field and overwrite
button.
the old search term, or clear the field by clicking the
44
Pinnacle MediaManager
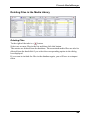
Deleting Files in the Media Library
Deleting Files
To the right of the tabs is a
button.
Select one or more files in the list and then click this button.
The entries are deleted from the database. The associated media files can also be
deleted from the hard disk if you select the corresponding option in the dialog
box displayed.
If you want to include the files in the database again, you will have to reimport
them.
45
Pinnacle MediaCenter
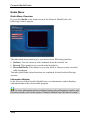
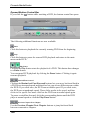
The Media Player
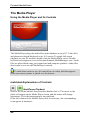
Using the Media Player and Its Controls
The Media Player plays the media files in the database on your PC. Video files
and photos are played/displayed on its 16:9 screen. To toggle full-screen
playback on your PC monitor, double-click the Media Player screen. Doubleclick the screen again to revert to the main Pinnacle MediaManager view. Audio
files are played back using your sound card and computer speakers. Audio files
also require you to use the Media Player controls.
To make them easier to use, all controls have a tooltip field that appears
when your mouse pointer is placed over the buttons.
Individual Explanations of Controls:
Start/Pause Playback
Select a file in the Media Library and then double-click it. The movie or the
photo will appear on the Media Player screen, and the button will change
appearance. Click the button again to stop playback.
In the left column of the Media Library next to each entry, the corresponding
icons appear in miniature.
46
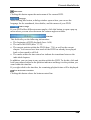
Pinnacle MediaManager
Previous
Click this button to play back the previous file in the playlist.
Next
Click this button to play back the next file in the playlist.
Shuffle
The music, video or photo files will be played/displayed in random order.
Repeat
If you click this button while a playlist is being played, the list will be played
back over and over until you deactivate the feature by clicking the button again.
Video Format
While playing a movie, you can click this button to select the video format
(standard 4:3, letterbox or widescreen 16:9. Note that a tooltip field will appear
when you place the cursor over this button. The video format you select for a
movie will be saved in the database – you won't have to reset it the next time
you watch the movie.
Progress Bar
This slider indicates by its position how much of the current audio or movie file
you have heard or seen. You can also move back and forth to anywhere in the
file by dragging the slider with your mouse.
Time Display
This shows you how long the audio or video file has been playing.
Volume Control
Located on the right-hand side of the screen section, this slider can be dragged
up and down with the mouse to set the volume.
Mute
Click this button to turn the sound on and off.
47
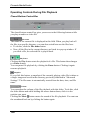
Pinnacle MediaCenter
Importing Media Files
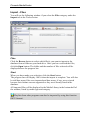
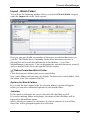
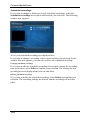
Introduction to the Import Tab
You will see the following window if you select the Import tab in the Tools
section:
You can import media files to the MediaManager Database from the following
sources:
Folder: From a folder on your PC.
Files: One or more files from a selected folder.
Drives: From any drive on your PC.
Audio CD: From the audio CDs that you wish to archive in the
MediaManager Database.
Digital camera: Photos taken with your digital camera.
Watch folder: From a watch folder on your PC.
Rhapsody playlists: Download Rhapsody playlists onto your PC.
Due to licensing restrictions, this function is not available in every version of
the Pinnacle MediaManager.
In the tab for a particular media type in the Media Library, you can see the
imported files in the Last imported category and in other categories.
Right-click the list and select the Display in Explorer option from the pop-up
menu in order to open the folder on your PC hard drive where the files are
stored.
The following sections explain the features for the individual categories in more
detail.
48
Pinnacle MediaManager
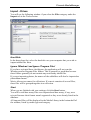
Import - Folder
You will see the following window if you select the Folder category in the
Import tab in the Tools section:
Folder
Click the Browse button to select which folder on your computer you want to
import media files from. Once you have found the folder, click the Open button.
The folder and the number of files selected will be displayed above the progress
bar.
Scan Subfolders
If you activate this checkbox, the application will import any files it finds in the
subfolders.
If you are importing photos, the names of the subfolders will also be imported as
photoalbum names.
Movie titles act as names for collections. If a movie consists of several files,
these files will be grouped together in a collection.
Start
When you are finished with your settings, click the Start button. The progress
bar will display 100% when the import is complete. You will also be told how
many files were imported and how many, if any, were rejected because their
format wasn't supported or they were already listed in the database. All imported
files will be displayed in the Media Library in the bottom half of the window,
listed by media type and category.
49
Pinnacle MediaCenter
Import - Files
You will see the following window if you select the Files category under the
Import tab in the Tools section:
Files
Click the Browse button to select which file(s) you want to import to the
database from a folder on your hard drive. Once you have selected the files,
click the Open button. The folder and the number of files selected will be
displayed above the progress bar.
Start
When you have made your selection, click the Start button.
The progress bar will display 100% when the import is complete. You will also
be told how many files were imported and how many, if any, were rejected
because their format was not supported or they were already listed in the
database.
All imported files will be displayed in the Media Library in the bottom half of
the window, listed by media type and category.
Playlists from other programs can also be imported by using this function
(M3U format).
50
Pinnacle MediaManager
Import - Drives
You will see the following window if you select the Files category under the
Import tab in the Tools section:
Hard Disk
In the drop-down list, select the hard drive on your computer that you wish to
import media files from.
Ignore 'Windows' and Ignore 'Program Files'
If you have activated these checkboxes, the application will not scan the
Windows and/or Program Files folders. This is generally a good idea because
these folders generally do not contain any noteworthy media files.
If you are importing photos, the names of the subfolders will also be imported as
photoalbum names.
Movie titles act as names for collections. If a movie consists of several files,
these files will be grouped together in a collection.
Start
When you are finished with your settings, click the Start button.
You will be told how many files were imported and how many, if any, were
rejected because their format wasn't supported or they were already listed in the
database.
All imported files will be displayed in the Media Library in the bottom half of
the window, listed by media type and category.
51
Pinnacle MediaCenter
Import - Audio CD
Due to licensing issues, this function is not available in all versions of the
Pinnacle MediaManager.
You will see the following window when you select the Audio CD category
under the Import tab in the Tools section:
This feature allows you to import your audio CDs to the MediaManager
Database. The tracks on each CD are read in and separated into individual MP3
files.
You may have problems importing copy-protected audio CDs.
Insert the CD and Select the Drive
Insert the audio CD in your computer's CD drive. If your computer has several
CD or DVD drives, you will have to select the drive from the Drive drop-down
list.
The application will read in the CD tracks and display them by number in the
Track column.
52
Pinnacle MediaManager
Get Titles
You will need an active internet connection to use this feature.
The names and titles of all known audio CDs are stored in an internet database.
The Get Titles feature allows you to import this information to the
MediaManager Database along with the tracks from the CD. If you click this
button, the application will search for the data online and will generally display
it immediately as shown below.
If you cannot connect to the internet or if your CD is not listed in the internet
database, you can enter the titles as well as artist and album names manually.
Just left-click the corresponding fields to enter this information.
You can also play back individual CD tracks by double-clicking the title. The
Media Player will display a special image indicating that you are playing back
from the CD.
53
Pinnacle MediaCenter
If you look in the Start column, you will see a checkbox for each track.
Activating these checkboxes allows you to select which tracks you want to
import.
Here's a helpful tip: if you want to select all the tracks at once, right-click the
Start column and choose Select all from the pop-up menu.
Start
When you are finished with your settings, click the Start button. During the
import, each track is assigned its own progress bar.
The progress bar at the bottom will display 100% once all selected titles have
been imported.
In the Music tab in the Media Library, you can see the files imported from
your audio CD in the Last imported category and in other categories.
Unless you have already defined a folder in the Preferences item in the File
menu, imported audio files will be saved by default to the ...\My Documents\My
Music folder on your PC's hard drive.
Ejecting the CD
Click this button to eject the CD from the drive.
Closing the CD Drive
You can close the CD drive by clicking this button.
54
Pinnacle MediaManager
Import - Digital Camera
At present, only cameras with WIA drivers are supported. Since Windows
2000 does not support WIA, this feature is only available in Windows XP.
You will see the following window when you select the Digital camera
category under the Import tab in the Tools section:
Camera
To import photos to the MediaManager Database directly from a digital camera,
select the camera from the Camera drop-down list.
If you connected a new camera to your PC while the MediaManager was active,
just click the Refresh button. It will then appear in the drop-down list.
Album
Enter a name for your album.
Delete photos on camera
Activate this checkbox to have the photo files removed from your camera's
memory after being imported.
55
Pinnacle MediaCenter
Start
When you are finished with your settings, click the Start button. The progress
bar will display 100% when all files have been imported.
In the Photos tab in the Media Library, you can see the imported files in the
Last imported category and in other categories.
Unless you have already defined a folder in the Preferences item in the File
menu, imported photo files will be saved by default to the ...\My
Documents\My Pictures folder on your PC's hard drive.
56
Pinnacle MediaManager
Import - Watch Folder
You will see the following window when you select the Watch folder category
under the Import tab in the Tools section:
Here you can specify/add any number of directories as watched directories on
your PC. The Media Server constantly checks these directories for new or
deleted files and records this information to the database – even if the
MediaManager is not active. You can designate the watched directories yourself
and see them all in the list in the right half of the window.
Define/Create New Watch Folder
Click this button to define/create a new watch folder.
New watch folders start out active by default. To deactivate a watch folder, click
the button in the first column of the list.
Options for Watch Folders
If you click the last column in the list of watch folders, a menu will appear
where you can select additional options for each watch folder:
Subfolder
If this option is activated, the server will watch all subfolders as well.
If you are watching folders with photos, the names of the subfolders will be
imported as photoalbum names.
Movie titles act as names for collections. If a movie consists of several files,
these files will be grouped together in a collection.
57
Pinnacle MediaCenter
Delete Watch Folder
Click this button to delete a watch folder from the database.
Only the reference to the folder will be deleted from the database; the folder
itself will still be stored on your PC's hard drive. To make the folder appear
again in the database, you will have to redefine it as a watch folder.
Scan Watched Directories Again
Click on this button to scan all of the watched directories again. This is useful if,
for example, the Media Server has been switched off temporarily.
58
Pinnacle MediaManager
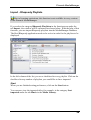
Import - Rhapsody Playlists
Due to licensing restrictions, this function is not available in every version
of the Pinnacle MediaManager.
If you select the category Rhapsody Playlisten in the function area under the
tab Import, the window will be structured as shown below. With the help of this
function, you can import Rhapsody playlists into the MediaManager Database.
The Real Rhapsody application needs to be active in order for the playlists to be
displayed.
In the left column of the list, you see a checkbox for every playlist. Click on the
checkbox for any number of playlists you would like to have imported.
Start
When you are finished setting preferences, click on the Start button.
You can now view the imported titles, for example, in the category Last
imported under the tab Music in the Media Library.
59
Pinnacle MediaCenter
Organizing Media Files
Organizing File Tags
Various organizing tags can be used to manage the three media types (music,
movies, photos) in the Pinnacle MediaManager. These organizational criteria
serve to rank all files of a specific media type.
Organizing tags are exclusive tags. That means that if a music file has been
assigned to the Pop genre, it can't also be assigned to the Classical genre.
Music files
The original ID3 tags of the imported files are normally used to categorize these
files according to name, artist, album, genre, etc.
If a music file is not categorized according to ID3 tags but according to folder
and file names, select Update values using file/directory names via the Media
Library Shortcut menu. Then select a category structure from the dialog
displayed. Compare this to the display underneath and click on OK.
Movies
When importing movies, the default categorization criteria for Genre is the
name of the folder where the movie is found. If the movie is made up of
multiple parts, these parts are automatically grouped together into a collection.
The categorization criteria Series is not set by default. You can change this via
the File/Preferences/Import menu. For example, you can fill the fields Genre
and Series with the names of folders at different levels in the directory
hierarchy.
Photos
If you import photos, the directory name is used as the photoalbum name by
default. For the creation date, the date the photo was taken (found in the EXIF
tag) is used.
Tip: If your photos do not have access to this date, the creation date is first
displayed as <Unknown>. When you select the photos, select "Organize" and
click on <Unknown>. Select the function "File date" via the menu to set the
creation date of the photo. This is usually the date when you copied the photos
to your PC.
60
Pinnacle MediaManager
Customized File Tags (Keywords)
In addition to the organizing tags, you can also assign customized tags
(keywords).
These non-exclusive tags will help you to organize your media files.
Assigning a Keyword - An Example
You can create the keyword "My Wedding" and assign all wedding-related
media files to it. This will make it a snap at some later date to filter out all the
files in "My Wedding" from the rest of the files in the Media Library.
Assigning Several Keywords - An Example
You can assign several keywords to one file. For example, some of the files to
which the "My Wedding" keyword has already been assigned can be assigned
one or more additional keywords, such as "At the rehearsal dinner", "At the
church" or "At the reception".
Display Keywords
lets you open the context menu and switch on the keywords
This button
display in the Media Library sort view.
61
Pinnacle MediaCenter
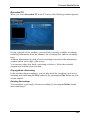
Introduction to the Organize Tab
You will see the following window when you select the Organize tab in the
Tools section:
The Organize tab helps you to change or add tags for your media files so as to
better organize your files.
Defining a New Keyword
On the left-hand side, you can assign keywords to the media files in the
MediaManager Database. You can then use the keywords as search terms in
order to find certain files quickly. You can assign several keywords to a single
file.
Select one or more files in the Media Library list and click the
button to
create a new keyword for the selected files.
Deleting a Keyword
Select the keyword you want to delete from the database and then click the
button.
Field and Value - Changing Organizing Tags
Whenever you select an entry in the Media Library list, you will also see the
value assigned to each field. By double-clicking, you can access and modify the
individual values.
For some organizing tags such as Genre, the application will suggest common
terms (Pop, Rock, Classical) even if you haven't imported any files in this
category. Just click the entry once to see the suggestions.
62
Pinnacle MediaManager
For music genres, you have the Rebuild this list via the Shortcut menu. If you
select this option, unused entries are deleted from the list and only those genres
are displayed whose media files are assigned in the database.
Once you are finished modifying the values for an entry in the list, click the
button to have the values written to the database. The changes will be shown
accordingly in the Media Library.
Note: changing tags that are associated with metadata (such as MP3
metadata) will cause these changes to be made in the associated file as well.
Undo Button
Click this button to undo previous changes. However, you can only undo
button.
changes if you have yet accepted them by clicking the
Rotate Clockwise/Counterclockwise (For Photos)
Selecting a photo from the Media Library will bring it up in the Media Player.
You can rotate the photo by clicking on these two buttons.
button to have the new position saved to the database. The
Next, click the
new position will be used whenever the photo is displayed on the television.
Restricted Access
You have the option of setting the Restricted access value for each media file
with the click of a mouse.
According to the setting value, for a particular file this may mean that the
correct access code will have to be entered from the menu of the output device
before the file can be played on the output device.
Note: the access code only applies to media playback from the menu of the
output device. All files can still be accessed from the MediaManager on your
PC.
63
Pinnacle MediaCenter
Using Playlists
Introduction to the Playlists Tab
You will see the following window when you select the Playlists tab in the
Tools section:
This section is where you create personal playlists in which you list your
favorite music, movies and photos, organized according to your own criteria.
Since each playlist can only contain one type of media, you will be creating
playlists for music, movies or photos. You cannot mix these different types of
media in one playlist.
Playlist Catalog
All the playlists are displayed in the left column.
Individual Playlist Contents
The right column displays the contents of the individual playlists. Selecting a
playlist in the left column will bring up detailed information in the right column
about the media files in the playlist.
64
Pinnacle MediaManager
Creating and Editing Playlists
Creating a New Playlist
button to create a new playlist.
Click the
An input field, which is by default called Playlist, will appear in the left-hand
side of the list. Double-click the field to access it and enter your own name for
the new playlist.
Now it's time to put together the media files you want in this playlist. Select one
or more files from the Media Library in the database and drag them up to the
right-hand section.
button instead.
If you do not want to drag with the mouse, you can use the
Organizing Items in a Playlist
Select the file you want to move within the playlist and drag it to its new
position. Or, if you prefer, you can use the two
and
buttons instead.
Deleting Playlists or Items
If you want to delete a playlist or remove a file from the playlist, just select it
and then click the
button.
65
Pinnacle MediaCenter
Slideshows
There are two extra things to do when creating photo playlists ("slideshows"):
1. Click the last column for a given entry in order to specify the display time
for a photo. If you select manual, the slideshow will not automatically
continue after that particular photo. To change the display time for all photos
at once, first right-click and choose Select all from the menu. Then, leftclick on the display time for any entry in order to set the time for all photos.
2. If you want to play background music during a slideshow then select an
appropriate music playlist from the drop-down list. This list will be played to
your photos on the output device.
Playback in the Media Player
Double-click an entry in the playlist to play it back with the Media Player. Once
that particular item is finished, the application will automatically move on the
next entry in the playlist. You can also use the Next, Previous, Shuffle, and
Repeat functions in the Media Player. When playing back a slideshow, the
Media Player will only display the photos; it will not play any selected music
playlist.
66
Pinnacle MediaManager
Exporting Media Files
Introduction to the Export Tab
You will see the following window when you select the Export tab in the Tools
section:
In this section, you can export copies of media files from your MediaManager
playlists to a:
New folder on your hard drive
M3U playlist
CD burner or DVD burner
The following sections explain the features for the individual categories in more
detail.
67
Pinnacle MediaCenter
Exporting to a Folder
You will see the following window when you select the Folder category under
the Export tab in the Tools section:
In this section, you can export the items in a playlist to a new folder on your
hard drive. The export will create copies of the media files.
Playlist
Select a playlist from the drop-down menu.
Folder
Use the Browse button to the right to select the folder you want the playlist to be
exported to.
Create subfolders
Activate this checkbox to have subfolders created based on the sort criteria of
the original files (e.g., artist, album, photo album).
If a particular file does not have all the tags, this option will create a subfolder
called Unknown.
Note: this option is not active when you export video playlists.
68
Pinnacle MediaManager
Create M3U playlist
If this checkbox is activated, you will both export the selected playlist to a folder
and create an M3U-compatible playlist.
Start
When you are finished with your settings, click the Start button. The progress
bar will display 100% once all the files have been exported. You will also be
told how many files were exported.
69
Pinnacle MediaCenter
Exporting to an M3U Playlist
You will see the following window when you select the Playlist category under
the Export tab in the Tools section:
In this section, you can export a MediaManager playlist to an M3U playlist. The
playlist will contain references to the actual location where your media files are
stored.
Playlist
Select the playlist you want to export from the drop-down menu.
File
Use the Browse button to the right to select the file you want exported to the
selected playlist. Then enter the name you want to give to the file.
Start
When you are finished with your settings, click the Start button.
70
Pinnacle MediaManager
Exporting to a Burner
You will see the following window when you select the Burner category under
the Export tab in the Tools section:
In this section, you can export a playlist to burn to CD or DVD.
Playlist
Select the playlist you want to export from the drop-down menu.
Disc type
The choice of output formats will depend on what kind of media files are in the
playlist. Select a format from the drop-down list.
Music
Audio CD: You want to burn an audio CD that you can play on your stereo
system or in your car's CD player. Any MP3 files will be automatically decoded.
MP3 Data CD/DVD: You want to burn MP3 files to a CD or a DVD. All tracks
in the playlist will have to be converted to the MP3 format.
Data CD/DVD: You want to burn original music files (MP3, WMA or WAV)
to a CD. Any converted versions will not be used.
Movies
Depending on what format the media files are in and whether converted copies
are available, you will be given the option of burning a VCD (VideoCD), SVCD
(SuperVideoCD) or DVD. You can always select a data CD/DVD, which will
71
Pinnacle MediaCenter
burn the media files in their original format.
You cannot start the burning process if the file(s) is (are) too long for a CD or
DVD.
Photos
Photos are always burned as original media files to a data CD/DVD.
Recorder
Select the burner you wish to use and click Start. The progress bar will display
100% when the burning process is complete.
The CD/DVD burner in the Pinnacle MediaManager is optimized for fast,
easy burning. It cannot create DVD menus nor can it spread long files/playlists
over several discs. If you need more sophisticated burning features, we
recommend using Pinnacle INSTANT CD/DVD.
72
Pinnacle MediaManager
The Menus
The File Menu
The File Menu Contains the Following Options:
New Playlist From Selection
If you have selected one or more files in the Media Library and then choose this
option, the selected files will be used to create a new playlist.
On the left-hand side of the Media Library, you will see an input field with a
default name where you can enter your own name for the new playlist.
For more information, consult the Creating and Editing Playlists section.
Play Selection
Select one or more files from the Media Library and choose this option. The
selection will now be played back / displayed in the Media Player.
Preferences
Choosing this menu item will bring up a dialog box where you can make all
your settings for the Pinnacle MediaManager:
Audio CD Import
Format (quality and bitrate)
Speed
General
Language
Data conversion settings
Skin settings
Specify the access code (PIN) for restricted file access
Define folders for audio, video and image files and for temporary files
Playback
Playback settings: device and memory buffer
73
Pinnacle MediaCenter
Key Commands
Choosing this menu item will bring up a dialog box where you can create, edit
and delete customized key commands and macros.
Quit
Choose this option to exit the Pinnacle MediaManager.
74
Pinnacle MediaManager
The Edit Menu
The Edit Menu Contains the Following Options:
Cut
Select the text you want to move and click Cut in the menu. Then, click the
location where you want to paste the text and click Paste in the menu.
The text will be removed from its original location and inserted at the new
location.
Copy
Select the text you want to copy and click Copy in the menu. Then, click the
location where you want to paste the text and click Paste in the menu.
The text will remain at its current location and will also be inserted at the new
location.
Paste
This command allows you to paste text at one location that you have cut or
copied from another location using the Cut or Copy commands.
Delete
Select the files and then choose this option from the menu in order to
permanently remove the files.
Select All
This option allows you to simultaneously select all the files in an active area
(e.g., the Media Library list).
Select None
This option allows you to undo the selection for files in an active area (e.g., the
Media Library list).
75
Pinnacle MediaCenter
Select Invert
This option allows you to simultaneously select all the files in an active area
(e.g., the Media Library list), or to undo an existing selection.
Browse
This option brings you to the Media Library sort view. There is a separate, more
detailed section in the manual for this feature.
76
Pinnacle MediaManager
The Tools Menu
In the Tools menu, you have the following options:
Import old database
With this function, you can import a database created with version 1.5 or older
of the ShowCenter application
Find missing/modified media
To do a manual search for missing or modified media in the database, select this
option. The search runs in the background and can take several minutes. The
missing and modified media are then marked in the left column with their own
icons.
Save database
With of this function, you can save an existing database. Select the option and
then indicate the desired target directory and file name. This procedure saves an
XML file. You can also generate more than one XML file, for example, at
different intervals.
Restore database
This function is used to restore a saved database. The Pinnacle MediaManger
automatically chooses the correct target directory in order to make the
previously saved XML files available again. The selected file is then loaded into
the database so that the media files in the Media Library are visible again.
77
Pinnacle MediaCenter
Real Rhapsody Music Service
Real Rhapsody Music Service - Overview
The Rhapsody Service is currently not available in all areas. Check
www.rhapsody.com for current information as to whether Rhapsody is available
in you country.
The Rhapsody Music Service from RealNetworks gives you unlimited access to
one of the largest legal music databases in the internet. Choose from over
700,000 titles for your playlists and put your own radio stations together.
Used with the ShowCenter, you can now also listen to Rhapsody music in the
comfort of you own living room. Pinnacle MediaManager automatically imports
all the titles and radio stations in your Rhapsody Library and even lets you
combine Rhapsody music with other titles to create new playlists.
Due to licensing restrictions, not every version of the Pinnacle
MediaManager supports the Rhapsody Music Service.
Installation and Registration
To use the music service, you need the Rhapsody application, as well as a
subscription - you can get both at www.rhapsody.com. Download the Rhapsody
application and install it on the same PC where the ShowCenter software is also
installed
Configuring the Rhapsody application
After starting up and registering the program, open the Options menu and select
User Settings... . n the dialog window, click on the tab UPnP and activate the
checkbox Start UPnP Server once logged on. Then click on Start to start the
UPnP server.
78
Pinnacle MediaManager
Now you can fill the Rhapsody application library with the music of your
choice, as well as select radio stations and even configure the application
yourself.
Rhapsody music and the Pinnacle MediaManager
All the titles and albums in the Rhapsody Library are automatically imported
into the Pinnacle MediaManager Media Library and are available as music
under the genre Rhapsody. This synchronization is also done when the Pinnacle
MediaManager is closed.
You can modify the synchronization settings or deactivate the synchronization
process via File/Preferences/Rhapsody. Note that the synchronization of a
large library can last several minutes.
In the Pinnacle MediaManager, Rhapsody titles are marked with their own icon.
You can create playlists of Rhapsody titles, as well as mixed playlists of
Rhapsody music together with, for example, MP3 titles.
All the playlists created with the Rhapsody application are displayed and can be
imported into the Pinnacle MediaManager, via Import/Rhapsody playlists.
Older playlists with the same name are not overwritten.
Due to licensing restrictions, the playback of Rhapsody titles via the
Pinnacle MediaManager on a PC is currently not possible.
79
Pinnacle MediaCenter
Rhapsody music and the ShowCenter Player
Just like other music, Rhapsody titles are displayed in the TV menu Music in
the ShowCenter Player. However, Rhapsody titles are marked with their own
icon. Note that it can take several minutes until newly added music is displayed
in the ShowCenter Player.
Radio stations in the Rhapsody Library are automatically made available via
Music/Internet Radio/Rhapsody Radio.
You can play back Rhapsody music via the ShowCenter Player only if the
Rhapsody application has already been started and you have logged on.
80
Pinnacle MediaManager
File Formats
Supported File Formats
Supported Audio File Formats
MP3
WAV
WMA
Supported Video File Formats
MPEG 1
MPEG 2 (including VOB files)
MPEG 4 AVI (Versions 3, 4, 5) [simple profile]
XviD AVI [simple profile]
DV AVI
WMV
Supported Photo Formats
JPG
PNG
GIF
BMP
81
Pinnacle MediaCenter
Converting Files
The Pinnacle MediaManager can convert media into other formats. For
example, you can convert an MPEG 2 movie file into the MPEG 1 VCD format
for burning onto a CD.
If you use the Pinnacle ShowCenter, this file conversion function is useful for
formats, which you cannot directly play back via the ShowCenter Player such
as, for example, DV-AVI video clips.
During conversion, a copy of the media is created, while the original file
remains unchanged. You can define where to save this copy in the
File/Preferences menu of the Pinnacle MediaManager. Here you can also
configure an automatic media conversion, as well as keep track of the current
status of running conversions.
In order to convert a media file, select it in the Media Library, right click and
then select the format you want via the Shortcut menu Convert/Convert to.
You can initiate conversions for more than one medium at a time. These
conversions are then queued and processed one after the other. Conversion runs
in the background and keeps going, even if you close the Pinnacle
MediaManager.
File Status
For each media type, the Media Library displays details on individual files in
the list to the right. The first column shows the file state, which describes the
file's conversion status.
82
Pinnacle MediaManager
Any file in a given category can have one of the following file states
(indicated by the icon):
The file needs to be converted before it can be played back.
The file can be found in the conversion queue.
The file is currently being converted.
The conversion of this file is completed.
Conversion Options
Right-click a file in the list to bring up the pop-up menu, where you can choose
among the following options:
Convert to
The selected file will be converted. You can choose between the following
movie formats:
VCD (VideoCD)
The video is compressed using MPEG 1 to one-fourth of its original image size
(352x240 or 288). The data rate is 1.15 Mbps in total. That means that one CD
(650 MB) can hold a little over an hour's worth of video and audio. While the
video quality is rather poor, VCDs can be played back in most DVD players.
SVCD (SuperVideoCD)
The video is compressed using MPEG 2 with full vertical resolution and 2/3
horizontal resolution. The data rate is 2.5 Mbps and one CD can only hold a
little less than a half an hour's worth of video and audio. The video quality is
much better than on a VCD, but only some DVD players accept the SVCD
format.
DVD LongPlay
The video is compressed using MPEG 2 with full vertical resolution and 1/2
horizontal resolution. The data rate is 3.5 Mbps, which makes for very goodquality video. DVD LongPlay can be burned to DVDs and is accepted by
virtually all DVD players. It is also an excellent format for converting high-datarate video to a low enough data rate to be able to play it back over a wireless
network.
83
Pinnacle MediaCenter
DVD
The video is compressed using MPEG 2 with full resolution. The data rate is 6
Mbps, which may produce excellent-quality video, but it is too high to be
transmitted over a wireless network. Converting to DVD format only really
makes sense for wired 100-Mbps networks or for burning a DVD that essentially
all DVD players can read.
The audio is always compressed using the MPEG 1 layer 2 format (stereo).
Delete converted files
With of this function, you can delete the converted files. The original files
remain unchanged.
Cancel conversion
A planned or already running conversion is cancelled. The original file remains
unchanged.
84
Pinnacle MediaCenter
Pinnacle MediaCenter Functions
The Pinnacle MediaCenter offers you the extensive and diverse functions of a
modern multi-media program. Its convenient and easy-to-use displays let you
enjoy a wide variety of media such as television, radio, music, movies, photos,
and lets you access a broad range of products offered by various online services:
In the TV area, you can keep track of the current TV schedule and the shows
you have recorded not only directly on your PC, but also from the comfort of
your armchair or sofa thanks to the full screen mode and the remote control
included. In addition, you can use the teletext function and the Electronic
Program Guide (EPG) to get quick and comprehensive information about the
TV schedule as well as all the latest news.
Want to record a TV show? With a simple push of a button, you can start
recording the current TV program at any time. Use the EPG function to
quickly and simply program your machine to record upcoming shows. You
won't have to miss any of your favorite TV programs again.
Even annoying interruptions while watching TV are no longer a bother
because you can delay watching a program by using the timeshift function.
In the Radio area, you can receive every available FM radio station. You can
also create radio playlists in the "Advanced Settings" so that you can receive
a radio station assigned to a certain category at any time. Recording FM radio
broadcasts is quick and easy with the Pinnacle MediaCenter - either press a
button to record the current program immediately or schedule an upcoming
radio program for later enjoyment.
In addition, the Pinnacle MediaCenter lets your receive Internet radio.
In the Movies area, you can view movies from a CD/DVD or from your hard
disk - all this using the remote control from the comfort of your sofa. No
need to get up and fiddle with the PC. If you have previously categorized
your movies in the Pinnacle MediaManager, you can easily access these
categories and select movies according to certain criteria
In the Music area, you can access CDs or files created in the Pinnacle
MediaManager. Play back your music according to any criteria you set (for
example, according to music genre or artist) and select just the right music to
suit your mood or the occasion.
85
Pinnacle MediaCenter
In the Photos area, you can view photos saved on your hard disk or on CD.
Photos can also be categorized in the Pinnacle MediaManager (for example,
the pictures from your last vacation or that one party or simply those taken on
a certain date) so that you see only those photos that you really want to see quickly and hassle-free. If you want to show off your photos, you can also set
up a slideshow to display them as a group.
In the Online menu option, you have access to various online services. These
services even include being able to watch videos on demand.
86
Pinnacle MediaCenter
Pinnacle MediaCenter User Views
In the Pinnacle MediaCenter, you can select between two different user views.
Each user view is optimized for the different ways of using the Pinnacle
MediaCenter:
The Remote View is optimized for operation with the remote control. The
entire menu is accessible from the Pinnacle MediaCenter window and each
menu option is easy to read even from a distance. This lets you use your
remote control to play back and edit media from the comfort of your own
sofa.
Of course, you can still operate the Pinnacle MediaCenter with your mouse
or keyboard while in the remote view. You can also display the PC view
control bars in the remote view and use them to operate the Pinnacle
MediaCenter.
87
Pinnacle MediaCenter
The PC View is optimized for use with your mouse or keyboard. This view
is especially useful when you use the Pinnacle MediaCenter while working at
your desk (for example, for watching TV while working on the computer).
The menu bar-shaped buttons are arranged at the top and bottom of the
Pinnacle MediaCenter window and are easily activated with a click of the
mouse.
Since you will be mainly using this view when working at your computer,
PC view menus are only displayed if necessary so that as little screen space
as possible is used.
You can switch between the PC view and the remote view at any time when
using the Pinnacle MediaCenter:
To go to the remote view, press the P or Menu button on the remote control
(depending on the remote control) or click the P button in the upper control
bar.
If you double-click in the preview or information window when you are in
the remote view, this window opens in full screen and takes you to the PC
view.
If you are interested in other ways of displaying the preview or information
window in full screen and thereby accessing the PC view, refer to the chapter
"Pinnacle MediaCenter Window Formats".
Using the Pinnacle MediaCenter in the remote view and in the PC view is
described in greater detail in the corresponding chapters.
88
Pinnacle MediaCenter
Pinnacle MediaCenter Window Formats
The Pinnacle MediaCenter lets you switch between various window sizes and
formats. These options let you customize the Pinnacle MediaCenter window
according to your needs.
For example, would you rather play back media directly from your desk while
working at you PC or from your TV chair? Do you want your Pinnacle
MediaCenter window to take up the entire screen so that you can read all the
menu options well even at a distance or do you want to minimize the window so
that you can continue working on your PC during playback? Would you like to
watch TV or movies or view photos in full screen mode or should the menu
remain visible?
The Pinnacle MediaCenter is very flexible in accommodating your wishes.
The following explains how to display the various window formats:
Pressing the "Full Screen" Remote Control Button for a Normal-Sized
Window Without Preview or Information Window
If you have opened the Pinnacle MediaCenter in normal size and there is no
preview or information window in the current menu (for example, the main
screen in the remote view) (1), you can switch between the normal-sized
Pinnacle MediaCenter window and full screen (2) by pressing the Full Screen
button on your remote control.
89
Pinnacle MediaCenter
Pressing the "Full Screen" Remote Control Button for a Full Screen
Window with Preview or Information Window
If you have opened the Pinnacle MediaCenter in full screen and the menu
displayed contains a preview or information window (for example, the TV menu
in the remote view) (1), you can switch between the entire Pinnacle
MediaCenter window in full screen and the preview/information window in full
screen (2) by pressing the Full Screen button on your remote control.
Pressing the "Full Screen" Remote Control Button for a Normal-Sized
Window with Preview or Information Window
90
Pinnacle MediaCenter
If you have opened the Pinnacle MediaCenter in normal size and the menu
displayed contains a preview or information window (for example, the TV menu
in the remote view) (1), you can display the entire Pinnacle MediaCenter
window in full screen (2) by pressing the Full Screen button on your remote
control.
If you press the Full Screen button again, only the preview/information window
is displayed in full screen (3).
If you press the Full Screen button a third time, you are taken back to the
original window, that is, the entire Pinnacle MediaCenter window in normal size
(1).
Clicking the Mouse in a Normal-Sized Window with Preview or
Information Window
If you have opened the Pinnacle MediaCenter in normal size and the menu
displayed contains a preview or information window (for example, the TV menu
in the remote view) (1), double-clicking will only display the
preview/information window in normal size (2).
91
Pinnacle MediaCenter
If you double-click again, you are taken back to the entire Pinnacle MediaCenter
window in normal size (1).
If you have opened the Pinnacle MediaCenter in normal size and the menu
displayed contains a preview or information window (for example, the TV menu
in the remote view) (1), you can display the entire Pinnacle MediaCenter
window in full screen (4) by clicking the Maximize button in the upper control
bar or double-clicking the upper control bar.
If only the TV window is displayed in normal size (2), you can enlarged it to full
screen by clicking the Maximize button in the upper control bar or doubleclicking the upper control bar (3).
If you double-click again or click the Minimize button, the TV window returns
to normal size (2).
If you double-click the TV window in full screen (3), you display the entire
Pinnacle MediaCenter window in full screen (4). If you double-click again, the
TV window appears again in full screen (3).
If you click the Minimize button or double-click the upper control bar when the
Pinnacle MediaCenter is in full screen (4), the Pinnacle MediaCenter window
will switch to the original normal size (1).
92
Pinnacle MediaCenter
Remote View (optimized for operation with the
remote control)
Overview
Operating the Pinnacle MediaCenter Remote View
The Pinnacle MediaCenter remote view is optimized for operation with a remote
control. The menu is not only extremely visible even from distance but it is also
easy to operate with your remote control buttons. It simply invites you to make
yourself comfortable in your easy chair or on the sofa and enjoy the media in
your Pinnacle MediaCenter.
And you can, of course, use either your keyboard or your mouse to operate the
Pinnacle MediaCenter remote view.
To simplify this manual, the instructions on how to operate the remote view
of your Pinnacle MediaCenter will be based mainly on the use of your remote
control. However, the same functions found on your remote control can also be
used via the function keys on your keyboard or by using your mouse.
On-Screen Menu Buttons
You can operate many of the functions in your Pinnacle MediaCenter using the
on-screen menu buttons displayed on your screen (for example, the individual
menu options on the main screen).
If you want to display a menu option, you can do one of the following:
Select that option using the arrow buttons on your remote control
Use the cursor keys on your keyboard.
Click the menu option once with your mouse.
To open this menu option, you can do one of the following:
Select the menu option and then press the Confirm button on your remote
control.
Select the menu option and then press the Enter key on your keyboard.
Double-click the menu option with your mouse.
The menu option you have selected now opens.
93
Pinnacle MediaCenter
Remote Control Buttons and PC Function Keys
You can also operate several of the functions directly using the remote control
that came with the product or using your PC keyboard - without having to
activate an on-screen menu button (this includes the fast forward function when
watching a television recording).
The remote control buttons required for the functions are described in detail
in the individual chapters of this documentation.
You can also refer to the documentation that came with your remote control
to get an overview of the functions assigned to the different buttons.
You can also use certain function keys on your keyboard to execute the same
commands available on your remote control. In this case, the individual
function keys correspond to specific buttons on your remote control.
Read the following overview to find out which keys on your keyboard are
used to perform which functions:
The PC view and the "Advanced Settings" in the Pinnacle MediaCenter can
only be accessed using your keyboard or mouse.
Function
PC function keys
Exit the PMC
ALT+F4
Switch between full screen and
preview window
ALT+F or ALT+Enter
OSD channel list
Enter (while watching TV)
Channel info/Help (depending on
remote control)
ALT+I
Mute On/Off
M
Toggle between the last two channels
ALT+L
Volume +/-
+/- or CTRL+Cursor Up/Down
Channel +/-
Page Up/Page Down
OK/Confirm
Enter
Start page/menu (P key; depending
on remote control)
Esc
Jump to live position during timeshift
playback
F5
94
Pinnacle MediaCenter
Function
PC function keys
Start recording
C
Pause
in TV mode: Start timeshift
recording
Space bar
Previous Track/Next Track
Pos1/end
Back (depending on remote control)
Back
Play
P
Stop
S
Rewind/Fast Forward
in teletext mode: Display
previous/next subpage
R/F
TV
F5
Teletext
F6
Radio (depending on remote control)
F7
EPG
F8
Enter numbers
1/2/3/4/5/6/7/8/9
0/AV (switch video input)
0
Selection of on-screen menu buttons
Cursor
in teletext mode: Display
previous/next page
Cursor Up/Down
Switch between letters and numbers
(C/N)
CTRL+C
Delete entry
Del
Control Bars
To quickly and easily operate your Pinnacle MediaCenter, you have two control
bars in the remote view which you can use to directly access important functions
with your mouse.
To display the control bars, move your mouse in the Pinnacle MediaCenter
window. The control bars disappear automatically a few seconds after you stop
moving your mouse.
For more information, refer to the chapter "PC View (optimized for operation
with mouse)".
95
Pinnacle MediaCenter
Main Screen of the Pinnacle MediaCenter Remote View
You can start the Pinnacle MediaCenter remote view using the Start menu and
the Pinnacle program group. Simply double-click the desktop link or press the
TV button (remote control type A) or the Pinnacle button (remote control type
B) on your remote control.
The main screen of the Pinnacle MediaCenter then opens:
The main screen provides you with an overview of seven menu options:
The menu options TV, Radio, Music, Movies, and Photos give you access
to the functions for each particular type of media.
You can use the Online area to access the various online services available.
In the Settings menu, you can configure the most important Pinnacle
MediaCenter settings.
You can configure more advanced settings in the "Advanced Settings
Dialog". For more information, refer to the chapter "Advanced Settings".
The following sections provide you with detailed information about the
numerous options available to you in the individual menu options.
For more information about operating the Pinnacle MediaCenter, refer to
the chapter "Operating the Pinnacle MediaCenter Remote View".
96
Pinnacle MediaCenter
TV Menu
TV Menu Overview
If you select TV in the main screen of the Pinnacle MediaCenter, the following
window appears:
The individual menu options give you access to the following functions:
Channels: Use this menu to select channels from the channel list.
Guide: This menu gives you access to an Electronic Program Guide (EPG).
Use this guide to not only get an excellent overview of the TV schedule but
to help you schedule and program recordings.
Teletext: Use this menu to activate teletext.
Record: This menu lets you record TV shows.
Recorded TV: This menu lets you play back or edit previously recorded
shows.
In addition, you can make timeshift recordings while watching television.
The individual TV menu functions are explained in detail in the following
sections.
Information Window
In the Pinnacle MediaCenter, the current TV schedule of the last channel
selected is displayed in an information window. You won't miss a minute of
your favorite show, even if you are in the middle of scheduling recordings or
looking up tomorrow's TV schedule in the EPG.
For more information about switching between the information window and
full screen mode, refer to the chapter "Pinnacle MediaCenter Window Formats".
97
Pinnacle MediaCenter
Selecting Channels
When you select Channels in the TV menu, the following window appears:
Switching Channels
Channel lists
On the right side of the window, all the channel lists created in "Advanced
Settings" (for example, Music, News, and Sports) as well as the entry All TV
Channels are displayed.
To change the current TV channel, select All TV Channels or select the channel
list you want and confirm your selection. A list of all the channels or the channel
assigned to the selected list is now displayed.
An EPG window located on the lower edge of the screen shows you information
about the selected channel (if EPG service is available). This information
includes the start and stop time of the program currently showing and a short
description of the content. This gives you an optimal overview of the schedules
for the channels in the list.
After you select and confirm a certain channel, its schedule is displayed in full
screen mode.
Channel list
When you are watching television in full screen mode or in the preview window,
you can also use the Channel+/Channel- buttons on your remote control to
change the current channel according to the sequence in the channel list.
Or you can press the Confirm/OK button on the remote control. This displays
the channel list in On Screen Display mode. Use the arrow buttons on your
remote control to select a channel and confirm.
98
Pinnacle MediaCenter
Direct channel input
When you are watching live TV in full screen mode or in the preview window,
you can also select a channel directly with your remote control or with your
keyboard:
To do this, simply enter the number of the channel you want using the number
keys on your remote control or the number keys on your keyboard. The TV
schedule of the channel you select is then displayed.
Switching between the last two channels
Press the Switch Between Channels button on your remote control to switch
back and forth between the last two channels (for example, to avoid irritating
commercial breaks).
After changing channels, the number of the current channel is displayed for
a few seconds on the screen.
Video Input
When you press the AV button, you can sequentially switch between the
available video input sources on your TV card (for example, from antenna to Svideo). And depending on your hardware and the reception, you even have the
option of switching between analog and digital television.
Volume
To regulate the volume while watching TV, use the Volume +/- buttons on your
remote control. Press the Mute on/off button to turn the sound off. Turn it back
on by pressing the button again.
When you change the volume, a status bar with the current volume level or
a "Sound off" icon is displayed on the screen for a few seconds.
99
Pinnacle MediaCenter
On Screen Display (OSD): General Information
You can configure detailed settings affecting the behavior of the On Screen
Display in the Settings menu.
When you turn on live TV or switch channels while watching TV, an EPG On
Screen Display appears (if EPG service is available) with the following
information:
The name of the current channel and its number in the channel list
The current language (if available)
The page format (if available)
The audio mode (if available)
The current time and date
The display of the time status of the current program
The start time, name, and short description of the current show, as well as of
the next show
If no EPG service is available, the following information is displayed:
The name of the current channel and its number in the channel list
The page format (if available)
The audio mode (if available)
The current time and date
This OSD disappears after a few seconds.
If you would like to display the OSD again manually (without changing the
channel), press the ? button or the Info button (depending on the remote
control). The same information including a volume level bar is displayed.
If you have not set the OSD to disappear automatically in the Settings menu, the
OSD disappears again when you press the ?/Info again.
On Screen Display (OSD): Audio Settings
When you are watching TV in full screen mode or in the preview window and
you press the B button on your remote control, an On Screen Display appears
where you can change your audio settings:
On the left side of the OSD, all the supported audio modes are displayed. All the
languages available for the current program are displayed on the right side of the
window.
Use the arrow buttons to select a new audio mode and/or a new language and
activate it by pressing the OK/Confirm button on your remote control.
Pressing the B button again will hide the On Screen Display and apply the
changes you made.
100
Pinnacle MediaCenter
Electronic Program Guide (EPG)
This menu is only available if an EPG service is present.
When you select Guide in the TV menu or press the EPG button on your
remote control, the following window appears:
The EPG (Electronic Program Guide) function is an electronic TV guide which
gives you not only a quick and easy-to-read overview of the TV schedule but
also makes recording TV shows a snap.
The EPG menu contains an EPG program list, a time and channel button, as well
as a time and channel display.
Press the arrow buttons on your remote control to move back and forth between
these areas and within the program list.
Sorting the EPG Program List
You can sort the program list by the time or by channel. You do this by selecting
and confirming the corresponding button.
Sorting the EPG program list by time
When you select and confirm the Time button, the current time is displayed on
the upper edge of the screen and all the programs scheduled to be broadcast at
the current time are listed in the program list.
When you select the time display on the upper edge of the screen and press the
left arrow or right arrow buttons on your remote control, the displayed time is
101
Pinnacle MediaCenter
updated in half-hour increments. Or you can use your mouse to press the "left
arrow" or "right arrow" buttons to change the time display.
The EPG program list now displays the shows that will be broadcast at the time
indicated.
Sorting the EPG program list by channel
After you select the Channels button and confirm it, the current channel is
displayed on the upper edge of the screen and the schedule of the current
channel appears in the program list, beginning at the current time.
When you select the channel display on the upper edge of the screen with the
arrow buttons and press the left arrow button or the right arrow button on your
remote control, the position of the channel changes within its channel list. Or
you can use your mouse to press the "left arrow" or "right arrow" buttons to
change the channel display.
The EPG program list now contains the schedule for the channel just chosen,
beginning at the current time.
If you would like to modify the channel list in order to display the schedule of a
different channel in the EPG program list, select the channel display and
confirm it. This displays the list of channel lists from which you can select a
new channel list or the All TV Channels entry. After you have confirmed your
selection, you are taken back to the EPG menu.
EPG Information
An EPG window on the lower edge of the screen displays information about the
selected channel. This includes start and stop times, a status bar for the time
status of the program currently showing and a short description of the content.
You can access detailed information about the selected schedule in the program
list by pressing the ?/Info button on your remote control (depending on the
remote control) or by clicking the More Info button. An EPG window now
opens displaying the show time, the channel, the name of the program, as well
as an extensive description of the content.
You can exit this EPG window by pressing the ?/Info button again (depending
on the remote control).
Viewing a Show in the EPG Program List
After you select and confirm a show in the EPG list that is currently being
broadcast, the show is displayed in full screen mode.
102
Pinnacle MediaCenter
Recording a Show From the EPG Program List
Using the EPG function, it is easy to record a show.
To do this, select the show your want from the EPG program list and press the
Record button on your remote control:
A program that is currently being shown is recorded immediately. The recording
of a program in the future is scheduled.
You can tell whether a show is currently being recorded or if a show is
scheduled to be recorded by the record symbol in the EPG channel list.
Pausing, Editing or Deleting Recordings in the EPG Program List
You can edit or delete recordings being made right now or recordings scheduled
in the future directly in the EPG menu.
To do this, select the corresponding program and confirm your selection or press
the Record button. In the window that now appears, you can pause, process or
delete the recording.
To pause a running recording or delete a scheduled recording, you can also
select the corresponding program in the EPG program list and press the Stop
button on your remote control.
103
Pinnacle MediaCenter
Teletext
When you select Teletext in the TV menu or press the Teletext button on your
remote control, the following window appears:
The teletext menu consists of two areas. On the left side of the window, you will
find TOP text. On the right side, you will see the teletext window. You can
switch back and forth between the two areas by pressing the right arrow and
left arrow buttons on your remote control or the cursor keys your keyboard.
If no TOP text is available, only the teletext window is displayed in the Teletext
menu.
TOP - The Intelligent Table of Contents
TOP text is displayed in the left part of the window. TOP (Table of Pages) is an
optional radio station service that is not, however, supported by all stations. It
works like a table of contents where all the information available in a particular
subject area is linked. This lets you quickly navigate though the teletext listings
in a user-friendly environment - without having to know the page numbers.
You can quickly and easily get to the information you want by selecting a topic
with the arrow buttons and confirming it.
If a topic has further subtopics (marked with a "+" before the topic title), you
can open the list of all subtopics by selecting and confirming the topic. If you
again select and confirm the topic, the list of subtopics disappears.
104
Pinnacle MediaCenter
Teletext
The teletext for the current TV channel is displayed is displayed on the right side
of the window. This is text information that is sent as part of the TV signal.
Switching between teletext pages
You can now switch to the next or to the previous teletext page by pressing the
Up or Down buttons on your remote control. Or you can use your mouse to
click the "Up" arrow and "Down" arrow buttons below the teletext window.
You can also enter a page number directly into your remote control or keyboard,
and the corresponding page will open.
Note that you can only enter page numbers between 100 and 899.
Switching between teletext subpages
A teletext page may have one or more subpages. You can access them by
pressing the Rewind/Fast Forward buttons on your remote control. Or you can
use your mouse to click the "Left" arrow and "Right" arrow buttons below the
teletext window.
If the active teletext page has no subpages, these options are not available.
FLOF - Page Navigation (Depending on the Remote Control)
FLOF is another way for you to quickly and easily access interesting teletext
topic areas.
With FLOF, you can open the highlighted information pages (red, green, yellow,
blue) displayed on the lower edge of the teletext window directly with your
remote control - without having to enter individual page numbers.
In order to display a specific teletext area, press the Miscellaneous Functions
button with the corresponding color on your remote control. The corresponding
teletext page now opens.
105
Pinnacle MediaCenter
Recording Live Television
When you select Record TV in the TV menu, the following window appears:
You can now start recording immediately, schedule a future recording or change
the existing schedule for future recordings.
If you open this menu while recording a TV show, you can cancel the recording
or change the recording schedule settings.
The following menu options are available:
Record Now
Guide
Record Manually
Scheduled Recordings
Record now
While you are watching TV, you can record the TV show at any time by
pressing the "Record" button on your remote control. Press the "Stop" button to
stop recording.
Recording the current program
If you want to record the current TV program right now, select Record now and
confirm it. The Record now button changes to Record..., and the recording of
the current program starts.
Or you can press the Record button on your remote control.
106
Pinnacle MediaCenter
Changing the settings of a currently running recording
In order to obtain more detailed information about the currently running
recording or to change the recording schedule settings during the recording,
select and confirm the Record button.
In the window that now appears, you can stop the recording or change the
duration/end time of the recording:
To end the currently running recording, select the Stop button.
To change the duration, select the Duration field with the arrow buttons and
press the OK/Confirm button. With the Up and Down buttons on your
remote control, you can enter the duration in minutes. If you enter the
number "999", your recording will have no time limit.
Or, after confirming the Duration field, you can enter a number with a
maximum of three digits.
After you have set a new recording time, press the OK/Confirm button
again.
To change the stop time, select the Stop time field with the arrow buttons and
press the OK/Confirm button. With the Up and Down buttons on your
remote control, you can enter the duration in hours.
Now press the OK/Confirm button again to activate the minute display. You
can enter the minutes in five-minute increments with the Up and Down
buttons on your remote control.
Or, after confirming the Stop time field, you can enter a number with four
digits which stand for the hour and minute display of the stop time.
After you have set a new stop time, press the OK/Confirm button again.
After selecting and confirming the OK button, your changes to the recording
settings will take effect.
Guide
This menu is only available if an EPG service is available.
After selecting and confirming this menu option, the EPG window appears
where you can record shows and edit recordings.
For more information about using the EPG menu, refer to the chapter
"Electronic Program Guide (EPG)".
To record a program, select the channel you want from the EPG channel list and
press the Record button on your remote control. The recording either starts or is
scheduled. You can see this by the recording icon in the EPG program list.
107
Pinnacle MediaCenter
To edit a currently running recording or a scheduled recording, select the
corresponding program from the EPG program list and confirm your selection or
press the Record button.
In the window that now appears, you can pause, edit or delete the recording.
To pause a running recording or delete a scheduled recording, you can also
select the corresponding program in the EPG program list and press the Stop
button on your remote control.
Record Manually
If you select and confirm this menu option, the following window appears:
This is where you configure the settings for recording manually:
Channel: This is where you enter the channel you want to record.
Use the arrow buttons to select the Channel field and then confirm your
selection. A list of all the channel lists now appears. Select the list which
includes the channel you want. In the channel list that now appears, select the
channel you want.
Day: Enter the day when the program should be recorded.
Use the arrow buttons to select the Day field and then confirm your selection.
Use the Up and Down buttons to select a day and then confirm your
selection.
Recording time (Start time, Stop time, Duration): Enter two of the required
time values, and the third will be calculated automatically.
Start time: Use the arrow buttons to select the Start time field and then
confirm your selection. With the Up and Down buttons on your remote
control, you can enter the hour of the start time.
108
Pinnacle MediaCenter
Now press the OK/Confirm button again to activate the minute display. You
can now enter the minute of the start time with the Up and Down buttons on
your remote control.
Or, after confirming the Start time field, you can enter a number with four
digits for the hour and minute display of the Start time.
After you have set a new start time, press the OK/Confirm button again.
Stop time: Use the arrow buttons to select the Stop time field and then
confirm your selection. With the Up and Down buttons on your remote
control, you can enter the hour of the stop time.
Now press the OK/Confirm button again to activate the minute display. You
can enter the minute of the stop time with the Up and Down buttons on your
remote control.
Or, after confirming the Stop time field, you can enter a number with four
digits for the hour and minute display of the stop time.
After you have set a stop time, press the OK/Confirm button again.
Duration: To change the duration, select the Duration field with the arrow
buttons and press the OK/Confirm button. With the Up and Down buttons
on your remote control, you can enter the duration in minutes.
Or, after confirming the Duration field, you can enter a number with a
maximum of three digits. If you enter the number "999", your recording will
have no time limit.
After you have set a new duration, press the OK/Confirm button again.
Frequency: Enter the frequency that the recording should be repeated.
Use the arrow buttons to select the Frequency field and then confirm your
selection. Use the Up and Down buttons to select a frequency (for example,
"daily" or "weekly") and then confirm your selection.
Format: You can change the recording format here.
Use the arrow buttons to select the Format field and then confirm your
selection. Use the Up and Down buttons to select a recording format and
then confirm your selection. Note that when recording digital TV, you cannot
set the recording format.
Destination: Enter the location where you would like to save your recording.
Use the arrow buttons to select the Destination field and then confirm your
selection. Use the Up and Down buttons to select a location and then confirm
you selection.
After selecting and confirming the OK button, the recording you want is
scheduled.
Make sure that your computer is turned on at the time the recording is
scheduled to start and that your Pinnacle hardware is not being used by any
other software.
109
Pinnacle MediaCenter
Scheduled recordings
If you want to change or delete previously scheduled recordings, select the
Scheduled recordings menu option and confirm your selection. The following
window now appears:
All of your scheduled recordings are displayed here.
If you want to change a recording, select it and confirm your selection. In the
window that now appears, you can edit or delete the scheduled recording.
Changing scheduled recordings
If you want to edit the scheduled recording (for example, change the recording
time or the date), select Edit and confirm your selection. The settings for this
recording are now displayed and you can edit them.
Deleting scheduled recordings
If you want to delete the scheduled recording, select Delete and confirm your
selection. The recording settings are deleted, and the recording will not take
place.
110
Pinnacle MediaCenter
Recorded TV
When you select Recorded TV in the TV menu, the following window appears:
On the right side of the window, you see all the currently available recordings
including information about the channel, the recording date, and the recording
time.
Addition information for each selected recording is located in the information
window on the lower edge of the screen.
You can now either play back a recording or delete it. Select the recorded
program and confirm your selection.
Playing Back a Recording
In the window that now appears, you can play back the recording you want by
selecting and confirming the Play button or by pressing the Play button on your
remote control.
Deleting Recordings
You can delete a previously selected recording by selecting the Delete button
and confirming it.
111
Pinnacle MediaCenter
Timeshift
The Pinnacle MediaCenter timeshift function lets you conveniently watch the
current TV show in timeshift mode.
Irritating interruptions when watching TV are now a thing of the past. With just
the push of a button, you can interrupt the current TV show and go back to
watching it later at any time. In the meantime, the rest of the TV program is
automatically recorded to a temporary area on your computer. Note that the size
of the temporary area determines the amount of the material that can be recorded
(for more information about the size of the temporary area, refer to chapter
Advanced Settings).
All you need to do to resume watching the program from the point you stopped
is to press a button, and the recording is played. At the same time, the current
program continues to be recorded in the background so that you don't miss a
minute of the show.
This lets you fast forward and rewind the timeshifted show in quick motion
while it is still being recorded, as well as skip over certain parts (for example,
commercials) or repeat parts (for example, the deciding touchdown in a football
game) or switch back to live TV.
Starting a Timeshift Recording
To start a timeshift recording, press the Pause button of your remote control
while watching TV. The current TV program is now recorded to a temporary
area on your computer.
Viewing a Timeshift Recording
Playing a timeshift recording
To watch a timeshift recording, use the Rewind or Previous Track buttons on
your remote control to jump to a specific place in the recording and continue
watching from this point. In the meantime, the live TV show continues to be
recorded.
Within the timeshift playback, you can use the Rewind/Fast Forward buttons
or the Previous Track/Next Track buttons to repeat parts or to skip them. Use
the Rewind/Fast Forward buttons to move forwards or backwards at a uniform
speed within the recording. Use the Previous Track/Next Track buttons to
jump backwards or forwards in the timeshift recording according to a previously
set time interval (for more information about setting this time interval, refer to
the chapter Advanced Settings).
Interrupting timeshift playback
Press the Pause button on your remote control to interrupt the timeshift
playback. To continue playback, press the Pause button or the Play button
again.
112
Pinnacle MediaCenter
Returning to live position
If you want to return to the live position in the current program, press the Live
TV button (remote control type A) or TV (remote control type B) on your
remote control. The timeshift recording continues to be recorded and you can be
play it back at any time.
Ending the Timeshift Recording
To end the timeshift recording, press the Stop button on your remote control.
On Screen Display
You can configure detailed settings affecting the behavior of the On Screen
Display in the Settings menu.
If you start a timeshift recording, an On Screen Display appears with the
following information:
Start time of the timeshift recording
Maximum timeshift position where the timeshift recording will pause or start
from the beginning
The current time status of live TV (the end of the corresponding status bar
marks the current position of live TV)
The current playback position
This On Screen Display disappears when you press the Play button on your
remote control.
If you would like to display the OSD again manually (without changing the
channel), press the ? button or the Info button (depending on the remote
control). The same information including a volume level bar is then displayed. If
you have not set the OSD to disappear automatically in the Settings menu, the
OSD disappears when you press the ?/Info button again.
113
Pinnacle MediaCenter
Radio Menu
Radio Menu Overview
If you select Radio in the main screen of the Pinnacle MediaCenter, the
following window appears:
The individual menu options give you access to the following functions:
Stations: Use this menu to select channels from the channel list.
Record: This menu lets you record radio broadcasts.
Recorded Radio: This menu lets you play back or edit previously recorded
radio broadcasts.
The individual Radio menu functions are explained in detail in the following
sections.
Information Window
In the left part of the Pinnacle MediaCenter, an information window displays
information about the current radio program.
For more information about switching between the information window and
full screen mode, refer to the chapter "Pinnacle MediaCenter Window Formats".
114
Pinnacle MediaCenter
Selecting Radio Stations
When you select Stations in the Radio menu, the following window appears:
Switching Channels
Channel lists
On the right side of the screen, you see all the radio channel lists created in
"Advanced Settings" (for example, Classical, News, and Rock) as well as the
FM Radio and Internet Radio entries (if available).
To select a certain radio channel or to change the current radio channel, select
either the FM Radio or Internet Radio entry or select the channel list you want
and confirm your selection. A list of all the channels or the channel assigned to
the selected list is now displayed.
After selecting and confirming a specific channel, you can listen to its
broadcasts. The matching visualization appears in full screen mode.
Channel list
When you listen to radio and watch the visualization in full screen mode or in
the preview window, you can also use the Channel+/Channel- buttons on your
remote control to change the current channel according to the sequence in the
channel list.
Or you can press the Confirm/OK button on the remote control. This displays
the channel list in On Screen Display. Use the arrow buttons on your remote
control to select a channel and confirm it.
Direct channel input
When you are listening to radio and watching the visualization in full screen
mode or in the preview window, you can also select a channel directly with your
remote control or with your keyboard.
115
Pinnacle MediaCenter
To do this, simply enter the number of the channel you want using the number
keys on your remote control or the cursor keys on your keyboard. You can then
listen to the broadcast of the channel you select.
Switching between the last two channels
Press the Switch Between Channels button on your remote control to switch
back and forth between the last two channels (for example, to avoid irritating
commercial breaks).
After changing channels, the number of the current channel is displayed for
a few seconds on the screen.
Volume
To regulate the volume while listening to radio, use the Volume +/- buttons on
your remote control. Press the Mute on/off button to turn the sound off. Turn it
back on by pressing the button again.
When you change the volume, a status bar with the current volume level or
a "Sound off" icon is displayed on the screen for a few seconds.
On Screen Display
You can perform detailed settings affecting the behavior of the On Screen
Display in the Settings menu.
When you turn on radio or switch channels while listening to radio, an On
Screen Display appears with the following information:
The name of the current channel and its number in the channel list
The current source
The audio mode
The current time and date
This OSD disappears after a few seconds.
If you would like to display the OSD again manually (without changing the
channel), press the ? button or the Info button (depending on the remote
control). The same information including a volume level bar is then displayed.
If you have not set the OSD to disappear automatically in the Settings menu, the
OSD disappears when you press the ?/Info again.
116
Pinnacle MediaCenter
Recording Radio
When you select Record in the Radio menu, a window appears where you can
start a recording immediately, schedule a recording for the future or modify an
already scheduled recording.
If you open the menu while recording a radio broadcast, you can cancel the
recording or change the recording settings.
The following menu options are available:
Record Now
Record Manually
Scheduled Recordings
Note that you cannot record Internet Radio.
Record Now
While listening to radio, you can record the current program of the current
station at any time by pressing the "Record" button on your remote control.
Press the "Stop" button to stop recording.
Recording the current broadcast
If you want to record the current radio broadcast right now, select the Record
Now menu option and confirm it. The Record Now button changes to
Record..., and the recording of the current broadcast starts.
Or you can press the Record button on your remote control.
Changing the settings of a currently running recording
In order to obtain more detailed information about the currently running
recording or to change the recording schedule settings during the recording,
select and confirm Record....
In the window that now appears, you can end the recording or change the
duration/stop time of the currently running recording:
To end the currently running recording, select the Stop button.
To change the duration, select the Duration field with the arrow buttons and
press the OK/Confirm button. With the Up and Down buttons on your
remote control, you can enter the duration in minutes. If you enter the
number "999", your recording will have no time limit.
Or, after confirming the Duration field, you can enter a number with a
117
Pinnacle MediaCenter
maximum of three digits.
After you have set a new recording time, press the OK/Confirm button
again.
To change the stop time, select the Stop time field with the arrow buttons and
press the OK/Confirm button. With the Up and Down buttons on your
remote control, you can enter the hour of the stop time.
Now press the OK/Confirm button again to activate the minute display. You
can enter the minutes in five-minute increments with the Up and Down
buttons on your remote control.
Or, after confirming the Stop time field, you can enter a number with four
digits for the hour and minute display of the stop time.
After you have set a new stop time, press the OK/Confirm button again.
After selecting and confirming the OK button, your changes to the recording
schedule settings will take effect.
Record Manually
If you select and confirm this menu option, a window appears where you can
manually configure the settings for recording.
This is where you enter the settings for recording manually:
Channel: This is where you enter which channel you want to record.
Use the arrow buttons to select the channel field and then confirm your
selection. A list of all the channel lists now appears. Select the list which
includes the channel you want. In the channel list that now appears, select the
channel.
Day: Enter the day when the broadcast should be recorded.
Use the arrow buttons to select the Day field and then confirm your selection.
Use the Up and Down buttons to select a day and then confirm your
selection.
Recording time (Start time, Stop time, Duration): Enter two of the required
time values, and the third will be calculated automatically.
Start time: Use the arrow buttons to select the Start time field and then
confirm your selection. With the Up and Down buttons on your remote
control, you can enter the hour of the start time.
Now press the OK/Confirm button again to activate the minute display. You
can enter the minute of the start time with the Up and Down buttons on your
remote control.
Or, after confirming the Start time field, you can enter a number with four
digits for the hour and minute display of the start time.
After you have set a new start time, press the OK/Confirm button again.
118
Pinnacle MediaCenter
Stop time: Use the arrow buttons to select the Stop time field and then
confirm your selection. With the Up and Down buttons on your remote
control, you can enter the hour of the stop time.
Now press the OK/Confirm button again to activate the minute display. You
can enter the minute of the stop time with the Up and Down buttons on your
remote control.
Or, after confirming the Stop time field, you can enter a number with four
digits for the hour and minute display of the stop time.
After you have set a stop time, press the OK/Confirm button again.
Duration: To change the duration, select the Duration field with the arrow
buttons and press the OK/Confirm button. With the Up and Down buttons
on your remote control, you can enter the duration in minutes.
Or, after confirming the Duration field, you can enter a number with a
maximum of three digits. If you enter the number "999", your recording will
have no time limit.
After you have set a new duration, press the OK/Confirm button again.
Frequency: Enter the frequency at which the recording should be repeated.
Use the arrow buttons to select the Frequency field and then confirm your
selection. Use the Up and Down buttons to select a frequency (for example,
"daily" or "weekly") and then confirm you selection.
Format: You can change the recording format here.
Use the arrow buttons to select the Format field and then confirm your
selection. Use the Up and Down buttons to select a recording format and
then confirm your selection.
After selecting and confirming the OK button, the recording you want is
scheduled.
Make sure that your computer is turned on at the time the recording is
scheduled to start and that your Pinnacle hardware is not being used by any
other software.
119
Pinnacle MediaCenter
Scheduled Recordings
If you want to change or delete previously scheduled recordings, select the
Scheduled Recordings menu option and confirm your selection.
All of your previously scheduled recordings are displayed in the window that
now appears. If you want to change a recording, select it and confirm your
selection. In the window that now appears, edit or delete the scheduled
recording.
Changing scheduled recordings
If you want to edit the scheduled recording (for example, change the recording
time or the date), select Edit and confirm your selection. The settings for this
recording are now displayed and you can edit them.
Deleting scheduled recordings
If you want to delete the scheduled recording, select Delete and confirm your
selection. The recording settings are deleted, and the recording will not take
place.
120
Pinnacle MediaCenter
Recorded Radio
When you select Recorded Radio in the Radio menu, a window opens where all
the currently existing recordings are displayed including information about the
channel, recording date, and recording time.
Additional information for each selected recording is located in the information
window on the lower edge of the screen.
You can now either play back a recording or delete it. Select the recorded
broadcast and confirm your selection.
Playing Back a Recording
In the window that now appears, you can play back the recording you want by
selecting and confirming the Play button or by pressing the Play button on your
remote control.
Deleting Recordings
You can delete a previously selected recording by selecting and confirming the
Delete button.
121
Pinnacle MediaCenter
Timeshift
Note that you cannot make timeshift recordings of Internet radio.
The Pinnacle MediaCenter timeshift function lets you conveniently listen to the
current radio broadcast in timeshift mode.
Irritating interruptions when listening to radio are now a thing of the past. With
just the push of a button, you can interrupt the current radio broadcast and go
back to listening to it later at any time. In the meantime, the rest of the radio
broadcast is automatically recorded to a temporary area on your computer. Note
that the size of the temporary area determines the amount of the audio material
that can be recorded (for more information about the size of the temporary area,
refer to the chapter Advanced Settings).
All you need to do to resume listening to the broadcast from the point you
stopped is to press a button, and the recording is played. At the same time, the
current broadcast continues to be recorded in the background so that you don't
miss a minute of it.
This lets you fast forward and rewind the time-shifted program in quick motion
while it is still being recorded, skip over certain parts (for example,
commercials) or repeat parts (for example, the deciding touchdown in a football
game) or switch back to live radio.
Starting a Timeshift Recording
To start a timeshift recording, press the Pause button of your remote control
while listening to radio. The current radio broadcast is now recorded to a
temporary area on your computer.
Listening to a Timeshift Recording
Playing back a timeshift recording
To listen to the timeshift recording, use the Rewind or Previous Track buttons
on your remote control to jump to the part you want in the recording and
continue listening from this point. In the meantime, the live radio broadcast
continues to be recorded.
Within the timeshift playback, you can use the Rewind/Fast Forward buttons
or the Previous Track/Next Track buttons to repeat parts or to skip them. Use
the Rewind/Fast Forward buttons to move forwards or backwards at a uniform
speed within the recording. Use the Previous Track/Next Track buttons to
jump backwards or forwards in the timeshift recording according to a previously
set time interval (for more information about setting this time interval, refer to
the chapter Advanced Settings).
122
Pinnacle MediaCenter
Interrupting timeshift playback
Press the Pause button on your remote control to interrupt the timeshift
playback. To continue playback, press the Pause button or the Play button
again.
Returning to live position
If you want to return to the live position in the current broadcast, press the Start
Radio button (remote control type A) or press the Next Track button on your
remote control (remote control type B). The timeshift recording continues to be
recorded and can be played back at any time.
Ending the Timeshift Recording
To end the timeshift recording, press the Stop button on your remote control.
On Screen Display
You can perform detailed settings affecting the behavior of the On Screen
Display in the Settings menu.
If you start a timeshift recording, an On Screen Display appears with the
following information:
Start time of the timeshift recording
Maximum timeshift position at which the timeshift recording will pause or
start from the beginning
The current time status of live radio (the end of the corresponding status bar
marks the current position of live radio)
The current position of playback
This On Screen Display disappears when you press the Play button on your
remote control.
If you would like to display the OSD again manually (without changing the
station), press the ? button or the Info button (depending on the remote control).
The same information including a volume level bar is then displayed. If you
have not set the OSD to disappear automatically in the Settings menu, the OSD
disappears again when you press the ?/Info button again.
123
Pinnacle MediaCenter
Music Menu
Music Menu Overview
If you select Music in the main screen of the Pinnacle MediaCenter, the
following window appears:
The individual menu options give you access to the following functions:
New Music: Use this menu to listen to all the music titles you have recently
imported.
Genre, Artist, Album, Song, and Playlists: Use these menu options to play
back music according to categories created in the Pinnacle MediaManager.
Browse: You can play music from your hard disk here.
CD/DVD: Select this menu option when you want to play music from a
CD/DVD.
The individual Music menu functions are explained in detail in the following
sections.
Music Playback
Playback
To play all the songs in a category, select a specific song from the category or
the entire category and press the Play button on your remote control.
To play a single song, select it and confirm your selection.
Rewind and Fast Forward
During playback, you can use the Rewind and Fast Forward buttons on your
remote control to access a specific location within a song.
124
Pinnacle MediaCenter
Previous Track and Next Track
Use the Previous Track/Next Track buttons to go to the beginning of the
current song or jump to the next song.
Pause
Press the Pause button on your remote control to pause the playback. Press the
Pause button again or press the Play button to continue playback.
Stop
Use the Stop button to end playback at any time. This also takes you back to the
previous menu.
Volume
To regulate the volume while listening to music, use the Volume +/- buttons on
your remote control. Press the Mute on/off button to turn the sound off. Turn it
back on by pressing the button again.
Shuffle
The Shuffle function is available in each menu:
Press the A button on your remote control to activate shuffle mode. Now all of
the songs you have chosen in the current category (for example, in a playlist or a
genre) are played back in a random sequence. Press the A button again to
deactivate shuffle mode. Now the songs are played in a set sequence.
Repeat
The Repeat function is available in each menu:
Press the B button on your remote control to activate repeat mode. Now all the
songs in a specific category will be repeated.
Press the B button on your remote control to deactivate repeat mode. Now the
songs will only be played once each.
Information Window
In every menu option in the Music menu, you see an information window
containing the album cover artwork or the visualization of the title currently
playing or of the first song of the category just chosen. The name of the artist
and the title of the album are displayed beneath the information window so that
you always have access to all the important information about the title currently
playing.
For more information about switching between the information window and
full screen mode, refer to the chapter "Pinnacle MediaCenter Window Formats".
125
Pinnacle MediaCenter
On Screen Display
You can perform detailed settings affecting the behavior of the On Screen
Display in the Settings menu.
If the album cover or the music visualization is displayed in full screen mode
during playback, the title of the current song is displayed below the lower edge
of the image. This OSD disappears after a few seconds.
If you press the ? button or the Info button (depending on the remote control)
during playback in full screen mode, an On Screen Display appears with the
following information:
Volume display
Title of the previous as well as of the next song and names of the artists
Album cover (if available)
The current time and date
Index of the position of the current song in its category
Name of the artist, title of the song and of the album, as well as additional
ID3 information about the current song
The time status display of the current song
If you have not set the OSD to disappear automatically in the Settings menu, the
OSD disappears when you press the ?/Info button again.
126
Pinnacle MediaCenter
New Music
When you select New Music in the music menu, the following window appears:
On the right side of the window, you see all of your recently imported songs in
alphabetical order.
Playing Back All New Music
To playback all the new music, select All New Music and confirm your
selection or press the Play button.
When you select a single song and press the Play button on your remote control,
all the newly imported songs are played, beginning with the song you selected.
Playing Back Individual Songs
When you select a single song and confirm your selection, only that song is
played.
127
Pinnacle MediaCenter
Genre
When you select Genre in the music menu, the following window appears:
On the right side of the window, all the music genres you created in the Pinnacle
MediaManager are displayed in alphabetical order (for example, Country,
Classical, and Pop).
Playing Back Songs of a Particular Genre
If you want to play all the songs of a certain genre, select the genre and press the
Play button on your remote control.
To display all the artists of a certain genre in the database, select the genre and
confirm your selection. These artists are then listed on the right side of the
window. You now have the following options:
If you select All Artists and press the Play button on your remote control, all
the songs in this genre will be played.
If you select All Artists and confirm your selection, all the songs in the
chosen genre are listed.
To play a single song, select it and confirm your selection.
If you select a song and press the Play button on your remote control, all the
songs in this genre are played, beginning with the song you selected.
Playing Back Songs by an Artist in a Particular Genre
To play all the songs by a certain artist, select the genre the artist is assigned to
and confirm your selection. Choose the artist from the list that now appears and
press the Play button on your remote control.
To display all the albums by a certain artist in the database, first select the genre
and then the artist in the window that now appears and confirm your selection.
128
Pinnacle MediaCenter
All the albums available by this artist are then listed on the right side of the
window. You now have the following options:
If you select All Albums and press the Play button on your remote control,
all the songs by this artist will be played.
If you select All Albums and confirm your selection, all the songs by the
chosen artist are listed.
To play a single song, select it and confirm your selection.
If you select a song and press the Play button on your remote control, all the
songs by this artist are played, beginning with the song you selected.
Playing Back an Album or Song by an Artist in a Particular Genre
To play a single album by a certain artist in the genre chosen, select the artist
and confirm your selection. All the albums by that artist in the database are now
listed to the right. To playback a specific album, select it and press the Play
button on your remote control.
To display all the songs from one of the albums listed, select the album and
confirm your selection. All the music titles on the album are now displayed to
the right.
To play a single song, select it and confirm your selection.
If you select a song and press the Play button on your remote control, the
entire album is played, beginning with the song you selected.
129
Pinnacle MediaCenter
Artist
When you select Artist in the music menu, the following window appears:
On the right side of the window, you see all of the artists in the Pinnacle
MediaManager listed in alphabetical order.
Playing Back All Songs
To play all the songs in the database, select All Artists and press the Play button
on your remote control.
Playing Back the Albums/Songs by All Artists
If you select All Artists and confirm you selection, a list of all the music albums
in the database appears. You now have the following options:
If you select All Albums and press Play, every available music album is
played.
If you select All Albums and confirm, all the songs in the database are
displayed. Now you can play all the songs by selecting and confirming a
single song or by selecting and pressing the Play button.
If you select a single album and press Play, the entire album will be played.
If you select a single album and confirm, all the songs on this album will be
displayed. Now you can play the entire album by selecting and confirming a
single song or by selecting and pressing the Play button.
Playing All the Songs by an Artist
To play all the songs by a specific artist, select the artist and press the Play
button on your remote control.
130
Pinnacle MediaCenter
Playing Back the Albums/Songs by an Artist
If you want to display the albums by a specific artist, select that artist and
confirm your selection. All the albums in the database by that artist are then
listed to the right. You now have the following options:
If you select All Albums and press Play, every available music album by this
artist is played.
If you select All Albums and confirm, all the songs in the database by this
artist are displayed. Now you can play all the songs by selecting and
confirming a single song or by selecting and pressing the Play button.
If you select a single album and press Play, the entire album will be played.
If you select a single album and confirm, all the songs on this album will be
displayed. Now you can play the entire album by selecting and confirming a
single song or by selecting and pressing the Play button.
131
Pinnacle MediaCenter
Album
When you select Album in the Music menu, the following window appears:
On the right side of the window, you see all of the albums in the database listed
in alphabetical order.
Playing Back All the Albums
To play all the albums in the database, select All Albums and press the Play
button on your remote control.
Playing Back Songs
If you select All Albums and confirm, all the songs in the database are listed.
Now you can play all the songs in the database by selecting and confirming a
single song or by selecting and pressing the Play button.
Playing Back an Album
To playback an entire album, select it and press the Play button on your remote
control.
If you select an album and confirm your selection, all the songs on the album are
listed. After selecting a single song and pressing the Play button on your remote
control, the entire album will be played, beginning with the song you selected.
Playing Back the Songs on a Specific Album
If you select an album and confirm your selection, all the songs on the album are
listed to the right.
To play a single song, select it and confirm your selection.
132
Pinnacle MediaCenter
Song
When you select Song in the Music menu, the following window appears:
On the right side of the window, you see all of the songs in the database listed in
alphabetical order.
Playing Back All the Songs
To play all the songs in the database, select All Songs and confirm your
selection or press Play on your remote control.
If you select a song and press the Play button on your remote control, all the
songs in the database are played, beginning with the song you selected.
Playing Back Individual Songs
To play a single song, select it and confirm your selection.
133
Pinnacle MediaCenter
Playlists
When you select Playlists in the Music menu, the following window appears:
On the right side of the window, you can choose from the following categories:
My Playlists: This category lists all the music playlists created in the
Pinnacle MediaManager.
Top rated: Here are all the songs that you have given top ratings in the
Pinnacle MediaManager.
Most played: This category lists all the songs that have been played often in
the past (this list is generated automatically).
Least played: This category contains all the songs that are rarely displayed
(this list is generated automatically).
Not yet played: This contains a list of all the songs that have not yet been
played (this list is generated automatically).
Displaying the Entire Category
If you want to play all the songs in an entire category, select the category (My
Playlists, Top rated, Most played, Least played or Not yet played) and press
the Play button on your remote control.
134
Pinnacle MediaCenter
My Playlists
To display all of the music playlists created in the Pinnacle MediaManager,
select the My Playlists category and confirm your selection. This displays a list
of all the available playlists. You now have the following options:
If you want to play an entire playlist, select a playlist and press Play.
If you select a playlist and confirm you selection, all the songs in the playlist
listed.
You can play a single song by selecting and confirming it. After selecting a
song and pressing the Play button on your remote control, all the songs on
the playlist are played, beginning with the song selected.
Displaying Specific Songs in a Category
To display individual songs in a category (Top rated, Most played, Least
played, Not yet played), select a category and confirm your selection. All the
songs in the category are now listed on the right side of the window.
If you only want to play one song, select it and confirm your selection.
If you select a song and press the Play button on your remote control, all the
songs in the category are played, beginning with the song selected.
135
Pinnacle MediaCenter
Browsing Your Hard Disk
When you select Browse from the Music menu, the following window appears:
On the right side of the window, you can browse your hard disk for music files
and play them. The current path is always displayed in the Pinnacle
MediaCenter window.
The first time you browse for music files on your hard drive, the "My Music"
folder will open by default. Select and confirm the Go Up button to go the next
higher directory on your hard disk.
If you select a specific directory and confirm your selection, the contents of
this directory are listed.
If you select a specific directory and press the Play button, all the songs in
this directory and its subdirectories is played.
When you select a single song and confirm your selection, that song is
played.
When you select a single song and press the Play button, all the songs in this
directory (without subdirectories) are played, beginning with the song you
selected.
136
Pinnacle MediaCenter
CD/DVD
When you select CD/DVD from the Music menu, the following window
appears:
If you have already selected the Autoplay function, CDs and DVDs will
automatically be played when inserted (if the Pinnacle MediaCenter is on).
Use this menu option to play music from a CD or DVD:
If there is no CD or DVD in the corresponding drive, Pinnacle MediaCenter will
prompt you to insert a CD or DVD.
If there is a CD/DVD in your CD-ROM/DVD drive, the directories and
individual songs on the CD/DVD will be displayed on the right side of the
window.
If you select a specific directory and confirm your selection, the contents of
this directory are listed.
If you select a specific directory and press the Play button, all the songs in
this directory and its subdirectories are played.
When you select a single song and confirm your selection, that song is
played.
When you select a single song and press the Play button, all the songs in this
directory (without subdirectories) are played, beginning with the song you
selected.
Press the C button on your remote control to activate the Autoplay function.
This automatically plays CDs and DVDs when they are inserted (if the Pinnacle
MediaCenter is on at the same time). Press the C button again to deactivate this
function.
137
Pinnacle MediaCenter
Movies Menu
Movie Menu Overview
If you select Movies in the Pinnacle MediaCenter main screen, the following
window appears:
The individual menu options give you access to the following functions:
New Movies: Use this menu to watch to all the movies you have recently
imported.
Genre and Playlists: Use these menu options to watch a movie assigned to a
specific playlist or a specific genre in the Pinnacle MediaManager.
All Movies: Select this menu option when you want to list all the movies in
the database or play one or more movies from the database.
Browse: This menu option lets you browse your dard disk for video files and
play them.
CD/DVD: Here, you can play movies from CD or DVD.
The individual Movie menu functions are explained in detail in the following
sections.
138
Pinnacle MediaCenter
Movie Playback
Playback
To play all the movies in a category, select a specific movie from the category or
the entire category and press the Play button on your remote control.
To play a single movie, select it and confirm your selection.
Rewind and Fast Forward
During playback, you can use the Rewind and Fast Forward buttons on your
remote control to access a specific location within a chapter.
Previous Track / Next Track
Use the Previous Track/Next Track buttons to jump to the beginning of the
current movies or jump to the next movie.
Pause
Press the Pause button on your remote control to pause the movie. Continue the
movies by pressing the Pause button again or the Play button.
Stop
Use the Stop button to end the movie at any time. This also takes you back to
the previous menu.
Volume
To regulate the volume, use the Volume +/- buttons on your remote control.
Press the Mute on/off button to turn the sound off. Turn it back on by pressing
the button again.
Shuffle
Each menu has a shuffle function:
Press the A button on your remote control to activate shuffle mode. Now all of
the movies you have chosen in the current category (for example, in a playlist or
a genre) are played back in random order. Press the A button again to deactivate
the function and play the movies in a set sequence again.
Repeat
The Repeat function is available in each menu:
Press the B button on your remote control to activate repeat mode. Now all the
movies in the selected category will be played repeatedly.
Press the B button on your remote control to deactivate repeat mode. Now the
movies will only be played once each.
139
Pinnacle MediaCenter
Information Window
In every menu option in the Movie menu, an information window for the movie
currently being shown or a graphic is displayed so that you won't miss a single
scene of the movie.
For more information about switching between the information window and
full screen mode, refer to the chapter "Pinnacle MediaCenter Window Formats".
On Screen Displays
You can configure detailed settings affecting the behavior of the On Screen
Displays in the Settings menu.
When the movie is being shown in full screen mode, the title of the movie is
displayed at the beginning of the movie on the lower edge of the image. This
OSD disappears after a few seconds.
If you press the ? or Info button (depending on the remote control) while
playing the movies in full screen mode, an On Screen Display appears with the
following information:
Volume display
Title of the previous as well as of the next movie or chapter
The current time and date
Index of the position of the current movie in its category
Name of the DVD and of the chapter or movie
The display of the time status of the current DVD or file
If you have not set the OSD to disappear automatically in the Settings menu, the
OSD disappears again when you press the ?/Info button again.
140
Pinnacle MediaCenter
New Movies
When you select New Movies from the Movie menu, the following window
appears:
On the right side of the window, you see a list of all the newly imported movies
in alphabetical order.
Playing Back All the New Movies
To playback all the new movies, select All New Movies and confirm your
selection or press the Play button.
When you select a single movie and press the Play button on your remote
control, all the newly imported movies are played, beginning with the movie you
selected.
Playing Back Individual New Movies
When you select a movie and confirm, only that movie will be played.
141
Pinnacle MediaCenter
Genre
When you select Genre in the Movie menu, the following window appears:
On the right side of the window, all the movie genres created in the Pinnacle
MediaManager are displayed in alphabetical order (for example, Action,
Documentary, and Comedy).
Playing Back All the Movies in a Genre
If you want to play all the movies assigned to a certain genre, select the
corresponding genre and press the Play button on your remote control.
When you select a genre and confirm your selection, all the movies assigned to
this genre are displayed. After you select a single movie and press the Play
button on your remote control, all the movies in the genre are played, beginning
with the selected movie.
Playing Back Specific Movies in a Genre
If you want to play all the movies in the database that are assigned to a certain
genre, select the genre and confirm your selection. These movies are then listed
on the right side of the window.
To play a specific movie, select it and confirm your selection.
142
Pinnacle MediaCenter
Playlists
When you select Playlists in the Movie menu, the following window appears:
On the right side of the window, you can choose from the following categories:
My Playlists: This category lists all the movie playlists created in the
Pinnacle MediaManager.
Top rated: Here are all the movies that you have given top ratings to in the
Pinnacle MediaManager.
Most played: This category lists all the movies that have been played often
in the past (this list is generated automatically).
Least played: This category contains all the movies that are rarely displayed
(this list is generated automatically).
Not yet played: This category contains a list of all the movies that have not
yet been played (this list is generated automatically).
Displaying the Entire Category
If you want to play all the movies in an entire category, select the category (My
Playlists, Top rated, Most played, Least played or Not yet played) and press
the Play button on your remote control.
143
Pinnacle MediaCenter
My Playlists
To display all of the movie playlists created in the Pinnacle MediaManager,
select the My Playlists category and confirm your selection. This then displays
a list of all the available playlists. You now have the following options:
If you want to play an entire playlist, select a playlist and press Play.
If you select a playlist and confirm you selection, all the movies in the
playlist are listed.
You can play a single movie by selecting and confirming it. After selecting a
movie and pressing the Play button on your remote control, all the movies on
the playlist are played, beginning with the movie you selected.
Displaying Specific Movies in a Category
To display individual movies in a category (Top rated, Most played, Least
played, Not yet played), select a category and confirm your selection. All the
movies in the category are now listed on the right side of the window.
If you only want to play one movie, select it and confirm your selection.
If you select a movie and press the Play button on your remote control, all
the movies in the category are played, beginning with the movie you
selected.
144
Pinnacle MediaCenter
All Movies
When you select All Movies from the Movie menu, the following window
appears:
On the right side of the window, you see all of the movies in the database listed
in alphabetical order.
Playing Back All the Movies
To play back all the movies, select All Movies and confirm your selection or
press the Play button.
When you select a single movie and press the Play button on your remote
control, all the movies are played, beginning with the movie you selected.
Playing Back Specific Movies
Select and confirm your selection for playing a single movie from the database.
145
Pinnacle MediaCenter
Browsing Your Hard Disk
When you select Browse in the Movie menu, the following window appears:
On the right side of the window, you can browse your hard disk for video files
and play them.
The current path is always displayed in the Pinnacle MediaCenter window.
The first time you browse for video files on your hard drive, the "My Files"
folder will open by default. Select and confirm the Go Up button to go the next
higher directory on your hard disk.
If you select a specific directory and confirm your selection, the contents of
this directory are listed.
If you select a specific directory and press the Play button, all the movies in
this directory and its subdirectories are played.
If you select a single movie and confirm you selection, the movie will be
played.
When you select a single movie and press the Play button, all the movies in
this directory (without subdirectories) are played, beginning with the movie
you selected.
146
Pinnacle MediaCenter
CD/DVD
When you select CD/DVD from the Movie menu, the following window
appears:
If you have already activated the Autoplay function, CDs and DVDs will
automatically be played when inserted (if the Pinnacle MediaCenter is on).
Use this menu option to play movies from a CD or DVD:
If there is no CD or DVD in the corresponding drive, Pinnacle MediaCenter will
prompt you to insert a CD or DVD.
If there is a CD/DVD in your CD-ROM/DVD drive, the directories and
individual movies on the CD/DVD will displayed on the right side of the
window.
If you select a specific directory and confirm your selection, the contents of
this directory are listed.
If you select a specific directory and press the Play button, all the movies in
this directory and its subdirectories are played.
If you select a single movie and confirm you selection, the movie will be
played.
When you select a single movie and press the Play button, all the movies in
this directory (without subdirectories) are played, beginning with the movie
you selected.
Press the C button on your remote control to activate the Autoplay function.
This automatically plays CDs and DVDs when they are inserted (if the Pinnacle
MediaCenter is on at the same time). Press the C button again to deactivate this
function.
147
Pinnacle MediaCenter
Photo Menu
Photo Menu Overview
If you select the Photos menu in the Pinnacle MediaCenter main screen, the
following window is displayed:
The individual menu options give you access to the following functions:
New Photos: Use this menu to display all your newly imported photos as
single images or together in a slideshow.
Slide Shows: Select this menu option to display a slideshow or to display
individual photos in a slideshow.
This means you do not have to show your friends and family an entire photo
album (for example, of a specific vacation). You can present the highlights in
a special slideshow.
Photo Albums: Select this menu option to display photo albums as
slideshows in the Pinnacle MediaManager or to display individual photos in
the album.
By Date: Here you can search for photos according to chronological features
(year, month, day) and play them in a slideshow or display them individually.
Name: Use this menu option to display the individual photos in alphabetical
order or in a slideshow.
Browse: Use this menu option to search your hard drive for photos and either
display them individually or in a slideshow.
CD/DVD: Use this menu option to display photos from a CD or DVD.
148
Pinnacle MediaCenter
Navigating a Slideshow
Playback
To start a slideshow, press the Play button on your remote control.
Previous Track, Left arrow, Up arrow
Use these remote control buttons to skip to the previous photo in the slideshow.
Next Track, Right arrow, Down arrow
Use these remote control buttons to skip to the next photo in the slideshow.
Rewind, Fast Forward
Use the Rewind and Fast Forward buttons to reduce or increase the display
times for each photo during a slideshow in increments of seconds.
Pause
Press the Pause button on your remote control to pause the slideshow. Resume
playing the slideshow by pressing the Pause button again or the Play button.
Stop
Press the Stop button to end the slideshow at any time and return to the previous
menu.
Use the "Settings" command to individually design your slideshow.
Displaying Individual Photos
To display an individual photo, select it and confirm your selection.
Previous Track, Left arrow, Up arrow
Press these buttons on your remote control to skip to the previous photo in the
category.
Next Track, Right arrow, Down arrow
Press these buttons on your remote control to skip to the next photo in the
category.
Stop, Full Screen, OK
Press these buttons at any time to stop the photo display and return to the
previous menu.
149
Pinnacle MediaCenter
Shuffle
Each menu has a shuffle function:
Press the A button on your remote control to activate shuffle mode. All the
photos you select in this category (for example, of the playlist or of the album)
are displayed in random order. Press the A button again to deactivate the
function and display the photos in a set sequence again.
Repeat
Each menu option has a Repeat function:
Press the B button on your remote control to activate repeat mode. Now all the
photos in the selected category will be repeatedly displayed.
Press the B button on your remote control again to deactivate repeat mode and to
display the photos once only.
Thumbnails
Many menu options offer the Thumbnail function:
Press the C button on your remote control for thumbnails of all the listed photos.
Press the C button on your remote control again to display the photos as a list
again.
Information Window
Every menu option in the Photo menu displays an information window with the
selected photo or the first photo in the selected category. This gives you an
overview of the photos/categories listed.
To switch between the information window and full screen, refer to the
chapter "Pinnacle MediaCenter Window Formats".
On Screen Display
You can configure detailed settings affecting the behavior of the On Screen
Display in the Settings menu.
When the photo display is set to full screen mode, the title of the current photo
appears on the lower edge of the image when a new photo is displayed. This
OSD disappears after a few seconds.
If you press the ? or Info button (depending on the remote control) while
displaying photos in full screen mode, an On Screen Display appears with the
following information:
Volume display
Title of the previous as well as of the next photo
150
Pinnacle MediaCenter
Current time and date
Index of the position of the current photo in its category
Name of the photo and additional EXIF information (if available)
Display of the time status of the current slideshow (if a slideshow is being
displayed)
If you have not set the OSD to disappear automatically in the Settings menu, the
OSD disappears again when you press the ?/Info button again.
151
Pinnacle MediaCenter
New Photos
When you select New Photos in the Photo menu, the following window
appears:
On the right side of the window, you see a list of all the newly imported photos
in alphabetical order.
Displaying All the New Photos in a Slideshow
To display all of the new photos as a slideshow, select All New Photos and
confirm your selection or press the Play button.
Selecting a specific photo and pressing the Play button on your remote control
starts a slideshow with all the newly imported photos, beginning with the
selected photo.
Displaying Specific New Photos
If you select a photo and confirm, the photo is displayed.
152
Pinnacle MediaCenter
Slideshows
When you select Slideshow in the Photo menu, the following window appears:
On the right side of the window, you can choose from the following categories:
My Slideshows: This category displays all the slideshows created in the
Pinnacle MediaManager.
Top rated: Here are all the photos with top ratings in the Pinnacle
MediaManager.
Most played: This category lists all the photos that have been played often in
the past (this list is generated automatically).
Least played: This category contains all the photos that are rarely displayed
(this list is generated automatically).
Not played: This contains a list of all the photos that have not yet been
viewed (this list is generated automatically).
Display the Entire Category
If you want to display the entire category as a slideshow, select the category
(My Slideshows, Top rated, Most played, Least played or Not played) and
press the Play button on your remote control.
153
Pinnacle MediaCenter
My Slideshows
To display all of the slideshows created in the Pinnacle MediaManager, select
the My Slideshows category and confirm your selection. This displays a list of
all the available slideshows. You now have the following options:
If you want to display an entire slideshow, select a slideshow and press Play.
If you select a slideshow and confirm your selection, a list of all the photos in
the slideshow is displayed. You can display a single photo by selecting and
confirming it. After selecting a single photo and pressing the Play button on
your remote control, a slideshow is displayed, beginning with this photo.
Displaying Specific Photos in a Category
To display individual photos in a category (Top rated, Most played, Least
played, Not played), select a category and confirm your selection. All the
photos in the category are then listed on the right side of the window.
If you select a photo and press the Play button on your remote control, all the
photos in the category are displayed, beginning with the photo selected.
If you only want to look at one photo, select it and confirm your selection.
154
Pinnacle MediaCenter
Photo Album
When you select Photo Album in the Photo menu, the following window
appears:
On the right side of the window, you see all of the photo albums in the database
listed in alphabetical order.
Displaying the Entire Album
To display the entire album, select it and press the Play button on your remote
control. The photos in the album are then displayed in a slideshow.
If you select an album and confirm your selection, all of the photos in the album
are displayed. When you select a single photo and press the Play button on the
remote control, the entire album is displayed, beginning with the photo selected.
Displaying Individual Photos in an Album
To display individual photos in an album, select an album and confirm your
selection. All the photos in the album are now listed on the right side of the
window.
If you only want to look at one photo, select it and confirm your selection.
155
Pinnacle MediaCenter
Date
When you select Date from the Photo menu, the following window is displayed:
On the right side of the window, you see the creation years for all the photos in
the database.
Displaying All Photos
If you want to see all of the photos in the database as a slideshow, select All
Years and press the Play button on your remote control. All the photos in the
database are now displayed in a slideshow.
To display all the photos in the database individually, click All Years and
confirm your selection. This displays all the photos in alphabetical order.
If you select a photo and press the Play button on your remote control, all the
photos are displayed in a slideshow, beginning with the photo selected.
If you only want to look at one photo, select it and confirm your selection.
Displaying Photos from a Specific Year
If you want to see all the photos in the database taken in a specific year, select
the year and press the Play button on your remote control. Now all the photos in
the database from that year are displayed as a slideshow.
To display all the photos in the database from a specific year individually, click
the specific year and confirm your selection. You now have the following option
in the list that appears:
If you select All Months and press the Play button on your remote control,
all the photos from that year will be displayed in a slideshow.
156
Pinnacle MediaCenter
Select All Months and confirm your selection for a list of all the photos from
that year.
If you select a photo and press the Play button on your remote control, all the
photos from the selected year are displayed, beginning with the photo
selected.
If you only want to look at one photo, select it and confirm your selection.
Displaying Photos from a Specific Month
If you want to see all of the photos in the database taken in a specific month,
select a year and confirm your selection. On the right side of the window, all the
months with photos in that year found in the database are displayed.
Now select a month and press the Play button on your remote control. Now all
the photos from the selected month are displayed in a slideshow.
To display all the photos in the database from a specific month individually,
select a specific month and confirm your selection. You now have the following
options:
If you select All Days and press the Play button on your remote control, all
the photos from that month will be displayed in a slideshow.
Select All Days and confirm your selection for a list of all photos from that
month. If you select a photo and press the Play button on your remote
control, all the photos from the selected month are displayed, begining with
the photo selected.
If you only want to look at one photo, select it and confirm your selection.
Displaying Photos from a Specific Day
If you want to see all the photos in the databse from a specific day, select a year
and confirm your selection. On the right side of the window, all the months with
photos in the database are displayed. Now select a month and confirm your
choice. On the right side of the window, all the days in that month with photos
in the database are displayed.
Now select a day and press the Play button on your remote control. Now all the
photos from that day are displayed as a slideshow.
If you want to look at individual photos from a specific day, select the day and
confirm your selection.
If you select a photo and press the Play button on your remote control, all the
photos from a specific day are displayed as a slideshow, beginning with the
photo selected.
If you only want to look at one photo, select it and confirm your selection.
157
Pinnacle MediaCenter
Name
When you select Name in the Photo menu, the following window appears:
On the right side of the window, you see all of the photos in the database listed
in alphabetical order.
Displaying All the Photos in a Slideshow
To display all the photos as a slideshow, select All Photos and confirm your
selection or press the Play button.
If you select a specific photo and press the Play button on your remote control,
all the photos are displayed as slideshow, beginning with the photo selected.
Displaying Specific Photos
If you select a single photo and confirm, the photo is displayed.
158
Pinnacle MediaCenter
Browsing Your Hard Disk
When you select Browse from the Photo menu, the following window appears:
On the right side of the window, you can browse your hard disk for photos and
view them individually or in a slideshow. The current path is always displayed
in the Pinnacle MediaCenter window.
The first time you browse for photos on your hard disk, the "My Pictures" folder
will open by default. Select and confirm the Go Up button to go the next higher
directory on your hard disk.
If your select a specific directory and confirm your selection, a list of the
contents of this directory is displayed.
If you select a specific directory and press the Play button, a slideshow of all
the photos in this directory and its subdirectories is displayed.
If your select a specific photo and confirm your selection, the photo is
displayed.
If you select a specific photo and press the Play button, all the photos in this
directory (without subdirectories) are displayed as a slideshow, beginning
with the photo selected.
159
Pinnacle MediaCenter
CD/DVD
When you select CD/DVD from the Photo menu, the following window
appears:
If you have already activated the Autoplay function, CDs and DVDs will
play automatically when inserted (if the Pinnacle MediaCenter is on).
Use this menu option to display photos located on a CD or DVD:
If there is no CD or DVD in the corresponding drive, Pinnacle MediaCenter will
prompt you to insert a CD or DVD.
If there is a CD/DVD in your CD-ROM/DVD drive, the directories and
individual photos on the CD/DVD will be displayed on the right side of the
window.
If you select a specific directory and confirm your selection, the contents of
this directory are listed.
If you select a specific directory and press the Play button, a slideshow of all
the photos in this directory and its subdirectories is displayed.
If you select a specific photo and confirm your selection, the photo is
displayed.
If you select a specific photo and press the Play button, all the photos in this
directory (without subdirectories) are displayed in a slideshow, beginning
with the photo selected.
Press the C button on your remote control to activate the Autoplay function:
This automatically plays CDs and DVDs when they are inserted (if the Pinnacle
MediaCenter is on at the same time). Press the C button again to deactivate this
function.
160
Pinnacle MediaCenter
Online Menu
Online Menu Overview
This menu option is only available if you have allowed the display of online
services in the Settings menu.
When you select the Online menu option in the main Pinnacle MediaCenter
screen, you can access online services which offer an incredible variety of
Internet content (for example T-Online Vision or Arcor). Among other things,
you can even watch videos on demand.
To access the Internet page of a specific online service, select it and confirm
your selection or press the Play button.
161
Pinnacle MediaCenter
Menu Settings
Menu Settings Overview
If you select Settings in the Pinnacle MediaCenter main screen, the following
window appears:
You have the option of configuring the most important settings for the following
menu options:
General
TV
Radio
Movie
Capture
Music
Photos
The individual Settings menu areas are explained in detail in the following
sections.
You can make more extensive changes in the "Advances Settings Dialog".
Refer to the chapter "Advanced Settings".
162
Pinnacle MediaCenter
Using the Settings Menu
To edit a specific field in the Settings menu, proceed as follows:
Use the arrow buttons on your remote control or the cursor keys on your
keyboard to select the corresponding field.
To activate the field, press the OK/Confirm button on your remote control
or the Enter key on your keyboard.
Press the Up/Down buttons or the arrow keys to move between the existing
entries (for example, "Yes"/"No" or "On"/"Off") or enter a number with the
keypad.
After you have made a selection or entered a number, deactivate the field by
pressing the OK/Confirm button on your remote control or the Enter key on
your keyboard.
Use the arrow buttons or the cursor keys to select another field and change
the corresponding settings.
After you have configured all the settings, select the OK button and confirm.
The changes to the settings will now take effect.
If you do not want to apply the changes, select Cancel and confirm.
Saving the Settings
If you have made changes, the following window will appear when you exit the
Settings menu:
If you want the changes to take effect, select Yes and confirm. The new settings
are now active.
If you do not want to keep the changes, select No and confirm. This cancels the
changes.
Information Window
While you are in the Settings menu of the Pinnacle MediaCenter, the current TV
program is displayed in the information window so you won't miss a second of
your favorite show.
163
Pinnacle MediaCenter
General Settings
When you select General from the Settings menu, the following window
appears:
Use this window to configure various general settings:
Parental Control
Here you can release all movies by deactivating restricted access to media set in
the Pinnacle MediaManager.
Select the access code field and use the number buttons on your remote control
or the number keys on your keyboard to enter your four-digit PIN number.
Restricted access is now released.
Language
In this area, you can change the language settings for the Pinnacle MediaCenter.
Theme (skin)
You can choose different skins for the Pinnacle MediaCenter here. After you
select a new skin, the Pinnacle MediaCenter will display the new appearance.
Switch profile
If you have saved different profiles for the Pinnacle MediaCenter settings on
your hard disk, you can now select one of these profiles.
164
Pinnacle MediaCenter
CD/DVD autostart
This lets you select whether a CD/DVD will start automatically when it is
inserted or whether you prefer to manually start the CDs/DVDs.
Note that the automatic playback of a CD/DVD only works when the
Pinnacle MediaCenter is switched on.
Online content
In this field, you can determine whether special online services (such as TOnline Vision or Arcor) should have a separate menu option or not.
More info auto hide
Here you can choose whether an OSD display, with detailed information about
the current TV or radio program, the current music, the movie on TV or the
photo, should automatically disappear after a few seconds. If the OSD display
does not disappear automatically, you can manually hide it by pressing the ? or
Info button on your remote control (depending on the remote control).
165
Pinnacle MediaCenter
TV Settings
When you select TV from the Settings menu, a window opens where you can
configure the various TV settings.
TV Hardware
Select which installed TV hardware will be used for the Pinnacle MediaCenter.
Antenna
Use this field to select one of the available antenna types.
Channel Scan
Click this button to start a channel scan based on the last settings used.
EPG Source
You can select an EPG source here (for example, DVB or Internet).
Teletext
Use this area decide whether hidden text in the teletext window should always
be shown or hidden and whether the pages should be updated automatically.
166
Pinnacle MediaCenter
Radio Settings
When you select Radio from the Settings menu, a window appears where you
can configure the various radio settings.
Radio Hardware
Select which installed radio hardware should be used for the Pinnacle
MediaCenter.
Antenna
Use this field to select one of the available antenna types.
Channel Scan
Click this button to start a radio channel scan based on the last settings used.
167
Pinnacle MediaCenter
Music Settings
If you select Music from the Settings menu, the following window appears:
You can configure different music settings here:
Visualization
Choose from various visualizations that can be displayed on the screen while the
music is playing.
Display song titles
Choose whether you want the title of the current song displayed on the screen or
not.
Photo slide show
Here you can select a photo playlist from the Pinnacle MediaManager as a
visual background for your music.
Shuffle
In this field, you can set random mode to default or not.
When random mode is active, all of the selected music titles in a category (from
a playlist or album, for example) are played in random order.
You can activate or deactivate random mode at any time in the Music menu for
the respective playback.
168
Pinnacle MediaCenter
Repeat
In this field, you can set repeat mode to default or not.
When repeat mode is active, all the selected music titles in the category (from a
playlist or album, for example) are played repeatedly.
You can activate or deactivate repeat mode at any time in the Music menu for
the music you are playing.
Start in full screen
Here, you can determine whether you want the music visualization to be
immediately set to full screen mode when music is played or if you prefer to
first see this in a preview window.
Internet radio
In this field, select whether Internet radio reception should be allowed or not.
169
Pinnacle MediaCenter
Movie Settings
When you select Movies from the Settings menu, the following window
appears:
Here you can configure various settings for playing movies:
Shuffle
In this field, you can set shuffle mode to default or not.
When shuffle mode is on, all the movies in the category you selected (for
example, in the playlist or genre) are played back in random order.
You can activate or deactivate shuffle mode at any time in the Movie menu.
Repeat
In this field, you can set repeat mode to default or not.
When repeat mode is on, all the movies in the category you selected (for
example, in the playlist or genre) are played back repeatedly.
You can activate or deactivate repeat mode at any time in the Movie menu.
Start in full screen
You can set whether the movies will start immediately in full screen mode or
first in a preview window.
Audio language
You can set the language for your DVD audio playback.
Subtitle language
In this field, you can select the language for your DVD subtitles.
170
Pinnacle MediaCenter
Menu language
You can set the language for your DVD menu.
Aspect ratio
In this area, you can choose between various window formats.
Display titles
Enter whether you want an On Screen Display of the title of the current movie
while the movie is running or not.
171
Pinnacle MediaCenter
Photo Settings
When you select Photos from the Settings menu, the following window appears:
Use this window to configure various photo settings:
Shuffle
In this field, you can set shuffle mode to default or not.
When shuffle mode is on, all the photos in the category you selected (for
example, in the playlist or genre) are displayed in random order.
You can activate or deactivate shuffle mode at any time in the Photo menu.
Repeat
In this field, you can set repeat mode to default or not.
When repeat mode is on, all the photos in the selected category (for example, the
playlist or album) are played repeatedly.
You can activate or deactivate repeat mode at any time in the Photo menu.
Start in full screen
Here you can set whether the photos will be displayed directly in full screen
mode or first in a preview window.
Display captions
Enter whether to have an On Screen Display of the title of the current photo or
not.
Transition type
Here you can set how the photos are to be displayed and hidden.
172
Pinnacle MediaCenter
Slide duration
Set the length of time each photo is displayed during a slideshow.
Music playlist
You can access the music playlists created in the Pinnacle MediaManager to
select background music for your photo presentation.
173
Pinnacle MediaCenter
Capture Settings
When you select Capture from the Settings menu, the following window
appears:
On the right side of the window, you can configure various settings for capture
input:
TV Tuner 1
In this field, you can select a TV tuner as the standard feed.
Composite 1
Here you can select a composite video feed as the standard feed.
S-Video 1
Here you can select an S-video feed as the standard feed.
TV Tuner 2
If you have a second TV tuner, you can select it as the standard feed.
Composite 2
If you have a second composite video feed, you can select it as the standard
feed.
S-Video 2
If you have a second S-video feed, you can select it as the standard feed.
174
Pinnacle MediaCenter
PC View (optimized for operation with a mouse)
Overview
The Pinnacle MediaCenter PC view is optimized for use with a mouse.
While you are sitting at your desk doing other things on your PC, you can access
your personal media directly with the mouse.To help you with this, you can
seemlessly adjust the Pinnacle MediaCenter window in the PC view to any size
you want and move it anywhere you find most convenient.
The control bars can be configured in such a way that they are only displayed if
necessary so only the minimum amount of screen space for media playback is
used.
Control Bars
To operate the Pinnacle MediaCenter in the PC view, you have two control bars,
one at the top and one at the bottom of the Pinnacle MediaCenter window. For
more information, refer to the chapter "General Operating Controls".
Size of the Pinnacle MediaCenter Window in the PC view
The size of the Pinnacle MediaCenter window in the PC view can adjusted to
any size you want.
To do this, left-click and hold the mouse button down on the corner of the
Pinnacle MediaCenter window and then drag the corner until the window is the
size you want.
If the window exceeds normal size, the control bars can no longer be displayed.
You can resize the Pinnacle MediaCenter window by either dragging the corner
with your mouse to enlarge it or double-clicking the window with your mouse.
This automatically sets the Pinnacle MediaCenter to normal size and the control
bars can again be displayed.
Positioning the Pinnacle MediaCenter Window in the PC View
To position the Pinnacle MediaCenter window in the PC view to the area on
your screen you want, left-click in the top or bottom control bar and move the
window while holding down the mouse button.
175
Pinnacle MediaCenter
General Operating Controls
Upper Control Bar
The upper control bar in the PC view contains various buttons for operating the
Pinnacle MediaCenter - independent of the media type currently being accessed.
For example, you can modify the size and behavior of the Pinnacle MediaCenter
window, switch to the remote view or access various types of media.
The control bars can be configured in "Advanced Settings" in such a way that
they are not always visible but are only displayed when you move your mouse
over the Pinnacle MediaCenter window. They automatically disappear again
when you move your mouse out of the Pinnacle MediaCenter window or if the
cursor does not move for a few seconds.
In addition, the control bars can be placed in the task bar by clicking the
button. Click the
original location.
button in the task bar to move the control bars back to their
Note that depending on your hardware and the current reception area, some
buttons and their functions may be temporarily unavailable.
Menu
If you click this button, you return to the main screen of the Pinnacle
MediaCenter remote view.
Back
Clicking this button will take you back to the previous page or menu selection.
TV
When you click this button, TV mode is activated and the current TV program
of the channel last selected is displayed in the PC view.
Radio
When you click this button, you switch to radio mode where you hear the
current broadcast of the channel last selected.
176
Pinnacle MediaCenter
Browse
When you click this button, an "Open File" dialog appears letting you browse
your hard drive or a CD/DVD for the files you want to play.
Teletext
Clicking this button opens the teletext window in the PC view (if teletext is
available).
EPG
Click this button to open the Electronic Program Guide (EPG) in the PC view (if
EPG is available).
Always On Top
When this button is activated, the Pinnacle MediaCenter window is always
displayed in front of all the other windows on the screen.
Minimize
Clicking this button minimizes the Pinnacle MediaCenter window into the task
bar.
Fullscreen/Normal Screen
Clicking this button lets you switch the Pinnacle MediaCenter window back and
forth from full screen to a normal-sized screen.
Close
This button closes the Pinnacle MediaCenter or a subwindow (for example, the
teletext or EPG window).
177
Pinnacle MediaCenter
Bottom Control Bar
The bottom control bar in the Pinnacle MediaCenter PC view is dependent on
the media type you have selected. Depending on whether you are currently
watching TV or listening to radio or playing a DVD or a file, the buttons
available will vary.
The control bars can be configured in "Advanced Settings" in such a way that
they are not always visible but are only displayed when you move your mouse
over the Pinnacle MediaCenter window. They automatically disappear again
when you move your mouse out of the Pinnacle MediaCenter window or if the
cursor does not move for a few seconds.
Since the bottom control bar can contain different operating controls
depending on the media type being used, detailed descriptions of the buttons are
found in the following chapters.
Open and Closed Bottom Control Bar
The bottom control bar can be opened by clicking the
button. This also gives
you access to additional buttons. Or you can also open the control bar by
clicking the Play/Pause or Record buttons.
button closes the bottom control bar.
Clicking the
Positioning the Bottom Control Bar
If the bottom control bar is docked on the Pinnacle MediaCenter window, you
can move them both around or change their size as a single unit.
You can also position the bottom control bar separately. This means you can put
it anywhere on the screen independent of the rest of the Pinnacle MediaCenter
window. To do this, click the bottom control bar and hold down your mouse
button. While holding down your mouse button, drag the control bar to the
position on the screen you want.
If the bottom control bar is positioned separately, it will not disappear and
cannot be resized.
In addition, the control bars can be placed in the task bar by clicking the
button. Click the
button in the task bar to move the control bars back to
their original location.
178
Pinnacle MediaCenter
Context Menu
When you right-click in the Pinnacle MediaCenter window in the PC view, a
context menu opens where you can make the following changes:
When you click the TV, Radio, Browse, Teletext or EPG options, you can
select the respective media type or display the "Open File" dialog.
If you activate the Dock Control option, the bottom control bar becomes
permanently docked on the Pinnacle MediaCenter window.
Use the View Mode option to decide whether your Pinnacle MediaCenter
window should be displayed without a border and what size and aspect ratio
it have should.
Use the Settings option to change the settings relating to channels, TV
hardware, audio, display, and recording.
179
Pinnacle MediaCenter
Operating Controls While Watching TV
Closed Bottom Control Bar
The closed bottom control bar gives you access to the following buttons while
you watch TV:
Channel
The currently set channel is displayed in this field. You can also switch channels
here:
To do this, click the Channel button.
If you have created channel lists in the "Advanced Settings", a pop-up
window displays all the available channels. Clicking a channel will take you
to its currently running program.
If you have created channel lists in the "Advanced Settings", a pop-up
window displays all the available channel lists. If you click a specific channel
list, all the channels assigned to this group appear on the right side of the
window. Clicking a channel will take you to its currently running program.
In addition, you can switch between composite and S-video input in the
lower part of the pop-up window. To do this, click the corresponding button.
Audio mode
The currently set audio mode is displayed in this field. If more than one audio
mode is available, you can select between them here:
To do this, click the Audio Mode button. This opens a pop-up window
displaying all the available audio modes.
Clicking a specific audio mode sets it.
Language
Here, the language of the current program is displayed. If more than one
language is being broadcast, you can choose between them:
To do this, click the Language button. This opens a pop-up window
displaying all the available languages.
After clicking a specific language, the language of the current program is
reset accordingly.
180
Pinnacle MediaCenter
Select up/down
Clicking these buttons switches you to the previous or to the next channel in the
currently selected channel list. In addition, you have here the option of switching
between composite and S-video input by clicking the corresponding button.
Snapshot
If you click this button, a snapshot of the currently playing TV program is taken
as a single image and saved in the previously indicated directory in "Advanced
Settings". The file name is automatically created from the date, time, channel
name, and any available EPG information.
Volume
You can adjust the volume of your TV show individually with this slider. To do
this, click the slider button and while holding the mouse button down, slide it to
the position you want.
Clicking the Mute button mutes the TV show soundtrack. You can turn the
soundtrack back on by clicking the button again.
Record
If you click this button, the TV program currently playing is recorded and saved
in the previously indicated directory in "Advanced Settings". The file name is
automatically created from the date, time, channel name, and any available EPG
information.
The recording can be paused by clicking the Record button again or by clicking
the Stop button.
Play/Pause
If a timeshift recording is not currently taking place, you can start a timeshift
recording by clicking the Play/Pause button.
During a timeshift recording, playback is paused by clicking the Play/Pause
button. Click the button again to continue the recording.
Minimize to the task bar
After clicking this button, the most important control bar buttons are made
available in the task bar:
When you move your mouse over the "P" icon, the currently set TV channel is
displayed as a Tooltip.
181
Pinnacle MediaCenter
Clicking the "Volume" icon displays a slider which you can use to adjust the
volume or mute the soundtrack.
button in the task bar to move the control bars back to their
Click the
original location.
Open the bottom control bar
Clicking this button opens the bottom control bar.
182
Pinnacle MediaCenter
Opened Bottom Control Bar
If you click the
button while watching TV, the bottom control bar opens:
The following additional functions are now available:
Back
These buttons can only be selected if a timeshift recording is currently running.
Clicking the Back button starts the playback of the timeshift recording from the
beginning.
Stop
This button is only available if a recording is currently being made or you are in
timeshift mode. You can then end the currently running recording by clicking
Stop.
Record
If you click this button, the TV program currently playing is recorded and saved
in the directory previously indicated in "Advanced Settings". The file name is
automatically created from the date, time, channel name, and any available EPG
information.
The recording can be paused by clicking the Record button again or by clicking
the Stop button.
Play/Pause
If a timeshift recording is not currently taking place, you can start a timeshift
recording by clicking the Play/Pause button.
During a timeshift recording, playback of the timeshift recording is paused by
clicking the Play/Pause button. Click the button again to continue the recording.
183
Pinnacle MediaCenter
Rewind/Fast forward
These buttons are only available if a timeshift recording is currently running.
Clicking the Rewind and Fast Forward buttons allows you to move back and
forth within the timeshift recording. If you click once, the recording runs at
double speed. If you click twice, the recording runs at quadruple speed. Three
clicks results in 8x speed, and four clicks in 16x speed. One more click lets the
recording run at normal speed again.
To pause rewind/fast forward, click the corresponding button until the recording
plays at normal speed or click the Play/Pause button.
Previous Track/Next Track
These buttons are only available if a timeshift recording is currently running.
With the Previous Track and Next Track buttons, you can jump back and forth
in the timeshift recording within a time interval set in the "Advanced Settings".
Live TV
This buttons is only available if a timeshift recording is currently running.
Click this button to return to the live position in the current program. The
timeshift recording continues to be recorded and can be played back at any time.
Timeshift timeline
This field tells you the following information:
The start time of the timeshift recording, rounded up to the next half hour
(here: 6:30 AM).
The maximum timeshift position, at which the timeshift recording will pause
or start from the beginning (here: 10:30 AM). This is dependent on the
maximum available disk space that you can set for timeshift recordings in
"Advanced Settings".
The end of the status bar marks the current position of live TV. You can also
see how much disk space has already been used for the timeshift recording or
how much free disk space is still left.
The current position of the timeshift playback (here: 7:34 AM).
In addition, you can jump to any position within the timeshift recording. To do
this, click and hold your mouse button on the position indicator for the timeshift
playback and drag it to the position you want within the recording.
184
Pinnacle MediaCenter
Signal strength
When you click this button, a window with additional channel information
appears.
Close the bottom control bar
Clicking this button closes the bottom control bar.
185
Pinnacle MediaCenter
Operating Controls During DVD Playback
Closed Bottom Control Bar
The closed bottom control bar gives you access to the following buttons while
you play a DVD:
DVD title
The title of the currently playing DVD is displayed in this field. You can also
switch to a specific chapter on the DVD from here:
To do this, click the DVD title button.
Now, all the chapters on the DVD currently inserted are listed in a pop-up
window. When you click a chapter, playback of the selected chapter starts.
Audio mode
The currently set audio mode of the DVD is displayed in this field. If more than
one audio mode is available, you can select between them here:
To do this, click the Audio Mode button. This opens a pop-up window
displaying all the available audio modes.
Clicking a specific audio mode sets it.
Language
The language of the current DVD is displayed here. You can also change the
language for the soundtrack of the currently playing DVD in this field:
To do this, click the Language button. This opens a pop-up window
displaying all the available languages.
After clicking a specific language, the language of the current DVD
soundtrack is reset accordingly.
Drive
Clicking these buttons lets you switch between the DVD and the CD-ROM
drive. If only one drive is present, these buttons are not available.
186
Pinnacle MediaCenter
Snapshot
If you click this button, a snapshot of the currently playing DVD is taken as a
single image and saved in the directory previously indicated in "Advanced
Settings". The file name is automatically created from the date, time, and DVD
title.
Volume
You can adjust the volume of the DVD playback with this slider. To do this,
click the slider button and while holding the mouse button down, slide it to the
position you want.
Clicking the Mute button mutes the sound of the DVD playback. You can
turn the soundtrack back on by clicking the button again.
Play/Pause
Clicking the Play button starts the playback of a DVD. This button then changes
to a Pause button.
You can pause DVD playback by clicking the Pause button. Clicking it again
resumes playback.
Minimize to the task bar
After clicking this button, the most important control bar buttons are made
available in the task bar:
When you move your mouse over the "P" icon, the title of the currently playing
DVD as well as the current chapter are displayed as a Tooltip .
Clicking the "Volume" icon displays a slider which you can use to adjust the
volume or mute the soundtrack.
button in the task bar to move the control bars back to their
Click the
original location.
Open the bottom control bar
Clicking this button opens the bottom control bar.
187
Pinnacle MediaCenter
Opened Bottom Control Bar
If you click the
button while watching a DVD, the bottom control bar opens:
The following additional functions are now available:
Back
Click this button to playback the currently running DVD from the beginning.
Stop
Click this button to pause the current DVD playback and return to the main
menu on the DVD.
Play/Pause
Clicking the Play button starts the playback of a DVD. This button then changes
to a Pause button.
You can pause DVD playback by clicking the Pause button. Clicking it again
resumes playback.
Rewind/Fast forward
Clicking the Rewind and Fast Forward buttons lets you move back and forth in
a DVD at an increased speed and therefore lets you access different areas within
the DVD. If you click once, the DVD runs at double speed. If you click twice,
the DVD runs at quadruple speed. Three clicks results in 8x speed, and four
clicks in 16x speed. One more click lets the DVD run at normal speed again.
To pause rewind/fast forward, click the corresponding button until the DVD
plays at normal speed or click the Play/Pause button.
Previous Chapter/Next Chapter
Use the Previous Chapter/Next Chapter buttons to jump back and forth
between consecutive chapters.
188
Pinnacle MediaCenter
Main menu
Clicking this button opens the main menu of the current DVD.
Language
After clicking this button, a dialog window opens where you can set the
language for the soundtrack, the subtitles, and the menus of your DVD.
Camera Angle
If your DVD offers different camera angles, click this button to open a pop-up
menu where you can select between the camera angles available.
Timeline
This field tells you the following information:
The beginning of DVD playback (here: 0:00)
The end of the DVD (here: 17:32)
The current position within the DVD (here: 7:34) as well as the current
chapter. You can see here how much of the DVD has already been played
back or how much is still left.
The marks within the time status bar indicate the transitions between the
individual chapters.
In addition, you can jump to any position within the DVD. To do this, click and
hold your mouse button on the position indicator and drag it to the position you
want within the timeline.
If you right-click in the timeline, the remaining playback time will be displayed.
Close the bottom control bar
Clicking this button closes the bottom control bar.
189
Pinnacle MediaCenter
Operating Controls During File Playback
Closed Bottom Control Bar
The closed bottom control bar gives you access to the following buttons while
you play an audio or video file:
File name
The name of the current file is displayed in this field. When you play back all
the files in a specific directory, you can also switch between the files here:
To do this, click the File name button.
Now, all the files in the current directory are listed in a pop-up window. If
you click a file, the selected file is played back.
Play/Pause
Clicking the Play button starts the playback of a file. This button then changes
to a Pause button.
You can pause file playback by clicking the Pause button. Clicking it again
resumes playback.
Snapshot
If you click this button, a snapshot of the currently playing video file is taken as
a single image and saved in the directory previously indicated in "Advanced
Settings". The file name is automatically created from the date, time, and file
name.
Volume
You can adjust the volume of the file playback with this slider. To do this, click
the slider button and while holding the mouse button down, slide it to the
position you want.
Clicking the Mute button mutes the sound of the file playback. You can turn
the soundtrack back on by clicking the button again.
190
Pinnacle MediaCenter
Minimize to the task bar
After clicking this button, the most important control bar buttons are made
available in the task bar:
When you move your mouse over the "P" icon, the name of the file currently
being played back is displayed as a Tooltip.
Clicking the "Volume" icon displays a slider which you can use to adjust the
volume or mute the soundtrack.
button in the task bar to move the control bars back to their
Click the
original location.
Open the bottom control bar
Clicking this button opens the bottom control bar.
191
Pinnacle MediaCenter
Opened Bottom Control Bar
If you click the
button while playing back a file, the bottom control bar
opens:
The following additional functions are now available:
Back
Click this button to play back the current file from the beginning.
Stop
Click this button to pause the file currently being played back and return to the
previous mode in the Pinnacle MediaCenter.
Play/Pause
Clicking the Play button starts the playback of a file. This button then changes
to a Pause button.
You can pause file playback by clicking the Pause button. Clicking it again
resumes playback.
Rewind/Fast forward
Clicking the Rewind and Fast Forward buttons lets you move back and forth in
a video file at an increased speed, therefore letting you access different areas
within the file. If you click once, the video runs at double speed. If you click
twice, the video runs at quadruple speed. Three clicks results in 8x speed, and
four clicks in 16x speed. One more click lets the video file run at normal speed
again.
Previous file/Next file
Use the Previous file/Next file buttons to move from file to file in the current
directory.
192
Pinnacle MediaCenter
Language
If subtitles are available for the current file and you click this button, a dialog
window appears where you can set the language for the subtitles.
Timeline
This field tells you the following information:
The beginning of file playback (here: 0:00)
The end of the file (here: 17:32)
The current position within the file (here: 7:34). You can see here how much
of the file has already been played back or how much is still left to play back.
In addition, you can jump to any position within the file. To do this, click and
hold your mouse button on the position indicator and drag it to the position you
want within the timeline.
If you right-click in the timeline, the remaining playback time is displayed.
Close the bottom control bar
Clicking this button closes the bottom control bar.
193
Pinnacle MediaCenter
Teletext
Overview
If you click the Teletext button in the upper menu bar, the teletext window
opens in the PC view (if teletext is available):
Teletext can consist of two windows. In the left window, you will see the TOP
text and the operating controls for navigating in teletext. To the right is the
teletext window where the teletext pages and subpages are displayed.
When there is enough space on the screen, the TV program showing on the
current channel is displayed next to the teletext area. This lets you read teletext
and watch TV at the same time.
For general information about teletext and TOP text, refer to the "Teletext"
chapter.
Positioning the Teletext Window
Both the teletext window as well as the TV window (if this is displayed) can be
coupled to each other and then moved together on the screen as a single unit.
Or you can also position the windows separately. This means you can put one of
the windows anywhere on the screen independent of the other window. To do
this, click the corresponding window and hold down your mouse button. While
holding down your mouse button, drag the window to the position on the screen
you want.
If the teletext window can be moved separately, you can also resize it. To do
this, left-click and hold the mouse button down on the corner of the window and
then drag the corner until the window is the size you want.
194
Pinnacle MediaCenter
Bottom Control Bar
In teletext mode, the buttons for operating the TV are located in the bottom
control bar so that you can keep track of both the teletext and your TV program
at the same time.
Closing a Teletext Window
When you close the TOP text window by clicking the Close button in the upper
control bar, the teletext window will continue to be displayed.
When you close the teletext window by clicking the Close button in the upper
control bar, the entire teletext window is closed and the currently showing TV
program is displayed in the Pinnacle MediaCenter window.
195
Pinnacle MediaCenter
Navigating Teletext
Navigating teletext using TOP text
TOP text lets you quickly and effectively navigate through teletext. After
clicking a TOP text entry, the corresponding page is displayed in the teletext
window.
If no TOP text is available, a selection of possible teletext pages that you can
also click for access is listed in the TOP text window.
If a topic in TOP text has additional subtopics (indicated by a "+" before the
topic title), you can open the list of all subtopics by clicking the "+". If you click
the "+" again, the list of all the subtopics is hidden.
Navigating teletext using the operating controls
In the right part of the TOP text window, there are several buttons that you can
use to navigate teletext:
Page
The page number of the current teletext page is displayed in this field.
button or
button to access either
To change the teletext page, click the
the previous or the next teletext page.
Or you can click the teletext page number display and enter the desired page
number directly using your keyboard.
Subpage
If the currently selected teletext page has subpages, the page number of the
current teletext subpage is displayed in this field.
button or
button to access
To change the teletext subpage, click the
either the previous or the next teletext subpage.
Or you can click the teletext subpage number display and enter the desired page
number directly using your keyboard.
Saving pages
When you click this button, an "Open File" dialog opens where you can save the
current teletext page as an ASCII text file. The file name is created by default
from the current date, time, channel name, and teletext page number.
Closing teletext windows
Clicking this button closes the entire teletext and displays the program showing
on the current TV channel in the Pinnacle MediaCenter window.
196
Pinnacle MediaCenter
Accessing pages directly
To access a teletext page or subpage, you can also enter the page number
directly with your keyboard.
197
Pinnacle MediaCenter
Electronic Program Guide (EPG) and Recording
Electronic Program Guide (EPG)
This menu is only available if you have access to an EPG service.
If you click the EPG button in the upper control bar, the Electronic Program
Guide opens in the PC view:
The Electronic Program Guide offers you a complete overview not only of the
current but also of the future TV schedule. This also lets you record TV shows
quickly and simply.
EPG Program List
In the middle part of the window, you see the EPG program list, which is sorted
either according to time or according to channel.
You can move up or down in the EPG program list by clicking the scroll bar or
by clicking the scroll bar and, at the same time, holding down the mouse button
to slide the scroll bar up or down.
Colored symbols indicate the status of a program. Currently running recordings,
shows scheduled to be recorded, already recorded shows or TV shows currently
being broadcast are marked using different symbols.
An information window on the lower edge of the screen displays information
about the selected show.
198
Pinnacle MediaCenter
Sorting a EPG Program List
You can sort the EPG program list according to time or according to channel:
Sorting the EPG program list by time
When you click the Time button, the current time is displayed in the Time field
and all the programs scheduled to be broadcast at the current time are listed in
the program list.
You can now adjust the time information and then display the TV listings of all
the available TV channels at one of the times you have indicated:
buttons next to the Time field. The time is changed
To do this, click the
by hour increments and the shows, which are to be broadcast at the newly
chosen time, are now included on the EPG list.
button. If you click on
To view the TV schedule of a different day, click the
a specific day in the calender window which opens, the program that will be
broadcast at the indicated time on the day you have chosen appears in the EPG
list (if this information is available).
Sorting the EPG program list by channel
After you select the Channel button and confirm it, the current channel is
displayed on the upper edge of the screen and the schedule of the current
channel appears in the program list, beginning at the current time.
You can now select another channel and display the schedule for this channel:
To do this, click the Channel field.
All the available channels are displayed in a pop-up window. Clicking a
channel enters it in the Channel field and the TV schedule for that channel is
displayed in the program list.
If you have created channel lists in the "Advanced Settings", a pop-up
window displays all the available channel lists. If you click a specific channel
list, all the channels assigned to this group appear on the right side of the
window. Clicking a channel enters it in the Channel field and the TV
schedule for that channel is displayed in the program list.
Or you can also select a channel by clicking the Previous/Next Channel
next to the Channel field and switching from the previous or to
buttons
the next channel in the channel list. The TV schedule of the corresponding
channel is now displayed in the program list.
Accessing a Schedule in the EPG Program List
If you would like to see a program currently being broadcast, click the
corresponding schedule in the EPG list, and the program will be displayed in the
PC view.
199
Pinnacle MediaCenter
Recording a Program from the EPG Program List
Using the EPG function, it is easy to record a program.
To do this, click the desired program in the EPG program list and then click the
Record button. A program that is currently being shown is recorded
immediately. The recording for a future program is scheduled.
You can tell whether a show is currently being recorded or if a show is
scheduled to be recorded by the record icon in the EPG channel list.
Pausing, Editing or Deleting Recordings in the EPG Program List
You can edit or delete recordings being made right now or recordings scheduled
in the future in the EPG menu directly.
To do this, click the program you want and then click the Edit button. In the
window that now appears, you can pause, edit or delete the recording (refer to
the chapter "Manual Recording")
200
Pinnacle MediaCenter
Manual Recording
To schedule a recording manually, click the EPG button in the upper task bar
and click the Manual Record tab in the window that now appears:
For a scheduled recording, enter the following information:
Channel
Enter the channel of the program to be recorded in this field:
To do this, click the Channel field.
All the available channels are displayed in a pop-up window. Clicking a
channel enters it in the Channel field.
If you have created channel lists in the "Advanced Settings", a pop-up
window displays all the available channel lists. If you click a specific channel
list, all the channels assigned to this group appear on the right side of the
window. Clicking a channel enters it in the Channel field.
Or you can also select a channel by clicking the Previous/Next Channel
and switching from the previous or to the next channel in the
buttons
channel list.
Day
In this field, enter the day your recording should take place.
To do this, you can enter a date directly using the number keys on your
keyboard.
button. If you click a specific day in the calender window
Or click the
that now appears, this day is entered automatically in the Day field.
201
Pinnacle MediaCenter
Start Time
Here, enter the time the scheduled recording should start.
To do this, enter a four-digit time directly using the number keys of your
keyboard (hours:minutes).
Or you can click the
button. In the window that now appears, a list of
times in half-hour increments is displayed. If you click a specific time, this
will be entered automatically in the Start Time field.
Stop Time
In this field, enter at what time the scheduled recording should stop.
To do this, enter a four-digit time directly using the number keys on your
keyboard (hours:minutes).
button. In the window that now appears, a list of
Or you can click the
times in half-hour increments is displayed. If you click a specific time, this
will be entered automatically in the Stop Time field.
Duration
Here, you decide how long the scheduled recording should last.
To do this, enter a time in minutes directly using the number keys on your
keyboard.
Or you can click the
button. In the window that now appears, a number of
time periods are displayed. If you click a specific time period, this will be
entered automatically in the Duration field.
Note that after entering the start time and the stop time, the duration is
automatically calculated. After entering the start time and the duration of a
recording, the stop time is automatically calculated.
Frequency
Here you can select the frequency your recording should be repeated (for
example, once, daily or weekly).
button and then click a frequency in the pop-up
To do this, click the
window that now appears. This will then be automatically entered in the
Frequency field.
When you select Suspend, you can suspend a regularly scheduled recording,
for example, when the program schedule changes.
Format
In this field, enter the recording format you want.
button and then click the format you want in the pop-up
To do this, click the
window that now appears. This will then be entered automatically in the Format
field.
202
Pinnacle MediaCenter
Destination
Here, select whether you would like to save your recording on your hard drive
or on DVD.
button and then click Hard disk or DVD in the pop-up
To do this, click the
window that now appears. This will then be entered automatically in the
Destination field.
203
Pinnacle MediaCenter
Scheduled Recordings
If you would like to edit or cancel a previously scheduled recording, click the
EPG button in the upper control bar. In the window that now appears, click the
Scheduled tab:
All of your scheduled recordings including recording times are displayed here.
Click the recording to select it so you can edit or cancel it.
More information about the selected scheduled recording is located at the
bottom of the window.
Cancelling Scheduled Recordings
If you would like to cancel a scheduled recording, click the corresponding
recording and then click the Cancel button. If you click Yes in the dialog
window that now appears, the recording schedule settings will be deleted and
the recording will be not take place.
Editing Scheduled Recordings
If you would like to edit the scheduled recording (for example, to change the
recording time or the date), click the corresponding recording and then click the
Edit button. The settings for this recording are displayed and you can now edit
them (for more information, refer to the chapter "Manual Recording").
204
Pinnacle MediaCenter
Recording
To get an overview of all the previous and saved recordings, click the EPG
button in the upper control bar and then the Recorded tab:
Here, you see all the currently available recordings including information about
the recording date and time.
You also see further information for each selected recording in the information
window on the lower edge of the screen.
If you would like to delete a recording, click the corresponding recording and
then click the Delete button. If you click Yes in the dialog window that now
appears, the recording will be deleted.
205
Technical Support
Getting Technical Support
If problems should occur with your Pinnacle Systems product, please check
first that the latest version of the software has been installed on your computer
system.
Pinnacle Systems provides a free, round-the-clock service, which enables users
to rectify problems themselves. You will be able to find answers to your
questions seven days a week, right around the clock.
You will find this technical support at:
http://www.pinnaclesys.com
Click Support and select your product from the product list. Select your product
again in the Interactive Support category. You will then be able to choose from
the following support options:
1. Frequently Asked Questions
This is the best way of obtaining answers to your questions. Here you will find
hundreds of technical problems and their solutions sorted by subject areas.
These are shown in the order of the 20 most frequently read questions. In
addition, you can also sort the documents according to problem categories. To
do this, use the pull-down Category menu.
Please use the search function to obtain answers to special questions.
2. Ask a Question and Get an Answer
Simply enter your question or the symptoms of your problem and you will
obtain a list of the most obvious solutions. If you do not obtain a satisfactory
solution, please rephrase your question. For example, instead of "I get error
messages" you could enter "I get error messages when installing the software".
Instead of entering a specific question, you can select one of the main functions
listed for your product or a general subject area from the pull-down Category
list. The ten most frequently asked questions and the appropriate solutions in the
category that you have selected will then be displayed.
3. E-mail Support
If you are unable to find an answer to your questions with the help of our Web
site, Pinnacle Systems also offers technical support by e-mail. E-mails will be
answered as quickly as possible. Please use the Ask a Question box for this
207
Pinnacle MediaCenter
purpose. Before the e-mail is submitted, five solutions to your problem will be
suggested. Please read these carefully, as more than 70% of customers find
suitable answers in these proposed solutions.
4. Discussion Forum
More than 100,000 registered users make use of this free service. Visit the
Pinnacle Systems online discussion forum to see whether your question has
already been asked and a suitable answer found. To use the service, ask your
question in the discussion forum and you will receive help from Pinnacle
Systems or other users.
A search function is provided in the discussion forum. If you enter "poor
picture", for example, contributions on this subject will be displayed.
When you make use of Pinnacle Systems technical support, you should
have all the technical information about your computer configuration ready at
hand.
208
License Agreement
Pinnacle End User License Agreement
This End User License Agreement (“License”) is a legal agreement between you
and Pinnacle Systems (“Pinnacle”) regarding Pinnacle’s software and the
accompanying documentation (collectively, the “Software”). CAREFULLY
READ THE FOLLOWING LICENSE. USING THIS SOFTWARE
INDICATES YOUR ACCEPTANCE OF THIS LICENSE. IF YOU DO NOT
ACCEPT OR UNDERSTAND THE TERMS OF THIS LICENSE, YOU
SHOULD NOT INSTALL THE SOFTWARE AND PROMPTLY RETURN
THIS PRODUCT TO YOUR VALUE-ADDED RESELLER.
1. License Grant. Subject to the restrictions set forth below, this License grants
you a non-exclusive, perpetual license to (a) install the Software on only one
computer; (b) use or authorize use of the Software on only one computer; (c)
make one copy of the Software, in machine-readable form, solely for backup
purposes; provided you include all copyright and other proprietary rights notices
on the copy and (d) transfer the Software and this License to another party if the
other party agrees to accept the terms and conditions of this License. If you
transfer the Software, you must at the same time either transfer all copies to the
same party or destroy any copies not transferred. If you transfer possession of
any copy of the Software to another party, your License is automatically
terminated.
2. License Restrictions. You may not, or allow any third party to, (a) rent,
lease, sell, loan or otherwise transfer the Software or any of your rights and
obligations under this License; (b) install the Software on a network for use by
multiple users, unless each user has purchased a license; (c) reverse-engineer,
decompile or disassemble the Software or hardware in whole or in part; (d)
remove or destroy any copyright notices or other proprietary markings of the
Software or any third-party software; (e) modify or adapt the Software, merge
the Software into another program or create derivative works based on the
Software; (f) make copies of or distribute, for profit or otherwise, the Software,
except as expressly provided above; (g) make any alteration, modification,
connection, disconnection, improvement or adjustment of any kind to or use the
Software except as explicitly contemplated in the enclosed documentation and in
this License and (h) sublicense, transfer or assign this License or any of the
rights and obligations granted under this License, except as explicitly
contemplated in this License. Any purported transfer or assignment will be
void.
209
Pinnacle MediaCenter
3. Export Restrictions. The export and re-export of Pinnacle software products
are controlled by the United States Export Administration Regulations and such
software may not be exported or re-exported to any country to which the United
States embargoes goods. In addition, Pinnacle software may not be distributed
to persons on the Table of Denial Orders, the Entity List, or the List of Specially
Designated Nationals. By downloading or using a Pinnacle software product
you are certifying that you are not a national of any country to which the United
States embargoes goods and that you are not a person on the Table of Denial
Orders, the Entity List, or the List of Specially Designated Nationals.
4. Ownership. The license granted hereunder does not constitute a transfer or
sale of ownership rights in or to the Software. Except for the license rights
granted above, Pinnacle retains all right title and interest in and to the Software
including all intellectual property rights therein. The Software is protected by
applicable intellectual property laws, including United States copyright laws and
international treaties.
5. Third Party Proprietary Property. This Software may contain the
proprietary property of others, which has been licensed to Pinnacle, your use of
the Software is expressly conditioned on your agreement not to remove any
copyright notices or other proprietary markings of the third party software.
6. Security. You acknowledge and agree that in order to protect the integrity of
certain third party content, Pinnacle and/or its licensors may provide for
Software security related updates that will be automatically downloaded and
installed on your computer. Such security related updates may impair the
Software (and any other software on your computer which specifically depends
on the Software) including disabling your ability to copy and/or play "secure"
content, i.e. content protected by digital rights management. In such an event,
Pinnacle and/or its licensors shall use reasonable efforts to promptly post notices
on Pinnacle’s web site explaining the security update and providing instructions
to end-users for obtaining new versions or further updates of the Software that
restore access to secure content and related features.
7. Term and Termination. This License shall be effective upon installation of
the Software and shall terminate upon the earlier of (a) your failure to comply
with any term of this License; (b) return, destruction or deletion of all copies of
the Software in your possession or (c) transfer of the Software and this License
to another party in accordance with Section 1(d). Pinnacle’s rights and your
obligations shall survive termination of this License.
8. Limited Warranty. Pinnacle warrants to the original licensee that the
Software, as delivered, will perform in accordance with the accompanying
documentation for a period of 30 days from the date of the original purchase
(“Limited Warranty”). Pinnacle’s entire liability and your exclusive remedy for
breach of the preceding Limited Warranty shall be, at Pinnacle’s sole option,
repair or replacement of the Software that does not meet the warranty set forth
210
License Agreement
herein and that is returned to Pinnacle. This limited warranty shall be void if
failure of the Software has resulted from any accident, abuse, misuse or
misapplication by you. Any replacement Software will be warranted for the
remainder of the original warranty period or 30 days, whichever is longer.
9. NO OTHER WARRANTIES. EXCEPT AS SET FORTH ABOVE, THE
SOFTWARE IS PROVIDED ON AN “AS IS” BASIS. YOU ASSUME ALL
RESPONSIBILITIES FOR THE QUALITY AND PERFORMANCE OF THE
SOFTWARE. TO THE MAXIMUM EXTENT PERMITTED BY
APPLICABLE LAW, PINNACLE DISCLAIMS ALL WARRANTIES,
EITHER EXPRESS OR IMPLIED, INCLUDING BUT NOT LIMITED TO
IMPLIED WARRANTIES OF MERCHANTABILITY,
NONINFRINGEMENT, AND FITNESS FOR A PARTICULAR PURPOSE.
LICENSOR DOES NOT WARRANT THAT THE FUNCTIONS
CONTAINED IN THE SOFTWARE WILL MEET YOUR REQUIREMENTS,
BE UNINTERRUPTED OR ERROR FREE.
10. LIMITATION OF LIABILITY. YOU AGREE THAT IN NO EVENT
WILL PINNACLE BE LIABLE FOR ANY CONSEQUENTIAL, SPECIAL,
INDIRECT, INCIDENTAL OR PUNITIVE DAMAGES WHATSOEVER,
EVEN IF PINNACLE HAS BEEN ADVISED OF THE POSSIBILITY OF
SUCH DAMAGES. IN NO EVENT SHALL PINNACLE’S LIABILITY
EXCEED THE TOTAL AMOUNT OF THE FEES PAID FOR THE
SOFTWARE. Some states/jurisdictions do not allow the limitation or exclusion
of incidental or consequential damages in certain circumstances, so the above
limitations may not apply in some circumstances.
11. General. This License is governed by the laws of the State of California and
by the federal laws of the United States, without reference to conflict of laws
principles. The federal and state courts within the County of Santa Clara,
California shall have excusive jurisdiction to adjudicate any dispute arising out
of this License and you hereby consent to the personal jurisdiction of the federal
and state courts within the County of Santa Clara, California. This License is
the entire agreement between you and Pinnacle and supersedes any other
communication with respect to the Software. No modification of or amendment
to this License will be effective unless in writing signed by both parties. If any
provision of this License is held invalid or unenforceable, the remainder of this
License will continue in full force and effect.
211
Glossary
#
16:9-Format: Also called widescreen. Television format where the width-toheight ratio of the display area is 16:9 instead of 4:3. When broadcast for
television, part of the picture is broadcast in black (black bars on top and bottom
of the picture) to make it compatible with the traditional 4:3 format. The first
line of the TV picture contains additional code that instructs any 16:9 television
to enlarge the picture (see also "4:3 format")
4:3 format: This is the traditional television format. The width-to-height ratio of
the display area is 4:3.(see also "16:9 format")
A
Aspect ratio: The width-to-height ratio of one pixel. Some video formats must
have this ratio in order to display the picture properly. If the aspect ratio is 1, the
pixel will be square. If the aspect ratio is not 1, the pixel will be rectangular.
When rectangular pixels are used without adjustment, circles are displayed as
ovals. This distortion can be eliminated by factoring in the aspect ratio. (see also
"Pixel")
AVI: Abbreviation for "Audio Video Interleaved", the standard format for
digital video on PCs. (see also "Video for Windows")
B
BMP: Abbreviation for "BitMaP". Microsoft Windows standard format for
pixel graphics.
C
Client: A system (computer or program) in a network or on the Internet that
requests files or services. The system (computer or program) that provides the
files or services is called a server. The client can request a data transfer or a print
job from the server.
CoDec: Acronym for Compressor/Decompressor, compresses (packs) and
decompresses (unpacks) image data.
Composite Video: The encoding of color and brightness information into a
single signal. (see also "S-Video")
Content: Content is the information contained in a message or a Web site that
does not consist of structures or formats. This term applies to all media,
including texts, data and images to audio information and videos.
213
Pinnacle MediaCenter
D
Data rate: The data rate is also known as the bit rate. The bit rate measures how
fast bits of data can be transferred over a medium in a given period of time. This
rate is listed in bits per second (bps).
DHCP: Abbreviation for "Dynamic Host Configuration Protocol". WindowsServer software that assigns an IP address to each computer in a network. (see
also "IP Address")
Dial-up connection: A dial-up connection is the most common type of
consumer Internet connection. A modem connects the computer to the Internet
provider's system via the telephone line. The provider's system is normally
connected to the Internet via an ISDN line. (see also "Modem" and "ISDN")
Digital Television: See also "DVB" or "DTVB". Digital television transmission
standard. Describes the transmission of video, audio and additional information
as digital data signals.
Digital video: Digital video stores information as bits in a file. This differs from
the method used by analog storage media such as VCRs.
DSL: Short for "Digital Subscriber Line". This technology allows users with
DSL modems to download up to 6 Mbps and upload 0.6 Mpbs over short
distances of 3 miles or less. DSL connects using copper landlines.
DTVB: Abbreviation for "Digital TeleVision Broadcasting". (see also "Digital
Television" or "DVB")
DVB: Abbreviation for "Digital Video Broadcasting". Transmission standard for
digital television. Classified as "DVB-C", "DVB-S", and "DVB-T" depending
on the transmission medium.
DVB-C: Abbreviation for "Digital Video Broadcasting Cable". Transmission
standard for digital television in the cable network. (see also "DVB")
DVB-S: Abbreviation for "Digital Video Broadcasting Satellite". Transmission
standard for digital television via satellite. (see also "DVB")
DVB-T: Abbreviation for "Digital Video Broadcasting Terrestrial".
Transmission standard for digital television via antenna. (see also "DVB")
DVD: Short for "Digital Versatile Disc", formerly known as "Digital Video
Disc". An optical storage medium with more capacity and bandwidth than a CDROM. DVDs are commonly used for multimedia and data-storage applications.
E
Ethernet: The most common type of local-area network. Each node (computer
or server) in the network checks whether any other computer is transmitting
data. It then waits for the other computers to finish with their transmissions
before it starts its own transmission. (see also "LAN")
214
Glossary
F
Field: A video image consists of horizontal lines divided into two fields. All the
odd-numbered lines make up one field; the even-numbered lines make up the
other field.
Filesharing: Filesharing refers to any exchange of data between two or more
computers over the Internet. There are currently many filesharing programs
available on the Internet, many of which can be used for free.
Firmware: Firmware is system software stored in ROM or Flash memory.
Firmware is not deleted when the system has been turned off.
Flash memory: Re-writable permanent memory that behaves like a hybrid of
RAM and a hard drive. Flash memory does not lose data even when its power
supply has been turned off. (see also "RAM")
G
GIF: Abbreviation for Graphics Interchange Format. This graphics format was
developed by CompuServe as a high-compression format for transmitting
images without losing any data. The most important graphics element on the
Internet. The GIF format only has 256 colors because only 8 bits go into storing
each dot. GIFs are ideal formats for animations.
H
HTML: Abbreviation for "HyperText Markup Language". A document standard
developed during the World Wide Web project that provides a simple logical
structure for titles, headings, paragraphs, numbering, forms, tables and
mathematical formulas as well as a language for defining hypertext links.
HTTP: Abbreviation for "HyperText Transfer Protocol". A standard mechanism
used on the Internet to share documents between servers and clients.
I
IDE: Abbreviation for "Integrated Drive Electronics". IDE is a parallel interface
used to connect hard-disk drives, CD drives, tape devices and floppy drives.
Advanced IDE hard drives have a IDE controller built into the hard-drive
housing.
Interlace: A method of creating an image used in PAL and other systems.
Interlacing uses fields. Each field has 312 1/2 lines that are inserted one after
another. (see also "Field")
IP Address: Abbreviation for "Internet Protocol". Every computer connected to
the Internet receives a unique identification number that consists of four
sections. This number is called an IP address. This allows other computers in the
network to identify it, send data packets to it and to process data they have
215
Pinnacle MediaCenter
received from it. IP addresses make sure that the right data packets are sent to
the right recipient via the right path.
ISDN: Abbreviation for "Integrated Services Digital Network". A digital
telephone network that, unlike analog modems, transmits digital data. With bit
rates of 64 bps, ISDN transmits data much faster and more accurately than
modems.
J
JPEG: Abbreviation for Joint Photographic Experts Group. The data extension
is "JPG". Graphics-compression method developed by C-Cube Microsystems.
This pixel image format offers 24-bit color depth and is especially suited for
photos and photorealistic images with many different shades and hues. Because
it exploits some of the physiological characteristics of human sight and permits
data losses that are invisible to the naked eye, it attains extremely high
compression rates.
JPG: See "JPEG".
L
LAN: Abbreviation for "Local-Area Network". A local network located in a
building or on company premises that is based on private transmission media
and equipment. Ethernet and Token Ring are common LAN technologies.
Letterbox: The letterbox format is created when an image recorded in 16:9
format (or wider) is displayed on a normal television (4:3). This format typically
displays the picture between black bars on the top and bottom of the screen. This
term was probably derived from the wide, thin format that looks a lot like the
slot of a letterbox.
M
M3U Format: M3U (file extension ".m3u") is the standard data format in which
Winamp and other playlists are saved.
Modem: Abbreviation for "MOdulator DEModulator". A device that converts
digital signals ("the computer's language") to analog signals ("the telephone's
language") and vice versa. Modems are used to connect to the Internet using a
dial-up connection.
MOV: Name given to Quicktime-formatted videos.
MP3: MP3 is an audio format that provides relatively good sound (compared to
the uncompressed original) and very high compression rates. It is an excellent
way to store and share music data over the Internet. Many MP3 players support
this format and allow users to store hours of sound at almost full-range HiFi
quality in just a few megabytes.
216
Glossary
MPEG: Abbreviation for Motion Pictures Experts Group. Video-compression
standard. There are different formats for different types of compression, such as
MPEG 1, MPEG 2, etc.
MPEG 4 AVI: Video format with extremely high compression.
N
NTSC: Abbreviation for "National Television Standards Committee". A
television standard with 525 lines and 60 fields per second that is used in North
and Central America. (see also "PAL", "SECAM", "Field")
P
PAL: Abbreviation for "Phase Alternation Line". Television standard developed
in Germany that uses 625 lines and 50 fields per second. This is the main TV
standard in Europe. (see also "NTSC", "SECAM", "Field")
PCMCIA: Abbreviation for "Personal Computer Memory Card International
Association". A PCMCIA card is a lightweight, removable module about the
size of a credit card that provides additional functionality to a portable
computer. The module may expand existing RAM or hard-drive space or
provide network functionality.
Peer-to-peer (P2P): Peer-to-peer filesharing sites are Internet forums that offer
freely available media files. There are more than 70 such forums online.
PHP: The abbreviation PHP officially stands for "Hypertext Preprocessor". PHP
is a widely used scripting language designed for general use. It can be embedded
in HTML and is ideal for Web applications. PHP is easy to learn, offers
excellent database and Internet-Protocol interfaces and supports many additional
function libraries. PHP is the ideal development tool for creating dynamic Web
content.
PIN: Abbreviation for "Personal Identification Number". A PIN is a secret code
comprising several digits that identifies a given user.
PiP: Abbreviation for "Picture in Picture."
Pixel: Also known as a "picture element" or "pel". In a video-recording device
(such as a camera) or a playback device (such as a monitor), a pixel is a lightsensitive or light-emitting surface with a specified height and width. When
stored electronically, pixels contain brightness and color information for a given
image element. The aspect ratio, which also plays a key role in video playback,
is stored separately in the files for some data formats. (see also "Aspect ratio")
PNG: Abbreviation for Portable Network Graphics. Graphics format for bitmapped images that supports interlacing and offers 24-bit color depth and
lossless compression. (see also "Interlace")
217
Pinnacle MediaCenter
R
RAM: Abbreviation for "Random Access Memory". The main memory of the
computer. The RAM temporarily stores data and runs programs at the same
time.
RGB: Abbreviation for "Red Green Blue". RGB values can be used to define a
particular hue. The color is calculated based on the amount of red, blue and
green in each pixel.
Ripping: Files or parts of files on an audio CD or movie DVD are "read in" and
stored on the PC's hard drive, where they can be played back or processed
further.
ROM: Abbreviation for "Read Only Memory". A memory chip that can be read
from, but not written to.
Router: Routers, also known as "Intermediate Systems (IS)", are linking
elements that interconnect two or more subnetworks. In addition to acting as a
bridge, routers can expand the boundaries of a network (number of nodes,
physical extension). Routers also control data traffic by not forwarding defective
data packets.
S
S-VHS: Improved version of VHS based on the S-Video standard, but with
better image definition. (see also "S-Video", "VHS")
S-Video: S-Video signals deliver brightness and color information separately
through several cables. This means that the video does not need to be modulated
and demodulated and image quality is not impaired as a result. (see also
"Composite Video")
SCART: Type designation for the EuroAV plug, a 21-pin, standardized
connector for all video and audio lines. Signals are not converted prior to
transmission, which makes for a high quality standard.
SD: Abbreviation for "Standard Definition". When a resolution consists of up to
720 x 480 (NTSC) or 720 x 576 (PAL), we are talking about "Standard
Definition". (see also "HD")
SECAM: Abbreviation for "Sequential Couleur à Mémoire". A color-television
standard developed in France and Eastern Europe based on the PAL system.
SECAM uses 625 lines and 50 fields per second. (see also "NTSC", "PAL",
"Field")
Server: A computer or a program that offers storage, data-transfer and other
services in a network or on the Internet. Servers often provide services for
requestors (clients) located on other computers.
Set-top box: A set-top box is an additional device that receives digital television
stations and data. It can be hooked up to any standard television set.
218
Glossary
Streaming: The act of transferring compressed video and audio files over the
Internet. Streaming does not download all the data at once, but downloads it in
stages using a store-and-forward method. The data does not arrive as a
continuous file, but is cached in the buffer, which can create delays at the start
of transmission. The data can be transmitted live or it can be downloaded later.
The computer receiving the data stream must have a program (player) installed
on it that decompresses the data. Players are usually installed in browsers such
as Internet Explorer. The speed and quality of the data depend heavily on how
much bandwidth is available. In order to ensure smooth playback, the Internet
connection should offer at least 300 Kbps in bandwidth. There are various file
formats for audio and video streaming. The most popular formats are MP3,
RealAudio and WMA.
SVCD: Expanded Video-CD standard. This image format offers a higher line
resolution and uses MPEG-2 instead of MPEG-1 to compress the video data.
(see also "VCD")
T
TIF: Abbreviation for "Tagged Image File Format". Standard format for
professional printed images developed by Aldus.
V
VCD: Abbreviation for "Video CD". A standard for writing MPEG-1-formatted
videos to CDs. A Video CD can hold up to an hour of digital video and stereoquality sound. The data rate of the MPEG-1 stream is constant - around 170 kB
per second (224 kpbs sound, 138 kB video, PAL). This standard offers image
and sound quality that is comparable to that of a HiFi VCR. (see also "SVCD")
VHS: Abbreviation for "Video Home System". System used by many VCRs for
recording and playing back sound and video from magnetic tape. It uses a
composite signal that combines brightness and color information into one signal.
(see also "Composite Video", S-VHS)
Video-on-Demand (Vod): A multimedia application that allows users to access
a video server and view photos/images or videos/movies.
Video for Windows: Video for Windows, a Microsoft Windows system
expansion, allows users to record, store and play back digital video sequences.
(see also "AVI")
W
Web Server: A computer on which HTML pages and network software are
stored. Web servers constantly deliver content via the Internet or a network to
Web browsers, where it is displayed on the user's monitor.
219
Pinnacle MediaCenter
Wi-Fi: Abbreviation for "Wireless Fidelity". Wi-Fi is an 802.11-compliant
certification for wireless local-area networks (LANs) issued by the WECA
(Wireless Ethernet Compatibility Alliance). This certification confirms that all
wireless network products that comply with the standard are interoperable.
WIA: Abbreviation for "Windows Imaging Architecture". An imaging
architecture introduced by Microsoft for Windows Millennium Edition and
Windows XP. WIA allows image-processing programs to communicate with,
and receive data from, digital cameras, scanners and other devices.
Widescreen: See "16:9 format".
WLAN: Abbreviation for "Wireless Local Area Network". (see also "LAN")
WMA: Abbreviation for "Windows Media Audio". Microsoft's audio playback
method that, unlike its rival, MP3, has an integrated rights-management system.
(see also "MP3")
WMV: Abbreviation for "Windows Media Video". Video-file format developed
by Microsoft.
X
XviD: Another version of the MPEG 4 AVI video-media format. (see also
"MPEG 4 AVI")
220
Index
A
Advanced Audio Settings ............. 22
Advanced Capture Settings........... 15
Advanced Channel Settings Editing Channel Lists ................ 27
Advanced Channel Settings Favorites .................................... 30
Advanced Channel Settings Overview ................................... 24
Advanced Channel Settings Scan ........................................... 25
Advanced Data Services Settings . 17
Advanced Display Settings........... 13
Advanced General Settings........... 10
Advanced General Settings Overview ................................... 24
Advanced Import/Export Settings 32
Advanced Playback Settings......... 19
Advanced PMCS Settings............. 33
Advanced Remote Control
Settings ...................................... 12
Advanced Services Settings.......... 36
Advanced Settings - About the
Pinnacle MediaCenter ............... 34
Advanced Update Settings............ 35
album .......................................... 132
all movies.................................... 145
artist ............................................ 130
B
bottom control bar....................... 178
browsing your hard disk ............. 136
Burner ........................................... 71
C
capture settings ........................... 174
Categories......................................40
CD/DVD .....................................137
channel list ..................................115
closed bottom control bar............180
context menu ...............................179
Customized File Tags....................61
D
date ..............................................156
Deleting Files ................................45
Digital photos................................37
E
Edit Menu......................................75
Electronic Program Guide
(EPG) .......................................101
end user license agreement .........209
Export..........................67, 68, 70, 71
Export Tab.....................................67
F
File Formats ............................81, 82
File Menu ......................................73
File Tags........................................60
functions in the Pinnacle
MediaCenter ..............................85
G
general settings............................164
genre............................................128
Get Titles.......................................52
H
hardware used by Pinnacle..............1
I
Import - Audio CD........................52
Import - Digital Camera ................55
221
Pinnacle MediaCenter
Import - Drives.............................. 51
Import - Files ................................ 50
Import - Folder.............................. 49
Import - Rhapsody Playlists.......... 59
Import - Watch Folder .................. 57
Import Tab .................................... 48
installing hardware.......................... 5
installing the software..................... 5
K
Keywords ................................ 61, 62
M
M3U playlist ........................... 67, 70
Main Window ............................... 38
manual recording ........................ 201
Media Library ............. 40, 43, 44, 45
Media Player ................................. 46
Media Types ................................. 40
Menus ............................... 73, 75, 77
movie settings ............................. 170
Movies and other video files......... 37
movies menu ............................... 138
music menu ................................. 124
music settings.............................. 168
N
name............................................ 158
new movies ................................. 141
new music ................................... 127
new photos .................................. 152
O
online Help...................................... 4
online manual.................................. 4
online menu ................................ 161
opened bottom control bar .......... 183
Organize Tab ................................ 62
Organizing File Tags .................... 60
222
P
package contents .............................3
PC view .................................87, 175
photo album.................................155
photo menu..................................148
photo settings ..............................172
Pinnacle INSTANT CD/DVD ......71
Pinnacle MediaCenter .....................1
Pinnacle MediaManager .................1
playlists .......................................134
Playlists ...................................64, 65
Playlists Tab............................64, 65
R
radio menu...................................114
radio settings ...............................167
radio stations ...............................115
readme file.......................................4
recorded radio .............................121
recorded TV ........................111, 205
recording radio ............................117
recording TV ...............................106
remote control .................................1
remote view.......................87, 93, 96
remote view main screen...............96
Rhapsody.................................59, 78
S
scheduled recordings...................204
Searching in the Media Library.....44
settings menu...............................162
slideshow.....................................153
song .............................................133
Sort View in the Media Library ....43
Supported File Formats.................81
T
technical support .........................207
Index
teletext......................... 104, 194, 196
timeshift radio ............................. 122
Tools Menu ................................... 77
TV channel.................................... 98
TV menu ....................................... 97
TV settings.................................. 166
TV timeshift................................ 112
tvtv manager ................................... 6
U
upper control bar .........................176
user views for the Pinnacle
MediaCenter ..............................87
W
Watch Folder.................................57
WIA drivers...................................55
window formats for the Pinnacle
MediaCenter ..............................89
223