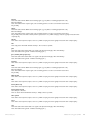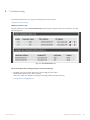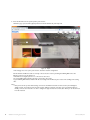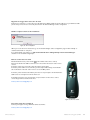
1
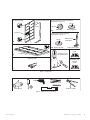
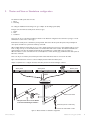
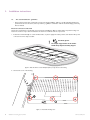
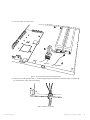
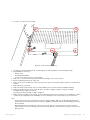
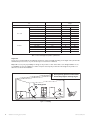
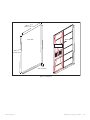
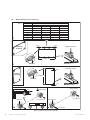
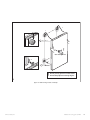
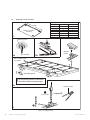
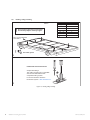
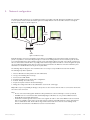
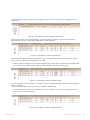
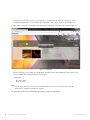
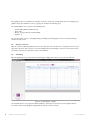
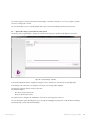
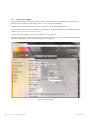
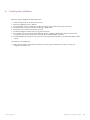
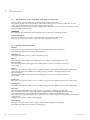
Philips luminous textile with
Installation and cleaning guide
© Royal Philips Electronics N.V. 2011
2
Installation and cleaning guide April 2013
Luminous textile panel
Contents
1. Component list.................................................................................................................................................... 4
2. Before installation............................................................................................................................................... 6
3. Master and Slave or Standalone configuration.................................................................................. 7
4. Installation instructions.................................................................................................................................... 8
4.1. The actual installation - guidelines........................................................................................... 8
4.2. Wall mounting Portrait / Landscape...................................................................................... 14
4.3. Ceiling / Recessed mounting................................................................................................... 16
4.4. Pending ceiling mounting........................................................................................................ 18
5. Network configuration................................................................................................................................. 19
5.1. Discover all luminous textile panels....................................................................................... 20
5.2. Surface Configuration.............................................................................................................. 23
5.3. Setting the time........................................................................................................................ 23
5.4. Program your content............................................................................................................. 23
5.5. Content conversion.................................................................................................................. 24
5.6.Scheduling................................................................................................................................. 24
5.7. Upload all setting to your luminous textile panels............................................................... 25
5.8. Streaming system (DVI).......................................................................................................... 26
6. Finalising the installation............................................................................................................................... 27
7.Maintenance....................................................................................................................................................... 28
7.1. Care instructions for the textile finish of the luminous textile panel................................. 28
7.1.1. Detailed cleaning instructions..................................................................................... 28
7.1.2. Material specification: Trevira CS............................................................................... 30
7.2. Data management instructions for the luminous textile panel. ......................................... 30
8.Troubleshooting................................................................................................................................................ 31
9. Contact / Information................................................................................................................................... 34
Appendix...................................................................................................................................................................... 35
Luminous textile panel
Installation and cleaning guide April 2013
3
1. Component list
Name:
1
Luminous textile panel (LTP)
a. Wall mounted
b.
Ceiling mounted
2
Ethernet cable
3
Mounting kit a. Portrait / landscape wall mounting kit
b. Ceiling / recessed mounting kit
c Pending ceiling mounting kit
4
Remote control with USB receiver
5
User reference guide
6
Installation and cleaning guide
7
Packaging
8
Philips Content Manager 2.0 software (online)
Not included:
Screws and plugs for fixation onto wall or ceiling
Tools
Table 1: Component list
4
Installation and cleaning guide April 2013
Luminous textile panel
Luminous textile panel
LTP, wall mounted
Back
Portrait/ landscape wall mounting kit
(see table 3 in Figure 6)
Ø4/16”
Ø4/16”
Front
5a
Driver box
Wall hook
Metal ring plate
Ceiling /recessed mounting kit
(see table 4 in Figure 8)
Ø4/16”
Delivered not
assembled
1a
LTP, ceiling mounted
5b Metal ring plate
Safety wire system
Reference
guide
Remote control
with USB receiver
Driver box
1b
Ethernet cable
2
7
Installation and
cleaning
guide
6
8
Figure 1: Components
Posilock Y0080
White gloves
Figure 2: Required tools (not included)
Luminous textile panel
Installation and cleaning guide April 2013
5
2. Before installation
For the complete installation, including the programming of the network settings and the content, it is important that you
locate all the necessary documents provided by your contractor before installation.
Required documents, drawings and digital files:
• Electrical and mechanical installation drawing
• Content Manager software 2.2
• Content Manager project folder (*.zip)
6
Installation and cleaning guide April 2013
Luminous textile panel
3. Master and Slave or Standalone configuration
The luminous textile panels have 2 modes:
1. Player
2. Streaming
For setting the installation in Streaming mode go to Chapter 5.8 Streaming System (DVI).
In Player mode, the luminous textile panels can have 3 types:
1. Master
2. Slave
3. Standalone
This mode can be set in the Content Manager software in the Network configuration area under the topic Type or in the
administrator section on the control page.
Each luminous textile panel is a Standalone panel by default. That means that the panel will operate independently from
other panels and will not be synchronised with any other LTP.
When multiple luminous textile panels are to be used to display synchronised content (i.e. when multiple LTPs are used to
form one large screen), one of the LTPs should be set as Master and all the others as Slave. The Master LTP handles the
synchronisation and is also the LTP that should hold the (optional) Remote control USB receiver (see Figure 3).
When the Master receives commands from the controls (Remote control, Control page), it will instruct the Slave panels to
follow the commands.
There can only be one Master panel, and this panel will control all the Slaves that are connected in the LAN.
Figure 3 shows instructions on how to connect multiple panels and define the Master panel.
Chapter 5 explains how to configure the Master and Slave panels in the Content Manager software.
6ODYHSDQHO
35(
66
6ODYHSDQHO
0DVWHUSDQHO
/$1
(6
6
0DLQ3RZHUIHHG
35
86%
UHFHLYHU
7KLVSDQHOKDVWREHVHWDV0DVWHU
LQWKH&RQWHQW0DQDJHUVRIWZDUH
(WKHUQHW&DWHRU&DWH
&RQQHFWWRZDOOVRFNHWURXWHU
Figure 3: Master and Slave or standalone configuration
Luminous textile panel
Installation and cleaning guide April 2013
7
4. Installation instructions
4.1.
The actual installation - guidelines
• This product is intended for permanently connected electrical installation. Adhere to locally applicable guidelines for
permanent electrical connections, such as provided by e.g. NEC, in combination with the electrical ratings provided by
this user manual.
Electrical connection of the LTP
This product is intended for permanently connected electrical installation. Only use wiring with a temperature rating of at
least 90° C. Connect only to branch circuits that are rated for a maximum current of up to 20A.
1. Position the LTP horizontally on a clean and flat surface, or place it upright in a stable position, such that the LTP’s power
connection becomes easily accessible.
!
Use white gloves.
Do not put any pressure on the textile.
Avoid sharp objects and dirty fingers.
Figure 4: Place the LTP on a clean and flat surface for easy access to the housing
2. Unscrew the cover of the housing.
Figure 5: Unscrew the housing cover
8
Installation and cleaning guide April 2013
Luminous textile panel
3. Locate the mains connection points.
Line
Neutral
Earthing
Figure 6: Locate the mains connections inside the housing
4. Attach a wire conduit (knockout size ½”) to the housing through the circular hole, as indicated in Figure 7. Pull through
the electrical wires of line, neutral and earthing.
Figure 7: Attach a wire conduit
Luminous textile panel
Installation and cleaning guide April 2013
9
5. Connect the line and neutral wiring to the internal black terminal block. Connect the protective earth wire to the
stripped & tinned pigtail end using an approved connection like a wire nut or similar.
L1
N
Figure 8: Connect wiring to connection points inside the housing
As an option, a chain of different driverboxes can be hooked up in a daisychained way for the mains wiring using a duplex
cable fitting or similar like shown in Figure 9. Please observe and comply to the following rules:
• All connections should be made according to the local electrical code.
• Only use a UL approved duplex fitting or similar.
• Do not exceed the maximum amount of driver boxes in a single daisychain to keep the combined mains current within
applicable limits for wiring and installation.
L1
N
Figure 9: Hooked up in a daisychained way
10
Installation and cleaning guide April 2013
Luminous textile panel
6. Screw the cover back onto the housing.
Figure 10: Screw cover back onto housing
1. Use white gloves during handling of the panel throughout the entire installation to avoid staining the textile.
2. Suitable Ethernet routers are:
• Linksys: E1000
• D-Link: DIR635 / DIR655
• or other router with support for port forwarding
3. Make sure to contact the local IT department when connecting the router in the network.
4. Ethernet cabling should be Cat 5e or Cat 6/6e.
5. Make sure the power and Ethernet sockets are positioned so they do not interfere with the elements on the backside of
the LTP.
6. Make sure the site is dust-free.
7. Make sure that the depth and size of the recessed installation are in accordance with the installation drawings.
8. Make sure that the fasteners used to attach the LTP to the wall or ceiling are adequate to support its weight:
for Wall mounting see Table 3 in Figure 13
for Ceiling / Recessed mounting see Table 4 in Figure 15
9. Philips cannot be held liable for any damage to the product finish or function as a result of incorrect installation or failure
to follow the preceding instructions. Also Philips can not be held liable for the total security of your local network.
Note:
• This product is intended for permanently connected electrical installation. Adhere to locally applicable guidelines for
permanent electrical connections, such as provided by e.g. NEC, in combination with the electrical ratings provided by
this user manual.
• Each LTP should have its own Ethernet connection in order for them to remain synchronised. It is not possible to
make an Ethernet connection directly between two LTPs. Each Ethernet connection must be directly connected to an
Ethernet router.
Luminous textile panel
Installation and cleaning guide April 2013
11
Size
Weight
Width
28" 11/32
47" 8/32
kg
lbs
28" 11/32
Length
Rated input power (W)
40
10
22
63" 25/32
80
17
37
85" 1/32
125
25
55
155" 29/32
180
34
75
177" 5/32
205
43
95
217" 10/32
250
51
112
255" 4/32
290
58
128
28" 11/32
60
13
29
63" 25/32
125
20
44
66
85" 1/32
200
30
155" 29/32
290
40
88
177" 5/32
335
50
110
217" 10/32
405
60
132
255" 4/32
475
68
150
Table 2: Power and weight as a function of dimensions.
Important
Screws are not supplied with the mounting kits and must be selected carefully depending on the weight of the panel and the
wall material (wood, concrete, etc.). The screws may not exceed 4/16" in diameter.
Philips will not accept any responsibility for damage to the product or other devices that occurs during installation or use,
nor will Philips accept responsibility for accidents or injuries caused by the product when the weight of the panels is not
taken into account for the installation.
!
!
Do not put any pressure on the textile.
Avoid sharp objects and dirty fingers.
Use white gloves
power socket
Ethernet socket
Figure 11: Handling
12
Installation and cleaning guide April 2013
Luminous textile panel
Min.2’-46/16”
Max.3’-114/16”
Front side
Back side
!No sockets
Min.2’-46/16”
Max.255’-2/16”
5”
incl. mounting
Figure 12: Dimensions
Luminous textile panel
Installation and cleaning guide April 2013
13
4.2.
Wall mounting Portrait / Landscape
Table 3
Wall mounting
Portrait
Landscape
Length (m)
Wall hooks
Magnetic bracket
Wall hooks
Magnetic bracket
0-2
2
2
2
2
2-3
2
2
2
2
3-4
3
2
3
2
4-5
3
2
3
2
5-6
3
2
4
2
6
3
2
4
2
1
514/16”
Landscape
mounting
514/16”
Magnetic bracket
Length (m)
2
Wall hook
514/16”
Portrait
mounting
Magnetic bracket
Length (m)
Wall hook
514/16”
3
3/16”
Metal ring plate
lbs Max.220lbs
14/16”
Wall hook
4a
not included
not included
Metal ring plate
4b
not included
Figure 13: Wall mounting Portrait / Landscape
14
Installation and cleaning guide April 2013
Luminous textile panel
1
1
1
!
Use white gloves
2
2
!
Do not put any pressure on the textile.
Avoid sharp objects and dirty fingers.
5
Figure 14: Wall mounting Portrait / Landscape
Luminous textile panel
Installation and cleaning guide April 2013
15
4.3.
Ceiling / Recessed mounting
Table 4
/HQJWK
&HLOLQJUHFHVVHG
PRXQWLQJ
Ceiling / Recessed mounting
Length
Magnetic bracket
Min. safety wires
0 - 78"
4
4
78" - 118"
6
4
118" - 158"
8
4
158" - 196"
10
6
196" - 236"
12
6
14
6
236"
0HWDOULQJSODWH
QRWLQFOXGHG
D
0DJQHWLF
EUDFNHW
E
0LQ[6DIHW\ZLUHV
6HHWDEOH
F
8VHZKLWHJORYHV
'RQRWSXWDQ\SUHVVXUHRQWKHWH[WLOH
$YRLGVKDUSREMHFWVDQGGLUW\ILQJHUV
3RVLORFN<
PD[OEV
Figure 15: Ceiling mounting
16
Installation and cleaning guide April 2013
Luminous textile panel
Recessed mounting
The panel is mounted using magnetic brackets only. The Ethernet and power sockets must be recessed in the wall. If sockets
are installed behind the panel, 1” 13/32 of space must be left between the inside panel and the mounting surface. The total
thickness of the sockets and cable plugs cannot exceed 1” 13/32 if they are to fit behind the panels.
3RZHUDQG/$1VRFNHW
:DOO
3DQHO
3RVLORFN
<
PD[OEV
:DOO
0LQ[
6DIHW\ZLUHV
6RFNHWV
RQO\E\PDJQHWLFEUDFNHWV
!1RVRFNHWV
Figure 16: Recessed mounting
Luminous textile panel
Installation and cleaning guide April 2013
17
4.4.
Pending ceiling mounting
7DEOH
'RQRWSXWDQ\SUHVVXUHRQWKHWH[WLOH
$YRLGVKDUSREMHFWVDQGGLUW\ILQJHUV
Length
0LQZLUHLQWHUIDFHV
0 - 78"
78" - 118"
118" - 158"
158" - 196"
196" - 236"
236"
0LQ[ZLUHLQWHUIDFHV
6HHWDEOH
3HQGLQJFHLOLQJPRXQWLQJ
8VHZKLWHJORYHV
1
326,/2&.LQWHUIDFH.DUO6WDKO
6XVSHQGHGFHLOLQJV
7KHFHLOLQJPRXQWLQJNLWLVFRPSDWLEOH
ZLWKWKH&DUO6WDKO326,/2&.
VXVSHQGHGFHLOLQJV\VWHP
For more information about the
POSILOCK system: www.carlstahl.com
2
Figure 17: Pending ceiling mounting
18
Installation and cleaning guide April 2013
Luminous textile panel
5. Network configuration
The luminous textile panel has one or two Ethernet interfaces, depending on the LTP dimensions. This Ethernet connection
is used to upload content, control the LTP and synchronise multiple LTPs. In order for the LTP to function correctly, the
Ethernet set-up must be as shown in Figure 18.
Length
4.32m
LAN
WAN
Figure 18: Ethernet set-up
Each LTP should be connected to an Ethernet router that acts as a DHCP server and provides network security for the
panels. It is possible to connect the LTP(s) directly to a router in the existing business or home network at your site but it
is recommended that they be placed behind a separate router such that the LTP(s) are in their own network, separate from
the rest of the business network. This is especially preferred when a large number of LTPs are connected together. A special
case is for LTPs with lengths greater than 170” 3/32. These larger panels have two Ethernet connections behind the panel
which have to be handled in the same way as two separate LTPs.
The following chapters will go into more detail about the correct way to set up the Ethernet network for the LTPs.
The following steps will be explained:
1.
2.
3.
4.
5.
6.
7.
Discover all luminous textile panels in the same LAN subnet.
Set-up port forwarding when necessary.
Connect to the LAN / WAN.
Run Content Manager and perform surface configuration.
Perform “Identify” to test the set-up.
Prepare and upload content in the Content Manager.
Change the settings of the LTP on the administrator section of the control page.
Philips will accept no responsibility for damage to the product or other devices when the device is connected to the internet
via an non-secure connection.
Note:
• Do not connect two LTPs together via Ethernet. Every LTP must be connected directly to a router (or switch).
• A DHCP server is a router function that automatically assigns an IP address to every connected Ethernet device.
Practically all routers include this function.
• A subnet is a network segment. Devices on the same segment can “talk” to each other. Within a local area network,
devices can only talk to other devices on the same subnet. A subnet is technically defined as a range of IP addresses
and a so-called subnet mask. The IP address range and the subnet mask can be set in the router settings menus.
Consult the documentation of the Ethernet router for more information.
Luminous textile panel
Installation and cleaning guide April 2013
19
5.1.
Discover all luminous textile panels
Before starting to configure the panels over the network, download the content manager from www.LLcontent.com/downloads
All LTPs connected to the same LAN subnet can be detected automatically using the procedure described below. In a large
installation with multiple subnets/LANs this procedure must be repeated for each subnet and LAN.
1. Connect a PC directly to the LAN to which the panels are connected.
Length
4.32m
LAN
WAN
Figure 19: Connecting a PC to the LAN for discovery of the LTPs’ IP addresses.
2. Open the Content Manager when connected to the local LAN.
Figure 20: Content Manager - Surface Configurator
20
Installation and cleaning guide April 2013
Luminous textile panel
Scan the network for luminous textile panels by clicking on the auto-discover icon in the network configuration section
shown below.
Figure 21: Content Manager - Network Configurator Auto-discovery
When clicking auto-discover the Content Manager scans and searches the network for panels in the LAN network.
When LTP’s are found the content manager will list them as shown in Figure 22.
Figure 22: Content Manager - Network Configurator Scan
Open the Content Manager manual from the Help menu to get more information about manual configuration of the IP
adress, control port, upload port and panel type for each LTP.
3. When you click the identify icon in the network configuration list (as shown below in Figure 23), Content Manager will
try to connect to the selected LTP and change the content displayed on that panel to a test pattern.
Figure 23: Content Manager - Network Configurator Identify
For more information about the “Identify” command please refer to the Content Manager manual and consult “Configure a
surface” in Chapter 3.
If there is no visual feedback on the selected panel, see Chapter 8: Troubleshooting.
4. If you have installed the remote control USB receiver in one of the LTPs, an active selection box will be shown in the
Remote control section as in Figure 24.
Figure 24: Content Manager - Network Configuration Remote
Luminous textile panel
Installation and cleaning guide April 2013
21
Use the remote control (stop, next or previous button) to see whether the LTP responds to the remote control
commands. This LTP must be set as the Master by selecting Master in the “Type” column, as shown in Figure 24.
5. Click “Open control page” for the Master. This will open the control page of the Master LTP as shown in Figure 25.
Figure 25: Control Page
On the control page you can change the overall settings. You must do this in the administrator section, which you can
access by clicking the administrator button on the top right.
Default login:
User name: admin
Password: admin
Note:
• For LTPs larger than 170" 1/16 x 46" 4/16 there will be 2 Ethernet connectors on the back side of the LTP. These must be configured separately in the network.
For additional information about dealing with bigger panels, see Chapter 8: Troubleshooting.
22
Installation and cleaning guide April 2013
Luminous textile panel
5.2.
Surface Configuration
Open the Content Manager manual from the help section an follow the instructions in chapter 3.2 Configure a surface on
how to import or create a new surface.
5.3.
Setting the time
When you program your luminous textile panel installation with a schedule in the Content Manager - Scheduler, you
must make sure the LTP’s internal clock is set to the correct time.
When you have one Standalone installation or multiple panels, make sure the internal clock is set to the correct local time.
When you have a Master/Slave configuration, only the Master needs to be set to the local time. The Master will automatically
synchronise the Slave panels.
For more information about Standalone and Master/Slave configuration, see Chapter 3.
For more information on how to set the time on your panels, please refer to the help section of the Content Manager.
5.4.
Program your content
When the surface configuration and the network configuration are finished, you can begin creating and editing playlists.
In the Content Manager - Playlist editor, it is possible to import content from different sources and add it to different
playlists.
Figure 26: Content Manager - Playlist Editor
Playlists can be recalled by the remote control or through the control page mentioned previously in section 5.1. The main
actions associated with playlists are play, stop, next playlist and previous playlist.
Luminous textile panel
Installation and cleaning guide April 2013
23
Every playlist can also be scheduled in the scheduler to start at a specific time and play during a time slot. Assigning every
playlist a unique name will make it easier to program your schedule in the following steps.
For optimal playback, choose content in the following format:
•
•
•
•
Format: WMV (Windows Media Video v9)
Codec: VC-1
Bit rate: average 5 Mbps (for standard quality)
Keyframe: 1s
For more information on how to edit playlists, fading, crossfading and previewing, please refer to the Content Manager
manual in the help section.
5.5.
Content conversion
After the content and different playlists have been created, you must convert the files into a compatible format so it can be
uploaded to the panels. This conversion is done automatically in the Content Manager - Content converter tab. You must
perform this step before you upload the content to the installation.
5.6.
Scheduling
Once the playlists have been created in the Content Manager - Playlist editor tab, you can open the Scheduler tab.
Figure 27: Content Manager - Scheduler
The Scheduler allows you to program the different playlists to start and end at specific times. If the playback duration
exceeds the duration of the playlist, the playlist will loop until the end time is reached.
24
Installation and cleaning guide April 2013
Luminous textile panel
You can also program recurring events in the Content Manager - Scheduler, so that there is no need to program a repetitive
action for each day, week or month.
For more information on how to schedule playlists, please refer to the Content Manager manual in the help section.
5.7.
Upload all setting to your luminous textile panels
The last step of the programming is to transfer the created and saved project to the LTPs via the Ethernet connections.
Figure 28: Content Manager - Uploader
It is important that all the Surface configurator settings are correct and have been tested before the uploading begins.
If the settings or the network are not configured correctly, an error message will be displayed.
A password is required to upload content to the panels.
The default settings are:
• User name: llcontent (LLcontent)
• Password: llcontent (LLcontent)
The password can be changed in the administrator section of the control page (see section 5.1).
For more information about uploading the project to the LTPs and changing passwords, please consult the Content Manager
manual in the help section of the Content Manager.
Luminous textile panel
Installation and cleaning guide April 2013
25
5.8.
Streaming system (DVI)
If your installation includes a streaming system that consists of a Philips Color Kinetics streaming device (e.g.Video System
Manager Pro) and the luminous textile panels, you do not need to use the Content Manager.
Each LTP will act as a Color Kinetics device and can be streamed to with the Philips KiNET protocol.
For more detailed instructions on how to install the streaming system, consult the Color Kinetics manual available from their
website: http://www.colorkinetics.com/support/userguides/
Search for the “Video Management Tool Pro 2 User Guide” in the user guide list.
Open the control page for each LTP (see section 5.1) and access the administrator page as described in the Content Manager
manual. In the administrator section, enable streaming as shown in Figure 29.
Figure 29: Streaming system
26
Installation and cleaning guide April 2013
Luminous textile panel
6. Finalising the installation
When the complete installation is finished, that means:
1.
2.
3.
4.
5.
6.
7.
Luminous textile panels are mounted and connected.
Network configuration has been finalised.
Content Manager - Surface configuration contains the settings of the network and the layout of the LTPs.
Content has been imported into the Content Manager - Playlist editor.
Content has been rendered in the Content converter.
The Content Manger Scheduler has been programmed, if desired.
The complete project created in the Content Manager (Surface configurator, Playlist editor, Content converter and
Scheduler) has been saved and uploaded to the panels via the Content Manager - Uploader.
8. Test final installation by using the remote control, the control page and the Scheduler to check the functionality of all the
controls.
The final step of the installation is:
9. Make sure the IP address of the Master LTP and the project file (*.lcp) is transferred to the client or the project
management for future access.
Luminous textile panel
Installation and cleaning guide April 2013
27
7. Maintenance
7.1.
Care instructions for the textile finish of the luminous textile panel
Stains can often be removed using a damp cloth before they penetrate into the fibres.
If the stain has dried, first scrape off as much as possible with a brush and remove as much as possible with a vacuum
cleaner. Then clean using water and, if needed, clean again with soapy water.
It is important to rinse with clean water. When treating stubborn stains, stain removers should be “worked into the fabric”
with a clean, damp, absorbent cloth.
WARNING!
Be careful when using solvents like benzene, xylol and acetone because these could damage the fabric.
General information
These tips for stain removal are only recommendations. We cannot guarantee 100% removal.
In all cases we recommend you obtain specialist advice from a reputable dry cleaner.
7.1.1. Detailed cleaning instructions
Alcohol
Fresh stains treat with a weak solution of organic acids (household vinegar). Rinse immediately.*
Dried stains treat with a general “oxidative” bleaching agent. †
Ballpoint pen
Use surgical spirit, then acetone (e.g. oil-free nail varnish remover).
Blood
Treat fresh stains with an alkaline-based cleaning agent (e.g. soap flakes or washing-up liquid and soda).
Rinse immediately.*
Treat dried stains with an enzyme agent, such as washing powder; note the recommended reaction time.
Dry carefully.
Butter
Treat with a solvent (benzene, xylol, acetone etc.). While scraping it off, beat it gently and vacuum when completely dry,
then: Treat fresh stains with an alkaline-based cleaning agent (e.g. soap flakes or washing-up liquid and soda).
Rinse immediately.*
Treat dried stains with an enzyme agent, such as washing powder; note the recommended reaction time.
Dry carefully.
Candle wax
Treat with a solvent (benzene, xylol, acetone etc.). While scraping it off, beat it gently and vacuum when completely dry.
Chewing gum
Treat with a solvent (benzene, xylol, acetone etc.). While scraping it off, beat it gently and vacuum when completely dry.
Chocolate
Treat fresh stains with an alkaline-based cleaning agent (e.g. soap flakes or washing-up liquid and soda).
Rinse immediately.* Finally, treat with a weak solution of organic acids (household vinegar). Rinse immediately.*
Treat dried stains with an enzyme agent, such as washing powder; note the recommended reaction time.
Dry carefully. Then treat with a solvent (benzene, xylol, acetone etc.). While scraping it off, beat it gently and vacuum when
completely dry.
Finally, treat with a general “oxidative” bleaching agent.
Coffee (black)
Fresh stains: treat with a weak solution of organic acids (household vinegar). Rinse immediately.*
Dried stains: treat with a general “oxidative” bleaching agent. †
28
Installation and cleaning guide April 2013
Luminous textile panel
Cream
Treat fresh stains with an alkaline-based cleaning agent (e.g. soap flakes or washing-up liquid and soda).
Rinse immediately.*
Treat dried stains with an enzyme agent, such as washing powder; note the recommended reaction time.
Dry carefully.
Gravy
Treat fresh stains with an alkaline-based cleaning agent (e.g. soap flakes or washing-up liquid and soda).
Rinse immediately.*
Treat dried stains with an enzyme agent, such as washing powder; note the recommended reaction time.
Dry carefully. Then, treat with a solvent (benzene, xylol, acetone etc.). While scraping it off, beat it gently and vacuum when
completely dry
Grease
Treat with a solvent (benzene, xylol, acetone etc.). While scraping it off, beat it gently and vacuum when completely dry.
Ink
Treat using water mixed with furniture shampoo. Then contact a specialist.
Jam
Treat fresh stains with a weak solution of organic acids (household vinegar). Rinse immediately.*
Treat dried stains with a general “oxidative” bleaching agent. †
Juice, drinks (fruit syrup base)
Treat fresh stains with a weak solution of organic acids (household vinegar). Rinse immediately.*
Treat dried stains with a general “oxidative” bleaching agent. †
Lipstick
Treat with a solvent (benzene, xylol, acetone etc.). While scraping it off, beat it gently and vacuum when completely dry.
Milk
Treat fresh stains with an alkaline-based cleaning agent (e.g. soap flakes or washing-up liquid and soda).
Rinse immediately.*
Treat dried stains with an enzyme agent, such as washing powder; note the recommended reaction time.
Dry carefully.
Nail varnish
Treat with a solvent (benzene, xylol, acetone etc.). While scraping it off, beat it gently and vacuum when completely dry.
Oil
Treat with a solvent (benzene, xylol, acetone etc.). While scraping it off, beat it gently and vacuum when completely dry.
Paint (oil based)
Treat with a solvent (benzene, xylol, acetone etc.). While scraping it off, beat it gently and vacuum when completely dry.
Paint (water based)
Start with just cold water.
Then use water mixed with furniture shampoo. Finally, contact a specialist.
Shoe polish
Treat with a solvent (benzene, xylol, acetone etc.). While scraping it off, beat it gently and vacuum when completely dry.
Soot
Treat with a solvent (benzene, xylol, acetone etc.). While scraping it off, beat it gently and vacuum when completely dry.
Tea
Treat fresh stains with a weak solution of organic acids (household vinegar). Rinse immediately.*
Treat dried stains with a general “oxidative” bleaching agent. †
Luminous textile panel
Installation and cleaning guide April 2013
29
Urine
Treat fresh stains with an alkaline-based cleaning agent (e.g. soap flakes or washing-up liquid and soda).
Rinse immediately.*
Treat dried stains with an enzyme agent, such as washing powder; note the recommended reaction time.
Dry carefully.
Vomit
Treat fresh stains with an alkaline-based cleaning agent (e.g. soap flakes or washing-up liquid and soda).
Rinse immediately.*
Treat dried stains with an enzyme agent, such as washing powder; note the recommended reaction time.
Dry carefully.
Wine
Treat fresh stains with a weak solution of organic acids (household vinegar). Rinse immediately.*
Treat dried stains with a general “oxidative” bleaching agent. †
Finishing
*) We recommend that after every cleaning, you use spray extraction, so that any edge marks / residual cleaning agents are
removed.
†) “Oxidative” bleaching agent. This refers to a weak, 3% hydrogen peroxide solution.
7.1.2. Material specification: Trevira CS
All textile finishes of the luminous textile panel are made from Trevira CS yarns.
Trevira CS is a special type of polyester (synthetic fibre): the chemical composition of the fibres makes this textile
permanently flame-retardant. This quality remains intact after repeated laundering and long-term usage.
Trevira CS fulfils all current fire standards applicable in Europe, both for home use and for the contract market. In addition,
this easy care textile ensures a high degree of light fastness, which means minimal fading.
7.2.
Data management instructions for the luminous textile panel.
The administrator can access log files of each LTP and can clean up data and change settings stored on each panel.
For more instruction on how to manage and to maintain this data storage, please check the Content Manager manual.
Copyrights:
All other brands and product names are trademarks of their respective companies or organizations.
30
Installation and cleaning guide April 2013
Luminous textile panel
8. Troubleshooting
If the information below does not solve your problem, please check our website:
www.philips.com/luminous-textile
DHCP reservation setup:
Enter the panels in the router’s DHCP RESERVATIONS LIST and assign each panel a name that corresponds to the setup
layout of the panel.
Figure 30: DHCP RESERVATIONS LIST
No visual feedback when clicking Identify in the Content Manager.
1. Unplug the power to the panels, wait a few seconds, and plug the power back in,
Check whether default colour content is running.
If there is no visible color animation on start-up, contact Large Luminous Surface back office:
Email: [email protected]
Luminous textile panel
Installation and cleaning guide April 2013
31
2. Enter the IP address of the specific panel in your browser.
When the page opens, click the play/stop button and check whether the panel responds.
Figure 31: Player
If the webpage does not open in your browser, check the network configuration.
Check whether the Ethernet cable is correctly connected to the router by checking the blinking LED next to the
Ethernet connector on the driver box.
If the LED does not light up there is no connection to the router.
An orange LED indicates that the panels are connected to the router.
A green blinking LED indicates that the LTP has been assigned an IP address by the router and is sending and receiving
data.
Note:
• Each panel can also operate without being connected to the Ethernet interface. In this case the panel will play its
default content. If you plan to have the panel operate without a network connection, it is recommended that you
initially connect it to a network so it can be configured to play the intended content, after which you can disconnect it
from the network.
32
Installation and cleaning guide April 2013
Luminous textile panel
My panels are bigger than 170” 3/32 x 47” 8/32
Contact your contractor to receive the project file delivered by Philips. Make sure the IP addresses of your luminous textile
panels correspond to the two connected parts shown in the Content Manager surface configuration.
Unable to upload content to the installation
Figure 32: Error notification
When you receive the error shown above, go to the Content Manager surface configuration page and click “Identify” to
obtain visual feedback on each panel.
If no visual feedback is provided, go to “No visual feedback when clicking Identify in the Content Manager”
elsewhere in the troubleshooting chapter.
Remote control does not work
Check whether the laser pointer works (
in the middle of the remote control)
Please check whether the USB receiver has been removed from the bottom of the remote
control.
If the laser pointer does not work, replace the battery and try again.
If the laser pointer still does not work after you have replaced the battery, check whether
the on/off switch on the side of the remote is set to the ON position.
If the laser pointer works but the Master panel does not respond, please check whether the
USB receiver is correctly inserted in the driver box
If the Master panel does not respond when you press buttons on the remote control,
contact Large Luminous Surface back office:
Email: [email protected]
Figure 33: Remote control
Part of the panel does not light up
Contact your supplier or Large Luminous Surface back office:
Email: [email protected]
Luminous textile panel
Installation and cleaning guide April 2013
33
9. Contact / Information
Large Luminous Surfaces, Philips Lighting B.V. head quarters:
High Tech Campus 27
5600 AE Eindhoven, the Netherlands
Email: [email protected]
Website: www.largeluminoussurfaces.com
34
Installation and cleaning guide April 2013
Luminous textile panel
Appendix
The entire installation procedure:
1. Plan the position of the panels on the wall or ceiling.
2. Plan the location of power sockets and Ethernet sockets. For more information about power and network requirements
and placement, see section 4.1: The actual installation - guidelines.
3. Plan the network set-up: How many panels will be connected to a router? How many routers and what type of router
will be used?
4. Determine which LTP will be set as Master. The Master LTP should hold the Remote Control USB receiver! See Chapter 3 for more information about Master/Slave configuration of the LTP.
5. Perform the actual installation starting from Chapter 4.
6. Set-up and test the LTP installation using the Content Manager as explained in Chapter 5.
7. Upload content to the LTP installation using the Content Manager.
Luminous textile panel
Installation and cleaning guide April 2013
35
36
Installation and cleaning guide April 2013
Luminous textile panel
Philips reserves the right to make design and specification changes
for product improvement without prior notice.
Trademarks are the property of Royal Philips Electronics or their respective owners.
2013© Royal Philips Electronics.
All rights reserved.