1
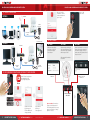
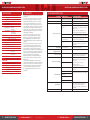
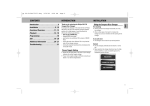
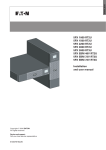
PROFESSIONAL SURVEILLANCE & SECURITY SYSTEM
Wi-Fi NETWORK CAMERA
REMOTE
MONITORING &
CONTROL FROM
SMARTPHONES,
TABLETS & PCs
SC201
AUDIO
& MOTION
NIGHT
VISION
HIGH
DEFINITION
MICROPHONE
& SPEAKER
SD CARD
STORAGE
PAN
& TILT
Wi-Fi
CONNECTIVITY
SIMPLE
SETUP
90˚
PAN & TILT
MOTION CONTROL
350˚
Internet router required
Instructions for use
Important! Please read these instructions carefully.
NOTE: SC201 camera requires network device (e.g. wireless/non-wireless router, network switch etc. that is connected to internet or
internal network for setup and use. Network device is not supplied with this kit.
SC201 camera might experience network, motion command and live transmission delay issues. This is normal, due to the connected
network, 3G/4G mobile network, server overflow or internet upstream speed, download speed and video resolution. To reduce delay,
it is recommended to reduce the video quality, or contact your mobile/network service provider.
SECURITY WITH VISION
www.orionlive.com.au
PROFESSIONAL SURVEILLANCE & SECURITY SYSTEM
PROFESSIONAL SURVEILLANCE & SECURITY SYSTEM
IMPORTANT
BEFORE RETURNING THIS
PRODUCT TO THE RETAILER
› A
djustable Lens: Rotate the ring clockwise or
anti-clockwise to adjust the focus
› Infra-red LEDs: Automatically turn on night vision at
night and off during the day
› M
icrophone: Used for two way communication or for
audio detection
PLEASE CONTACT
IF YOU HAVE ANY
CONCERNS OR PROBLEMS WITH THIS PRODUCT
› Indication light: Power / Network indication
Customer Service Phone: (03) 9982 5111 (Monday to Friday 8.30am – 5.30pm EST)
Email: [email protected]
For further information visit www.orionlive.com.au
identification
› Micro SD card socket: Max 32GB SD card
› Audio out: 3.5mm audio jack output
› E
xternal I/O:
1, 2 for Alarm Output
Eg: Siren, Door Strike, Home alarm system etc.
3, 4 for Alarm Input
Eg: Reed switch, PIR etc.
Note: Consult a licensed person if you are not
sure how to connect
Warning: Maximum rating of relay 1A
qr code
UID,
password
› WPS/Reset: Wi-Fi Protected Setup / Device Reset
› RJ45 Ethernet Port: Ethernet port 10/100 Mbps
ANTENNA
Adjustable
Lens
› Power socket: DC 5V 2A
Mounting
bracket
› QR Code: Scan from Phone/Tablet
IR LEDS for
night vision
› UID, Password: User ID, Password
TILT/PAN
CAMERA HEAD
Audio
out
Micro SD external
Card slot
I/O
rj45 ethernet
port
wps/reset
Power
Socket
MICROPHONE
Indication
LIGHT
Speaker
Microphone
1System Installation
› Plug in the provided RJ-45 Ethernet cable and
power supply to the Orion camera.
Responsible use
Please ensure this equipment is used in accordance
with any local laws or regulations, especially if your
device is capable of audio recording. Users of this
equipment should at all times act responsibly and
consider the reasonable expectations of privacy of
individuals. Surveillance should be for a legitimate
purpose related to the activities of the person or
organisation conducting it. We recommend that
you clearly indicate (written or otherwise) that
surveillance is in operation in the monitored area.
WARNING
› Do not drop, puncture, or disassemble
the camera.
› Plug in the adaptor to a 240V power point.
› Wait for 1 minute and let the camera go through
the initial self-diagnostic test (approx. 1 min).
› Plug in the other end of RJ-45 Ethernet cable to a
Wi-Fi router.
› Once the camera is setup correctly, you
can mount it with the mounting bracket
that is provided.
› If the image is blurry, the camera is not focused.
Rotate the silver knob on the camera lens to
adjust the focus.
Important Note: You will need an internet router to
operate this device.
› Do not tug the power supply or any connected
›
CONTENTS:
CAMERA
MOUNTING
plate
POWER SUPPLY
ETHERNET
CABLE
Installation CD
USER MANUAL
MOUNTING SCREWS,
PLUGS
›
›
›
cable, remove connection gently.
Do not mount directly expose/near to the sun,
rain, radio transmitting devices, metal objects
or heat sources.
Do not crush or damage the power cable.
Do not cover the unit, leave adequate space for
ventilation and pan/tilt motion.
Use the cameras with care, do not exert any force
on the camera.
4 X DETERRENT
STICKERS
2
SECURITY WITH VISION
WI-FI NETWORK CAMERA SC201
www.orionlive.com.au
WI-FI NETWORK CAMERA SC201
SECURITY WITH VISION
3
PROFESSIONAL SURVEILLANCE & SECURITY SYSTEM
PROFESSIONAL SURVEILLANCE & SECURITY SYSTEM
2COnnection Diagram
option 1
After you finish the
registration, enter the
registered details and
press “Login”.
Internet
Press to add
new camera.
Power
Adapter
Ethernet
Cable
SC201 REAR VIEW
option 2
4 add camera
option 1
Internet
option 2
Add camera manually by
entering the “UID” and
“password” and press
“Save” button.
Add camera by scanning the
QR code at the bottom of the
camera. Enter the “password”
and then press “Save”.
option 3
Search local network for connected
camera. Press search and wait for
the camera to appear, select the
camera, enter the “password” and
then press “Save”.
UID, password found under
the camera
Ethernet
Cable
Ethernet
Cable
Power
Adapter
3 apple/android smartphone and tablet configuration
search connected
camera on local
network
ADD Camera
manually
Install “Oricam” application
from Android Google
Play or Apple App Store
Oricam
scan camera
qr code
Register an account
by entering your
E-mail address and
unique password.
4
SECURITY WITH VISION
WI-FI NETWORK CAMERA SC201
Login with the
details you
have registered.
www.orionlive.com.au
Important Note: Remember to
change the default password.
The default password is for setup
purpose only (Refer to “Change
password” section)
WI-FI NETWORK CAMERA SC201
SECURITY WITH VISION
5
PROFESSIONAL SURVEILLANCE & SECURITY SYSTEM
PROFESSIONAL SURVEILLANCE & SECURITY SYSTEM
5Camera Settings
Internet
Tap to view live video
or
PRESS AND HOLD TO
ACCESS SETTINGS
MENU
WI-FI SETTINGS
WI-FI SSID
Wi-Fi Setup:
1. Select the Wi-Fi SSID.
2. Enter Wi-Fi password.
3. Press “Save” button.
4. If successful, you can disconnect
Ethernet cable.
5. Relocate camera anywhere within
Wi-Fi router range.
CAMERA Successfully
CONNECTED
swipe screen
for pan & tilt
control
SETTINGS MENU
Back
Settings
Events
Motion / Audio alerts
Files on Camera SD Card
Video / Pictures
recorded on the cameras
SD card phone
Files on Phone
Video / Pictures recorded
in the mobile phone
Device Info
Change device password
Video quality
Video flip
Environment mode
Wi-Fi
Motion detection
Audio detection
I/O alarm
Dropbox
Recording mode
Format SD card
About device
Snap a photo: Take a
snapshot and save it on the
mobile phone.
CHANGE PASSWORD
Record video: Record the
video on the mobile phone.
1. Enter “Advance
Setting > Change
Device password” menu.
2. Enter new unique
password.
3. Press “Save” button.
Speaker/Headphones: Listen
to the audio captured by the
microphone on the camera.
Microphone: Talk back to the
speaker on the camera.
Data information: Indicate
19KBps how much data is being
downloaded.
Delete
Delete camera from
user account
6
SECURITY WITH VISION
WI-FI NETWORK CAMERA SC201
www.orionlive.com.au
WI-FI NETWORK CAMERA SC201
SECURITY WITH VISION
7
PROFESSIONAL SURVEILLANCE & SECURITY SYSTEM
PROFESSIONAL SURVEILLANCE & SECURITY SYSTEM
6App Notifications
1. R
un “Oricam” software.
Notification settings on the app can be accessed by pressing the “Account” button and then you can
modify the settings.
2. Register an account.
3. Enter your e-mail address and unique password.
1PC/MAC Configuration
Install the software from the CD that is provided or from “www.orionlive.com.au” website.
4. P
ress “Submit” to complete registration.
Windows PC:
1. Insert the provided CD in the PC.
2. G
o to “My Computer”, then open
the CD files and double click on
“Oricam_Setup.exe”.
3. T
he Oricam Setup will start, and then
follow the instructions on the screen.
4. If the software has installed
successfully, double click on the
“Oricam” icon.
Apple MAC:
1. Insert the provided CD in the Mac’s
optical drive.
2. Open the CD files by clicking on the
CD icon.
3. Open the “Mac” folder, drag the
“Oricam” software on to the desktop.
Just double click the software to run it as
there is no installation required.
Use “Local mode” if you are accessing the camera locally, and ensure your Smart Phone/PC is connected
to the same wireless router as the Orion network camera.
Note: Turn off 3G, 4G data on the phone/tablet and use only Wi-Fi to ensure you don’t use your data.
In this mode you will not be using any data from your internet service provider as the video transfer is
happening locally within your network.
8
SECURITY WITH VISION
WI-FI NETWORK CAMERA SC201
www.orionlive.com.au
WI-FI NETWORK CAMERA SC201
SECURITY WITH VISION
9
PROFESSIONAL SURVEILLANCE & SECURITY SYSTEM
PROFESSIONAL SURVEILLANCE & SECURITY SYSTEM
3Add Cameras
3. The setup is now complete. Double click on the camera you just registered
to view live video. The settings can be tweaked according to the users
requirements.
4. Once the setup is done on a PC you will be able to access the camera on
your Smart Phone using the same login details.
1. After you finish the registration, enter your account details and press “Login”. You will see a window with options
to add cameras, access recorded files and access settings to change the recording path, password etc.
4VIDEO PLAYBACK
Alarm / Event
Add
Device
Search
Device
Open File
location
Software
setting
Refresh
Video playback allows you to review recordings.
1. Select the date range and press “Query”,
it should display all the recordings from the
selected range.
2. You can either select the footage recorded
locally or from the SD card (remotely).
3. The video plays in the built in media player. If
you wish to use your own media player, press
the browse button next to the file address and
it takes you to the location where all the videos
are stored.
5SOFTWARE settings
Add the camera (UID and
password are located under
the camera)
option 1
Settings allows you to change your login password and the folder where the
videos are recorded.
option 2
Add the camera manually
Search connected camera on local network
6events
1. E
nter the details found under the camera.
»» Device Name: Name your device.
»» Device UID: UID is found under the camera.
»» Password: Default password is found
under the camera.
»» Wi-Fi Configuration: Tick to configure
Wi-Fi settings.
2. Press “Submit” to add camera to device list.
10
SECURITY WITH VISION
1. Press “ Search” to search local network
for camera.
2. Select camera and press “Add”.
3. Enter camera name and password.
4. Press “Submit” to add camera to device list.
WI-FI NETWORK CAMERA SC201
www.orionlive.com.au
Notification icon flashes if there are any new
events that have been detected by Motion/Audio
detection.
If you want to search for events from a specific date,
select the date and press “Query”, this produces all
the events from that particular date.
WI-FI NETWORK CAMERA SC201
SECURITY WITH VISION
11
PROFESSIONAL SURVEILLANCE & SECURITY SYSTEM
PROFESSIONAL SURVEILLANCE & SECURITY SYSTEM
7Dashboard features
Device name
Pan/Tilt control
Multi-device
window:
Video quality:
You can prioritise quality or video smoothness and
the software automatically adjusts the settings.
Definition: The camera records at the highest quality
and when accessing it remotely, the application uses
more data to stream the video. This mode gives
preference to quality.
Fluency: The camera records at lower resolution
but has a much smoother frame rate, and when
accessing it remotely, the application uses less data
to stream the video.
Video Setup
Alarm Setup
Pre Point:
You can have 5 pre-points, move the camera to the
point where you want to save and press “Setup”.
This helps you to quickly select the locations you
saved and go to them automatically instead of using
the pan/tilt function.
Once you press the “Setup” button the same image
should appear in the corner of the window. The point
is now saved; follow the same procedure for
configuring more pre-points.
WI-FI SSID
Wi-Fi Setup
Net Setup
Pause / Play:
You can pause live
video on the camera
Snap a photo:
Takes a snapshot
and saves it.
Record video:
Record onto the SD
card (Remote Mode)
or on the computer
HDD (Local Mode).
Speaker/
Headphones:
Listen to the audio
captured by the
microphone on the
camera.
Microphone:
Talk back to the
speaker on the
camera.
The default setting is in “Auto mode”
and it automatically assigns an address
to the camera.
If you wish to change it, click on “Manual
mode” and enter the details.
Restore:
restores the video
settings to default
Camera settings:
Configure password, alerts,
motion detection and more
options. (More info further
below in the document)
12
SECURITY WITH VISION
WI-FI NETWORK CAMERA SC201
www.orionlive.com.au
Changing
Password
WI-FI NETWORK CAMERA SC201
SECURITY WITH VISION
13
PROFESSIONAL SURVEILLANCE & SECURITY SYSTEM
PROFESSIONAL SURVEILLANCE & SECURITY SYSTEM
8Video Setup
Display OSD: Displays “Date” and “Time” stamp on the
video and photos.
Environment Mode: Either choose 50Hz or 60Hz if you
notice any flicker from the fluorescent lights.
IR LED: Tick this option if you do not wish to use the Infrared night vision. The Orion camera has a light sensor and
it automatically turns ON and OFF the IR LEDs according
to the brightness of the surrounding area.
Note:
Motion detection:
1. If the motion detection is too sensitive, ensure the camera is not faced directly towards a light source,
flashing objects, windows or mirrors.
2. The camera motion sensitivity even detects slight changes such as leaves moving or brightness changes.
Audio detection:
1. If the audio detection is too sensitive, ensure the camera is not next to a sound source.
2. The cameras audio detection detects any changes to sound levels.
10 snap to e-mail
9 alarm setup
Digital I/O alarm input and Output to I/O are the ports behind the camera.
Alarm Input: Sensory devices such as reed switches or PIR
sensors can be connected to digital I/O alarm input
(Pin 3 & 4) to trigger alarm.
Alarm Output: Alarm devices such as sirens and home
alarm systems can be connected to digital I/O alarm
output (Pin 1 & 2) to respond to alarm events detected by
the camera or wired input.
Select normally open or normally closed options
depending on the devices that are connected to the I/O
pins. Consult a licensed person if you are not sure how to
connect the I/O pins.
OUTPUT
(1, 2 pins)
INPUT
(3,4 pins)
Warning: Use a higher rated external relay for devices
using high power.
Note: Consult a licensed person if you are not sure how to
connect the I/O pins.
This feature works in conjunction with Motion/Audio detection, it sends three photos to your email whenever
the camera detects motion or audio.
Note: Each email is approximately 200 – 300 kB
We recommend using Gmail or Yahoo mail for email setup, if you are using a different email provider ensure
it supports SMTP and have their SMTP server and SMTP port numbers ready.
To get email alerts enter the details as shown in the example below:
Sender: “E-mail of the sender” E.g.: [email protected]
Receiver: “E-mail of the receiver” E.g.: [email protected]
(Note: If you wish to send the email to yourself just put your same email address in both sender and receiver
section E.g.: [email protected])
SMTP server: Depends on the Email service provider you are using.
Motion/Audio Detection Sensitivity
Tick Motion or Audio check boxes to enable motion
or audio detection. These functions generate alarm
notifications and log events into the events list if the camera
detects motion or sound.
The levels of detection vary according to sensitivity setting.
OFF - LOWEST - LOW - NORMAL - HIGH - HIGHEST.
Test this function before you choose the appropriate level.
E.g. For Gmail:
Gmail SMTP server : smtp.gmail.com
Gmail SMTP port : 465 or 587
Security mode: Yes
E.g. For Yahoo:
Yahoo SMTP server: smtp.mail.yahoo.com
Yahoo! Mail SMTP port: 465 or 587
Security mode: Yes
Username: Sender Email Username E.g. [email protected]
Password: Sender Email password E.g. ***************
14
SECURITY WITH VISION
WI-FI NETWORK CAMERA SC201
www.orionlive.com.au
WI-FI NETWORK CAMERA SC201
SECURITY WITH VISION
15
PROFESSIONAL SURVEILLANCE & SECURITY SYSTEM
PROFESSIONAL SURVEILLANCE & SECURITY SYSTEM
11 WI-FI SETUP
14MAINTENANCE
1. Select the Wi-Fi SSID.
2. Enter Wi-Fi password.
3. Press ‘OK” button.
4. If successful, you can disconnect Ethernet cable.
5. Relocate camera anywhere within
Wi-Fi router range.
Changing password:
Ensure you change the default password of the
camera, and enter the new password.
WI-FI SSID
The default password is for setup purpose only,
use a mix of UPPERCASE, lowercase and number
for the password.
WI-FI SSID
12 WPS CONNECTION
1. WPS is a quick and easy way to connect the camera without going through
all the settings, firstly check if your wireless router is compatible with Wi-Fi
Protected Setup (WPS), usually there is WPS written on one of the buttons or
have a symbol that looks like this
. Refer to your routers documentation
or search on Google the model number of your router along with “WPS” to find
more information. If your router does not support WPS standard please use the
wired setup.
Drop Box setup:
You can choose to save the recordings in the cloud
if you have a drop box account. To set it up, please
follow the instructions below.
Note: Ensure your Network is encrypted using WPA or WPA2 encryption. If your
routers encryption is set to WEP, the WPS method will not work. (WEP used
to be an old encryption standard and has critical security flaws).
n the Orion Software, select “Open” and press
2. O
“Yes” to link it to your Dropbox account.
1. F
irst, create a drop box account by going to
“www.dropbox.com”, if you don’t have one.
2. Make sure the camera is within the Wi-Fi range of the router and plug in the camera, and then wait for
approximately 2 minutes until camera finishes its initial start-up procedure.
3. O
nce you press “Yes”,it opens the drop box
page on your web browser and asks your
permission to add a folder to your account.
15reset to factory settings
3. Then press the WPS button on you Wi-Fi router for 2 seconds (may vary with the router), the WPS light
should start flashing and start scanning for Wi-Fi devices.
4. Now press the WPS / RESET button behind the camera for 1 to 2 seconds, the blue light on the camera
flashes until it establishes a connection with the wireless router.
5. It may take up to 2 minutes (may vary with the router) for the connection to complete.
4. P
ress “Allow”, and a confirmation message
appears saying the camera is connected to
your drop box.
1. Turn ON the camera and wait until it
finishes the start-up routine.
2. Now press and hold the WPS/reset button
for 5 seconds and release.
Camera
3. The camera is now set to
Power
factory settings.
6. The connection should be complete now and refer to “PC/Mac” or “Smart Phone/Tablet”
Configuration section.
13NET SETUP
The default setting is in “Auto mode” and it
automatically assigns an address to the camera.
If you wish to change it, click on “Manual mode”
and enter the details.
16
SECURITY WITH VISION
WI-FI NETWORK CAMERA SC201
www.orionlive.com.au
5. N
ow, press “Yes” on the
popup message of the
Orion software.
wps/reset
Button
6. T
here should be a folder created in your drop
box account now.
WI-FI NETWORK CAMERA SC201
SECURITY WITH VISION
17
PROFESSIONAL SURVEILLANCE & SECURITY SYSTEM
PROFESSIONAL SURVEILLANCE & SECURITY SYSTEM
specificationS
› video
Image Sensor
Image Resolution
Lens
Viewing Angle
Compression Format
Image Frame Rate
Display Resolution
6mm Colour CMOS Sensor
1280 x 720 pixels (1.0 Megapixels)
F: 3.6mm
60º
H.264
30fps (720P)
30fps (VGA)
30fps (QVGA)
1280 x 720 (720P)
640 x 480 (VGA)
320 x 240 (QVGA)
› AUDIO
Audio Compression
Input
Output
ADPCM
Built-in microphone
Built-in speaker with audio out
› NIGHT VISION
Infrared Light
11 IR LEDs
Range
Up to 10m
› ALARM
Detection
Alarm
Motion/Audio Detection,
External Input
Email, Notification,
External Output
› PAN & TILT
Pan/Tilt/Speed
Horizontal 350° - Vertical 90°
› NETWORK
Ethernet
Wi-Fi
10/100Mbps RJ-45
IEEE 802.11g/b/n
› GENERAL
Power Supply
DC 5V 2A
Data Storage
Micro SD Card (Not Included)
Dimensions
122(L) x 100(W) x 113(H)mm
18 troubleshooting guide
17Warranty
Arlec guarantees this product in accordance with the Australian
Consumer Law.
Arlec also warrants to the original first purchaser of this product
(“you”) from a retailer that this product will be free of defects
in materials and workmanship for a period of 12 months from
the date of purchase; provided the product is not used other
than for the purpose, or in a manner not within the scope of the
recommendations and limitations, specified by Arlec, is new and
not damaged at the time of purchase, has not been subjected
to abuse, misuse, neglect or damage, has not been modified or
repaired without the approval of Arlec and has not been used for
commercial purposes (“Warranty”).
If you wish to claim on the Warranty, you must, at your own
expense, return the product, and provide proof of original
purchase and your name, address and telephone number, to
Arlec at the address below or the retailer from whom you
originally purchased the product within 12 months from the date
of purchase.
Arlec will (or authorise the retailer to) assess any claim you may
make on the Warranty in the above manner and if, in Arlec’s
reasonable opinion, the Warranty applies, Arlec will at its own
option and expense (or authorise the retailer to) replace the
product with the same or similar product or repair the product and
return it to you or refund the price you paid for the product. Arlec
will bear its own expenses of doing those things, and you must
bear any other expenses of claiming on the Warranty.
The Warranty is in addition to other rights and remedies you
may have under a law in relation to the product to which the
Warranty relates.
Our goods come with guarantees that cannot be excluded
under the Australian Consumer Law. You are entitled to a replacement
or refund for a major failure and for compensation for any other
reasonably foreseeable loss or damage. You are also entitled
to have the goods repaired or replaced if the goods fail to
be of acceptable quality and the failure does not amount to
a major failure.
* Range depends on location, temperature and wireless network device
Problem Possible cause
Power supply is loose or unplugged.
Camera has no power or not powering up No power at socket outlet/power point.
SD card is not detected by camera SD card not formatted
Cannot connect to camera
Suggested Remedy
Check all cable and power supply connections.
Check power at socket outlet/power point.
Format SD card, please format SD card.
Camera out of range
Relocate camera closer to wireless router.
Camera not connected to
LAN or Wi-Fi
Check all cable and power supply connections.
Check network device (e.g. wireless/non-wireless router,
network switch etc...).
Restart the camera Click or tap “REFRESH” on the
control device (Apple/Android/Desktop/Notebook).
Signal interference
Relocate camera away from sun, rain, radio transmitting
devices, heat sources, metal objects or major obstacles.
No power at camera or no power at
socket outlet/power point
Check all cable and power supply connections.
DHCP not enabled.
Enable DHCP settings on the internet router.
Refer to router user manual or consult your internet
service provider
Check power at socket outlet/power point.
When IR night vision is activated, screen only Infra-red LED light is reflected off from
displays white glass or reflective objects
Relocate camera away from windows, reflective and
glass objects or remove obstacles.
When IR night vision is activated, screen only Infra-red LED light is activated
displays black and white
This is normal. No action required.
Save necessary files on control device (Apple/Android/
Desktop/Notebook) then format current SD memory
card or insert new SD memory card and format.
SD memory card full
Signal interference
Blurry or poor image quality Camera lens not focused
Relocate camera and Camera away from sun, rain, radio
transmitting devices, heat sources, metal objects or
major obstacles.
Relocate camera closer to wireless router.
Check antenna connection.
Manually adjust camera lens to adjust focus.
Low or unstable signal
Antenna
Adjust antenna connection or relocate camera closer to
wireless router.
Signal interference
Relocate camera away from sun, rain, radio transmitting
devices, heat sources, metal objects or major obstacles.
Strong radio emitting or transmitting
devices nearby
Strong electromagnetic interference
nearby
Too close to metal objects
Camera too close to sound source
Audio interference
Frozen video
18
SECURITY WITH VISION
WI-FI NETWORK CAMERA SC201
www.orionlive.com.au
WI-FI NETWORK CAMERA SC201
Camera has a high sensitivity microphone.
Keep the camera and other sound source at least
5 metres apart. If the camera must be within
5 metres of other vocal device, reduce the volume or
turn on MUTE.
Disconnect power to camera and reconnect
SECURITY WITH VISION
19
PROFESSIONAL SURVEILLANCE & SECURITY SYSTEM
Arlec Australia Pty. Ltd. ACN 009 322 105 (“Arlec”) gives the Warranty.
Arlec’s telephone number, address and email address are:
Customer Service: (03) 9982 5111
New Zealand Toll Free: 0800 003 329
Building 3, 31 – 41 Joseph Street, Blackburn North, Victoria, 3130
Blackburn North LPO, P.O. Box 1065, Blackburn North, 3130
Email: [email protected]
SC201
CPIN002934