1
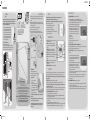
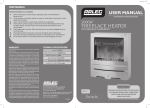
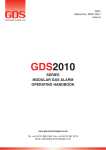
CPIN002837
USER MANUAL
5
IMPORTANT SAFEGUARDS
7
timer operation example
If you want the heater to come ON on MON – WED – THU at 11.30am and must be turned off at 5.30 pm
i. Check the clock is set to right time and day while the ON/OFF/AUTO is set to
“AUTO OFF”. (Fig 1.)
ii. Press the PROG button till it shows the program number and ON in front which
indicates the time you set is the time when the heater will be turned on.
iii. Press the week button till it shows the desired week setting MON-WED-THU.
iv. Press the HOUR and MIN button till the clock shows the correct time 11.30. (Fig 2.)
v. Press the PROG button again only once and the same program number and OFF comes
in front of the number which indicates the time you set is the OFF time of the heater.
vi. Press the WEEK button to select the day when you want to turn the heater off.
For this example we choose the same days –MO-WE-FR.
vii. Press the HOUR and MIN button till the clock shows the correct time 17.30.
Once the time is set return to main menu by pressing the MENU button once. (Fig 3.)
This unit maybe painted to suit decor using water
based paints only, rated at 120°C and above.
8
Fig.01
6
Fig.02
Fig.03
operation
CAUTION There may be some odour coming from the heater for the very first time you use it.
This is normal during the break-in period or after long term storage.
Make sure the heater is in well ventilated area and continue running it until the odour goes away.
i. Plug the heater to a standard wall socket.
ii. Press the ON/ OFF Power switch located on the right side of the panel to ON position. The light on the switch
body will illuminate which will indicate power is supplied to the unit.
iii. Set the clock and the current day as explained above.
iv. The compact digital timer on the heater body acts a manual switch. To turn ON the heater press the “On/
OFF / AUTO” button until the display shows “ON”. This will turn ON the heating element. When the heater
is turned ON the power on indicator on the timer will glow. To turn OFF the heater press the same button
until the display shows “OFF”. The heater will be turned OFF; the light on the power switch will still glow.
v. To program the heater to be turned ON at specific time periods press the “On/OFF / AUTO” until the display
shows “AUTO “.
Note: For the heater to work in pre-programmed modes the mains Power-ON switch must be turned to ON
position , light on switch body must illuminate.
vi. Program the heater to desired preset programs as given above. The heater will come ON and OFF as set
time periods as programmed.
vii. To turn OFF and prevent timer operation toggle press the “On/OFF / AUTO” button so that display shows “OFF”.
viii. If the timer is set to “ON” and then switched across to “AUTO” by pressing the “On/OFF / AUTO” button, the
appliance will continue to remain “ON”. The timer will switch “OFF” the appliance at the next programmed
“OFF” time. If no “OFF” time is set then the timer will continue to stay “ON”. This is also true in the “OFF” to
“AUTO” position; the timer will stay “OFF” until the next set “ON” time is reached.
This is also applies across different programs. For the same day Program 1 OFF time is set at 11.30 am and
Program 2 OFF time is at 10.30am the timer will switch “OFF” the appliance at first noticeable off time which is
at 10.30am. This is also true for “ON” setting, the timer will scan all the ON settings through all the programs
and the appliance will be switched on at next set “ON” time.
ix. The heater panel is hot to touch when in use. When you want to relocate the heater while free standing or
want to store the heater give ample time for the heater to cool down before you attempt to do it.
CPIN002837.indd 5-1
Painting Panel
maintenance & Cleaning
The heater requires regular cleaning to ensure trouble free operation:
i. Unplug the heater from mains supply before cleaning.
ii. Use a wrung out (damp) cloth to wipe the exterior of the heater
to remove dust and dirt.
iii. Ensure heater is dry before plugging back into the mains supply.
iv. To release the heater from the wall, for cleaning or redecoration, just open the screw bolt cap
and unscrew the screws to take off from the wall. For short term storage, just unplug the heater
and leave it away; for long term storage, you can dismantle from the wall and put some protective
covering over it and store standing upright.
9
warranty
Arlec guarantees this product in accordance with the Australian Consumer Law.
Arlec also warrants to the original first purchaser of this product (“you”) from a retailer that this product will be free of defects in
materials and workmanship for a period of 12 months from the date of purchase; provided the product is not used other than for the
purpose, or in a manner not within the scope of the recommendations and limitations, specified by Arlec, is new and not damaged
at the time of purchase, has not been subjected to abuse, misuse, neglect or damage, has not been modified or repaired without
the approval of Arlec and has not been used for commercial purposes (“Warranty”).
If you wish to claim on the Warranty, you must, at your own expense, return the product, and provide proof of original purchase
and your name, address and telephone number, to Arlec at the address below or the retailer from whom you originally purchased
the product within 12 months from the date of purchase.
Arlec will (or authorise the retailer to) assess any claim you may make on the Warranty in the above manner and if, in Arlec’s
reasonable opinion, the Warranty applies, Arlec will at its own option and expense (or authorise the retailer to) replace the
product with the same or similar product or repair the product and return it to you or refund the price you paid for the product.
Arlec will bear its own expenses of doing those things, and you must bear any other expenses of claiming on the Warranty.
The Warranty is in addition to other rights and remedies you may have under a law in relation to the product to which the
Warranty relates.
Our goods come with guarantees that cannot be excluded under the Australian Consumer Law. You are entitled to a replacement
or refund for a major failure and for compensation for any other reasonably foreseeable loss or damage. You are also entitled to
have the goods repaired or replaced if the goods fail to be of acceptable quality and the failure does not amount to a major failure.
1. Read all instructions before using this heater.
2. This heater is hot when in use. To avoid burns,
do not let bare skin touch hot surfaces. Allow
the heater to cool down before relocating or
storing the heater. Keep combustible material
such as drapery and other furnishings, at least
1 metre from the heater. When in use keep the
mains cord of the heater from touching the
heater body. Do not drape the cord over the
heater while hot.
3. Extreme caution is necessary when any
heater is used by or near children or invalids
and whenever the heater is left operating
unattended. Young children must be supervised
to ensure they do not play with the appliance.
4. Always unplug heater when not in use.
5. Do not operate any heater with a damaged
cord or plug or after the heater malfunctions,
has been dropped or damaged in any manner.
Return heater to suitably qualified facility
for examination, electrical or mechanical
adjustment or repair.
6. Do not use outdoors, the product is designed
only for household use.
7. Never locate heater where it may fall into a
bathtub or other water container.
8. Connect to properly earthed socket-outlet of
the appropriate voltage.
9. Do not insert or allow foreign objects to enter
any ventilation or exhaust opening as this may
cause an electric shock or fire, or damage the
heater.
10. Do not use in areas where petrol, paint, or
flammable liquids are used or stored.
11. Use the heater only as described in this
manual. Any other use not recommended by
the manufacturer may cause fire, electric
shock, or injury.
12. Do not connect via double adapters or power
boards. Avoid the use of an extension cord
because the extension cord may overheat
and cause risk of fire. However, if this heater
is used with an extension cord, use as short a
cord as practical.
13. Do not use this appliance with a programmer,
timer or any other device that switches the
heater on automatically, since a fire risk exists
if the appliance is covered or positioned
incorrectly.
14. In order to avoid overheating, do not cover the
heater.
15. There are no user serviceable parts installed in
the unit
16. Keep these instructions handy for future
reference
User Manual
FOR PERSONAL INDOOR USE ONLY
caution
This heater is to be operated only in upright
position. The heater incorporates a tip over
switch. If the unit is tilted or knocked over while
freestanding or wall mounted incorrectly the
power will be cut automatically. When the heater
is put back to upright position it will start working
as normal again.
When the heater is not in use, store in a
cool dry location.
Do not store until the heater cools down.
400W & 600W
ECO PANEL
HEATERS
Slimline design
WARNING
This appliance is not intended for use by persons
(including children) with reduced physical, sensory
or mental capabilities, or lack of experience
and knowledge, unless they have been given
supervision or instruction concerning use of the
appliance by a person responsible for their safety.
Young Children should be supervised to ensure that
they do not play with the appliance.
The heater must not be located immediately below
a power outlet.
Do not use this heater in the immediate
surroundings of a bath, shower or swimming pool.
The heater must be connected to an earthed
socket-outlet of the appropriate voltage.
The product is for household use only.
In order to avoid overheating, do not
cover the heater.
technical specifications
Model PEH208T
Rated Power 360-400W max
Rated Frequency
Voltage
PEH209T
500-600W max
50Hz
50Hz
220-240Vac
220-240Vac
Simone
400W
ECO PANEL HEATER
PEH208T
Snowie
600W
ECO PANEL HEATER
PEH209T
WARNING!
For all Sales & Warranty enquiries
Arlec Australia Pty. Ltd. ACN 009 322 105
(“Arlec”) gives the Warranty.
Building 3, 31 – 41 Joseph Street, Blackburn North, Victoria, 3130
Blackburn North LPO, P.O. Box 1065, Blackburn North, 3130
Customer Service: (03) 9982 5111
New Zealand Toll Free: 0800 003 329
Email: [email protected]
CPIN002837
To reduce the risk of fire, electric shock,
or personal injury, read, understand
and follow instructions before
using this heater
Keep this manual in a safe place for future reference
19/12/13 4:02 PM
CPIN002837
USER MANUAL
1
installation
installation
ii.
Make sure you use a drill which is suitable to the type of the wall on which
you intend to mount the heater. Drill the mounting holes at the marked
position.
iii. Insert the plastic fitting supplied with the accessory pack into the holes.
iv. Align the four mounting holes on the panel heater with the plastic fittings
and install the panel heater.
v. Screw the four fasten screws into the plastic fitting.
vi. Insert the screw caps over the screw heads.
vii.To remove the unit from wall, switch off and unplug the heater.
Remove the screw caps and unscrew the screws and remove the heater.
Wall Mounting
Important : The heater must always be positioned so that the power switch
is located to the top right hand side of the panel when installed either in
wall mounted or free standing position. The heater is NOT designed to be
operated in any other mounting position.
400W & 600W
i. Take into consideration the minimum required
clearance for wall mounting as indicated in the
figures below and locate the heater on the wall.
Position the heater so that the power switch is
located to the top right hand side of the panel.
The heater is not designed to be operated in
any other mounting position. Mark the four
mounting holes to be drilled.
Slimline Design
Do not install the panel heater:
• Under a fixed mains power socket.
• In Zone 1 & 2 of bathrooms as indicated in the diagram.
• Maybe installed in Zone 3 but must be above the shaded area.
Electrical socket must not be located in the shaded area.
1
ECO PANEL
HEATERS
2
3
THIS WAY
UP ONLY
Main ON/OFF
power switch
(Control box
on rear)
Four
Mounting
Holes
4
5
Zone 1
Zone 2
2.50m
Digital Timer
Zone 3
2.25m
6
400mm
150mm
FREESTANDING
When using the panel heater as free
standing it must always be used with feet
assembled and in upright position.
600mm
600mm
To assemble the feet:
Feet for Freestanding option
500mm
500mm
300mm
Minimum Furniture
Clearance
CPIN002837.indd 2-5
Before First Use
Remove any promotional material and packaging from the heater.
Unwind the cord to its full length and place the heater on a firm level surface in a
stable, upright position. Visually inspect the air inlets
and outlets on the control box to ensure that there are no blockages.
To avoid overheating to a circuit do not plug the heater into
a circuit that already has other appliance working.
CAUTION: There may be some odour coming from the heater for the very first time
you use it. This is normal during the break-in period or after
long term storage. Make sure the heater is in a well ventilated
area and continue running it until the smell goes away.
i.
Place the panel heater on a
flat surface.
ii. Align the feet in position as shown
in the figure and tighten the fixing
screw located at the rear of the feet.
Make sure the screw is tight and the
assembly is secured.
iii. The heater is now ready for use.
NOTE: When using freestanding, keep out of traffic areas where it may be
knocked over.
The heater is equipped with a tip over switch. If the heater is knocked
over the power will be cut off automatically.
The heater panel body is hot to touch when it is operating. Turn off the
heater and allow sufficient time to cool before your relocate the panel
heater or store it.
2
timer operation
operation
v. TO PROGRAM THE TIMER follow the steps as given below.
Caution: There may be some odour coming from the heater for the very first time you use it.
This is normal during the break-in period or after long term storage.
Make sure the heater is in a well ventilated area and continue running it until the smell goes away.
Please follow the instructions given below
i.
Check if the On/OFF Power switch is along the
side of the heater is at OFF position.
ii. Plug the heater into a 10 ampere wall socket.
iii. Press the On/Off Power Switch along side of the heater to ON
position to turn the heater ON.
3
timer identification
A. CLOCK Button to set the current day of the week and
time in hours and minutes.
B. PROG Button to set the timer to desired program,
G
in total there are 20 user programmable programs
available.
H
C. OFF/ON/AUTO Shows mode “OFF-0N-AUTO “ as
selected by pressing this manual override button .
D. RESET Clears all data in memory and resets the unit.
E. RECALL Button when pressed recalls the last stored data A
F. MIN Button used to set the minutes of the clock
B
setting.
G. HOUR Button used to set the hours of the clock setting
H. WEEK Button used to set the day of the week when
setting the clock.
I. POWER ON INDICATOR Indicates heater element is ON.
4
I
F
E
D
C
timer operation
The timer has a built in, rechargeable battery. If a power failure occurs or the unit is removed from the mains
outlet, the rechargeable battery will power the time switch avoiding the loss of any preset programs.
NOTE The rechargeable battery is a non replaceable type. The battery will not provide power to any appliance
during a power failure.
i. INITIAL SETUP Plug the timer into a mains outlet and switch on.
ii. All segments of the display should flash on momentarily if the screen was blank prior to power up.
NOTE: If screen remains blank after connection to mains supply, leave unit for approx. 14 hours to fully
charge the battery before operation.
iii. If unit was already operational before connection to mains outlet, reset unit by pressing small reset button
using a paperclip or pen. The display segments should all illuminate and the unit will reset to time 0:00
iv. TO SET PRESENT TIME AND DAY follow the steps as given below:
• Press the CLOCK button and follow the steps given below
• Press the WEEK button until the display shows the current day. Release the WEEK button when the
correct day is displayed on the LCD display.
• Press the HOUR button until the display shows the current time in hour. The hour icon on the display will
increment by 1 hr.
• Release the HOUR button once the display shows the current hour.
• Press the MIN button until the display shows the current time in minutes. The minute icon on the display
will increment by 1 min. Release the MIN button once the display shows the current minute.
• Press the button PROG to scroll and set the timer programs as desired.
There are in total 20 timer programs available with individual ON and OFF settings.
• Press the On/OFF/AUTO button until the display shows “AUTO OFF ”
• Press the button mark PROG, the display will come up with
program number and ON (as shown right) which indicates the
ON time when the heater should be turned ON is to be set.
• Press the WEEK button until the display shows the day
you want the heater to be turned on. The timer has been
programmed with several day/week groupings which are
given as below.
• a) All days of the week
• b) Each day of the week
• c) Monday – Tuesday-Wednesday – Thursday – Friday
• d) Saturday – Sunday
SELECT ONE OF THE PRESET DAY SETTING OPTIONS GIVEN ABOVE
vi. Press the HOUR and MIN button and the set the desired time of the day when you want the heater to be
turned ON. This completes the ON time setting for the heater.
vii. TO SET THE OFF TIME (time at which the heater must be turned off) follow the steps as
given below:
• Press the PROG button again and the display will come up
with same program number and OFF (as shown right). This
indicates the time which will be set is the time when the
heater should be turned OFF.
• Press the HOUR and MIN buttons and the set the desired time
of the day when you want the heater to be turned OFF.
• Press the WEEK button and choose the day you want the
heater to be turned OFF. The preset program can be same as
the ON setting or can be different.
This completes setting for one program. Repeat the steps given above for all the programs which you
desire to set (up to 20 programs in total).
• When the programs are set press the CLOCK button to return to the current time and day menu.
To check the program settings anytime press the PROG button repeatedly. To return back
press CLOCK button.
viii. TO DISABLE TIMER PROGRAMS follow the steps as given below:
• To disable all timer programs press the ON-OFF-AUTO button till the display shows only ON or OFF.
The AUTO Icon on the display will disappear.
• To enable the preset time programs press the ON-OFF-AUTO till the AUTO icon appears on the display.
The appliance will be turned ON or OFF at the first noticeable ON or OFF setting as programmed.
19/12/13 4:02 PM