1
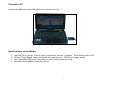
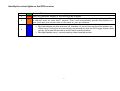
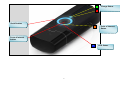
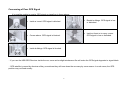
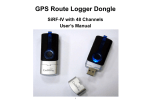
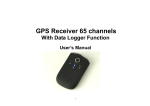
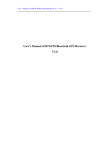
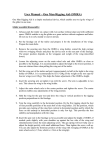
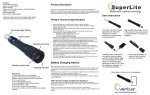
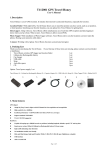
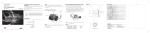
VENTUS GPS G730 DATA LOGGER
USER MANUAL
Outline House, 73 Guildford Street, Chertsey, Surrey KT16 9AS
Tel: 0845 2300 599
(Local Call Number) Tel: 01932 567 333 (Direct Dial Number)
Web: www.MLandS.co.uk
E-mail: [email protected]
Caution
Read before you start to use:
Global position system (GPS) is obtained by American Ministry of National Defense, and they got the full responsibility about the
preciseness and the maintenance. Any changes may cause the capacity and preciseness of GPS differed.
If you use this device inside of buildings, tunnels, or any huge objects beside you, the GPS signals might be cut-off or disturbed. Please
do not consider that the receiver is malfunction.
The receiver operating temperature is located between – 20°C and + 60°C.
1. Introduction
The GPS USB Dongle Receiver is a total solution of GPS receiver with Venus 621 ;65 channels all-in-view tracking technology.
This GPS USB Dongle Receiver can communicate with other electronic devices by USB interface.
The GPS USB Dongle Receiver is designed as an ultra low power consumption device, and high position accuracy. It will update the
satellite position every second. This GPS USB Dongle Receiver auto-locating feature is capable of automatically determining a navigation
solution without intervention. However, acquisition performance could be interfered and do cold start if the receiver were initialized with
occurrence of the following events:
1) First in use
2) The GPS receiver is not in use for more than 3 months or transportation over distances further than 500 kilometers.
2. Features and Functions
1) Venus 621 simultaneous time-frequency search bins. Signal detection better than -160dBm
2) Cold start < 30 seconds at –147dBm
3) Hot start < 1sec. under open sky.
4) 5m CEP accuracy.
5) Signal reacquisition 1 sec.
6 Acquire and track 65 satellites simultaneously
7) USB Version 1.1/2.0, 4dBm output level Up to 10m of operation
8) Data tag (start, stop point): This means you can set the G730 to log in different time or distance intervals. This function is to be used
from the Photo Tagger software.
2
Check the Package Content
Before you start using, please check out if your package includes the following items.
• GPS USB receiver X 1
• CD with software and driver X 1
• Fastening strap
Safety
• Do not let children play with the GPS receiver as it contains small items.
• Be aware of signs that prohibits the use of electronic devises.
• This receiver contain a LI-Polymer-Battery. Please keep it away from open fire as the battery can explode.
• Used equipment must be disposed of in compliance with current environmental protection regulations.
• You should return it to your reseller or dispose of it in an approved recycling centre.
Basic Operations
Charge the battery
When using it for the first time, the battery must be charged for 4 hours to ensure a full charge. Next time it will take about 2 hours to
recharge it. While charging will the green LED lights light up. When the battery is fully charged is the green LED light turned off.
Power on/off
The power button is on the side. It is on when there is light and off when there is no light
3
Connect to PC
Connect the USB unit to the USB port in the computer, see Fig 1.1
Fig 1.1
Install drivers and software
1.
2.
3.
4.
Insert the CD in your pc. Click on ”Start” in Windows. Click on ”Computer”. Then double click on CD.
Click on ”Photo Tagger” folder and double click afterwards on ”GPS Photo Tagger_install”
Click ”Allow/OK/Confirm etc” depending on which antivirus you are using.
Now follow the installation steps on your pc.
4
Identify the colour lights on the GPS receiver
1
Green LED indicates: battery is charging.
2
Red LED indicates: battery is low and must be charged.
Orange LED indicates: Point og interest. This function is to be activated by holding the ”Point
of interest” down for more than 1 second. Then it will automatically activate this position on
your track and you can see this on the track on your pc software.
3
•
4
•
Blue light flashes one time and turns off. Indicates it is on but have not found the position yet.
When using it for the first time we strongly recommend you take the GPS-logger outside under
opn sky for at least 45 seconds to secure that it locks the position.
Blue light flashes every 1 second meaning it has found the position
5
1
Charge Status
2
On/off button
3
Point of interest
Status.
Point of interest
button
4
6
GPS Status
Quick guide for your first trip
• You now have ”Photo Tagger” software well installed on your pc.
• Be aware of correct time settings in “Display Time Zone” on the top of the screen in “Photo Tagger”. And remember to click
on “Daylight saving time”
• Be aware of correct time settings in “Tools” – “Options”, “Photo Time Zone” and click OK to confirm.
• Be aware of correct time settings on your digital camera.
• Start the GPS-logger on the start/stop switch button and wait until the blue light is on. When using it for the first time we
strongly recommend you take the GPS-logger outside under opn sky for at least 45 seconds to secure that it locks the
position.
• Start your trip and take pictures during the trip with your digital camera.
• By the end of the trip, push the start/stop switch button on the GPS-logger again.
• Plug your GPS-logger in your pc and open “Photo Tagger” and push the start/stop button on your GPS-logger again.
• Click on the icon: “Read GPS devise log”
• The GPS-logger will now transfer your track(s) to “Photo Tagger” and the tracks will show in the track list in the right side of
the screen. Click on the track you would like to see and it will show on the map.
• Connect you digital camera to your pc. Create and Save your pictures in a folder on your pc.
• In “Photo Tagger” you now click on the icon: “Add Media files from folder” and choose the folder you just have created.
• The pictures will now show on the correct positions on the map.
• Click on “Photo Slideshow” which is under “Play”.
• Now click on “Play” and the track will be shown on the map with your pictures.
Note: If the pictures does not appear on the track it is due to false time settings. Then please check the following:
1.
2.
3.
4.
“Tools”-“Options”, “Photo Time Zone”
“Daylight Time Zone”
“Shift Photo/Media Time”, where you can change the time settings on your pictures.
Check also your digital camera for correct time setting.
7
Concerning of Poor GPS Signal
It is possible unable to receive GPS signal or signal low in these places:
Inside a tunnel. GPS-signal is blocked.
Covers above. GPS-signal is blocked.
Inside buildings. GPS-signal is blocked.
Beside buildings. GPS-signal is low
or disturbed.
Inside a forest or to many covers.
GPS-signal is low or disturbed.
If you use the USB GPS Receiver inside the car, some anti-sunlight windscreen film will make the GPS signal degraded or signal blank.
GPS satellite is owned by America military; sometimes they will tune-down the accuracy by some reason. In such cases, the GPS
position may not fixed exactly.
8
Authorised UK & Ireland Distributor
Outline House, 73 Guildford Street, Chertsey, Surrey KT16 9AS
Tel: 0845 2300 599
(Local Call Number) Tel: 01932 567 333 (Direct Dial Number)
Web: www.MLandS.co.uk
E-mail: [email protected]
Used equipment must be disposed of in compliance with current environmental protection regulations.
You should return it to your reseller or dispose of it in an approved recycling centre.
DECLARATION: We hereby declare that this product complies with essential requirements and other related
requirements, of the 1999/5/EC R&TTE directive and particularly with article 3 sections 1a, 1b and 3. 9
Xeecom ApS
Denmark
www.xeecom.com
www.ventusdesign.com
Copyright Xeecom ApS
9